
11. Using Color
In This Chapter
Choosing colors from a library
Copying colors as hexadecimals
Creating a Solid Color Fill layer
Creating a Gradient Fill layer
Creating and editing a gradient preset
Creating custom and scripted patterns
In this chapter, you’ll learn ways to choose the colors that are applied by various Photoshop tools and commands.
You will also learn how to choose a blending mode for a layer or tool, apply a tint via a Solid Color Fill layer, apply and edit gradients, and create and apply patterns.
Choosing colors in Photoshop
The Foreground and Background colors
The current Foreground color is applied by some tools, such as the Brush, Pencil, and Mixer Brush, and by some commands. The current Background color is applied by other procedures, such as when you enlarge the canvas area with the Crop tool (Delete Cropped Pixels option enabled) or use the Eraser tool on, or cut an area from, the Background. One or both of these colors are also used by some of the Photoshop filters.
The Foreground and Background colors are displayed in color squares on the Tools panel A and on the Color panel.B Note: In this book, Foreground color and Background color are written with an uppercase “F” and “B” to differentiate them from the foreground and background areas of a picture.

A These are the color controls on the Tools panel.
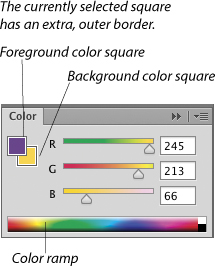
B The two color squares also appear on the Color panel.
On the following pages, you will learn how to choose Foreground and Background colors via these methods:
• Use the controls in the Color Picker dialog or via an on-image color picker.
• Choose a predefined color from a matching system via the Color Libraries dialog.
• Use the sliders on the Color panel.
• Click a solid color swatch on the Swatches panel.
• Sample a color in an image with the Eyedropper tool.
The color models
Colors in Photoshop can be chosen from four models and a wide assortment of matching systems. When output on a commercial press, your Photoshop image will be printed using different percentages of cyan (C), magenta (M), yellow (Y), and black (K) inks, which together create the impression of smooth, continuous tones. In the printing industry, colors are standardized by number, with each company providing its own system and printed fan guide (similar to the way you might pick house paint colors). Spot colors, which are premixed inks based on set formulas (e.g., PANTONE PLUS), are sometimes used in addition to CMYK inks where color accuracy is critical, such as for a company logo. For commercial printing, the only way to get dependable results is by referring to a printed fan guide. If you pick colors based on whether they look appealing onscreen (even on a well-calibrated display), you may be in for an unpleasant — and potentially costly — surprise when you see them in print.
RGB colors (based on the components of red, green, and blue light in a computer display) are used solely for screen output; for these colors, you don’t need to refer to a printed fan guide. For Web output, some designers also use hexadecimal colors. For the HSB color model, see the sidebar on page 188.
Using the Color Picker
To choose a color via the Color Picker
1. Do either of the following:
On the Tools panel, click the Foreground or Background color square.
On the Color panel, ![]() click the Foreground or Background color square if it’s already selected (has an extra outer border), or double-click the square if it’s not selected.
click the Foreground or Background color square if it’s already selected (has an extra outer border), or double-click the square if it’s not selected.
Note: If the square you click contains a custom color from a matching system (such as PANTONE PLUS), the Color Libraries dialog will open instead of the picker. Click the Picker button to get to the Color Picker dialog.
2. Do one of the following:
Click a color on the vertical color ramp or drag the slider to choose a hue, then click a brightness and saturation value of that hue in the large square.A (You can also click or drag in the image to sample a color while the Color Picker dialog is open.)

Note: For this feature to work, Use Graphics Processor must be checked in Edit/Photoshop > Preferences > Performance upon launch. In General preferences, via the HUD Color Picker menu, you can choose a strip or wheel design and size for the HUD Color Picker (including two new small sizes). ![]()

To choose a process color for print output, enter C, M, Y, and K percentages from a printed formula guide for a process color matching system.
For onscreen output, enter R, G, and B values (0 to 255).
To choose a hexadecimal color (for Web output only), enter the number in the # field.
3. Click OK. The color will appear in the selected color square on the Tools and Color panels. To add the color to the Swatches panel, see page 189.
• To change the interface of the Color Picker, in Edit/Photoshop > Preferences > General, from the Color Picker menu, select either Windows/Apple (the picker for your system) or Adobe (the default Photoshop picker).
• You don’t need to restrict yourself to Web-safe colors for Web graphics, because most computers display millions of colors. Ignore the non-Web-safe icon ![]() if it appears in the Color Picker, and keep Only Web Colors unchecked. For the out-of-gamut icon,
if it appears in the Color Picker, and keep Only Web Colors unchecked. For the out-of-gamut icon, ![]() see the sidebar on the next page.
see the sidebar on the next page.
Choosing colors from a library
Before choosing spot colors for print output, ask your commercial print shop which brand of ink they’re going to use, then choose colors from a printed fan guide for that system (each manufacturer makes its own guide). Note: By default, Photoshop color-separates both process and spot colors in a document into C, M, Y, and K process colors. If you need to output a spot color to a separate plate, you must create a separate spot color channel for it (see page 370).
Color Libraries for Print Output
• ANPA colors are used in the newspaper industry.
• DIC Color Guide and TOYO Color Finder colors are used in Japan.
• FOCOLTONE is a process color system that was developed to help prevent registration problems. It can be used in North America.
• HKS process colors and HKS spot colors (without “Process” in the name) are used primarily in Europe.
• PANTONE PLUS (+) ![]() process and spot colors are widely used in North America.
process and spot colors are widely used in North America.
• TRUMATCH is a process color system, organized in a different way from PANTONE. It is used worldwide.
To choose a color from a library
1. Do either of the following:
On the Tools panel, click the Foreground or Background color square.
On the Color panel, ![]() click the Foreground or Background color square if it’s already selected (has an extra outer border), or double-click the square if it’s not selected.
click the Foreground or Background color square if it’s already selected (has an extra outer border), or double-click the square if it’s not selected.
2. If the color square you clicked isn’t a custom color, the Color Picker dialog will open. Click Color Libraries to show the Color Libraries dialog.
3. From the Book menu, choose a matching system. For commercial printing, choose the system that your print shop has recommended, and find the desired color in a formula guide.
4. Do either of the following:
Without clicking anywhere, type the number of the desired color; that swatch will become selected.A
Click a color on the vertical color slider to display a family of hues, then click a swatch on the left side of the dialog.B

5. Click OK. To add the chosen color to the Swatches panel, see page 189.
Using the Color panel
Another way to select RGB or HSB colors for Web output, or for output to an inkjet printer, is via the color ramp, sliders, or fields on the Color panel.
To choose an RGB or HSB color using the Color panel
1. Click the Foreground or Background color square on the Color panel, ![]() if the desired square isn’t already selected.A
if the desired square isn’t already selected.A
2. From the top portion of the Color panel menu, choose a color model for the sliders.B For output to an inkjet printer, choose RGB Sliders; for Web output, choose RGB Sliders or HSB Sliders (see the sidebar at right).
3. Do any of the following: C
Move any of the sliders.
Click on or drag in the color ramp.
Enter values in the fields.

4. Optional: To add your new color to the Swatches panel, see the instructions on the next page.
• To change the style of the color ramp, right-click the ramp and choose from the context menu.
• Alt-click/Option-click the color ramp to choose a color for whichever color square (Foreground or Background) isn’t currently selected.
• If Dynamic Color Sliders is checked in Preferences (Ctrl-K/Cmd-K) > General, colors in the bars above the sliders will update interactively as you mix or choose a color.
• In the HSB model, the hue (H) is the wavelength of light for which a color is named (such as “red” or “blue”); brightness (B) is the lightness of a color; and saturation (S) is the purity of a color (how much gray it contains, versus pure color).
• In the RGB model, which is used by your computer display, white (the presence of all colors) is produced when all the sliders are at the far right (at 255) on the Color panel, black (the absence of all colors) is produced when all the sliders are at the far left (0), and gray is produced when all the sliders are aligned vertically with one another at any other location.
The Out-of-Gamut Alert
An out-of-gamut alert icon ![]() on the Color Picker or Color panel indicates that the current color isn’t printable (has no ink equivalent). If you click the icon, Photoshop will substitute the closest printable color, as shown in the swatch next to or below the icon. Similarly, if the color currently under the pointer is outside the printable gamut, exclamation points will display next to the CMYK color values on the Info panel. The out-of-gamut range is defined by the current CMYK output profile, which is chosen on the Working Spaces: CMYK menu in Edit > Color Settings. When your image is converted to CMYK mode for commercial printing, all the image colors are brought into the printable gamut automatically. You need to pay attention to the alerts only if you want to convert specific colors manually.
on the Color Picker or Color panel indicates that the current color isn’t printable (has no ink equivalent). If you click the icon, Photoshop will substitute the closest printable color, as shown in the swatch next to or below the icon. Similarly, if the color currently under the pointer is outside the printable gamut, exclamation points will display next to the CMYK color values on the Info panel. The out-of-gamut range is defined by the current CMYK output profile, which is chosen on the Working Spaces: CMYK menu in Edit > Color Settings. When your image is converted to CMYK mode for commercial printing, all the image colors are brought into the printable gamut automatically. You need to pay attention to the alerts only if you want to convert specific colors manually.
Using the Swatches panel
Note: For easy access, detach the Swatches panel from the Color panel group by dragging its tab.
To choose a color via the Swatches panel
1. Display the Swatches panel. ![]()
2. Do either of the following:
To choose a Foreground or Background color for the color square that is currently selected on the Tools and Color panels, click a swatch.
To choose a Foreground or Background color for the color square that isn’t selected on the Tools and Color panels, Ctrl-click/Cmd-click a swatch.
• To access other libraries of swatches, see page 117 or 119. To access a wide assortment of process color swatches, use the Kuler panel; see page 111.
Colors that you add to the Swatches panel will remain there until the swatches are deleted, replaced, or reset, and are available for use in all documents. (To save swatches as a permanent library, see “To save the presets currently on a picker as a library” on page 117.)
To add a color to the Swatches panel
1. Choose a Foreground color via the Color panel or Color Picker, or select a color in the image with the Eyedropper tool (see the next page).
2. On the Swatches panel, ![]() do one of the following:
do one of the following:
Click the New Swatch of Foreground Color button. ![]()
Click the blank area below the swatches.A

A To add a color to the Swatches panel, we’re clicking the blank area below the swatches.
Right-click any existing swatch and choose New Swatch from the context menu.
3. In the Color Swatch Name dialog, enter a name for the swatch,B then click OK. The new swatch will be displayed (or listed) last on the panel.C

B We entered a name for the swatch.

C Our new swatch appeared on the panel.
• To create a new swatch without opening the Color Swatch Name dialog, hold down Alt/Option and click the blank area in the Swatches panel.
• To rename an existing swatch, double-click it, then change the name in the dialog. To learn a swatch name, either use the Tool Tip or list the swatches by name (choose Small List or Large List from the panel menu).
• To restore the default swatches to the Swatches panel, see page 118.
• If you want to use the current swatches on the panel in another Adobe Creative Suite application, save them via the Save Swatches for Exchange command from the panel menu.
Using the Eyedropper tool
To sample a color from an image using the Eyedropper
1. Choose the Eyedropper tool ![]() (or hold down I to spring-load the tool) and click the Foreground or Background color square on the Color panel.
(or hold down I to spring-load the tool) and click the Foreground or Background color square on the Color panel.
2. On the Options bar, do the following:
Choose a Sample Size (see the sidebar below, right).
Choose an option from the Sample menu to control from which layer(s) the tool samples a color. Notes: If you choose a “Current” option, also click a layer. Choose a “No Adjustments” option to sample color values minus the effect of any adjustment layers. ![]()
Optional: Check Show Sampling Ring. Note: To access the sampling ring, Use Graphics Processor must be checked in Edit/Photoshop > Preferences > Performance upon launch.
3. Do either of the following:
Click a color in any open document.A

A With Show Sampling Ring checked for the Eyedropper tool on the Options bar, we are clicking a color in the image.
Drag in any document, and release the mouse when the pointer is over the desired color.
If you checked Show Sampling Ring, the sampled color will preview at the top of a ring in the image and the former color will display on the bottom.
• Alt-click/Option-click or drag in an image with the Eyedropper tool to choose a Background color when the Foreground color square is selected, or vice versa.
Copying colors as hexadecimals
For Web output, you can copy a color as hexadecimal values from a document in Photoshop and then paste it into an HTML file or Web page layout program.
To copy a color as a hexadecimal value
1. To copy a color to the Clipboard as a hexadecimal value, do either of the following:
Choose the Eyedropper tool ![]() (I or Shift-I) and choose Options bar settings for the tool. Right-click a color in the document window, then choose Copy Color as HTML (HTML color tag) or Copy Color’s Hex Code (HEX number).
(I or Shift-I) and choose Options bar settings for the tool. Right-click a color in the document window, then choose Copy Color as HTML (HTML color tag) or Copy Color’s Hex Code (HEX number).
Choose a Foreground color via the Color panel, Color Picker, or Swatches panel. From the Color panel menu, choose Copy Color as HTML or Copy Color’s Hex Code.
2. To paste the color into an HTML file, display the HTML file in your HTML-editing application, then choose Edit > Paste (Ctrl-V/Cmd-V).
Sample Size for the Eyedropper Tool
• To change the size of the area from which the Eyedropper tool takes a sample, from the Options bar, choose Sample Size: Point Sample (to sample only the exact pixel you click) or one of the Average options to sample an average value from the area (e.g., from a 5 by 5-pixel square area).
• You can also right-click in the document with the Eyedropper tool and choose a sample size from the context menu.
• The 3 by 3 Average and 5 by 5 Average options are useful for sampling continuous tones, such as skin tones in a portrait photo or the background area in a landscape (we usually use 3 by 3 Average). The 11 by 11 Average through 101 by 101 Average options are better choices for very high-resolution files.

Choosing a blending mode
The blending mode that you choose for a tool or layer affects how that tool or layer interacts with underlying pixels. To produce a blending mode effect, Photoshop compares the colors of two layers on a channel-by-channel basis, or compares each color in a layer to a corresponding color in the underlying layer (the base color), or compares the paint color being applied by a tool to the existing color in the layer.
You can choose from a menu of blending modes in many locations in Photoshop, such as the Options bar (for most painting and editing tools), the Layers panel,A and the Layer Style and Fill dialogs. In order to see the results of a blending mode choice for a layer, the contents of the selected layer must overlap some contents of the underlying layer.B–C

A The blending modes are grouped in categories based on their function and effect.

B We applied light blue strokes to a blank layer above the image layer. The layer containing the brush strokes has a blending mode of Darker Color.

C This is the same image, except we chose the blending mode of Lighter Color for the layer that contains the brush strokes.
• When choosing an Opacity percentage for a tool (via the Options bar), keep in mind that the results will also be affected by the opacity of the layer that you edit. For example, strokes applied with a Brush tool of 50% Opacity on a layer that has an Opacity of 50% will appear lighter than the same strokes if applied to a layer that has an Opacity of 100%.
Here you will choose a blending mode for a layer to change how its color values blend with values in the underlying layer. Some blending modes, such as Soft Light, produce subtle changes, whereas others, such as Difference, produce marked color shifts. You can’t choose a blending mode for the Background. (To learn about advanced blending controls, see pages 330–331.)
To choose a blending mode for a layer
1. Click any kind of layer (not the Background), such as a duplicate image layer A or a type, adjustment, fill, shape, or Smart Object layer. You can also select multiple layers. ![]()

A This is the original image.
2. From the menu in the upper-left corner of the Layers panel, choose a blending mode.B (No blending occurs In the default mode of Normal.)
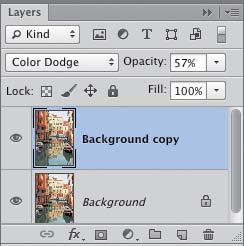
B We duplicated the Background, chose Color Dodge mode for the duplicate layer, and lowered the layer Opacity to 57%.
3. Optional: Adjust the Opacity setting.C

C The final image is a combination of the two layers.
• In Photoshop CS6, unlike in former versions of the program, the mode and Opacity settings for a selected, hidden layer are listed on the panel. ![]()
Creating a Solid Color fill layer
When we need to add a solid background below type or below an image layer that contains some transparent pixels, we use a Solid Color fill layer. The advantages to using this method are that we can quickly preview and change the color of the fill layer, hide or remove it, or edit its mask (to make it partially visible) at any time. In contrast, the results from using the Fill dialog are permanent; and a Color Overlay layer effect, although editable, can’t be given its own mask.
To create a Solid Color fill layer
1. Click the layer above which you want the fill layer to appear. It can be below a type layer, or below an image layer that contains some transparent pixels.
2. Optional: To make the solid color visible in only part of the layer, create a selection.
3. From the Create Fill/Adjustment Layer menu ![]() on the Layers panel, choose Solid Color.
on the Layers panel, choose Solid Color.
4. In the Color Picker dialog, choose a color for the tint. Don’t sweat over your color choice; you can easily change it later. Click OK.A–B

A We clicked the Background in this document, then created a Solid Color fill layer (we chose a tan color).

B The color from the fill layer is visible below the transparent areas in the “BOOKS” layer.
5. Optional: Change the Opacity or blending mode of the fill layer (see the preceding page).
• To change the color of the fill layer, double-click the layer thumbnail; the Color Picker reopens.C–D

C We double-clicked the Color FIll layer thumbnail on the Layers panel, then, via the Color Picker, changed the tan color to teal.

D This is the image after we changed the color in the fill layer.
• Whether you created a selection in step 2 or not, you can edit the mask by applying brush strokes (black to reveal, white to conceal).
Creating a Gradient fill layer
A gradient is a soft blend between two or more opaque or semitransparent colors. A good use of this feature is to enhance the area behind imagery or type. We will show you how to apply a gradient via a Gradient fill layer and the Gradient tool, and how to create and modify a gradient via the Gradient Editor.
A gradient that you apply via a Gradient fill layer appears in its own layer, complete with a layer mask that you can edit to control where the gradient is visible. Like an adjustment layer, this type of gradient is editable, unlike a gradient that is applied directly to a layer, and it does not increase the file storage size.
To apply a gradient via a fill layer
1. Click a layer on the Layers panel. If you want the gradient fill to display below type or an image layer that contains some transparency, click the layer directly below that image or type layer.A

A The original image consists of an image layer (that contains transparent pixels) above a white Background. We clicked the Background on the Layers panel ...
2. Optional: To make the gradient visible in only part of the layer, create a selection.
3. From the Create Fill/Adjustment Layer menu ![]() on the Layers panel, choose Gradient. The Gradient Fill dialog opens.
on the Layers panel, choose Gradient. The Gradient Fill dialog opens.
4. Click the Gradient picker arrowhead at the top of the dialog, click a gradient preset on the picker,B then click back in the dialog and keep it open.
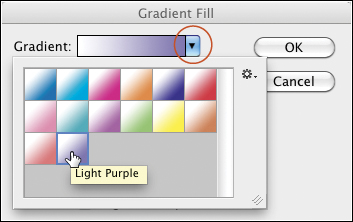
B ... then chose Gradient from the Create Fill/Adjustment Layer menu. In the Gradient Fill dialog, we clicked the Gradient picker arrowhead, then loaded the Simple library via the picker menu. Here, we are clicking a preset in the picker.
• To load more gradients, open the preset picker menu, ![]() choose a library name from the assortment at the bottom, then click Append or OK in the alert dialog (see page 117).
choose a library name from the assortment at the bottom, then click Append or OK in the alert dialog (see page 117).
5. Choose a gradient Style of Linear (a good choice if this is your first try), Radial, Angle, Reflected, or Diamond.
6. Do any of the following optional steps:
To change the angle of the gradient, move the Angle dial or enter a value.C

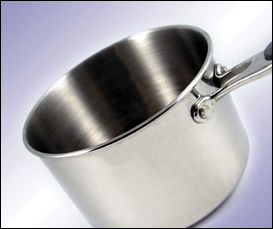
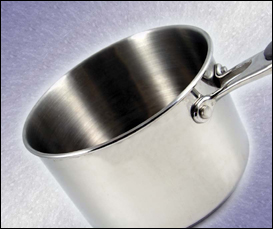
C Finally, we chose the settings shown above, including changing the Angle to align the gradient with the saucepan in the image.
To scale the gradient relative to the layer, use the Scale slider or field. The greater the Scale percentage, the more gradual the transition between colors in the gradient.
To reposition the gradient, drag in the document window (with the dialog still open).
To swap the order of colors in the gradient, check Reverse.
To minimize banding (stripes) in the gradient on print output, check Dither.
If you created a selection in step 2, check Align with Layer to fit the complete gradient within the selection area, or uncheck this option to have the gradient stretch across the whole layer (in which case only part of the gradient will display within the selection).
7. Click OK.A
A This is the image with the Gradient fill layer.
8. If the Gradient fill layer is completely obscuring all the layers below it, do any of the following: Lower the Opacity of the fill layer;B restack it below the layers you want to show; lower the Opacity of some of the color stops (see the next page); or click the fill layer mask thumbnail, then apply black brush strokes (the gradient will be hidden where you apply strokes).
B As a variation, we created a new, blank layer below the Gradient Fill layer and filled it with a Scripted pattern (Stucco 2 in the Texture Fill 2 library, Script: Spiral), and lowered the Opacity of the Gradient fill layer to 77%.
• To edit the settings for the Gradient fill layer, double-click the layer thumbnail; the Gradient Fill dialog reopens.
• To set a preference so that all new Solid Color, Gradient, and Pattern fill layers are given a mask automatically, open the Panel Options dialog from the Layers panel menu, then check Use Default Mask on Fill Layers. Via the Properties panel, you can adjust the density of any black areas in the mask, or feather the edge.
• To apply a gradient to an image based on luminosity values, see pages 228–229.
Creating and editing a gradient preset
You can create a variation of any existing gradient preset or create new, custom presets. When you edit a preset, Photoshop forces you to work on a copy automatically, so as to preserve the original one in the library. We’ll show you how to add and change the colors in a gradient, adjust the color transitions, and make specific colors semi- or fully transparent.
To create or edit a gradient preset
1. Open the Swatches and/or Color panels, which you will be using to pick colors for the gradient (you can collapse the panels to icons).
2. To open the Gradient Editor, do either of the following:
Choose the Gradient tool ![]() (G or Shift-G), then click the Gradient thumbnail on the Options bar.A
(G or Shift-G), then click the Gradient thumbnail on the Options bar.A
A We are opening the Gradient Editor by clicking the Gradient thumbnail on the Options bar.
Double-click the thumbnail for an existing Gradient Fill layer, then click the gradient thumbnail at the top of the Gradient Fill dialog.
3. In the Gradient Editor, click the preset swatch that you want to create a variation of (when you begin editing the gradient, the Name will change to Custom). Keep the Gradient Type as Solid and the Smoothness setting at 100%.
If you want to create a gradient that uses which ever Foreground and Background colors are in effect when the gradient is applied, click the Foreground to Background preset.*
*Foreground to Background is the first preset in the default gradient library. To reload that library, choose Reset Gradients from the Gradient picker menu, then click Append or OK.
4. For any gradient except Foreground to Background, click the starting (left) or ending (right) color stop under the gradient bar (A, next page), then do either of the following:

A In the Gradient Editor dialog, we clicked a preset (in the Simple library), double-clicked one of the original color stops, and changed the Color.
Click a color on the Swatches panel, or on the color ramp at the bottom of the Color panel, or in any open document window (the pointer becomes a temporary Eyedropper tool).
Double-click a color stop or click the Color swatch at the bottom of the Gradient Editor. Choose a color in the Color Picker, then click OK.
5. Do any of these optional steps:
To add an intermediate color to the gradient, click below the gradient bar to produce a stop, then choose a color for that stop, as described in the preceding step (B, next page).

B We clicked below the gradient bar to add three more color stops, and chose a color for each one.
To add an opacity stop, click above the gradient bar, then use the scrubby slider to change the Opacity percentage (C, next page). You can also click any existing opacity stop and change its Opacity percentage. In the gradient bar, transparency is represented by a checkerboard pattern.

C We clicked above the bar to add an intermediate Opacity stop, and lowered the Opacity setting for that stop. (We also lowered the Opacity of the leftmost opacity stop to 80%.)
To change the location of a color or opacity stop in the gradient, drag the stop to the left or right.
To control the abruptness of a transition between color or opacity stops, click a stop, then drag the midpoint diamond (found on either side of the stop) to the left or right (D, next page). The diamond marks the point at which two adjacent colors are evenly mixed.

D We dragged the midpoint diamond for the middle opacity stop. (We named our custom gradient, clicked New, then exited both dialogs.)
To delete an opacity or color stop, drag it upward or downward off the bar.
• Use Ctrl-Z/Cmd-Z if you need to undo the last edit (some edits can’t be undone).
6. Don’t click OK yet! To create a preset of your custom gradient, type a name in the Name field, then click New.
Your custom presets will be deleted from the picker if you allow them to be replaced by another gradient library or if the Photoshop Preferences file is deleted or damaged. To save the presets on the picker as a permanent library, click Save, enter a name, keep the default location, then click Save again. (See page 117 or 119.)
7. Click OK to exit the Gradient Editor, and again if necessary, to exit the Gradient Fill dialog (E, next page). Your new gradient preset is the last one on the Gradient picker.

E We applied our custom gradient via a Gradient fill layer (above an image layer). The dialog settings we chose are shown above. Note that we used the Reflected style.
• To delete a gradient preset from the picker, Alt-click/Option-click the preset thumbnail.
• To rename a gradient preset, double-click the swatch in the Gradient Editor, and edit the name in the Gradient Name dialog.
Using the Gradient tool
With the Gradient tool, you apply a gradient by dragging in the image. Although you can’t edit the results in the same way that you would edit a Gradient fill layer, if you use the tool on a separate layer, you will be able to change the layer blending mode or opacity.
To apply a gradient via the Gradient tool
1. Create a new, blank layer to contain the gradient.
2. Optional: To confine the gradient to an area of the layer, create a selection.
3. Choose the Gradient tool ![]() (G or Shift-G).
(G or Shift-G).
4. On the Options bar, do all of the following:
Click the Gradient picker arrowhead, then click a preset on the picker.
Click a Style button: Linear, Radial, Angle, Reflected, or Diamond.
Choose Mode: Normal and Opacity 100%.
5. On the Options bar, check any of the following optional features:
Reverse to swap the order of colors in the gradient.
Dither to minimize banding (stripes) in the gradient on print output.
Transparency to enable any transparency that was edited into the gradient, or turn this feature off to apply a fully opaque gradient.
6. For a Linear gradient, drag from one side or corner of the image or selection to the other. For any other gradient style, drag from a center point outward (Shift-drag to constrain the angle to a multiple of 45°).A–C Drag a long distance to produce subtle transitions between colors or a short distance for abrupt transitions; this has the same effect as changing the Scale value in the Gradient Fill dialog.

A With the Gradient tool (Diamond style chosen), we dragged diagonally from the middle to the lower right on a new, blank layer.

B This is the Layers panel for the image shown below.

C This is the final image.
7. Optional: Change the gradient layer mode or Opacity.
• To delete the Gradient tool results, click the prior state on the History panel.
• You can use a gradient to create a gradual transition in the mask on an image, editable type, adjustment, fill, Smart Filter, or shape layer. See page 259.
Creating custom and scripted patterns
To create a custom pattern
1. Click a layer, or select an area of a layer, that contains the elements to be saved as a pattern.
Note: For the best results when creating a tile for use with Scripted Patterns, open a small document. Select an area; if desired, feather it via Refine Edge; copy it to a new layer; and hide all other layers.
2. Choose Edit > Define Pattern.A

A We selected an area of this image, then chose Edit > Define Pattern.
3. In the Pattern Name dialog, type a name, then click OK. Your new pattern is now available on the preset picker in the Fill dialog, in the Layer Style dialog for the Pattern Overlay effect (see page 379), as a Texture option for the Bevel & Emboss effect (see pages 374–375), and as a fill layer (choose Pattern from the Create Fill/Adjustment menu on the Layers panel). Via any of the latter three options, you can choose a Scale value for the pattern.
• If you create a custom pattern, then discover that the tiles look too large when used as a fill in your document, lower the Image Size of the document from which you created the pattern, then create a new pattern from that smaller document.
Using the Scripted Patterns feature in the Fill dialog, you can choose from an assortment of preset scripts that control how pattern tiles are colored and positioned. You can get some great effects by applying this command to more than one layer. For added richness, experiment with layer blending modes.
To fill an area with a scripted pattern 
1. Create a new, blank layer to contain the pattern.
2. Optional: To confine the pattern to an area of the layer, create a selection.
3. Choose Edit > Fill (Shift-Backspace/Shift-Delete). The Fill dialog opens.
4. From the Contents: Use menu, choose Pattern.B Click the Custom Pattern thumbnail, then click a pattern preset (you can load additional pattern libraries from the lower part of the picker menu).

B We created a new, blank document, then chose these Pattern options in the Fill dialog.
5. Check Scripted Patterns, then choose an option from the Script menu. Keep the Opacity setting as 100%, and uncheck Preserve Transparency to permit transparent areas in the layer to be filled.
6. Click OK C (and A–E, next page). Note: Unfortunately, the dialog doesn’t have a preview; your only recourse is to undo your edits via the History panel.

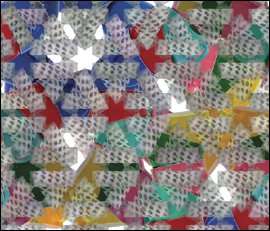
C This is the result. The Spiral script rotates tiles in a spiral pattern, originating from the middle of the layer or selection. It doesn’t tint the tiles, as the other scripts do.
Scripted Patterns

A The Brick Fill script (shown in the background of this image) offsets the pattern tiles every other row by half the width of the tile and varies the pattern colors randomly. The Random Fill script (foreground) positions and scales the pattern tiles randomly.

B The Cross Weave script rotates the pattern tiles by 90°, varies the colors randomly, and, provided the pattern tile isn’t square, nudges the tiles slightly to reveal small gaps.

C We used the layer shown at far left to create a custom pattern. The Symmetry Fill script tinted the tiles randomly and arranged them in circles.

D We filled a second layer with another pattern.

E These patterns were created using various scripts.