
9. Selections & Masks
In This Chapter
Creating layer-based selections
Using the Rectangular and Elliptical Marquee tools
Deselecting and reselecting selections
Deleting or filling a selection
Using the Quick Selection tool
Hiding and showing the selection border
Creating a frame-shaped selection
In this chapter, you will learn how to create and refine selections and layer masks. These techniques are put to practical use in many other chapters, and you will discover that they are essential to your work in Photoshop.
When you select an area of an image layer, only that area can be edited and the rest of the layer is protected. If you apply a filter, for example, only pixels within the selection area on the currently active layer are affected. The function of a layer mask is to hide parts of a layer.
Each mechanism that we cover in this chapter represents the isolation of image areas in a unique way. A selection is displayed as a blinking border, a channel or mask is displayed as black (or gray) and white areas, and a Quick Mask (a temporary mask used for creating or editing a selection) is displayed as red and clear areas.
Creating layer-based selections
To select a whole layer
On the Layers panel, ![]() click a layer or the Background, then choose Select > All or press Ctrl-A/Cmd-A. A border of “marching ants” surrounds the entire layer.
click a layer or the Background, then choose Select > All or press Ctrl-A/Cmd-A. A border of “marching ants” surrounds the entire layer.
To select just the nontransparent areas of a layer
On the Layers panel, ![]() Ctrl-click/Cmd-click the layer thumbnail A–B or right-click the layer thumbnail and choose Select Pixels.
Ctrl-click/Cmd-click the layer thumbnail A–B or right-click the layer thumbnail and choose Select Pixels.

A To select only the nontransparent pixels on a layer, Ctrl-click/Cmd-click the layer thumbnail.

B Just the butterfly is selected.
Using the Rectangular and Elliptical Marquee tools
To create a rectangular or elliptical selection
1. Click the layer you want to edit.
2. Choose the Rectangular Marquee ![]() or Elliptical Marquee
or Elliptical Marquee ![]() tool (M or Shift-M).
tool (M or Shift-M).
3. Optional: For a smoother edge on an elliptical selection, check Anti-alias on the Options bar (see the sidebar on page 159) and set the Feather value to 0 px.
4. Drag diagonally. Hold down Shift while dragging to create a perfect square or circle; hold down Alt/Option while dragging to draw the selection from the center.A As you draw a selection, width and height dimensions display in a readout next to the selection![]() (and on the Info panel). When you release the mouse, a selection border appears.
(and on the Info panel). When you release the mouse, a selection border appears.
A With the Elliptical Marquee tool, we’re holding down Alt/Option while dragging to draw a selection from the center.
5. Optional: To add to the selection, Shift-drag; to subtract from it, Alt-drag/Option-drag.
• To move the selection while drawing it, keep the mouse button down, then drag with the Spacebar held down. To move the selection after releasing the mouse, drag inside it with any selection tool.
• To create the thinnest possible selection, choose the Single Row Marquee or Single Column Marquee tool, then click in the image.
To create a selection that has a fixed ratio or specific dimensions
1. Click a layer.
2. Choose the Rectangular Marquee ![]() or Elliptical Marquee
or Elliptical Marquee ![]() tool (M or Shift-M).
tool (M or Shift-M).
3. On the Options bar, set the Feather value to 0, then do either of the following:
From the Style menu, choose Fixed Ratio, enter Width and Height for the ratio of the selection (e.g., 5 to 7),B then drag in the image diagonally to create a selection.C
B For the Rectangular Marquee tool, we chose Fixed Ratio and entered a Width to Height ratio of 5 to 7...

C ... so any size selection we draw with the tool will have that fixed ratio.
From the Style menu, choose Fixed Size, enter exact Width and Height values in any unit that can be used in Photoshop (see page 441), then click in the image.D
D We chose Fixed Size, entered Width and Height values, then clicked in the image to make the border appear (here, we’re repositioning it).
• To swap the current Fixed Ratio or Fixed Size values, click the Swap Height and Width ![]() button on the Options bar.
button on the Options bar.
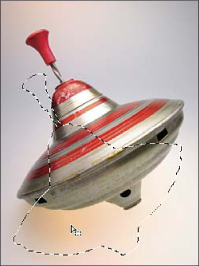
Using two of the lasso tools
We use the Lasso tool to select an area loosely, say, to limit subtle color adjustments to a general area. We also use this tool to clean up selections we make with other tools, such as the Magic Wand or Quick Selection tool.
To create a free-form selection
1. Click the layer you want to edit.
2. Choose the Lasso tool ![]() (L or Shift-L).
(L or Shift-L).
3. Optional: For a smoother edge on an elliptical selection, check Anti-alias on the Options bar and set the Feather value to 0 px.
4. Drag around an area on the layer.A Your initial selection doesn’t have to be perfect, as you will be able to refine it easily in the next step. When you release the mouse, the open ends of the selection will join automatically.
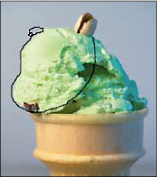
A With the Lasso tool, we are selecting the left part of the ice cream.
5. To add to the selection, position the pointer inside it, then Shift-drag around the area to be added.B To subtract from the selection, position the pointer outside it, then Alt-drag/Option-drag around the area to be removed.C–D
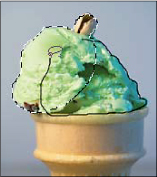
B Using Shift, we are adding to the selection, to complete the shape.

C To eliminate the pistachio nut from the selection ...
D ... we are holding down Alt/Option and dragging around it with the Lasso tool.
• To feather an existing selection, see pages 165 and 243.
• To create a straight side with the Lasso tool, with the mouse button still down, hold down Alt/Option and click to create corners. To resume creating free-form edges, press the mouse button, release Alt/Option, then drag.
To create a straight-sided selection
1. Click the layer you want to edit.
2. Choose the Polygonal Lasso tool ![]() (L or Shift-L).
(L or Shift-L).
3. Click to create corners.E To create a selection edge at a multiple of 45°, hold down Shift while clicking.
E The Polygonal Lasso tool produces straight-edged selections.
4. To join the open ends of the selection, do either of the following:
Click the starting point (a small circle appears next to the pointer).
Ctrl-click/Cmd-click or double-click anywhere in the document.
• To draw a free-form segment while creating a polygonal selection, Alt-drag/Option-drag. Release Alt/Option and click to create more straight sides.
• To erase the last corner while using the Polygonal Lasso tool, press Backspace/Delete.
Deselecting and reselecting selections
If you don’t like having to retrace your steps (we sure don’t), deselect a selection only when you’re sure you’re done using it. Although selections register as states on the History panel, states disappear when the panel listings reach their maximum number or when you close the document. To preserve a selection for future access and use, save it in an alpha channel (see page 164) or convert it to a layer mask (see page 172).
To deselect a selection
Do one of the following:
Press Ctrl-D/Cmd-D (Select > Deselect).
Choose the Lasso, ![]() Rectangular Marquee,
Rectangular Marquee, ![]() or Elliptical Marquee
or Elliptical Marquee ![]() tool, then click inside or outside the selection.A
tool, then click inside or outside the selection.A

A To deselect this selection, we’re clicking inside it with a selection tool.
Choose any selection tool, then right-click anywhere in the document and choose Deselect.
To reselect the last selection
Do one of the following:
Press Ctrl-Shift-D/Cmd-Shift-D (Select > Reselect).
With any selection tool except the Magic Wand, right-click in the document and choose Reselect.
On the History panel, ![]() click the state labeled with the name of the tool or command that you used to create the selection.
click the state labeled with the name of the tool or command that you used to create the selection.
Deleting or filling a selection
When you delete a selection of image pixels from a layer, Photoshop fills that area automatically with transparent pixels. When you delete a selection of pixels from the Background, Photoshop fills the exposed area with a solid color.
To delete or fill a selection
1. On the Layers panel, ![]() click a layer or the Background. For the Background, also choose a Foreground or Background color (see Chapter 11).
click a layer or the Background. For the Background, also choose a Foreground or Background color (see Chapter 11).
2. Do one of the following:
If a layer is active, press Backspace/Delete.B–C

B We selected the blue sky on an image layer, then pressed Backspace/Delete.
C Photoshop replaced the deleted area with transparent pixels.
If the Background is active, press Alt-Backspace/Option-Delete (to fill the selection with the Foreground color) or Ctrl-Backspace/Cmd-Delete (to fill the selection with the Background color).D
D Here, with the Background selected, we pressed Ctrl-Backspace/Cmd-Delete, so the selection filled with the current Background color (in this case, the color red).
To delete the selection and put it on the Clipboard, choose Edit > Cut (Ctrl-X/Cmd-X). (To learn about the Clipboard, see pages 239–242.)
Choose Edit > Clear.
Moving a selection border
You can move a selection border to a different area of an image without moving its contents.
To move a selection border
1. Choose any selection tool except the Quick Selection tool or hold down M, L, or W to spring-load a selection tool, and activate the New Selection button ![]() on the Options bar.
on the Options bar.
2. Do either of the following:
Drag inside an existing selection.A To constrain the movement to a multiple of 45°, start dragging, then hold down Shift and continue to drag. The horizontal and vertical distance the selection border is being moved displays in a dynamic readout onscreen. ![]()
A A selection border is moved with a selection tool.
Press any arrow key to nudge the selection border by one pixel at a time, or press Shift-arrow to nudge the border by 10 pixels at a time.
• To transform a selection border (but not its contents), choose any selection tool except the Magic Wand. Right-click the image and choose Transform Selection. Use the handles on the transform box to scale, rotate, skew, or distort the selection, as described on pages 332–333.
• To copy a selection border between documents, drag it to the tab of another open document with a selection tool, pause to let the second document display, then drag into the active window.
Moving selection contents
In these steps, you will move a selection and its contents.
To move the contents of a selection
1. Create a selection.
2. Optional: For help in positioning the selection precisely at a specific location in the document, display the rulers (Ctrl-R/Cmd-R), drag a guide from the horizontal or vertical ruler, and turn on View > Snap To > Guides.
3. Do either of the following:
On the Layers panel, click the Background, then choose a Background color (see Chapter 11). The area that is exposed when you move the selection will be filled with this color.
Click a layer. The area you expose when you move the selection will be filled with transparent pixels.
4. Choose the Move tool ![]() or hold down V to spring-load the Move tool.
or hold down V to spring-load the Move tool.
5. Drag from within the selection.B You can let the edge of the selection snap to a ruler guide, if you created one. The distance you move the selection displays in a dynamic readout onscreen. ![]()
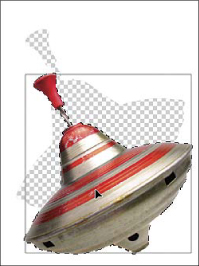
B Selection contents are moved on a layer with the Move tool.
6. Deselect (Ctrl-D/Cmd-D).
• In Chapter 13, Combining Images, you will learn how to copy the contents of a selection, and how to use other alignment aids, such as Smart Guides.
• With the Move tool chosen, you can press an arrow key to nudge a selection (and its contents) by one pixel at a time, or press Shift-arrow to nudge it by 10 pixels at a time.
Using the Quick Selection tool
The Photoshop features we’re going to discuss next — the Quick Selection tool, Magic Wand tool, and Color Range command — create selections in a more automatic way than the marquee and lasso tools. With these tools, Photoshop does the work of detecting the color boundaries for you.
If the area you want to select has fairly well-defined borders, try using the Quick Selection tool instead of a lasso tool. Rather than tediously tracing a precise contour, with this tool, you merely drag within a shape and pause to let it detect and select the shape’s color boundary. You can push the resulting selection outward to include an adjacent color boundary or inward to make it smaller. This tool is awesome!
To use the Quick Selection tool
1. Click the layer you want to edit.
2. Choose the Quick Selection tool ![]() (W or Shift-W).
(W or Shift-W).
3. On the Options bar, do all of the following:
Click the New Selection button ![]() to replace any existing selections with the one you’re about to create (or press Ctrl-D/Cmd-D to deselect).
to replace any existing selections with the one you’re about to create (or press Ctrl-D/Cmd-D to deselect).
Check Sample All Layers to let the tool detect color boundaries on all layers, or uncheck this option to allow it to detect color boundaries on just the current layer.
Check Auto-Enhance for a smoother, more refined selection edge.
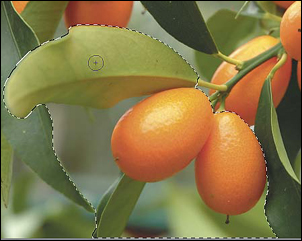
4. To choose a brush diameter, Alt-right-click-drag/Control-Option-drag to the left or right or press ] or [, then drag within the area to be selected.A The selection will expand to the first significant color or shade boundary that the tool detects. The selection will preview as you drag, and will become more precise when you release the mouse.
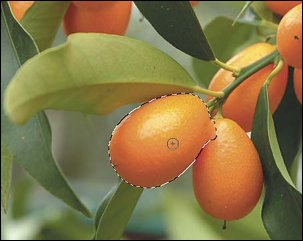
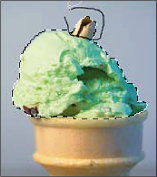
A We selected the kumquat in the center of this layer by dragging inside it with the Quick Selection tool.
5. Do any of the following optional steps:
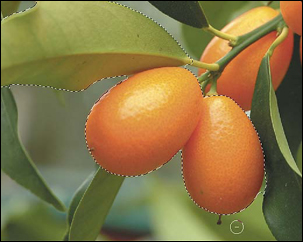
To enlarge the selection, click or drag in an adjoining area; the selection will expand to include it.B–C

B After enlarging the brush diameter, we clicked the kumquat on the right to add it to the selection.
C Next, we dragged across the green leaf above the kumquats. The selection spread beyond the edge of the leaf to include some of the background area, which wasn’t our intention.
To shrink the selection, Alt-drag/Option-drag along the edge of the area to be subtracted (the modifier key is equivalent to clicking the Subtract From button) (A–B, next page).

A We Alt-dragged/Option-dragged below the leaf to subtract the background area from the selection...
B ...and did the same thing to subtract the area below the kumquats.
• To block an adjacent area from being included as you enlarge an existing selection, Alt-click/Option-click or drag in that area, release Alt/Option and the mouse, then drag to enlarge the selection area, while avoiding the blocked area. The block will remain in effect until you click the blocked area again with the Quick Selection tool.C–E
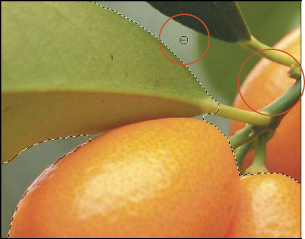
C We zoomed in, reduced the brush diameter, then Alt-clicked/Option-clicked areas around the stems to prevent them from becoming selected.

D We dragged along the stems to select them, then held down Alt/Option and clicked the background areas between the stems to remove them from the selection.
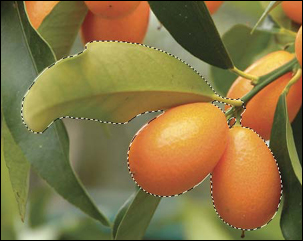
E Finally, we cleaned up the selection of the stems. (At this point, we could copy the selection to a new layer; it would be surrounded by transparent pixels.)
You can change the tool diameter between clicks.
• To undo the last click or drag of the Quick Selection tool, press Ctrl-Z/Cmd-Z.
• To save a selection, see page 164.
• To clean up a Quick Selection, you can use another selection tool, such as the Lasso. To refine the selection, see page 165.
Using the Magic Wand tool
With the Magic Wand tool, you simply click a color in the image and the tool selects all adjacent pixels of the same (or a similar) shade or color. Like the Color Range command (see pages 160–161), the Magic Wand lets you control the range of pixels the tool selects, but unlike Color Range, this tool also lets you add nonsimilar colors to the selection.
To use the Magic Wand tool
1. Click a layer or the Background.
2. Choose the Magic Wand tool ![]() (W or Shift-W).
(W or Shift-W).
3. On the Options bar, do all of the following:
Choose a Tolerance value (use the scrubby slider) to control the range of colors the tool selects.
Check Anti-alias to let the tool add semitransparent pixels along the edges of the color areas it detects. This will produce smoother edge transitions for your image edits.
Check Contiguous to limit the selection to areas that are connected to the first pixel you click, or uncheck this option to allow the tool to select similarly colored, noncontiguous (unconnected) areas throughout the image with each click.
To select occurrences of a similar color on all visible layers, check Sample All Layers, or uncheck this option to select colors on just the current layer.
4. Click a color in the image.
5. Do any of the following (optional):
To add to the selection, Shift-click any unselected areas.A

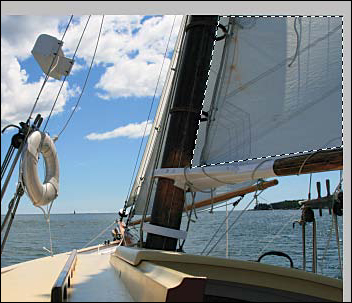
A To select the sky in this image layer, we clicked on the right side with the Magic Wand tool (Tolerance 38; Contiguous checked), then Shift-clicked more sky areas to add them to the selection (as shown above).
To subtract areas from the selection, hold down Alt/Option and click them. Or choose the Quick Selection tool, then with the Alt/Option key held down, drag short strokes across the areas to be subtracted.B

B Some parts of the keys became selected, so we are using the Quick Selection tool with Alt/Option held down to subtract them from the selection.
See also the options in “To expand or add to a selection via a command” on the next page.
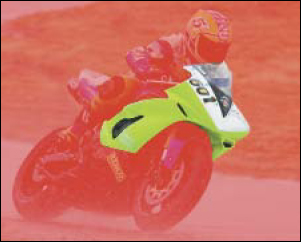
6. Optional: If you selected a background area of the image that you want to remove and you clicked a layer in step 1, press Backspace/Delete;C or if you clicked the Background in step 1, choose a Background color, then press Ctrl-Backspace/Cmd-Delete. Deselect (Ctrl-D/Cmd-D).

C Finally, we pressed Backspace/Delete to get rid of the selected pixels, to isolate the hand and keys (in this document, the Background is hidden).
• To select just one color or shade with the Magic Wand tool, choose a Tolerance value of 0 or 1. You can also lower the Tolerance value incrementally between clicks. For instance, you could click with a Tolerance of 30–40 first, lower the value to 15–20 and click again, then to add unselected areas along the edges of the selection, lower the value to 5–10 and click once more.
The Grow command expands a selection only into contiguous areas, whereas the Similar command can add both contiguous and noncontiguous areas. Both commands use the current Tolerance setting of the Magic Wand tool.
To expand or add to a selection via a command
Create a selection, click any selection tool, then choose Select > Grow or Similar; A–B or if the Magic Wand tool is selected, right-click in the image and choose either command from the context menu. You can repeat either command to enlarge the selection further.
A We clicked the blue sky area with the Magic Wand tool (Tolerance of 35), Shift-clicked once on the clouds...

B ...then chose Select > Similar. The Tolerance setting controlled which pixel range was added to the selection.
• To undo the results of the last click made with the Magic Wand tool or the last use of the Grow or Similar command, press Ctrl-Z/Cmd-Z.
Inverting a selection
If one area of an image is easier to select than another, select the easy part first (such as the sky in a landscape photo), then invert the selection.
To invert a selection
Do either of the following:
With any tool chosen, press Ctrl-Shift-I/Cmd-Shift-I (Select > Inverse).C–D
C This is the original selection.
D And this is the inverse of the same selection.
With any selection tool chosen, right-click in the document and choose Select Inverse.
Using the Color Range command
When using the Color Range command, you click a color area in the document window or in the preview area of the dialog, and depending on the parameters you have chosen, all occurrences of just one color or a range of related colors become selected. This command works best on relatively uniform color areas.
To create a selection via the Color Range command
1. Click a layer. Optional: Create a selection to limit where the command may select colors.
2. Choose Select > Color Range, or with any selection tool chosen, right-click in the image and choose Color Range.
3. In the Color Range dialog, choose from the Select menu to limit the selection to Sampled Colors (shades or colors you’ll click with the Color Range eyedropper); to a specific preset color range (e.g., Reds or Blues); to a luminosity range (Highlights, Midtones, or Shadows); or to Skin Tones. ![]()
4. If you chose Sampled Colors in the preceding step, with the Eyedropper tool from the dialog, click to sample a color in either the dialog preview or the image.A–B (The command samples colors from all the currently visible layers, regardless of which layer is active.)
A We chose the Color Range command, then with the eyedropper, clicked a sky area near the top of the image.

B In the preview, white represents fully selected pixels, gray represents partially selected pixels, and black represent unselected pixels.
5. To add colors or shades to the selection, Shift-click in the document or preview window; or to subtract colors or shades from the selection, Alt-click/Option-click.
To expand or narrow the range of selected colors and to control the number of partially selected pixels, adjust the Fuzziness value.C
If you chose Skin Tones in step 3, check Detect Faces. ![]() Note: This option works only for Caucasian skin tones. However, it’s useful for limiting the effect of a tonal adjustment, when a precise selection isn’t necessary (see the sidebar on this page).
Note: This option works only for Caucasian skin tones. However, it’s useful for limiting the effect of a tonal adjustment, when a precise selection isn’t necessary (see the sidebar on this page).

C To select the sky more thoroughly, we Shift-clicked a lower section of that area in the preview, then lowered the Fuzziness value to 14.
For the Localized Color Clusters option, see the next page.
6. Choose a Selection Preview option for the selection in the document: None for no preview, Grayscale to see a larger version of the dialog preview, Black Matte to view the selection against a black background, or White Matte to view the selection against a white background.
• Press and release Ctrl/Cmd to toggle the Selection and Image previews in the dialog.
7. Click OK.A
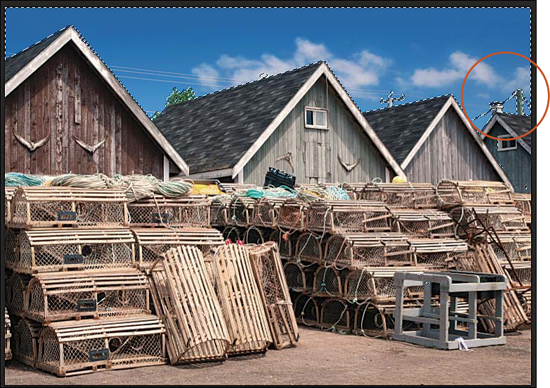
A Using the Color Range dialog, we were able to select the entire sky, including noncontiguous areas (e.g., in between the chimney and poles on the right side).

Using the Localized Color Clusters Option in the Color Range Dialog
The Localized Color Clusters option in the Color Range dialog limits the selection to colors that are close to where you click.
Open the Color Range dialog, choose Select: Sampled Colors, then with the Eyedropper tool, click in the document to sample a color.A
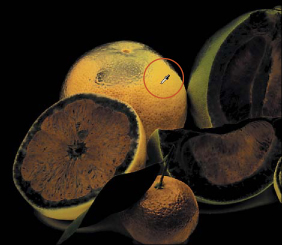
A We chose the Color Range command, then with the Eyedropper, clicked the grapefruit in the image.
Check Localized Color Clusters, then use the Range slider to control the distance from the sampled color within which the command may select similar colors.B
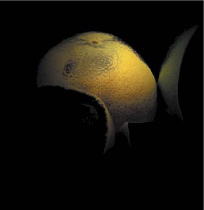
B To limit the selection more closely to the area we clicked, we checked Localized Color Clusters and reduced the Range value to 15 percent.
You can Shift-drag in the preview or document to add more color areas to the selection (within the current range),C or Alt-drag/Option-drag to subtract areas.D Remember to click a layer before you apply edits.

C Next, we Shift-dragged to select more grapefruit colors (within the current Range).

D Finally, we dragged with Alt/Option held down to subtract some color areas from the selection.
Hiding and showing the selection border
You can hide the blinking selection border without having to deselect the selection (say, to preview the results of an edit). If you do hide the border, remember that the selection remains in effect!
To hide or show the selection border
Press Ctrl-H/Cmd-H (Show > Extras).
Note: A one-time alert dialog may appear, offering you the option to assign the Ctrl-H/Cmd-H shortcut to the Extras command in Photoshop (our preference) or to the Hide Photoshop command.
• If the Ctrl-H/Cmd-H shortcut doesn’t hide the selection border, confirm that Selection Edges is checked on the View > Show submenu. (This shortcut hides or shows all the options that are checked on the View > Show submenu.) Note also that unchecked options in the View > Show > Show Extras Options dialog can be turned on or off only via the Show submenu, not via the shortcut; for this reason, we keep all the options in the dialog checked.
Creating a frame-shaped selection
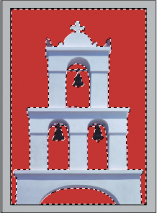
With the Rectangular Marquee or Elliptical Marquee tool, you can create a selection in the shape of a frame, either at the edge of the canvas area or floating within it. Image edits that you apply to the frame-shaped selection (e.g., filters or adjustments) will be visible only in that area.
To create a selection in the shape of a frame
Method 1 (at the edge of the canvas area)
1. Click a layer.
2. Choose the Rectangular Marquee ![]() (M or Shift-M).
(M or Shift-M).
3. In the document window, drag a border to define the inner edge of the frame selection.
4. Optional: To soften the edges of the selection, click Refine Edge on the Options bar. In the dialog, choose On White (W) from the View menu, set the sliders to 0, then adjust the Feather value to achieve the desired softness level, then click OK.
5. Press Ctrl-Shift-I/Cmd-Shift-I (or right-click in the document and choose Select Inverse).A–B
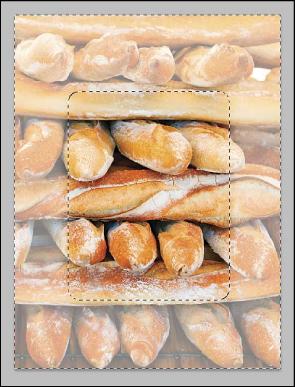
A We drew an inner selection with the Rectangular Marquee tool on this 300 ppi image, applied a Feather value of 25 px via Refine Edge, then chose Select > Inverse. Next, we used a Levels adjustment to lighten the area within the selection (see pages 210–211).
B Finally, we added four editable type layers. The type is easy to read on the light background.
Method 2 (within the image)
1. Click a layer.
2. Choose the Rectangular Marquee or Elliptical Marquee tool (M or Shift-M), then drag to define the outer edge of the frame selection.
3. Alt/Option drag inside the first selection to create the inner edge of the “frame.” C Before releasing the mouse, you can release Alt/Option then hold down the Spacebar and drag the inner selection. After releasing the mouse, you can drag between the selection borders to reposition the entire “frame.”

C We are holding down Alt/Option and dragging to subtract one rectangular selection from the other.
Saving and loading selections
Creating a selection can be a laborious process, but fortunately, you can preserve your hard work either as an alpha channel (this page) or as a layer mask (see page 172). Once stored, the channel or mask can be loaded as a selection at any time (see this page and page 176), and you can also add or subtract areas from it.
To save a selection to an alpha channel
1. Create a selection.A
A We created a selection ...
2. Display the Channels panel, ![]() then click the Save Selection as Channel button
then click the Save Selection as Channel button ![]() on the panel. Press Ctrl-D/Cmd-D to deselect. A new alpha channel appears on the panel.B
on the panel. Press Ctrl-D/Cmd-D to deselect. A new alpha channel appears on the panel.B
B ... then clicked the Save Selection as Channel button on the Channels panel. The Alpha 1 listing appeared.
• To reverse the masked and unmasked areas in an alpha channel, click the alpha channel on the Channels panel, then press Ctrl-I/Cmd-I.
• To rename an alpha channel, double-click the name, type a new one, then press Enter/Return.
• To delete an alpha channel, right-click the listing and choose Delete Channel.
• Alpha channels can be saved with files in several formats, such as Photoshop, JPEG 2000, Photoshop PDF, and TIFF. In the File > Save As dialog, be sure to check Alpha Channels.
To edit an alpha channel
1. On the Channels panel, click an alpha channel.
2. Choose the Brush tool ![]() (B or Shift-B), set the Opacity to 100%, then paint with white to expand the selection area or with black to remove areas from it (press X to swap the two colors).
(B or Shift-B), set the Opacity to 100%, then paint with white to expand the selection area or with black to remove areas from it (press X to swap the two colors).
3. Click the topmost channel on the Channels panel.
• If you prefer to display and edit an alpha channel as a rubylith (red tint) over the image, click the alpha channel, then click the visibility icon for the topmost channel. To restore the normal display, hide the alpha channel (click its visibility icon).
To load an alpha channel as a selection
On the Channels panel, do either of the following:
Ctrl-click/Cmd-click the alpha channel thumbnail or listing.
Drag the channel listing to the Load Channel as Selection button ![]() at the bottom of the panel.
at the bottom of the panel.
• To learn more about options for saving and loading alpha channels, see Photoshop Help.
Refining selection edges
The Refine Edge dialog provides many useful options for refining (e.g., smoothing, feathering, contracting) the edges of a selection, as well as options for outputting the selection (e.g., to a layer or as a layer mask).
To refine the edges of a selection
1. Create a selection. With your selection tool still chosen, click Refine Edge on the Options bar or press Ctrl-Alt-R/Cmd-Option-R. The dialog opens.A

A The Refine Edge dialog provides many options for refining and outputting a selection.
2. Set all the sliders to 0, and set the zoom level to enlarge the selection in the document window.
3. To control how the selection previews in the document, choose an option from the View menu; or use the letter shortcut, as listed on the menu; or cycle through the options by pressing F. We find these options to be the most useful:
Overlay (V) to view the selection as a Quick Mask (to view the selection relative to the areas outside it).
On Black (B) to view the selection on a black background (useful if you’re going to copy the selection to a dark background or if the selection edge has a light color).
On White (W) to view the selection on a white background (useful if you’re going to copy the selection to a light background).
On Layers (L) to view the selection on top of the layer directly below it, if any (to judge how the selection looks on top of that layer).
4. Under Edge Detection, check Smart Radius to allow the Radius to adapt to hard and soft edges in the image.
If you want to enlarge the refinement area to include pixels just outside the selection edge, increase the Radius value (use the scrubby slider).
To view just the current refinement area, check Show Radius (J); uncheck it before proceeding.
• Press P to toggle the original and refined selections.
5. Under Adjust Edge, adjust any of these sliders:
To smooth out small bumps or jaggedness along the edges, raise the Smooth value slightly.
To feather the edge, increase the Feather value.
To produce a crisp selection edge, increase the Contrast value. This option counters the effect of an increased Radius, Smooth, or Feather value.
To contract the selection inward to eliminate background pixels or to expand it outward to include more, adjust the Shift Edge value.
6. Under Output:
If you want to replace a fringe of background pixels along the selection edge with colors from within the selection, check Decontaminate Colors, then adjust the Amount value.
Choose Output To: Selection to refine the selection without putting the contents on a new layer. Or to copy the selection contents to a new layer, choose New Layer (no mask) or New Layer with Layer Mask (the selection is converted to white areas in a layer mask). If Decontaminate Colors is checked, only the “New” layer options will be available.
7. Optional: Check Remember Settings to have the current settings become the new default values for the dialog (we keep this option off).
8. Click OK. (See also the task on the next four pages.)
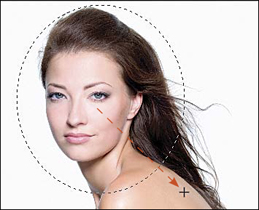
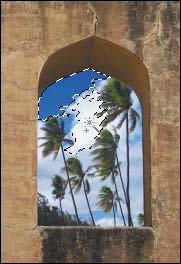
Using the Refine Radius tool in the Refine Edge dialog, along with the sliders, you can fine-tune the edge of a selection manually. Here we’ll show you how to use these controls to refine a selection of hair (the bane of any Photoshopper’s existence!), so you will be able to stack just the figure — surrounded by transparent pixels — above a different background.
To improve a selection of hair via the Refine Edge dialog
1. Open an RGB portrait in which the figure has flyaway hair, and duplicate the Background.
2. Click the Background, and create a new Solid Color fill layer (see page 193); via the Color Picker, choose a color to appear behind the figure.A Note: You won’t see the color in the image until step 5.

A We duplicated the Background in this 300 ppi photo, then created a Solid Color fill layer directly above the Background.
3. Click the duplicate image layer, then with the Quick Selection tool, ![]() loosely select the face and hair.B
loosely select the face and hair.B

B With the Quick Selection tool, we made a rough selection of the figure, including just the main part of her hair.
4. On the Options bar, click Refine Edge (Ctrl-Alt-R/Cmd-Option-R). In the dialog, set all the sliders to 0 and uncheck Decontaminate Colors.
5. From the View menu, choose On Layers (L). Under Edge Detection, check Smart Radius and set the Radius value to 60–120 px.A–B

A In the Refine Edge dialog, we checked Smart Radius to allow the Radius to adapt to edges in the image, and increased the Radius value to 120 px.
B In On Layers view, the underlying layer is visible below the unselected areas. Now the selection includes most of her hair, but we will refine it further it to add the fine strands.
To display just the refinement area onscreen so you can judge how it is affected by the two radius options, check Show Radius or press J.C The higher the Radius value, the wider the area of edge pixels the command analyzes. Smart Radius analyzes the content of the refinement area, narrowing that area where the edges are well defined while keeping it wide where the edges are complex or more finely detailed.
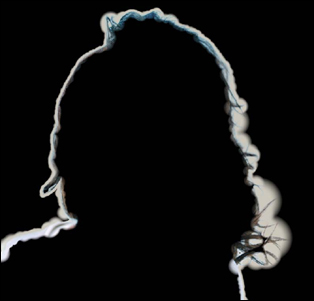
C We pressed J (Show Radius) to view the refinement area, noting where it was wide versus narrow. Afterward, we pressed J to return to On Layers view.
Press J again to turn off the Show Radius option.
6. Choose the Refine Radius tool ![]() (E), then press X to view the original image layer. Press ] or [ to set the brush to a medium to large size, then drag over the fine hair strands. Your brush work will display as green strokes.A–B
(E), then press X to view the original image layer. Press ] or [ to set the brush to a medium to large size, then drag over the fine hair strands. Your brush work will display as green strokes.A–B

A We clicked the Refine Radius tool, ![]() pressed X to view the original image, then applied strokes over the fine hair strands to include them in the radius. (We didn’t apply strokes to the edge of the sweater because the original selection of that area didn’t need more refinement.)
pressed X to view the original image, then applied strokes over the fine hair strands to include them in the radius. (We didn’t apply strokes to the edge of the sweater because the original selection of that area didn’t need more refinement.)

B Because we widened the refinement area, Refine Edge added the fine hair strands to the selection.
7. Press X to return to On Layers view.
Optional: To better define the hard edges, reduce the Radius value slightly, but keep the Contrast, Smooth, and Feather values at 0 so they don’t impede the effect of the Refine Radius tool.
8. Check Decontaminate Colors, then raise the Amount value until all colors from the background are removed. If you need to include yet more fine strands in the selection, increase the Shift Edge value slightly.
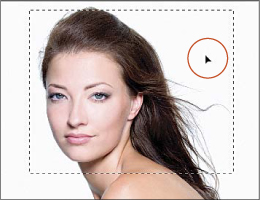
9. Choose Output To: New Layer with Layer Mask, then click OK (A–B, next page).

A We checked Decontaminate Colors, set the Amount value to 70%, and increased the Shift Edge value just enough to include more hair strands but none of the original background. From the Output To menu, we chose New Layer with Layer Mask (then clicked OK).
• If you find that the Decontaminate Colors option produces unwanted colors along the selection edge, narrow the refinement area in those areas with the Erase Refinements tool. ![]()

B A new layer and layer mask appeared on the Layers panel (Photoshop hid the original duplicate layer automatically).
• To make the fine hair strands in dark hair more visible, duplicate the new layer and its layer mask after the last step above (C, next page).
C We duplicated the new layer with its mask (panel not shown) to make the hair strands look darker, then finally to soften the effect, we lowered the Opacity of the new layer to 70%.
Using Quick Masks
In these steps, you will create a selection, then put your document into Quick Mask mode; the selection will display temporarily as a semitransparent red tint over the image (like a traditional rubylith). You will add or subtract areas from the mask using brush strokes, then put the document back into Standard mode; the mask will be converted back to a (newly reshaped) selection automatically. You can also use this mode to apply a mask to an image (see the next page).
To reshape a selection in Quick Mask mode
1. Select an area of a layer.A
A We selected an area of a layer.
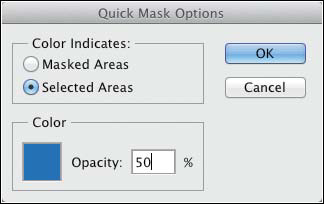
2. Click the Edit in Quick Mask Mode button ![]() on the Tools panel or press Q. A mask should cover the unselected areas of the image.B (If it doesn’t, for this task, double-click the same button, click Color Indicates: Masked Areas, then click OK.)
on the Tools panel or press Q. A mask should cover the unselected areas of the image.B (If it doesn’t, for this task, double-click the same button, click Color Indicates: Masked Areas, then click OK.)
B When we put the document into Quick Mask mode, Photoshop covered the unselected area with a red mask.
3. Choose the Brush tool ![]() (B or Shift-B).
(B or Shift-B).
4. On the Options bar, click the Brush Preset picker arrowhead, then click a Hard or Soft Round brush (Soft if you want the selection edge to be slightly feathered); choose Mode: Normal; and set both the Opacity and Flow to 100%.
5. Zoom in on the mask, size the brush cursor by pressing [ or ], then do either of the following:
To enlarge the masked (protected) area, press D to reset the default colors, then apply strokes with black.
To enlarge the unmasked area, press X to swap the Foreground and Background colors (make the Foreground color white), then apply strokes.C
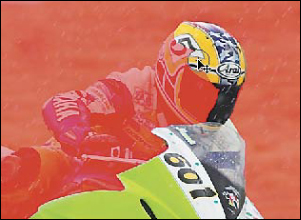
C Here, we’re unmasking the helmet by applying strokes with the Brush tool.
• To create a partial mask, lower the brush opacity via the Options bar (or use the shortcut we describe on page 272) before applying strokes. When you edit pixels within the selection, that area will be only partially affected by your edits.
6. To restore the normal document mode, click the Edit in Standard Mode button ![]() on the Tools panel or press Q. The unmasked areas will turn into a selection.
on the Tools panel or press Q. The unmasked areas will turn into a selection.
7. Optional: To preserve the selection, store it as an alpha channel (see page 164) or as a layer mask (see page 172). There is no mechanism for saving the Quick Mask while the document is in Quick Mask mode.
In these steps, you will paint a mask directly in a document without creating a selection first. As with any Quick Mask, when you restore the document to Standard mode, it converts to a selection. One practical use for this technique is to select areas for retouching, such as the eyes or teeth areas in a portrait.
To create a selection via a Quick Mask
1. Choose the Brush tool, ![]() and choose tool options as described in step 4 on the preceding page.
and choose tool options as described in step 4 on the preceding page.
2. Double-click the Edit in Quick Mask Mode button ![]() on the Tools panel.
on the Tools panel.
3. In the Quick Mask Options dialog,A click Color Indicates: Selected Areas, then click OK. This option will cause the areas you mask (instead of the unmasked areas) to convert to a selection when you exit Quick Mask mode.
A We clicked Selected Areas in the Quick Mask Options dialog, and also changed the mask color from default red to blue to have it contrast better with the image.
4. Zoom in, size the brush cursor by pressing [ or ], then with black as the Foreground color, apply strokes to create a mask.B

B We’re painting a Quick Mask on teeth.
• You can start by painting with a medium-sized brush, then refine the mask with a smaller one.
If you need to remove any areas from the mask, press X to switch the Foreground color to white.
5. Press Q to put the document back into Standard mode.C The mask converts to a selection.

C When we restored the document to Standard mode, the mask converted to a selection. (To use a selection like this to whiten teeth, see page 292.)
6. Optional: To feather the edges of the selection, use the Feather slider in the Refine Edge dialog (see page 165).
7. Optional: To store the selection as a mask on the current layer, see the next page. Or to save it as an alpha channel, see page 164.D

D We saved the selection as an alpha channel, then renamed the channel.
Creating layer masks
A layer mask is an editable (and removable) 8-bit grayscale channel that hides all or some of the pixels, type, or vector shapes on a layer. In a layer mask, white areas reveal parts of the layer, black areas hide, and gray areas hide partially. Here’s an easy way to memorize this concept: White reveals, black conceals.
When a layer mask thumbnail is selected, you can edit the mask or move or copy it to other layers. At any time, you can disable the mask temporarily, apply it to make its effect permanent, or discard it to undo its effect.
To add a layer mask via the Layers panel
1. Optional: Create a selection, which will become a shape in the mask.
2. On the Layers panel, ![]() click an image, type, or shape layer, a layer group, or a Smart Object.A
click an image, type, or shape layer, a layer group, or a Smart Object.A
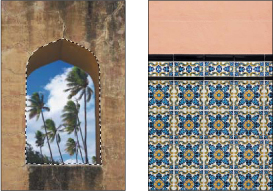
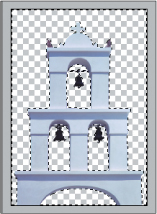
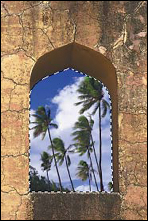
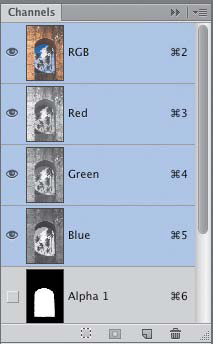
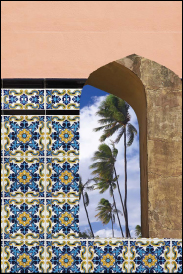
A The original image contains a photo of tile on a layer above a photo of an archway (Background). We selected the archway, then clicked the tile layer.
3. Do either of the following:
To create a white mask that hides none of the layer or that hides only the areas outside an active selection, at the bottom of the Layers panel, click the Add Layer Mask button. ![]()
To create a black mask that hides the whole layer or that hides only the areas inside an active selection, Alt-click/Option-click the Add Layer Mask button ![]() on the Layers panel.B–C
on the Layers panel.B–C

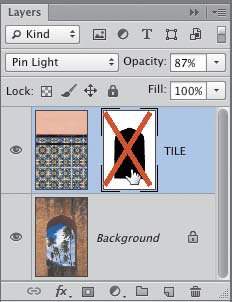
B To add a black mask to the tile layer, we held down Alt/Option and clicked the Add Layer Mask button on the Layers panel. To blend the tile with the stone wall, we chose Pin Light blending mode and lowered the layer Opacity.
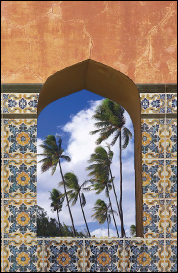
C The center of the tile layer is hidden by the arch-shaped layer mask.
• To create a selection from type, Ctrl-click/Cmd-click an editable type layer thumbnail. You can then hide the type layer by clicking its visibility icon, and use the selection to create a layer mask.
To add a layer mask via the Refine Edge dialog
1. Create a selection to become a shape in the mask.
2. On the Layers panel, ![]() click an image, type, or shape layer, a layer group, or a Smart Object.
click an image, type, or shape layer, a layer group, or a Smart Object.
3. Click Refine Edge on the Options bar, and use the dialog to refine the selection edges (see page 165). From the Output To menu, choose Layer Mask, then click OK.
Editing layer masks
In this task, you’ll edit a layer mask by applying strokes in the image with the Brush tool. In the steps on the next two pages, you will edit a mask via the Properties panel. Throughout this book, you will have many opportunities to practice these essential skills.
To reshape an existing layer mask
1. Choose the Brush tool ![]() (B or Shift-B).
(B or Shift-B).
2. On the Options bar, click a brush on the Brush Preset picker; choose Mode: Normal; and choose an Opacity of 100% to mask or unmask areas fully or a lower Opacity to mask or unmask them partially.
3. Do either of the following: ![]()
To display the mask as a colored overlay on the image, Alt-Shift-click/Option-Shift-click the layer mask thumbnail on the Layers panel.A–B

A We’re painting out areas of the mask, which we chose to display as a red overlay.

B This is the result.
To display the mask in black and white with the image hidden, Alt-click/Option-click the layer mask thumbnail on the Layers panel.
4. Size the brush cursor by pressing [ or ], then do either or both of the following:
Paint with white as the Foreground color to remove areas of the mask and reveal more of the layer.C

C We’re subtracting areas from the mask by painting with white (only the mask is showing in the document).
Paint with black as the Foreground color to enlarge the mask and hide more of the layer.D

D We’re adding to the mask by painting with black.
• To change the brush hardness or opacity, use the shortcut described on page 272.E

E Here we’re partially hiding an area of the layer with our brush set to 60% Opacity.
5. Click the layer (not the mask) thumbnail.
• In lieu of step 3, you can double-click the layer mask thumbnail, then hold down Alt-Shift/Option-Shift or Alt/Option and click the Layer Mask thumbnail on the Properties panel. ![]()
![]()
• To change the mask Color or Opacity, right-click any layer mask thumbnail on the Layers panel (the Mask Options dialog opens).
To swap the black and white areas in a layer mask
Do either of the following:
Double-click a layer mask thumbnail on the Layers panel to display the Properties panel, then click the Invert button. ![]()
Click a layer mask thumbnail on the Layers panel, then press Ctrl-I/Cmd-I.
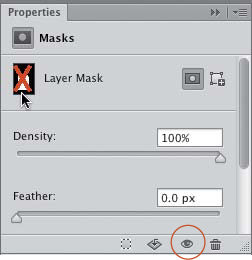
In the Masks pane of the Properties panel, you can use the Density slider to change the opacity of the overall mask and/or the Feather slider to adjust the opacity of the mask edge. The sliders are nondestructive, meaning they don’t alter the mask permanently and can be readjusted at any time.
To adjust the density or feather value of a layer mask
1. Double-click a layer mask thumbnail on the Layers panel A to show the Properties panel. ![]()

A In this document, a black, hard-edged mask is hiding everything on the image layer except the car.
2. Do either or both of the following:
Reduce the Density value to lighten the black part of the mask and partially reveal areas of the layer (make the mask more transparent).B

B To lighten the black part of the mask, we reduced the Density value on the Properties panel.
Increase the Feather value to soften the edge of the mask, for a more gradual transition between the masked and unmasked areas.C

C Next, we increased the Feather value on the Properties panel to soften the edges of the mask. (Note that the layer Opacity is still 100%.) The car is the star of the show, while the faded background plays a supporting role.
To refine the edges of a layer mask
1. Double-click a layer mask thumbnail on the Layers panel to show the Properties panel. ![]()
2. Click Mask Edge to open the Refine Mask dialog.
• If you don’t see the Mask Edge button, either scroll downward in the panel or enlarge the panel by dragging the gripper bar downward.
3. Use the Refine Mask controls to adjust the softness or sharpness of the edge of the mask. The controls work like those in the Refine Edge dialog, which is discussed on page 165.
• We keep the Feather slider in the Refine Mask dialog at 0 because it’s destructive, and use the Feather slider on the Properties panel instead because it’s nondestructive.
• If you click Color Range on the Properties panel for a selected mask, you can edit the mask using the same dialog controls that you would use to create a selection via Select > Color Range (see pages 160–161).
• If you create a mask by applying brush strokes or by converting an imprecise selection, some unwanted image pixels may still be visible along the edge. To expand or contract the mask to include or exclude more pixels, try setting the Radius to around 1 or 2 and fiddling with the Shift Edge slider.
Working with layer masks
By default, every layer mask that you create is linked to its layer thumbnail, and when moved, the two travel together as a unit. If you want to move either component separately, you have to unlink them first.
To reposition layer content or a mask independently
1. On the Layers panel, click the Link icon ![]() between a layer thumbnail and layer mask thumbnail. The icon disappears.
between a layer thumbnail and layer mask thumbnail. The icon disappears.
2. Click either the layer thumbnail or the layer mask thumbnail, depending on which one you want to move.A–B

A A layer mask is hiding the center of the tile layer and revealing part of the underlying Background photo.

B We clicked the Link icon to disengage the layer image from the mask, then clicked the layer mask thumbnail.
3. Choose the Move tool ![]() (or hold down V to spring-load the tool), then drag in the document window.C
(or hold down V to spring-load the tool), then drag in the document window.C
C With the Move tool, we dragged the mask in the document to reveal a different part of the Background. (If you want to move the layer imagery instead, click the layer thumbnail before dragging.)
4. Click between the layer and layer mask thumbnails to restore the Link icon.
To move a mask to a different layer
Drag a layer mask thumbnail to another layer (you can’t move it to the Background).
To copy a layer mask to another layer
Alt-drag/Option-drag a layer mask thumbnail to another layer.
When you load a mask as a selection, it displays in your document as a border of “marching ants.”
To load a mask as a selection
Do either of the following:
On the Layers panel, Ctrl-click/Cmd-click a layer mask thumbnail.
On the Layers panel, double-click a layer mask thumbnail, then on the Properties panel, click the Load Selection from Mask button. ![]()
![]()
When you disable a layer mask, a red X appears in the thumbnail on both the Layers and Properties panels, and the entire layer becomes visible.
To disable or enable a layer mask 
Method 1 (Layers panel)
To disable a layer mask, on the Layers panel, ![]() Shift-click the layer mask thumbnail A (this doesn’t select the thumbnail). Repeat to reenable the mask.
Shift-click the layer mask thumbnail A (this doesn’t select the thumbnail). Repeat to reenable the mask.
A To disable a layer mask, Shift-click the mask thumbnail.
Method 2 (Properties panel)
To disable a layer mask, on the Layers panel, double-click a layer mask thumbnail, then on the Properties panel, Shift-click the Layer Mask thumbnail.B To reenable the mask, click the Layer Mask thumbnail. You can also disable or enable a mask via the Disable/Enable Mask button. ![]()
B Another method is to double-click the mask thumbnail on the Layers panel, then Shift-click the Layer Mask thumbnail on the Properties panel.
You can discard any masks you don’t need (this will reduce the file size slightly).
To delete a layer mask
1. Deleting a mask is a permanent change, so we recommend copying the file first via File > Save As and storing the original for future editing.
2. Do either of the following:
On the Layers panel, right-click a layer mask thumbnail and choose Delete Layer Mask.
On the Layers panel, double-click a layer mask thumbnail to display the Properties panel, then click the Delete Mask button. ![]()
![]()
On an image layer (only), you can apply the effect of a mask and delete the hidden pixels permanently. The mask thumbnail disappears from the Layers panel.
To apply a layer mask
1. Applying a mask is a permanent change, so we recommend copying the file first via File > Save As.
2. Do either of the following:
On the Layers panel, right-click a layer mask thumbnail and choose Apply Layer Mask.
On the Layers panel, double-click a layer mask thumbnail to display the Properties panel, then click the Apply Mask button. ![]()
![]()