
23. Presentation
In This Chapter
Adding a watermark to an image
Creating a PDF presentation of images
Creating and using layer comps
Creating a PDF presentation of layer comps
Importing video clips into Photoshop
Adding video tracks to a timeline
Changing the length, order, or speed of a clip
Adding transitions to video clips
Adding still images to a video
Applying adjustment layers and filters to a video
In this chapter, you’ll learn various ways to frame your photos, and ways to showcase them for clients.
You will spotlight your subject matter as a vignette; add an artistic border; embed a watermark for copyright protection; create a Web gallery, contact sheet, or PDF presentation of multiple images; create and present layer comps (layer variations within a single document); and create a video. ![]()
Creating a vignette
We’ll show you several ways to create a vignette (lighten or darken the outer part of an image).
To create a white-bordered vignette 
1. Duplicate the Background in an image (Ctrl-J/Cmd-J).
2. Click the Background, then press Shift-Backspace/Shift-Delete. In the Fill dialog, choose Use: White, Mode: Normal, and Opacity: 100%, then click OK.
3. Click the image layer. Choose the Elliptical Marquee tool ![]() (M or Shift-M). To select the area of the image you want to keep visible, drag with Alt/Option held down (to draw the selection from the center).
(M or Shift-M). To select the area of the image you want to keep visible, drag with Alt/Option held down (to draw the selection from the center).
4. On the Layers panel, click the Add Layer Mask button. ![]()
5. On the Properties panel, adjust the Feather value to soften the edge of the mask.A

A An oval, feathered mask gives this garden photo a vintage look.
6. Optional: To reposition the mask to reveal a different part of the image, on the Layers panel, click between the layer and mask thumbnails to unlink them, click the mask thumbnail, then hold down V (temporary Move tool) and drag in the document.
Another way to create a vignette is by manipulating light and dark values. Here you will use the layer mask on a Brightness/Contrast adjustment layer to control where the vignette is located in the image. It’s like shining a spotlight.
To create a vignette via a tonal adjustment and mask
1. Choose the Elliptical Marquee tool ![]() (M or Shift-M), then drag with Alt/Option held down to select the area of the image you want to feature (Alt/Option draws the selection from the center).
(M or Shift-M), then drag with Alt/Option held down to select the area of the image you want to feature (Alt/Option draws the selection from the center).
2. On the Adjustments panel, ![]() click the Brightness/Contrast button.
click the Brightness/Contrast button. ![]()
![]() Press Ctrl-I/Cmd-I to invert the adjustment layer mask, then on the Properties panel, lower the Brightness value to darken the unmasked areas of the image.
Press Ctrl-I/Cmd-I to invert the adjustment layer mask, then on the Properties panel, lower the Brightness value to darken the unmasked areas of the image.
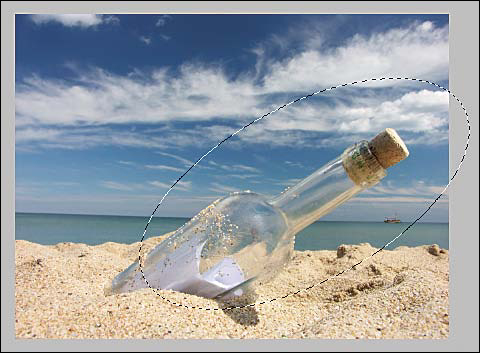
A We created an elliptical selection, then rotated it via the Select > Transform Selection command.
3. To soften the edge of the mask nondestructively, click the Masks icon ![]() on the Properties panel, then increase the Feather value.B
on the Properties panel, then increase the Feather value.B

B Next, we applied a Brightness/Contrast adjustment, inverted the mask, then softened the edge of the mask via the Feather slider.
4. If you need to reposition the “spotlight,” on the Layers panel, click the mask thumbnail on the adjustment layer, click the Link icon ![]() to unlink the mask, then hold down V (temporary Move tool) and drag the mask in the image.C–D When you’re done, click between the thumbnails to restore the link icon.
to unlink the mask, then hold down V (temporary Move tool) and drag the mask in the image.C–D When you’re done, click between the thumbnails to restore the link icon.

C We clicked between the adjustment layer and mask thumbnails to remove the Link icon, then with the Move tool, we dragged the layer mask slightly to the left.

D Now the mask is positioned fully on the bottle.
A third way to create a vignette is by using the Vignette controls in the Lens Correction filter dialog. With this method, you can’t control where the vignette is positioned, but it’s quick and easy and you can readjust the settings at any time.
To create a vignette via the Lens Correction filter
1. Duplicate the Background in an RGB image.A

A This is the original image.
2. Right-click the duplicate layer and choose Convert to Smart Object.
3. Choose Filter > Lens Correction (Ctrl-Shift-R/Cmd-Shift-R). At the bottom of the dialog, check Preview and uncheck Show Grid.
4. Click the Custom tab, then under Vignette, do the following: B
Choose a negative Amount value for the amount of darkening.
Adjust the Midpoint value to control where the darkening effect begins in the image (you may need to readjust the Amount value as you do this).

B We chose these values in the Custom tab of the Lens Correction dialog.
5. Click OK.C To edit the Lens Corrections settings at any time, double-click the Lens Correction listing on the Layers panel.

C This is the result.
• To create a vignette in Camera Raw, see page 77.
Adding an artistic border
Using options in the Refine Edge dialog, it’s super easy to add an artistic border to an image.
To add an artistic border to an image
1. Click the Background on the Layers panel.
2. Choose the Rectangular Marquee tool ![]() (M or Shift-M), then draw a selection within the image where you want the border to begin.A You can reposition the selection border with the same tool.
(M or Shift-M), then draw a selection within the image where you want the border to begin.A You can reposition the selection border with the same tool.

A We created a rectangular selection.
3. On the Options bar, click Refine Edge.
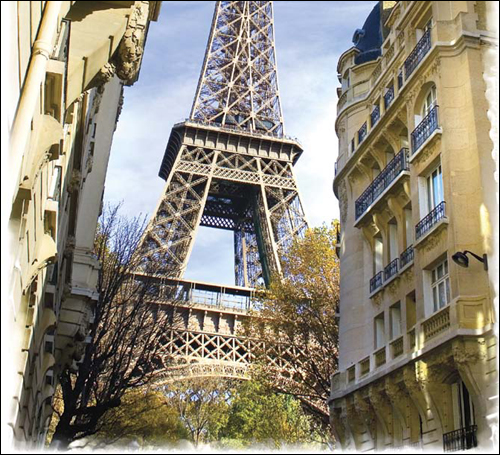
4. In the Refine Edge dialog, choose View: On White (W), then adjust the Radius, Smooth, Contrast, and Shift Edge values to create rough edges.B

B We chose these settings in the Refine Edge dialog.
5. From the Output To menu, choose New Layer with Layer Mask, then click OK.C

C So easy!
6. Click the Background, make it visible, then press Shift-Backspace/Shift-Delete. In the Fill dialog, choose Use: White, Mode: Normal, and Opacity: 100%, then click OK.
• The actions in the Frames library apply various kinds of frames (apply to a one-layer document).
Using Artistic Borders in a Montage
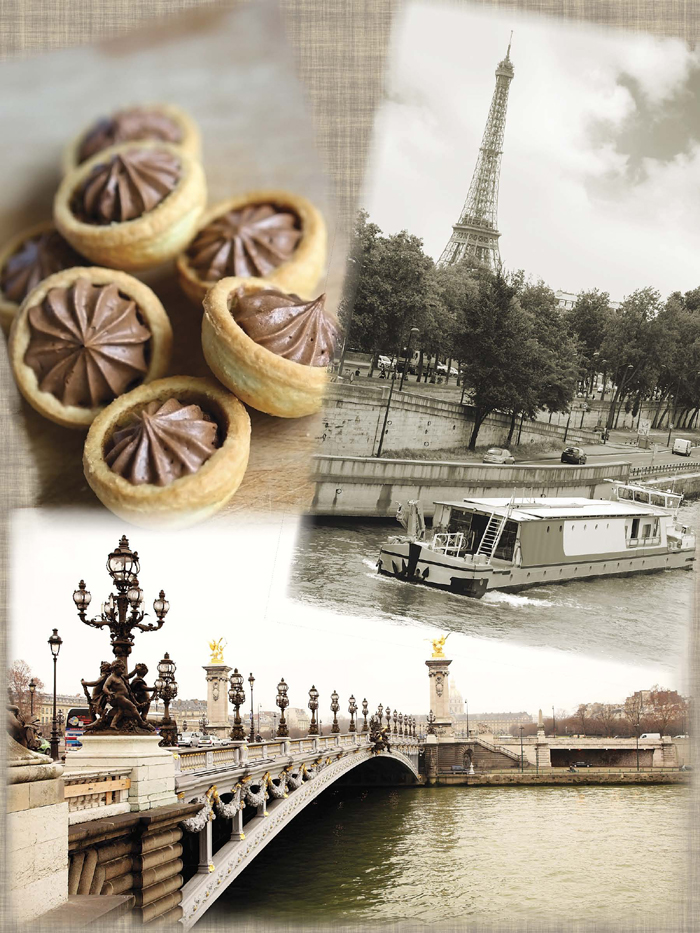
To create this Paris montage, we added a border to each image separately in its own file, using the technique described on the preceding page. We dragged each image layer into a larger document, which contains a photo of burlap as the Background image. To complete the composition, we scaled and moved — and rotated two of — the layers.
Adding a watermark to an image
If you’re planning to display any of your images online, you should help protect them from unauthorized use by embedding a copyright or custom watermark into them (akin to traditional watermarking on paper). In these steps, you’ll create a custom watermark using the Type tool, then save the type as a custom shape preset, for use in any document.
To create a watermark shape from text
1. Open an RGB image.
2. Choose the Horizontal Type tool, ![]() create the desired text for the watermark, then scale and style it as desired. To create the copyright symbol, type Alt + 0169/Option-G.
create the desired text for the watermark, then scale and style it as desired. To create the copyright symbol, type Alt + 0169/Option-G.
3. Choose Type > Convert to Shape.A ![]()

A To create a custom watermark, we converted this text to a shape.
4. Choose Edit > Define Custom Shape, enter a name (we entered the same name as in our watermark), then click OK.
5. Delete the shape layer.
To add your watermark to an image
1. Choose the Custom Shape tool ![]() (U or Shift-U).
(U or Shift-U).
2. On the Options bar, do the following:
From the Tool Mode menu, choose Shape.
Click the Shape picker thumbnail, then click your new custom shape (you’ll find it at the bottom of the picker).B

B We clicked our new custom shape on the Shape picker.
Click the Fill Color swatch, then click a gray swatch in the picker.
Click the Stroke Color swatch, then click the No Color button ![]() in the picker.
in the picker.
3. Shift-drag in the document to produce the watermark. A shape layer appears on the Layers panel.C

C After we dragged with the Custom Shape tool, a new shape layer appeared on the Layers panel.
4. On the Layers panel, change the Fill value for the shape layer to 0%.
5. Double-click next to the shape layer name to open the Layer Style dialog, then click Bevel & Emboss (but not Contour). Choose Style: Inner Bevel, Technique: Smooth, Depth between 80 and 130%, Size 6–15, and Soften 7–10, then click OK.
6. You can use the Move tool to reposition the shape on the image. For a better view of the watermark, click another layer.A

A This is our watermark shape with a Fill of 0 and the layer style applied.
7. To save your layer settings and layer effects as a preset in the Styles panel for future use, click the shape layer for the watermark. On the Styles panel, ![]() click the New Style button.
click the New Style button. ![]() Type a name in the dialog, then click OK.
Type a name in the dialog, then click OK.
8. Optional: To soften the edges of the watermark to make it look as if it’s embedded into the image, click the shape layer on the Layers panel, then on the Properties panel, increase the Feather value.B

B We softened the edges of the shape via the Feather control.
Creating a Web gallery
When displayed as a Web Gallery, your photos can be viewed either as static thumbnails that the viewer can click, or as a slideshow with viewer controls for the playback. You will create the gallery (periodically previewing the current settings in your browser), then save it and upload it to the Web.
To create a Web Gallery
1. In Adobe Bridge, put all the files for the gallery in the same folder, in the order in which you want them to be viewed.
2. Display the Output workspace, then click Web Gallery at the top of the Output panel.A A large Preview panel and an Output panel display. Note: If the Output workspace isn’t listed, go to Edit/Adobe Bridge CS6 > Preferences > Startup Scripts, check Adobe Output Module, then relaunch Bridge.

A In the Output panel in Bridge, we clicked Web Gallery, then chose the Standard gallery template and Style: Medium Thumbnail. (We hid the left pane of the Bridge window.)
3. In the Folders panel on the left side, click the folder that you set up in step 1. The images will display as thumbnails in the Content panel. Ctrl-click/Cmd-click approximately 10 thumbnails (limiting the number enables previewing to run more quickly).
4. Double-click the vertical bar between the left and center panes to hide the Favorites and Folders panels.
5. From the Template menu at the top of the Output panel, choose a layout option.
Note: Images in the HTML Gallery, Airtight PostcardViewer, and Airtight SimpleViewer templates can’t be viewed as a slideshow.
The Standard template displays the thumbnails in rows to the left of a large preview.
The Left Filmstrip and Filmstrip templates display the thumbnails either to the left of or below the large preview.
The Journal with Filmstrip and Journal with Slideshow templates list metadata information for the currently selected thumbnail.
The Slideshow template displays just a large preview (no thumbnails).
The Airtight PostcardViewer template displays small tilted thumbnails that enlarge when clicked; the Airtight AutoViewer template displays a sequence of large thumbnails with left and right navigation arrows; the Airtight SimpleViewer template displays multiple small thumbnails and one large preview.
6. For the Standard, Left Filmstrip, or Lightroom Flash Gallery template, choose a preset thumbnail or style option from the Style menu.
7. Click Preview in Browser to preview your selected thumbnails, template, and style in your default browser.A–D You can click a thumbnail in the gallery to view it as a large preview.

A The Standard template (Medium Thumbnail style) was used for this Web Gallery.

B The Left Filmstrip template (Medium Thumbnail style) was used for this Web Gallery.

C The Lightroom Flash Gallery template (Classic style) was used for this Web Gallery.

D The Airtight PostcardViewer template was used for this Web Gallery. Note that there are no title or menu bars at the top.
Note: All the features discussed in steps 8–10 are available for the Standard, Left Filmstrip, Filmstrip, and Slideshow templates. Other options are available for other templates.
8. Click the Site Info bar to expand that category, then enter text for the Gallery Title and Gallery Caption (A, next page).

A Next, we clicked the bar for Site Info and entered text in some fields for display on the Menu and Title bars of the gallery.
9. Click the Site Info bar to collapse that category, then click the Color Palette bar. To change the color for any of the components of the gallery — Background, Title, Menu (below the title), or frame around the Thumbnail — click the color swatch, choose a color from the system color picker, then click OK/Close button.B Click Preview in Browser again to preview your new choices.
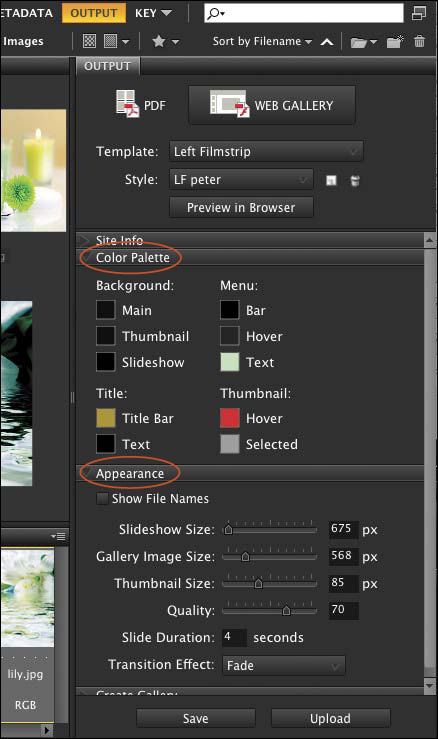
B In the Color Palette category, we chose new colors for the title bar and text and the menu text. In the Appearance category, we increased the Gallery Image Size and Thumbnail Size values, and chose a Slide Duration setting of 4 seconds.
10. Click the Color Palette bar to collapse it, then click the Appearance bar. Check Show File Names if you want file names to display in the gallery (to help the viewer identify specific photos). Choose a Slideshow Size, Gallery Image Size, and Thumbnail Size (these settings will overwrite the current Style menu choice, if any). Choose a Quality setting for JPEG compression (the higher the value, the better the quality, but the larger the file size), enter a Slide Duration value, and choose a Transition Effect option. Once more, click (you guessed it!) Preview in Browser.
The Airtight templates offer different Appearance settings, and two different categories — Image Info and Output Settings — which you can use to control the size, position, and quality of the gallery thumbnails and previews.
11. Follow the first set of instructions on the next page to save your settings as a preset, and then the second set to view the gallery as a slideshow.
You can save all the custom settings you have chosen for your Web Gallery as a custom style preset, for future use.
To save the current Web Gallery settings as a preset
1. After choosing a template and entering custom text and settings in the Output panel categories, click the Save Style button ![]() (next to the Style menu).
(next to the Style menu).
2. In the New Style dialog, enter a name, then click Create. Your custom style will be listed at the top of the Style menu.
• To save newly changed settings to an existing custom style preset, choose the preset from the Style menu, click the Save Style button, enter the same name as the existing style, click Create, then click Yes in the alert dialog.
To play a slideshow in your default browser
1. With the Output panel still displaying, select up to 20 image thumbnails, then click Preview in Browser. Note: Images in the HTML Gallery and the Airtight PostcardViewer and SimpleViewer templates can’t be viewed as a slideshow.
2. Click the View Slideshow button ![]() below the large preview image to hide the thumbnails.
below the large preview image to hide the thumbnails.
3. Click the Play Slideshow button ![]() to start the slideshow and preview your settings.A To stop the show, click the Pause Slideshow button. To redisplay the thumbnails, click the View Gallery button.
to start the slideshow and preview your settings.A To stop the show, click the Pause Slideshow button. To redisplay the thumbnails, click the View Gallery button. ![]()

A As you preview the gallery in your default browser, you can click any thumbnail or use the navigation or slideshow buttons. (To create this gallery, we chose some custom Site Info and Color Palette settings for the Left Filmstrip template.)
4. When you’re done watching the gallery, exit/quit your browser, then click in the Bridge window.
To save and upload the gallery, follow the steps on the next page. Note: Although only up to 20 thumbnails can be previewed in the browser, you can upload as many thumbnails as you like.
Once you’ve finalized your gallery, be sure to save it!
To save a Web Gallery
1. Arrange the image thumbnails in the order in which you want them to appear in the Web Gallery, then select them.
2. Click Create Gallery to expand that category, then enter a Gallery Name for a folder to be created. For the Save Location, click Browse and locate a destination folder, then click OK/Open.
3. Click Save at the bottom of the Output panel, then pause for processing. All the necessary files for the gallery will be saved to the chosen folder on your hard disk.
To upload a Web Gallery via Bridge
1. Obtain the necessary data from your Web administrator.
2. Expand the Create Gallery category, then enter the data in the FTP Server, User Name, Password, and Folder fields.A (The folder is the location on the server to which the gallery files will be uploaded.)

A In the Create Gallery category, enter Save and Upload Location information.
3. Optional: To save the data as a preset that can be accessed from the Custom menu, click the Save Preset Name button, ![]() enter a name, then click Create.
enter a name, then click Create.
4. At the bottom of the Output panel, click Upload. Your gallery files will be sent to the server.
5. Give your viewers the Web address so they can view your beautiful gallery!
Creating a contact sheet
A contact sheet is an arrangement of image thumbnails that you either output to a printing device or view onscreen. It’s a useful way to catalog images (such as the photos that you back up onto DVDs or need to present to clients). We’ll show you two ways to create a contact sheet, one via the Contact Sheet II command (it’s baaack!) and the other via the Output workspace in Bridge (see pages 418–419).
To use the Contact Sheet II command
1. In Bridge, click a folder to display its contents or Ctrl-click/Cmd-click multiple image thumbnails.
2. Choose Tools > File > Photoshop > Contact Sheet II. (Note: This command is also accessible in Photoshop via File > Automate > Contact Sheet II.)
3. In the dialog, under Source Images, choose Use: Bridge (A, next page).

A We chose these options in the Contact Sheet II dialog.
4. Under Document, choose Width, Height, and Resolution values for the contact sheet file, and also choose Mode, Bit Depth, and Color Profile settings.
Optional: Check Flatten All Layers to have all the images (and optional captions) appear on a single layer, or uncheck this option to have the command create a separate image layer (with a mask) for each image, plus a separate layer for each text caption.
5. Under Thumbnails, choose a Place option for the order of thumbnails, and the desired number of Columns and Rows. Check Use Auto-Spacing to let Photoshop calculate the spacing between images, or uncheck this option and enter specific Vertical and Horizontal spacing values. Uncheck Rotate for Best Fit to have the images keep their original orientation, or check this option to let Photoshop rotate horizontal images vertically, and vice versa.
6. Optional: Check Font to have a caption containing the file name appear below each image, then choose a font, font style, and font size.
7. Click OK. Grab a snack while Photoshop opens each image and creates the contact sheet(s). Save the new document(s) (B, next page).

B The settings in the dialog shown above produced this contact sheet.
• To save your Contact Sheet II settings, click Save. To load your settings, use the Load button.
To create a PDF contact sheet via Bridge
1. In Bridge, put all the files to be displayed on the contact sheet in the same folder, in the order in which you want them to appear on the sheet (they can be grouped in a stack), then display the contents of the folder.
2. Choose the Output workspace (or from the Output menu ![]() on the toolbar, choose Output to Web or PDF).A Note: If this workspace isn’t listed, go to Edit/Adobe Bridge CS6 > Preferences > Startup Scripts, check Adobe Output Module, then relaunch Bridge.
on the toolbar, choose Output to Web or PDF).A Note: If this workspace isn’t listed, go to Edit/Adobe Bridge CS6 > Preferences > Startup Scripts, check Adobe Output Module, then relaunch Bridge.

A In Bridge, display a folder of image thumbnails and the Output workspace.
3. At the top of the Output panel, click PDF, then from the Template menu, choose 4*5 Contact Sheet or 5*8 Contact Sheet (the numerals indicate the number of columns and rows).
If you’re content with the default settings for the chosen template, skip ahead to step 10 or 11; or if you prefer to customize the template, follow the remaining steps.
4. In the Document category, do all of the following:
Choose a Page Preset.
Choose a preset Size, or to produce a customsize sheet, enter Width and Height values. Click the Portrait or Landscape orientation icon.
Choose image Quality settings. As an example, for onscreen output, choose 72 ppi and move the Quality slider to 60–70. These settings will affect the storage size of the resulting file.
From the Background menu, choose a background color for the contact sheet. For print output, we recommend choosing White.
For the Password options, see the optional steps in step 4 on page 420.
5. Select approximately 10–15 thumbnails (this restricted number will minimize the preview time), then click Refresh Preview. The contact sheet displays in a new Output Preview panel.
6. In the Layout category, change any of the following settings:
Choose an Image Placement option for the order in which the images are arranged.
Enter the desired number of Columns and Rows for the contact sheet, depending on how many images you want it to contain.
Check Use Auto-Spacing to let Bridge calculate the spacing between thumbnails; or uncheck this option, then enter specific Vertical and Horizontal values for the desired spacing between thumbnails, and enter Top, Bottom, Left, and Right values for the outer margins.
Optional: Uncheck Rotate for Best Fit to keep the original orientation of the images, or check this option to let Photoshop rotate horizontal images vertically, and vice versa.
Keep Repeat One Photo per Page unchecked.
7. Optional: In the Overlays category, check Filename and Extension to have that data appear below each image, and choose Font, Size, and Color settings for that text.
8. Optional: To display a header at the top of the sheet, in the Header category, check Add Header, choose an alignment option, enter text, and choose text attributes; and if desired, choose a width and color for a Divider (rule below the header). Repeat, if desired, to add Footer text.
9. In the Playback category, uncheck all options (the sheet is going to be viewed manually).
10. Optional: In the Watermark category, check Add Watermark, then click Insert Text and enter copyright info to appear in the center of each image (choose Font, Size, Color, and Offset options, and a low Opacity). Or click Insert Image, click the Path button, ![]() locate a watermark image file, then click Open.
locate a watermark image file, then click Open.
11. Select all the thumbnails (or a thumbnail stack) for the contact sheet, then click Refresh Preview (A, next page). If needed, adjust any settings or rearrange any thumbnails, then click Refresh Preview once more.
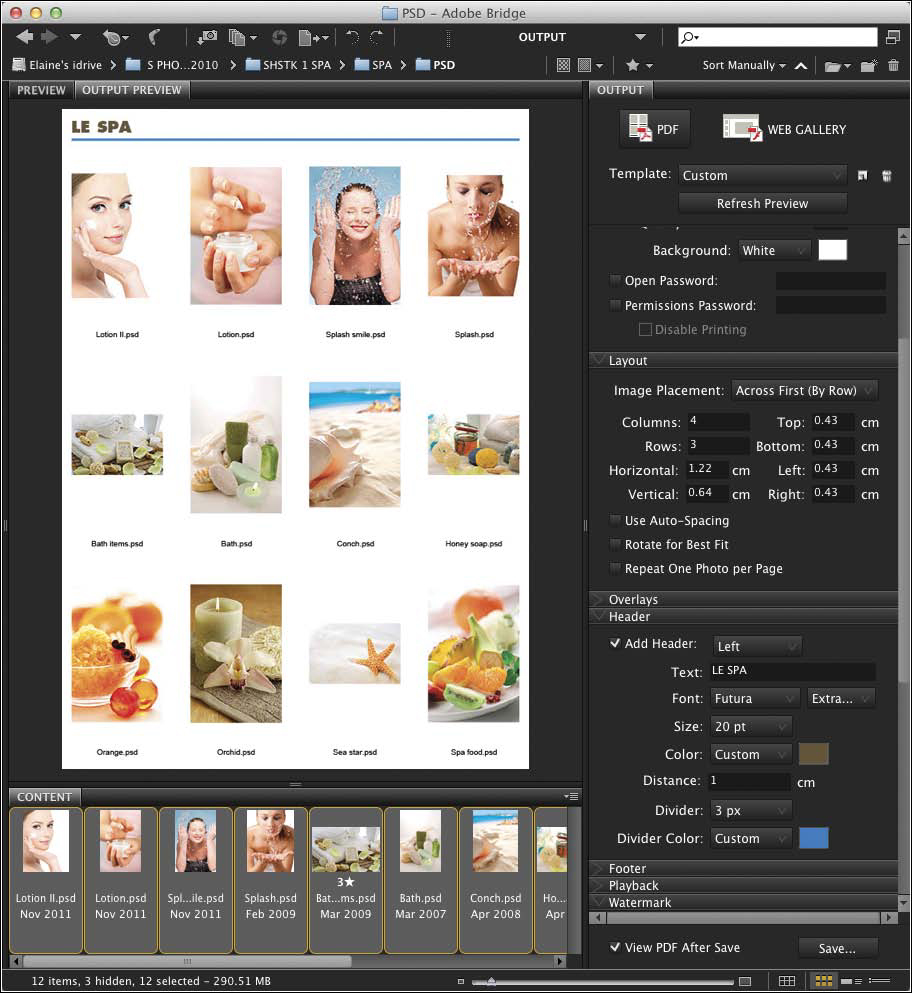
A In the Output panel in Bridge, we chose these settings for our PDF contact sheet, then clicked Refresh Preview to preview them.
12. At the bottom of the panel, check View PDF After Save, then click Save. In the Save As dialog, enter a file name, choose a location, then click Save.
13. A PDF file will be created, and will display in Adobe Reader, Acrobat Standard, or Acrobat Pro.B If the document contains multiple pages, you can click the Next Page and Previous Page buttons to cycle through them.

B Our contact sheet opened in Adobe Acrobat Pro.
Creating a PDF presentation of images
Another way to package and send files to a client or friend is via a PDF presentation, in which images play sequentially onscreen. To view the presentation in Adobe Reader, Acrobat Standard, or Acrobat Pro, all the viewer has to do is double-click the PDF file icon.
To create a PDF presentation
1. In Bridge, put all the image files you want to display in the presentation in the same folder, in the order in which you want them to appear (they can be grouped in a stack). Display the contents of the folder, and click one of the thumbnails.
2. Click the Output workspace (or from the Output menu ![]() on the toolbar, choose Output to Web or PDF).A (If this workspace isn’t listed, go to Preferences > Start Scripts, check Adobe Output Module, then relaunch Bridge.)
on the toolbar, choose Output to Web or PDF).A (If this workspace isn’t listed, go to Preferences > Start Scripts, check Adobe Output Module, then relaunch Bridge.)

A In Bridge, display a folder of image thumbnails and the Output workspace.
3. At the top of the Output panel, click PDF, then from the Template menu, choose Maximize Size.
4. In the Document category, do the following:
From the Page Preset menu, choose Web, and from the Size menu, choose 800 × 600 or 1024 × 728.
Choose Quality settings. For Web or other onscreen output, choose 72 ppi and set the Quality to 60–70. These settings affect the file size and the speed of transmission.
From the Background menu, choose a color to be displayed behind the images (or click the color swatch then choose a color via the Color Picker).
Optional: Check Open Password and enter a password. Your viewers will need to enter this password in order to open the PDF file.
Optional: Check Permissions Password and enter a password to restrict how the PDF file can be used. Your viewers will need to enter this password in order to print or edit the PDF file. You can also disable printing separately by checking Disable Printing.
5. In the Layout category, uncheck the options at the bottom, including Rotate for Best Fit, to prevent any images from being rotated.
6. Optional: In the Overlays category, check Filename and Extension to have that data appear below each image, choose a Font and Size, and choose a color that will stand out well against the Background color (or click the swatch and use the Color Picker).
7. Optional: To display a header at the top of the presentation, in the Header category, check Add Header, choose an alignment option, enter text, and choose text attributes. If desired, also choose a width and color for a Divider (rule below the header). Ditto for a Footer.
8. Under Playback, check these slideshow options:
To display the presentation images at full-screen size in Acrobat, check Open in Full Screen Mode.
To have the frames advance automatically, check Automatic Advance to the Next Page, then enter the Duration (Seconds) for each frame to display.
To have the slide show loop continuously, check Loop After Last Page (after the last frame displays, the show replays from the first frame).
Optional: To display a transition effect between frames, choose a Transition option (e.g., Dissolve or Fade). Also choose a Direction option (if available) and a Speed option.
9. Optional: In the Watermark category, check Add Watermark, then click Insert Text and enter copyright info to appear in the center of each image (choose Font, Size, Color, and Offset options, and a low Opacity). Or click Insert Image, click the Path button, ![]() locate a watermark image file, then click Open.
locate a watermark image file, then click Open.
10. Select all the thumbnails for the presentation, then click Refresh Preview to preview the first frame (A, next page).
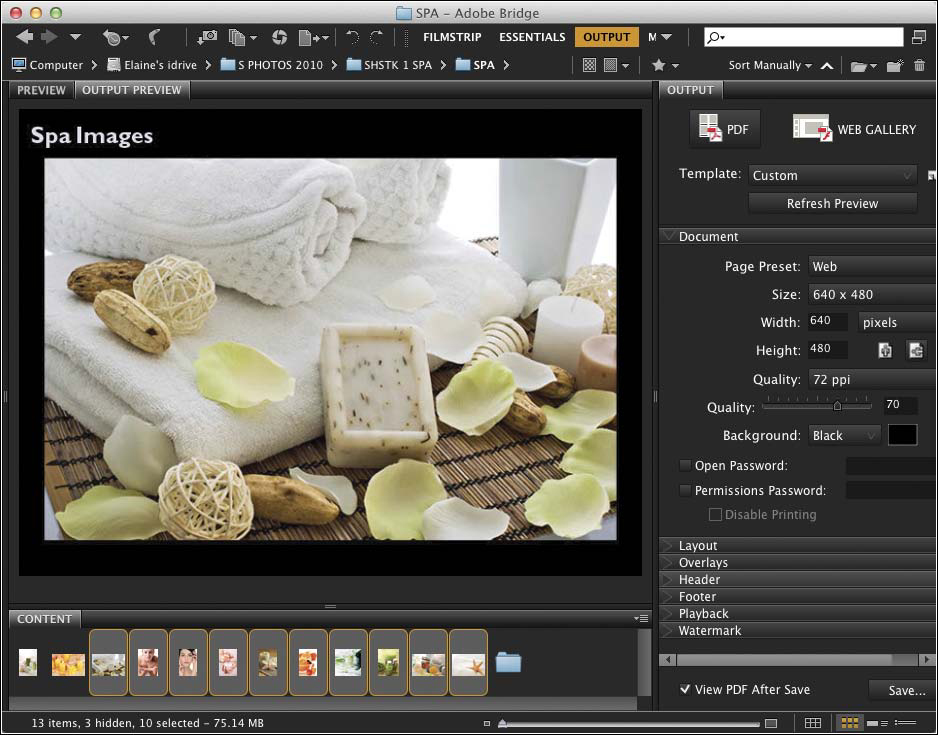
A In Bridge, the first frame of our PDF presentation displayed in the Output Preview panel. (We double-clicked the vertical bar between the center and left panes to hide the left pane.)
11. Check View PDF After Save to have the presentation play automatically when you click Save.
12. Click Save. In the Save As dialog, enter a file name, choose a location, then click Save. A PDF file will be created, and Adobe Reader or Acrobat will launch. If an alert pertaining to Acrobat appears, click Yes. The PDF file will open onscreen, then the slideshow will play (B, next page). To halt the show at any time, press Esc.

B Adobe Acrobat launched, and the presentation played on the full screen. The image at left shows a Glitter transition.
Creating and using layer comps
A layer comp (short for “composition”) is a set of layer characteristics, which can include visibility, position, and layer effect settings. Via the Layer Comps panel, you can store multiple comps in one document. By displaying different comps, you can quickly present multiple design variations to coworkers or clients.
To create a layer comp
1. Create design variations within your document using multiple image, type, fill, or adjustment layers. The layers can have different colors, type-faces, masks, layer styles, Smart Filter settings, adjustment settings, imagery, etc.
2. To create the first comp, for each layer in the document, do any of the following: Choose a visibility setting, a position (location), and layer style settings (blending mode, Opacity setting, etc.).
3. Show the Layer Comps panel, ![]() A then click the New Layer Comp button
A then click the New Layer Comp button ![]() at the bottom of the panel. The New Layer Comp dialog opens.B
at the bottom of the panel. The New Layer Comp dialog opens.B
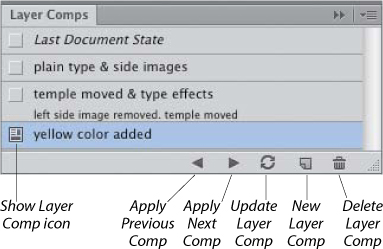
A Use the Layer Comps panel to create, store, apply, edit, update, and delete layer comps.

B In the New Layer Comp dialog, we typed a Name, decided to save only the layer visibility settings in the comp, and entered a comment for the viewer.
4. Enter a Name for the comp, then check the layer settings you want it to contain: Visibility, Position, and/or Appearance (Layer Style).
5. Optional: Enter text in the Comment field, such as an explanatory note, to appear on the panel.
6. Click OK.C To create more comps from different design variations, repeat steps 2–6 (e.g., hide or show different layers, move the content of a layer, change the layer style or adjustment settings).
C Our new comp appeared on the panel.
• To change which layer settings a comp is storing (and therefore displaying), or to add or edit the Comment data, double-click to the right of the comp name; the Layer Comp Options dialog opens.
• To bypass the Layer Comp Options dialog when creating a comp, Alt-click/Option-click the New Layer Comp button. The options you chose for the last comp will apply to the new one.
• To rename a comp quickly, double-click its name on the panel.
To display a layer comp
Do either of the following:
On the Layer Comps panel, click in the left column. The Layer Comp icon ![]() moves to that slot.
moves to that slot.
To cycle through the layer comps, click the Apply Next Selected Layer Comp button ![]() or Apply Previous Selected Layer Comp
or Apply Previous Selected Layer Comp ![]() button.A
button.A


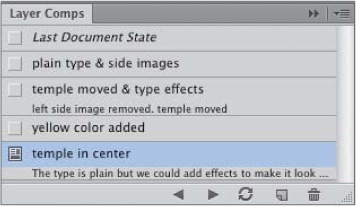
A The variations shown above are layer comps within a single image.
Let’s say you edit your document, then display a layer comp. If you want to restore the document to its state before you displayed the comp, do as follows.
To restore the last document state
On the Layer Comps panel, do either of the following:
Click in the left column next to the Last Document State listing.
Right-click a layer comp and choose Restore Last Document State.
You can update any existing layer comp to incorporate new edits that you have made to your document.
To update a layer comp
1. On the Layer Comps panel, click the layer comp you want to edit.
• If you need to remind yourself which Apply to Layers settings are turned on for the comp (or to change them), double-click the comp. The Layer Comp Options dialog opens.
2. Add, edit, or delete layers; change their visibility settings or position; or change the layer style settings.
3. Click the Update Layer Comp button ![]() at the bottom of the panel.
at the bottom of the panel.
If you change the layer count (e.g., delete or merge layers) in a document that contains layer comps, an alert icon, ![]() indicating that the “Layer Comp Cannot Be Fully Restored,” will appear next to the name of the comps that are missing data.
indicating that the “Layer Comp Cannot Be Fully Restored,” will appear next to the name of the comps that are missing data.
To clear an alert icon
When you do either of the following, the alert icon disappears and the comp is synced with the current status of the Layers panel (this just gets rid of the alert; the deleted layers aren’t retrieved):
Click a layer comp that has an alert icon, then click the icon. In the alert dialog, click Clear.
Right-click the alert icon and choose Clear Layer Comp Warning (or to clear all alert icons, choose Clear All Layer Comp Warnings instead).
When you delete a layer comp, no layers are deleted, and the appearance of the document is preserved.
To delete a layer comp
1. On the Layer Comps panel, click the layer comp to be deleted.
2. Click the Delete Layer Comp button ![]() at the bottom of the panel.
at the bottom of the panel.
Creating a PDF presentation of layer comps
You can use the Layer Comps to PDF script to produce a PDF presentation from the layer comps in your document, which any viewer will be able to watch as a slideshow.
To create a PDF presentation of layer comps
1. Open a Photoshop file that contains layer comps.
• To create the PDF presentation from select layer comps in your document (instead of all of them), Ctrl-click/Cmd-click those comps.
2. Choose File > Scripts > Layer Comps to PDF. The Layer Comps to PDF dialog opens.A

A In the Layer Comps to PDF dialog, choose a destination folder and options for the PDF slideshow.
3. Click Browse. In the Save As dialog, enter a file name and choose a location for the PDF file, then click Save.
4. If you selected some layer comps in step 1, check Selected Layer Comps Only.
5. Under Slideshow Options, check Advance Every [ ] Seconds to let the comps advance automatically (and enter a time value).
Optional: Check Loop After Last Page to allow the slideshow to replay continuously (after the last frame displays, the show replays from the first frame).
6. Click Run. Pause while the script produces a PDF file from your document. When it’s done processing, an alert dialog will appear, indicating that the script was successful. Click OK.
7. In Bridge, locate and double-click the PDF file. Adobe Reader, Acrobat Standard, or Acrobat Pro will launch. If an alert pertaining to Acrobat appears, click Yes.
8. The PDF file will open onscreen, then the slideshow will play. To end the show at any time, press Esc.
Importing video clips into Photoshop
The quality of video that current digital SLR cameras produce rivals that of stand-alone video cameras, but until the inclusion of the Timeline panel in Photoshop, users had to edit their videos in other programs. Although the video editing tools in Photoshop won’t replace stand-alone video applications, they offer all the features that a photographer who shoots occasional video will ever need. If you fall into that category, you will enjoy the added bonus of being able to use many of the Photoshop features that you’re already familiar with for video editing.
To edit video in Photoshop, you will use the Timeline panel.A The first step is to set up your Photoshop workspace.
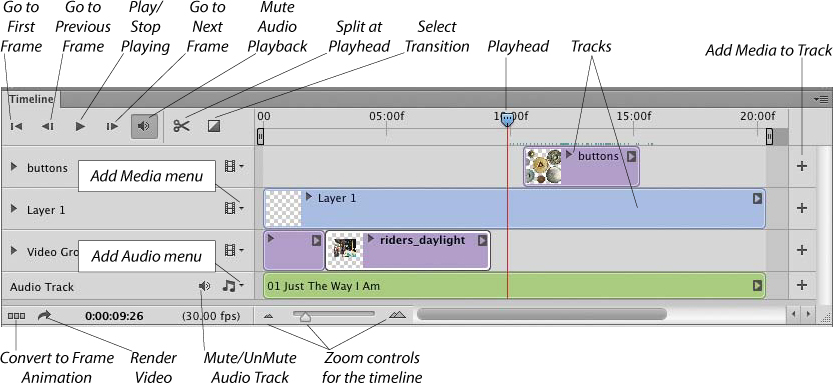
A The Timeline panel is used for video editing in Photoshop.
To set up the Photoshop workspace for video editing
1. Choose Window > Workspace > Motion. By default, the Timeline panel is nested at the bottom of the Application frame.
2. On the Timeline panel menu, check Enable Timeline Shortcut Keys.
3. From the Timeline panel menu, choose Panel Options. In the Animation Panel Options dialog, click Timeline Units: Timecode, then click OK.
• To reopen the Timeline panel if it’s hidden, choose Window > Timeline. You can dock it at the bottom of the Application frame.
• To enlarge the Timeline panel if it’s docked, drag the top of the panel (the dark line) upward. If the panel isn’t docked, drag the side, bottom, or corner.
Both standard and high definition video files can be imported into Photoshop, in many popular formats. When you import a video, your edits are stored in a Photoshop document; the original video file isn’t altered. In order to play your final video, you will need to render it (see page 432).
To import a video file into a new Photoshop document
1. Close all open Photoshop documents, then do one of the following:
From Bridge, drag a video file thumbnail into the Application frame in Photoshop.
From Mini Bridge, drag a video file thumbnail into the Application frame.
On the Timeline panel, ![]() choose Add Media from the Add Media menu
choose Add Media from the Add Media menu ![]() or, at the right end of the timeline, click the Add Media to Track button.
or, at the right end of the timeline, click the Add Media to Track button. ![]() In the Add Clips dialog, select one or more clip files, then click Open.
In the Add Clips dialog, select one or more clip files, then click Open.
2. Respond to any Profile Mismatch or Pixel Aspect Ratio alerts that appear. A new document appears in Photoshop. The video clip appears on the Layers panel within a Video Group listing,A and on the Timeline panel as a blue bar.B The first frame of the clip displays as a thumbnail within the bar.

A The three clips that we added to a Video Group are listed on the Layers panel.

B This Timeline panel is showing the same Video Group as on the Layers panel. The three layers display as clips on one track.
3. Optional: Add more clips via the Add Media menu (not via dragging). They will appear from left to right on the timeline in the sequence in which you import them.
Note: Once you have imported a video into a Photoshop file, don’t move the original video file, or the link to that file will be broken.
4. Save your file in the Photoshop format — and remember to save it periodically while editing it.
• As your video gets more complex, you will need to scroll the window horizontally in order to view the clips.
Adding video tracks to a timeline
By default, clips that you add to a timeline appear within the currently selected Video Group (track), and are also listed on the Layers panel. The first clip in a track corresponds to the bottommost layer on the Layers panel, and plays back first. If you want clips to play simultaneously, such as a title clip on top of video footage, you need to put them on separate tracks.
To add a track to the timeline
1. From the Add Media menu ![]() on the Timeline panel, choose New Video Group. A new Video Group appears on both the Timeline and Layers panels.
on the Timeline panel, choose New Video Group. A new Video Group appears on both the Timeline and Layers panels.
2. Drag a video clip from another track (Video Group) into the new track, or import it via the Add Media menu ![]() or the Add Media to Track button.
or the Add Media to Track button. ![]()
Changing the length, order, or speed of a clip
One of the first edits you should make to a video is to trim off any excess footage.
To trim a clip by dragging
Position the pointer over either end of a clip (the Trim cursor appears ![]() ), then drag inward to shorten the clip.A
), then drag inward to shorten the clip.A

A As we dragged the end of a clip to shorten it, the frame at which the clip would end displayed temporarily in a trim window.
As you trim the clip, the frame at which the clip will begin or end displays temporarily in what is called a trim window. The window also lists the current position of the Trim cursor on the timeline (the left value, which is labeled Start or End) and the current Duration (length) of the clip.
• Trimmed frames aren’t deleted. To retrieve trimmed frames at any time, drag the start or end of the clip outward.
To specify the length or speed of a clip via a panel
1. To display the Video panel, right-click a clip or click the arrowhead at the end of the clip.B
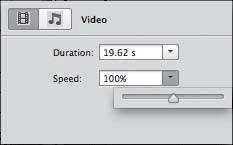
B We right-clicked a clip to display this Video panel, then chose new Duration and Speed settings.
2. Do either or both of the following:
To adjust the length of the clip, click the Duration arrowhead, then adjust the slider; or enter a value in the field.
To adjust the speed at which the clip plays, click the Speed arrowhead, then adjust the slider; or enter a value in the field. Any audio in the clip will be muted, as the change in speed will cause audio distortion.
There are two ways to change the order of clips in a track.
To change the order of clips
Do either of the following:
On the Timeline panel, ![]() drag a clip to the left or right, either between two other clips or to the beginning or end of its track, and release when the vertical black bar or rectangle displays. The other clips will rearrange automatically.
drag a clip to the left or right, either between two other clips or to the beginning or end of its track, and release when the vertical black bar or rectangle displays. The other clips will rearrange automatically.
On the Layers panel, ![]() drag a clip layer upward or downward. The clip that is listed at the bottom of a Video Group plays first.
drag a clip layer upward or downward. The clip that is listed at the bottom of a Video Group plays first.
To delete a clip or track
Do one of the following:
On the Timeline panel, click a Video Group listing or a clip (colored bar), then press Backspace/Delete.
On the Layers panel, expand a Video Group listing, click a clip layer, then press Backspace/Delete.
Playing and Reviewing Your Video
• To play your video at normal playback speed, press the Play button on the Timeline panel. ![]() Had enough? To stop the playback, press the button again
Had enough? To stop the playback, press the button again ![]() (same button, different icon).
(same button, different icon).
• If you want to review just a section of your video (a process called scrubbing), simply drag the Playhead along that section of the timeline.
• To mute the audio in all video clips, click the Mute Audio Playback button at the top of the Timeline panel. ![]() To mute the audio in one video clip, right-click the clip, click the Audio icon,
To mute the audio in one video clip, right-click the clip, click the Audio icon, ![]() then check Mute Audio on the temporary panel.
then check Mute Audio on the temporary panel.
Splitting a clip
When you split a clip into sections, an insertion point is created, into which you can add other clips. You also have the option to move or delete any of the sections that result from the split.
To split a clip
1. On the Timeline panel, drag the Playhead (the blue marker at the top of the red line) over the frame where you want a clip to be split.
2. Click the Split at Playhead button. ![]() A
A
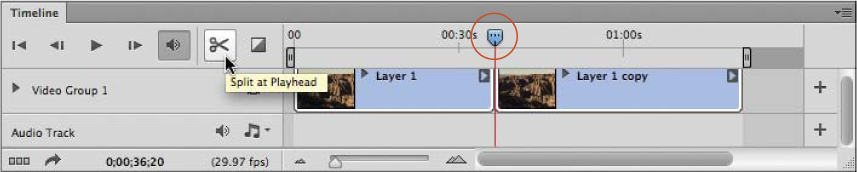
A To split a clip, we moved the Playhead to the desired position, then clicked the Split at Playhead button.
3. Optional: To split the clip further, reposition the Playhead at the end of the section to be split, then click the Split at Playhead button again.B

B To split the clip once more, we moved the blue Playhead further along the timeline. Because we split the clip, we now have the option to delete any unwanted sections or move a section to a different track.
You can click any section that results from a split, then drag it to a new location within the same track or into another track, or press Backspace/Delete to remove it. Any resulting gap in the track will close automatically.
• When you split a clip, no frames are deleted. If you want to restore “cut” frames, position the pointer over either end of the split clip (the Trim cursor appears), then drag to lengthen the clip. Each section of a split clip contains all the video footage of that clip; you can control how much of the video file is played for each clip.
Adding transitions to video clips
Although a video editor might sometimes use a “jump cut” (abrupt transition) between scenes to convey a sense of action and energy, a smoother transition, such as a fade, creates a more gentle segue between clips, and can be used to convey the passage of time.
To add a transition to a clip
1. On the Timeline panel, click the Transition button, ![]() then drag a transition from the panel to the start or end of any clip (A, next page), or between two clips to have the transition apply to the end of one clip and the beginning of the next one.
then drag a transition from the panel to the start or end of any clip (A, next page), or between two clips to have the transition apply to the end of one clip and the beginning of the next one.

A We clicked the Transition button on the Timeline panel to open this temporary panel. Next, we will drag an option from the panel to a clip on our timeline.
2. To change the transition style, right-click the transition ramp in the lower-left or lower-right corner of the clip and choose a different option from the menu on the temporary Transition panel.
To adjust the duration of a transition
Do either of the following:
Position the cursor over the transition ramp on the clip, then drag inward to shorten the effect or back outward to lengthen it (Trim cursor) (B, next page).

B We’re dragging a transition ramp to change its duration.
Right-click the transition ramp on the clip to display the Transition panel, then change the Duration value via the slider or field.
Adding still images to a video
You can also add still images to a timeline, then make them “come to life” by choosing a pan, zoom, or rotate option. You can have a still image play on top of a video track, or import a series of still image clips into one track, to be played in succession, like a slideshow.
To add a still image to a video
1. Create a copy of a photo, then use the Image Size dialog to change its resolution to 72 ppi.
2. Click a Video Group, then from the Add Media menu, ![]() choose Add Media.
choose Add Media.
3. The Add Clips dialog opens. Select a still image, then click Open. The still image will appear as a new purple bar on the timeline.
4. Optional: Drag the Playhead over the image clip. Press Ctrl-T/Cmd-T, then press Ctrl-0/Ctrl-0 to zoom out. Shift-drag a corner handle to scale the clip, then double-click in the transform box to accept the edit.
5. Optional: Each still image is assigned a default play interval of 5 seconds. You can adjust that interval by dragging its edge.
• For the most flexibility in trimming and positioning a still image clip, move it to a separate track.
To apply a motion effect to a still image
Right-click a still image clip or click its arrowhead, then on the Motion panel, choose an option from the first menu.C For a “Ken Burns” type effect, choose Pan & Zoom.

C We’re choosing Zoom as the motion option from the first menu on the Motion panel.
Adding title clips to a video
The addition of titles to a video adds a professional touch, and sometimes necessary information. Just make sure your titles are concise, carefully kerned, and easy to read. Avoid using serif fonts, which can become fuzzy on a low-resolution monitor, and the color red, which can smear or bleed onscreen.
To add a title clip to a video
1. On the Timeline panel, position the Playhead where you want the title to appear.
2. With the Horizontal Type tool, create an editable type layer. The type layer will appear within the currently selected Video Group on the Layers panel and as a purple clip on the Timeline panel.
To have a title clip play on top of a video clip
1. Do either of the following:
Create a new Video Group above the other tracks, then drag the title clip into that group.
On the Layers panel, drag the type layer to the top of the layer stack.
2. Optional: To extend the duration that the title clip plays, drag its right edge. (The maximum duration is the current length of the timeline.)
You can apply a motion effect to a title clip to make it less static, just as you can to a still image.
To apply motion to a title clip
See the second task, at left. If you want the title to fill the entire screen when the video plays, check Resize to Fill Canvas on the Motion panel.
Applying adjustment layers and filters to a video
You can apply any Photoshop adjustment command to a clip, to a track, or to the whole timeline. As expected, you can edit the adjustment layer settings at any time. By default, each adjustment layer is clipped to, and only affects, the clip directly below it. You have the option to expand the adjustment effect to all the clips in the Video Group or to all the tracks on the timeline.
To apply an adjustment layer to one clip
1. On the Layers panel or the Timeline panel, click the clip to be adjusted, then on the Timeline panel, drag the Playhead over that clip.
2. Create an adjustment layer. Try applying a Color Lookup adjustment, ![]()
![]() which adds Hollywood movie-like effects.
which adds Hollywood movie-like effects.
To apply an adjustment layer to all the clips in a Video Group
1. On the Layers panel or Timeline panel, click a Video Group.
2. Create an adjustment layer.
3. To unclip the adjustment layer, on the Layers panel, Alt-click/Option-click the line between the clip layer and the adjustment layer, then drag the adjustment layer upward to the top of its Video Group.
Note: The adjustment clip won’t display as a clip on the timeline (except if you follow the steps in the next task).
To apply an adjustment layer to all the tracks in a timeline
1. On the Layers panel, click the topmost Video Group.
2. If you haven’t already done so, create an adjustment layer.
3. Drag the adjustment layer above (and outside of) its original Video Group.A it will appear in a new track.
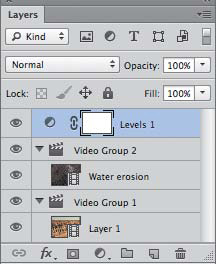
A On the Layers panel, we dragged an adjustment layer out of a Video Group.
4. On the Timeline panel, drag the end of the adjustment clip to adjust its duration.B

B Because we dragged the Levels adjustment layer clip to its own track, the adjustment will apply to all the tracks in the timeline. We lengthened the adjustment clip to have it apply to the entire duration of the video.
• When an adjustment layer is in its own track, you can apply keyframing edits (such as opacity changes) to have the effect appear gradually over time (see the next page).
You can apply any Photoshop filter to a clip. By default, a filter will affect only one frame in a video clip (where the Playhead is located). To have a filter affect an entire clip, you must convert the clip to a Smart Object first.
To apply a filter to a clip
1. On the Timeline panel, click a clip.
2. Choose Filter > Convert for Smart Filters; the clip color changes to purple. Apply one or more filters (Filter menu). If an alert appears, click OK.
• To apply a filter to just a section of a clip, split the clip, click a section, then follow step 2, above.
• To make a filter effect fade in and then out over time, duplicate a clip, put the duplicate clip in a track directly above the original one, apply the filter to the duplicate, then use keyframing to lower the opacity of the effect (see “To create a manual fade” on this page).
Keyframing
By using keyframe markers, you can apply an edit to a video that occurs over a specified span, such as a transformation (e.g., scale change), opacity change, or layer style change (blending mode or layer effect).
To create a picture-in-a-picture
1. Make sure your timeline contains at least two video clips that are on separate tracks. Drag the upper clip to the right (so the video begins with the lower clip).
2. Click the clip on the upper track, then to enable it to be transformed, if it’s not already a Smart Object, choose Layer > Smart Objects > Convert to Smart Object. If you need to edit the original clip (e.g., change its Speed setting), double-click the Smart Object thumbnail on the Layers panel.
3. Move the Playhead to align with the left edge of the upper clip, expand that Video Group, then click the Enable Keyframe Animation button ![]() for Transform. A yellow diamond-shaped marker appears on the timeline.
for Transform. A yellow diamond-shaped marker appears on the timeline.
4. Move the Playhead to the right to designate the amount of time the clip is to play at full size.
5. Click the Add Keyframe button ![]() to mark the location where the clip begins to scale.
to mark the location where the clip begins to scale.
6. Move the Playhead to the point on the timeline where the scaling is to end.
7. Press Ctrl-T/Cmd-T for the Transform command, Shift-drag a corner handle in the document window to shrink the clip (while preserving its aspect ratio), then press Enter/Return to accept the transformation. A second keyframe marker appears on the timeline.
8. Drag the scaled clip to the desired location in the timeline. As you play the video, the still image will shrink and move between the keyframes.A

A We added keyframes to a video clip to designate where we wanted Transform and Opacity changes to occur. The section between each pair of diamonds (within a row) marks the area of transition.
To create a manual fade
1. On the timeline, click a clip (not in the bottommost Video Group), then position the Playhead several seconds inward from the end of the clip.
2. Expand the Video Group and click the Enable Keyframe button ![]() for Opacity.
for Opacity.
3. Move the Playhead to the end of the clip.
4. On the Layers panel, lower the Opacity value to 0%. A second keyframe marker appears on the timeline.
Adding audio clips
By default, one audio track (for narration or music) is included in each timeline. You can add more audio clips or tracks as needed, plus you can fade, mute, or adjust the volume for any existing audio clip.
To adjust the settings of an audio clip
1. To display the Audio panel, right-click a video clip, then click the Audio icon ![]() A; or right-click an audio clip.B
A; or right-click an audio clip.B

A We’re adjusting the audio settings for a video clip via the Audio panel.
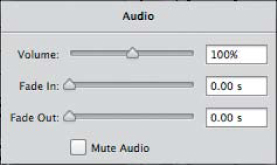
B We right-clicked an audio clip to display these Audio panel settings.
2. Adjust the Volume, Fade In, and Fade Out sliders. If you want to mute the clip, check Mute Audio.
• If the audio doesn’t play as you play the video, click the Enable Audio Playback button. ![]()
To add an audio clip or track to a timeline
1. Optional: To add an audio clip to a new track, from the Add Audio menu ![]() on an audio track, choose New Audio Track.
on an audio track, choose New Audio Track.
2. From the Add Audio menu ![]() on an audio track, choose Add Audio; or click the Add Audio to Track button
on an audio track, choose Add Audio; or click the Add Audio to Track button ![]() at the right end of the timeline.
at the right end of the timeline.
3. The Add Audio Clips dialog opens. Locate an audio file, then click Open.
Rendering clips into a movie
Rendering is the essential final step of combining edited clips into a playable movie file.
To render a timeline into a final video
1. Save your file. On the Timeline panel, click the Render Video button. ![]()
2. The Render Video dialog opens.C Do all of the following:
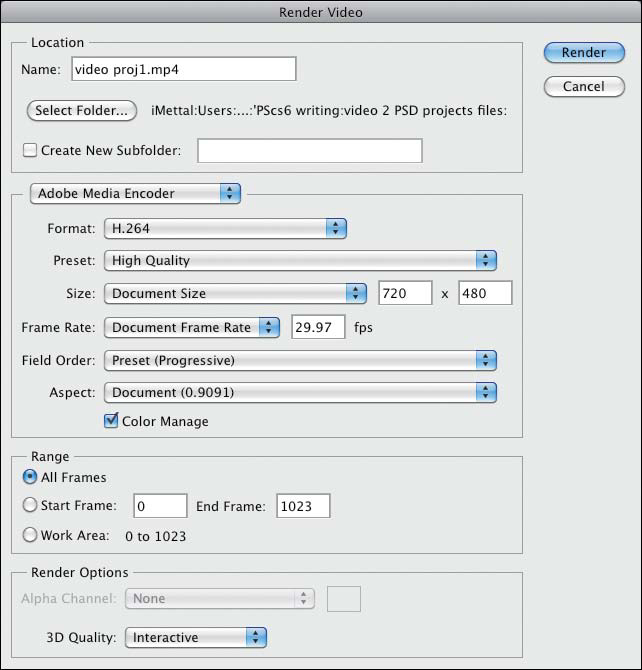
C The Render Video dialog offers a number of output options.
Enter a Name for your video file (keep the default extension).
Click Select Folder, choose a location for the file, then click OK/Choose.
Choose a Format and Size for the video. (The Preset menu for the H.264 format offers presets for many common tablets, devices, and video services.) Leave the other menus alone.
Under Range, click All Frames, or click Start Frame and enter a specific range of frames.
Click Render. The rendering process may take a while, depending on the speed of your computer and length of the video.
• To enable your Photoshop video to be played on a home DVD player, use Windows Live Movie or Apple iMovie to convert it to the proprietary file format for DVD players.