Lesson 13. Making Isolated Color Adjustments
In this lesson, you’ll learn how to make secondary corrections to bring some finesse to your grades. Secondary color corrections are targeted adjustments to specific elements within a scene and have literally hundreds of uses. They allow you to:
• Adjust the color of the sky
• Fix troublesome skin tones
• Brighten a face that’s not distinct enough from the background
• Desaturate a shirt that’s distractingly colorful
• Intensify the color of foliage in an exterior shot
• Legalize a single oversaturated color without desaturating everything
Final Cut Pro X provides two ways to isolate subjects for secondary correction: Using masks that you create by keying specific colors, and using shapes that surround areas of the image.
In the following exercises, you’ll use both techniques, individually and in combination, to isolate aspects of images and perform subject-specific corrections.
Using Color Masks
One of the most flexible tools for making targeted corrections is the color mask. Essentially a chroma keying operation, color masks let you turn any hue of the spectrum into a mask for isolating a subject.
In the following exercise, you’ll use color masks to target specifically colored features within multiple clips and address a variety of creative issues.
1. In the Project Library, display the contents of the APTS FCP X ADV Part 3 disk image, and then click the disclosure triangle next to the Lesson_13 folder to show its contents.
2. Open the In the City project, and press Shift-Z to expand its clips to the available width of the Timeline.
3. If necessary, open the video scope (press Command-7), and set it to display the luma waveform.
4. Select the first clip. The image of the woman sitting in front of her house has a lovely variation of color that is ideal for showing off what you can do with the Final Cut Pro X mask effect.
Before beginning secondary color correction, always make sure you’ve exhausted the creative possibilities of a primary correction using Correction 1. A single primary correction can save you several secondary corrections. Diving into a secondary correction is usually a mistake, unless you have a specific task that requires it.
5. Click the Color Board button to open the Color Board. Click Exposure, and drag the Global exposure control down until the bottom of the waveform just touches 0.

This creates nice, dense shadows in the image and also lowers the white point so that the highlights fall under 100, which is ultimately ideal. At this point, you’re done. Although the image has a somewhat warm color cast, it’s desirable for most of this image, and you’ll later adjust specific colors that shouldn’t be so warm.
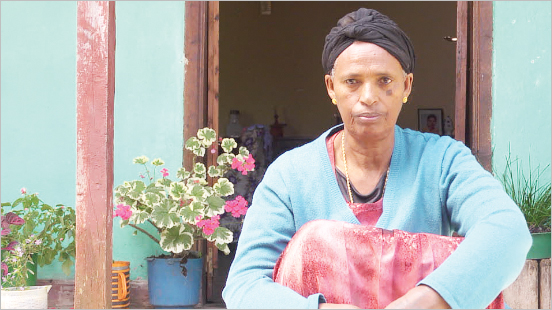
6. Click the back arrow button to return to the Video Inspector, and set the video scope to show the Vectorscope.
Now that you’ve made a primary correction, you need to create another correction in the Color group to perform a secondary adjustment. If you used the mask effect with Correction 1 for this task, you’d inadvertently limit the effect of Correction 1, which is not what you want.
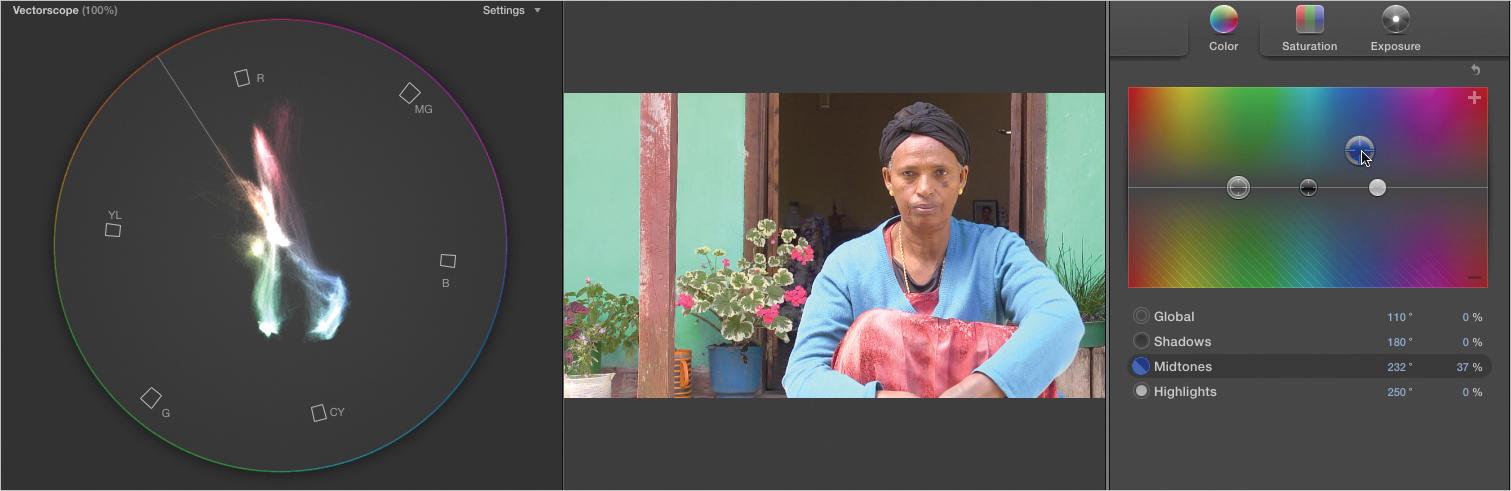
7. Click the Add Correction button to create Correction 2. You’ll use Correction 2 to adjust the woman’s blue sweater, without altering anything else in the scene. As you can see in the Vectorscope, there is excellent separation between the various pools of different hues throughout this image—an ideal situation for color masks.
8. Click the Add Color Mask button of Correction 2, but don’t do anything just yet.

Underneath Correction 2, a Color Mask control appears with a color swatch, a slider, and a color picker, which is turned on (highlighted in blue) and ready to pick a color.

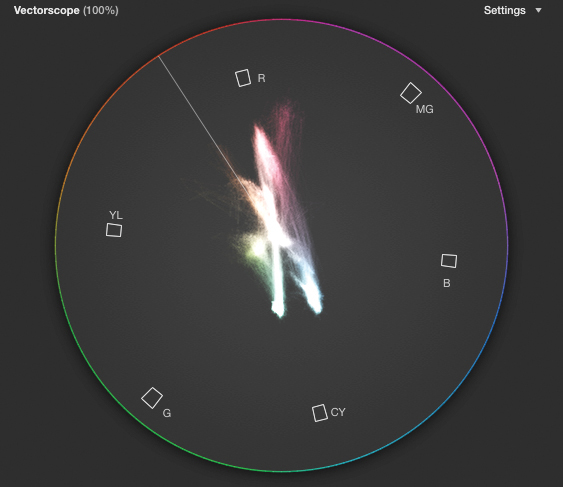
9. In the Viewer, move the pointer to the blue-green wall, click the portion of the wall to the right of the doorway, and drag slowly outward.
As you drag away from the pixel you clicked, a circle appears to define how much of the image is being sampled for the mask. The mask you’re creating is shown as the saturated portion of the image, while everything not included in the mask appears as a desaturated gray. Dragging outward enlarges the sample area and expands the mask; dragging inward shrinks the sample area and reduces the amount of the image that’s masked.
10. Continue dragging outward until you’ve masked the majority of the wall without including the woman’s sleeve or other parts of the image. When you’ve isolated as much of the wall as you can—while omitting everything else—release the mouse button.
You should have been able to mask the entire wall except for the bottom portion to the left of the doorway and beneath the potted plant. Fortunately, you can expand the mask to include this area, too.
If you’re dissatisfied with your sampled region, click again somewhere else in the Viewer to clear the current mask, and drag a new sample circle to redefine the mask.
11. With the Correction 2 mask eyedropper button still highlighted, Shift-drag in the section of the wall beneath the plant to add that part of the image to the mask. Release the mouse button when you’re finished.

When you Shift-click with the eyedropper, a + (plus sign) appears next to the eyedropper, and the saturated/desaturated mask selection view shows that you are adding to the previously sampled region of the image rather then resampling from scratch.
Be careful not to include the leaves or wood in the selection, although the edge of the woman’s right sleeve is unavoidable.
Tip
You may get a better result with a series of small selections made by Shift-clicking multiple areas.
Now that you’ve sampled the maximum amount of wall along with the woman’s sleeve, you’ll use the Option key to remove that sleeve from the selection.
12. With the Correction 2 mask eyedropper still highlighted, Option-drag to create a sample circle over the woman’s sleeve. As you drag, the mask shrinks to omit that portion of the image. Continue dragging until you’ve omitted as much of the sleeve as possible while retaining the maximum amount of the wall in the mask. Release the mouse button when you’re finished.

When you Option-click with the eyedropper, a − (minus sign) appears next to the eyedropper, and the saturated/desaturated mask selection view shows that you are subtracting from the previously sampled region of the image.
Using this method, you can add to and subtract from several parts of the sampled mask to fine-tune the mask area as much as possible.
13. When you’re satisfied with your mask’s isolation of the wall, click the eyedropper button to deselect it. At this point, you’ve defined the region you want included in the mask. Next, you’ll further refine the mask using the Softness slider, located between the color patch showing the currently sampled hue and the eyedropper button.
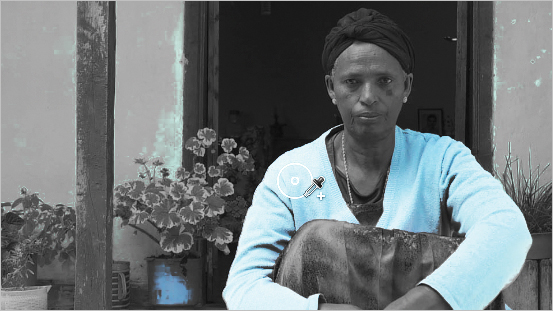
14. Option-drag the Softness slider slowly to the left.
Option-dragging the slider forces the Viewer to show you the mask in black and white. White indicates the portion of the image in the mask, and black indicates the omitted parts of the image.
15. Keep Option-dragging the Softness slider to the left until the fringing on the woman’s sleeve is almost gone, and then release the mouse button. At this point, you have a good mask and are ready to make an adjustment.
16. Click the Color Board button for Correction 2 to open the Color Board.
With the Color Board open, you’ll know you’re making an adjustment that’s limited by a mask because the Inside Mask and Outside Mask buttons appear next to the Action pop-up menu.
These buttons appear only when you’re limiting a correction using a mask or shape, and they let you apply different settings to the inside and outside of the mask. This effectively gives you two corrections in one.
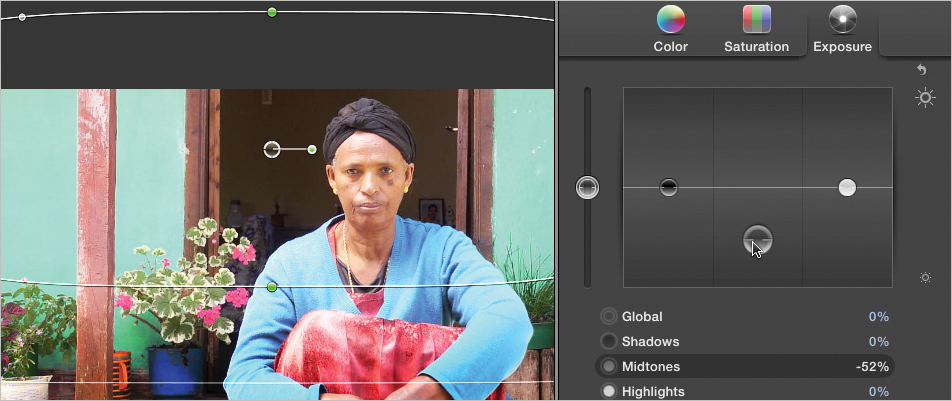
17. With Inside Mask turned on by default, drag the Midtones color control up toward positive green.
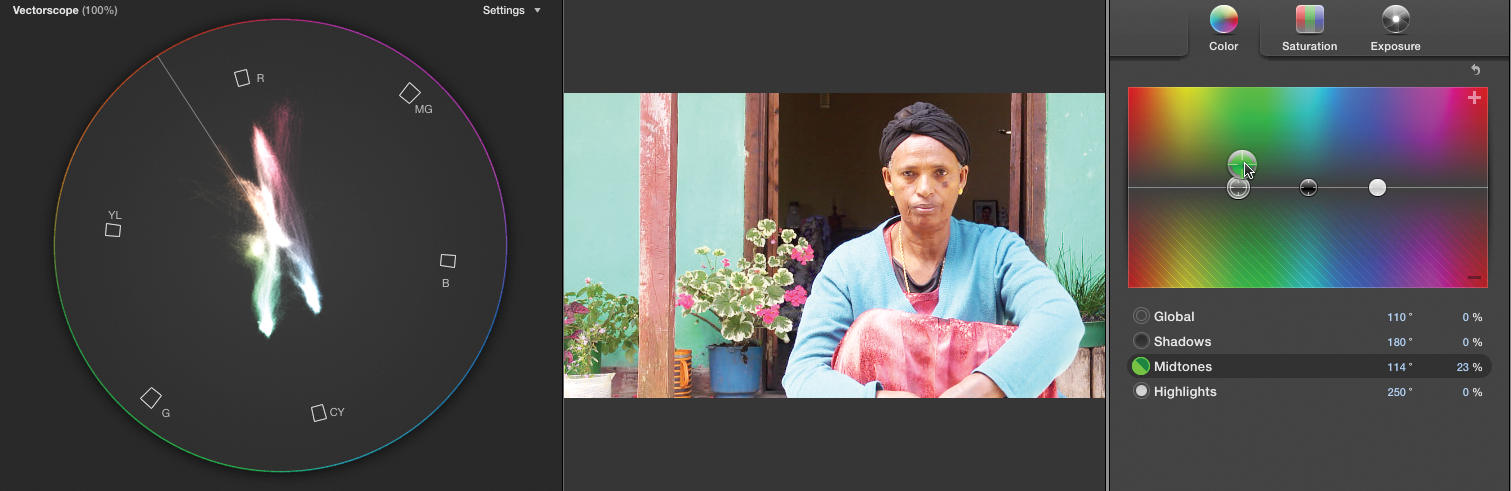
As you make this adjustment, watch what happens in the Vectorscope. The distinct arm of color stretching between the CY (cyan) and G (green) targets is moving toward green. The Vectorscope is an excellent tool for viewing how color-limited masks affect the video signal.
18. Drag the Midtones color control until the wall is distinctly greenish, but don’t drag it too high or the level of saturation will be distractingly vivid.
Note
If you’re worried that your mask isn’t quite perfect, don’t be. As long as the color adjustment you’re making is in the same general families of hue and saturation as the original color, you can get away with imperfect masks so long as the holes and edges don’t move or call attention to themselves by being in an awkward part of the image.
19. When you’re done, click the back arrow button to return to the Video Inspector.
20. Turn Correction 2 off and on to see a before-and-after comparison of this adjustment.

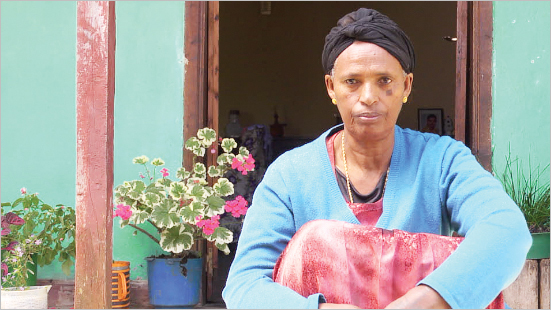
Before correction
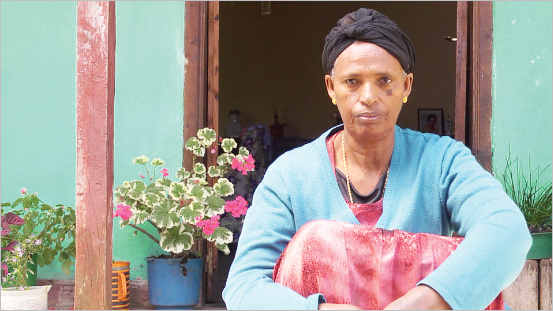
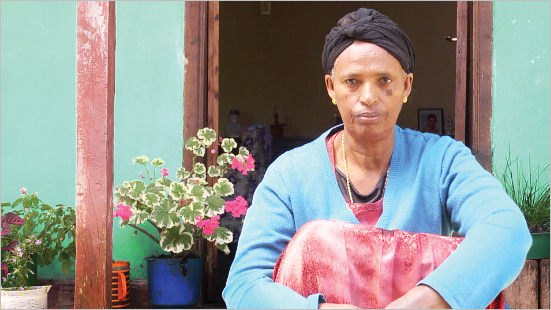
After correction
Now that the wall is a more vivid and distinct color, the woman is not competing so well with the background. Because you’re going for a vivid, colorful look in this example, she could stand out more if you make one of her garments more colorful. Let’s target her blue/cyan sweater.
In this exercise, you’ll discover that masking a color need not be a multistep process.
21. Click the Add Correction button to add Correction 3.
22. Click the Add Color Mask button, and then start dragging somewhere around the woman’s left shoulder to sample her blue sweater. Expand the sample until you’ve masked most of the sweater, while masking as little of the surrounding scene as possible. You won’t be able to include the darkest shadows of the sweater, but that’s OK.
Note
As you’re masking, remember that some colors are meant to mimic pools of light and shadow. This means, so long as you’re not completely changing the hue of a subject (which does require a perfect mask), it may be fine to exclude shadows or highlights in the mask.
23. Click the eyedropper button to disable sampling, and Option-drag the Correction 3 Softness slider to the left until you’ve eliminated as much of the non-sweater fringing as you can.
Tip
If you make a sample selection you don’t like, you can press Command-Z to undo the last sample.
24. Click the Color Board button for Correction 3 to open the Color Board.
25. Drag the Midtones color control up into positive blue to make the sweater a bit less cyan and a bit more saturated. Stop when you’ve achieved a nice balance between the green of the wall and the blue of the sweater.
So that’s all there is to it. By adding additional color corrections and using the mask tool, you can isolate colors and manipulate the color, saturation, and exposure as necessary to make highly specific changes.
Tip
If you leave a color mask’s eyedropper button turned on when you open the Color Board, you can modify the mask while making color adjustments, without having to return to the Video Inspector.
Working Inside and Outside of Masks
Once you’ve created a color mask (any type of mask, actually), you have the added flexibility of making separate adjustments to the inside and outside of the mask within the same color correction. It’s like having two corrections in one.
In this exercise, you’ll use inside and outside masks to create an early morning look for a clip, while keeping the skin tones in the shot healthy and naturalistic.
1. Click anywhere within the second clip of the project.
2. Open the Color Board for Correction 1, and set the video scope to the luma waveform.
3. Click Exposure, and drag the Shadows control down until the black point of the waveform dips just below 0. This stretches contrast and adds some visual weight to the image.

4. Set the video scope to display the Vectorscope to examine the color distribution.

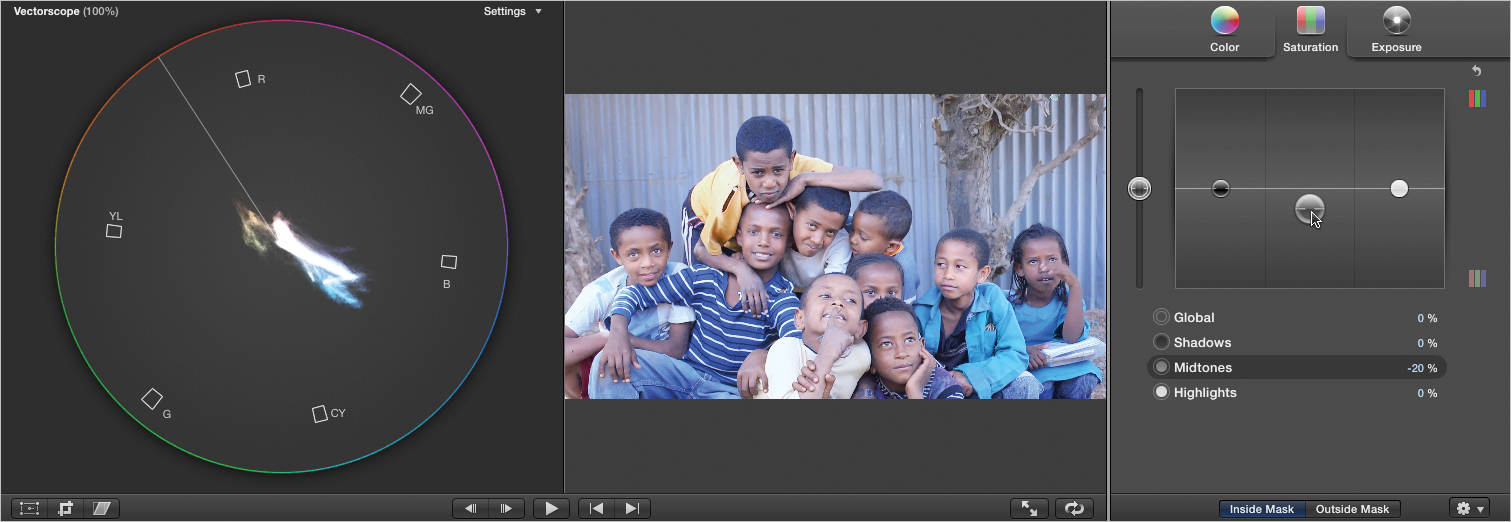
The Vectorscope graph is fairly well centered. However, all the dark-complexioned skin tones are angled toward the orange side of the Skin Tone Indicator, indicating warmth.
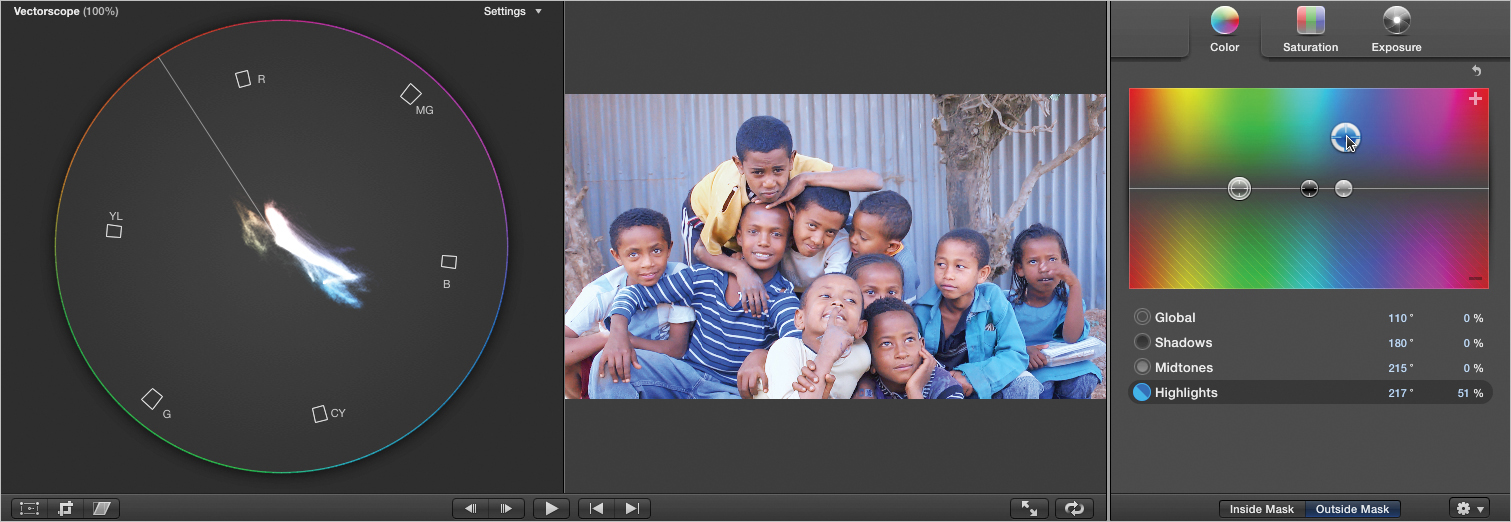
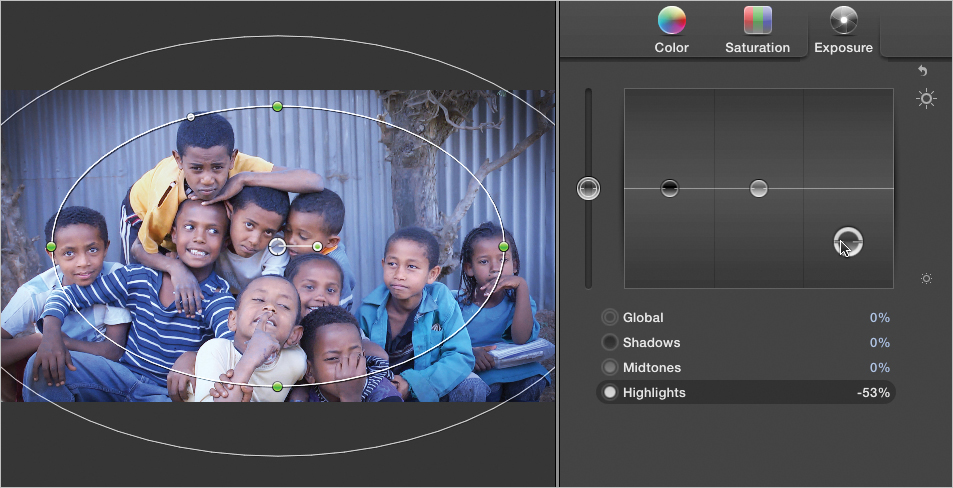
5. To alter the atmosphere, click Color, and drag the Highlights control up into the positive blue/cyan area of the Color Board to cool off the image.

Because you’re working to simulate a change in color temperature due to lighting, the Highlights control is a logical tool to make this adjustment. However, while the environment is certainly cooled off, the highlights in the children’s faces have turned a bit blue. You can address this unflattering situation using a mask.
6. Click the color Reset button, and then click the back arrow button to open the Video Inspector.
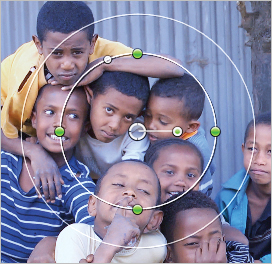
7. Click the Add Correction button to add Correction 2, and then click its Add Color Mask button and sample one of the children’s faces to create a mask for only the skin tones. (The lower facial area of the second child from the right works well.)
8. For this adjustment, it’s important to eliminate as much background fringing in the mask as possible. Option-click to subtract any bits of mask appearing on the tree or the corrugated wall behind the children.
9. When you’re satisfied with the mask, turn off the color mask, and click the Correction 2 Color Board button.
You’ve created the necessary mask to isolate the faces. Now you want to make the same cool-blue adjustment you made in step 5, but apply it to everything except the children’s faces.
10. Click the Outside Mask button, located at the bottom of the Color Board.
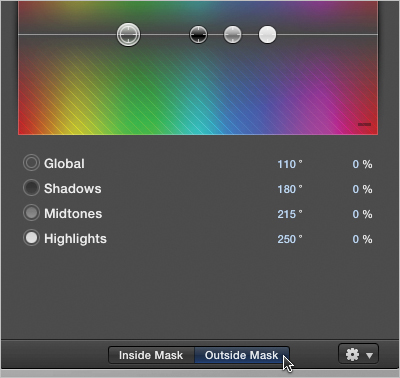
11. Drag the Highlights color control up into the cyan/blue area of the Color Board to cool down everything outside the mask.
As you can see, this technique is extremely effective; however by cooling down the environment this much, the protected faces look unnatural. This occurs because, in reality, the quality of light of the illuminant, or dominant light source in a scene, typically affects everything within that scene. By excluding the faces, you’ve created an unnatural color contrast. The solution is to make a small adjustment to the faces to bring them into the scene.
12. Click the Inside Mask button. Notice that the color controls all move to their default positions. Because the settings for Inside Mask and Outside Mask are completely independent, changes made in one mode have no effect on the controls of the other.
13. Drag the Midtones color control up very slightly, toward blue/cyan. The goal is to take a bit of the edge off of the intensely warm skin tones without turning the faces blue. With the exception of specular highlights on shiny skin, skin tone generally falls within the midtones of the scale.
14. Click Saturation, and drag the Midtones saturation control down just a little so that the faces aren’t quite so intensely colorful.
You’re finished. If you return to the Video Inspector and click the Color checkbox to turn the entire grade off and on, you can compare the difference.

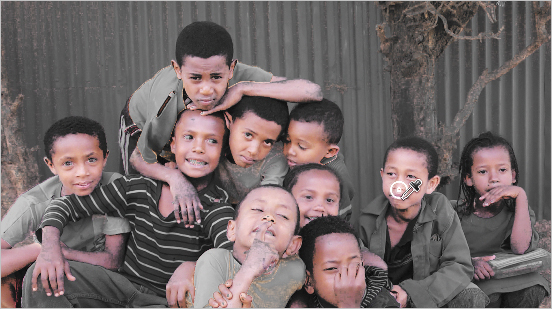
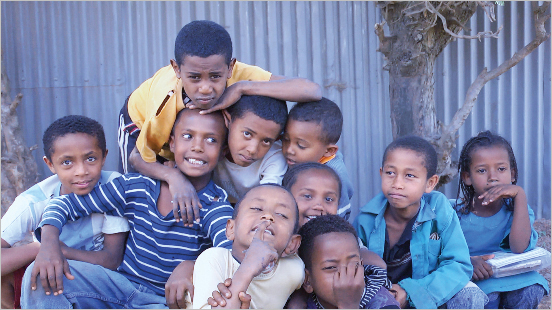
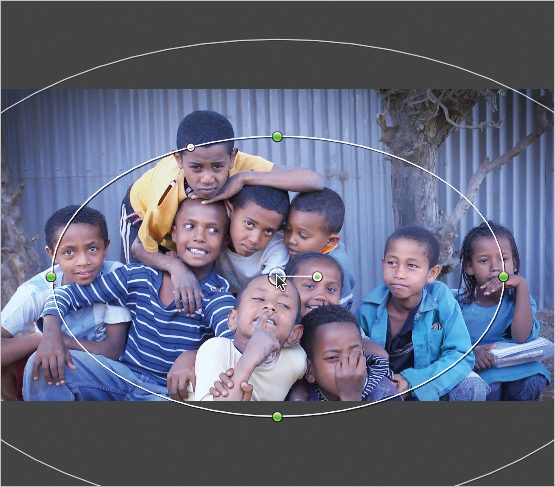
Original image
Stylized image using inside and outside mask adjustments
You’ll often manipulate the inside and outside portions of a mask to control how a particular adjustment affects various subjects in the frame. It’s a common technique and useful for a wide variety of situations.
Using Shapes to Target Frame Regions
Color masks are flexible and have dozens of uses, but you’ll still find many situations in which the feature or region you want to adjust is either too complicated to key on or so simple that it’s not worth the trouble.
For example, if you wanted to darken the wall of a hallway to create a region of more intense shadow, various multicolored features—such as artwork, wallpaper, and doors—could make using a color mask difficult. This is an excellent situation in which to use a shape mask.
On the other hand, if you just want to brighten someone’s face or adjust the contrast of a sign by a road, creating a shape that surrounds the thing you want to manipulate might be easiest, rather than meticulously sampling and isolating the area.
Using a Shape to Create a Vignette
Vignettes are a darkening around the edges of the frame, typically produced by an optical filter that cuts off light coming into the lens or by a mechanical defect of the lens structure, a matte box, or other obstruction that infringes on the corners of the scene being imaged.
Vignettes are artificially created all the time for creative effect, and are also useful for directing audience attention and darkening elements at the edge of the screen that you may not want seen.
In this exercise, you’ll use a shape in the simplest possible way: to create a darkening vignette.
1. If necessary, open the In the City project you’ve been working on in the last few exercises.
2. Open the second clip into the Video Inspector.
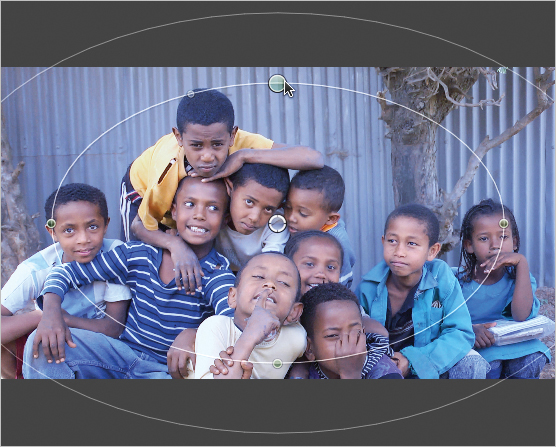
3. Click the Add Correction button to add Correction 3, and then click the Add Shape Mask button.
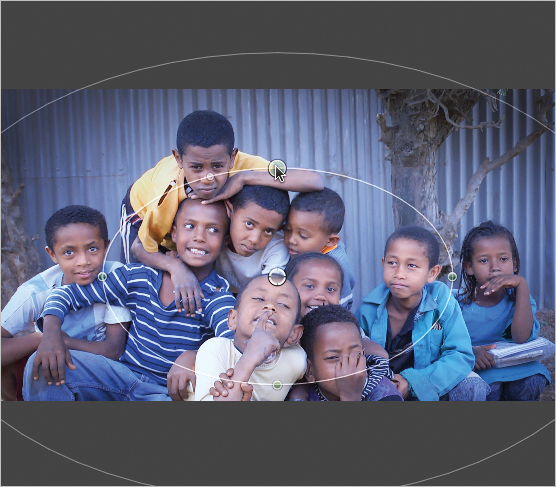
A circular onscreen control (OSC) appears with handles you can use to move, resize, rectangularize, soften, and rotate it.
4. Drag one of the side handles toward the edge of the frame to widen the shape.
5. Drag the top handle up to make a taller oval that just encompasses the top and bottom child of the group.
6. Click the Correction 3 Color Board button to open the Color Board. At the bottom of the color board, you’ll see the same Inside Mask/Outside Mask buttons that were available for color masks, letting you know that you’re working on a secondary operation.
What you want to do is create a darkening around the edges of the frame, so you’ll adjust everything that’s outside of the shape OSC.
7. Click Outside Mask. Click Exposure, and drag the Highlights exposure control down to darken the edges.
Dropping down the highlights or midtones mutes the lighting without crushing the blacks. If you instead lowered the Shadows control, you would end up with a harsher, less smooth vignette with really dense, clipped blacks.
8. Now that you can see the darkening effect, click anywhere along the outer edge and drag the shape OSC farther from the center, increasing the softening of the vignette and making the effect more subtle.
9. Move down the shape by dragging the center handle so that there’s more darkening at the top edge than at the bottom. This prevents too much of the vignette from appearing on top of the kids.
You now have a nice, soft, subtle vignette surrounding the kids, but it may be too subtle. Stretching the softness away from the center as you did resulted in a very gradual falloff. Although that’s good, it also results in the darkest part of the vignette being well off the side of the screen. You can fix this by reducing the overall size of the shape, and then stretching out the softness border even farther.
10. Shift-drag the top handle of the shape OSC down to shrink it overall until it bisects the faces of the top and bottom child. When you Shift-drag the resizing handles, you constrain the shape proportions, resizing it overall without squeezing or stretching it. At this point, you have a nice vignette.
11. To see the effect without the shape OSC in the way, click the back arrow button to return to the Video Inspector, and turn off the shape mask for Correction 3.
Combining Shapes
Using shapes to selectively lighten or darken different parts of an image is sometimes referred to as digital relighting. The vignette in the previous exercise was an extremely simple example of this, but you can make much more subtle adjustments that fit invisibly into the lighting scheme of a clip.
Specific, shaped shadows can do much to add depth and dimension to an otherwise flat lighting scheme. However, certain situations often call for including or excluding scene elements that intersect the shape you’re using to perform digital relighting.
In the next exercise, you’ll create some subtle shadows, and in the process, use multiple intersecting shapes to make sure that foreground subjects don’t also fall into background shadows.
1. With the In the City project open, select the first clip to open it into the Video Inspector.
2. Click the Add Correction button to add Correction 4, and then click the Add Shape Mask button.
3. Reposition, resize, and soften the shape so that the bottom size and softness boundaries encompass only the bottom half of the frame from the bottom of the woman’s neck to her wrists.
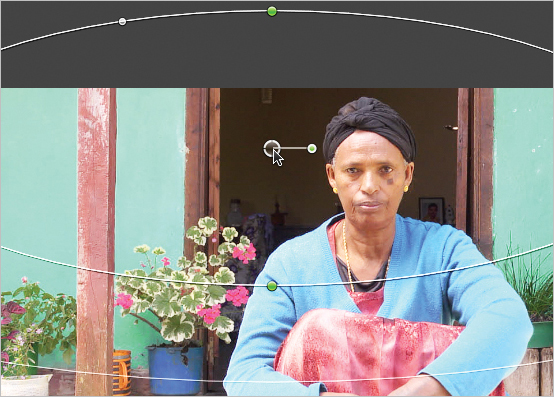
4. Drag the rectangular handle (to the left of the top resize handle) to flatten the curve of the shape and make the shape more of a strip running along the bottom.
5. Click the Correction 4 Color Board button. Click the Outside Mask button, and then click Exposure and drag the Midtones control down to darken the bottom of the image.
Dragging the Midtones exposure slider darkens the floor and plants behind the woman, but leaves some of the brightest highlights alone, creating more naturalistic darkening shadows behind her.
Unfortunately, this operation has also darkened the woman, which doesn’t quite serve our goal of bringing her out from the background. Fortunately, you can create another shape to exclude her from the darkening operation.
6. Click the back arrow button to reopen the Video Inspector, and click the Add Shape Mask button for Correction 4 to create a second shape OSC.
7. Reposition and resize the second shape so that it conforms to the woman and intersects the first shape. Notice that the Shape Mask button for Shape Mask 2 is highlighted to indicate which shape OSC is currently active.

All shapes are added together automatically, which means that any Outside Mask operation you create affects only those areas outside all the shapes you create. This makes it easy to create many additional shapes to exclude the features you don’t want affected by a particular correction.
Before adding shadow
After adding shadow to the floor in the background
Similarly, any Inside Mask operations will affect whatever is inside every shape you’ve created for that correction.
Combining Shapes and Masks
Masks and shapes have different strengths. For example, masks are essentially chroma keys, so they automatically follow a subject in motion without the need for keyframing or manual animation.
On the other hand, when you want to adjust a region that is not easily defined by a single color, a shape can more quickly and easily limit your correction.
However, you can combine shapes and masks in a variety of ways to create highly flexible and very specific corrections. In the next two exercises, you’ll combine shapes and masks to address two common correction issues.
Masking Difficult-to-Isolate Skin Tones
In this exercise, you’ll mask the woman’s face in the first clip, and then use a shape to exclude similarly colored elements of the scene from this mask.
1. With the In the City project open, select the first clip to open it in the Video Inspector.
2. Click the Add Correction button to add Correction 5, and then click the Add Color Mask button.
3. With the eyedropper chosen, sample the woman’s face by dragging from her nose outward until you’ve included her face and neck. In the process, many other parts of the scene may also be included, but you can ignore everything except the doorway behind her, which should remain excluded.
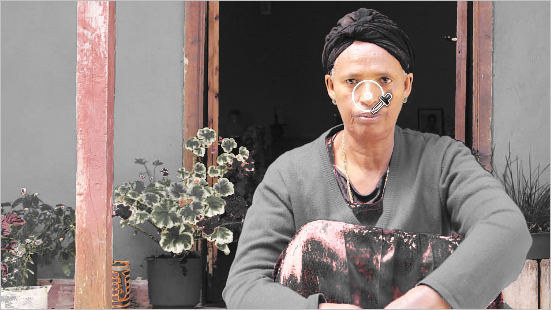
It should be easy to create a solid mask that includes both the highlights and shadows of the woman’s face, but to do so you’ll end up including other elements such as the post, some fringing on her dress, and a number of unwanted edges. However, instead of adding and subtracting from the mask using the Shift and Option keyboard modifiers, you can create a shape to exclude what you don’t want.
4. Click the Add Shape Mask button to add a shape to Correction 5, and then reposition and resize the shape as an oval that closely surrounds the woman’s face and neck. Reduce softness to exclude as much of her red dress as possible.
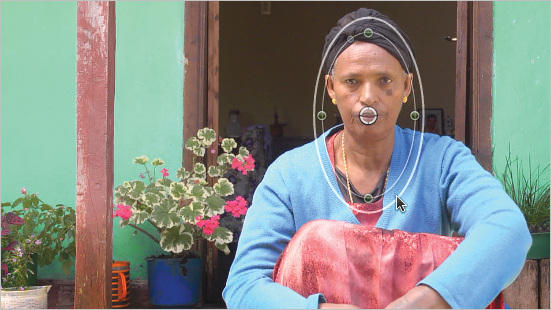
5. Click Correction 5’s Color Board button to open the Color Board. By default, when a shape mask’s Inside Mask button is turned on at the same time a color mask is applied, the final mask includes only the region where the color mask and shape mask intersect. This important feature lets you work more quickly when isolating hard-to-separate subjects with colors that are very similar to other elements in the frame.
6. Click Exposure, and then raise the Highlights exposure control and lower the Shadows exposure control to stretch the contrast in the woman’s face, making her a bit brighter and giving her more definition.
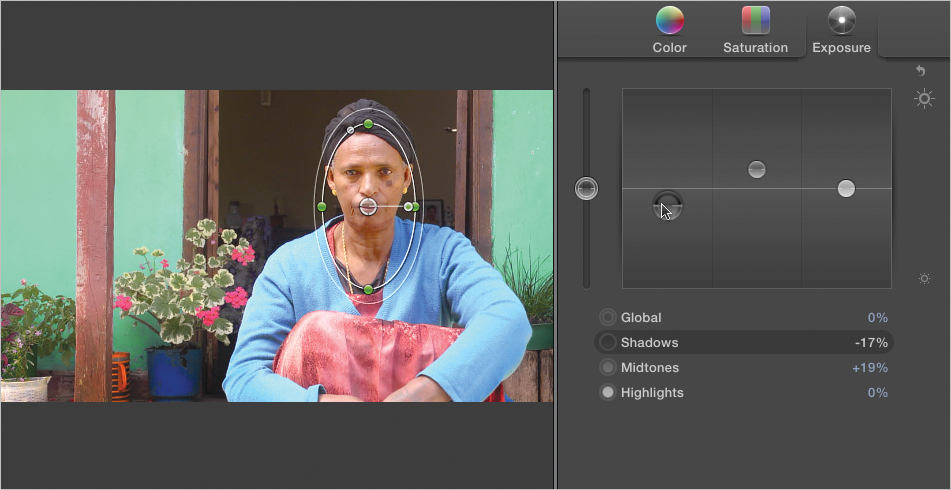
As you make this adjustment, you can see that it is successfully limited to just her face and neck. By lightening the woman’s face by adjusting the midtones, you avoid blowing out her highlights, which would be unflattering. By also dropping her shadows to increase the overall contrast of her face, you give her more definition and keep the adjustment looking natural and consistent with the rest of the image.
Note
As you can see, grades often consist of many separate corrections working together, and Final Cut Pro X makes this easy. However, these exercises represent an unusually detailed treatment for this clip. While they’re representative of the kind of detail work you might be able to put into a thirty-second spot or a music video, long-form work such as broadcast or feature documentaries might not allow the time or budget for such elaborate corrections. As you work, make sure you keep your schedule and not get lost in a grade to the point where the day is almost over and you’ve corrected only fifty of the six hundred clips you needed to correct.
Masking Corrections to the Sky
In this exercise, you’ll combine shapes and masks in a different way to make a correction to the sky, while omitting subjects passing in front of it.
1. With the In the City project open, click near the very beginning of the third clip to open it into the Video Inspector.
2. Open the Color Board for Correction 1, and use the exposure controls to drop the shadows a bit and raise the midtones, thereby stretching the contrast of the darker portion of the image. Then, open the color controls, and drag the Midtones color control up into positive orange just a little to warm up the overall clip.
3. Click the back arrow button to return to the Video Inspector. Click the Add Correction button to add Correction 2, and click the Add Shape Mask button.
4. Reposition, resize, and soften the shape to isolate the sky, locating the inner region of the shape at the top part of the sky and the outer softness ring near the tops of the buildings and trees.

Tip
Drag the rectangular control to the left of the top resize handle to square off the shape, making it easier to isolate the sky with a long rounded rectangle.
5. Click the Correction 2 Color Board button. Click Color, and drag the Highlights color control up into the positive blue/cyan to put some blue into the sky.
Note
When adding blue to a sky, subtlety is key, although to make this change more visible in print, the correction shown here was exaggerated. Experiment with different shades to see what looks best to you.
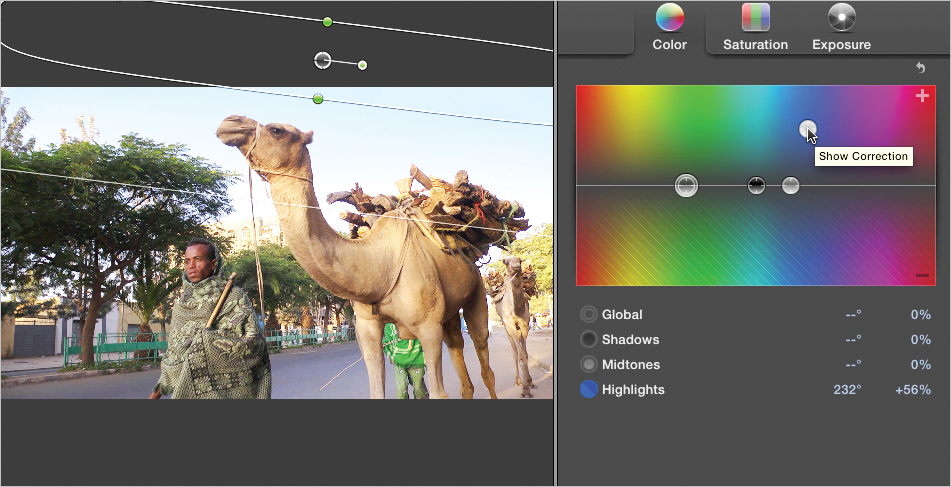
Using shapes to add a blue gradient to the sky is a long-used technique, and in many instances, it may be all you need to do. Because of the way sunlight scatters in the atmosphere, skies are usually a gradient of color which helps the illusion. Adding only colors somewhere between blue and cyan is helpful also. However, in this clip, the camel is tall enough to poke its head into your clever illusion. Since camels aren’t typically blue, you’ll need to fix this.
6. Click the back arrow button, and then click the Add Color Mask for Correction 2.
7. Drag a large sample circle near the upper-right corner to mask most of the sky, excluding the camel and treetops.
8. Shift-click a much smaller sample circle at the upper-left corner of the sky to expand the mask a bit more in that area. Immediately, the blue you added to the sky is limited to the intersection of the color mask you just created and the shape you made. The camel’s head and the treetops return to their natural colors, and you’re finished.

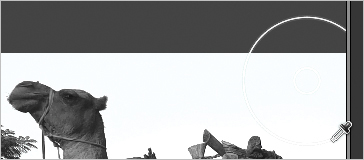
Before correction
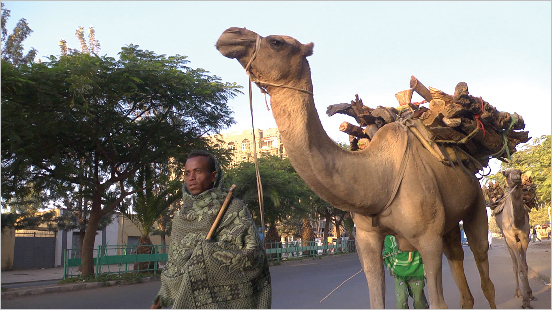
After sky enhancement with intersecting color and shape masks
Incidentally, some additional camera movement occurs in this clip. Fortunately, the sky correction you’ve made is amorphous enough so that you don’t have to animate the shape to move with the camera. The blue of the sky makes enough sense on its own.
In the next exercise, however, you’ll learn how to animate shapes for situations when your correction does need to move.
Animating Shapes
When you create a shape that must adjust to a subject that’s moving, or you isolate a region of a clip in which the camera is in motion, you may need to animate the shape to follow the movement. Shape animation uses keyframes, and animates much like other parameters and effects in Final Cut Pro X.
In this lesson, you’ll use shape animation to highlight a car in a documentary-style clip.
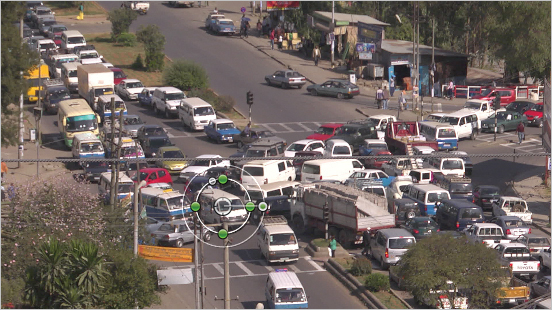
1. With the In the City project open, click near the beginning of the fourth clip to open it into the Video Inspector.
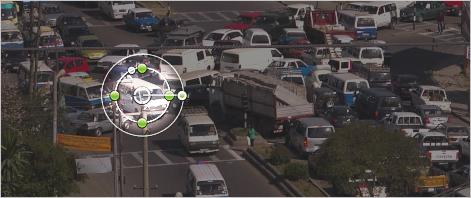
2. Click the Add Shape Mask button, then resize and reposition the OSC shape to surround the white van that’s just passing the intersection.
Tip
Shift-dragging one of the repositioning handles is the fastest way to resize the entire shape to hug the van.
In this case, you’re creating a special effect to highlight one particular van to the viewers—as one might do in a documentary or forensic project—and no primary correction is necessary.
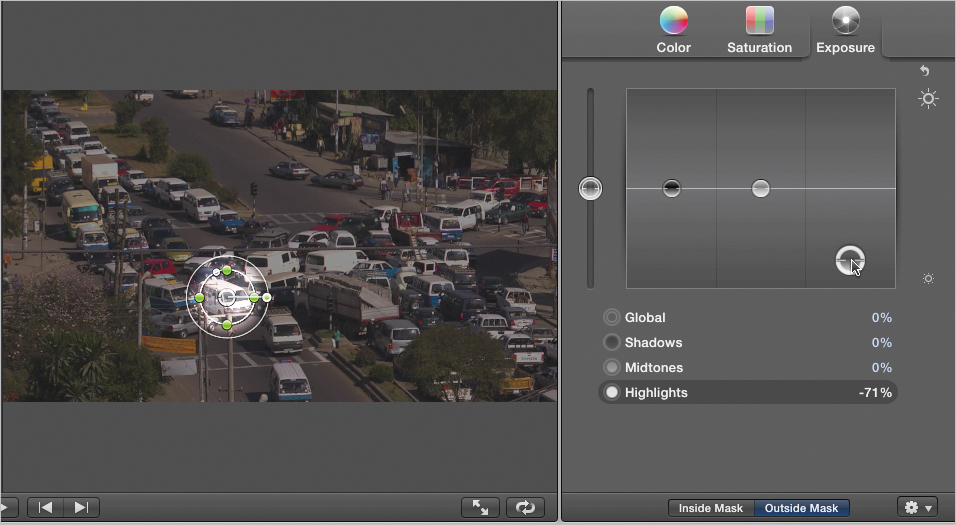
3. Click the Correction 1 Color Board button. Click the Outside Mask button, and click Exposure to drag the Highlights exposure control down to darken everything except the van inside the shape.
4. Click the back arrow button to return to the Video Inspector. At this point, you’ve created the highlighting effect you need, and you can animate the shape to follow the van as it drives.
5. In the Video Inspector, click the Keyframe button for the Shape Mask 1 parameter to add a shape keyframe at the current position of the playhead.
The Keyframe button turns orange to indicate that a keyframe is present at the current position of the playhead.
6. Move the playhead forward to the end of the clip, and then drag the shape to the current position of the car.
Another keyframe is automatically added at the current frame as indicated by an orange Keyframe button.
The arrow to the left of the Keyframe button indicates that a keyframe exists to the left of the playhead. You can click these left (or right) arrows to jump the playhead to the next keyframe in that direction.
Play the clip. The shape, and your correction, moves to follow the car.
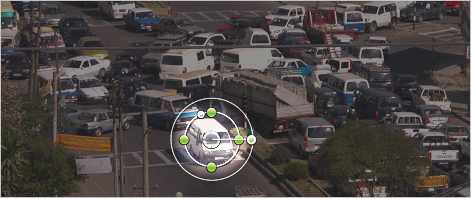
The animated shape follows the van.
You can also click the upper-left corner of any clip in the Timeline to open its Adjustments pop-up menu and choose Show Video Animation. This opens the Video Animation Editor in the Timeline, within which you’ll see a “Color: Correction 1: Shape Mask 1” item with the two keyframes you’ve created. In this editor, you can add keyframes (Option-click the keyframe track), remove keyframes (select a keyframe, and press Delete), or move keyframes (drag them left or right). (For more information on using keyframes, see Lesson 9.)
Animating shapes is necessary whenever you’re using a shape to adjust a region in motion, such as a moving subject or as in a roving camera shot. However, shape animation can also be a way to use color corrections creatively.
Lesson Review
1. What’s a secondary correction?
2. What’s the difference between a color mask and a shape mask?
3. How do you add to a color mask?
4. How do you subtract from a color mask?
5. What does the color mask’s Softness slider do?
6. Can you apply separate color adjustments to the inside and outside of any mask?
7. What happens when you add more than one shape mask to a correction?
8. If you add a shape mask to a correction with a color mask to create three masked areas—one with the color mask only, one with the shape mask only, and one where they intersect—which area will be adjusted if you use the Color Board?
9. How do you animate a shape mask?
Answers
1. A correction that’s limited to a specific area of the image
2. Color masks let you isolate a color, while shape masks isolate a portion of the frame using a shape.
3. Shift-drag in the Viewer to add to the sampled area.
4. Option-drag in the Viewer to subtract from the sampled area.
5. It adjusts the edge softness of the sampled range of color.
6. Yes
7. All masks are added together.
8. The area where the shape and color masks intersect
9. Add keyframes to the Shape Mask parameter in the Video Inspector, or use the Adjustments pop-up menu in the Timeline.