Lesson 8. Transformations, Effects, and Titles
In addition to compositing video clips with graphics and generators using transparency, keying, and blend modes, Final Cut Pro X includes tools for transforming clips. You can change the position, scale, rotation, and other attributes of any clip interactively in the Viewer, or by entering specific values in the Inspector. These tools let you choose only a portion of a video or graphic, and place it exactly where you want it.
You can also control the appearance of your video by choosing from a large variety of effects that can distort, blur, stylize, tile, or colorize video in many ways.

Finally, you can use titles to communicate key messages to your audience by leveraging the vast number of text animations provided with Final Cut Pro X. You can use them “as is” or modify them to create highly customized and animated titles. And you can use roles metadata to easily work with multiple language versions of your project.
In this lesson, you’ll use transform tools, effects, and titles to give your show open a unique look and polish.
Transforming Clips
In the previous lesson, you keyed the clips of Justine onto background graphics, but the layout could still use some work. Each shot of Justine is dead center on the screen with too much empty headroom. To achieve a more dynamic feel and create room to add titles, you can transform the clips by changing their scales and positions, either directly in the Viewer or in the Inspector. You’ll use the Show Open compound clip you started building in the last lesson.
Note
If you didn’t complete the previous lesson, you’ll find a completed project on the APTS FCP X ADV Part 2 mounted disk image. Open the Lesson 8 folder and double-click the Lesson 8 Start project to open it into the Timeline.
1. Select the first video clip in the Timeline, Justine_funny_spin.
At the lower left of the Viewer are three buttons that allow you to apply effects and change the clip directly in the Viewer. You can transform, crop, or distort a clip.
2. Click the Transform button to apply the Transform effect.

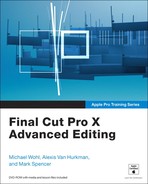
The button turns blue when it is selected. In the Viewer, a bounding box appears around the clip with blue control handles at the corners and midpoints of each side. At the upper left of the Viewer are controls for setting and navigating keyframes. (You’ll work with these in the next lesson.) And at the top right is a Done button for exiting the Transform effect.
Let’s increase the scale of the clip so that Justine fills more of the frame, and then move the clip to the right to make room for text you’ll add later. First, you may need to zoom out so that you can see, select, and move the control handles.
3. Click the Viewer zoom level and choose a value that allows you to see all the control handles.
Note
Depending on your screen resolution, you may require a different zoom level than the one shown in the screenshot.
4. Drag out any corner control handle to increase the size of the clip. Then drag inside the clip to reposition it up and toward the right side of the frame.

Note
Dragging a corner control handle scales the clip proportionally, but dragging an edge control handle scales the clip only horizontally or vertically. Shift-dragging a handle reverses this default behavior for both types of control handles.
5. Click Done to turn off the Transform effect.
Tip
You can also click the Transform button again to turn off the effect, or press A to return to the Select tool.
That looks better, but what exactly did you just do? How much did you scale the image and how far did you move it? The Inspector provides the answers.
6. If the Inspector is not already open, click the Info button in the toolbar, or press Command-4. Click the Video tab, if necessary, and scroll down to the Transform section. If it’s closed, click the word Show that appears when you move your pointer over the title bar.

Here, you can view, change, and even reset all the Transform parameters.
7. Click the Reset button (the curved arrow) to return all the Transform parameters to their default values. Then press Command-Z to undo.
The Reset button is a convenient way to restore your video clip to its original position, scale, rotation, and anchor point settings.
For consistency, you’ll make Justine the same size in each clip. To make this value easier to remember, let’s change the current Scale value to a round number.
8. Click the Scale field, type 115, and press Return.
To change the Transform parameters in the Viewer, you clicked the Transform button to enable the Transform effect. But in the Inspector, you can make these changes without enabling the Transform effect.
Applying transformation changes in the Viewer is more direct and intuitive, but you can make more precise changes in the Inspector.
9. Set the Viewer zoom level to Fit, and in the Timeline, select the second clip, Justine_flip_roar.
Tip
When the Viewer is the active window, press Shift-Z to fit the Viewer to the window.
Since you’ll be transforming the clip in the Inspector, you no longer need to make it smaller in the Viewer to access the control handles.
10. In the Inspector, scroll down to the Transform section and change Scale to 115%. Then, drag left in the Position X field to move the clip to the left. Drag right in the Position Y field to move the clip up a little. However, make sure you don’t reveal the lower edge of the clip.

Tip
Option-drag in a parameter’s value field in the Inspector to change the value more slowly, allowing for finer adjustments. Command-drag to change the value more quickly, allowing for very large adjustments.
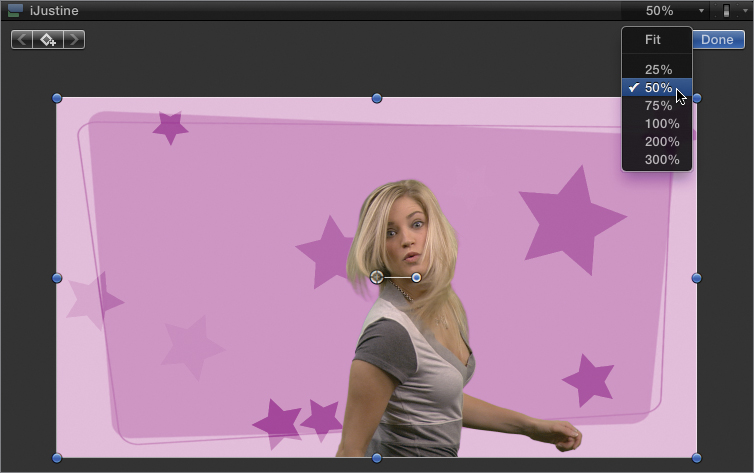
11. In the Viewer, enable the Transform effect once again, and experiment by changing the Anchor Point and Rotation properties in the Inspector. Then press Command-Z to undo the changes.
The anchor point is in the middle of the bounding box, represented by a control handle that extends to the right. It is the point around which a clip scales and rotates. You can drag the handle to rotate the clip.
Tip
When rotating a clip, Shift-drag to snap the rotation values to 45-degree increments.
The next clip must remain centered to suit the animation you’ll create later, but you can change its scale to match the first two clips.
12. Select the third clip in the Timeline, Justine_selects, and change its Scale to 115%.

13. Select the upper copy of the last video clip in the Timeline, Justine_turn_look.
This clip was shot with the camera zoomed in, so it needn’t be scaled. You’ll move it to the left to make room for the final title.
14. In the Inspector, change Position X to –50.
Note
These Position X and Y values in the Inspector represent the percentage of the height of the clip. So a value of -50 moves the clip to the left 50 percent of its height.
The duplicate clip no longer aligns with the original. You could individually enter the same value for the lower clip, but the Inspector allows you to transform multiple clips at the same time.
15. Press Command-Z to undo the previous position change. Then in the Timeline, drag a selection rectangle to select both of the Justine_turn_look clips, and in the Inspector, change Position X to –50.

The value change is applied to both clips at the same time, and they stay perfectly aligned.
You can also crop and distort clips in both the Viewer and the Inspector. Although you don’t need to apply these effects here, understanding how they work is useful.
16. In the Viewer, click the Crop button to enable the Crop effect and experiment with the onscreen controls, as well as changing the parameters in the Inspector. In the Inspector, click the Reset button to reset all the parameter values when you are done. Also enable the Distort effect and experiment by changing its parameters.
Each Justine clip now has a more visually dynamic and pleasing composition, plus you now have room to add titles to three of them. Before adding those titles, however, let’s stylize each of the clips with some effects.
Working with Effects
You applied several keying effects in the previous lesson, but Final Cut Pro includes many other effects that allow you to create interesting looks for your footage. Once applied, many effects have parameters you can use to customize their results. You can even combine effects, and change the end result by switching their stacking order. In this exercise, you’ll apply a variety of effects to give your show open a more stylized look.
Browsing, Previewing, and Applying Effects
Let’s take a deeper look at the variety of effects available in Final Cut Pro X.
1. In the Timeline, select the first video clip.
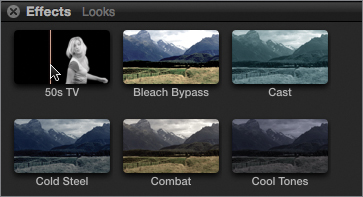
2. In the toolbar, click the Effects button (or press Command-5), and select the Looks category.

This category includes 25 effects to give your footage a specific visual character. To see more effects onscreen at once, you can hide the category names.
3. At the lower left of the Effects Browser, click the Show/Hide button.

4. Skim a few of the Looks effects to see how they appear on the first shot of Justine.
As with the Keying effects, the preview thumbnail is replaced with the shot of Justine with the effect applied, and the shot also appears in the Viewer with the effect preview applied.
Note
The effect preview in the thumbnail and the Viewer shows just the selected clip, separate from any other composited clips.
5. Scroll down to the last row of the Looks effects, and locate the Teal & Orange effect. Double-click it to apply it to the selected clip.
Tip
You can also drag an effect onto a clip. When dragging, you don’t need to select the clip first. If you select multiple clips before double-clicking an effect, that effect will be applied to all the selected clips.
The Teal & Orange effect creates an interesting look. Let’s leave it in place for now.
6. In the Timeline, select the second video clip.
7. In the Effects Browser, click the Show/Hide button to show the category names. Select the Stylize category.
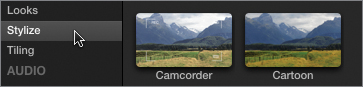
While most of the effects in the Looks category change only the colors of a video clip, these 22 effects add textures, graphics, and even animation.
8. Preview a few of the effects. Then, locate the Graphic effect and apply it to the second Justine clip.

This effect’s default parameters create an extreme black-and-white version of the image, which looks interesting but may be too different compared to the other clips. You’ll readjust these effects shortly; but first, you’ll apply an effect to each of the last two clips.
9. In the Timeline, select the third video clip, and in the Effects Browser, select the Basics category.
The Basics category contains some of the most useful and versatile effects.
10. Preview several of the effects, and then apply the first Basic effect, Black & White, to the selected clip.
Later, you’ll isolate this effect so that Justine will appear in color inside the shape she draws in front of her, and black and white outside the shape.
11. In the Timeline, select the top copy of the last video clip, and from the Basics category, apply the Hue/Saturation effect.

The default settings of the Hue/Saturation filter make the shot of Justine pop with color.
Now that you have applied an effect to each clip, let’s see how to modify them.
Modifying and Combining Effects
Some effects are pretty much “what you see is what you get,” while others include adjustable parameters that can create many different looks. Let’s see how you can alter the effects you’ve applied.
1. Select the first video clip. Open the Inspector, if necessary, and locate the Teal & Orange effect controls.
The Amount parameter is set to 50 by default.
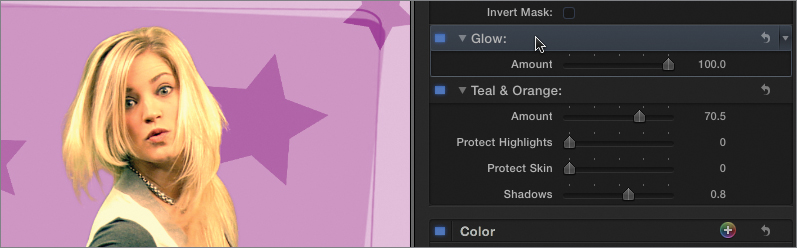
2. Drag the Amount slider to increase its value to 100, and then experiment with the other parameters.

Notice that when you adjust the Protect Skin parameter, it removes the Teal & Orange effect from Justine’s skin. In this case, it just barely affects her gray clothing, so you can return its value to 0.
Having played with the other parameters, you may have noticed that the overall impact of the effect is a little too intense with an Amount value of 100.
3. Set Protect Highlights back to 0. Set Amount to about 70, and Shadows to about 0.8, and then toggle the effect visibility off and on by clicking the blue checkbox next to the effect name. Because your eyes quickly adjust to an effect, it’s easy to forget how much it impacts a clip until you turn it off.
You can also apply multiple effects to a single clip. While the order of the effects can change their impact, it’s easy to reorganize them.
4. In the Effects Browser, select the Light category, and add the Glow effect to the first video clip.

The Glow effect appears in the Inspector below the Teal & Orange effect. Effects are applied in the Inspector from the top down. In this case, the stacking order blows out the highlights in Justine’s face and hair to a complete white.
5. In the Inspector, drag the Glow effect above the Teal & Orange effect.
The hair highlights now have more detail, but they have turned too yellow, and this combination of the two effects causes the overall image to be overly bright.
6. In the Teal & Orange effect parameters, drag the Protect Highlights slider all the way to the right and the Shadows slider all the way to the left. Toggle each effect on and off to see its impact.

That looks better. Let’s move on to the next clip.
7. Select the second video clip, and in the Inspector, locate the controls for the Graphic effect.
Tip
You can click the disclosure triangles to hide added effects in the Video Inspector and reduce the need for scrolling. You can hide the parameter controls for the default Color, Transform, and other properties by placing the pointer over the top edge of each effect’s title bar and clicking the word Hide when it appears.
8. Set the Amount to about 50.

Decreasing the Amount value reintroduces some color into the clip and makes its appearance more consistent with the first clips. Still, it’s different enough to indicate a new “look.”
Note
In the next lesson, you will animate parameters of this effect so that it changes over time.
You don’t need to adjust the Black & White effect on the third clip, but the last clip could use some tweaking.
9. Select the top copy of the last video clip.
10. Try adjusting the Hue/Saturation effect parameters, turning the effect off completely, changing the blend mode or the opacity of the clip, or using a combination of these adjustments to get a look that you like.
Tip
Press V to temporarily disable the top clip and see just the bottom clip.
By combining effects with blend modes and opacity levels, you have a great deal of control over the look of your footage.
11. Experiment with different effects and combinations of effects on each of the video clips. There is no right answer here. Just make sure to leave the third clip with only the Black & White effect applied because you’ll continue to work with it in the next lesson.
Creating Titles
The written word can support, clarify, and amplify the communication of your video and graphics. And by animating that text, you increase your viewer’s attention.
To be effective, all text and its animation should support the look and feel of the video. The Final Cut Pro Titles Browser contains myriad animated text options, all of which can be customized in the Viewer and the Inspector.
In this exercise, you’ll browse, apply, edit, and stylize an animated title. Then you’ll build your own text animation using another title as a starting point. You’ll finish by creating Spanish versions of your English titles, and you’ll use roles and subroles to organize, view, and export those titles.
Modifying Titles
Your show open will have four titles, one for each video clip. The first three will be “teaser” titles, describing different aspects of iJustine’s character: Bold, Brash, and Colorful. The last title will display the name of the show (iJustine) and its time slot (Tuesdays 8pm).
1. In the Timeline, move the playhead to the frame in the last video clip where Justine freezes, at about 10:05. This is the frame where the title should begin animating onto the screen. (Note that no clips need to be selected.)
Tip
To locate this frame precisely, you could select one of the copies of the final video clip, press Command-R to show the Retime Editor, and place the playhead at the start of the Hold segment.
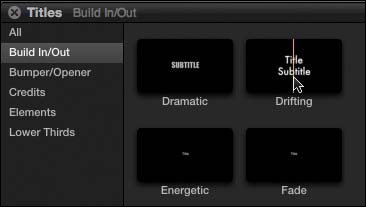
2. In the toolbar, open the Titles Browser.

The Titles Browser contains over 160 title styles, organized into five categories. Most of the titles animate, and you can preview and modify all of them to suit your needs.
3. Select a few categories and skim the thumbnails slowly to preview several titles.

Some titles include animated graphics. Some are part of a theme, as indicated by the theme name below a divider bar.
Tip
Titles and transitions that are part of a theme are also available in the Themes Browser, which you can open by clicking the Themes button in the toolbar.
For this show open, you don’t need any additional graphics, just an animated title.
4. Select the Build In/Out category, and skim the Drifting thumbnail to preview the title animation. This title could work well as a starting point.
5. Click the Drifting thumbnail to select the title, and press Q to connect it to the primary storyline at the playhead position. Instead of pressing Q, you can also drag a title to the Timeline.
If you don’t select the title before pressing Q, the last selected clip in the Event Browser is edited into the Timeline.
Tip
Two titles—Basic Title and Basic Lower Third—can be added to the Timeline by choosing Edit > Connect Title, or pressing Control-T for the Basic Title or Shift-Control-T for the Basic Lower Third.
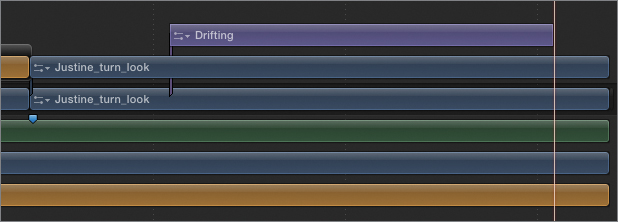
The title appears in the Timeline as a purple bar with its name, Drifting, and a line connecting it to the primary storyline.
6. Click the purple bar to select the title, and press / (slash) to play the title.
The title animates onto the screen, drifts, and then animates off. If you enabled looping (choose View > Playback > Loop Playback, or press Command-L), it will continue to play. However, the repeating music track can be distracting.
7. Select the green Two Seater Short audio clip. Choose Clip > Disable, or press V, to disable the clip. Then reselect and play the title clip.
You can now concentrate on the title design in silence. As a first step, the title might look more integrated into the scene if it animated onto the screen from behind Justine.
8. Shift-drag the Drifting title below the two Justine_turn_look clips.

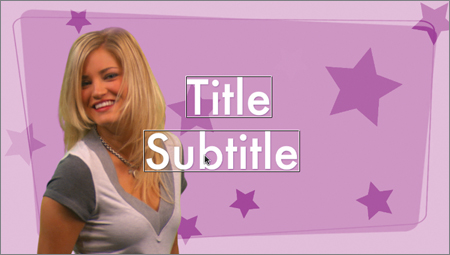
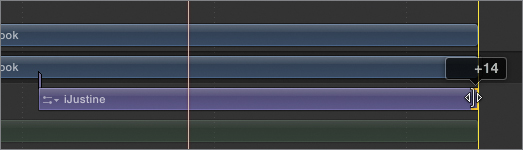
The title now animates behind Justine. The white borders around each line of text indicate that you can change the text directly in the Viewer. You can even independently change the position of each line of text.
9. With the playhead near the middle of the title clip (so that you can see most of the text in the Viewer), double-click the word Title and type iJustine.
Notice that while you are in text-entry mode the box around the text is replaced by a white underline, and a control handle appears at the midpoint of that line.
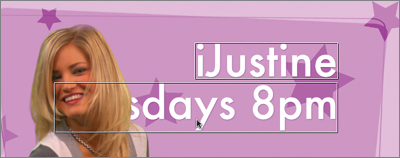
10. Drag the control handle to move the top line of text up and to the right.

11. Double-click the Subtitle text, and type Tuesdays 8pm. Drag this title below and slightly to the left of the iJustine title, and then press Esc (Escape) to exit text-entry mode.
Clearly, the font is too large for this second line of text. You can change its size and other attributes of the text in the Inspector.
12. Open the Inspector by pressing Command-4, if necessary, and click the Title button.

Remember, like the effects, transitions, and generators you’ve been working with, all of these titles are Motion projects. The Title Inspector contains only those parameters that the Motion title designer published to Final Cut Pro X. Sometimes they are duplicates of parameters in the Text Inspector.
For this title, you can quickly change its font, size, and color in the Title Inspector. You can also turn off the incoming and outgoing animations.
13. In the Title Inspector, from the Line 1 Font pop-up menu, choose the Coolvetica font.

Each font listed in the pop-up menu appears in the correct style, and as you scroll through the list, the text in the Viewer updates so you preview each font in context.
Note
The menu includes all the fonts installed on your system, so your menu may differ from the previous screenshot.
14. Change the Line 2 Font to Helvetica and the Line 2 Size to 100. Then, double-click the second line in the Viewer and drag the control handle to move this line closer to the first line. Press Esc to exit text-entry mode.
15. In the Title Inspector, click the arrow next to the Line 1 color well and change the color of the iJustine text to a deep purple. Then, play the title.
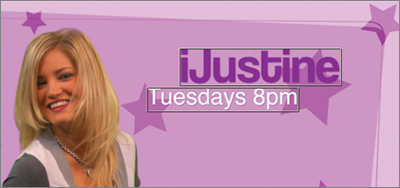
The font, size, position, and color of the text all look good, as does the incoming animation. However, because this is the last shot and the text is the key information you want the viewers to read, it shouldn’t animate offscreen.
16. At the top of the Title Inspector, deselect the Build Out checkbox.
Now the text continues to drift right to the end of the title. However, the title is a little shorter than the video clip.
17. Stop playback, and in the Timeline, trim the end point of the title clip to match the end points of the video clips above it.
The text could use a more prominent drop shadow to separate it from the background. Text attributes not available in the Title Inspector are found in the Text Inspector.
18. In the Inspector, click the Text button.
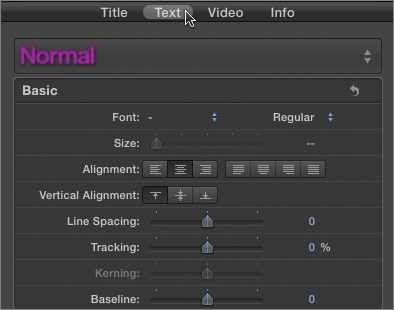
While the parameters available in the Title Inspector will differ from title to title (depending on which parameters the title designer published in Motion), the parameters in the Text Inspector are always the same. Here, you can change the basic formatting of the text (including the Font and Size parameters that you already adjusted in the Title Inspector), as well as the style of the text, including its Face, Outline, Glow, and Drop Shadow parameters.
19. Move the pointer over the Drop Shadow title bar, and click the word Show when it appears. Then increase Blur to 6 and Distance to 20.
A soft drop shadow sets the text off from the background.

When nothing is selected in the Viewer, parameter changes made in the Text Inspector affect all lines of text. To change a specific line of text, select it in the Viewer before changing parameters in the Text Inspector. You can also change individual characters or a range of characters by first selecting them in the Viewer.
20. Press / (slash) to play the title.
The titles are looking good! Now let’s take advantage of all the work you’ve done to make it easier to create the remaining three titles.
Using Text Styles and the Custom Title
Final Cut Pro includes a variety of text styles to apply to your text. You can also save your own text styles and apply them to text in any generator or to the title of any project. In the next exercise, you’ll save the iJustine text style to use as you build the three remaining titles for this project. And instead of using a title that is already animated, you’ll use a custom title that lets you design your own animation.
1. In the Viewer, double-click the iJustine text to select it. Then, in the Text Inspector, click the Style pop-up menu (the bar at the top that reads Normal).
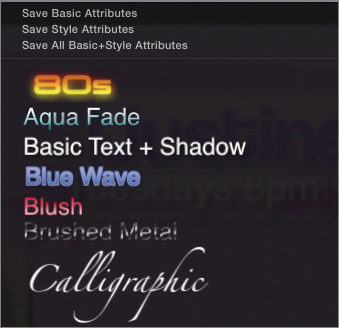
From this menu, you can choose a preset text style or you can save your own.
2. Choose Save All Basic+Style Attributes, name the preset iJustine, and click Save.

Choosing Save All saves the preset with both the basic font information (font, size, and alignment) and the Style attributes (face color, drop shadow, and so on). Let’s apply this preset to a new title template.
3. In the Timeline, move the playhead over the first video clip and place it on the frame where Justine freezes, at about 0:23.
4. In the Titles Browser, in the Build In/Build Out category, select the Custom title. Press Q to connect it to the primary storyline at the playhead position. Then, trim the end point of the title to match the end point of the first video clip.
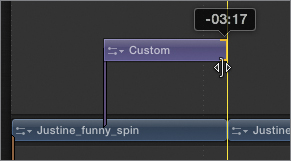
The title now matches the duration of the Hold segment. Let’s apply the new text style to it.
5. In the Timeline, select the Custom title. In the Text Inspector, from the Style pop-up menu, choose the iJustine style that now appears in the list.

The font, size, color, and drop-shadow settings all change to match the saved text style. That’s quite a timesaver! However, the title still needs a few tweaks to work in the context of this video clip.
6. In the Viewer, double-click the text and type Bold. Then move it to the left, press the Esc key, and increase the Size to about 350. Press / (slash) to play the title.

By default, the Custom title isn’t animated. Rather, you choose the parameters you want to animate.
7. Stop playback. In the Inspector, click the Title button.

The Title Inspector contains a long list of Published Parameters. The first 13 parameters start with the word In and control the title’s animation onto the screen. The next 13 parameters are exactly the same except that they start with the word Out and control the title’s animation off the screen. You’ll just animate the title onto the screen by first animating its Opacity value.
8. Drag the In Opacity parameter slider to 0, and then press / (slash) to play the title clip.
Each letter of the word Bold now starts with an opacity of 0% and animates to an opacity of 100%, one after the other.
9. Stop playback and increase the In Scale parameter to 400%. Play the title.

Now each letter starts at 0% opacity and 400% scale and animates to 100% opacity and 100% scale, thereby creating the appearance of floating down onto the screen. Because text scales from its baseline, each letter starts high on the screen. You can use the Position parameter to center them.
10. Stop playback and drag left in the In Position Y field to about –25 as you watch the animating character in the Viewer move down until it’s centered horizontally with the characters that have finished animating. Play the title.
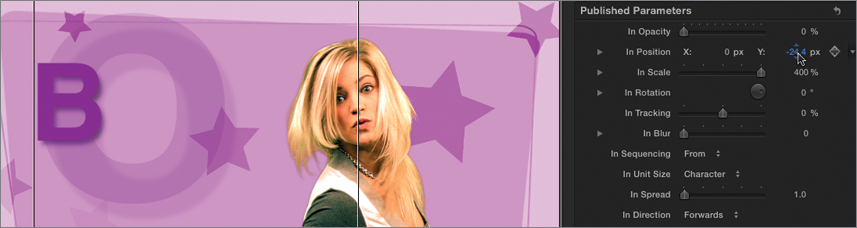
11. Stop playback. To add a little more spice to the animation, change the In Rotation value to –90 degrees. Play the title.

Now each character starts rotated 90 degrees clockwise and spins into place as it scales down, fades up, and moves up.
Currently, each letter completes its animation before the next one begins, which can feel a little “clunky.” The In Spread parameter determines how many characters are animating at once.
12. Stop playback, change the In Spread value to 3, and play the title.

The animation lasts for the same total duration (determined by the length of the bar in the Timeline); but at any point in time, three letters are animating at once. In other words, the animation spreads across more characters, resulting in a smoother animation sequence.
However, it still takes too long for the animation to complete. The clip ends before the animation is finished!
13. Stop playback and reduce In Duration from the default value of 40 to 12 frames.
The title now animates on in just 12 frames. The snappier animation matches the feel that you want and gives the viewer enough time to read the word.
From this point, it’s quick and easy to apply copies of this title to the next two video clips.
14. Press Command-C to copy the selected Bold clip, move the playhead to the first Hold segment of the second video clip (at about 3:11), and press Command-V to paste a copy of the clip, which will connect to the primary storyline at the playhead.
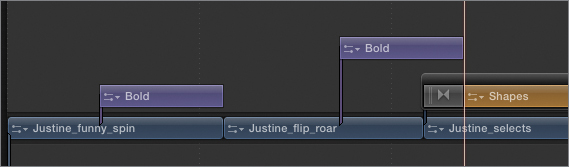
15. Trim the copied title to match the end of the second video clip. Then select the title, and edit the text to read Brash. Reposition the title next to Justine and adjust the font size as necessary. Feel free to play with the animation settings to create a different animation.

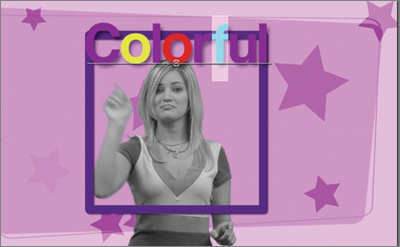
16. Move the playhead over the third clip on the frame where Justine finishes expanding the imaginary square and looks at the camera, at about 7:00. Paste a copy of the title here, trim it to match the end of the video clip, and change the text to read Colorful. Drag it directly above Justine. Adjust the font size to fit the box. Select each letter, and in the Face section of the Text Inspector, assign a new color to every other letter. Again, feel free to adjust the animation.
Note
You’ll make Justine herself appear “colorful” in the next lesson.
17. Select the audio clip, press V to enable it, and play the full project.
Note
Depending on your hardware, you may need to render the project to play it at the full frame rate. To do so, choose Modify > Render All, or press Control-Shift-R to render the project.
You’ve integrated titles into your show open that match the look and pacing of the video and background graphics. As a final step, you’ll use the powerful roles feature to create an alternate version of the titles in another language.
Using Roles with Titles
Roles allow you to tag audio clips based on the contents, such as dialogue, music, or effects. But roles can also be used on clips and titles. For example, many shows are produced in multiple languages for international viewing. You can create and assign subroles to different versions of a Titles role, and then enable just the language you want to view or export.
For your show open, you’ll first create copies of each title and translate them into Spanish. Then you’ll create new English and Spanish subroles for the Titles role, and assign these subroles to the appropriate titles. Finally, you’ll learn how you can export different language versions of your show open.
1. In the Timeline, select the first title, Bold. Press the Up Arrow to move the playhead to the start point of the title. Press Command-C to copy it and then press Command-V to paste a copy directly above it.
Note
If the copied upper clip is positioned one frame before the lower clip, press Command-Z to undo, press the Right Arrow key to move forward one frame, and press Command-V to paste.
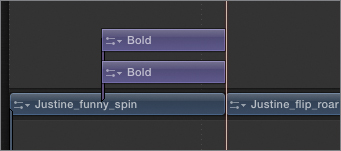
2. Select the lower Bold clip, and press V to disable it. Then select the upper Bold clip, and in the Viewer, change the text to Audaz, which is the Spanish word for “bold.” Adjust the font size and title position as necessary, and press Esc to exit text-entry mode.

Tip
In addition to working in the Viewer, you can also change text in the Text Inspector’s Text box.
By disabling the lower copy of the title, you have an unobstructed view of the top copy. Because the Spanish translation contains more characters, you need to reduce the font size.
3. Repeat the previous two steps with the next title. Duplicate the Brash title, disable it, change the duplicate to read Pintoresca, and adjust the font size and position as necessary.

Tip
You may find it easier to change the font size before typing the new characters because the Spanish word is so much longer than the English word.
4. Repeat the steps with the next title, replacing the copied title Colorful with Atrevida.
Tip
If you select and replace one letter at a time, you can maintain the unique face color of each letter. Fortunately, in this case, the translated word has the same number of characters.

5. For the final title, once again copy and paste it with the playhead on the first frame, and change only the Tuesdays 8pm line to read Martes 20:00. Press the Esc key.
Instead of copying and pasting each title individually, you could select all the titles, and with the playhead located at the start point of the first title, press Command-C and then press Command-V to create a copy of every title on top of itself.

6. Select one of the lower English titles, then Command-click the others to select them all. Press V to enable them all. Then click in an empty area to deselect everything.
Rather than selecting every title in a language to disable or enable them, you can use the power of roles. To do so, you will start with every title enabled.
7. Press Shift-Z to fit the Timeline to the window. At the lower left of the Timeline, click the Show/Hide Timeline Index button, or press Command-Shift-2.
8. In the Timeline Index, click the Roles button, if necessary, and then select the Titles role.
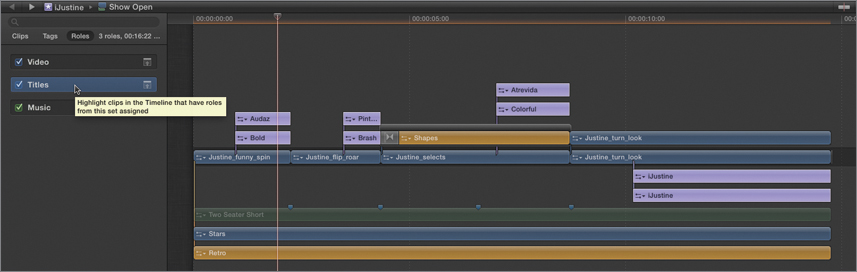
All the titles in the timeline are highlighted because they all are assigned to the Titles role. To distinguish between English and Spanish titles, you’ll create subroles.
9. Choose Modify > Edit Roles to open the Role Editor.
10. In the Role column, select the Titles role. Then, in the Subrole column, click the Add (+) button twice to create two new subroles. Name the first subrole English and the second Spanish.

With the subroles defined, you can assign them to the appropriate titles.
11. Click OK to close the Role Editor. In the Timeline Index, click below all the roles to deselect the Titles role.
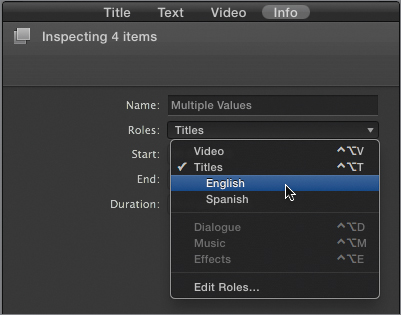
12. In the Timeline, select the first lower title (English), and then Command-click the other three English titles.
13. In the Inspector, click the Info button. From the Roles pop-up menu, choose the English subrole.
Tip
Alternatively, you could choose Modify > Assign Roles > English.
The new subrole is assigned to the selected titles, and appears in the Timeline Index.
14. Select all the upper titles (Spanish), and in the Info Inspector, assign the Spanish subrole. Now both subroles appear under the Titles role in the Timeline Index.
15. In the Timeline Index, deselect the English subrole.

Now only the Spanish titles are visible in the project because all the English titles are disabled. As you can see, by using roles you can quickly turn the titles for a specific language on or off, and then export a movie for a particular language.
You can also export the titles as separate tracks of a QuickTime movie.
16. Choose Share > Export Media.
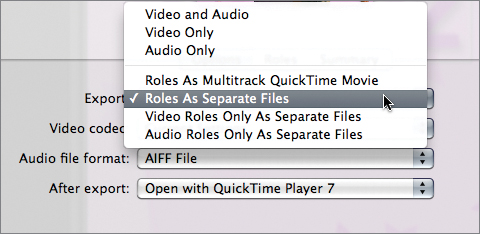
In the Export options, you can choose to export roles as tracks in a multitrack QuickTime movie or as separate files. You can also choose to include an alpha channel to export your titles with a transparent background.
17. Choose “Roles as Separate Files,” and from the Video Codec pop-up menu, choose ProRes 4444. Then, click the Roles button.

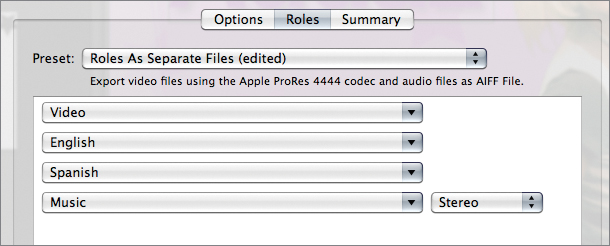
Here, you can choose which title subroles to export. By default, all titles will be exported, but for this project, you want to export English titles separate from the Spanish titles.
18. From the Titles pop-up menu, choose English. Click the Add Video File button, and from the pop-up menu, choose Spanish.
Now you will export each title language as a separate movie, so that it can be composited back into the show in another application.
19. Click Next, choose a location, and click Save to render the movies. Then, play the movie files.

Good work. You’ve applied the edited and keyed clips you created in the last lesson, and given your show open a better layout by transforming clips. You’ve also achieved a stylized look by adding effects, and added punch and meaning with animated titles. In the next lesson, you’ll complete your iJustine open by animating many of its other components.
Lesson Review
1. True or false: When dragging a corner control handle to scale a video clip with the Transform effect enabled, you need to hold down the Shift key to scale the clip proportionally.
2. How can you change the position or scale of a video clip without enabling the Transform effect?
3. Describe two ways to apply an effect to a selected clip.
4. When applying multiple effects to a clip, what determines the order in which the effects are applied?
5. In what two ways can you change the content of a title?
6. You’ve modified a line of text in a title by changing the font to Impact and the face color to red. You then saved a text style by choosing “Save Style Attributes.” When you apply this new text style to a title that is in the Helvetica font, will the font change to Impact? Will the color change to red?
7. What role is automatically assigned to titles by default and how can you tell?
8. Describe one way to create a new subrole.
Answers
1. False. You need to Shift-drag only when moving one of the control handles at the midpoint of a bounding box edge.
2. Change the Transform parameters in the Video Inspector.
3. Double-click the effect, or drag it onto the clip.
4. The stacking order of the effects in the Inspector. The effects are applied from the top down.
5. With the title in the Timeline selected, double-click the text in the Viewer to enter text-entry mode and type the new text; or, in the Text Inspector, type in the Text box.
6. The color will change to red but the font will not change. To change both, you need to choose Save All Basic+Style Attributes from the Text Styles pop-up menu in the Text Inspector.
7. Titles are assigned the Titles role, which you can see by opening the Timeline Index and selecting the Titles role. This action will highlight all the titles in the Timeline. Or, you can select a title, and in the Info Inspector, the Roles pop-up menu will identify the assigned role.
8. Choose Modify > Edit Roles; or in the Info Inspector, from the Roles pop-up menu, choose Edit Roles. Then, select the role, click the Add (+) button in the Subrole column, and name the new role.
Keyboard Shortcuts
