Lesson 19. Audio Encoding
Lesson Files
None
Media
Media > Advanced Authoring > Lesson 19
Time
This lesson takes approximately 60 minutes to complete.
Goals
Learn what formats of digital audio are compatible with DVD Studio Pro
Explore AC-3 files and discover how they produce such tiny yet great-sounding audio streams
Discover how to choose data rates for your AC-3 streams
Explore dialog normalization
Learn about dynamic range compression profiles
Use downmix settings to turn a 5.1 surround stream into an appropriate stream for stereo playback
There’s an old saying in the video world: Video is two-thirds audio. You can spend a great deal of time encoding perfect MPEG-2 streams, and your menus might be fun and engaging, but if your title’s audio constantly peaks into distortion, or if you improperly encode an AC-3 (Dolby Digital) file so that its volume levels surge up and down (gain pumping), your carefully authored DVD will end up as a drink coaster. Audio is vital part of your project, and consequently it’s incredibly important to get it right.
Fortunately, producing great-sounding audio streams is easy. It just takes a little practice. To help you on your way, this chapter details how to use Compressor to produce professional-quality, tightly compressed audio streams for use in your DVD Studio Pro projects. But be forewarned—creating AC-3 files takes practice, and also a practiced ear. Still, if you follow a few basic rules, much of the mystery behind Dolby Digital files will fade away, leaving you with audio that sparkles time after time.
Audio Formats for DVD-Video
DVD Studio Pro supports all of the following DVD-Video-compliant digital audio formats. DVD-Video-compliant means they are part of the DVD-Video specification, and are thus legal for use in DVD-Video titles:
• PCM—PCM stands for pulse code modulated, or uncompressed, digital audio. For example, AIFF, WAV, and SDII (Sound Designer 2) files all fall into the PCM category. For DVD-Video, PCM files must use a sampling rate of 48 or 96 kHz, at a bit depth of 16-bit, 20-bit, or 24-bit. PCM is a mandatory audio format for DVD-Video.
• AC-3—Also called Dolby Digital, AC-3 is a common 5.1 surround sound format. Like PCM, AC-3 is a mandatory audio format for DVD-Video, and every DVD player manufactured for the Western world must support this format. So if you deliver nothing but Dolby Digital audio streams on your discs, you can be sure your viewers will hear them.
• MPEG1-Layer 2—MPEG1-Layer 2 is a format of audio compression common on PAL DVDs. MPEG1-Layer 2 supports 5.1 surround sound and data rate compression but is not a mandatory audio format for DVD-Video.
• DTS—DTS is a high-quality surround format that offers higher data rate settings than AC-3, but DVD players are not required to have a DTS decoder. DTS streams are typically included as “optional” sound tracks, along with an AC-3 or PCM stream.
Note
The DVD Studio Pro Simulator does not have a DTS decoder. If you need to hear how a DTS audio stream sounds, you must burn a DVD disc and play it in a DVD player that supports DTS playback.
Of the formats just discussed, DVD Studio Pro comes with all the tools necessary to work with PCM and AC-3 files. If you want to use MPEG1-Layer 2 or DTS files, you’ll have to look elsewhere for encoders.
The remainder of this chapter focuses on PCM and AC-3 digital audio.
Using Digital Audio Files in DVD Studio Pro
You just learned about all of the DVD-Video-compliant digital audio formats that DVD Studio Pro supports, but what about noncompliant formats such as MP3, AAC, or even 44.1 kHz PCM files ripped from an audio CD?
Well, guess what? DVD Studio Pro will actually let you work with noncompliant as well as compliant digital audio. In fact, DVD Studio Pro has a great built-in encoder that can transfer any format of audio that QuickTime understands into 48 kHz, 16-bit stereo PCM files (AIFF) that are DVD-Video-compliant.
1. In DVD Studio Pro, create a new, empty project.
2. From this book’s companion DVD-ROM files, locate the Media > Advanced Authoring > Lesson 19 > MP3_Audio folder.
This folder has a single MP3 file in it: trailer.mp3.
Tip
To open a Finder window over DVD Studio Pro, click the Finder icon in the Dock.

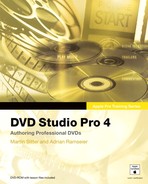
3. Drag trailer.mp3 from the MP3_Audio folder directly into the Assets container.

DVD Studio Pro imports the file and converts it to a 48 kHz AIFF. Take a look at the MP3_Audio folder, and notice the new folder inside it, called MPEG.
4. Open the new MPEG folder and take a peek inside.

Notice the new AIFF file in this folder. This is the converted, 48 kHz, 16-bit stereo PCM file that DVD Studio Pro will use when it builds the project. As you can see, DVD Studio Pro quite handily converts any type of audio that you drag into the Assets container, including MP3, AAC, IMA 4:1, and even 44.1 kHz audio files ripped from audio CDs. Basically, if QuickTime can play the file, DVD Studio Pro will import and convert it.
Tip
If you need to convert several audio files to 48 kHz from another format, use DVD Studio Pro. Just drag the files into the Assets container, go to the new MPEG folder, and harvest your converted audio files. This works great when, for example, you need to convert a few audio streams for editing in a 48 kHz Timeline in Final Cut Pro.
Note that by default, DVD Studio Pro encodes new files to the same folder as the source file, but you can change this functionality by using the Destinations pane in the Preferences window. Here you can choose to encode to the same folder as the source asset, to the project bundle itself, or to a specified or fallback folder.

When you select the Project Bundle option, DVD Studio Pro sends all encoded files into the project bundle—that is, to the file created when you first saved the project you’re currently working on. You may access these files by Ctrl-clicking the project bundle and choosing Show Package Contents from the shortcut menu to tunnel into the project bundle.
Saving to the project bundle is a good way of consolidating all encoded assets to the same place on your hard disk(s), which is great for backing up projects but can result in huge project bundles. Additionally, if you select the project bundle as your encode destination, make sure you save your project before importing any files that need to be converted. Why? DVD Studio Pro needs to know where to place the encoded files, and if you haven’t saved the project, there’s no project bundle to store the encoded files. However, this problem isn’t a show-stopper, because if the project is not saved, all encoded files will be sent to the fallback folder until you press Cmd-S to save that project.
About AC-3 Files
You just learned that AC-3 files are a mandatory digital audio format for DVD. In other words, all DVD players must support AC-3 playback. But AC-3 goes far beyond being just a standard. It also includes playback controls not available to the other formats. For example, AC-3 files incorporate a dynamic range control setting, as well as a volume control circuit (dialog normalization) that is designed to automatically adjust dialog levels between different audio streams.
Encoded Data and Control Parameter Settings
When an AC-3 file is created, two different types of data are wrapped into the package: encoded data and control parameters.
Encoded data settings control things like the number of channels in the file or the data rate—parameters that are “hardwired” with the file and cannot be changed after encoding is finished.
Control parameter settings are simply playback hints sent with the AC-3 file that tell the playback device how to play the encoded data. For example, the file’s compression preset and downmix settings are all included as control parameters with the file, and they are interpreted by the playback device when the disc is played. Most control parameters can be overridden or altered by the playback device.
The following table lists encoded data settings and control parameters settings:
Encoded Data vs. Control Parameter Settings

Note
In the Disc Setup pane of the Apple DVD Player Preferences window, you can choose to disable Dolby dynamic range compression. This option overrides the included compression profile control parameters to help you avoid gain pumping—dramatic and unexpected fluctuations in volume—as a result of incorrectly encoded AC-3 streams.

Frequency Masking
AC-3 files gain significant data reduction through a process of perceptual coding algorithms that selectively remove frequencies we can’t hear from the final AC-3 stream. This process is based on frequency masking.
To get a sense of what this means, consider the following example. You’re talking to a client on your cell phone, and a cement truck drives by. The rumble of the cement truck is loud, and it overrides your client’s voice on the cell phone. Even though the client’s voice is in a much higher frequency range than the rumble of the truck, loud sounds in one frequency range tend to override quieter sounds in adjoining frequency ranges. This phenomenon is called masking, and it lies at the heart of the AC-3 encoder.
When the AC-3 encoder creates a stream, it begins by separating the audio frequency spectrum into thousands of tiny bands. It then searches these bands to find which ones are relatively loud, compared with their neighbors. Bands that are so quiet they will not be heard are entirely removed from the stream. Consequently, AC-3 is a lossy compression process, because you can never get back the bits of audio—or the frequency ranges—that are thrown away.
Creating AC-3 Files with Compressor
The built-in encoder in DVD Studio Pro does not itself create AC-3 files. In other words, it will not transfer a PCM file to an AC-3 file. However, DVD Studio Pro does come with Compressor, and Compressor is more than up to the job of transcoding Dolby Digital files.
Let’s start Compressor now and set up to make an AC-3 file:
1. Choose Startup Disk > Applications > Compressor.
Tip
If you haven’t already added the Compressor icon to your Dock, do so now. With Compressor open, go to the Dock, Ctrl-click the Compressor icon, and choose Keep In Dock from the shortcut menu. Compressor will now be available right in the Dock, whenever you need it.
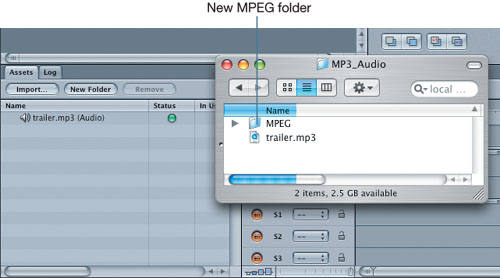
Compressor’s Batch window appears on the screen.

2. In the Batch window, click the Import Surround Sound Group button (or choose File > Import Surround Group, or press Shift-Cmd-I).
A Channel Assignment sheet drops down from the Compressor title bar.

Okay, now you’re ready to assign channels from a source digital audio file to be encoded. You’ll learn how this works in the next section.
Assigning Source Audio Channels
Compressor is a versatile encoder, and it can create files of one (mono) to six channels (5.1 surround). Your first decision after opening Compressor is, “How many channels will my final AC-3 file have?” Once you’ve decided, you set the audio coding mode—AC-3 terminology for the number and arrangement of the channels in the stream.
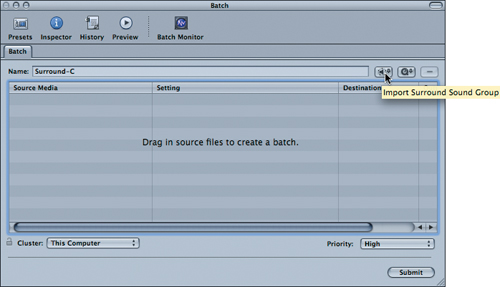
Right now, Compressor is displaying the input channel matrix, which is where you assign audio channels to be encoded. By default, the input channel matrix is arranged to reflect the speaker positions of a 5.1 surround sound speaker system. But don’t be fooled—you can encode any combination of audio channels, from 1 (mono), 2 (stereo), right up to 5.1 (surround). To demonstrate this, you’ll begin by using Compressor to encode a stereo file:
1. In the Channel Assignment sheet, click the L button (Left Front Channel).

A selection dialog opens and prompts you to locate the file to use for the AC-3 stream’s left channel.
2. Locate the file named Media > Advanced Authoring > Lesson 19 > AudioSlugs > –12TestTone.aif, and click Open.

The left channel of the file is assigned to the input channel matrix Front Left Channel button.
You can also drag and drop audio files from the Finder, directly onto input matrix channel buttons.
3. Open a Finder window over Compressor, and navigate to the –12TestTone.aif file.
4. Drag the –12TestTone.aif file directly onto the Right Front Channel button.

Compressor assigns the right channel from the AIFF file to the input channel matrix Right Front Channel button.
5. Click OK.
A new Surround group is added to the Batch window.

Creating a Dolby Digital Preset
You have a file imported into Compressor’s Batch window. That’s step one. But, there’s a massive step still ahead—you need to create a Dolby Digital preset to assign to this file, which is not a shallow task:
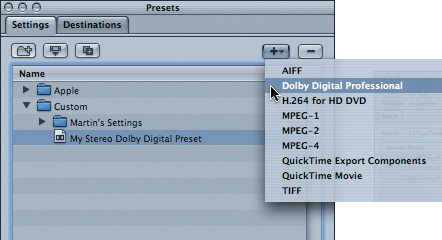
1. Press Cmd-2 to open the Presets window.
2. Click and hold the Create New Setting button, and then choose Dolby Digital Professional from the pop-up menu that appears.

A new Dolby Digital preset is added to the Custom settings group.
3. Double-click the new Dolby Digital preset.

The Inspector updates to show you the preset’s properties. In the following sections, you’ll use the Inspector almost exclusively as you learn about all of the important settings required to create proper, professionally encoded AC-3 streams. With that in mind, focus your attention now on this very important Compressor window.

Assigning the Audio Coding Mode
The first step in creating a preset is determining how many audio channels the preset will encode. You already imported a stereo file into Compressor as a surround sound group. To properly encode those two audio channels into a stereo file, you must tell the Dolby Digital preset to always encode only stereo files, which you’ll accomplish by setting the preset’s audio coding mode:
1. In the Name field, change the preset name to My Stereo Dolby Digital Preset.

2. Ensure that 2/0 (L,R) is selected in the Audio Coding Mode menu.

Notice there are many channel configurations, from 1 channel (mono) straight through to 5.1 (surround sound). This is an important consideration, because a preset using a stereo audio coding mode cannot be used to encode a surround file, and vice versa. In fact, other settings in the preset, including Data Rate and Downmix settings, depend upon the audio coding mode used. Consequently, you need to create different presets for each different type of audio you encode on your computer.
Choosing a Bit Rate
Dolby Digital’s biggest virtue is its capability to compress digital audio to make the file size smaller, while still maintaining high-quality sound. Although you could encode all AC-3 streams at the maximum setting legal for DVD-Video (448 kbps), doing so would create AC-3 streams that have a far bigger file sizes than needed. Instead, you should learn how to clamp down Compressor’s digital “vise” to squeeze the smallest possible file size out of your AC-3 files while still maintaining optimal sound quality.
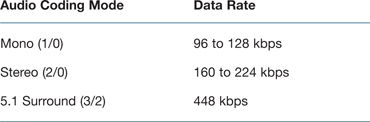
You can accomplish this by adjusting Compressor’s Data Rate setting. The data rate (or bit rate) you select will depend entirely upon the content of the source material you are encoding. For example, if you’re encoding a mono stream of narration only, you can use a lower data rate than you would use for a complete main mix (music and vocals) stereo file and still maintain high quality. Similarly, 5.1 streams, which have six channels of audio, need a higher data rate than stereo streams. For reference, the following table lists common data rates used with three common audio coding modes.
Note
There’s no hard and fast rule about which data rate to use. When in doubt, you may need to encode the same file with two or three different data rates and then audition the final files to hear which one sounds the best, given the resulting file size.
Data Rates for Common Audio Coding Modes
In the following exercise, you’ll try out some different data rate settings:
1. In the Audio tab, choose 192 kbps from the Data Rate pop-up menu.
You are encoding a stereo file, so 192 kbps is a good data rate that provides an optimum balance between file size and sound quality in the final AC-3 stream.
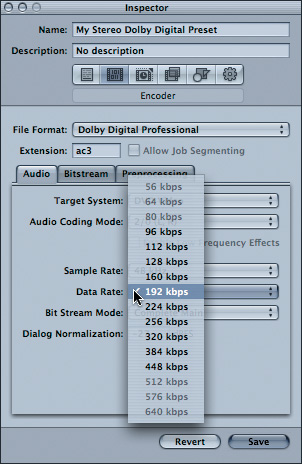
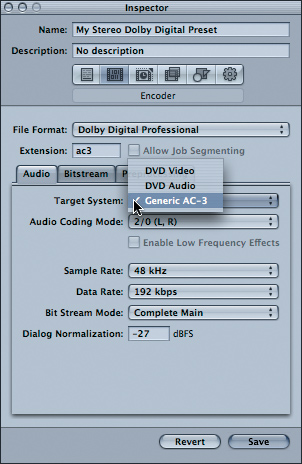
You may have noticed that several data rate options are dimmed in the Data Rate menu. Compressor is smart enough to show you only the legal data rates for your target delivery system. For example, in DVD-Video, only data rates from 64 to 448 kbps are legal for use.
Compressor uses the setting in the Target System pop-up menu to determine which data rates are legal for use.
2. Choose Generic AC-3 from the Target System pop-up menu.
3. Choose 640 kbps from the Data Rate pop-up menu.

Notice that with Generic AC-3 selected as the Target System, you have access to three data rates that are higher than the maximum AC-3 data rate of 448 kbps for DVD.
4. Choose DVD Video from the Target System pop-up menu.

A dialog opens to tell you that the specified data rate is out of range for your target delivery system. Compressor goes ahead and changes the data rate to the next-closest legal setting for use with DVD.

5. Set the Data Rate for this stereo file back to 192 kbps.

Encoding a File
With the audio coding mode and data rate set, you can now encode the file. But one warning—these are the bare minimum settings you should make. There’s a lot more you can do to tweak the file and make it sound better, and you’ll learn about that in a few moments. For now, you’ll step through the process of actually encoding a file:
1. In the Inspector, click Save.

2. Assign the new Dolby Digital preset to the file in the Batch window, and set its Destination to your computer’s Desktop (or some other folder where you can easily access the file).

The Batch Monitor opens and encodes the file.
About Dialog Normalization
In the audio world, normalization is the process of matching the volume level between two different songs. For example, it’s common to normalize the volume of CD-Audio so that peak volumes of all songs on the disc are close to 0 dB on the digital scale (also referred to as 0 dBFS, or 0 dB full scale).
In the video world, audio is normalized in a slightly different way. When you watch a video, your ear pays the most attention to the audio stream’s dialog, because it’s the dialog that provides most of the information. During the video, certain sounds, like explosions or chirping crickets, are either louder or quieter than the dialog. Nonetheless, it is the dialog that we focus on, so it’s common practice to normalize the audio levels of our video so that all dialog reaches the viewer at the same volume level, across all programs. This is the reason why the news announcer on one television channel is at the same volume as the narrator in a documentary on the next channel: The audio streams have been normalized so that the dialog in each plays at exactly the same volume.
With CD-Audio discs, you are concerned only with peak volumes—specifically to get the audio as loud as possible without clipping by pushing it past 0 dBFS—but in the video world you’ll usually look at average volume levels. Peak volumes are still important, because you still need to ensure that your audio stream doesn’t clip. But you’ll instead focus on average volume levels because dialog is not a steady sound—it fluctuates over time, and even in individual words, as the talent speaks. For example, if you say the word “peak,” notice that your voice sounds louder on the “p” part than it does on the “eak” part.
The main point to keep in mind is that it’s advantageous to judge dialog using average volume levels, not peak volume levels. For reference, the following table lists the average and peak volume levels commonly used for several different audio and video formats:
Average and Peak Dialog Level Comparison

Tip
Properly encoded AC-3 files used on a DVD will always sound quieter than broadcast television. If you need your project’s audio to sound as loud as broadcast television, use PCM audio files that have an average level of dialog of –12 dB and peak levels no higher than –6 dB.
If you compare the settings in the preceding table, you’ll see that movie soundtracks and DVD-Videos both use the same average dialog level (–31 dBFS), as well as the same peak volume. This is because DVD-Video was designed as a delivery format for movies. Although DVD uses have grown far beyond Hollywood, AC-3 files were nonetheless designed with Hollywood in mind.
However, not all audio streams are created using an average dialog level of –31 dBFS. For example, if you’re editing in Final Cut Pro, you will more often than not edit dialog so that it uses an average dialog level of –12 dB. You’ll then need to lower the volume of this audio stream to –31 dB to create perfect audio for DVD-Video. This is the job of dialog normalization.
More Info
For a good discussion on creating audio in Final Cut Pro, see the book Apple Pro Training Series: Advanced Editing and Finishing Techniques in Final Cut Pro 4 (Peachpit Press, 2003). This book has a few chapters on creating audio, including discussions of how to use test tones and the difference between average and peak levels in Final Cut Pro.
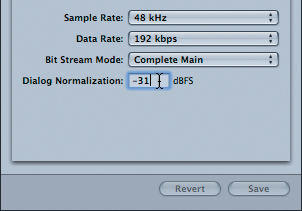
In fact, –31 is such a key number that you can’t set a dialog normalization value that’s lower. Follow these steps to see what happens if you try to enter –35 into the Dialog Normalization setting:
1. In the Inspector, type –35 into the Audio tab’s Dialog Normalization field, and press Return.
Tip
Always press Return when entering your Dialog Normalization setting. If you don’t press Return, Compressor will not lock in the changed setting.

Compressor beeps at you. In fact, –31 dBFS is the lowest setting you can make in Compressor’s Dialog Normalization setting (read on to find out why).
2. Set the Dialog Normalization setting to –31, and press Return.

The Dialog Normalization Formula
Before you get into Compressor, you need to determine the average level of the dialog in your audio stream. You can do this by watching Final Cut Pro’s audio meter and taking an educated guess, or you can use sophisticated audio analyzing tools such as the Waves Paz Analyzer (www.waves.com) and Logic Pro. Whichever method you use, remember what the average level of your audio stream’s dialog is, because this is exactly the value you will type into Compressor’s Dialog Normalization setting.

The Waves PAZ Analyzer is great at displaying average volume levels, as well as the frequency distribution of sounds in your audio stream.
The dialog normalization value (DNV) is stored as control parameters in the encoded AC-3 stream, and it is applied at playback by the DVD player’s AC-3 decoder according to the following formula:
At playback, your AC-3 stream will be attenuated, or lowered in volume, by (31 + DNV) dB.
So, if your source audio stream has dialog at an average level of –12 dB, and you set its DNV to –12 at the time of encoding, at playback this stream will be attenuated by (31 + (–12)) dB, or 19 dB. That’s a lot of attenuation, but the result is that the stream plays with an average level of dialog of –31 dB.
Similarly, if a second audio stream on your DVD has an average level of dialog of –20 dB, at playback it will be attenuated (31 + (–20)) dB, or 11 dB. The result is that this audio stream will also play back with an average dialog level of –31 dB. The two audio streams have both been normalized to –31 dB.
Let’s put this theory into action. In the following steps, you will use Compressor to create three AC-3 files. The first file has an average level of dialog of –12 dB, the second is –20 dB, and the third is –31 dB. These streams also have a test tone at the same level as the dialog, so you can really hear how the Dialog Normalization setting affects them.
1. In QuickTime Player, open the following files, located in the Media > Advanced Authoring > Lesson 19 > AudioSlugs folder:
–12TestTone.aif
–20TestTone.aif
–31TestTone.aif

2. Play each file.

Listen carefully to the difference in volume between the three files. The –12TestTone.aif file is the loudest of all three files. The –31TestTone.aif file is quietest, and the –20TestTone.aif file sits somewhere in the middle. Leave these files open in QuickTime throughout the following steps so that you can later return to QuickTime to hear what the original files sound like.
You need to encode three different files, which is a perfect job for Compressor.
3. Add the files to the Compressor Batch window.

4. In the Presets window, create a new Dolby Digital Professional preset.
5. Double-click the new preset to open it in the Inspector.
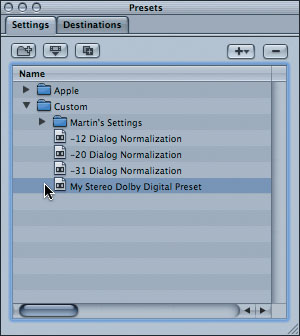
6. Name it -12 Dialog Normalization.
7. Set the Audio Coding Mode to 2/0 (L,R), Data Rate to 192 kbps, and Dialog Normalization to –12. Press Return.

8. Repeat Steps 4 through 7 to create two additional Dolby Digital presets. Name them –20 Dialog Normalization and –31 Dialog Normalization. And finally, set each file’s Dialog Normalization value to –20 and –31, respectively

9. In the Batch window, assign the –12 Dialog Normalization preset to the –12TestTone.aif file; assign the –20 Dialog Normalization preset to the –20TestTone.aif file; and then assign the –31 Dialog Normalization preset to the –31TestTone.aif file.

10. Set the destination of each file to your Desktop.
11. Click Submit.

The Batch Monitor opens, and the files are encoded to your Desktop.
Auditioning a File
The final step in producing an AC-3 file is auditioning it to judge the encoded sound quality. There’s no need to wait for the final DVD, because you can audition AC-3 files directly inside DVD Studio Pro.
1. In the Finder, select the three Dolby Digital files you just encoded.
Note
Hold the Command key to select multiple files.
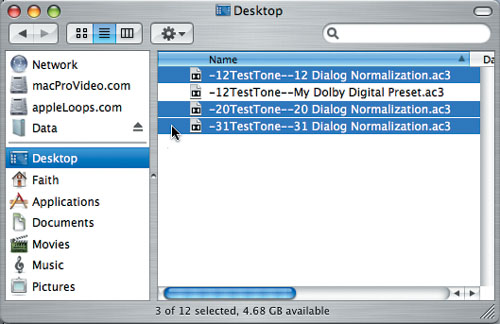
2. Double-click one of the selected files.
The files are imported into DVD Studio Pro and appear in the Assets tab.
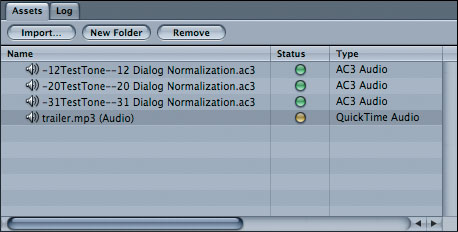
3. In the Assets tab, double-click the –12TestTone—12 Dialog Normalization.ac3 file.

The AC-3 stream begins playing in the Viewer. Listen carefully to the volume of this file. (This works best through headphones.) Remember that the source file was louder than the –20TestTone.aif and –31TestTone.aif files.
4. In the Assets tab, double-click the–20TestTone—20 Dialog Normalization.ac3 file.
Do you notice anything interesting about the file’s volume? It’s exactly the same as that of the –12TestTone—12 Dialog Normalization.ac3 file.
5. In the Assets tab, double-click the –31TestTone—31 Dialog Normalization.ac3 file.
Once again, this file’s volume sounds exactly like the volume on the other two, because all three files have been normalized to –31 dBFS. They are all now the same volume, because the Dialog Normalization settings in Compressor were all appropriately set to the average volume level of the dialog in the source files.
6. Switch back to QuickTime and play the original source files. Then use DVD Studio Pro to audition the encoded files one more time.
Notice the difference between the volume levels of the source and encoded files.
Understanding Compression Profiles
AC-3 files contain special control parameters that control dynamic range compression at playback. Not to be confused with data rate compression, dynamic range compression does not lower the data rate of the final AC-3 file. Instead, it helps to even out the difference between the highest and lowest volumes in a single audio stream.
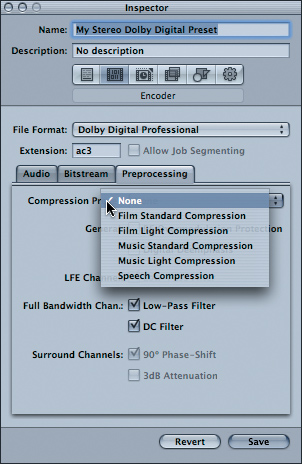
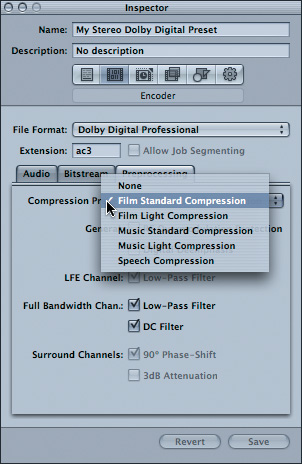
You can assign one of six compression profiles to AC-3 files through the Dolby Digital preset’s Preprocessing tab. Each compression profile is descriptively named. For example, if your audio stream contains music, the Music Standard profile is the one to select. If the audio stream contains nothing but dialog, use the Speech profile.
Note
AC-3 compression profiles are designed by Dolby, and you can’t change them or their sound.
So what do these compression profiles sound like? Well, it’s hard to tell sound from numbers, but the following table lists the different profile qualities for your reference.
AC-3 Dynamic Range Compression Profiles

Notice that the null band of each compression profile straddles –31 dB. The null band specifies a range in which no dynamic range compression is applied to the file. When the volume of the stream pumps above the top of the null range, dynamic range compression is applied to lower the volume of the sound. When the volume goes below the bottom of the null band range, dynamic range compression is applied to raise the volume of the sound. The result is that the sound is always pushed toward the volume levels at the top and bottom of the null band.
If you’ve properly set your dialog normalization value, your audio stream’s dialog will play at –31 dB. This means that dynamic range compression will not often be applied to the file—another important reason to properly assign your dialog normalization value. In fact, there’s one thing about dynamic range compression that you must keep in mind:
If you don’t correctly set your dialog normalization value, you MUST disable dynamic range compression, or your AC-3 file will very likely exhibit gain pumping—that is, dramatic and unexpected volume fluctuations.
It’s hard to describe sounds in words, so let’s play with Compressor’s Dynamic Range profiles and see how they work. The test file you will encode is a test tone along with an intermittent beat. The test tone is at –21 dB, while the beat peaks at –1 dB.
1. In the Presets window’s Settings tab, double-click the My Stereo Dolby Digital Preset.
The Inspector updates to display the selected preset’s properties.
2. In the Inspector’s Audio tab, ensure the preset’s Dialog Normalization value is set to –31, and press Return.
Remember the dialog normalization formula: At playback the AC-3 stream will be attenuated (31 + DNV) dB. Thus, when Dialog Normalization is set to –31, no attenuation will be applied to the file at playback (31 + (–31) = 0 dB of attenuation). This is appropriate for this exercise, because now you will hear only the sound of the dynamic range compression.
3. In the Preprocessing tab, set the Compression Preset to Film Standard Compression.
4. From a Finder window, drag the Media > Advanced Authoring > Lesson 19 > AudioSlugs > –21TestTone-Beats.aif file and drop it into Compressor’s Batch window.

5. In the Batch window, assign the My Stereo Dolby Digital Preset to the file.
6. Set the file’s destination to your Desktop, and encode the file.

7. Find the file on your Desktop, and double-click it.
The file imports into the DVD Studio Pro Assets tab.
8. In the Assets tab, double-click the newly imported file.

Notice that as the beat plays, the volume of the test tone dips. This is gain pumping, and it happens because the AC-3 Monitor is applying dynamic range compression to the loud beat, causing the entire audio stream to dip in volume until the loud beat passes, at which time the stream once again rises in volume. The reason? According to the dynamic range profile, the AC-3 Monitor is attempting to push the volume down to the null band range (–21 dB at the top). Consequently, the AC-3 Monitor is pushing the beat part of the stream from –1 dB to –21 dB. It doesn’t sound very good at all!
9. In the Inspector’s Preprocessing tab, set the Compression Preset to None.

10. Click Save to lock in the changed compression profile.
11. Re-encode the –21TestTone-Beats.aif file with this modified preset.
Remember to set your Desktop as the file’s destination. And don’t worry if you replace the file you made a few steps back, because DVD Studio Pro will automatically update and play the newly encoded file.
12. Switch to DVD Studio Pro and audition the new file.
This new file, with no compression preset, sounds much louder than the first one. This is because no dynamic range compression is applied. This file is coming out of Compressor at exactly the same volume as it went in.
Tip
If you want to preserve the volume level of your source audio streams, set Dialog Normalization to –31 dB, and set the Compression Preset to None. Now your AC-3 streams will play at exactly the same volume as the source audio stream.
Surround Sound and Downmixing
As programs like Logic Pro begin to appear on more and more video editing stations, 5.1 surround sound is becoming increasingly popular. And of course, DVD-Video in conjunction with AC-3 audio makes a perfect 5.1 surround delivery format, so there’s no reason not to jump onto this next wave in audio design.
More Info
To find out how to mix surround sound in Logic Pro, check out the book Apple Pro Training Series: Logic Pro 7 and Express 7 (Peachpit Press, 2005). This book has a lesson dedicated to surround mixing, and it even comes with a 30-day demo of Logic, so you can try it out for yourself!

Logic Pro’s Surround Panner
AC-3 files enjoy a tremendous advantage when it comes to delivering 5.1 surround audio streams because they incorporate a downmix algorithm that can turn a 5.1 surround stream into a properly formatted audio stream for the playback device. For example, if the playback device has only stereo outputs, a 5.1 surround AC-3 stream will automatically be converted to a stereo stream. In Compressor, you can control how this downmixing occurs. For example, you can decide how the surround channels are mixed into the stereo channels, so that your viewer will never miss a second of your sound.
1. In the Presets window’s Settings tab, double-click the My Stereo Dolby Digital Preset.

The Inspector updates to display the selected preset’s properties.
2. In the Inspector, change the preset’s name to My Surround Dolby Digital Preset.
3. In the Inspector’s Audio tab, set the Audio Coding Mode to 3/2 (L, C, R, Ls, Rs).
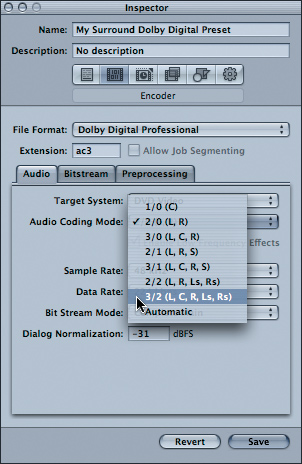
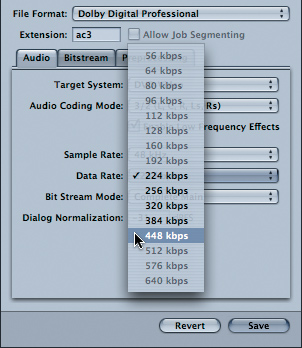
An alert dialog appears, telling you one or more data rates have changed. Your preset’s data rate was set to 192, and that’s too low for 5.1 surround. Consequently, Compressor has automatically increased the data rate to 224 kbps. In fact, 224 kbps is acceptable if your soundtrack has only vocals and a few effects swirling through the background, but if it’s a full mix with music, effects, and vocals coming out of all six channels, you should double the data rate to the maximum allowed for DVD-Video: 448 kbps.

Note
If your surround stream has a low-frequency effects channel, make sure that the Enable Low Frequency Effects check box is selected.

4. From the Data Rate pop-up menu, choose 448 kbps.
5. In the Preprocessing tab, make sure that the LFE Channel: Low-Pass Filter check box is selected.

This check box enables a brick-wall low-pass filter at 120 Hz. In general, 120 Hz is considered the highest frequency you should send to an LFE channel device, or subwoofer, so it’s important to turn this filter on. With this filter disabled, you could encode a full frequency channel into the LFE channel, but no subwoofer would be able to accurately reproduce this sound. All those extra frequencies would be just a waste of bits in the final AC-3 stream.
6. In the Bitstream tab, choose a Center Downmix option.
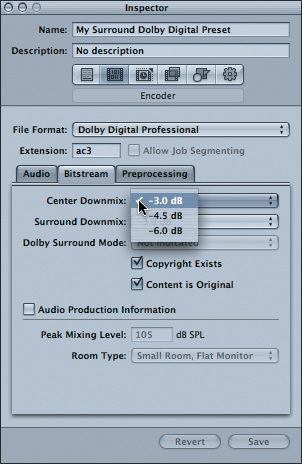
The choices are –3.0, –4.5, and –6.0 dB. So which to choose? When you downmix the center channel, the sound in this channel is sent to both the left and right speakers to create the effect of a phantom center channel. Effectively, you are playing two mono streams of the exact same content, at the exact same time, through both the left and right speakers. The effect will be similar to having a center speaker.
There is an interesting phenomenon in audio: When you play the exact same sound twice, at the exact same time, the volume of the sound increases by 6 dB. When you downmix the center channel to both the left and right speakers, the sound of the center channel may increase by up to 6 dB relative to the other sounds in the AC-3 stream. To counteract this, you can choose to attenuate the downmixed center channel by up to 6 dB.
7. Choose a Surround Downmix option.

The choices are –3.0, –6.0, and – ∞ (infinity) dB. When you downmix the surround channels, the sound in the left surround speaker is sent to the front left speaker, and the sound in the right surround speaker is sent to the right front speaker. If you wish to ensure that the surround channels are not downmixed into the front channels, choose the – ∞ option.
Note
The LFE channel is not downmixed into the left and right channels. Consequently, it’s a good idea to mix some of your bass sounds into the left and right channels when you’re creating your surround audio streams in an audio editor like Logic Pro.
8. In the Batch window, click the Import Surround Sound Group button.

The input channel matrix sheet appears.
9. In the Media > Advanced Authoring > Lesson 19 > SurroundStems folder, locate the six surround stems and assign each stem to the appropriate input channel button. Click OK.

Note that each stem has a hyphen and an abbreviation at the end of the filename. These abbreviations are the default abbreviations applied by Logic Pro, and they stand for the following:
• C: Center
• L: Left
• Sub: Low-frequency effects
• R: Right
• Ls: Rear left
• Rs: Rear right
10. Assign My Surround Dolby Digital Preset to the file and encode it.
Lesson Review
1. Can you import a 44.1 kHz AIFF file directly into DVD Studio Pro?
2. Is 44.1 kHz AIFF a digital audio format that is legal for use in DVD-Video (is it part of the DVD-Video specification)?
3. In a Dolby Digital file, what is the audio coding mode?
4. What is the most common data rate for stereo AC-3 files?
5. True or false: Dolby Digital files can automatically raise or lower in volume to ensure a uniform volume level across all programs on your DVD-Video.
6. What is the dialog normalization formula?
Answers
1. Yes. In fact, you can import any audio format that QuickTime understands directly into your project.
2. No. DVD Studio Pro must convert all nonlegal digital audio formats, including 44.1 kHz AIFFs, into 48 kHz AIFFs, which are legal for use in DVD-Video.
3. The audio coding mode determines how many channels the final AC-3 file will have, and also their position inside the surround sound spectrum.
4. 192 kbps. 448 kbps is a common data rate for 5.1 surround files.
5. True. But only if you set the dialog normalization formula correctly.
6. At playback, your AC-3 stream will be attenuated, or lowered in volume, by (31 + DNV) dB.