
Lesson 13. Connections and Basic Scripting
Lesson Files
Lessons > 13_Tiger_start (or the My_Projects > Tiger_DVD project you created in Lesson 12)
Media
Media > Tiger folder
Time
This lesson takes approximately 60 minutes to complete.
Goals
Set up a simple project with an advanced menu design
Learn how to create advanced motion menus with transitions
Learn how to make a DVD look professional
Use the Connections tab to link all the elements in your project
Create a random play script
Create a menu loop script
Now that you have prepared your menus, stories, and video and audio assets for the Tiger project, it is time to assemble the elements into a finished DVD.
In this lesson, you will give the Tiger project a motion menu with video transitions that bridge the gaps between menus, tracks, and slideshows. You will then create advanced menus that link with these transitions.
You will also learn how to create navigation that occurs without any input from the viewer. You can do this using a menu loop and a random play script, without the need to insert any new content or take up more space on the DVD.
For the Tiger DVD, you will program the menu to loop two times, and if there is no input from the viewer through the remote control, a random play script will then jump to one of the four stories before coming back to the main menu. This makes the DVD a lot more interesting, especially for viewers who insert the DVD into their players and let the main menu loop for several minutes while they’re making popcorn.
Assembling the Tiger Project
Since the elements required for the Tiger project have already been created, you can simply use the steps in the following exercises to put them together into a finished DVD. Examining the way these pieces are used should give you ideas for your own menu designs and disc layouts.
Adding Transition Tracks
As a part of the menu design process, transition movies can bridge the space between the start of a disc and a menu, or between a menu and a track. Automated transition movies are easily one of the most exciting additions to DVD Studio Pro 4. You can even build your own alpha transitions in DVD Studio Pro 4, which we cover in depth in Lesson 16.
However, if you want to include sound or you want to build very specific transitions, you can easily create these transitional movies in an application such as Final Cut Pro. Since any sequence in Final Cut Pro can be the background for a menu, you can export the first part of the sequence as an MPEG-2 transition movie, and then export the remaining part of the sequence as the background for a motion menu. In this way, you can create smooth transitions into and out of menus. You can set up these transition movies just as you would any other track in DVD Studio Pro. In a later section of this lesson, you will set the links that activate these tracks from the main menu, as well as set a first-play action for the disc itself.
In the following exercise, you will create a track that contains the Intro Transition movie, which will be used as the first-play action that takes you seamlessly into the main menu. You will also create a track that will contain a transition movie. The transition movie will activate whenever the viewer makes a choice to jump from the main menu to other DVD content.
1. Open the My_Projects > Tiger_DVD file you created in Lesson 12, or the Lessons > 13_Tiger_start file.
2. Click the Graphical tab to make the Graphical view active.
3. From the Assets tab, drag the Tiger_Intro.mov video into an empty space in the Graphical view.
A track named Tiger_Intro is created in the Graphical view. In a moment, we will reassign this track as the first play, so that it becomes the first thing a user sees when inserting the disc into the player.
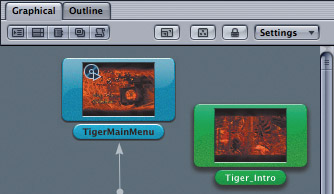
4. From the Assets tab, drag the Tiger_Transition1.mov video into an empty space in the Graphical view.
A track named Tiger_Transition1 appears in the Graphical view. This track will contain a transition from the TigerMainMenu to the TigerMovie track.
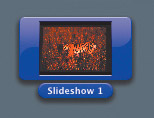
5. From the Assets tab, drag the Slideshows folder into an empty space in the Graphical view.
A slideshow named Slideshow 1 is created.
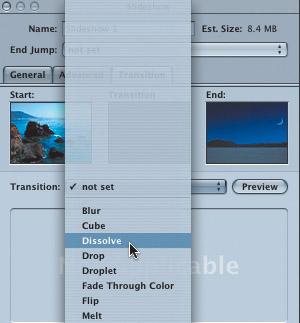
6. Click the Slideshow 1 tile to bring its parameters into the Inspector.
7. From the Assets tab, drag TigerSlideshow.aif onto the Audio area of the Inspector.

8. In the Inspector, click the Transition tab and choose Dissolve as your Transition for the entire slideshow.
It is almost a must to use this great transition feature for slideshows.
Establishing Connections
In previous lessons, you have established links between buttons, tracks, stories, and other disc items using several intuitive techniques. You will now learn how to connect all your items by using the Connections tab. The Connections tab will be most useful in this lesson, because there are only a few links established between disc items so far.
Using the Connections tab is perhaps the quickest way to check and establish links between the different items in a project. The way you set the connections determines how the viewer experiences your DVD title. You will make these connections so that the viewer jumps from a starting point, or source, to a destination, or target.
The following steps illustrate how to make connections in the Connections tab, where you will complete the Tiger project by establishing the first play for the Tiger_Intro movie, making the logical connections between all tracks, and linking the remaining buttons to their corresponding track and slideshow. As a last step, you’ll complete the DVD by making sure that all of the links between menus, tracks, and slideshows are in place. Once all of your disc items are in place for the project, you can link them to your buttons in the main menu. You will also need to set the appropriate targets for your transitions.
1. Press F3 to switch to the Advanced window configuration.
2. Click the Graphical tab, and then click the background of the Graphical view to activate the Disc level in the Connections tab.
3. Click the Connections tab.
4. Make sure that Basic is selected in the View pop-up menu in the top-left corner of the Connections tab.
The Connections tab offers you different views of the connections in your project. You can determine the level of detail you want to see by setting View to Basic, Standard, or Advanced. For our purposes, Basic will be sufficient.
In the Basic view, you will find all major jumps, such as the first-play action; jumps from buttons to menus and tracks; and end jumps from tracks to menus. By using Basic view to connect all project elements, you can make sure that your disc is not missing any major links.
5. Click the pop-up menu next to Basic, and make sure that All is selected.
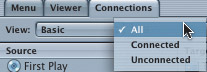
The All setting shows us all available Basic connections, whether they have targets or not. If we switched to Connected, the list below would just show which links were connected, and Unconnected would just display those links that do not currently have targets. We’ll keep this set to All to view all available links.

The Connections tab has two panes. The left pane is divided into two columns. The left column, Source, lists the source links: menus, menu buttons, tracks, slideshows, and other items. The Target column lists what the buttons or items are linked to. If there is nothing in the Target column, the source is not linked to anything.
In the pane on the right side is a third column, Targets, which lists the possible disc items—menus, tracks, slideshows, and stories—that are available to be set as targets.
Let’s start with changing the first-play action to the Tiger_Intro movie.
6. Drag the Tiger_Intro track from the Targets column onto the first entry in the Target column, which is currently filled with TigerMainMenu.
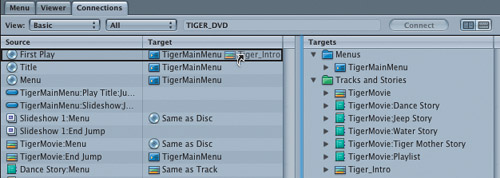
Tiger_Intro replaces TigerMainMenu as the first-play item on the disc.
Finding the Unconnected Elements
Working with the Connections tab set to display only unconnected items is a good way to quickly check your disc for links that have not been established yet. In effect, it provides a “to-do” list. When only unconnected items are viewed, items will disappear from the list as soon as they are connected to something. When the Source and Target columns are both empty, you have correctly connected everything in your DVD.
1. Click the pop-up menu to the right of the View pop-up menu and choose Unconnected.

Now the Connections tab displays only the items that you still need to connect before finishing your project. Let’s go ahead and connect these items now.
2. Drag the Tiger_Transition1 track from the Targets column onto the TigerMainMenu: Play Title target in the second column.
For the Tiger DVD, Tiger_Transition1 will bridge the space between TigerMainMenu and the TigerMovie track.

As soon as you connect the Play Title button from your TigerMainMenu, this item disappears from the list of unconnected source items.
3. Drag the TigerMovie track from the Targets column onto the Tiger_Transition1: End Jump target in the second column.

4. Drag Menus > TigerMainMenu from the Targets column onto the Tiger_Intro: End Jump target in the second (Target) column.

5. Click the disclosure triangle next to the Slideshows folder in the Targets column to get access to the Slideshow 1 target.
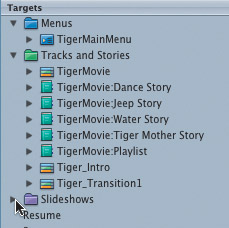
6. Drag Slideshow 1 from the Targets column onto the TigerMainMenu: Slideshow target in the second (Target) column.
7. Select Slideshow 1 End Jump in the Source list and double-click TigerMainMenu in the Targets list.
Double-clicking an item in the Targets list is an alternate way to add the item to the currently selected source.
Now let’s set the Connections tab to show All connections. This will enable us to be sure that we’ve set up all the links.
8. Click the pop-up menu to the right of the View pop-up menu, and choose All.
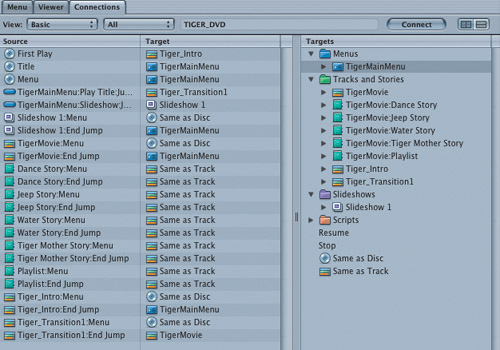
You have now successfully set up the navigation of your Tiger_DVD project. This view gives you a chance to examine all the connections on your DVD.
9. Click the pop-up menu next to View, and choose Standard from the list of choices.
To get access to additional sources of your DVD project, you can use the Standard view. If you choose the Advanced view, your source list will display every single detail. For the Tiger_DVD project, it is not necessary to use the Standard or Advanced view.
Tip
Since they are so detailed, the Standard and Advanced views work better if you choose only a single item, such as a menu or track, in your Outline or Graphical tab rather than the Disc or global view.

You should now simulate your disc to make sure that all links work properly.
More Info
For more detailed information on the Connections tab, please refer to page 485 in the DVD Studio Pro 4 manual.
10. On the toolbar, click the Simulate icon to preview the disc.
Now, the Tiger_Intro movie starts playing and leads to the menu. If you choose Play Title from TigerMainMenu, a video transition will lead you to the TigerMovie.
11. Close the Simulator window.
Creating a Menu Loop Script
Scripts are a powerful, advanced feature included as a part of the DVD-Video specification. Although many users may never need to use these scripting features, it is nice to know that they are available, particularly when you come accross a sophisticated project that requires unique solutions or workarounds.
Scripting in DVD Studio Pro allows you to accomplish complex tasks that could not otherwise be performed. For example, you can create a script that tells a track to loop a certain number of times, or create a script that randomly selects a story to play when a user activates a button in a menu or even when the user fails to make any selection. You can combine several functions into a single script that you attach to a disc item in DVD Studio Pro.
In this lesson, you will get exposed to some basic scripting. You will create a script that loops a predetermined number of times. You will also add random play commands that choose a particular story to play from the TigerMovie track.
Note
For in-depth practice with scripting, see Lesson 20 in the Advanced section of this book.
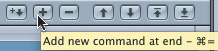
1. On the toolbar, click the Add Script button.
![]()
2. In the Outline tab, double-click the new script (Script 1), which opens up the Script Editor.
3. In the Inspector, rename the script Menu Loop Script.

You’ve created a new script. Now let’s put something in it.
Setting Up the Counter
The first thing that needs to be set up is a counter for the number of times the menu is going to loop before it jumps randomly to one of the four stories you have created in a previous lesson.
1. In the Inspector, click the disclosure triangle to the left of GPRM 0.
GPRM stands for General Purpose Register Memory. This is a fancy term for variables. You have eight of them to use when you author your disc, and they can be assigned any number of useful values. In this case, we are going to create a counter variable to keep count of how many times our main menu has looped.
2. In the newly expanded area or GPRM 0, double-click the word “GPRM 0” and type in “Counter.”
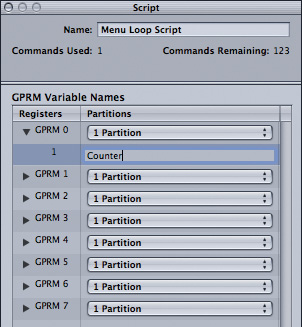
Naming this GPRM value is simply a way to help you identify it later on. You can name your GPRM variables anything you want (hopefully related to what that GPRM is doing for you), or you can leave them with their default names.
3. In the Script Editor, click the first command line, Nop.
It will become highlighted when selected.

The Nop, or No Operation, command is the simplest of all commands in scripting. It means do nothing, and in this case it is simply a placeholder for the first line of the script until you assign a useful command, as you will do now.
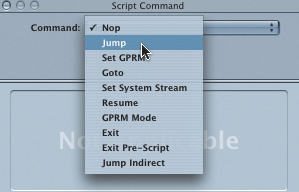
3. From the Command pop-up menu at the top of the Inspector window, choose Set GPRM.
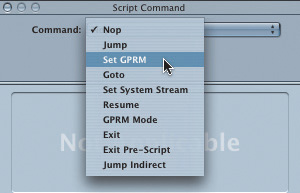
This command simply allows you to set the value of a GPRM. We are going to add the number 1 to the current value of our Counter variable (GPRM 0).
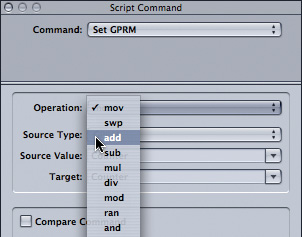
4. From the Operation pop-up menu, choose “add.”
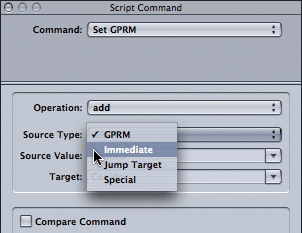
5. From the Source Type pop-up menu, choose Immediate.
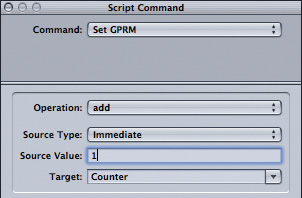
6. Type the number 1 into the Source Value field and press Return.
This command will add an immediate value of 1 to our Counter variable. Notice that Counter is automatically set as the target of this command.
Setting Up the Compare Condition
In the next few steps, you will set up a compare command that will loop the menu again if the menu has played fewer than two times. This will be achieved by a Jump command, which lets the menu jump to itself and play again. But if the menu has already looped twice, it will jump to a random play script, which will play one of the four stories randomly.
1. Click the Add button (+) at the top of the Script Editor.
Another command line is added to the script.
2. Select the new command line you added in the Script Editor, Nop.
3. In the Inspector, choose Jump from the Command pop-up menu.
4. From the Jump To pop-up menu in the Inspector, choose Menus > TigerMainMenu > [Menu].
So far, this command is jumping us out of this script and back to the main menu. Now we will add a condition to this command, so that the jump back to the main menu happens only when a certain condition is met.

5. Click the Compare Command check box.
6. From the Execute If pop-up menu, choose Counter.
7. From the “is” pop-up menu (which contains operation types), choose less than (<).

8. From the “to” pop-up menu (which is the element type to compare), choose Immediate.
Immediate means that instead of comparing with a number stored in a variable somewhere, we will use a value that we input immediately into the command.
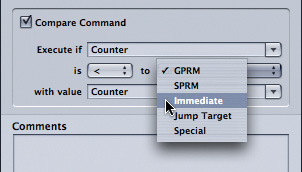
9. Type the number 2 in the “with value” field and press Return.

Now the jump command executes only if there is a number 0 or 1 in Counter (the GPRM 0 that we renamed). If not, the script will move on to the next command. This is important to understand: If the compare command in a line of a script is false, the action of that line will be ignored, and the script will begin to execute its next line. Let’s create that next line now.
Resetting the Counter
In the preceding exercise, you learned how to set up the counter. Now, you will add another command that resets the counter to 0 whenever it reaches a value of 2.
1. Click the Add button (+) at the top of the Script Editor.
Another command line is added to the script.
2. Select the new command line in the Script Editor (Nop).
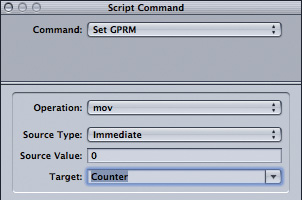
3. In the Inspector, choose Set GPRM from the Command pop-up menu.
4. From the Operation pop-up menu, choose “mov.”
5. From the Source Type pop-up menu, choose Immediate.
6. Type the number 0 into the Source Value field and press Return.
7. From the Target pop-up menu, choose Counter.
We have now entered a command that resets our counter to 0.
Adding Random Play Commands
Now that you have set up your script to loop a menu two times, you’ll want to add a random play action to the script, which will randomly choose a story to play from the TigerMovie track. The first step is to set up a random number variable that will generate a random number from the number of stories you have.
1. In the Outline tab of the main window, click the Menu Loop Script.
At this point, you should rename another GPRM variable to be used in the following steps. Although you don’t need to rename GPRMs, it is a good way to keep track of variables that you use in your scripts.
2. In the Inspector, rename GPRM 1 “Random Number”.

3. Click the Add button (+) at the top of the Script Editor.
Another command line is added to the script.
4. Make sure the new command line is selected in the Script Editor.
5. In the Inspector, choose Set GPRM from the Command pop-up menu.
6. From the Operation pop-up menu, choose “ran.”

7. From the Source Type pop-up menu, choose Immediate.
8. Type the number 4 into the Source Value field and press Return.
This command will generate a random number between 1 and 4. The random number that is generated by the Source Value is placed into Random Number (the GPRM 1 variable that you renamed) and will be used to determine the next track that will play.
9. From the Target pop-up menu, choose Random Number.

Setting Up Random Play Jumps
Now you create the commands that play the random stories from the TigerMovie track. More specifically, you will create four jumps to one of the four stories using the Compare command.
1. Click the Add button (+) at the top of the Script Editor.
Another command line is added to the script.
2. Make sure the new command line is selected in the Script Editor.
3. In the Inspector, choose Jump from the Command pop-up menu.

4. From the Jump To pop-up menu, choose Tracks and Stories > TigerMovie::Dance Story > [Story].

5. Click the Compare Command check box.
6. From the “Execute if” pop-up menu, choose Random Number.
7. From the “is” pop-up menu (which contains operation types), choose equal (=).
8. From the “to” pop-up menu (which is the element type to compare), choose Immediate.
9. Type the number 1 in the “with value” field and press Return.

This jump command executes and plays the Dance Story, if there is a number 1 in the Random Number variable (the GPRM 1 that you renamed). Otherwise, the script moves onto the next command line.
10. In the Script Editor, select command line 5, “Jump TigerMovie: Dance Story if (Random Number = 1).”
11. Press Cmd-C to copy this command line.
12. Press Cmd-V to insert a copy of this command line.
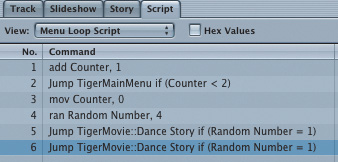
13. In the Inspector, change the Jump To command to TigerMovie::Jeep [Story] and the “with value” for the Random Number compare command to 2.

14. Press Cmd-C once and Cmd-V twice to insert two more copies of command line number 6.
15. In the Script Editor, click command line number 7.
16. In the Inspector, change the Jump To command to TigerMovie::Water [Story] and the “with value” for the Random Number compare command to 3.
17. In the Script Editor, click command line number 8.
18. In the Inspector, change the Jump To command to TigerMovie::Tiger Mother [Story] and the “with value” for the Random Number compare command to 4.
When you are done, the finished script should look like this:

Connecting the Script to the Menu
After you create your script, it is time to connect it to your TigerMainMenu. The easiest way to achieve this is to set the script as a timeout action for the menu.
For this project, you will make the TigerMainMenu do a timeout jump to the Menu Loop Script you created. This causes the script to play the two loops you want for the menu before the script randomly plays one of the four stories that are linked back to the TigerMainMenu.
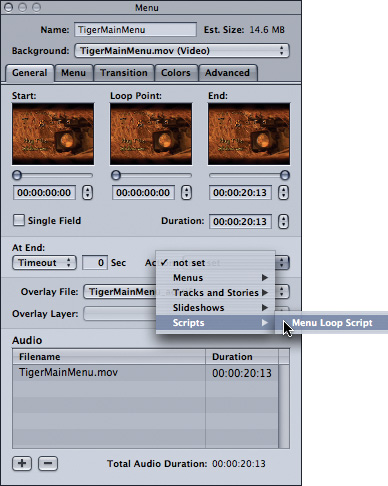
1. In the Graphical tab, click TigerMainMenu tile.
2. In the Inspector, select the General tab.
3. Set the At End value to Timeout.
4. Type a duration of 0 seconds for the timeout.
A timeout value of 0 simply means that there should not be a pause before the menu jumps to the next disc item.
5. From the Action pop-up menu, choose Scripts > Menu Loop Script.
6. Choose File > Save to save your Tiger_DVD project.
7. On the toolbar, click the Simulator icon to simulate the disc.
Without clicking any buttons or remote control buttons, allow the main menu to loop, time out, then loop again. You should now see the script executing one of the four stories randomly. You should then return back to the main menu, and the process starts again.
8. Close the Simulator window.
9. Click the Log tab to view the actions of your script in detail.
Congratulations! You have just set up a sophisticated DVD project, including a script that makes the menu more interactive.
As you have learned in previous lessons, you should now thoroughly test your DVD. Then you can build or burn your project if you wish. Please see Lesson 9 for further information on finishing your project.
Lesson Review
1. What does the Connections tab do?
2. True or false: you can filter the connections tab to show you only the unconnected items in your project.
3. What does GPRM stand for?
4. What do GPRMs do?
5. When creating a random play script, what operation do you choose from the Set GPRM command’s Operation menu?
6. Can you target a script from a menu time-out action?
Answers
1. It allows you to quickly check and establish links between the different items in a project.
2. True. You can also filter the connections tab to display only the connected items, or to display all items (both connected and unconnected).
3. General Purpose Register Memory.
4. GPRMs are variables you can use to hold values as a script executes.
5. Choose the operation called “ran.”
6. Yes. In fact, you can target a script from any target menu inside DVD Studio Pro.