Lesson 14. Advanced Menu Design
Lesson Files
Lessons > 14_Advanced_Menu_Design-Start
Media
Media > Blackbox folder
Time
This lesson takes approximately 60 minutes to complete.
Goals
Learn how to create standard menu assets
Discover how menu overlays are created
Explore the way DVD Studio Pro automatically updates when source assets are altered
Learn more about adding audio to menus
Concatenate multiple audio files together in a single menu
Add motion backgrounds to a standard menu
Create a menu intro transition and set a loop point to delay the display of button state overlays
Explore layered menus
DVD-Video is all about the menus. Without menus, you have just a linear progression of video, and that’s not much more exciting than a standard VHS tape. Menus provide interactivity, and it’s the menus that make a DVD-Video both engaging to watch and memorable. While it is important to ensure that your video is encoded properly and looks good, menu design consumes the bulk of the effort that goes into making any professional DVD-Video.
And speaking of professional, this chapter is aimed at designers who already have graphics chops but need a little extra information about the menu creation process. If you’re a DVD author who uses Adobe Photoshop as an integral part of the design process, this lesson is for you.
The following pages build on menu creation concepts covered in previous lessons, particularly Lesson 11, “Creating Menus with Overlays.” You’ll start the lesson by dissecting a properly configured Photoshop document to see how a menu source asset is created. You’ll also see just how easy it is to create a motion menu in DVD Studio Pro, and you’ll add audio files to give your menus some aural ambiance. Finally, you’ll explore the world of layered menus, which make it possible to turn on graphics outside a button’s hotspot.
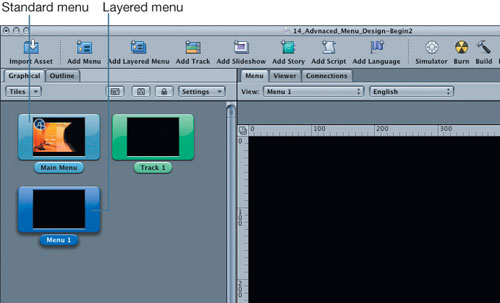
The Two Types of Menus
In DVD Studio Pro, there are two types of menus: standard menus and layered menus. Up to this point in the course, all the menus you’ve created have been standard menus.
Standard menus—a.k.a. overlay or highlight menus—are the preferred menu format for DVD-Video. Check your favorite Hollywood DVD, and chances are it uses this type of menu. Standard menus use a background image that includes the button graphics, and an overlay image that is a template for “stamping” button states onto the menu.
The advantages of standard menus are that they respond quickly to user input when the DVD-Video material is played on a computer, and they can have audio playing along, as well as moving video backgrounds. However, standard menu button states are limited to three colors, and you cannot enable graphics outside of the button’s hotspot.
Layered menus use a specific layer of a Photoshop document for the menu background and for each button state. When a button is selected or activated, DVD Studio Pro enables the entire layer for that button state. The advantage of a layered menu is that you can “turn on” graphics outside of the button hotspot, and you can also use full 16-bit color in the design of your button states. However, layered menus cannot have audio or use video backgrounds, and they respond slowly to user input when played on a computer.
Note
This lesson assumes that you own Photoshop and know your way around it. Specifically, you’ll need to understand the layering structure of Photoshop documents.
Each type of menu has its advantages and disadvantages. In this lesson you will make one of each to explore the differences between these two types of DVD Studio Pro menus.
Creating a New Menu in Photoshop
DVD-Video uses a frame dimension of 720 × 480 pixels (720 × 576 PAL). But that’s only half the story, because when this 720 × 480-pixel video frame is displayed on a television, it is always horizontally squeezed, which means it displays thinner on a TV than it does on a computer. The reason? Computers and televisions display pixels differently. To understand why, you need to understand pixel aspect ratio.
Understanding Pixel Aspect Ratio
Computers display pixels as perfect squares, while televisions display pixels as rectangles that are slightly taller than they are wide. Defined as a ratio, a pixel on a computer is 1 unit wide by 1 unit tall (1:1), while a pixel on an NTSC television is 0.9 units wide by 1 unit tall (0.9:1). In other words, pixels displayed on an NTSC TV look approximately 10 percent thinner than they do on a computer screen.
We’ve all heard the saying “TV adds 10 pounds,” but this dramatic thinning of the image is just not the right way to take those pounds off! Instead, you need to compensate for this difference when you create your computer-generated graphics.

Note
PAL TVs stretch pixels horizontally, instead of squeezing them. A PAL television displays pixels at an aspect ratio of 1.066:1.
More Info
CRT televisions do not actually display pixels. Instead, an electron gun fires charged particles at the front of the picture tube, causing colored phosphors to glow red, green, and blue. The combination of colors in these glowing phosphors creates the actual picture, not pixels. While it’s common to refer to CRT televisions as displaying “rectangular pixels” (as we do in this book), this is a bit misleading because no pixels are actually used in the display of a TV image. Once the video is printed to tape, transmitted down the copper cable wire, or played off of a DVD-Video disc, all those little digital pixels get converted to analog waves.
Creating a New Photoshop Document
So, computers display square pixels, while NTSC televisions display horizontally squeezed, or rectangular, pixels. How do we get around this fundamental difference between computers and televisions?
You know NTSC TVs horizontally squeeze the image by approximately 10 percent. To avoid this problem you could design your menus to be 10 percent thinner and then stretch them out before bringing them into DVD Studio Pro. For example, you could design your menus at 640 × 480 (a 4:3 aspect ratio), and then stretch them out to 720 × 480 before importing them. At playback, your menus would be squeezed 10 percent to display at the computer equivalent of 640 × 480 pixels—exactly the size and aspect ratio you designed them at!
However, there is a problem with designing menus at 640 × 480: When you resize the menu to 720 × 480, Photoshop (or DVD Studio Pro) has to interpolate the image to make it physically bigger, which means it has to add extra pixels to fill out the frame. When graphics programs interpolate images, they are better at throwing data away than they are at adding new data. For this reason, you will achieve better image quality by starting with a larger image and resizing to make it smaller.
Note
Regardless of their original dimensions, DVD Studio Pro will automatically resize all menu source assets to 720 × 480 pixels for NTSC or 720 × 576 pixels for PAL. If you are graduating to DVD Studio Pro 4 from version 1 or 1.5, you’ll be happy to know that you no longer need to resize menu assets before importing them into the program.
When designing in Photoshop, start your new documents at 720 × 534 pixels for NTSC, and at 768 × 576 for PAL. The following exercise demonstrates why this works so well.
More Info
It’s a common mistake to design Photoshop NTSC menus at 720 × 540 pixels. These dimensions are the proper square pixel dimensions for Standard Definition video (also called SD, or D1 video), or video that uses a frame dimension of 720 × 486 pixels. To understand why, multiply 540 by 0.9 (the horizontal part of the NTSC pixel aspect ratio). The result is 486. However, if you multiply 534 by 0.9, the result is 480 (rounded to the next lowest whole number). Because DVD-Video uses a frame dimension of 720 × 480 pixels, starting your Photoshop graphics at 720 × 534 will help preserve the correct aspect ratio in the final DVD.
1. Open Photoshop.
2. Choose File > New (Cmd-N).


3. Enter 720 pixels for the Width setting and 534 pixels for the Height setting.
For PAL, use a width of 768, and a height of 576.
More Info
The resolution setting in Photoshop’s New dialog is used to increase pixel density for graphics that are going to be printed on paper. If you come from a print background, you are probably used to designing Photoshop documents at a pixel resolution of 300 pixels/inch, or higher. DVD Studio Pro will still accept and display these images correctly, though it will convert them to 72 pixels/inch before multiplexing your project. Because DVD Studio Pro automatically converts, you don’t gain an increase in image quality by designing at higher pixel resolutions.
4. If you are using Photoshop CS or later, at the bottom of the New dialog, ensure that the Pixel Aspect Ratio menu is set to Square.

Note
Photoshop CS introduced several new video functions, including the ability to automatically compensate for rectangular pixels. However, if you’re following the steps in this exercise, you are already compensating for rectangular pixels by designing your menus approximately 10 percent taller than the video frame dimensions, so there’s no need to have Photoshop display using rectangular pixels. In general, when creating graphics on a computer, it’s always best to design the way the computer displays the pixels—that is, square.
5. Click OK.
A new Photoshop document appears.
6. Draw a perfect circle in the Photoshop document and fill it with black.
Tip
To draw a perfect circle in Photoshop, hold down the Shift key as you drag the Elliptical Marquee tool. If you can’t see the Elliptical Marquee tool in Photoshop’s Toolbox, it’s because the tool is hidden under the Rectangular Marquee tool. To expose the Elliptical Marquee tool, click and hold the Rectangular Marquee tool in Photoshop’s Toolbox, and select it from the pop-up menu.
7. Choose File > Save and save the file using the name Circle_720X534.psd.
8. Launch DVD Studio Pro 4.
9. Choose File > New.
10. Import the Circle_720X534.psd asset into DVD Studio Pro.
11. Create a menu out of the Circle_720X534.psd asset.
12. Open the new menu in the Menu Editor.

There are a few things to notice here. First, the rulers along the top and bottom of the Menu Editor clearly show that this menu is 720 × 480 pixels, not 720 × 534, as designed. Second, the circle looks like a perfect circle. DVD Studio Pro has automatically resized the document to 720 × 480, and it is also automatically compensating for rectangular pixels.
13. From the Menu Editor’s Settings menu, choose Square Pixels.

The Menu Editor now displays the file at exactly 720 × 480 square computer pixels. In other words, DVD Studio Pro has automatically resized the Photoshop document from 720 × 534 to 720 × 480. This causes the circle to look vertically squashed by approximately 10 percent. It now looks like an Easter egg lying on its side.
However, as you learned in the last section, when displayed as rectangular pixels on an NTSC television, this same circle is squeezed horizontally by about 10 percent. In short, the circle is squeezed 10 percent vertically to become an oval, and then it is squeezed 10 percent horizontally, which turns it into a circle once again!
The moral of the story is:
Always design your NTSC menus at 720 × 534 (768 × 576 for PAL)! If you take care to begin your menus at the correct frame size, in the finished DVD-Video your circles will look like circles, your squares will look like squares, and all aspect ratios will look correct.
Note
Apple DVD Player displays NTSC DVD-Videos at 640 × 480 square pixels. This has the effect of horizontally squeezing the 720 × 480 square pixel frame by about 10 percent, causing it to display the exact same way it would on a TV.
14. From the Menu Editor’s Settings menu, choose Rectangular Pixels.
It’s easier to design DVD-Video while looking at the assets as they’ll appear on a TV, so make sure you reset the menu to display using rectangular pixels.
15. Close the project.
Now that you understand the difference between square and rectangular pixels, let’s look at how menus are designed in Photoshop.
A Closer Look at Standard Menus
Often a standard menu is designed as a multilayer Photoshop document that contains all of the layers needed to create the background graphics, plus an additional single layer containing the overlay graphics. The background graphics include all imagery that sits behind the menu buttons, as well as the button shapes in their normal state (the graphics that display when the user is not interacting with the button).
The overlay layer uses four distinct grayscale or chroma colors to define shapes that are “laid over” the background graphics when a viewer selects or activates menu buttons.
Let’s examine a standard menu in Photoshop.

1. From this book’s companion files, open the DVD Studio Pro Project named 14_Advanced_Menu_Design-Start.
This is just a brand new DVD Studio Pro project with a default empty menu and track tile, but the Assets tab has been preloaded with all the media you’ll need for the next several lessons.
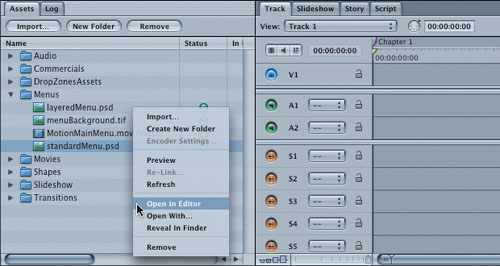
2. In the Assets container’s Menus folder, Ctrl-click the standardMenu.psd file, and choose Open in Editor.

The standardMenu.psd asset opens in Photoshop.

3. In Photoshop’s Layers palette, click the visibility icons to turn document layers on and off, and take a look at the graphics on each layer.
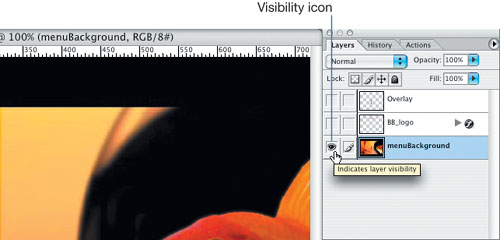
As you can see, the BB_logo and menuBackground layers are both part of the menu background; the Overlay layer provides three grayscale shapes (squares) that will be used for the menu’s selected and activated states.
4. Switch back to DVD Studio Pro, and in the Graphical view, double-click the default menu item to open it in the Menu Editor.
5. From the Assets tab’s Menus folder, drag the standardMenu.psd asset over the Menu Editor, but don’t release the mouse button.
6. Choose Set Background, All Layers Visible.
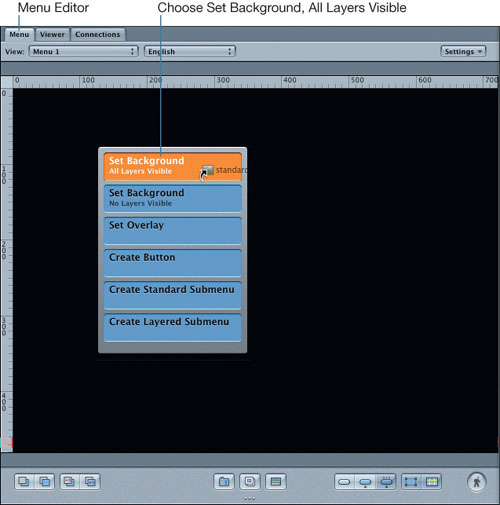
The asset is assigned to the menu. But if you take a close look, you’ll see that the Overlay layer is currently enabled, and the overlay graphics are displaying over the background graphics. The Overlay layer has to be specifically activated later, so let’s turn it off in the Inspector’s Background area.
7. In the Graphical view, select the Menu 1 item.
The Inspector updates to display the menu’s properties.
8. In the Menu Inspector, select the Menu tab.
9. In the Background Layers area, deselect the Overlay layer.

In the Menu Editor, the Photoshop document’s Overlay layer is no longer displayed.
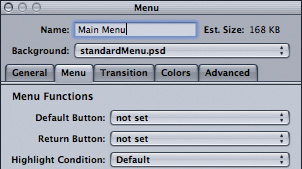
10. While you’re in the Menu Inspector, change the menu’s name to Main Menu.
11. In the Menu Editor, drag hotspots around the menu’s buttons, and give each button a name that reflects its target.

This menu is well on its way to being finished. Next you need to add the overlay layer to create the selected and activated button states.
Exploring the Overlay Layer
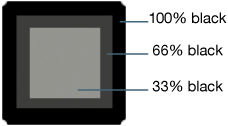
In the last exercise, you took a look at the overlay layer in the standardMenu.psd Photoshop document, and you saw that the overlay layer contained three squares. Furthermore, each square consisted of three grayscale colors. Let’s take a moment to explore this overlay layer further.
First, those three grayscale colors are distinct shades of black—specifically, 100% black, 66% black, and 33% black. (There’s also a fourth color in the overlay layer: 0% black, which is white.) The second thing to be aware of is that the shapes on the overlay layer exactly cover the black squares on the menu background. When properly configured in DVD Studio Pro, the shapes from the overlay layer provide a template used to map colored button states over the menu background. This theory may seem a bit esoteric at first, but a bit of practice shows exactly what’s going on. Let’s configure this overlay.
Tip
All transparent areas in an overlay image are mapped to 0% black (100% white).
1. Without releasing the mouse button, drag the standardMenu.psd item from the Assets container over the Menu Editor.
The Drop palette appears.

In the Menu Inspector, at the very bottom of the General tab is an Overlay File pop-up menu. This menu now shows that the standardMenu.psd asset is used as the overlay file. Directly under the Overlay File menu is an Overlay Layer pop-up menu. It currently says menuBackground, but this is not the correct overlay layer. By default, this menu displays the first, or lowest, layer in the Photoshop document. The overlay layer in this document is a couple of layers up, so you’ll need to select it from the Overlay Layer pop-up menu in the Inspector’s General Tab.
3. In the Inspector, click General Tab
In the middle of the General Tab there is an overlay file area.
4. From the Overlay Layer pop-up menu, choose the layer named Overlay.

5. In the Menu Editor, select a menu button.
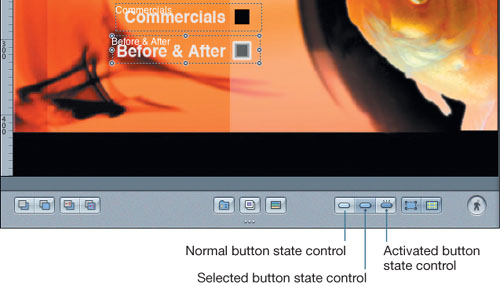
6. Use the button state controls at the bottom of the Menu Editor to preview your normal, selected, and activated button states.
The keyboard shortcut for toggling through button states is W.
Tip
If you can’t see the button state controls in the Menu Editor, your screen resolution might not have enough width. To fix this, make the Menu Editor wider, and the button state buttons will magically appear. You can also access the button state controls from the View menu.
Presto! Colored buttons. As you can see, DVD Studio Pro is mapping colors onto the menu, based on the shapes in the overlay layer.
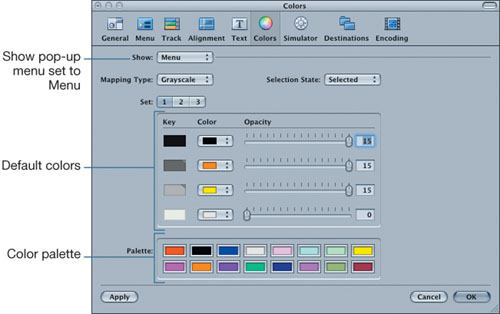
Using Advanced Overlays with Grayscale Color Mapping
In Lesson 11, you imported a four-color overlay from a Photoshop file to use in place of the simple overlay for the Tiger DVD’s main menu. In this exercise, we’ll go deeper by working with three grayscale colors defined for our Photoshop overlay image. As you’ll see, grayscale mapping gives you lots of control over the look of your button states.
The grayscale colors in the overlay image are called key colors. They literally provide a key that tells DVD Studio Pro how to create colored button states. However, DVD Studio Pro still needs to know what colors to map onto the overlay’s key colors. You provide this information by configuring the key colors in Menu Inspector’s Colors tab.
Tip
Grayscale color mapping is sometimes called luma mapping, because it’s actually the luminance, or brightness, of the grayscale colors that DVD Studio Pro reads.
1. In the Button Inspector, select the Colors tab.
2. From the Overlay Colors area, select Advanced.

3. Ensure that the Mapping Type is set to Grayscale.

The Inspector’s Key area updates to display a grayscale color key. All of the grayscale values used in the overlay layer have their own color and opacity settings.
Note
When you use grayscale mapping, you need a good monitor! If you are using a monitor with poor contrast reproduction, designing grayscale overlays is difficult because you will not see a noticeable difference between 100% black and 66% black. To solve this problem, you can use chroma (chrominance) mapping. Chroma mapping is available from the Colors tab’s Mapping Type area, and it works exactly the same way as grayscale mapping, except instead of using 100% black, 66% black, and 33% black in your overlay image, you use 100% black, 100% red, and 100% blue. For more information, refer to Lesson 11.
4. Ensure that the Selection State is set to Selected.
You’ll configure the selected state colors first. After they are set, you will move on to configure the activated colors.
5. Select different colors and opacity values for each of the grayscale values in the overlay, except for the 0% black (white) value.

6. Click the buttons you created in the Menu Editor, and see how the selected button’s overlay changes to the chosen colors and opacity values.
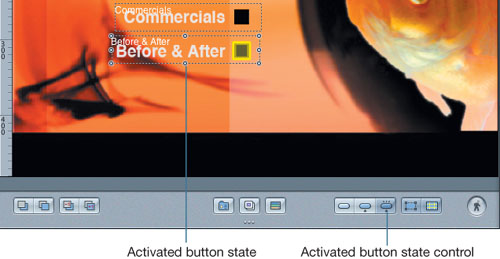
7. In the Inspector, set the Selection State to Activated.

Notice that enabling the Activated Selection State causes two things to happen in the Menu Editor. First, the selected button updates to display the activated colors. Second, the button state controls along the bottom of the Menu Editor change to visually reinforce that you are currently looking at the menu’s activated button states. As you can see, the Inspector’s Selection State area lets you cycle through the display of button states in the Menu Editor in exactly the same way as clicking the Button State controls at the bottom of the Menu Editor. It’s a handy little trick to know!
8. Select colors and opacity values for each of the activated state’s grayscale colors.
9. Simulate the menu and check out your handiwork.
Customizing Button Colors
The color palette in the Inspector’s Colors tab provides access to only 16 colors. That’s a pretty limited selection, and you may need to change the default colors to something a bit more appropriate for your menu design.
Fortunately, DVD Studio Pro gives you access to full 16-bit color for your buttons. Use the following steps to choose any color you need to preserve the integrity of your presentation.
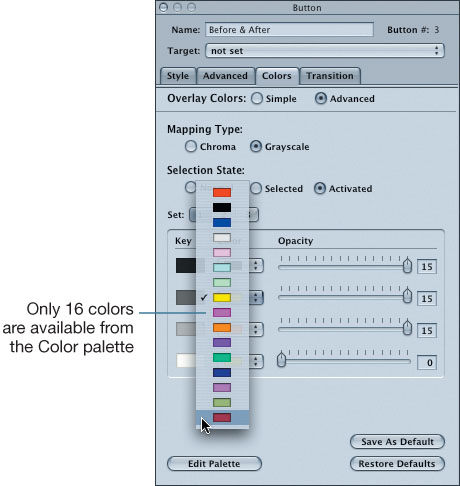
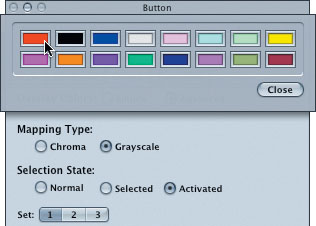
1. At the bottom of the Colors tab, click the Edit Palette button.

The Color palette drops down from the top of the Inspector.
2. Click the red color patch.
The Color Picker appears.
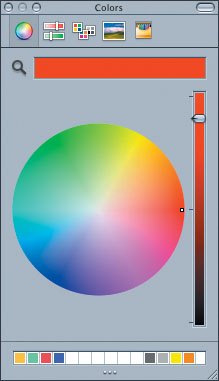
3. From the Color Picker, choose a color.
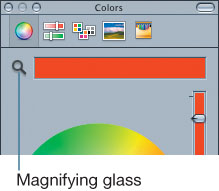
Tip
Use the Color Picker’s magnifying glass to sample colors from anywhere on your screen, including the Menu Editor! This is a great trick when you need to match your button states to existing colors on the menu.
4. Close the Color Picker.
The Color palette updates with the new color.
5. Click the Color palette’s Close button.
The new color is now available from all of the Menu Inspector’s color patches.
Saving New Default Colors
This project will use several menus by the time we’re done with it. To preserve the continuity of your display, each menu should use button states that are the same color. Although you could hand-configure each new menu to use the proper colors, there’s a better way.
Using the Inspector’s Save As Default button, you can make the current color and opacity values the default color and opacity values for all newly created menus. (Menus that already exist in the project will not be changed to match the new colors.) This expedites your workflow, because when you create a new menu, all the effort that goes into specifying overlay colors will have already been done. At that point, it’s just a simple matter of defining button hotspots for the new menu, and your work is almost finished.
1. In the bottom-right corner of the Inspector’s Colors tab, click the Save As Default button.

The colors specified for the selected and activated button states are now saved as the default button state colors. This change is also reflected in DVD Studio Pro’s Preferences.
2. Choose DVD Studio Pro > Preferences.
The Preferences window opens.
3. Select the Colors pane, and make sure the Show pop-up menu is set to Menu.
As you can see, the colors you selected in the Menu Inspector have now been saved as DVD Studio Pro’s default colors. If need be, you can also change the default colors, including the colors in the button state Color palette, right here in the Preferences window.
4. Close the Preferences window.
Refreshing Assets
By now you’ve seen that DVD Studio Pro will happily work with layered Photoshop files. Although you could flatten all the finished menu’s background layers into a single layer before bringing the document into DVD Studio Pro, it is usually best to leave your menu’s layer structure intact. When you change a source asset, this change ripples into your DVD Studio Pro project, so leaving the menu’s layer structure intact gives you a lot of flexibility to go back and make changes later, if necessary. This time-saving feature is quite powerful, so we suggest you use it!
In fact, we’ll put it to practice right now. Take a close look at the menu you are currently working on, and notice that the drop shadow has disappeared from the Black Box logo. This is because the drop shadow was added to the logo as a layer style in Photoshop.
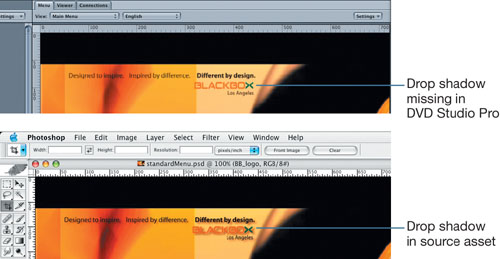
Photoshop uses a layer’s alpha channel to create layer styles, which it generates in real time whenever the document is open. But note that these layer styles are not actually represented as pixels on the layer. DVD Studio Pro does not know how to generate these Photoshop layer styles, so if you want layer styles to be visible in your DVD-Video project, you’ll need to turn all layer styles into actual pixels that DVD Studio Pro can see and display.
1. In the Assets tab, Ctrl-click the standardMenu.psd asset and choose Open in Editor from the shortcut menu.
The source asset opens in Photoshop. In the Layers palette, there is a small “f” symbol on the right side of the BB_logo layer. This is the Layer Style icon, which denotes that at least one layer style is attached to the layer.

Tip
To add layer styles to a layer in a Photoshop document, simply double-click the layer in the Layers tab. A dialog, as shown in the next part of the exercise, will prompt you to select and edit the style you wish to apply to the layer.
2. In the Layers palette, double-click the Layer Style icon.
The Layer Style window opens. Currently there is a drop shadow applied to this layer, but you could also enable Bevel and Emboss, Outer Glow, or any other layer style that fits.

3. Click OK to close the Layer Style window.
In the next few steps, you will render the layer style into actual pixels that DVD Studio Pro can see.
4. In the Layers palette, make sure the BB_logo layer is selected.
5. At the bottom of the Layers palette, click the Create New Layer icon (the one that looks like a turning page).

A new layer is added above the BB_logo layer, and this new layer is automatically selected.
6. In the Layers palette, select the BB_logo layer once again.
7. Link the new layer to the BB_logo layer by clicking its linking box.

At the top-right corner of the Layers palette is a small button with a right-pointing triangle. When clicked, it reveals the Layers palette menu. This menu contains several options for working with layers, including a few options used to combine layers together. Let’s do this now.
8. From the Layers palette menu, choose Merge Linked (or press Cmd-E).
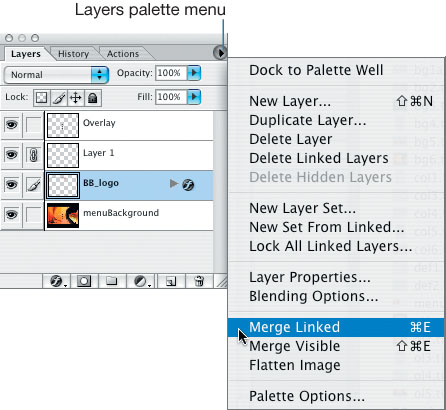
The layer style is rendered, and the Layer Style icon no longer appears on the right edge of the BB_logo layer.
9. Save the document.
10. Return to DVD Studio Pro, and look at the menu in the Menu Editor.
DVD Studio Pro understands that you’ve resaved the file, and it updates to display the drop shadow under the BB_logo layer.

Advanced Menu Audio
Without audio, a menu is only half an experience. And with tools like Apple Soundtrack at your disposal, there’s no reason not to add audio to your menus. (The menu audio in this project was created and mixed in Soundtrack.)
The DVD-Video specification includes only a few compliant digital audio formats. In this case, “compliant” simply means legal for use in DVD-Video. The compliant formats include the following:
• AC-3 (Dolby Digital)
• 16- or 24-bit, 48 or 96 kHz PCM (Pulse Code Modulated—AIFF, WAV, or SDII)
• MPEG1-Layer2
• DTS
If you include any of these audio formats in your project, DVD Studio Pro will use them in their native format. On the other hand, if you add files in noncompliant digital audio formats, such as MP3 or AAC, or 44.1 kHz PCM files ripped from an audio CD, DVD Studio Pro will happily accept them and let you add them to project items. However, when you build the project, DVD Studio Pro must first encode the files to 48 kHz, 16-bit DVD-Video–compliant files before it multiplexes the DVD-Video. With these rules in mind, let’s add some audio to the menu.
Tip
DVD Studio Pro will let you import and work with any type of audio file that QuickTime understands. If you’re unsure whether or not DVD Studio Pro will play a particular audio file, try opening and playing the file in QuickTime first.
Note
DVD Studio Pro will accept DTS audio files, but the Simulator does not include a DTS decoder. If you add DTS files to your project, you will need to build a finished disc and test it in a DVD-Video player that supports DTS playback before you will be able to hear the DTS audio.
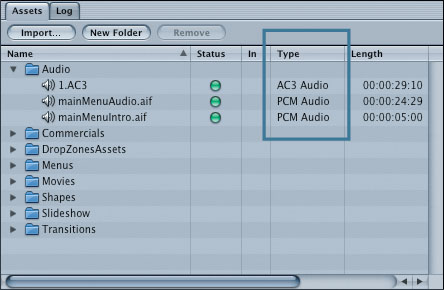
1. In the Assets tab, open the Audio folder and take a look inside.
This folder contains several audio files. If you take a close look at the Assets container’s Type column, you can see there is a mix of AC-3 and PCM files.
Note
If you can’t see the Assets tab’s Type column, grab the right edge of the Assets tab’s quadrant and drag it right to make the Assets tab wider.
2. In the Graphical view, select the Main Menu tile.
The Inspector updates to display the menu’s properties.
3. Click the Inspector’s General tab.
Toward the bottom of the General tab is an audio area that is currently empty. Watch this area as you add audio files to the menu.

4. From the Assets tab, drag the mainMenuIntro.aif asset over the Menu Editor, and use the Drop palette to add the audio file to your menu.

In the Inspector, the Menu tab’s Audio area updates to show that the mainMenuIntro.aif file has been added to the menu.
5. In the bottom-right corner of the Menu Editor, click the Motion button.
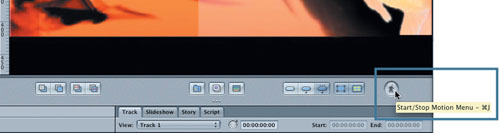
The audio plays.
6. Click the Motion button once again to stop audio playback.
Concatenating Audio Files
You can add multiple audio files to the same menu, and DVD Studio Pro will automatically concatenate them, or string them together, into one long audio stream. However, there is a small catch with concatenating audio—and, in fact, with menu audio in general:
Per the DVD-Video specification, all audio streams used in all project menus must be exactly the same format.
For example, you cannot mix AIFF with AC-3 files, and you also cannot mix 5.1 AC-3 files with 2.0 AC-3 files—“the same” means exactly the same! If you add different formats of audio streams to different project menus, DVD Studio Pro will stop and display the following warning dialog when you attempt to build your project.

More Info
There are several situations in which you might want to concatenate audio in a menu. For starters, you can easily add several audio streams together to make a standard still menu play longer. But there’s an even better reason.
When a menu loops, the transition from the end of the menu to the beginning is not seamless, and you will always experience a short glitch (a pause) in audio playback. If you are using a background loop that is perfectly trimmed, such as a drum loop, this inherent glitch will make it impossible to create a continuous, seamless playback loop. However, if there’s enough space on the disc, you can concatenate several copies of the same loop together, perhaps for several minutes or more! This makes it unlikely that the viewer will sit and watch the menu long enough to hear the glitch when the menu times out and replays.
1. From the Assets container, drag the mainMenuAudio.aif asset over the Menu Editor, and use the Drop palette’s Add to Existing Audio option.

In the Menu Editor, the General tab’s Audio area updates to show two different files.
Tip
To delete an audio file from the menu, select it in the Menu Inspector’s Audio area and press Delete.

While DVD Studio Pro has concatenated the audio files, it has not automatically updated the duration of the menu. In the bottom-left corner of the Inspector’s Audio area, the total Audio duration is displayed (00:00:29:29). Let’s quickly update the menu’s duration to match the duration of the audio streams. To do that, we need to switch back to the General tab.
2. In the Inspector, click the General tab.
Halfway down the General tab’s right edge there is a Duration setting.
3. Type 00:00:29:29 into the General tab’s Duration field, and press Return.

4. In the bottom-right corner of the Menu Editor, click the Motion button.
The audio plays, and after the mainMenuIntro.aif file is finished, the mainMenuAudio.aif file begins to play.
5. Click the Motion button one more time to turn off the audio.
6. From the Assets tab, drag the 1.AC3 asset over the Menu Editor, and use the Drop palette’s Add to Existing Audio option.

A warning dialog appears. This dialog says the audio file does not match the menu’s existing audio file format, so DVD Studio Pro won’t allow you to add it to the menu. Why? Because it’s an AC-3 file, and the other files in the menu are AIFFs. Remember: All audio files in all project menus must be exactly the same format. When it comes to menu audio, you can’t mix and match.

Using Motion Menus
It may surprise you to learn that in the end, all menus are basically motion menus. DVD-Video is designed to display only MPEG video streams. Consequently, all other graphics that go into your project—including Photoshop documents used in still menus and slideshows—must be converted to the MPEG format. When DVD Studio Pro builds your project, it encodes still menus, such as the standard menu you’re working on, into MPEG stills (technically, I-frames, but more on that in Lesson 17). So the question must be asked: If still menus are turned into MPEG video, can you also use moving MPEG video in menus? The answer, of course, is yes. Doing so creates a motion menu, and it’s a very easy process.
1. In the Assets tab, open the Menus folder and locate the MotionMainMenu.mov asset.

2. Double-click the MotionMainMenu.mov asset.
The movie opens in the Viewer and begins playing. It shows a sequence of fades that build the menu on the screen.
3. In the Graphical tab, double-click the Main Menu tile to open it in the Menu Editor.
4. From the Assets tab, drag the MotionMainMenu.mov file over to the Menu Editor, and choose Set Background.

The video asset is assigned as the menu’s background. Note that the highlights you’ve created stick to the menu, so there’s no need to alter your highlights after adding the new background asset.
5. In the bottom-right corner of the Menu Editor, click the Motion button.
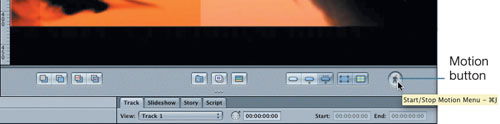
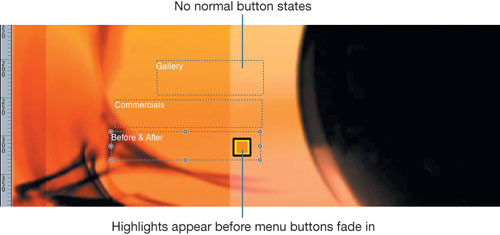
You’ve just created a motion menu. But there’s currently a bit of a problem. For starters, the button overlays appear before the buttons fade onto the screen. Additionally, there are no normal button states. Problems indeed, but easy ones to solve.
Setting a Loop Point
The motion menu you’re working on has a 5-second intro that consists of the button graphics fading onto the screen. Because the fade section acts as a transition into the menu, you need to ensure that the button overlays do not appear until after this transition has finished. In DVD Studio Pro, you can achieve this goal by setting a menu loop point.
As the name implies, the loop point setting tells the DVD player where to jump back to when the menu is set to loop. For example, at the end of this menu’s video clip, the DVD-Video player will refocus its laser back to the beginning of the menu and play it all over again. However, you do not want viewers to see the intro transition every time the menu loops, so setting a loop point ensures that the laser jumps back to the point defined as the loop point, instead of to the beginning of the menu.
Note
If you use DVD Studio Pro’s menu-compositing features to add text or drop zones to a menu, you will not be able to set a loop point.
1. In the Menu Inspector, select the General tab.
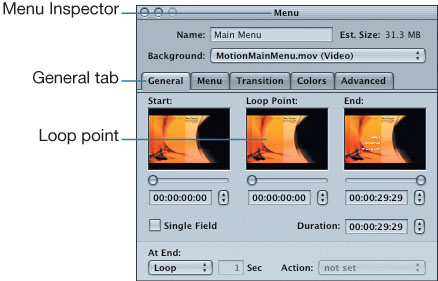
At the top of the General tab are three display areas: one for the menu start, one for the menu loop point, and one for the menu end. You can use the Start and End settings to trim the beginning or end of the video used in your menu, but for the purpose at hand, you are going to adjust the Loop Point setting.
2. On the Loop Point setting, click the increment button.

As you click the Increment button, a few things happen. First, the Menu Editor updates to display the video frame indicated by the Loop Point setting. This is important, because as you design motion menus, the Menu Editor, when not in motion, will always display the frame exactly at the loop point, not the beginning or end frames. Second, the timecode setting to the left of the Increment button jumps by 15 frames every time you click to increase the loop point position. As you’ll come to see in Lesson 17, all MPEG streams are divided into groups of pictures, and each group of pictures is typically 15 frames in duration. Furthermore, each group of pictures has a single I-frame, and it’s these I-frames that the loop point must latch on to. For this reason, you cannot create frame-accurate loop points inside DVD Studio Pro. Keep this in mind when designing your motion menus!
Tip
If you need to set a loop point that is frame-accurate, there’s a bit of extra work involved. First, open the source video asset in Final Cut Pro. Then set a chapter or compression marker on exactly the frame where you want the loop point to occur. Next, export an MPEG-2 stream directly from Final Cut Pro’s Timeline, either using the File > Export > Using QuickTime Conversion option, or the File > Export > Using Compressor option. When the file is encoded to MPEG-2, the frame you tagged with the chapter marker will become an I-frame. Back in DVD Studio Pro, you can then set the loop point to this I-frame, and your menu will loop back to exactly the frame you require.
3. In the Loop Point timecode box, type 5.0 and press Return.
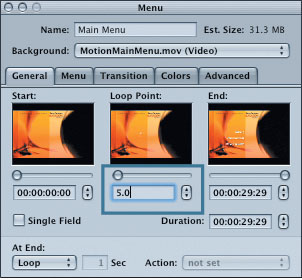
The loop point jumps to the frame at timecode value 00:00:05:00. Notice that you didn’t have to type all of the zeros in the timecode value. DVD Studio Pro is smart, and it realizes that “5.0” means second number 5, frame number 00. It’s a handy workflow feature!
4. Set the General tab’s At End pop-up menu to Loop.

5. Simulate the menu.
OK, the overlays now display only after the button graphics fade onscreen. This menu is starting to look good. However, there are still no normal button states. You’ll fix this in the next section.
6. Close the Simulator.
Advanced Overlay Tricks
Earlier in this lesson, you adjusted the selected and activated overlay colors for this menu, but you left the normal state overlays untouched. This was because the normal state for the buttons was already included in the background graphics, so there was no need to set up the normal state overlays—doing so would have obscured the graphics on the menu background below. However, the video you added as the menu background does not have normal button states on it, so let’s use the normal state overlays to show viewers where to click.
1. In the Menu Inspector, choose the Colors tab.
2. In the Colors tab’s Selection State area, select Normal.

Notice that all the key colors in the normal state are assigned colors, but these colors use an opacity value of 0, which means they are currently completely transparent.
3. Increase the opacity values for the 33% black and 66% black key colors only.

Why 66% and 33% black? As you may recall, the overlay uses three different grayscale values. The areas covered by 33% and 66% black are exactly the same size as the black square from the original background graphics. If you look at the Menu Editor, you’ll see that there are now multicolored squares exactly where the normal button states should be. However, these squares should be black, so let’s adjust the color next.
4. Set both the 33% and 66% key colors to black.

The overlays turn on only after the intro transition has finished, and the normal button states are now displayed. The menu now looks exactly as it should.
Creating Layered Menus
Layered menus are not often used in DVD-Video. They suffer from a few basic problems. For example, they are slow to respond when a user interacts with them on a computer, and they can’t have audio or motion backgrounds. But don’t stigmatize layered menus for what they can’t do, because these menus have definite uses.
Layered menus use a separate layer in a Photoshop document for the menu background graphics, and additional layers for each button state. When a button is selected or activated, DVD Studio Pro enables the entire layer for that button state.
The advantage of layered menus is that selecting a button can “turn on” graphics outside of a button’s hotspot. This is a common feature of the Internet, where, for example, selecting a button causes information elsewhere on the Web page to update. Corporate DVD-Videos are often based on concepts gleaned from the Internet, and these presentations sometimes have an information area on the menu that updates as product pictures are selected. Layered menus provide this type of interactivity, whereas standard menus can’t.
Additionally, layered menus are not limited by the 16 colors in the overlay key color palette. Button states on a layered menu can be any color or design that you can create in Photoshop. With a bit of imagination, layered menus can be much more visually engaging than standard menus.
1. In the Assets tab’s Menus folder, Ctrl-click the layeredMenu.psd asset and choose Open in Editor from the shortcut menu.
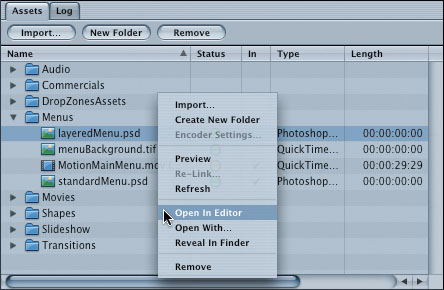
The menu opens in Photoshop.

2. In the Layers palette, use the Eye icon to turn the layers on and off, and check out the graphics on each layer.
As you turn layers on and off, notice that each layer is named for the graphics of the button state it contains. Also notice the empty layers named with a dash (–). These layers are used to group button states together. As you’ll come to see, these “dash layers” make it easier to identify which layer is which when you’re creating button states in DVD Studio Pro.
Adding a Layered Menu
Follow these steps to add a layered menu to your project.
1. Back in DVD Studio Pro, click the Graphical tab; then Ctrl-click in an empty space in the Graphical view to bring up the contextual menu, and choose Add > Layered menu.
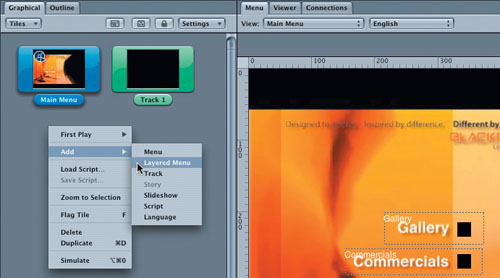
A layered menu item is added to the Graphical view, and the Menu Editor updates to display the new menu, which is currently empty. In the Graphical view, there’s not much visual difference between the layered menu item and the standard menu item you created earlier. Layered menus are a darker shade of blue, but that’s all there is to visually differentiate the two. Don’t confuse them with standard menus, because you can’t make a layered menu in a standard menu item!
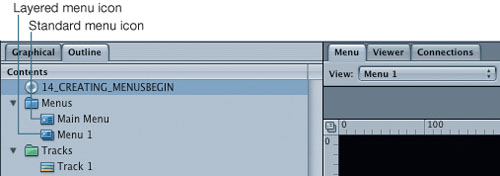
Note
In the Outline tab and in the toolbar, there is a bit of a visual difference between layered and standard menus. If you take a close look, you’ll see that standard menus have a single layer in the icon, whereas layered menus have two layers.
2. From the Assets tab, drag the layeredMenu.psd asset and hold it over the Menu Editor.
The Drop palette appears.
3. Choose Set Background, No Layers Visible.

Why Set Background, No Layers Visible? Because layered menus commonly have lots of layers used for button states but only one or two layers used for the background. It’s much easier to turn on one or two layers than to turn off dozens of button state layers. So when you add layered menu assets using the Menu Editor’s Drop palette, it’s easier to start with no layers visible.
4. In the Inspector, looking at the General tab’s Background area, enable the bottom two layers in the list: BB_logo and menuBackground.

5. Drag out hotspots for all three of the menu’s buttons.

6. Name the buttons Before, After, and Main Menu.
Creating Layered Menu Buttons
The trick to layered menus is the way you assign layers to button states. Each individual button on the menu will use unique layers from the Photoshop document. Let’s start the process by configuring the Before button.
1. In the Menu Editor, select the Before button.

The Inspector updates to display the button’s properties. Notice that in layered menus, the Button Inspector has a Layers tab, which isn’t there when you’re working with standard menus.
2. In the Inspector, choose the Layers tab.

The Layers tab is divided into four columns. There’s a column each for the normal, selected, and activated states, and a final column displaying all the layers in the Photoshop document.
Note
The layers named with a dash are those empty layers you saw in the Photoshop document a few pages ago. Notice how the “dash layers” help to visually group button states together.
3. In the Normal column, select the check box for the Before – Normal layer.
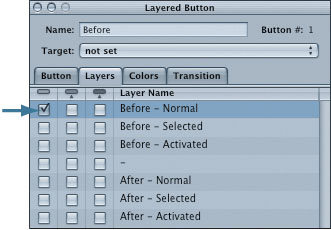
4. Finish this button by selecting the appropriate check boxes for the Before button’s selected and activated states.

5. Repeat steps 1 through 4 to assign button states for the menu’s After and Main Menu buttons.
6. Simulate the menu, and use the mouse to interact with the menu buttons.

Graphic updates as you interact with menu buttons
The graphic on the right side of the screen updates as you select each new button, giving you a preview of the item the button targets. Cool!
7. Save your project.
Layered menus are not part of the DVD-Video specification. In fact, they are unique to DVD Studio Pro. When you build the project, DVD Studio Pro effectively makes a separate menu for each button state in the layered menu and uses auto actions to jump among this series of new, single-state menus. The reason you can’t have audio in layered menus is directly related to this fact—it’s because you can’t have a single audio stream stretch across multiple menus.
Additionally, every time the DVD-Video player’s laser has to refocus on a different project item, you will always experience a short pause, sometimes up to a second or more. A layered menu is converted into a series of menus that the DVD-Video player must jump through as buttons are selected and activated. All of this jumping around means that layered menus are slow to respond to viewer interaction.
By the way, DVD Studio Pro is not doing anything here that you wouldn’t be able to create manually in this program or other DVD authoring software. It takes time, but you can create your own series of standard menus and use the Auto Action function to have buttons automatically jump from menu to menu as they are selected. Remember, standard menus can use audio, so this is a great way to create the illusion of button sounds that trigger when a button is selected. Who said you couldn’t have mouse-over sounds?

Lesson Review
1. DVD Studio Pro lets you create two types of menus. What are they?
2. The Square Pixel dimensions for creating menus in Photoshop are what?
3. An overlay can use three shades of black, which map to different colors and/or opacity values for your buttons in DVD Studio Pro. What are the types of shades of black?
4. The color pallet in DVD Studio Pro lets you choose from X number of different colors for you buttons. X equals what?
5. True or false: If you change a source asset on your hard drive, the change ripples into your DVD Studio Pro project.
6. Unless the motion button is enabled, the Menu editor always shows you which frame of a motion menu?
Answers
1. Standard overlay menus, and (Photoshop) layered menus.
3. 100% Black, 66% Black, and 33% Black.
4. 16, though you can edit the pallet to make those 16 colors any color you desire.
6. The frame directly under the Loop point, as set in the Menu Inspector’s General tab.
Keyboard Shortcuts
![]()