
Lesson 11. Creating Menus with Overlays
Lesson Files
Lessons > 11_Tiger_finished
Media
Media > Tiger folder
Time
This lesson takes approximately 60 minutes to complete.
Goals
Understand button states
Learn about the creation of menus and overlays
Create a simple overlay
Add a motion background and make it loop
Understand chroma mapping for advanced overlays
Create an advanced overlay
Menu creation is the heart of DVD authoring. In this lesson, you will learn how to create simple and intermediate menus using overlay graphics and highlights, which are an essential part of the menu creation process. When users select buttons by pressing arrow buttons on their remote controls, they need a way to know which button is currently selected or activated. An overlay provides visual feedback to indicate whether buttons are in their normal, selected, or activated states.
In addition to working with overlays, you will also learn more about creating motion menus and using Adobe Photoshop with DVD Studio Pro.
We’ll start with a preview of the Tiger project.
The Tiger DVD Project
The Tiger project is a promotional tool for a documentary called Tigers: Tracking a Legend. In Lesson 10, you encoded the video and audio assets for the Tiger project. Now let’s take a closer look at the navigational structure for this project, which will be our focus in this lesson and the next two lessons.

The Tiger project contains a “making of” documentary, as well as a slideshow. In addition to these elements, there are two transitional movies that are designed to play seamlessly into and out of the main menu. The main menu employs sophisticated features such as advanced overlays, which allow your buttons to be any shape and have multiple highlight colors. Using markers to create stories, and a couple of simple scripts, you will learn how to add exciting visual and navigational enhancements to your DVDs while taking negligible disc space away from the all-important video and audio assets.
As you can see in the following storyboard, the first-play action in the DVD is called TigerIntro, which is the first of two transitional movies used in this project. When TigerIntro is finished, it links to the main menu, which is a motion menu with an MPEG-2 file as the background asset. TigerIntro is a transitional movie because the video asset that is the basis for TigerIntro and the asset that is the background for the main menu are two parts of the same movie. When the DVD is inserted, TigerIntro will play seamlessly into the main menu, as if the two elements were one movie—because, of course, they are.

The main menu has two buttons—Play Title and Slideshow—which will lead viewers to the “making of” documentary and the slideshow, respectively. However, instead of the Play Title button linking to the TigerMovie track directly, it links to a second transitional movie called TigerTransition1. Just as you can have a transition into a menu, you can have a transition out of one. TigerTransition1 is the bridge between the main menu and the TigerMovie track. When the Play Title button is activated, the TigerTransition1 movie will play.
Note that transitional movies don’t necessarily have to use a frame adjacent to the menu’s last frame as a starting point, although the transition will be smoother if it does. Since the TigerTransition1 movie is triggered by the viewer’s selecting a button with the remote, and the viewer could make that choice at any time during the motion menu’s duration, matching frames isn’t an option anyway. Although the transitional movie out of the main menu is not a continuation of the menu background movie, the content is similar enough to create a suitably smooth transition.
Let’s play a sample build of the Tiger DVD in Apple DVD Player.
Playing the Tiger DVD with DVD Player
1. Insert this book’s DVD-Video into your DVD-ROM drive or a DVD player.
This will automatically launch the DVD Player application, which will start playing the disc.
2. Click the Tiger DVD button to begin playing the project.
The first thing that plays is the TigerIntro movie. Watch how it transitions into the main menu. That’s the purpose of a transitional movie—it helps one element flow into another.
Note
If you’re watching on a computer, you may notice a slight pause between the end of the TigerIntro and the main menu, which is due to limitations of the software DVD Player and may or may not be present on the final DVD.
In the main menu the Play Title button is in its selected state, indicated by yellow highlighting of the text and an orange tiger pawprint graphic to the right of the text.
3. Select the Slideshow button by clicking the down arrow button on the remote control, by pressing the down arrow on your keyboard, or by using your mouse to position the pointer over the Slideshow button.
Note that the yellow highlight and the orange pawprint have moved to the Slideshow button.
4. Click the Slideshow button.
Did you notice the yellow highlight moving from the text to the pawprint? Clearly something new is going on that indicates selected and activated button states. You will learn how to do this in the following exercises.
The slideshow will play. When it is finished, the screen will return to the main menu.
5. Select the Play Title button by clicking the remote control arrow buttons, using the arrow keys on the keyboard, or dragging the mouse.
6. Activate the button by pressing Return on the keyboard, clicking the Enter button on the remote control, or clicking the button with the mouse.
7. Watch the movie to familiarize yourself with the content. If you wish, click the Chapter Skip Forward button on the remote or press the right arrow key on your keyboard to jump to other chapters.
When the movie is done, it will jump back to the main menu.
8. Watch the menu loop twice.
After the second menu loop, the menu will time out, and a script will randomly play one of four pieces of video that you will define as stories in Lesson 12. In that lesson, you will also learn how to write a menu loop script and a random play script. This will help you to make your DVD more interesting and interactive.
9. Quit the player application when you’re finished.
Note
Chapter markers in movies still function when accessed by the remote control, even if there is no chapter index menu. Creating a chapter index menu at a later time is simple, so creating chapter markers for your movies is usually a good idea even if you’re not sure whether you will be creating a chapter index menu.
Now that you have seen the blueprint and final build for the Tiger DVD, let’s get down to the topic of this lesson: menu design with overlays.
Creating Menus with a Simple Overlay
The interactive experience you create for a user should be attractive, easy to understand, and as seamless as possible. Creating your own menu designs is an important part of the process. In order to incorporate your own designs into a DVD project, you need to understand overlays, which define how buttons look when they are selected or activated. Overlays are the fastest method for navigating and displaying menus on a DVD player and are used in nearly all professional DVD titles.
Every button has three states you can define: normal, selected, and activated. Each state can be assigned a different highlight color in DVD Studio Pro. (Highlights are discussed in a later section of this lesson.) The normal state is how a button looks before the user has selected it. Once a viewer uses the remote control to choose a button, it is considered selected. When the user presses Enter on the remote control, the button is activated.
An overlay produces the simple outline or graphic that is used to highlight a button in order to indicate its state. The result is that when you assign a highlight color to a button state in DVD Studio Pro, only the area defined by the overlay will be highlighted when the button is selected or activated.
Just as a stencil constrains a brush stroke of color to a defined shape or character, the overlay constrains the color of the highlight to specifically defined words or shapes. Therefore, an overlay is actually an additional still image, usually created in Photoshop, that contains a map of where these words or shapes appear, corresponding to the look and composition of the menu. You can create simple overlay files, which contain one color map, or more complex overlays with up to four colors, as described later in this lesson.
More Info
Lesson 14 builds on many of the concepts introduced in this lesson. For an in-depth treatment of how menu overlays are created, see Lesson 14.
Tips for Designing Menu Graphics
The following are some suggestions for creating graphics that will look best on a television set or video monitor. Since video is restricted in its use of colors (graphics applications such as Photoshop have a much broader palette) and image resolution, you need to consider some basic design principles for motion design work before creating your menus and overlays:
• Avoid text that is smaller than 18 to 24 points, depending on the font.
• Use sans serif fonts whenever possible (fonts without the “curls” at the ends of letters).
• Design your overlays without any soft or feathered edges.
• Make all of the lines in your graphics at least 3 pixels thick. Since most video still uses fields instead of progressive frames, thin lines will appear to flicker or buzz on an interlaced display.
• Be wary of any colors that are shifted toward the red end of the spectrum, since they tend to flicker, especially in thin graphics.
• Avoid heavily saturated colors (particularly bright red), which tend to bleed and look bad on a television screen.
• Because TV colors are not as rich, vibrant, or precise as computer colors, be wary of subtle shades of red and blue, which tend not to reproduce accurately.
• To avoid problems with bright colors interfering with the audio on older TV sets, keep your primary color levels (red, green, and blue) to a value of 235 or lower.
Perhaps the most important and peculiar issue when creating graphics for a menu is how the images are sized. Since graphic applications use square pixels, which are the standard for computer displays, you need to account for the nonsquare pixels that are used by video. For this reason, you always begin by creating a document in Photoshop with an image size of 720 × 534, which DVD Studio Pro will later resize down to 720 × 480. If you are creating menus with a 16:9 aspect ratio, they should start at 864 × 480 (for NTSC) before DSP resizes them to 720 × 480.

If you do not resize your images in this way, they will appear stretched on your DVD. Circles will become ovals, and squares will become rectangles. Fortunately, Photoshop 7 and CS include presets for proper DVD proportions, which should make it easier to remember the correct size when creating a new document.
For more information about this important topic, see the discussion of pixel aspect ratio in Lesson 14.
Note
Always remember to select the proper aspect ratio (4:3 or 16:9) as the first step when you create a new menu. Do this before adding graphics. Otherwise, your overlays will not be aligned properly, and you will need to delete them and add them back to the menu.
Importing the Tiger Assets Folder
Since you will be using the files in the Tiger_Assets folder for the remaining lessons in this project, you should simply import the entire folder into the Assets tab. All of the files you will need for this project will be available for use in the Assets tab.
1. Launch DVD Studio Pro. Create a new project by choosing File > New.
2. Press F3 to make sure you are in the Advanced configuration.
3. On the Disc Inspector’s General tab, click the NTSC radio button in the Disc Inspector to switch the Video Standard setting to NTSC.

Note
Directly above the NTSC radio button there is an SD radio button. SD stands for “StandardDefinition Video,” or the 720 × 480 NTSC video you are editing now.
4. Click the Import button at the top of the Assets tab.

5. Navigate to your Media folder on your hard drive, then the Tiger folder, and select the folder Tiger_Assets.
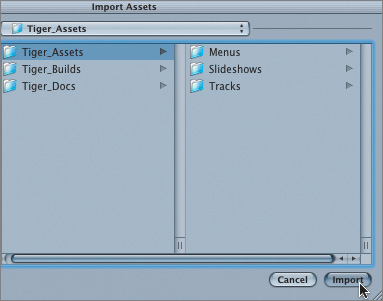
6. Click Import to bring the entire folder into DVD Studio Pro.
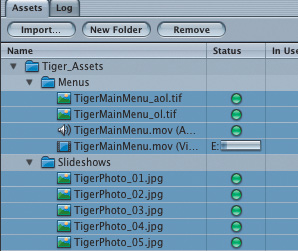
The main folder with all of its subfolders should now be named and organized for you in the Assets tab.
7. Choose File > Save and save your project as Tiger_DVD. Put it on your media hard drive, in the My_Projects folder.
Adding a Motion Background and Overlay
For this exercise, you will be creating a motion menu with an overlay for the main menu of the Tiger project.
As you know, DVD Studio Pro enables you to create motion menus, which are much more exciting than still menus, by assigning an MPEG-2 movie as the menu background instead of a still image or Photoshop document. Many DVD titles include some form of motion menu to add interest to the interactive experience. The background can be motion video, but so can the buttons, which can display video from the asset they are linked to.
The majority of motion menus consist of a video clip that is approximately 15 to 40 seconds long. A motion menu is usually set to loop, although you can make it jump to a track or other menu element when it times out, after playing for a set amount of time.
Typically, motion menus are created in applications such as Final Cut Pro or Motion. Using their powerful compositing features, you can design complex animations, motion graphics, and buttons for use as menu backgrounds. Button areas, including text, can be composited directly onto a motion background in an application such as Final Cut Pro or Motion and then used as a basis for an overlay file created in Photoshop.
You can use both simple and advanced overlays with motion backgrounds. In the following exercise, you will learn how to work with simple overlays. Later in the chapter, you will use the same menu with an advanced overlay.
1. In the Assets tab, click the TigerMainMenu.mov (Video) file from the Tiger_Assets > Menus folder and drag it onto the Menu Editor.
Do not release the mouse button until the Drop palette appears and you have made your selection in the next step.
2. Choose Set Background from the list of choices in the Drop palette.
Your main menu now has a motion video background in place. The TigerMainMenu.mov (Audio) was automatically imported as well.

Take a look at the words “Play Title” and “Slideshow” on the menu. These background button graphics represent the normal state for buttons in your menu. The normal state is how a button looks before a user has selected it. Since this state does not require an overlay to help define it, you can just incorporate the normal state of a button by making it a part of your background, as we have done for you in this menu. Creating a button graphic on a still image or compositing it onto a video is all you need to do for a normal-state button.
3. In the Assets tab, double-click the TigerMainMenu_ol.tif file to preview the overlay graphic file.
This image is now being displayed in the Viewer tab. As you can see, this simple overlay graphic is a black-and-white image, with the black pixels indicating the overlay area and the white pixels indicating transparency. Notice that the overlay graphic representing the text is a little bit larger than the text that is rendered into the motion background.
4. Click the Menu tab to get back to the menu.
5. Again drag TigerMainMenu_ol.tif from the Assets tab, but this time onto the Menu Editor.
6. Choose Set Overlay from the list of choices in the Drop palette.
The simple overlay graphic is assigned to the menu.

Note
You can also assign background and overlay layers in the Inspector, which you will do for the more complex overlays you’ll create later in this lesson.
OK, nothing happened...yet. When you create button areas in the next exercise, the intersection of the button area and the overlay will produce the shape of the highlight colors that indicate the button states.
Creating Buttons for the Overlay
Now that your menu background and overlay are in place, you need to define the active button areas for your menu. You can do this using the same techniques you used to create buttons in previous lessons.
1. In the Menu Editor window, click the Show Button Selected State button.

Note
Make sure your Menu Editor window is wide enough to display the button state icons. If it is too narrow, these button state icons in the bottom right of the window will disappear.
Keeping the selected state showing for your button overlays will help you to accurately draw and position your button selection areas in the next steps. You will notice the overlay graphic as you click each button while creating it in the Menu Editor. Since the overlay will help define the active area for your buttons, the overlay must precisely match the positions of any buttons or graphics you have added to the background.
2. Click and drag on the menu background to create a new button selection area.
3. Resize the active area of the button by dragging a corner of the button outline to cover the overlay image exactly. Then choose View > Display State > Composite.
When drawing buttons in the Menu Editor, you are defining the active button area.

Note
Depending on the color assigned to the selected state, your button may appear different from the one pictured here.
4. Click the first button area and duplicate it by holding down the Option key while dragging it.

5. Position the new button area precisely over the next button graphic on the menu background, as you did for the first button.
Tip
You can use align and distribute tools to help you precisely position your buttons. Select each button while holding down the Shift key, Ctrl-click one of the buttons, and choose a command from the Align Objects or Distribute Objects selections of the contextual menu.
6. Click Button 1 and name it Play Title in the Name field of the Inspector.

Tip
If the Inspector is not open, you can always get there by clicking the Inspector icon in the toolbar or pressing Cmd-Option-I.
7. Click Button 2 and name it Slideshow.
Choosing Highlights for Selected and Activated States
After your button areas have been drawn and named, it is time to set the selected and activated highlights for each button. The highlights you will select use the overlay graphic as the basis for the area where the colors show up.
1. Click your menu’s background in the Menu Editor to open the Menu Inspector.
This will deselect any buttons and put the menu’s parameters into the Inspector. The title bar now displays “Menu.”
2. Rename your menu by typing TigerMainMenu in the Name field.
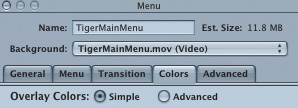
3. Click the Colors tab.
4. Make sure that the Overlay Colors option is set to Simple. If it’s not, click the Simple radio button.
Selecting this button will provide the highlight color choices only for simple overlays. Later in this lesson, you will learn how to use advanced overlays.
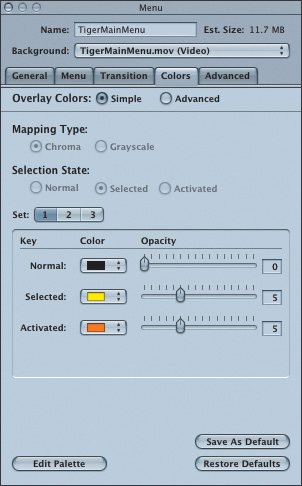
5. Make sure that the Opacity slider for your normal button state is set to 0.
Since your normal state buttons are part of the background image, you should set the Opacity to 0 (completely transparent), so that the menu graphics are always visible and your overlays are not.
6. Choose a yellow color for your selected button state and set the Opacity to 5.
On the scale for Opacity settings, 15 is the maximum value and is considered 100 percent, or completely opaque. A setting of 5 will give you an Opacity value of approximately 33 percent, which should make your underlying button graphics easily visible, even with the overlay on top of them. Remember, if the Opacity values are set too high, the overlay colors might appear too bright on a television set.
7. Select an orange color for your activated button state, and set the Opacity slider to 5.
Although the activated state is not as crucial as the selected state (since the activated state just flashes briefly on the screen before the disc jumps to the item), it does help to provide additional feedback and a more consistent user experience.
Note
You can change the colors chosen for this project to suit your own design preferences.
8. Save your project.
9. Click Simulate in the toolbar to see the selected and activated states of your buttons.
10. Close the Simulator.
Looping the Motion Menu
When a motion menu loops, it plays through and then jumps back, by default, to the first frame. For this reason, a simple choice when designing a motion menu in Final Cut Pro (or any other application) is to fade up your audio at the beginning and fade it down at the end. Because the ending and beginning volume is zero, the resulting loop will not contain any noticeable changes in audio that would bother a viewer.
As far as the video of your motion menu is concerned, you may also fade in and fade out the video to create a smoother point for transitioning back to the beginning. Another common technique is to find a suitable frame to end on, which you also set as the first frame of the video asset, to create a seamless or “invisible” loop. Once you have your motion background designed for a nearly perfect loop, you should set the looping option in the Menu Inspector.
Note
Loops will not be “perfect” on a DVD, since there will be a pause as the player jumps from the last frame back to the beginning of the clip.
1. In the Menu Inspector window, click the General tab.
2. Make sure that Loop is selected from the At End pop-up menu.
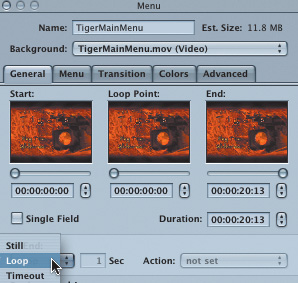
The At End pop-up menu allows you to decide what the motion menu does when it reaches the end of a clip. You can choose to freeze on a still frame (the last frame of your video clip), continue looping, or time out after a defined number of seconds. When you decide to time out, you can then choose where the menu should jump to, such as another menu or track in your project.
Creating Menus with Advanced Overlays
In addition to using simple overlays, you can use what DVD Studio Pro refers to as advanced overlays to create more colorful button overlays. Although an advanced overlay is limited to the use of four simultaneous colors, you can still create many interesting designs.
More Info
Lesson 14 builds on many of the concepts introduced in this section. For an in-depth treatment of advanced overlays, see Lesson 14.
Understanding Key Colors
Advanced overlays contain advanced color mapping—that is, key colors—which gives you a lot more flexibility in your designs. For instance, you can assign more than one highlight color to the selected and activated states, or even modify the appearance of the overlay to include a graphic or other elements.
There are two methods of creating these key colors for advanced overlays: chroma mapping and grayscale (or luma) mapping. Essentially, both methods produce the same result, since each uses four key colors or shades to define the overlay colors. The chroma mapping method uses black, red, blue, and white; grayscale (luma) uses black, dark gray (at 66 percent), light gray (at 33 percent), and white. You would use one of these sets of colors in Photoshop to create your button elements.
When you import the overlay into DVD Studio Pro, you choose the colors with which you replace each of these four key colors. For example, a red button element you created in Photoshop could be designated as your yellow highlight in DVD Studio Pro.
As an introduction to the concept of key colors, you will use a graphic file with an advanced overlay in the next series of exercises.
Adding an Advanced Overlay
In the following exercise, you will use an advanced overlay to use in place of the simple overlay you created for the main menu of the Tiger DVD. By seeing both of these overlays in the menu, you will understand the benefits of each one and how you can use them.
1. Double-click TigerMainMenu_aol.tif from the Assets tab to preview this graphic file.

This advanced overlay graphic has four colors: black, red, blue, and white. Each of the colors in the overlay constrains a highlight color to the pixel areas that are defined by that particular color, as you will see after completing the following steps. The color white is almost always assigned an Opacity of 0 so that only the black text, red outline, and blue graphic will receive highlights. The pawprint graphic, which is a new element not indicated by anything in the background layer, will probably receive an Opacity of 15 so that it will stand out. The two remaining colors will have their Opacity values set somewhere in between to reveal the text beneath them, and they can be any color you wish.
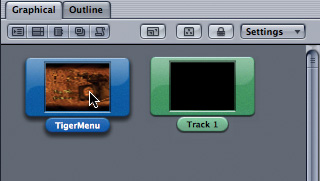
2. Click the Graphical tab, and double-click the TigerMainMenu tile.
3. On the Menu Inspector’s General tab, click the Overlay pop-up menu and choose Tiger_Assets > Menus > TigerMainMenu_aol.tif.

4. Expand the button selection area for each button farther to the right, to encapsulate the new design elements on the advanced overlay graphic.

Since our button areas were already created for the simple overlay in an earlier exercise, you can use the existing button areas by changing their sizes. You can enter precise button dimensions in the Coordinates & Size area of the Advanced tab in the Inspector if you want to have exact button sizes.
Choosing the Highlight Colors for an Advanced Overlay
Once the advanced overlay graphic is in place over your background, you can make decisions regarding the use of different highlight colors.
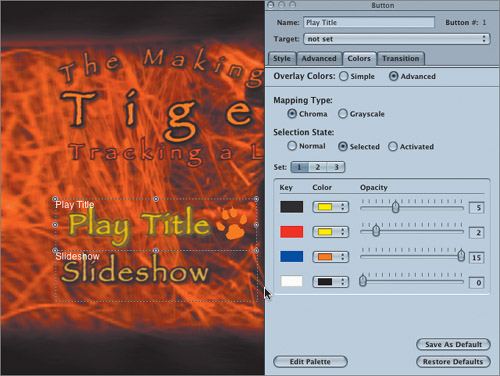
1. In your Menu Editor, click the Play Title button to load the button’s parameters into the Inspector.
2. In the Inspector, select the Colors tab.
3. Click the Advanced radio button in the Overlay Colors area.
4. Select Chroma as the Mapping Type.

Notice that the four colors listed under Key are black, red, blue, and white, just like in the overlay.
5. Click the Normal radio button in the Selection State area.
6. Make sure that all of the Opacity sliders are set to 0.
The Opacity sliders are set to 0 by default. Since the normal state for the Menu button is to be part of our background image, the overlay should not be visible.
7. Click the Selected radio button in the Selection State area.
All of the adjustments you make will be applied to the buttons using the overlay when the viewer selects them. You can test the effects of the changes you make by selecting the buttons and clicking the Show Button Selected State button at the bottom of the Menu Editor window, just as you did for the simple overlay.
8. Using the Color pop-up menus, choose yellow for the black key, and set an Opacity of 5.
If you followed the previous simple overlay exercise to the letter, you may notice that this step was already done. This is because the simple and advanced overlays both use black as the main selection area for this project.
9. Choose yellow for the red key with an Opacity of 2.
10. Choose orange for the blue key with an Opacity of 15.
As you saw earlier in the lesson when you worked with simple overlays, the scale for Opacity settings has a maximum value of 15, which is considered 100 percent, or completely opaque. A setting of 5 will give you an Opacity value of approximately 33 percent, which should make your underlying button graphics easily visible, even with the overlay on top of them. You should set the Opacity slider to 0 for the color white, since that is the color used as the background. Note that if the Opacity values are set too high, the overlay colors may appear too bright on a television set.
Note
For most projects, the key color white will always be removed (made transparent) by setting the Opacity slider to 0.
Next, you’ll invert the color set in the selected state to give it a nice touch when the button state changes from selected to activated.
11. Click the Activated radio button in the Selection State area.
12. Choose orange for the black key with an Opacity of 5.
13. Choose orange for the red key with an Opacity of 2.
14. Choose yellow for the blue key with an Opacity of 15.
All of the adjustments you make will be applied to all of the buttons using the overlay when they are activated by a user. You can test the effects of the changes you make by selecting a button and clicking the Show Button State Activated button at the bottom of the Menu Editor window.

15. In the Menu Editor, Ctrl-click the menu’s background and choose Simulate Menu to test the menu’s button states for the correct selected and activated highlights.
Tip
Testing highlights is a lot simpler before linking button areas to project elements, because you can test each button’s activated state without jumping away from the menu.

16. Close the Simulator window.
17. Choose File > Save to save your project.
Lesson Review
1. What does an overlay do?
2. How many button states can you define in DVD Studio Pro?
3. What is the pixel width of the thinnest horizontal lines you should use when designing for video?
4. True or false: Overlay graphics outside of a button’s hotspot will not display.
5. Can menu’s loop seamlessly (without a pause or glitch)?
6. What are the two types of color mapping you can use with DVD Studio Pro?
Answers
1. It produces the simple outline or graphic that is used to highlight a button in order to indicate it’s state.
2. Three: Normal, Selected, and Activated.
3. Three pixels. Lines that are horizontally thinner than that will appear to flicker on interlaced TVs.
4. True. If you want to see the overlay graphics, they must be inside the button’s rectangular hotspot.
5. No. When a menu loops, the player jumps from the last frame back to the first frame, and there will be a pause of up to one second.
6. Chroma mapping (100% Black, Red, Blue, and white), and grayscale/luma mapping (100% black, 66% black, 33% black, and 0% black/100% white).
Keyboard Shortcuts
