Lesson 4. Creating Menus Within DVD Studio Pro
Lesson Files
Lessons > 04_Swiss_start (or the My_Projects > Swiss_DVD project file you created in Lesson 3)
Media
Media > Swiss > Swiss_Assets > Menus folder
Time
This lesson takes approximately 60 minutes to complete.
Goals
Understand and create basic menus
Learn how to create buttons
Create professional-looking menus within DVD Studio Pro
Create an intro menu using media from a track
Create a button style
Create a text style
Use transitions
Change font properties
Link buttons to assets
Use a drop zone
DVD menus are the gateway to a world of possibilities. The purpose of menus is to allow the DVD viewer to make choices: what to see, what to hear, and what to play, to name a few. But menus can also be as visually and aurally interesting as the content they link to.
Menus can be simple, such as a screen for choosing between two different music videos, or more complex, such as a dynamic motion menu with multiple layers of moving video and soundtracks of your choice. In fact, you can have several menus, with buttons that guide a user through a disc full of exciting video, audio, and images. And the best news is that DVD Studio Pro greatly simplifies the menu creation process. Building on iDVD’s ease of use, DVD Studio Pro expands the number of ways you can customize the layout of your disc.
This lesson showcases the power of DVD Studio Pro as a DVD design tool. You’ll build highly customized menus entirely within DVD Studio Pro, without the need to create assets in Adobe After Effects or Photoshop, Final Cut Pro, or other applications. Utilizing existing content in the SwissMovie track, you’ll achieve great results in relatively few steps.
The Menu Creation Process
Menus provide access to material on a DVD. They include buttons linking to video tracks, slideshows, submenus, or other content on a disc. You must create at least one button for a menu, although you can create as many as 36 buttons per menu. In a way, buttons on a DVD are similar to buttons on a Web page, since they both contain links capable of activating content or other menu pages.
Menus have backgrounds, which may be composed of still images (such as a photograph or Photoshop design), a motion video clip, or a combination of both. Button designs are also incorporated into the majority of menu backgrounds. These button designs might include overlay files or different Photoshop layers. (We’ll cover these methods in later lessons.)
DVD Studio Pro gives you several ways to customize your menus and create buttons, without the need to rely on Photoshop or another graphic editing application. This lesson will show you how.
Importing Assets
You’ll begin this lesson by importing the menu assets for the Swiss project into the Swiss_DVD project file you created in Lesson 3.
1. Open the Swiss_DVD project file you created in Lesson 3.
Note
Throughout this book, we recommend using the project files you created in the previous lesson. That way, you can avoid relinking your media assets. If you did not create a Swiss_DVD project file in Lesson 3, use the 04_Swiss_start file you will find on the DVD provided in this book. See “Introduction: Getting Started” for instructions on how to relink your media.
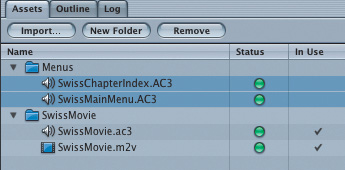
2. In the Assets tab, Ctrl-click the background and choose Import.

3. Select the Swiss_Assets > Menus folder.
4. Click Import to add the Menus folder to the Assets tab.

Note
You can import a specific asset into the Assets tab only once, although you may use it multiple times in a project.
Working with the Assets Tab
The Assets tab organizes all of the files that are used in a project. For example, all of the video, audio, and graphics you import are displayed there. You can import files directly into the Assets tab and place them into folders. Having all your assets organized in folders makes it simpler to work with them, particularly for large projects.
Once you have imported an asset, you can view information for it in one of the Assets tab’s columns. If you have the Inspector open, you can also click a file in the Assets tab to view its information in the Inspector window.
Adding a Background Graphic
The first step in the menu creation process is to add a background graphic. In this exercise, you begin by creating a standard menu background with a single image from the SwissMovie video track. Later in the lesson, you will add other elements, such as buttons, drop zones, and a title to your menu.
1. Click the Track tab and select the timecode field above the track. Type 044021 and then press Return.
This moves the playhead to the still image frame at 04:40:21 that you are going to use for your menu background.

2. Press M to set a chapter marker.
3. In the Inspector, click the Chapter check box to deselect this marker as a chapter marker.
The purple chapter marker will turn into a green cell marker (a marker that serves merely as a placeholder) and won’t be included in the chapter index menu we will create in Lesson 5.

4. In the Inspector, click Save Still to export this still frame from your movie track.
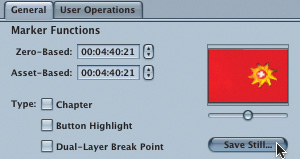
5. Name the still image SwissMainMenu.tiff and save it in your Menus folder. (If it’s already there, click OK to replace.)
The Menus folder will be automatically selected because you just imported your menu assets.

6. Click the Import button in the Assets tab.
7. Select SwissMainMenu.tiff.
The SwissMainMenu still image is now imported in your Menu folder.
8. Click the Menu tab to activate the Menu Editor window.
9. Select SwissMainMenu from the pop-up menu in the top-left corner of the Menu Editor to switch to the SwissMainMenu.

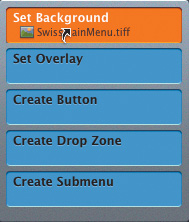
10. Select SwissMainMenu.tiff in the Assets tab, and drag it into the Menu Editor.
Make sure you do not release the mouse button until the Drop palette appears.
11. From the Drop palette, choose Set Background.
The graphic has now become the background for your menu.
Tip
You can adjust the amount of delay that occurs before the Drop palette appears by changing the Drop Palette Delay value in Menu Preferences (DVD Studio Pro > Preferences > Menu). Some users may like the Drop palette to respond more quickly, whereas others will find that a longer delay gives them more time to position an asset in the correct place when creating their menus.
Creating Buttons on a Still Menu
Once you have added a background to your menu, you can create the buttons that will link to the other elements of your disc. For this exercise, we will start by creating a single button on top of your still background. You will then create additional buttons, name them, and modify their text properties.
Note
Although you can import menu graphics with buttons already created, the purpose of this exercise is to demonstrate the menu and button creation features built into DVD Studio Pro.
Drawing Buttons
For this exercise, you will learn how to work with button areas and text for a simple menu, without other graphic elements. The button area you select is the location where users can click to activate a link.
In many cases, you will have decided already where to place your buttons by creating them as part of a background image and overlay file, as described in the Tiger project in Lesson 11. But you can also begin drawing your buttons directly in the Menu Editor. You can always use overlays or add shapes later.
1. Click an area of the Menu Editor and drag to reveal a rectangular button shape.
The position you first clicked becomes the corner of a button. Dragging to an opposite corner reveals the button outline area, which is represented by dashed lines.

2. Resize the active area of the button by dragging a corner of the button outline.
When you draw buttons in the Menu Editor, you are defining the active button area. Make sure to create a bounding box that is a little bigger than the area you need for your button. This will make it easier for people viewing your disc with software players to select buttons with the mouse.
Tip
You can maintain a button’s aspect ratio as you resize it by holding down the Shift key as you drag an edge or corner.
3. Position the button precisely by using the arrow keys to shift it 1 pixel at a time in any direction.
Naming Buttons
After your button is created, you should name it in the Inspector. If your Inspector window is not visible, press Cmd-Option-I or click its icon in the toolbar to make it appear, and click the Style tab if it is not already showing.
1. Click your button once to select it.
2. Type Play Video in the Name field at the top of the Inspector window.
The Name field is where you assign an identifier, which does not actually appear in the menu, for your button. It is simply a way to identify your buttons in DVD Studio Pro or to add navigation functions. Without names, your buttons might be difficult to distinguish from each other.

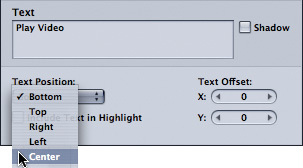
3. Click the Style tab, then at the bottom of the Inspector window, type Play Video in the Text box.
The Text box is where you input displayed text—the name that appears in the menu and that users see when they play your disc.

4. In the Text Position section, choose Center from the Position pop-up menu.
Adding Drop Shadows
Since your text is white, you should add a drop shadow to make it more visible against the background image.
1. Select the Play Video button in the Menu Editor to display its properties in the Button Inspector.
2. In the Text area at the bottom of the Button Inspector window, click the Shadow check box to add the drop shadow.

Choosing Fonts
With your button’s text in place, you can use the formatting tools to modify the appearance of your text. The font used for the button is one of the first attributes you will want to change.
1. Select the Play Video button in the Menu Editor.
2. Select the text you want to format.
3. Activate the Font window by selecting Format > Font > Show Fonts or using the shortcut Cmd-T.

4. Choose Helvetica Neue Condensed Bold in 24 point size from the list of choices.
5. Close the Font window by clicking the Close button in the upper-left corner.
Tip
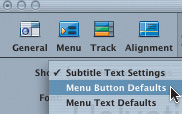
You can change the default font for button text in Preferences. Open Preferences, click the Text icon to switch to the Text pane, then choose Menu Button Defaults from the Show pop-up menu. Changing settings here will change the default text that appears whenever you create a new button.
Setting Button Highlight Colors
You can add button highlights to each button you create for a menu. Button highlights, unique to DVD authoring, consist of different colors that display based on the state of your button.
Button states are defined as normal, selected, and activated. For a simple DVD, you need to set only the selected and activated highlights. When a user chooses a button with his or her remote control, the button becomes selected, and it displays the highlight color you have chosen for the selected state. The activated state shows up for a split second when the user presses the Play button on the remote control.
In this exercise, you will set the selected and activated highlight colors for the button you’ve created. Later in this book, you will learn more about buttons and about simple and advanced highlights, as well as how to create your own button overlays, which work with highlights.
1. Select the Play Video button in the Menu Editor to display its properties in the Button Inspector.
2. Make sure you have the Include Text in Highlight check box selected at the bottom of the Text Formatting section.

3. Click the Colors tab in the Button Inspector.
4. Select yellow from the Selected pop-up menu, and leave the Opacity slider at 15.

When the viewer selects the Play Video button, the button’s text will be highlighted yellow because the Include Text in Highlight check box is checked.
5. Select red from the Activated pop-up menu, and set its opacity at 15.
The activated highlight will show up for only a split second when the user activates the button.
6. In the Menu Editor, navigate to the button state icons at the bottom of the window and click the Selected State icon (in the middle).
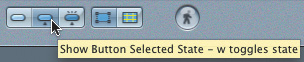
When you click the button, you should see the yellow text overlay color that you have chosen for the text.
7. Click the Activated State icon to the right of the Selected State icon.
The text color should now switch to red for the activated state.

Creating More Buttons
This project requires a total of three buttons on the main menu, so you need to create two more buttons. In this exercise, you will learn how to easily create new buttons with the same button style.
1. Click the Play Video button to select it.
2. Press Cmd-D to duplicate the button.
3. Reposition the button by dragging it directly under the first button you created.
Use the yellow snapping guides to help align your buttons.

4. Repeat steps 2 and 3 to create an additional button.
5. Click the second button.
6. In the Text and Name fields of the Button Inspector, enter the name Chapter Index for the second button.
7. Click the third button. In the Button Inspector, enter the name Slideshow in the Text and Name fields.

8. Ctrl-click the Slideshow button, and choose Set as Default Button Style from the shortcut menu.

From now on, any other buttons you create will use this default button style.
Simulating Your New Buttons
After you have created your buttons, you will want to test their appearance. You should simulate frequently while assembling a project to avoid making mistakes and to ensure proper operation of your menu elements. In this case, you just want to make sure that your buttons are displaying correctly.
1. Ctrl-click the Menu Editor background (not a button), and choose Simulate Command from the shortcut menu.

2. Use the Simulator to check that your buttons display correctly.
For this exercise, simply looking at the buttons as you use the remote control should tell you whether your fonts, colors, and images are working properly.
Making Connections from Buttons to Video
Now that you have your buttons in place, you can begin linking them to the video tracks and other disc items in your project. In this exercise, you will link the Play Video button to the video track you created earlier in the last lesson. In DVD Studio Pro, the item that is being linked to a button is called the target.
After you have created the connection between your button and your video track, you will want to test it in the Menu Editor to be certain that your button is linked to a video asset.
1. Ctrl-click the Play Video button in the Menu Editor.
2. Choose Target > Tracks and Stories > SwissMovie > [Track] from the shortcut menu that appears.

You may also set your links by using the Target pop-up menu at the top of the Inspector window. However, using the Ctrl-click method is quicker and more intuitive.
3. Ctrl-click the Menu Editor background, and choose Simulate Menu from the shortcut menu to activate the Simulator.
4. Click Enter to activate your Play Video button and test the link to the video track.
5. Click the Menu button in the upper-left corner to get back to the menu.
You have now successfully created your first simple menu. Your menu includes three buttons, with the first one linked to a video track.
Using the Title Safe Feature
When creating text for a DVD menu or video track, you need to be aware that some of the image area is cut off by the overscan of a television set. The overscan area is what falls outside of the normal viewing area. Older televisions tend to be the worst offenders—they may cut off significant amounts around the edge of your frame. Newer televisions are a bit better, although the only way to see your entire frame is with a software DVD player (such as the Apple DVD Player) or certain digital monitors. For this reason, designers consistently use two guides called action safe and title safe. Using these guides in DVD Studio Pro can help you to determine the best (and safest) placement for your text.
The title safe area is the smaller area containing important text and graphics that must be viewable on a television. If it’s not already activated, you can activate it by choosing View > Title Safe Area; by clicking the Settings pop-up menu at the top of the Menu Editor and choosing Title Safe Area; or by using the keyboard shortcut Cmd-Shift-E.
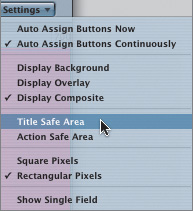
The action safe area is an area closer to the edge of the screen that should contain any visual information crucial to the action or movement of the image. You can activate the action safe area guides by choosing View > Action Safe Area; by clicking the Settings pop-up menu at the top of the Menu Editor and choosing Action Safe Area; or by pressing Cmd-Option-E.
Adding Title and Text to the Menu
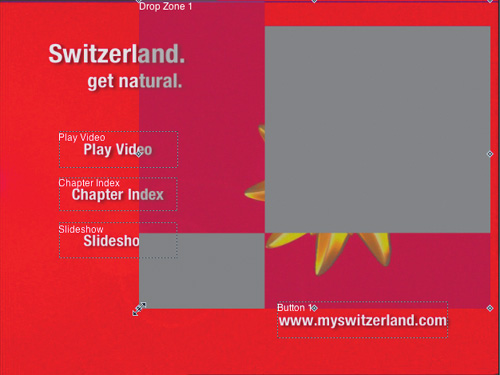
The next step is to add some text elements to your menu. You will type the title, tagline, and URL in your Menu Editor. The capability to add text is a nice feature of DVD Studio Pro, since you are not forced to use a separate application, such as Photoshop, to create titles for your menus or buttons. In fact, this feature makes using templates a possibility, since you can do all of your text editing and renaming within DVD Studio Pro.
1. Double-click the top of the Menu Editor window to create a text box.
2. Type Switzerland. into the box that appears.
3. In the Text Object Inspector, click the Shadow check box to add a drop shadow.

Now let’s use the text formatting features described in the section “Creating Buttons on a Still Menu” earlier in this lesson to change the appearance of your text.
4. Activate the Font window by choosing Format > Font > Show Fonts.
5. Make sure your text is highlighted, and then use the font Helvetica Neue Condensed Bold 40 pt.
6. Once the text has changed, click next to the Switzerland text element to deselect it.
7. Double-click the background again to add a tagline for the title.
8. Type get natural., and then use the Font window to format it as Helvetica Neue Condensed Bold 30 pt.
9. Align the text to the right, and click the Shadow check box to add a drop shadow.

10. Ctrl-click this text element, and choose Create Text Style from the shortcut menu.
11. Name your new style SwissMenu, click the Project check box, and then click Save.

12. Draw a button in the lower-right corner of your menu and name it Weblink.
This button contains the default properties we set earlier in the “Creating More Buttons” section.
13. Type www.myswitzerland.com in the Text field of the button.
The new font style will be automatically applied to the text. Your Swiss still menu now looks like this:

Adding Sound to the Menu
Adding sound to your still menu quickly and dramatically enhances it. For the SwissMainMenu, you will use a portion of the SwissMovie.AC3 audio track that is called SwissMainMenu.AC3. This portion of the audio has been prepared in Final Cut Pro. To avoid any audio glitches when the menu loops, we recommend that you fade up the volume in the beginning and fade down the end of the menu loop.
1. From the Assets tab, select SwissMainMenu.AC3 and drag it to the Menu Editor.
Tip
Make sure that you use the same audio format (AC-3 or AIFF) at the same bit rate for all menus you create. Mixing different audio formats in the Menu domain (all menus on your DVD) is illegal, according to the DVD specification, and DVD Studio Pro will not complete the disc building process.
2. From the Drop palette, choose Set Audio.

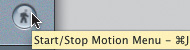
3. Click the Motion button at the bottom-right corner of the Menu Editor to hear if the audio plays correctly.
Creating an Intro Menu
You are about to build an exciting introduction to the Swiss DVD using content from your SwissMovie asset file. The introduction menu will then transition to the main menu.
DVD Studio Pro will automatically place the matching audio for the video that you’ll use for the intro menu. To ensure that your new intro menu is the first thing to play, you’ll need to change the first play from the SwissMovie track to the SwissIntroMenu.
SwissMovie contains a section that would work perfectly as an introductory video segment for this DVD. Follow these steps:
1. Click the Outline tab, and select the SwissIntroMenu that you created in Lesson 3.

2. From the Assets tab, select SwissMovie.m2v. Drag it onto your Menu Editor, and choose Set Background when the Drop palette appears.
3. In the Menu Inspector, move the End slider as close as possible to timecode 00:09:16:06.
4. Use the up and down arrows to move the end slider to the exact frame.
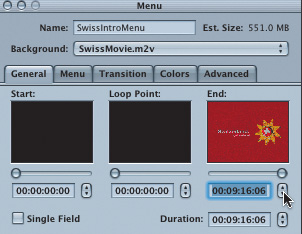
5. Select the Start timecode field, and enter 090407 to define the start timecode at 00:09:04:07.
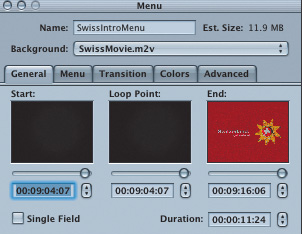
By defining the start and end points, you have reduced the duration of the SwissMovie asset to about 12 seconds. Only this section, along with the associated audio, will be rendered into the menu background when you build your disc.
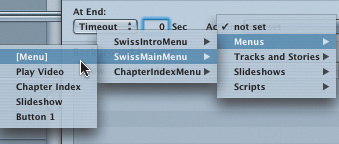
6. Choose Timeout from the At End pop-up menu located in the middle of the Menu Inspector.

7. Change the Timeout value to 0 sec.
Your SwissIntroMenu will only play for about 12 seconds and then time out at 0 seconds. In the next step, you will define the timeout action.
8. Choose Menus > SwissMainMenu > [Menu] from the Action pop-up menu.
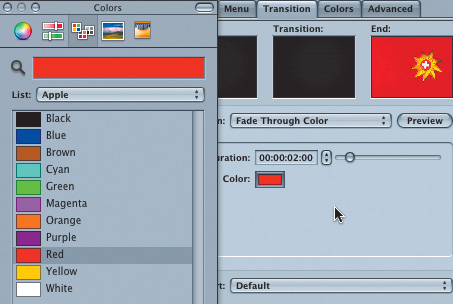
9. Click the Transition tab to reveal the Transition options for this menu.
There are over 20 built-in transitions available in DVD Studio Pro. For this situation, a fade-through color transition works really well.
10. Choose Fade Through Color in the Transition pop-up menu.

11. Click the color patch to activate the Color Picker, and choose Red.
Setting Up Navigation on Your DVD
Since you have set up a DVD that plays just the track in the previous chapter, you need to change the navigation in order to play the assets in the right order. For this project, the first thing that will play is the SwissIntroMenu. This menu plays once and then leads to SwissMainMenu.
Every DVD player remote control is equipped with a Menu button that is intended to return users to the last menu they came from. For this project, it is important to set both the Menu button and the Title button on the remote control.
1. In the Outline tab, click the Swiss_DVD disc icon to activate the disc’s properties in the Inspector.
2. Click the First Play pop-up menu, and choose Menus > SwissIntroMenu > [Menu].

The next step is to set up the remote control correctly. To make changes that affect the operation of the entire disc, you must use the Inspector.
3. Make sure the disc’s properties are still visible in the Inspector. In the Title pop-up menu of the Remote Control section, choose Menus > SwissMainMenu > [Menu].
This will play the SwissMainMenu in case the user presses the Title button on the remote control.

4. In the Menu pop-up menu of the Remote Control section, choose Menus > SwissMainMenu > [Menu].
This will play the SwissMainMenu when the user clicks or presses the Menu button on the remote control.

5. Choose File > Save to save your project.
Changing the Still Menu into a Motion Menu
Motion menus add excitement to a DVD interface. In DVD Studio Pro, you can play video in buttons, drop zones, and as a motion background of a menu. Instead of an ordinary static menu, you can have a menu that is pulsating with life.
Adding a Drop Zone to the Main Menu
Drop zones are simple graphics and video clips that you can use to easily customize the look of your backgrounds, especially when you want to add motion to them.
Drop zones should not be confused with buttons. Drop zones are purely graphic or video elements that do not contain interactivity. For this project, you will use a few Apple drop zones from the Palette as design elements, and allocate a 49-second portion of the SwissMovie track to one of the drop zones. You will integrate all these elements in the existing Swiss still menu that you just created.
1. In the Outline tab, select SwissMainMenu.
2. In the Palette, select the Styles tab, then the Apple tab, and then the Drop Zones tab to access the available drop zones.
3. Scroll down in the Palette window, and then select and drag the Panes Rectangle Frosted Blur Window 1 drop zone onto the Menu Editor.
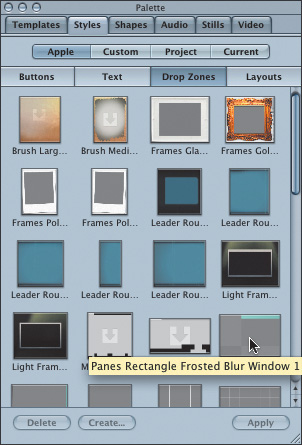
As you drag, hold down the mouse button until the Drop palette appears in the Menu Editor.
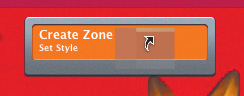
4. From the Drop palette, choose Create Zone, Set Style.
5. Drag out the top-right and bottom-left corners of the drop zone so that it covers the entire Menu Editor window.
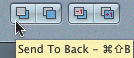
6. At the bottom-left corner of the Menu Editor, click the Send To Back icon to send the drop zone all the way to the back.
7. Click the Assets tab; choose SwissMovie.m2v and apply it to the drop zone.

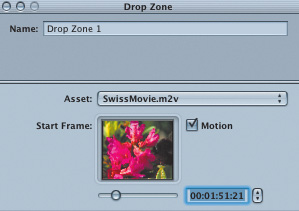
8. In the Drop Zone Inspector, select the timecode field, enter 15121, and press Return to get to the start frame 00:01:51:21.
Changing the Duration of Your Motion Menu
The default duration of a motion menu is set to 30 seconds. You can easily change the default settings in Preferences. For this menu, you will change the duration of the menu to match the duration of the audio, which is 49 seconds.
1. Double-click an empty space at the top of the Menu Editor to activate the Menu Inspector.
![]()
2. In the General tab, type 4907 into the Duration timecode field and press Return.
You have now extended the duration of your motion menu to 49 seconds to match the duration of the audio used for this menu.

3. Save your project in the My_Projects folder.
Lesson Review
1. How do you create a button in DVD Studio Pro?
2. Can buttons be round?
3. How do you add a drop shadow to button text?
4. What is the title safe area?
5. What is the Key command for enabing the Title Safe area?
6. True or false: you can mix both AC-3 and AIFF audio in a single project’s menus.
Answers
1. Open the menu editor, then click and drag to drag out the button’s outline.
2. No. Buttons in the DVD-Video must be rectangular or square.
3. Open the Button Inspector and click the Drop Shadow check-box, located in the General tab’s Text area.
4. Title safe represents an area that is outside of the visible area on most picture tube TVs. Anything outside of the title safe area is not guaranteed to display in the finished DVD-Video.
5. Command-Shift-E (Command-Option-E enables the action safe area).
6. False. All audio in every one of your projects menus must be exactly the same type.
