
Lesson 18. Using Alternate Angles
Lesson Files
Lessons > 18_Alternate_Angles-Start
Media
Media > Blackbox
Time
This lesson takes approximately 30 minutes to complete.
Goals
Learn the difference between multi-angle and mixed-angle tracks
Discover how to encode MPEG streams for alternate angles
Learn how to target alternate angles from menu buttons
Simulate alternate angles
Explore Final Cut Pro cut markers
Learn how to encode alternate angle streams directly from Final Cut Pro
The DVD-Video specification allows for up to nine video streams in each track. This includes the main video stream, along with up to eight alternate video streams.
Alternate angles give you a great deal of creative potential, because you can serve up all sorts of interesting extra content in these extra video streams. For example, 3D animators sending demos to clients can add the main animation to a track’s first video stream, and a wireframe view of the same animation as an alternate angle. Or you could record a sports event with eight different cameras placed strategically around a field. Along with the main edit of the event, you may also include each camera angle as an alternate angle on the final DVD (for a total of nine separate angles). Using the remote control’s Angle button, viewers can cycle from stream to stream, seeing the action the way they want to see it.
The possibilities for alternate angles are immense, but interestingly, they are one of the least used features of the DVD-Video specification. If you’re looking for that extra edge to set your productions apart, this lesson will move you in the right direction.
Setting Up the Project
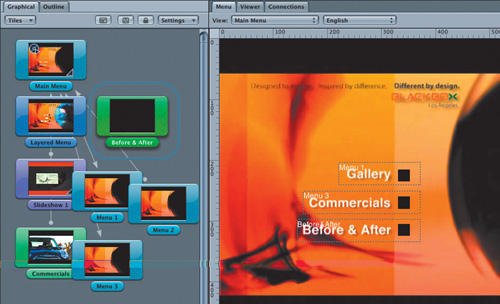
Blackbox is a film effects house in Santa Monica, California. To show interested parties the caliber of its work, we will add a “Before & After” track to this project. The Before & After track will display a “before” angle of a green-screened actor, and an “after” angle that is the same shot with various effects applied.
Let’s check out these shots now. We’ll also take a moment to set up this project so that it’s ready to accept alternate angle streams.
1. Open the file named 18_Alternate_Angles-Start, or continue working on the project from Lesson 17 in the My_Projects folder.
2. In the Assets tab’s Movies folder, double-click the ai-before.m2v video.
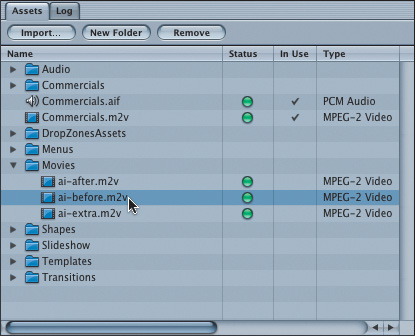
The ai-before.m2v video plays in DVD Studio Pro’s Viewer. It shows an actor in front of a green screen.
3. Double-click the ai-after.m2v video.
The ai-after.m2v video plays in DVD Studio Pro’s Viewer. It shows the actor after various effects have been applied to the shot.
The ai-before.m2v and ai-after.m2v videos will link to this project’s Before & After layered menu. This menu is currently not connected into the project’s navigational hierarchy. In the next steps you’ll fix this problem by connecting the Before & After layered menu to the main menu.
4. In the Graphical view, double-click the Main Menu tile.

The main menu opens in the Menu Editor.
5. Position your pointer over the main menu’s Before & After button.
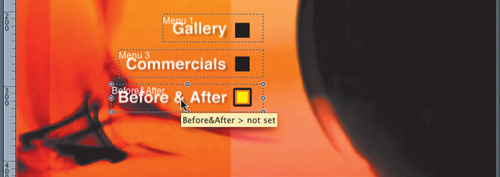
A tooltip appears. It shows you the name of the button, followed by its target. Currently, the Before & After button’s target is not set.
6. Ctrl-click the Before & After button, and choose Target > Menus > Layered Menu > Main Menu.

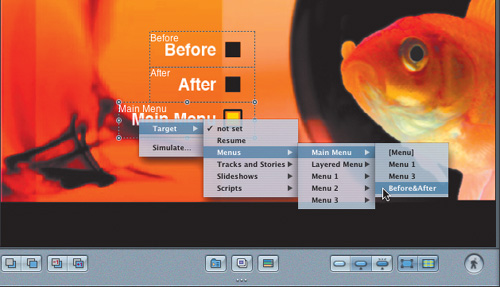
7. In the Menu Editor, double-click the main menu’s Before & After button.
The Layered Menu opens in the Menu Editor. The Main Menu button currently has no target. It needs to link back to the main menu’s Before & After button.
8. Ctrl-click the Layered Menu’s Main Menu button, and choose Target > Menus > Main Menu > Before&After.
All items are now connected and ready to go. It’s time to make the alternate angle track.
About Alternate Angles
DVD Studio Pro lets you create two different types of alternate angle tracks:
• Multi-angle tracks, in which each angle is exactly the same length as the main video stream.
• Mixed-angle tracks, which include alternate video streams that are shorter in duration than the main video stream. Where there’s a space in the mixed-angle stream, DVD players revert to the main video stream, which they play until the mixed angle appears again. Mixed angles save disc space for alternate angle streams that do not need to run the length of the entire track. Technically, all angles in the mixed-angle track must be sandwiched by markers—one marker at the front, and one marker at the back.

Encoding Alternate Angle Streams
Whether you use multi-angle streams or mixed angle, creating alternate angles in DVD Studio Pro is remarkably easy—as long as the MPEG streams are correctly prepared before you import them into DVD Studio Pro. The DVD-Video specification requires alternate angle tracks to be multiplexed in a particular way, and you must encode your MPEG streams with several rules in mind.
For starters, DVD players use I-frames as bridges for jumping between alternate video streams, so all I-frames must be aligned across all alternate angle streams. This means all alternate angle streams must be encoded using the exact same GOP structure. If the MPEG in the V1 stream uses a 15-frame GOP, then all other alternate angle streams must use a 15-frame GOP. Furthermore, only closed GOPs will work for alternate angles in DVD Studio Pro, because only closed GOPs guarantee that an I-frame will appear at the exact same place in each GOP.
You must also pay close attention to the maximum bit rate used in each alternate angle. This is determined by the number of alternate angles in the track:
• For two to five angles, encode each video stream at a maximum bit rate of no higher than 8 Mbps.
• For six to eight angles, encode each video stream at a maximum bit rate of no higher than 7.5 Mbps.
• For nine angles, encode each video stream at a maximum bit rate of no higher than 7 Mbps.
Note
The maximum allowable bit rate for alternate angle streams is also affected by the number of audio and subtitle streams in the track. The above numbers assume that the track will use a single AC-3 encoded audio stream. If you add alternate audio streams to the track, you will need to lower the maximum bit rate used for the alternate angle video streams. In general, it’s best to use a maximum bit rate of no higher than 7 Mbps, even if your track has fewer than five alternate angles.
With these rules in mind, let’s move on to creating multi-angle tracks.
Creating Multi-Angle Tracks
Now that you know the theory behind multi-angle streams, let’s create one.
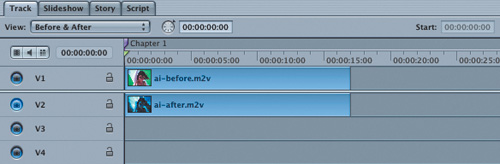
1. In the Graphical view, create a track, name it Before & After, and place it to the right of the Layered Menu item.
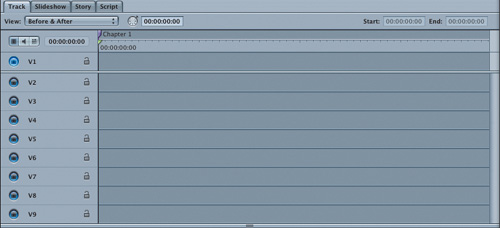
2. In the Graphical view, double-click the Before & After tile.
The track opens in the Track Editor. As you’ve seen in previous lessons, the Track Editor is divided into three sets of streams: At the top there are 9 video streams, in the middle there are 8 audio streams, and at the bottom there are 32 subtitle streams.
We are only working with alternate angles, so let’s filter the Track Editor so that it displays only video streams. To filter the Track Editor, we’ll use the Track Editor’s stream configuration buttons.
3. In the top-left corner of the Track Editor, click the video stream configuration button.

The Track Editor updates to display all of the track’s available video streams, V1 through V9. Notice that the V1 stream is separated from all potential alternate streams by a thin horizontal divider. The V1 stream is the most important stream in any track. All alternate video, audio, and subtitle streams run parallel to the V1 stream.
Note
You can click more than one stream configuration button, and the Track Editor will split the available display area between the streams you choose to view.
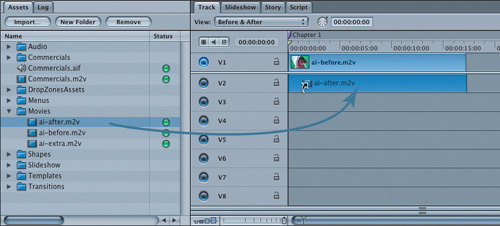
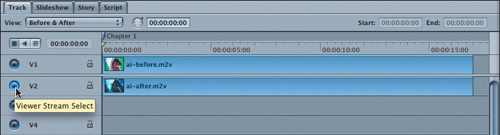
4. From the Assets tab, drag the ai-before.m2v asset and drop it into the V1 stream.
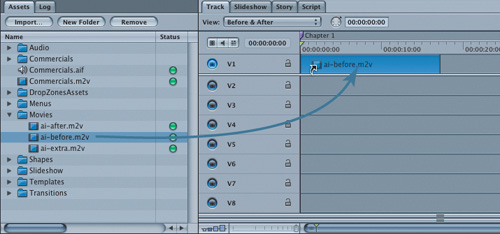
That takes care of the V1 stream. Next, let’s add an alternate angle to the V2 stream.
5. From the Assets tab, drag the ai-after.m2v asset and drop it into the V2 stream.

Note
Alternate angle streams can be composed of many different clips arranged in sequence, as long as the sequence of clips has no gaps and is exactly the same length as the V1 stream. And of course, GOP structure and maximum data rate constraints are still in effect.
Previewing Multi-Angle Tracks in the Viewer
At the left edge of each stream in the Track Editor there is a Viewer Stream Selection button. This button determines which stream plays when you preview the track in the Viewer. Let’s use the Viewer Stream Selection buttons on the V1 and V2 streams to preview this multi-angle track.
1. In the Viewer, play the Before & After track.

2. In the Track Editor, use the Viewer Stream Selection buttons to toggle the Viewer’s display between stream 1 and stream 2.
As you toggle the display, the Viewer updates to show you the selected stream.
3. In the Viewer, click the Stop button to halt playback.
Creating Mixed-Angle Tracks
One disadvantage of alternate angles is that they consume a lot of disc space. For example, if you encoded the video tightly, you could squeeze up to 2 hours of video onto a single track on a DVD-5 disc. However, if that track has two angles, then the maximum duration of that track decreases to about an hour because you are effectively combining two different video streams into a single track. If you add three video streams, the total run time decreases to about 40 minutes. Put nine angles on a disc, and the maximum duration of the project decreases to just over 10 minutes.
To save disc space, DVD Studio Pro allows you to create mixed angles. In contrast to multi-angle tracks, where each angle is exactly the same length as the main video in the V1 stream, mixed-angle tracks can use video streams that are shorter than the main video stream, which means that there can be empty spaces in the alternate angle streams. Where there’s an empty space in the stream, DVD players will default to playing the V1 stream. As soon as there’s content to play in the alternate angle stream, DVD players will instantly and seamlessly switch back to displaying the alternate angle.
In some respects, mixed angles work exactly the same as multi-angles. They must be encoded using the exact same GOP structure as the main video in the V1 stream, and you still must keep the maximum bit rate limits in mind. But there is one additional technical concept to keep in mind when creating mixed-angle tracks: In a mixed-angle track, all alternate angle streams must be enclosed by a marker at the front and a marker at the back.
You’ll learn more about this later in this lesson. For now, let’s start by shortening the clip in the Before & After track’s V2 stream.
Resizing Video Clips
DVD Studio Pro’s Track Editor lets you resize clips by dragging their left and right edges, just as you would in Final Cut Pro. Accuracy is extremely important when editing mixed-angle streams. As a result, it’s a good idea to keep an eye on the Track Editor’s various timecode displays while resizing mixed-angle clips. The following exercise gives you some practice using the timecode controls when editing.
1. Position the mouse pointer over the front of the V2 stream.
The pointer turns into a resize icon.

As you perform the next task, watch the Start timecode box in the top-right corner of the Track Editor. This timecode box displays the start time of any clip selected in the Track Editor, relative to the start time of the track itself.
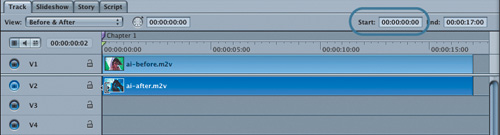
2. Drag the front of the clip until the Start timecode box says 00:00:02:00 (2 seconds into the track).

3. In the End timecode box, type 00:00:15:00, and press Return.

The clip in stream V2 is now only 13 seconds long. It starts later and ends earlier than stream V1.
This mixed-angle track is close to complete. But there’s one final step left: adding sandwich markers.
Adding Sandwich Markers
Mixed-angle tracks must have markers sandwiching all mixed-angle clips. For the track you’re working on, there must be a marker at the start, and a marker at the end of the clip in stream V2. To achieve this goal, you’ll use DVD Studio Pro cell markers.
Every track can have a maximum of 255 markers. Of those markers, only 99 can be chapter markers. You could sandwich a mixed-angle clip with chapter markers, but doing so uses up two of these valuable marker types. Additionally, sandwiching mixed-angle clips with chapter markers allows viewers to jump back and forth to the beginning and end of the mixed angle by pressing the DVD player’s Next Program and Previous Program remote control buttons. This is not necessarily a bad thing—it all depends on the presentation you’re after. However, for the sake of demonstration, we’ll conserve our chapter markers and use cell markers instead.
1. Create a marker at 00:00:02:00.
DVD Studio Pro creates a purple chapter marker, and the Inspector updates to display the marker’s properties. The Inspector includes a marker Type area. In this area the Chapter check box is selected, indicating that this marker is a chapter marker. The other choices in the Type area include Button Highlight and Dual-Layer Break Point markers. If you disable all of the Type check boxes, you create a fourth type of marker—a cell marker.
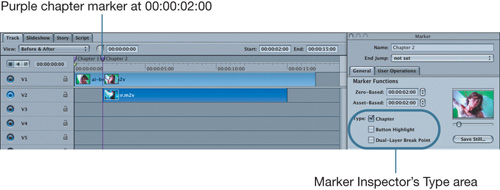
2. In the Inspector’s Type area, deselect the Chapter check box.
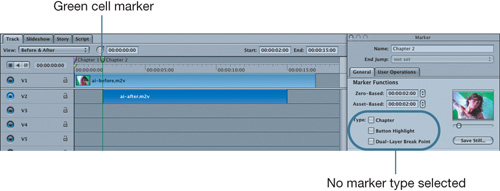
In the Track Editor, the marker turns green. It is now a cell marker.
You’ve inserted a cell marker at the beginning of the mixed-angle clip. Let’s finish this mixed-angle track by adding a cell marker to the clip’s end.
3. Ctrl-click the V2 stream’s clip and choose Add Marker to Clip End.
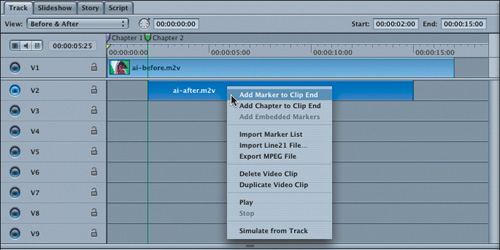
A cell marker is added to the end of the clip, at 00:00:15:00.

4. Click the Viewer Stream Selection button for stream V2.
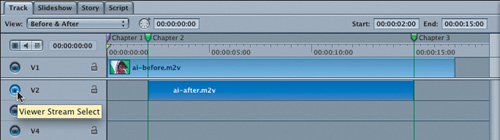
5. In the Viewer, play the track from the beginning.
As the track plays, keep an eye on the Track Editor’s playhead. Where there’s no clip in stream V2, the Viewer defaults to play the clip in stream V1. As soon as the playhead moves over the clip in stream V2, the Viewer displays stream V2. As you can see, in a mixed-angle track, playback always defaults to the V1 stream whenever the alternate angle streams do not contain a clip.
Note
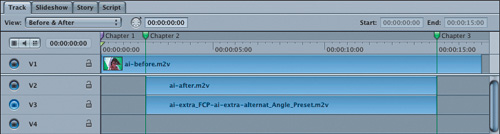
In mixed-angle tracks that need more than one alternate angle, parallel alternate angles must be exactly the same length, as shown in the figure below.

Targeting Alternate Angle Streams
One of the biggest challenges with using alternate angle streams is letting viewers know they’re there. While it’s a simple matter to switch between angles using the DVD player’s Angle remote control button, if viewers don’t know that a track has alternate angles, they are unlikely to ever see your alternate presentation.
To alert viewers, you can add a note to the DVD-Video’s liner or even to a menu that targets the alternate angle track. Better still, you can make a menu with buttons that specifically target each alternate angle.
This is the approach we’ll take in our project, and it’s the reason we have Before and After buttons on the layered menu. Let’s target this menu’s buttons to the appropriate streams in the Before & After track.
1. In the Graphical view, double-click the Layered Menu tile.
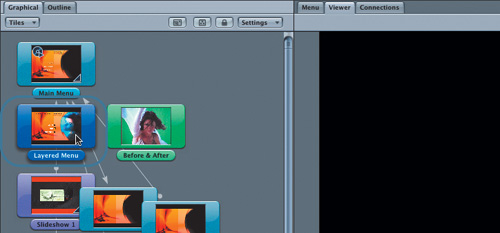
The menu opens in the Menu Editor.
2. In the Menu Editor, select the Before button.
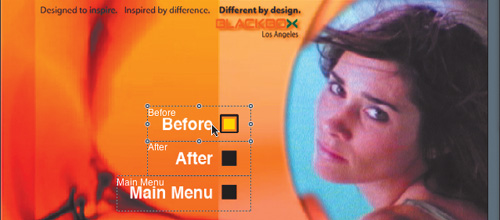
The Inspector updates to display the button’s properties.
3. From the Inspector’s Target menu, choose Tracks and Stories > Before & After > [Track].

Clicking the button now targets the correct track, but you still need to specify the video stream that should display when the track plays. To do so, you’ll use the Inspector’s Streams area. The Streams area provides an Angle menu that lets you select individual video streams in the targeted track. The Before & After track has the ai-before.m2v video in stream V1, so you need to select the first video stream from the Angle menu.
Note
In layered menus, the Streams area is located on the Inspector’s Button tab. In standard menus, the Streams area is located on the Inspector’s Advanced tab.
4. In the Inspector’s Streams area, click the Angle pop-up menu and select 1 (video stream 1).
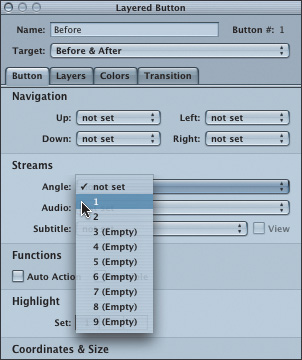
When this menu’s Before button is activated, the Before & After track will play stream V1, which contains the ai-before.m2v video.
Now let’s set up the menu’s After button.
5. From the Graphical view, hold down the Option key and drag the Before & After track tile over the menu’s After button.

6. Choose Connect to Track.
The button is now targeted to the correct track. To finish the button, you need to select stream 2 as the display stream.
7. In the Menu Editor, select the After button.
The Inspector updates to display the button’s properties.
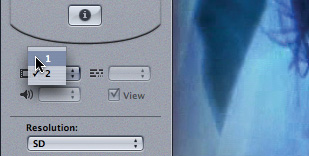
8. In the Inspector’s Streams area, click the Angle pop-up menu and choose 2 (video stream 2).

Does it work? Let’s find out by simulating the menu.
Simulating Alternate Angle Streams
When viewers watch an alternate angle stream, they can use the Angle button on the DVD player’s remote control to cycle through a track’s alternate angle streams. Let’s do the same in our Simulator.
1. In the Graphical view, Ctrl-click the Layered Menu tile and choose Simulate Menu.
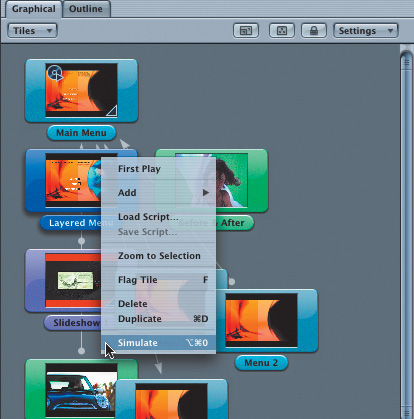
The Simulator opens and displays the layered menu.
2. Click the After button.
The Simulator jumps to the Before & After track and plays video stream 2. Notice that the first 2 seconds of the track displays the Before video, but then at exactly 2 seconds into the track, it switches to the After video.
As viewers watch the DVD, they can use the Angle button to cycle through the track’s angles. To mimic this behavior, the Simulator has an Angle menu.

3. Use the Simulator’s Angle menu to switch to the first video stream.
4. Close the Simulator.
About Alternate Angle Errors
When creating multi- or mixed-angle tracks in the future, you may experience the dreaded “Cannot add entire video asset” error. This error occurs primarily if you have encoded your alternate angle MPEG streams with GOP structures that don’t match. If this error occurs, there’s only one thing to do—re-encode your MPEG streams!
Surprisingly, this error is very common if you encode MPEG streams directly from Final Cut Pro using Compressor. It’s easy to fix, and you’ll learn how in the following exercise. First, though, let’s take a look at what happens when this error gets generated.
1. From the Assets tab, drag the ai-extra.m2v asset and drop it into the V3 stream, directly after the first cell marker.

A warning dialog appears. This dialog says the ai-after.m2v clip is only usable up to the timecode value of 00:00:02:00.

2. Click Use Anyway, and dismiss the GOP Alert dialog that appears by clicking OK..
Only the first 2 seconds of the ai-after.m2v clip are added to the track’s V3 stream. What’s going on here?

The main video stream in this track uses a 15-frame, closed GOP structure. As it turns out, only the first 2 seconds of the ai-extra.m2v asset has GOPs that are 15 frames long. The next GOP is shorter, so DVD Studio Pro must truncate the clip at the point where its GOP structure begins to differ from the main video stream.
This problem was created by encoding the stream from Final Cut Pro directly to MPEG video using Compressor. You’ll see why this can be problematic in the next section, but first let’s delete this short clip from the V3 stream.
3. In the Track Editor, select the clip in the V3 stream, and press the Delete key.
The clip is deleted from the V3 stream.
Exploring Final Cut Pro Cut Markers
The ai-extra.m2v clip was edited in Final Cut Pro. To avoid the time and disk space required to render a final reference movie and then encode it, the clip was encoded to MPEG-2 using Final Cut Pro’s Export Using Compressor option. This is a great time-saving and disk-space-saving feature, because you can avoid rendering out a finished QuickTime movie before encoding, but it has unexpected consequences when encoding MPEG-2 streams that will be used for alternate angle tracks.
To facilitate higher quality encoding, Final Cut Pro automatically inserts compression markers at every edit point in the sequence. These automatically inserted markers are called cut markers. This ensures that every new scene begins with a brand new I-frame, which improves the overall look of your MPEG streams by making sure that a scene transition does not happen in the middle of a GOP. However, with cut markers automatically inserted, you lose the ability to control where I-frames will be placed in the MPEG stream, and therefore wind up with very little control over the final MPEG stream’s GOP structure.
Fortunately, there’s an easy way to fix this problem when you encode using Compressor, as the following steps demonstrate.
Note
This exercise assumes that you have Final Cut Pro installed on your system. If you do not have Final Cut Pro, skip ahead to “What You’ve Learned.”
1. In the Assets tab, Ctrl-click the ai-extra.m2v asset and choose Reveal in Finder from the menu.

A Finder window opens. Next to the ai-extra.m2v asset there is an ai-extra_FCP project.

Note
If your Finder window opens in column view, it may take a few seconds for the Finder to display the MPEG stream. Don’t worry—the Finder is just thinking hard.
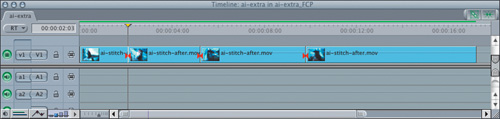
2. Double-click the ai-extra_FCP project file to open the project in Final Cut Pro.
The sequence’s Timeline has three cut edits, including one at 00:00:02:03.
3. In Final Cut Pro, choose File > Export > Using Compressor.

Compressor opens, and the sequence is automatically added as a file in the Batch window.
4. In Compressor’s Batch window, select the file and click the Preview button.
The Preview window opens.
5. From the Preview window’s Marker menu, choose “show edit/cut markers.”
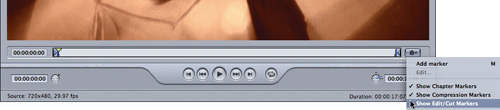
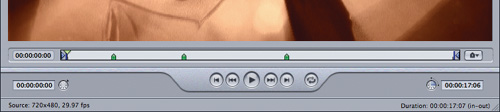
Three green cut markers appear in the timeline, one for each of the cut edits in the Final Cut Pro sequence.
Unless further action is taken, Compressor will automatically insert I-frames at each of these cut markers when it encodes the MPEG stream. To avoid this, let’s tell Compressor to ignore these cut edits.
6. Create a new Compressor MPEG-2 preset.
Note
When you create the new MPEG preset, keep the maximum bit rate limitations for alternate angle streams in mind. To learn more, see “Encoding Alternate Angle Streams,” earlier in this lesson.
7. In the new preset, click the Encoder button and then click the Extras button.
At the bottom of the Extras pane, you’ll see the option “Include chapter markers only.” With this option selected, Compressor will filter out all markers except chapter markers. A cut marker is not a chapter marker, so with this option selected, Compressor will remove cut markers (and any manually set compression markers) before it encodes the MPEG stream.

8. Click the “Include chapter markers only” check box.
9. Apply the preset to the file in the Batch window.
10. Encode the file.
11. Import the file into DVD Studio Pro.
12. In DVD Studio Pro, add the newly encoded file to the Before & After track’s V3 stream.
13. Edit the V3 stream so that it’s exactly the same length as the V2 stream.
Nothing beats the sweet feeling of mixed-angle success!
14. Save the project file to the My_Projects folder on your hard drive.
Lesson Review
1. Each track in your project can have how many angles?
2. True or false: Each angle in a multi-angle track must use exactly the same GOP structure.
3. What’s the Difference between multi-angle tracks and mixed-angle tracks?
4. Mixed-angle tracks must use markers, but where should you put them?
5. True or false: If you export using compressor from Final Cut Pro, each hard cut in your timeline is automatically turned into an I-Frame in the final MPEG stream.
Answers
1. One main angle, plus eight alternate angles for a total of nine different angles.
2. True. If not, DVD Studio Pro will only add the angle up to the point where the GOP structure differs.
3. In a multi angle track, all angles must be exactly the same length as the main angle, whereas in a mixed-angle track the alternate angles do not have to be the same length as the main angle.
4. Markers must “sandwich” the mixed-angles, with one at the front of the angle, and one at the back.
5. True. To avoid this, open your Compressor MPEG preset, visit the Extras tab, and enable the Include Chapter Markers only option.