Lesson 17. Advanced MPEG Encoding
Lesson Files
Lessons > 17-Advanced_MPEG_Encoding_Start
Media
Media > Blackbox
Time
This lesson takes approximately 45 minutes to complete.
Goals
Learn how motion estimation facilitates temporal compression in MPEG-2 video streams
Explore groups of pictures (GOPs), including the three types of frames they contain
Use the Preview window to see how the final MPEG-2 stream will look, before the stream is encoded
Set compression and chapter markers directly into the MPEG-2 stream
Crop standard definition video (720 × 486) so that it fits in the 720 × 480 DVD-Video frame
DVD-Video is a delivery format not just for video, as its name implies, but for high-quality, crisp, beautiful digital MPEG-2 video. However, the video that goes onto that DVD is only as good as the encoder that produces it. Fortunately, we have Compressor.
In Lesson 10, you took Compressor for a test drive and learned how to produce MPEG-2 streams for use in DVD Studio Pro. This lesson builds upon that base by introducing you to some of Compressor’s advanced MPEG-2 encoding features, including the following:
• Previewing encoding settings
• Setting chapter markers inside Compressor
• Cropping standard definition video (720 × 486) so that it fits into the 720 × 480 pixels of the DVD-Video frame
As this lesson progresses, we’ll spelunk deep into the theory behind MPEG-2, exploring how motion estimation and groups of pictures (GOPs) conspire to strip redundancy out of the video stream, allowing up to two hours of high-quality video on a single DVD-5 disc. To encode MPEG-2 correctly, you have to know the theory. Sharpen those pencils, we’re going in...
Setting Up
In this lesson you will encode a QuickTime movie called Commercials.mov. This movie is currently in the Assets container of the project you’ve been working on. Let’s import the movie into Compressor.
1. In DVD Studio Pro, open the file named 17-Advanced_MPEG_Encoding_Start, or continue working on the project from Lesson 16.
2. In the Assets tab’s Commercials folder, Ctrl-click the Commercials.mov asset, and from the contextual menu choose Reveal In Finder.
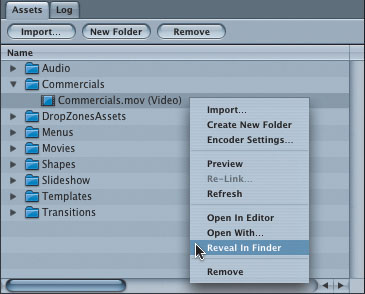
A Finder window pops open to display the Commercials.mov file.
3. Launch Compressor (Startup disk > Applications > Compressor).
4. From the Finder, drag the Commercials.mov file into Compressor’s Batch window.
Note
Leave the Finder window open onscreen. You’ll come back to this window later in the lesson.

Choosing Quality Settings
In Lesson 10, you learned that the Quality setting is important because it affects both the look of the encoded MPEG-2 file and also the stream’s resultant file size. In general, as you lower the quality, you also lower the file size. In fact, if you encode at Compressor’s minimum quality setting of a mere 2 megabits per second (Mbps), you can squeeze nearly three hours of video onto a DVD-5 disc. If there’s not much motion in the video, and you take time to create an appropriately configured preset, it will even look good. Compressor’s a very advanced MPEG-2 encoder!
To prove how good Compressor is, we are going to encode the Commercials.mov movie at the lowest possible quality setting. By the end of this lesson, you’ll know just how low you can push Compressor. You’ll also see that cranking Compressor up to the highest possible setting is not just a waste of disc space, but also a waste of time for many projects.
1. Create a new Compressor preset and name it LowQualityMPEG-2.

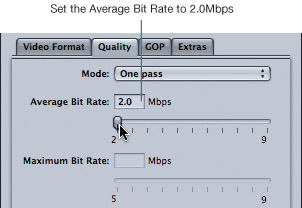
2. In the Inspector window’s Encoder pane, click the Quality tab.

3. From the Mode pop-up menu, choose “One pass.”

4. Set the Average Bit Rate slider to the lowest possible setting: 2 Mbps.
Note
In general, you should never encode MPEG streams with a max bit rate higher than 8 Mbps. The DVD-Video specification requires DVD-Video players to stream a maximum of 10.08 Mbps off a DVD disc. If you set your max bit rate to 8 Mbps, that leaves only 2.08 Mbps for the audio and subtitle streams. A 48 kHz, 16-bit stereo PCM stream has a data rate of approximately 1.5 Mbps. Add that to the 8 Mbps for the video stream, and your DVD-Video will stream at a max bit rate of 9.5 Mbps—that’s only 0.58 Mbps under the maximum allowed by the DVD-Video specification! When in doubt, a bit rate of 4.5 Mbps is always a good place to start, because 4.5 Mbps generally provides great balance between quality and file size.
About Motion Estimation
When an MPEG encoder creates an MPEG-2 stream, it divides each source frame into a matrix of 16-pixel-by-16-pixel squares called macro-blocks. As the encoder progresses from frame to frame, it can determine the color information in each macro-block, and then calculate how far blocks of color have moved within the frame.
For example, if you have a tripod shot of a balloon drifting across the sky, the blocks of color in the balloon never change—they simply float from left to right. Using motion estimation, Compressor can determine how far these blocks of color have moved, and then encode a motion vector to define this change of position. As a result, a tiny algorithm is all that’s used to define the motion of these blocks of color over time; the individual pixels inside the blocks do not need to be re-encoded! It’s sort of like MPEG-2’s version of the sprite animation techniques found in Macromedia Flash or Totally Hip LiveStage Professional.
Compressor has three levels of motion estimation: Good, Better, and Best. The only difference between the three is that the Best setting searches farther afield in the frame to find macro-blocks that have moved than the Better setting, which in turn searches farther than the Good setting. But all of that extra searching takes an increased amount of time, so if you choose Best motion estimation, be prepared to wait.
For us, time is critical, since we have so many other things to learn in this lesson. Let’s set motion estimation as low as it will go.
1. From the Motion Estimation pop-up menu, choose Good.

Note
To see how motion estimation works, you need Digigami’s MPressionist.X, which allows you to view macro-blocks in an encoded MPEG stream, and even to see how these macro-blocks move from frame to frame. For more information, visit www.digigami.com.
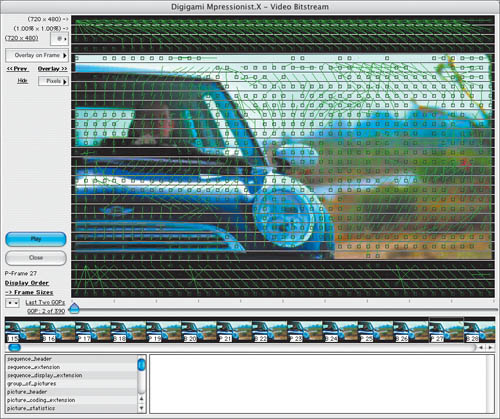
Digigami’s MPressionist.X allows you to inspect motion vectors in MPEG streams.
Examining GOP Structures
Let’s take a moment to dive deep into the science behind MPEG-2 encoding. MPEG-2 streams achieve such incredibly low data rates because they employ both spatial and temporal compression. Spatial compression occurs within the video frame, similarly to how the JPEG file format spatially compresses still images. Temporal compression, on the other hand, occurs between frames in the video stream. For example, the motion vectors described in the last section are a form of temporal compression, because they help to encode moving blocks of color, between video frames, over time.
All MPEG encoders begin the compression process by dividing the video stream into small units called groups of pictures (GOPs). A GOP can have three different types of frames: I-frames, P-frames, and B-frames. Of the three, both I- and P-frames are considered reference frames because they can be used as the base from which to derive other frames in the GOP. With that in mind, let’s take a closer look at these three frame types.
About I-Frames, P-Frames, and B-Frames
I-frame stands for intra-frame. I-frames are spatially encoded, within the video frame, in a way that is similar to encoding for JPEG still images. You can consider an I-frame to be the GOP’s keyframe. It is the highest quality frame in the GOP, but it’s also the one that takes the most bits to encode because the I-frame is not mathematically derived from any other frame. Rather, it contains all of the data needed to completely reproduce the frame, independent of any other frame in the GOP. As you’ll come to see later in this lesson, I-frames are very important to the MPEG stream, because all chapter markers are locked onto I-frames.
P-frame stands for predicted frame. A P-frame is derived mathematically from content within the reference frame immediately preceding it. This could be an I-frame or another P-frame. Remember, both are considered reference frames.
For example, if a macro-block is black in the preceding reference frame, and also exactly the same shade of black in the current P-frame, the encoder doesn’t need to re-encode that macro-block’s color information. Rather, it can record a small motion vector that simply says, leave the macro-block the same color and in the same place as it was in the last frame.
Note
Portions of the P-frame that aren’t covered by motion vectors are encoded the same way as an I-frame.
A B-frame is a bi-directional frame. Although B-frames are similar to P-frames, they differ in being derived from information in both the previous and next reference frames. B-frames are the most efficient of the three types of GOP frames.

1. In the Inspector window’s Encoder pane, click the GOP tab.
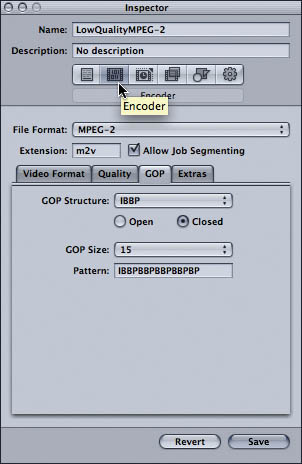
The GOP pane holds settings used to configure GOP structure and size. Of particular note, the Pattern field displays the GOP’s sequence of I-frames, P-frames, and B-frames.
2. From the GOP Structure pop-up menu, choose IBP, and from the GOP Size pop-up menu, choose 7.
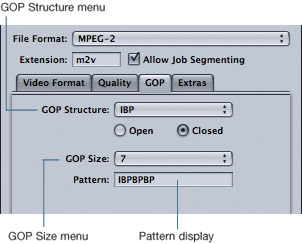
The Pattern display updates to show the new GOP structure. The GOP Structure and GOP Size menus combine to determine how many I-, P-, and B- frames there will be in each GOP. As you can see, this new GOP has only seven frames, and only three of them are B-frames.
The GOP structure you select determines how far apart P-frames are in the stream. If the stream has a low amount of motion, P-frames can be spaced further apart because there is less change between successive pixels, over time. However, if the stream contains a lot of motion (as, for example, the car commercials in this stream do), moving the P-frames closer together provides enhanced image quality because there are fewer B-frames between the P-frames. This means the encoder does not have to span extra B-frames as it encodes successive P-frames, which makes it easier to create motion vectors.
Adjusting the GOP structure and size can result in higher quality MPEG-2 streams, but your file size will also go up, even if just marginally. By adjusting the GOP structure, you can create streams with more P-frames and fewer B-frames. P-frames more accurately reproduce the source image than B-frames, but that extra quality means P-frames also have a larger file size than B-frames. Consequently, if you add more P-frames to each GOP, you increase the size of each GOP.
Note
There are no hard and fast rules about the GOP structure and size you should use. Your choices about structure and size depend upon the content of the stream you are encoding. In general, a GOP size of 15 frames for NTSC (12 frames for PAL) and an IBBP structure provide sufficient quality for most MPEG streams.
In the end, however, nothing beats experience. If you have a moment, encode the same source file with several different GOP structures and sizes. Then watch each encoded stream to see if there is a difference in quality. Make sure you also pay attention to the file size of each stream!
3. Ensure that the Closed GOP radio button is selected.

GOPs can be either open or closed. When Closed is selected, notice how the GOP begins with an I-frame and ends with a P-frame. An I-frame is self-contained and does not refer to any other frame in the GOP. A P-frame, on the other hand, refers to the previous reference frame to derive its image data. Consequently, a closed GOP is a self-contained unit in the final MPEG stream, because a closed GOP contains all of the information necessary to re-create every frame in the GOP.
Note
If you are creating multi-angle or mixed-angle tracks, you must use closed GOPs. Multi-angle or mixed-angle tracks use I-frames as the bridge between video streams. In a closed GOP, the I-frame is always the first frame in the GOP. Consequently, if both streams use closed GOPs and the same GOP size and structure, all I-frames will align throughout the multi- or mixed-angle stream, which means the DVD-Video player can easily switch from one stream to another.
4. Select the Open GOP radio button.

When Open is selected, the GOP Size updates to 14 frames. Additionally, the open GOP begins with a B-frame and ends with a P-frame. A B-frame refers to both the preceding and following reference frames. In other words, in order to derive its image data, the B-frame at the front of the open GOP refers to the P-frame at the end of the previous GOP. Thus, in contrast to a closed, self-contained GOP, an open GOP does not contain all of the information needed to fully re-create every frame in the GOP.
So why use open GOPs? The quick answer is file size. Open GOPs tend to have one fewer P-frame and one more B-frame than a closed GOP. B-frames are smaller than P-frames, so an open GOP structure will enjoy a smaller file size than a closed GOP, even if only a few kilobytes smaller. However, there are a lot of GOPs in an MPEG stream, so all those kilobytes add up!
Note
DVD Studio Pro will accept both open and closed GOP streams, but open GOP streams cannot be used for mixed- or multi-angle tracks.
5. Close the Presets window and save your changed preset.
6. In the Batch window, assign the LowQualityMPEG-2 preset to the Commercials.mov file.
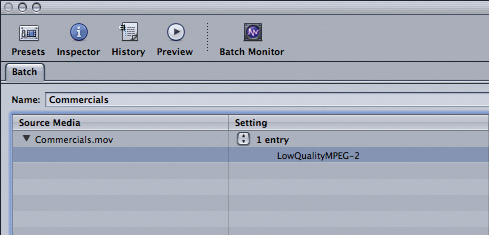
This file is ready for encoding. But before you click the Submit button, let’s take a moment to preview the Encode settings, using Compressor’s Preview window.
Previewing Compression Settings
Up to this point in the lesson, you’ve created the lowest quality MPEG compression setting possible. How do you think it looks? Although there’s no substitute for actually encoding the video and taking a look, you can use Compressor’s Preview window to quickly preview compression settings without outputting any video at all. The Preview window provides a real-time simulation of your encoder settings. Let’s open the Preview window now and take a look at the quality of this yet-to-be encoded stream.
Note
It’s no secret that quality MPEG encoding takes a long, long time. Encoding with Compressor is no exception. If you choose the best possible settings for your encoding preset, it will take hours to encode an hourlong file. The Preview window will provide a good simulation of how the final file will look, but keep in mind that it really is just a simulation: The only way to truly test encode settings is to actually encode the file.
To get around this problem, try encoding a 10-second clip trimmed out of the source footage. Pick a clip that represents a hard-to-encode section of the footage, such as a scene with lots of motion or visual complexity. If the encode settings look good in 10 seconds of a visually complex scene, they’ll look good throughout the entire MPEG stream.
1. In the Batch window’s toolbar, click the Preview button.

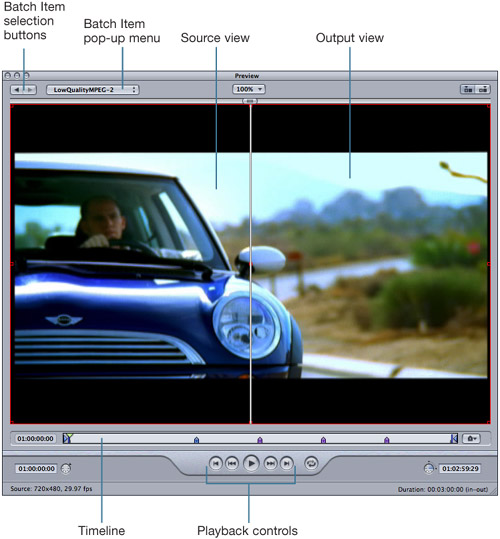
2. To ensure that you’re viewing the LowQualityMPEG-2 preset, select it from the Batch Item pop-up menu.
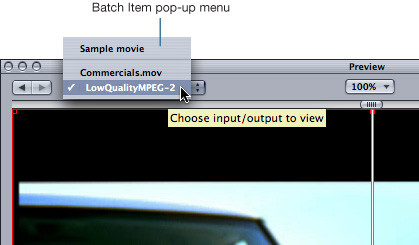
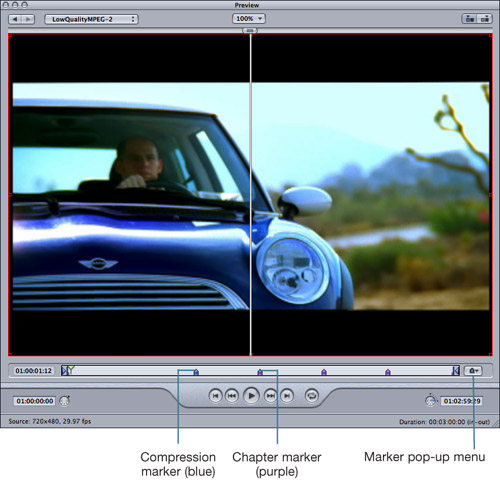
With a preset selected from the Batch Item pop-up menu, the Preview window lets you do A/B comparisons of your source and output video. At the top of the Preview window’s display area is a slider, and a thin line extends vertically from this slider to bisect the display area. To the left of this line, the Preview window displays the source video; to the right, it displays a simulation of the output video.

3. Click the Preview window’s Play button to start playback.
4. Drag the slider left and right to preview encoding.
As you can see, at the lowest possible MPEG-2 compression settings the video still looks pretty good. You will notice a small loss of detail in fine features. In addition, some colors might look a bit dull, particularly in high-motion parts of the stream. Otherwise, this low-quality setting is quite satisfactory.
5. Leave the Preview window open.
Setting Markers in Compressor
While exploring chapter markers in Lesson 12, you learned that markers can only be assigned to I-frames in the MPEG stream. A typical NTSC MPEG-2 stream uses a GOP size of 15 frames (12 frames for PAL), which means there will be one I-frame for every 15 frames, or two I-frames per second. This makes it very difficult to frame-accurately position markers inside DVD Studio Pro. You learned that to get around this you can insert chapter markers on individual frames in Final Cut Pro, and then export those markers into the final MPEG-2 stream.
In addition to using Final Cut Pro to insert chapter markers frame-accurately, you can do so in Compressor. In fact, Compressor allows you to insert two types of markers: compression markers and chapter markers. This is accomplished using Compressor’s Preview window.
The source file you are about to examine was exported from Final Cut Pro as a self-contained movie, and several chapter and compression markers have been embedded into it. In the following steps you’ll examine these markers in Compressor, and then add a couple of your own.
1. From the Marker pop-up menu in the bottom-right corner of the Preview window, deselect the “show compression markers” option.
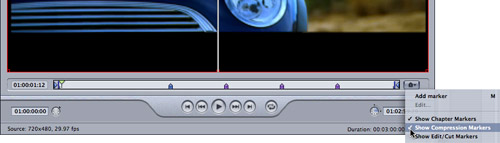
The Preview window’s timeline shows chapter markers only.

2. From the Marker pop-up menu, deselect the “show chapter markers” option and select the “show compression markers” option.

Only the single compression marker is displayed in the Preview window’s timeline.
Setting Compression Markers
Compression markers force an I-frame at an exact frame in the MPEG stream. A compression marker, as its name implies, is meant to enhance compression by forcing an I-frame at any abrupt change in the scene. For example, if a sudden change in the scene, such as a cut or a quick fade, occurs in the middle of a GOP, it’s very difficult for the encoder to use motion vectors and algorithms to encode that change. As a result, you might see a subtle breakup of your picture until the next I-frame comes along. By placing a compression marker at the beginning of that scene change, you force an I-frame, giving the MPEG encoder a clean slate to start the new scene from.
Note
The GOP before the compression/chapter marker will be shorter than your specified GOP size. Compressor will cap off the shorter GOP with a P-frame, and then begin creating new GOPs from the frame tagged by the marker. After the compression/chapter marker, the MPEG stream continues with the specified GOP size and structure.
1. In the Preview window’s Timecode text box, type 01:00:30:00.
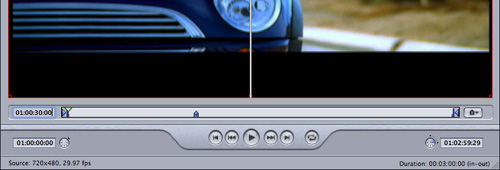
The playhead jumps to 30 seconds and 0 frames into the video. This frame marks a sudden scene transition.
2. Press the left arrow key.
The playhead jumps back one frame, and the screen goes black.
3. Press the right arrow key to move the playhead back to the first frame of the scene transition.
4. From the Marker pop-up menu choose “Add marker.”

Tip
In Compressor’s Preview window, you can press the M key to add a marker, just as you can in Final Cut Pro and DVD Studio Pro.
A blue compression marker is added at the playhead’s current position.

This demonstrates an important point:
By default, all new markers added to the Preview window are compression markers.
To make a chapter marker, you must transform a compression marker, as you’ll see in the next exercise.
Setting Chapter Markers
Chapter markers work the same way as compression markers, with the advantage that you can name them. The name is encoded with the MPEG-2 stream, and the marker will be visible inside DVD Studio Pro’s timeline-based Track Editor.
To make a chapter marker, you transform a compression marker by giving it a name. The playhead is currently parked over the compression marker at 30 seconds, 0 frames. Let’s transform it.
1. From the Preview window’s Marker pop-up menu, choose Edit.
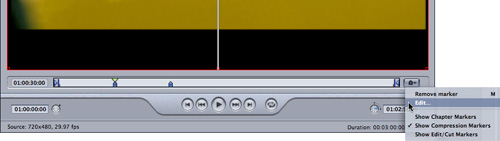
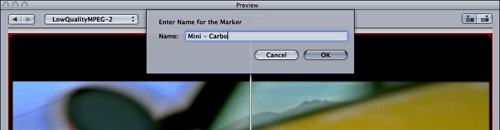
A dialog drops down from the Preview window’s title bar. This dialog prompts you to enter a name for the marker.
2. Name the marker Mini – Carbo, and click OK.
The compression marker is transformed into a chapter marker. Because the timeline is currently set to display only compression markers, the marker dissappears from the timeline. There is still one final compression marker in the timeline. Let’s turn that one into a chapter marker, too.
3. Move the playhead to 01:01:00:00.
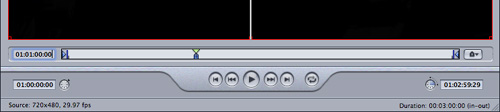
The playhead is parked over the final compression marker.
4. Name the compression marker Honda – City.
5. From the Marker pop-up menu, choose “show chapter markers.”
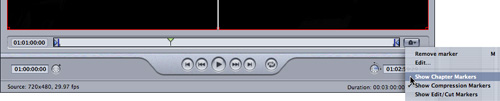
All of the markers are now chapter markers, as displayed in the timeline.
Cropping Video
There are two types of video that are commonly used as source assets for DVD: standard definition video (SD) and DV video (DV). DV video uses the same frame dimension as DVD-Video: 720 × 480. Standard definition video, on the other hand, uses a frame dimension of 720 × 486—that’s six extra vertical lines of resolution. The video you are currently working on is SD. If you take a quick look at the bottom-left corner of the Preview window, you’ll see a display that shows the source video’s frame dimension is 720 × 486—in other words, SD.

Before you can encode an SD video, you need to crop those extra six lines off. Crop is an important word here, because if you simply resize SD video to 720 × 480, your video will look mushy and blurred in the final MPEG stream, instead of retaining its sharp, crisp digital appearance.
By default, Compressor automatically crops four lines from the top and two lines from the bottom of SD video that is assigned an MPEG-2 preset. In the Preview window, a thin red outline surrounds the cropping area of the final MPEG stream. Areas of the video outside the red outline will be cropped off. To set your own custom cropping area, you need to visit the Geometry pane of your MPEG-2 Preset.
Tip
In the Preview window, you can drag the red outlined cropping area to quickly change the way your video is cropped.

1. Open the Presets window and select the LowQualityMPEG-2 preset.
2. Select the Geometry button.
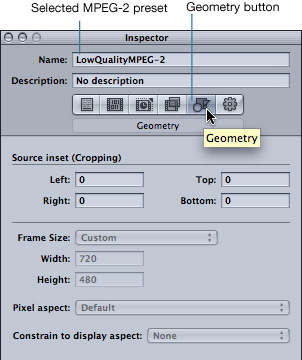
The Geometry pane includes a Source inset (Cropping) area that lets you define how many pixels will be cropped off the left, right, top, and bottom of your MPEG-2 stream.
3. For the Bottom setting, enter the value 6.

Six lines will now be cropped off the bottom of the video before it is encoded to MPEG-2.
Tip
Remember, there are two fields in every frame! When cropping interlaced SD video, always use even numbers, or you may accidentally encode the MPEG stream using the wrong field order. For example, you can crop six lines off the top, or two lines off the top and four lines off the bottom, and your MPEG stream will look fine. However, if you crop three lines off both the top and bottom, you may run into interlacing problems in the final MPEG stream.
4. Close the Presets window and save the changed LowQualityMPEG-2 preset.
Adding the Encoded File to Your Project
With the encoding settings made and chapter markers set, encoding the file is all that remains. Let’s do so now, and then import the file into DVD Studio Pro.
1. Set the Destination to the Source folder.
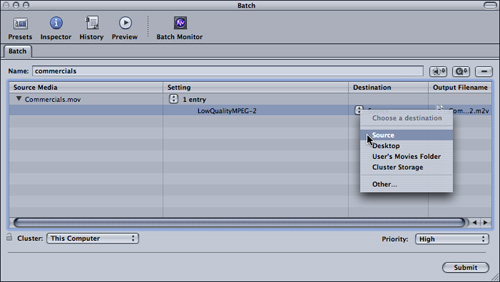
The Source folder should still be open on your Desktop. Choosing this folder as the destination makes it easy to find the file after it’s encoded.
Note
If you use Final Cut Pro’s Export > Using Compressor option, choosing Source as the destination causes the encoded files to be placed at the root of your hard disk.
2. In the Batch window’s Output Filename column, change the output file’s name to Commercials.m2v.
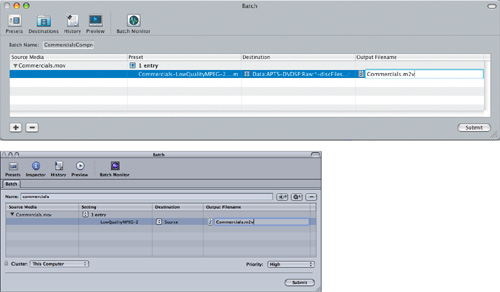
A few steps from now, you will add this file to your DVD Studio Pro project, and it’s very important that the name is exactly Commercials.m2v, so take care as you type.
3. In the bottom-right corner of the Batch window, click Submit.
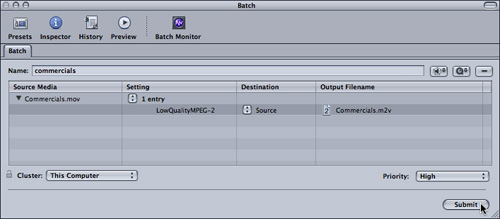
The Batch Monitor opens, and the file is encoded. Once the file has finished encoding, you can drag it into DVD Studio Pro.
4. In the Finder, locate the encoded file.
5. Drag the file directly from the Finder into DVD Studio Pro’s Graphical view.

A track item is added to the Graphical view.
6. Double-click the new Commercials track item to open it in the Track Editor.

There are a few important things to note. First, all of your named chapter markers are present in the Track Editor. Second, DVD Studio Pro has automatically added an audio track to the A1 audio stream. There’s no audio stream in the MPEG-2 file that Compressor encoded, so where did this audio come from?
As we saw in Lesson 10, if you add a movie or MPEG-2 file to a track, DVD Studio Pro automatically looks in the asset’s folder on the hard disk and checks to see if there’s an audio file with exactly the same name as the video asset. If there is, DVD Studio Pro assumes the audio file is an audio stream that corresponds to the video and thus automatically adds it to the track! How cool is that?
Note
DVD Studio Pro’s Track Preferences pane contains an option called “Find matching audio when dragging.” This option must be selected for DVD Studio Pro to automatically add matching audio streams to tracks.

7. In the Track Editor, select the start marker.
The inspector updates to show the marker’s properties. At the very top of the Marker Inspector there is a Name setting.
8. Rename the Start marker Mini – Breeze.

You are almost done. Let’s finish this lesson by adding a chapter menu for this track.
9. In the Graphical view, double-click the Main Menu tile to open it in the Menu Editor.
10. From the Graphical view, hold down the Option key and drag the Commercials track over the main menu’s Commercials button.
A Drop palette appears.
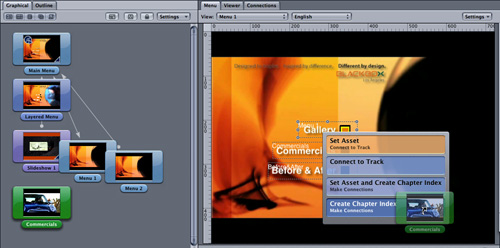
11. From the Drop palette choose Create Chapter Index, Make Connections.
The Choose Template or Layout Style window opens.
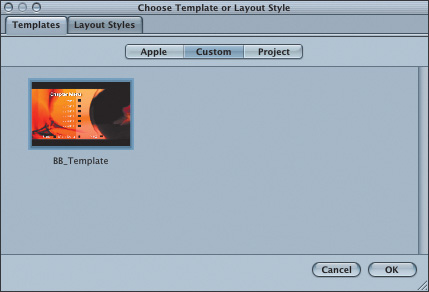
12. Click the Templates tab, click the Custom button, and select BB_Template. Click OK.
DVD Studio Pro adds a chapter menu for the Commercials track and links the chapter menu to the main menu’s Commercials button.
13. Save your project.
14. Simulate the project to test the new chapter menu and the encoded MPEG-2 stream.

The chapter menu works great. But more important, the encoded track also looks pretty good, and it was encoded at 2 Mbps, which is a low data rate. Remember: There’s rarely a need to encode your MPEG-2 streams at the highest possible data rate setting. Typically, a target data rate of between 4 and 6 Mbps is more than adequate to preserve the visual quality of the stream.
Lesson Review
1. What is a macroblock?
2. What is a Motion Vector?
3. What is a GOP?
4. What is a common GOP size for NTSC video?
5. What is an I-Frame?
6. In a Closed GOP, where is the I-Frame?
Answers
1. A macroblock is a 16-pixel by 16-pixel block inside the MPEG-2 video frame.
2. A motion vector is used to determine how far macroblocks have moved from frame to frame inside the MPEG-2 stream.
3. A GOP is a Group Of Pictures inside the MPEG-2 stream.
4. 15 frames (12 frames for PAL video).
5. An I-Frame is an Intra Frame, or keyframe.
6. In a closed GOP, the I-Frame is always the first frame in the GOP.