Lesson 20. Scripting
Lesson Files
Lessons > 20_Scripting-Start; 20_Scripting-Finished
Media
Media > Advanced Authoring > Lesson 20 folder
Time
This lesson takes approximately 60 minutes to complete.
Goals
Learn how to script with General Parameter Register Memories (GPRMs) and System Parameter Register Memories (SPRMs)
Discover how to use compare commands to program your DVD-Video to make its own decisions
Use the Simulator’s Information Drawer to keep track of GPRM and SPRM values as you simulate scripts
Discover how to use a prescript
Learn how to check SPRM 1, which stores the current audio stream
Learn how to check SPRM 14, which stores the DVD player’s aspect ratio
Learn how to check SPRM 13, which stores the DVD player’s parental level
There’s a simple fact about DVD-Video: It’s old technology. Because you’re familiar with Macromedia Flash on the Internet, and Macromedia Director or Totally Hip Software’s LiveStage Professional, you tend to expect DVD-Video to live up to today’s standard of interactivity. But the truth is, DVD-Video, as a format, was finalized in 1994. In other words, DVD-Video reached full maturity when Macromedia Flash was in its infancy.
The good news is that you’re not stuck with a 1994 view of what interactivity should be. Scripting is one of the best ways to make your DVDs much more interactive.
This chapter begins by introducing you to several of the important scripts you’ll use day-to-day with DVD Studio Pro. These scripts form the base of most of the scripts you’ll write in DVD Studio Pro. Of course, scripts are situation-dependent, and your scripting requirements will change from project to project. However, with a little effort you can adapt the techniques learned here to your own personal projects in the real world.
Getting Started
In this lesson, you will take a project that is close to complete, and add the finishing touches through five scripts that complete the navigational structure of the DVD-Video. In a moment, you’ll open the project and take a look at where you’re going. But first things first—this project uses a custom alpha transition that we’ve created for you. You must install this alpha transition before you can continue. (To learn more about alpha transitions, see Lesson 16, “Creating Transitions.”)
Note
If you do not install the custom alpha transition, DVD Studio Pro will substitute the default transition when it loads this project. However, installing the transition takes less time than it took to read this sentence, so why not install it?
1. Drag the Folder named APTS_Trans from the Media > Advanced Authoring > Lesson 20 > Transitions folder and drop it into your Startup Disk > Library > Application Support > DVD Studio Pro > Apple > Transitions folder.
Tip
If you don’t see a Transitions folder in the Application Support > DVD Studio Pro folder, just create a new folder and name it Transitions.

If you do not have permission to access the Startup Disk > Library > Application Support > DVD Studio Pro > Transitions folder, use the Startup Disk > Users > your user name > Library > Application Support > DVD Studio Pro > Apple > Transitions folder. The only difference between the two is that transitions in the Startup Disk > Library > ... folder are available to every user on the computer, whereas transitions in the your user name > Library >... folder are available to just that user.
2. Start (or restart) DVD Studio Pro.
Alpha transitions are loaded when DVD Studio Pro launches, so you need to start, or restart, DVD Studio Pro before this custom alpha transition will become available.
3. Open the DVD Studio Pro Project file named 20_Scripting-Start.
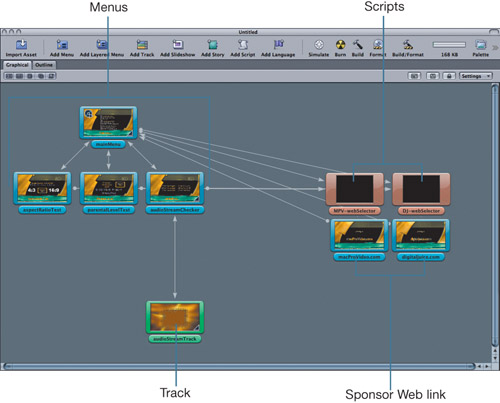
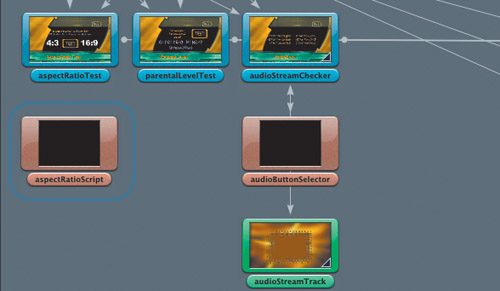
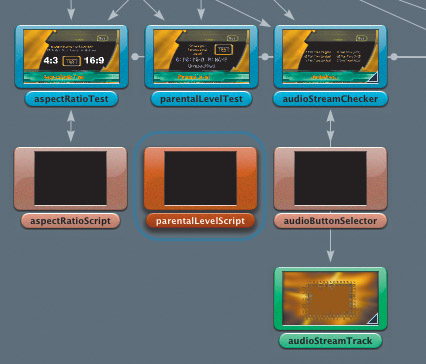
This project has a series of menus, a track, and two script items that have already been created for you. Notice that script items are brown.
This is a 16:9 project, so you need to be sure you are simulating at the correct aspect ratio. To do so, take a quick trip to DVD Studio Pro’s Preferences window.
4. Choose DVD Studio Pro > Preferences, and click the Simulator icon to open that pane. Change the aspect ratio to 16:9.
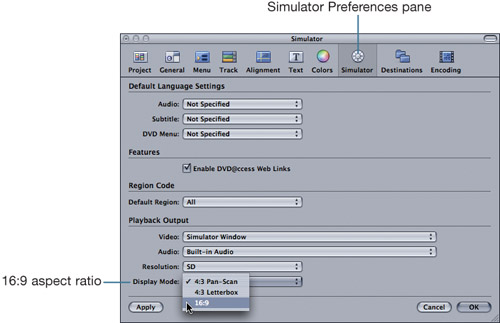
5. Click OK to close the Preferences window.
6. Simulate the project and explore the navigation of this title.
There are a few mistakes, to be sure. In fact, the aspectRatioTest and parentalLevelTest menus just plain don’t work. That’s because you need to do some scripting! Let’s get started.
Scripting Basics
At its core, DVD-Video’s interactivity is simply the capability to jump between project items. Whether you’re using a track end jump to link to a menu, or a menu button to target a slide in a slideshow, DVD authoring is solely focused on building a navigational structure to display your items.
Scripting is a method for enhancing this kind of interactivity. When you write DVD scripts, you are essentially building complex and advanced project navigation structures—things you can’t do using button targets or end jumps alone.
The climax of 95 percent of the scripts you’ll write is a jump action that jumps the viewer out of the script to a different project item. You’ll use jump actions a lot, so let’s ease into scripting by checking one out.
1. Ctrl-click the Graphical view, and choose Add > Script from the shortcut menu.
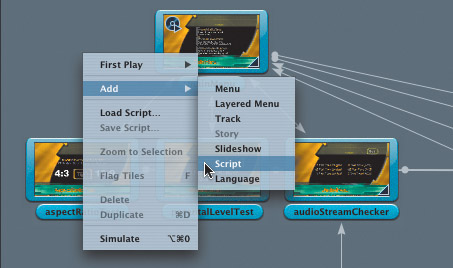
A new script item is created.

2. Double-click the script to open it in the Script Editor.

By default each new script has a single Nop command. Nop stands for “no operation,” or do nothing. When a DVD player runs into a scripted Nop command, it does exactly what the Nop command says to do—nothing! In other words, the DVD player will literally stop playback right at that point—usually displaying a black screen—because it has no further commands to follow. Because of this, you need to replace this default Nop command with a command that’s a bit more useful.
Note
If the Nop command is part of a pre-script, the Nop command acts as an exit command and the item that the pre-script is attached to will play.
3. In the Script Editor, select the Nop command.

The Inspector updates to display the selected command’s properties. As you can see, there’s not much to this script, because all of the Inspector’s property areas currently say “Not Applicable.”

Let’s turn this Nop command into a jump action.
4. From the Inspector’s Command pop-up menu, choose Jump.
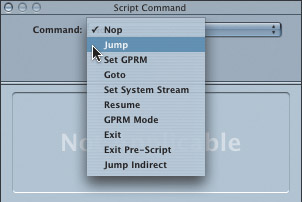
The Inspector updates to show you the jump command’s unique properties. Back in the Script Editor, the command line changes to say “Jump not set.” The next step is to set the project item that this command targets.

5. From the Inspector’s Jump To pop-up menu, choose Menus > mainMenu > AudioStreamSelector.

This jump command now targets the AudioStreamSelector button on the main menu. But don’t take our word for it—check it out for yourself.
6. In the Graphical view, Ctrl-click the new script tile, and choose Simulate Script from the shortcut menu.
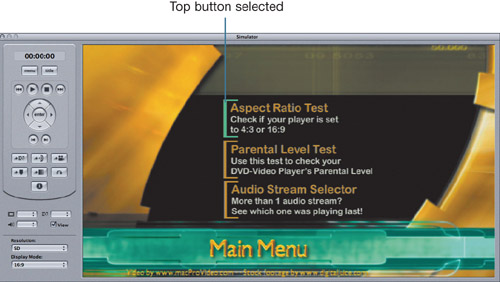
The Simulator opens to display the main menu with the AudioStreamSelector button automatically selected. You’ve just programmed a jump action using a script!
7. Close the Simulator.
Using Variables
Scripting is powerful because it lets you program your DVD-Video to make its own decisions. These decisions can be based on viewer input, such as the order in which buttons are clicked, or they can be automatic decisions based on the order in which project items are played. In either situation, you will need to use variables to give your scripts maximum playback power.
In DVD-Video scripting, variables are called General Parameter Register Memory, or GPRMs for short. In DVD Studio Pro, you have access to eight GPRMs that you can use in your scripts.
Note
The DVD-Video Specification provides for 16 GPRMs. DVD Studio Pro gives you access to 8 of them, and reserves the other 8 GPRMs for “under-the-hood,” or behind-the-scenes, calculations.
1. In the Graphical view, select the Script 1 item.
The Inspector updates to display the script’s properties. These properties include all eight of the GPRMs available to your scripts. If you find it helps your workflow, you can rename these GPRMs to something more descriptive than their default names. GPRMs are global to your entire project, so it’s often beneficial to use one GPRM in one script, a second GPRM in the next script, and so on. Renaming a GPRM makes it less likely that you will accidentally use the same GPRM in two conflicting scripts.

2. In the Inspector, double-click the text box to the left of GPRM 0 and type buttonSelector.

3. In the Script Editor, select the current command line.
The Inspector updates to display the command’s properties.
4. Change the selected command in the Inspector’s Command pop-up menu from Jump to Set GPRM.

The Inspector updates to show the Set GPRM command’s properties.

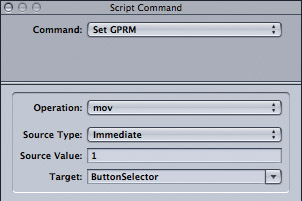
To experiment with variables, let’s use the next few steps to store the value 1 in our newly named GPRM. In DVD Studio Pro methodology, you are going to move a value into the GPRM named buttonSelector. A quick look at the Inspector shows that DVD Studio Pro has already helped us along the way. The Operation menu says “mov,” which means move, and the target for this move action is the buttonSelector GPRM. You’re halfway there, but before you go any further, let’s take a second to explore the Operation and Target pop-up menus.
5. Click and hold the Operation pop-up menu to open it.

The Operation pop-up menu shows all of the things you can do with this GPRM. For example, you can move a value into it (mov); perform addition (add), subtraction (sub), and several other mathematical operations; or even load a randomly generated number into the GPRM (ran).
6. Leave the Operation set to mov.
7. Click and hold the Target pop-up menu.

The Target pop-up menu displays all of the GPRMs, including the one you renamed to buttonSelector. As its name implies, the Target menu determines which GPRM you will move the value into in the next few steps.
8. Leave the Target pop-up menu set to buttonSelector.
9. From the Source Type pop-up menu, choose Immediate.
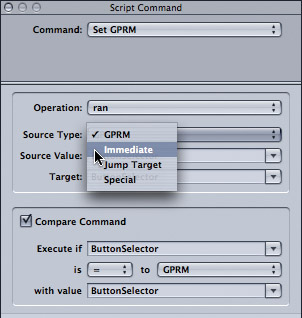
The Source Type pop-up menu determines the source of the info you will move into the target GPRM. There are several sources that you can use, and we’ll cover each of them in later exercises. For now, let’s concentrate on the Immediate source type. The Immediate source allows you, the DVD author, to state exactly what value should be loaded into the GPRM.
Once you’ve selected a source type, you need to define a source value.
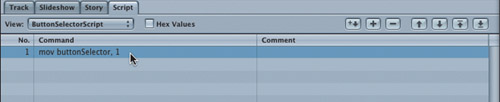
10. In the Source Value text box, type 1.

When the script executes, the value 1 will be moved into the GPRM named buttonSelector.
That was easy enough. Let’s move on to the next section and put this script to action.
Using the Simulator’s Information Drawer
The Simulator can show you GPRM settings, as well as other important script settings, as you preview your DVD. This information is displayed on the Simulator’s Information Drawer. Let’s use the Information Drawer now to check the value you moved into the buttonSelector GPRM.
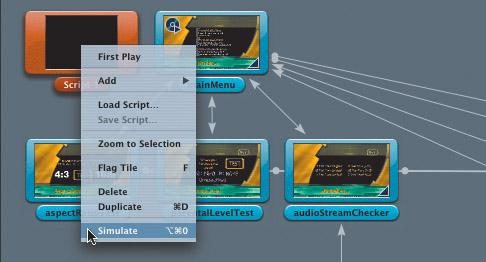
1. In the Graphical view, Ctrl-click the Script 1 item, and choose Simulate.

The Simulator opens and plays Script 1. This script, of course, does not have a jump action, so the Simulator stops on a black screen after executing the script.
2. On the Simulator’s remote control, click the Info button.

The Simulator’s Information Drawer opens. The Information Drawer has two display areas: an Item Properties area and a Registers area.

Note
The Information Drawer can open on the top, bottom, left, or right side of the Simulator. Where it opens depends upon your screen resolution, and also on the Simulator’s position on the screen. If the Simulator is close to the left edge of the screen, for example, the Information Drawer will most likely open on the Simulator’s right side.
3. In the Information Drawer’s Registers area, scroll down until you can see the GPRM settings.
Notice that the buttonSelector GPRM holds the value of 1. This confirms that you have just set the value for a variable in your DVD project. If you want to test this a bit further, close the Simulator, move a different immediate value into the buttonSelector, and then launch the Simulator once again to check out what the Information Drawer’s GPRM settings say.
Programming the Title Button
One common rule of DVD navigation is that when the user returns to a menu, the button automatically selected should always be the one that corresponds to the last project item played. Using DVD Studio Pro’s target menus, it’s usually a simple matter to target jump actions directly to individual menu buttons. But in some situations, you can’t control the way the user returns to a menu.
A classic example of this navigation problem is the Title button, which can only be set once for the whole project, in the Disc Property Inspector. In this section, you will program a script that looks at the last item played and then tells the DVD player which main menu button to select. You will then assign this script to the Title button, ensuring that the correct menu button is always correctly displayed, regardless of how the viewer returns to the main menu.
1. Ctrl-click the main menu item and choose Simulate Menu.
2. In the Simulator, click one of the main menu’s buttons.
3. Now click the Simulator’s Title button.
The Simulator jumps back to the main menu, and the top menu button highlights by default. To fix this navigation problem, you must use a script.
4. Close the Simulator.
Using the Last Item Command
To script the Title button, you need to solve this problem: How do I jump to specific menu buttons based on the last project item played? Fortunately, DVD Studio Pro has a special script command for just this purpose: the Last Item command. Every item in your project has a unique value assigned to it, and the DVD-Video player can use this value to keep track of the order in which items play. The last item command will always provide the value of the last project item played, whether it’s the last track, the last menu, or even the last slideshow that played. Last item is a very versatile command.
To use the last item command, you do much the same thing as when you moved an immediate numerical value into the buttonSelector GPRM. But instead of moving a numerical value into the GPRM, you will now move the value of the last item played into the GPRM.
1. In the Graphical view, double-click the Script 1 item.
The script opens in the Script Editor, and the Inspector updates to display the script’s properties. Let’s take this opportunity to give this script a better name than “Script 1.”
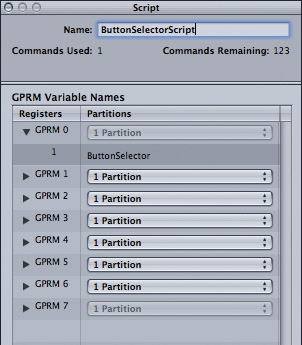
2. In the Inspector’s Name text box, type buttonSelectorScript.
3. In the Script Editor, select the command line.
The Inspector updates to display the command line’s properties. Right now this script is configured to move an immediate value of 1 into the GPRM named buttonSelector.
4. From the Inspector’s Source Type pop-up menu, choose Special.
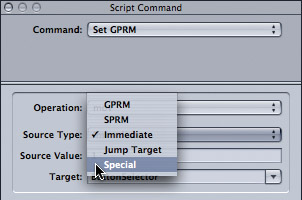
5. From the Source Value pop-up menu, choose Last Item.

Now the script says “move the value of the last item played into the GPRM named buttonSelector.” This is a good start. But you need to check the value stored in the buttonSelector GPRM and then jump to the appropriate button on the main menu. To do so, you’ll use a series of compare commands.
Using Compare Commands
In DVD Studio Pro, a compare command is similar to a conditional statement in other programming languages. Classically, a conditional statement has an “if, then” structure. In other words, a conditional statement might say, “If the last item that played was the AspectRatioTest menu, then play the Main Menu button named aspectRatioTest.”
Compare commands in DVD Studio Pro work similarly, except the conditional statement is configured backward. So, in DVD Studio Pro, the conditional statement would say, “Play the Main Menu button named aspectRatioTest if the last item that played was the AspectRatioTest menu.” It’s a different sentence structure, but the result is the same.
As with all things in DVD Studio Pro, learning by example is the best way, so let’s create a compare command and see how it works.
1. At the top of the Script Editor, click the Add Command button.
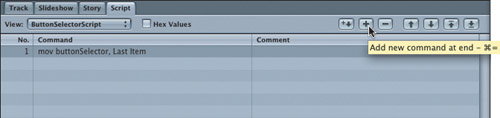
A new command line is added to the Script Editor, and by default this new command line is filled with an Nop command.

2. Create a jump command that targets the main menu button named aspectRatioTest.
For more information on creating jump commands, see the earlier section called “Scripting Basics.”

3. In the Inspector, check the Compare Command check box.
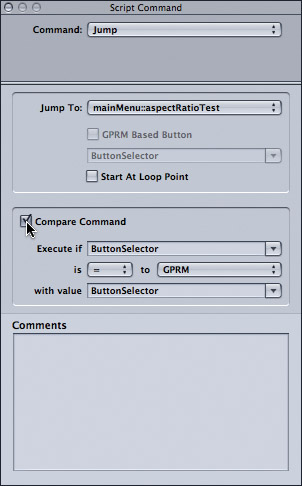
Back in the Script Editor, an “if” section has been added to the jump command line. This is the compare command.
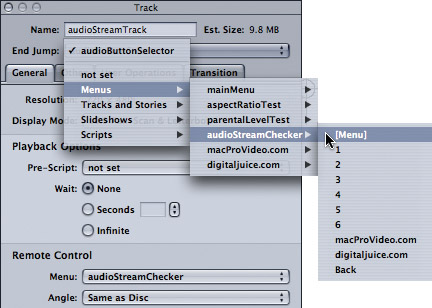
4. In the Inspector’s Compare Command area, set the “to” pop-up menu to Jump Target.

5. In the Inspector’s Compare Command area, set the “with value” pop-up menu to Menus > aspectRatioTest > [Menu].

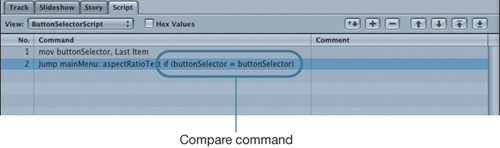
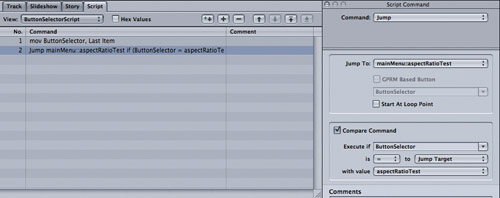
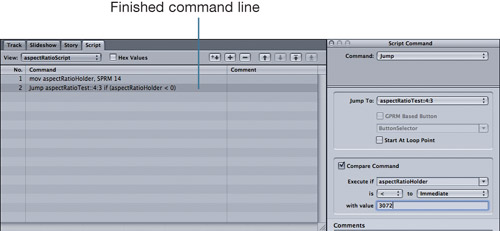
The finished command line should look like the one in the following figure. Literally, this script now says
• Store the value of the last item played in the GPRM named buttonSelector.
• If the GPRM named buttonSelector has the value of the AspectRatioTest menu, play the main menu button named aspectRatioTest.
6. Repeat steps 2 through 5, creating a separate jump action and compare command for the project’s two remaining submenus (parentalLevelTest and audioStreamChecker).
When you’re finished, your Script Editor will look like this:

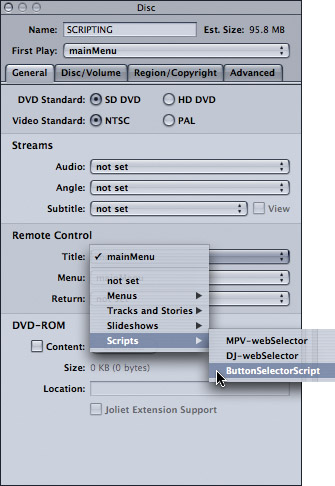
7. Click the Graphical view’s background to select the disc itself.
The Disc Inspector updates to display the disc’s properties. The Inspector’s General tab has a Remote Control area that display a Title button setting.
8. From the Remote Control area’s Title setting, choose Scripts > buttonSelectorScript.
9. Simulate the project, and use the Title button to jump from submenus back to the main menu.
Each time you return to the main menu, the proper button automatically highlights.
Using Escape Commands
DVD players execute scripts beginning at command line 1, and then progress to command line 2, command line 3, and so on. If a particular command line cannot be executed (for example, if a compare command is false), the player simply skips to the next command line, and it keeps going until it finds a command line that jumps it out of the script. But what happens if the script does not contain any command lines that the player can execute? The player continues to the end of the script and stops. Black screen...oh no!
To guard against this, you should place an escape command at the end of every script. An escape command is a jump action placed in a script’s last command line. If by some chance the player works through every line in the script without executing, the escape command ensures that your DVD keeps playing. Typically, you’ll use the escape command to jump the viewer back to an easily recognizable menu, such as the project’s main menu, although the choice is up to you and depends on the particular situation.
Let’s add an escape command to the buttonSelectorScript you’ve been working on.
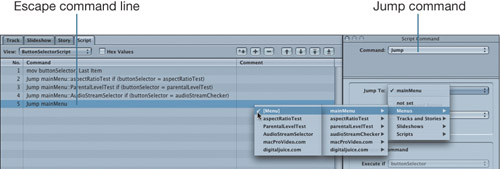
1. Add a new command line to the end of the buttonSelectorScript.
2. Configure the new command as a jump command.
3. Use the Inspector’s Jump To menu to target this jump command at the project’s main menu.
Scripting Audio Streams
In earlier lessons you learned that it’s possible to include up to eight alternate audio streams in every track. Projects that have alternate audio streams often include an audio options menu that allows users to choose which audio stream they’d like to hear. When you return to the audio options menu, it’s a good idea to ensure that the correct button is automatically selected so that viewers know which audio stream they’ve been listening to. To achieve this, you will need to write a script.
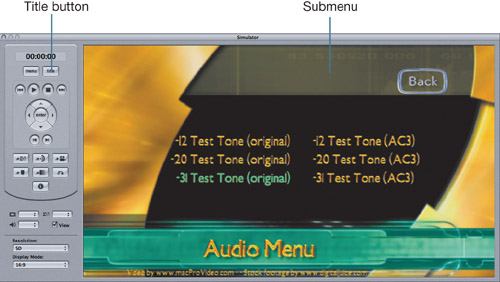
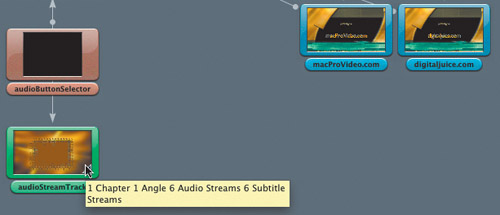
In Lesson 18 you experimented with dialog normalization by encoding three AIFFs to AC-3. The source AIFFs each had a test tone, one at –12 dB, one at –20 dB, and the last at –31 dB. The project you’re currently working on has a single track, and that track contains the three source AIFF streams as well as the three encoded AC-3 files. It also has an audioStreamChecker menu that allows viewers to choose which of these six audio streams they’d like to hear. However, when you return to the audioStreamChecker menu, the first menu button is selected by default, instead of the button that corresponds to the last audio stream that played. In the following section you’ll create a script to fix this navigational problem. But first, let’s see how the problem affects this project.

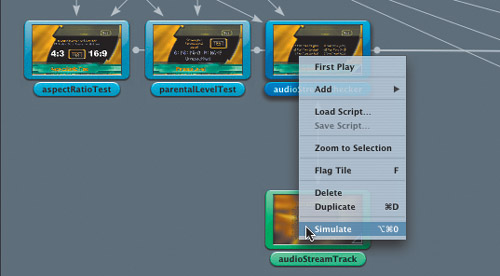
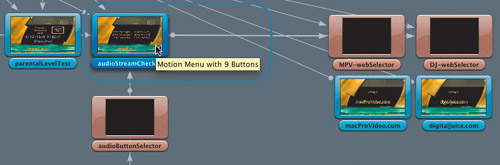
1. In the Graphical view, Ctrl-click the audioStreamChecker menu, and choose Simulate.
2. On the Simulator, click any button other than the –12 Test Tone (original) button.
The Simulator jumps to the audioStreamTrack and plays the correct audio stream.
3. Wait for the track to finish playing, or click the Simulator’s Menu button to jump back to the audioStreamChecker menu.
The –12 Test Tone (original) button is automatically selected, instead of the button corresponding to the last audio stream you heard. To fix this navigational inaccuracy, you must use System Parameter Registers.
Using System Parameter Registers
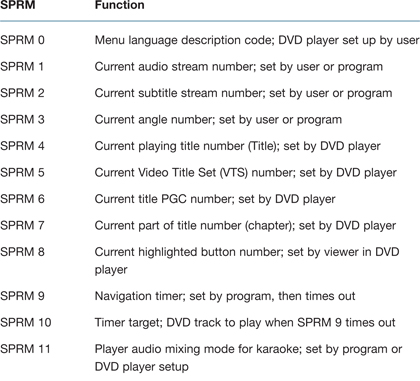
Like General Parameter Register Memories (GPRMs), System Parameter Register Memories (SPRMs) are used to store data as the DVD plays. But unlike GPRMs, SPRMs are not programmable, and you cannot use them to store variables. Instead, SPRMs are used to store information about the playback device, or the system, that the DVD is playing on. For example, when users set up their DVD players, they can specify their preferred aspect ratios, language settings, and parental levels. Some SPRMs, like the region code, are hardwired into the playback device; other SPRMs are used to track the button, chapter, or audio stream that is currently playing. For reference, the table below lists all available SPRMs and their functions.
Because SPRMs return information about the way the DVD player is configured, and also about how the DVD is playing, they are like properties in other scripting languages. All scripting languages use a common technique in which you load the value of a property into a variable, and then check that variable to make a decision and perform an action. DVD Studio Pro works exactly the same way by using SPRMs in conjunction with GPRMs. For example, you can move the value of an SPRM into a GPRM, and then check that value to make navigational decisions.
The following exercise will move the value of SPRM 1 (the current audio stream) into GPRM 1. Later command lines will check GPRM 1 to see what the current audio stream is and then jump to the appropriate button on the audioStreamChecker menu.
System Parameter Register Memories

Note
For a list of all possible SPRM values, see the DVD Studio Pro manual’s section on scripting.
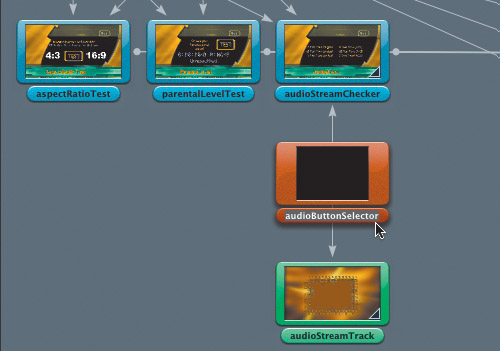
1. In the Graphical view, Ctrl-click the background just under the audioStreamChecker menu, and choose Add > Script.

2. Double-click the name of the new script, and rename it audioButtonSelector.
3. Double-click the new script’s icon to open it in the Script Editor.
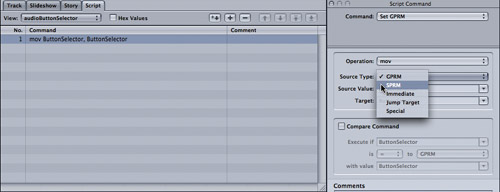
4. Change the default Nop command to a Set GPRM command.

5. From the Inspector’s Source Type menu, choose SPRM.
6. From the Inspector’s Source Value menu, choose SPRM 1 (the current audio stream SPRM).
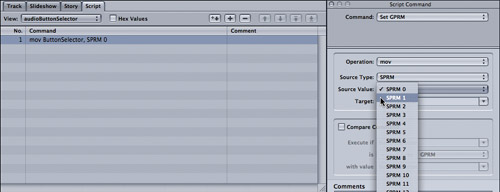
7. From the Inspector’s Target menu, choose GPRM 1.
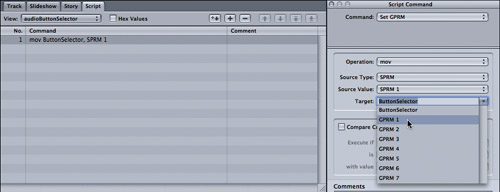
The finished command line now says, “Move into GPRM 1, the value of SPRM 1.” To continue this script, you need to know the potential values that may now be moved into GPRM 1. The following table lists all of SPRM 1’s potential values.


Note
In most scripting languages, numbering always starts at 0, and DVD Studio Pro is no exception. When it comes to audio streams, the first stream is number 0, the second is number 1, and so on. In essence, the numbering scheme is offset by –1.
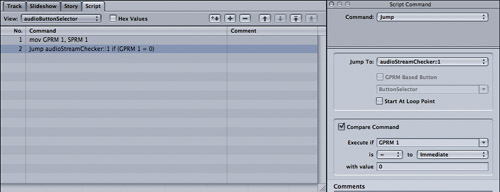
8. Create a new line of code, with a compare command, that says the following:
“Jump to button 1 of the audioStreamChecker menu, if GPRM 1 equals the immediate value of 0.”
Note
For more info on creating compare commands, see the “Using Compare Commands” section earlier in this lesson.
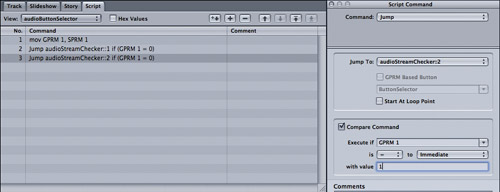
9. Now create a third line to your script, again with a compare command, that says the following:
“Jump to the button 2 of the audioStreamChecker menu, if GPRM 1 equals the immediate value of 1.”
10. Create jump commands for the remaining four alternate audio streams. When you are done, you should have seven lines of code, as shown here:
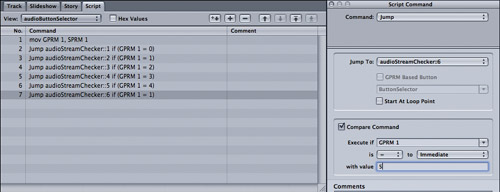
This script is finished—sort of. You still need to ensure that the script executes at the appropriate time during your DVD’s playback. In a moment, you’ll do just this by assigning this script as a pre-script for the audioStreamChecker menu.
Targeting Scripts
When you programmed the remote control’s Title button earlier in this lesson, you targeted the Title button directly at the buttonSelectorScript. In fact, you can directly link to any script from any of DVD Studio Pro’s target menus. For example, using target menus, you can place a script between a track and a menu by targeting the script from the track’s end jump setting.
1. In the Graphical view, select the audioStreamTrack.
The Inspector updates to display the track’s properties.
2. From the Inspector’s End Jump menu, choose Scripts > audioButtonSelector.
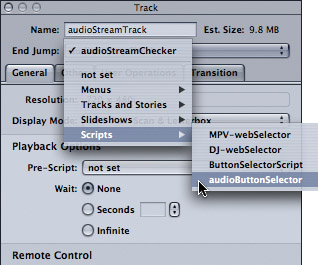
Now, when the track finishes playing, it will jump to the audioButtonSelector script, and this script will check to see which audio stream the track was playing, before jumping to the audioStreamChecker menu.
But what if the user presses the remote control’s Menu button while the track plays? In this situation, the DVD should jump back to the audioStreamChecker menu, but before doing so, the audioButtonSelector script must be executed to choose the correct button. As you can see, you will also need to target the Menu button to the audioButtonSelector script if you want your DVD to navigate correctly. That’s two individual settings. (Are there any others you’ve forgotten?) Wouldn’t it be nice if you could just make one setting and ensure that your DVD will navigate correctly regardless of the path a viewer takes to get to the audioStreamChecker menu? Using pre-scripts, there is!
Using Pre-Scripts
A pre-script is a script that launches before the item it’s assigned to, instead of after. In the following exercise, you’ll assign the audioButtonSelector script as a pre-script to the audioStreamChecker menu. As a result, the audioButtonSelector script will always execute before the audioStreamChecker menu appears onscreen.
1. Select the audioStreamChecker menu.
The Inspector updates to display the menu’s properties.
2. In the Inspector, choose the Advanced tab.
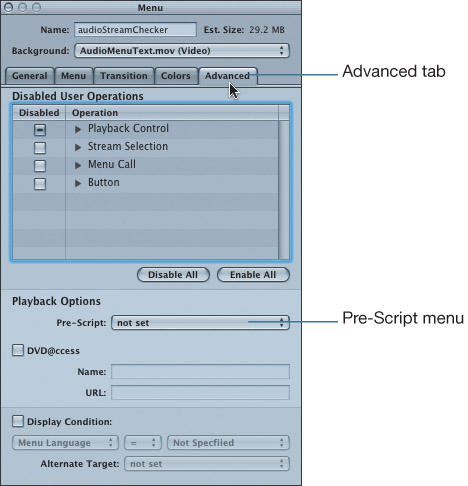
Halfway down the Advanced tab is a Pre-Script pop-up menu.
Note
Pre-scripts can be attached to menus, slideshows, tracks, and stories.
3. From the Pre-Script pop-up menu, choose Scripts > audioButtonSelector.

This pre-script is now assigned, but there’s one more important thing you must know about pre-scripts before you simulate the project to test this pre-script: Pre-scripts execute only when the DVD jumps to the root of the item to which the pre-script is assigned.
The root of an item is denoted in DVD Studio Pro’s target menus by the item name in square brackets. For example, when targeting the root of a menu, you would choose the [Menu] option. If you target a button on the menu, the pre-script will not execute.
4. Select the audioStreamTrack item.
The Inspector updates to display the track’s properties.
5. From the Inspector’s End Jump pop-up menu, choose Menus > audioStreamChecker > [Menu].
6. To see the efforts of your labor, Ctrl-click the audioStreamChecker menu and choose Simulate Menu, click an audio stream button, and then click the menu key on the remote to return to the menu.
Now the correct audio stream button is always automatically selected.
Note
You may notice that this script does not have an escape command on the last command line. There is a reason for this: Pre-scripts will not stop playback if no command line is executed, and instead the DVD player will just jump to the root element of the project item the pre-script is assigned to. Consequently, an escape command is unnecessary.
Checking Aspect Ratio
The project you’re working on uses a 16:9 aspect ratio—in other words, it’s a widescreen project. You’ve included just one set of 16:9 assets for this project, because it is unlikely you will ever build this example scripting project and watch it on a 4:3 television. In the real world, however, it’s common to include both 16:9 and 4:3 assets on the same disc. For example, you could create two different sets of project menus—one set using a 16:9 aspect ratio and one set using a 4:3 aspect ratio. At playback, you can have the DVD-Video check the DVD player’s aspect ratio setting and then jump to the matching set of menus. This ensures that viewers always see assets that are properly designed for their playback systems.
The DVD player’s aspect ratio setting is stored in SPRM 14, and it can return the values listed in the table below. In the following example, you will write a script that checks SPRM 14 and then displays the correct button on the aspectRatioTest menu. Although you are not jumping to a completely different menu, you are still going to script a jump action to jump to the correct button on this menu.
SPRM 14 Values

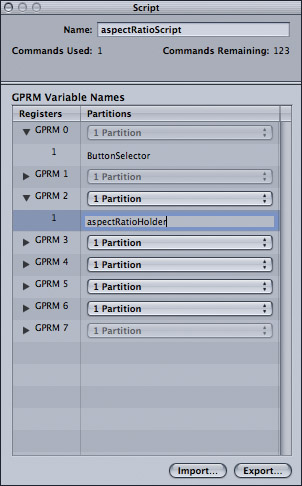
1. In the Graphical view, add a new script under the aspectRatioTest menu, and call the new script aspectRatioScript.
2. With the new script still selected in the Graphical view, move over to the Inspector and name GPRM 2 aspectRatioHolder.
3. Double-click the script icon to open it in the Script Editor.
4. In the first command line, move the value of SPRM 14 into the GPRM named aspectRatioHolder.
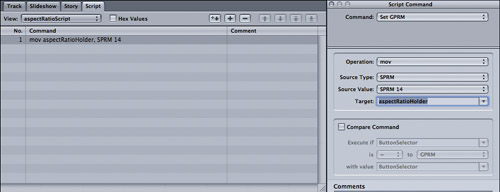
5. On command line 2 of the script, create a new jump command that targets the aspectRatioTest menu’s 4:3 button.

Next comes the part you have to think about. You are about to add a compare command to line 2 that checks the value of SPRM 14 that is currently stored in the GPRM named aspectRatioHolder. But first, refer to the table at the beginning of this exercise. Notice that every value less than 3072 is a 4:3 aspect ratio, and the value 3072 is the only one used for 16:9. Armed with that knowledge, you can write a compare command that jumps to the 4:3 button only if the value of the aspectRatioHolder GPRM is less than 3072.
6. Create the compare command that says: “Jump to the aspectRatioTest menu’s 4:3 button if the aspectRatioHolder GPRM is less than the immediate value of 3072.”
Note
Be sure to choose a less-than operator (<) for your compare command. It’s quite easy to accidentally select a greater-than operator (>), but that won’t work at all well in this script.
7. On command line 3 of the script, create a new jump command that says: “Jump to the aspectRatioTest menu’s 16:9 button.”
We don’t need a compare command here. Why? Because if line 2 is false, that means the DVD player is set to 16:9. The script will skip to line 3, and we will then jump to the 16:9 button. This script is done. Of course, you must still target the script from the menu’s Test button, or there will be no way to execute the script.
Note
In this script, command line 3 also acts as your escape command, because if no other command lines execute, line 3 will jump to the 16:9 button and the DVD will, at the very least, keep playing.
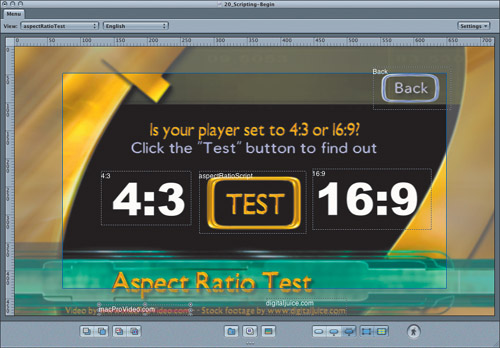
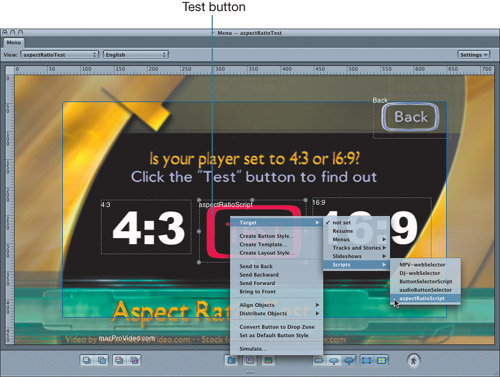
8. In the Graphical view, double-click the aspectRatioTest menu to open it in the Menu editor.
9. Ctrl-click the aspectRatioScript button (the Test button), and choose Target > Scripts > aspectRatioScript.
10. Ctrl-click the menu background, and choose Simulate.
11. Activate the Test button.
The 16:9 button is underlined.
12. Use the Simulator’s Preferences pane to change the project’s aspect ratio to 4:3 letterbox.
13. Simulate the menu, and activate the Test button once again.
The 4:3 button is now underlined.
14. Use the Simulator’s Preferences pane to change the project’s aspect ratio back to 16:9.
Checking Parental Level
Consider the following example: Your project contains content that some parents might find objectionable. Most DVD players allow viewers (such as parents) to set a parental level that is stored in SPRM 13. Armed with this knowledge, you can write a script that checks SPRM 13. If it’s set to a low parental level, the DVD may then jump to a PG- or G-rated version of the content, instead of the R-rated version.
Note
Some DVD-Video players do not correctly implement parental control options. Forewarned is forearmed!
SPRM 13 Values

1. In the Graphical view, add a new script under the parentalLevelTest menu, and call the new script parentalLevelScript.
2. Double-click the new script to open it in the Script Editor.
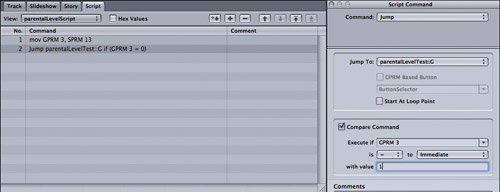
3. On the first command line, move the value of SPRM 13 into GPRM 3.

Refer to the table at the beginning of the exercise and note that the General (G) rating has an SPRM 13 value of 1. GPRM 3 is now holding the value of SPRM 13, so you can write a command line that jumps to button G of the parentalLevelTest menu, if GPRM 3 equals 1.
4. Configure command line 2 to say: “Jump to the parentalLevelTest menu’s button named G if GPRM 3 equals 1.”
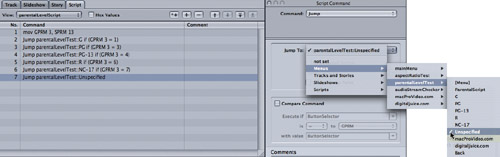
5. Create four additional command lines, one for each parental level setting listed in the table at the beginning of the exercise, and make sure each command targets the correct button on the parentalLevelTest menu.
Tip
In the Script Editor, you can copy (Cmd-C) and paste (Cmd-V) command lines. When writing repetitive command lines like the ones in this step, it’s often useful to copy and paste the first line, then reconfigure the pasted command lines so that they target the correct project items.
When you’re finished, the script should have six lines of code and should look like this:
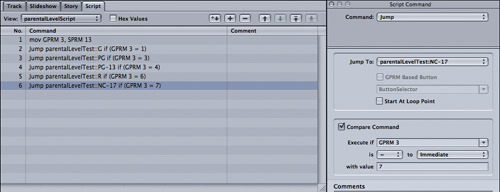
6. At the bottom of the Script Editor, add a jump command that targets the Unspecified button of the parentalLevelTest menu.
Note
This last command line acts as the script’s escape command.

7. In the Graphical view, double-click the parentalLevelTest menu.
The menu opens in the Menu Editor.
8. Ctrl-click the ParentalScript button (the Test Button), and choose Target > Scripts > parentalLevelScript.

9. Ctrl-click the background of the Menu Editor, and choose Simulate Menu.
10. Click the Test button.
The Simulator always highlights the Unspecified button! This is because there is no parental level setting preference for the Simulator. However, there is a trick you can use to simulate parental levels. You’ll explore this in the next section, so leave the Simulator open and keep reading.
Simulating SPRMs
Earlier in this lesson you looked at the Simulator’s Information Drawer. The Information Drawer lets you see the value of SPRMs and GPRMs as you simulate projects. Up to this point, you may have thought the Information Drawer was just a static display area, but it’s not—the Information Drawer is interactive! In fact, you can change SPRM values in the Information Drawer, and see how these changes affect the playback of the project you’re simulating.
1. In the Simulator’s Information Drawer, locate SPRM 13.
2. Change SPRM 13 to the value of 1.
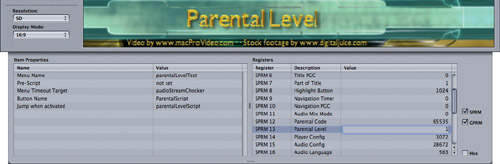
3. On the parentalLevelTest menu, click the Test button.
The G button highlights.
4. In the Information Drawer, change the value of SPRM 13 to 4.
5. On the parentalLevelTest menu, click the Test button.
The PG-13 button highlights.
6. Close the Simulator.
Using Jump Indirect
This project’s menus all have two small buttons hidden in the action safe area, and these buttons link to DVD@ccess-enabled menus that take you to the sponsor’s Web sites. Right now, you can jump to these DVD@ccess-enabled menus from any project menu. But when the DVD@ccess menus time out, they always return to the main menu. That is not correct navigation. Instead, they should return to the menu that jumped you to them in the first place. Fortunately, this is a very easy script to create, using DVD Studio Pro’s jump indirect command.
Jump indirect will jump to a target value stored in a GPRM. As you saw earlier in this lesson, the last item command is used to store the target value of a project item in a GPRM. Does that give you any ideas?
In the following steps, you will use the Jump Indirect command in conjunction with the Last Item command to ensure that you always return to the correct menu after clicking one of the DVD@ccess buttons.
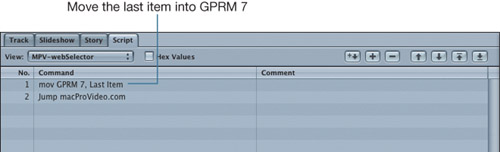
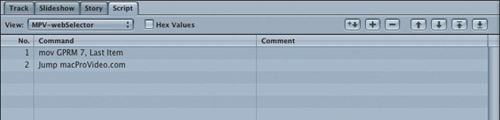
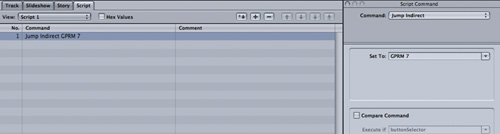
1. In the Graphical view, double-click the MPV-webSelector script.
The script opens in the Script Editor (the macProVideo.com button in each menu targets this script). Command line 1 of this script moves the value of the last item played into GPRM 7. Note that the last item to play will always be the menu that jumped you to this script. The next line jumps to the macProVideo.com DVD@ccess menu.
2. From the Script Editor’s View pop-up menu, choose the DJ-webSelector script.
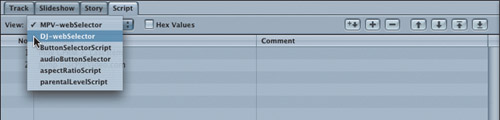
The DJ-webSelector script appears in the Script Editor (the digitalJuice.com button in each menu targets this script). Note that this script is very similar to the MPV-webSelector script. It still moves the value of the last item layed into GPRM 7, but it then jumps to the digitalJuice.com DVD@ccess menu.
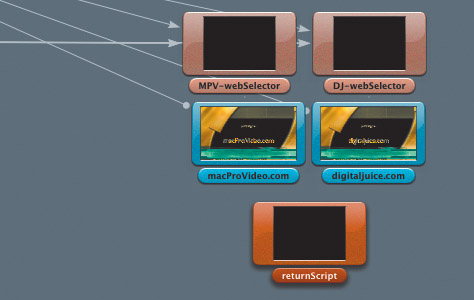
The main point to take away from this is that in either script, GPRM 7 is filled with the value of the last item played. This is important, because you’ll use the next script you create to check the value of GPRM 7.
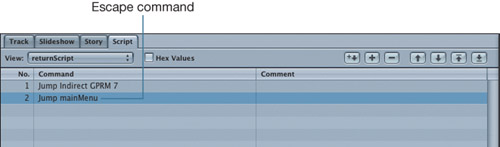
3. Add a script under the Web link menus, and name it returnScript.
4. Double-click the returnScript to open it in the Script Editor.
5. For command line 1, choose the Jump Indirect command.

6. From the Inspector’s Set To pop-up menu, choose GPRM 7.
That’s all there is to it. But before you test out this script, let’s think about the script’s logic. In the MPV-webSelector and DJ-webSelector scripts, you loaded the value of the last item played into GPRM 7. This value will stay in GPRM 7 until it is overwritten by another value, so you can use this new script’s jump indirect command to check GPRM 7 and jump to whatever value GPRM 7 contains.
7. For safety’s sake, create an escape command that jumps to the main menu.
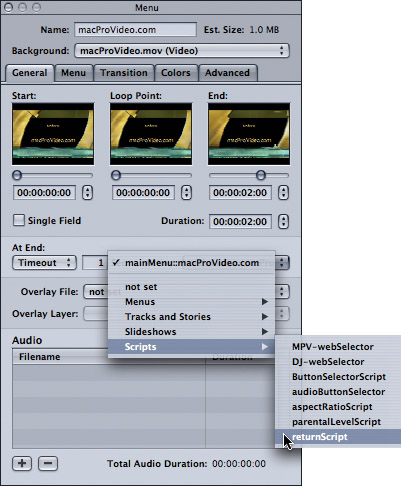
8. In the Graphical view, select the macProVideo.com menu.

The Inspector updates to display the macProVideo.com menu’s properties.
9. From the General tab’s Action pop-up menu, choose Scripts > returnScript.
Next you need to set the timeout action for the digitaljuice.com menu.
10. In the Graphical view, select the digitaljuice.com menu.
The Inspector updates to display the digitaljuice.com menu’s properties.
11. From the General tab’s Timeout Action menu, choose Scripts > returnScript.
12. Simulate the project, and use the Web link buttons at the bottom of each menu to jump to the Web link menus.
Tip
When the Web link menus time out, they return to the correct project menu.
Note
Why are the buttons to the sponsor Web link menus hidden in the action safe area? You cannot launch Web links on a television set, so viewers watching the project on a TV don’t need to see the Web link buttons. This is a simple way to remove temptation, because on a TV, clicking these buttons does nothing. On a computer, however, these buttons will be visible and clickable.
Lesson Review
1. What does SPRM stand for?
2. What are SPRMs used for?
3. What does the Simulator’s Information Drawer do?
4. What does the Last Item script command do?
5. What is a compare command?
6. How does a pre-script work?
Answers
1. System Parameter Register Memory.
2. System Parameter Register Memories (SPRMs) are like properties in other scripting languages; they return information about the way the DVD player is configured, as well as information about how the DVD is playing.
3. The Simulator’s Information Drawer lets you check—and change—the value of GPRMs and SPRMs as you simulate projects.
4. The Last Item script command returns the value of the last item played in your project.
5. Compare commands are similar to conditional statements in other scripting languages, except they are written in reverse order. In other words, the“then” part of the statement comes before the “if” part.
6. If a script is assigned as a pre-script, it will execute before the item that it is attached to plays. However, a pre-script executes only when the DVD jumps to the root of the item it is attached to.