
Chapter 12 Using Subreports for Advanced Reports
Introduction to Subreports 288
Understanding Linked Versus Unlinked Subreports 292
Considering Subreport Execution Time and Performance 295
Using Variables to Pass Data Between Reports 297
Emulating Nested Subreports 300
Crystal Reports in the Real World—Multiple Subreports 301
Introduction to Subreports
The first 11 chapters of this book introduced you to the design of individual reports using single aggregated datasets. Crystal Reports provides further flexibility and reporting capabilities through the use of additional reports embedded directly within an original main report. These embedded reports, referred to as Subreports, provide enhanced value extending your reporting solutions into an expanded domain that will be explored in this chapter.
The next two sections provide you with
- A further introduction to Subreports
- An idea of when you might use them
- A lesson on how to use Subreports
Crystal Reports provides the capability to embed multiple Crystal Reports within a single existing main report to allow for increased flexibility in report creation. Think of these Subreports as entire reports within reports, which can contain their own data sources, formatting, and record selections. The embedded Subreports can be created from existing Crystal Reports files or can be dynamically created at report design time using the insert Subreport functionality. When presenting a report that contains one or more Subreports to business users, the Subreports can be displayed either in-place, providing a seamless integration, or on-demand, minimizing the amount of required up-front report processing.
Common Subreport Usage
A few particular reporting problems are difficult to solve without the use of Subreports. Some of the most common problems and a specific example of each are listed here:
- The presentation of data from two (or more) completely unrelated data sources on a single report. Specific Example: On a Manufacturing Plant Efficiency report sourced from your internal Oracle ERP system, you want to display industry average information sourced from a completely different and unrelated industry or trade database.
- A report that needs to combine data from different tables with only derived (and not direct) database field links. Specific Example: On a Customer Profile report, you want to combine Order Information from your ERP (for example, SAP, Oracle, Baan) system with call-center information from your call-center application (for example, Remedy) and your CRM system (for example, Siebel, PeopleSoft), but the employee ID field is stored slightly different in each system. The Subreports enable the linking of the different employee IDs by allowing linking on formulas or derived fields.
- The presentation of the same data in two (or more) different ways in a single report. Specific Example: On a Sales Summary Report, senior management wants to present a high-level summary of sales by region but also wants to present a separate and personalized summary of sales by product for each salesperson who will be viewing the report.
- The inclusion of a summary field in the report that is unrelated to the established grouping in the main report. Specific Example: On an employee HR report, HR managers want to see employee salary information grouped by Business Unit, Division, and Department. Additionally, they want to view a count of the different departments that this employee worked for in the previous year. The main report groups employees by department (and by division and business unit), whereas the Subreport groups departments by employee to determine a department count.
- The inclusion of a reusable component like a standard reporting header or footer in numerous reports across an organization that can be dynamically updated for all reports in a single location. Specific example: A firm wants to deploy all reports in its organization with a standard header including standard logos and titles. In addition to using the Report Templates and Repository, Subreports can be used within all the reports as a header and provide a single location for updating the header across all the reports.
Data presented in Subreports is often related to the data presented in the associated main report, but it does not have to be. Subreport data can be a twist on the main report’s information or sourced from a completely different database.
Adding Subreports to Your Reports
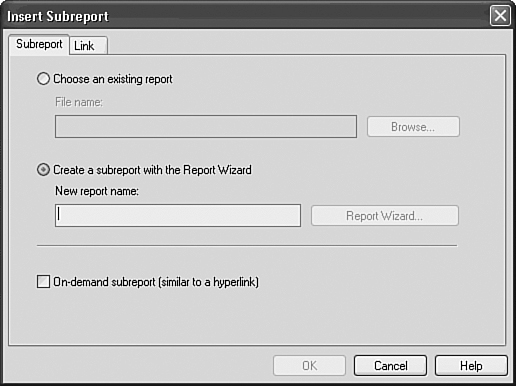
Adding a Subreport to your main report is as easy as adding any other Crystal Reports object. After selecting the Subreport option from the Insert menu, you are presented with the Insert Subreport dialog (see Figure 12.1).
Figure 12.1 The Insert Subreport dialog enables you to add a Subreport to your main report.
To explore one of the many challenges solved by using Subreports, let’s solve the hypothetical reporting problem faced by the Chief Operating Officer (COO) of Maple Leaf Bikes Corporation. This COO wants a single report that highlights the recently acquired company’s (Xtreme) top-selling products in one bar chart and additionally highlights the company’s top selling sales reps in a corresponding pie chart. The two charts are sourced from the same sales information but have no direct relation or links to each other. To resolve this request, complete the following steps:
- Create a New Report and point this report at the Xtreme Sample Database 11.
- Select the Orders, Order Detail, and Product Tables and then select the Product Name and Order Amount Fields to Display on the report.
- Group the report by Product Name and Add a Summary to the report that sums Order Amount for each Product Name group. Also limit the report to display only the top five groups based on the Summarized Field. (Reminder: You can use the Group Sort Expert under the Report menu option to accomplish this last task and remember to explicitly not include an Others group by selecting that check box.)
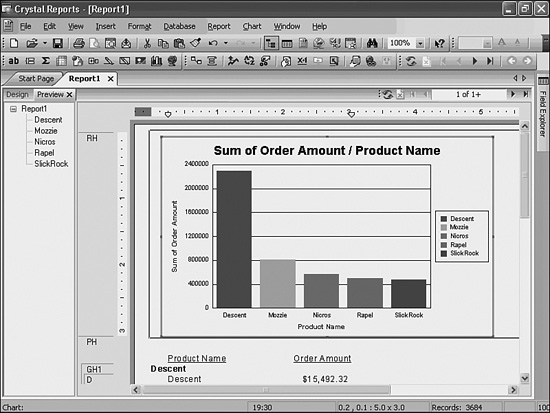
- Add a bar chart in the Page Header to represent the top five selling products, and you should have a report similar to that depicted in Figure 12.2.
Figure 12.2 Preliminary sample report to solve COO problem.
- Make room for the COO’s requested second visual by resizing the bar chart to only take up half of the page header’s width.
- Select the Insert Subreport option by either accessing that option from the Insert menu or clicking on the Insert Subreport icon. The Insert Subreport dialog in Figure 12.1 appears.
- Select the Create a Subreport with the Report Wizard option by clicking on the associated radio button.
- Enter a Name similar to Top Sales Reps and click on the Report Wizard button.
- As you step through the familiar Report Wizard to create this Subreport, select the Xtreme Sample Database 11 and the Employee and Orders tables. From the list of available fields, select the First Name and Order Amount.
- Group the Subreport on Employee First Name and create a Summary on the Sum of Order Amounts for each Employee Group. Limit the report to display the top five employees based on this sum, add a pie chart to this report, and click the Finish button.
- Ensure that the On-Demand Subreport check box is unchecked, and then click OK on the Insert Subreport dialog. Drop the Subreport on the right side of the main report so that it does not overlap the existing bar chart. The details of On-Demand reports are described later in this chapter.
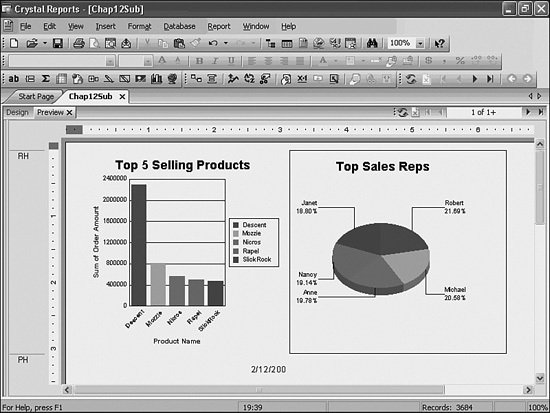
- To clean up the final presentation of your main report and included Subreport, edit the Subreport by right-clicking on it and then hiding all the sections of the report except the report header a. As a reminder, hiding sections is accomplished by right-clicking on the name of the involved sections in the Design or Preview tab and selecting the Hide option. Lastly, delete the report header b section in the Subreport. Figure 12.3 shows the final result of this quick report. If your final result appears slightly different, review Chapter 8, “Visualizing Your Data with Charts and Maps,” and revise the charts accordingly.
Figure 12.3 Sample report with Subreport to solve COO problem.
As mentioned in the previous sections, Subreports are Crystal Reports in their own right, and as such they have their own Design tab in the Crystal Reports Designer. To format the details of a Subreport, it is necessary to open the Design tab for that Subreport from within the Designer of the main report. This can be accomplished by right-clicking on a Subreport and selecting the Edit Subreport option. Figure 12.3 displays the tabs for both the sample’s main report and the Subreport.
With that introduction to Subreports, you should begin to see some of the flexibility and power that they offer in solving difficult reporting (and even dashboard-related) problems. The next few sections explore this in more detail.
Understanding Linked Versus Unlinked Subreports
The hypothetical COO scenario just explored highlights an example of an unlinked Subreport. In Crystal Reports terminology, this means that the parent, or main, report did not have any specific data connections (or links) to its related child report (the Subreport). Unlinked Subreports are completely independent from their main reports and do not rely on the main report for any data. Many reporting problems in which multiple views of the same or different data sources are required in a single presentation can be resolved with unlinked Subreports. If a requirement exists to share data between the parent/main report and its Subreport, linked reports provide the answer.
Contrary to unlinked Subreports, linked Subreports are bound (or linked) to the data in their associated main report. The links are defined in the Link tab of the Insert Subreport dialog shown in Figure 12.4.
Figure 12.4 Link tab of the Insert Subreport dialog.
The Link tab enables you to link report, database, or formula fields in the main report to fields in the Subreport and enables you to filter the Subreport based on the data passed in from the main report.
The Available Fields section of the Links dialog enables you to select the field from the main report to be linked on. More than one field can be selected for linking. After at least one field has been selected, a separate Field Links section appears at the bottom of the Links tab. For each linked field, a parameter in the involved Subreport must be selected to receive and hold that information. These parameters can be pre-existing parameters predefined in the Subreport, or they can be a parameter that is automatically created for each field you have selected to link. (These are automatically created in the Subreport with the prefix ?Pm-.)
Finally, for each linked field from the main report, a data filter can be created in the Subreport based on that parameter. This is accomplished by checking the Select Data in Subreport Based on Field check box and selecting the report field, database field, or formula field in the Subreport that you want to have filtered based on the linked parameter from the provided drop-down box. In effect, checking this box creates a selection filter in your Subreport that is based on the selected filter field and the selected parameter field.
To explore a reporting solution with linked Subreports, solve the hypothetical reporting problem faced by the same COO of Maple Leaf Bikes Corporation. The COO now wants a single report that highlights the company’s top-selling product types in one bar chart (similar to the previous example), enables drill-down into the actual products, and produces a list of suppliers for each product type to be available for review—essentially, a Supplier’s listing Subreport linked to the main report based on the Product Type Name. To accomplish this, follow these steps:
- Open the previous sample report from this chapter and delete the previous Subreport containing the Top 5 Sales Rep pie chart. Now add the Product_Type table to this report through the Database Expert under the Database menu option. It is automatically and correctly linked to the Product table. Also, add another Group for Product Type Name on top of the existing Product Name (Hint: You can use the Group Expert under the Report menu.) Then hide the details section of this report.
- Open the Insert Subreport dialog and create another new Subreport called Supplier Info using the provided Subreport Report Wizard. Connect this new Subreport to the Xtreme sample database, select the Supplier, Product, and Product Type tables (they will correctly smart-link), and add the Supplier Name, City, and Phone Number fields to the report. Finally, click on the Report Wizard Finish button, but do not exit the Insert Subreport dialog.
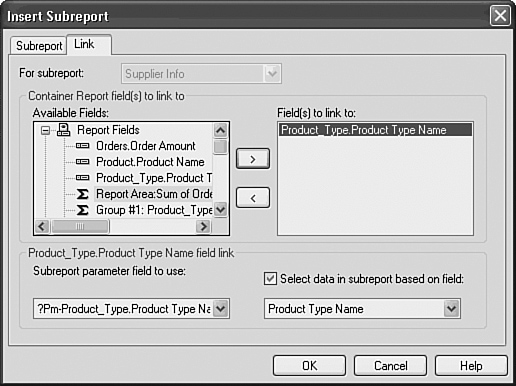
- Click on the Link tab in the Insert Subreport dialog. Now, select the Product Type Name field from the Available Fields list as the Field to link on (it can be selected from the Product Type Table). This initiates the Product Type Name ID Link section at the bottom of the dialog. Use the default (and automatically generated) parameter
'?Pm-Product_Type.Product Type Name'for the link on the Subreport. - Select the Select Data in Subreport Field Based On check box and choose the Product Type Name field from the Product_Type table in the drop-down box. Essentially, you have just specified that this supplier’s Subreport be filtered on the Product Type Name that is passed in from the main report every time this Subreport is called. Click OK to add the Subreport and place it in the Product Type Name Group Header on the right side of the report.
- To ensure that the desired results are provided and provided in a clean way, edit the Subreport to remove the default provided date and resize its Report Header Subreport section and hide the report footer b in the Subreport. You also need to specify that this Subreport should only return a distinct list of suppliers because the COO is not interested in a repetitive list—this can be done through the Report Options selection under the File menu. Click the Select Distinct Records check box.
- Lastly, back in the main report, resize the bar chart graphic on the main report and you will have a new sample report for the COO resembling the report depicted in Figure 12.5.
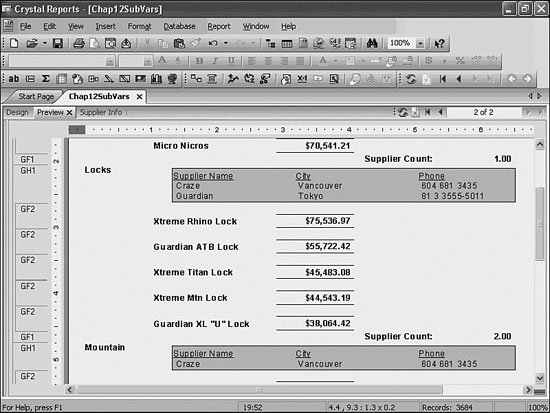
Figure 12.5 Sample report with Linked Suppliers Subreport.

The COO can now make an informed analysis on whether his firm has too much reliance on a small number of suppliers, and you have learned some of the benefits of a linked Subreport.
Unlike the initial sample report presented in this chapter where we placed the Top Sales Rep Subreport in the Report Header and it ran once for the entire main report, the Product Suppliers Subreport is run multiple times—in fact, once for every product type. This is the case because the Subreport was placed in the Group Header of the main report, and it therefore is executed for each different group in the main report. This is important to note with respect to performance, specifically when your databases and reports become large.
Considering Subreport Execution Time and Performance
There are two types of Subreports—In-Place and On-Demand. Both of the sample reports created previously in this chapter have been In-Place Subreports. An In-Place Subreport is virtually indistinguishable from the main report components when viewed because it is run at the same time as the main report. In-Place Subreports are displayed as components of the main report like any other report object and require no special business user interaction to view them. On-Demand Subreports, on the contrary, are not executed at the same time as the main report and require user interaction to be viewed.
All In-Place Subreports on a main report are run at the execution time of the main report. In the two examples presented in this chapter, this has clearly not caused any performance problems, but as you might imagine, it could on larger databases and reports. Imagine running the last sample report (with the Product Suppliers Subreport in every Group Header) for a large conglomerate with thousands of products. The Product Suppliers Subreport would need to run thousands of times to complete the presentation of the main report. Moreover, the thousands of supplier Subreports would be unlikely to be used by any given business user and would therefore have run extraneously. An elegant solution to that problem is the use of On-Demand Subreports.
Unlike In-Place Subreports, On-Demand Subreports only execute when a user requests them. They lie dormant until that time. The performance benefits to On-Demand reports are clear; however, it does come at the expense of a less seamless integration than In-Place Subreports and a small delay in viewing because the Subreport executes dynamically after being requested.
Taking the last example, follow these steps to make the Product Suppliers Subreport an On-Demand Subreport:
- Open the most recent sample report if you have closed it.
- Right-click on the Product Suppliers Subreport and select the Format Subreport option. Many familiar formatting options are available here (see Figure 12.6), but click on the Subreport tab.
Figure 12.6 The Format Subreport dialog enables specification of many standard formatting options, including whether a Subreport is On-Demand.
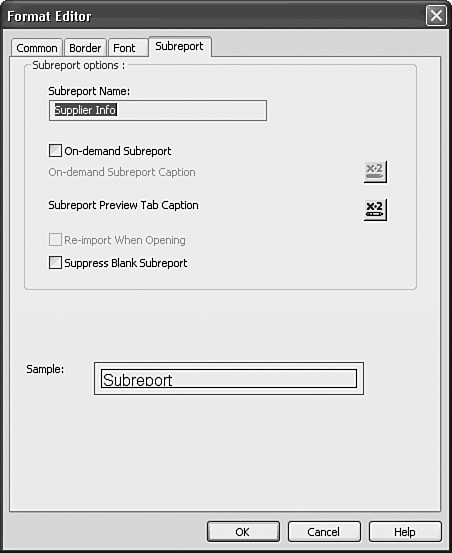
- Click the On-Demand Subreport check box to turn on that option. Notice that the On-Demand Caption section becomes un-grayed.
- Click on the On-Demand Caption button (x-2) and type
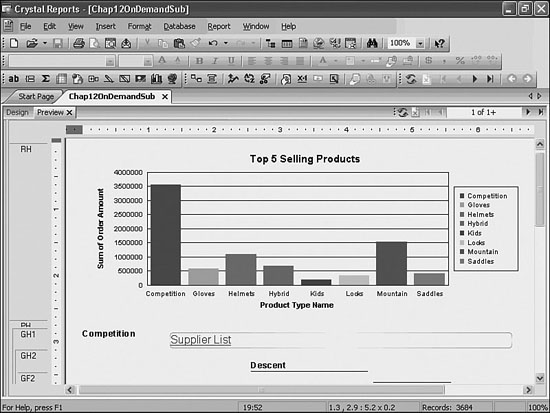
'Supplier List'(do include the apostrophes) in the Text Editing area. Click on the Save and Close button, and you should now have a main report that resembles Figure 12.7 where the Supplier List link dynamically runs the involved Subreport if and only if a report consumer requests it.
Figure 12.7 Sample report with Linked, On-Demand Suppliers Subreport.
Careful consideration should be given to report design when deciding between In-Place and On-Demand Subreports. There is a trade-off between the seamless integration of In-Place Subreports and the performance benefits of On-Demand Subreports that must be considered in addition, of course, to the specific requirements of the business users’ overall experience.
Using Variables to Pass Data Between Reports
The examples up to this point in the chapter that involve passing data between a main report and a Subreport have worked exclusively through the Subreport Linking tab or dialog. Although the functionality provided there is certainly powerful, circumstances might require more flexible passing of data between the main report and the Subreport or the passing of data the other way—from a Subreport to a main report.
With the use of variables, it becomes possible to pass data between the main report and any of the Subreports or even among different Subreports in the same main report. By declaring the same shared variable in formulas in both the main report and at least one Subreport, data can be exchanged back and forth fluidly, and each report can leverage information from the other in a very flexible manner.
Using Subreports and variables to pass data back to a main report from a Subreport is an effective way to capture important summarizations or external information to your main report that is not possible otherwise because of the default groupings of the main report. A simple example in this chapter’s last sample report would be the inclusion of a count on the number of suppliers for each product. Using only the default groupings provided in the main report (By Product), this count would be impossible to calculate. By using a Subreport, however, that count can be calculated external to the main report (in a Subreport), shared using variables, and eventually displayed on the main report.
To explore the power of shared variables, follow these steps to modify this chapter’s last sample report:
- Open the most recent sample report if you have closed it. Turn the Supplier Subreport back to an In-Place Subreport (versus On-Demand).
When passing shared variables from a Subreport to a main report, the involved Subreport cannot be set to On-Demand. The reason, of course, is that Subreports are not run until specifically requested by the business user. Therefore, their associated variables are not set until that time, making them unusable in the main report.
- Edit the Supplier’s Subreport by right-clicking on the Subreport and selecting the Edit Subreport option.
- Select the Supplier Name field and insert a summary field that counts the distinct supplier names in this report. (Hint: Right-click on the Supplier Name field and access the Summary menu option.) This summary will shortly be assigned to the shared variable that will be created and used to pass the information back to the main report.
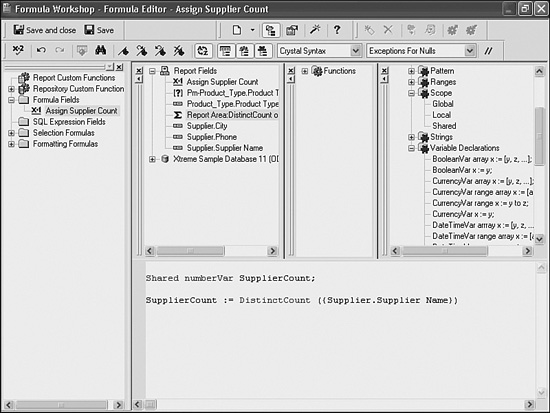
- Insert a formula into the Report Footer of this Subreport and call it
Assign Supplier Count. In this formula, declare a shared numeric variable calledSupplierCountand then assign this variable to equal the Supplier Summary created in the last step. (Reminder: You can access the summary created in step 3 for use in your formula by double-clicking on it.) The formula definition should resemble Figure 12.8.
Figure 12.8 Formula with a shared variable declaration in the Subreport.
- Now click on the Preview or Design tab of the Crystal Reports Designer to take you back to the main report, insert a formula into the Product Type Group Footer section, and call it
Place Supplier Count. In this formula, declare the same shared numeric variable—SupplierCount—and make this variable the output of this formula. Figure 12.9 shows what this formula should look like.
Figure 12.9 Formula with a shared variable declaration and output in the main report.
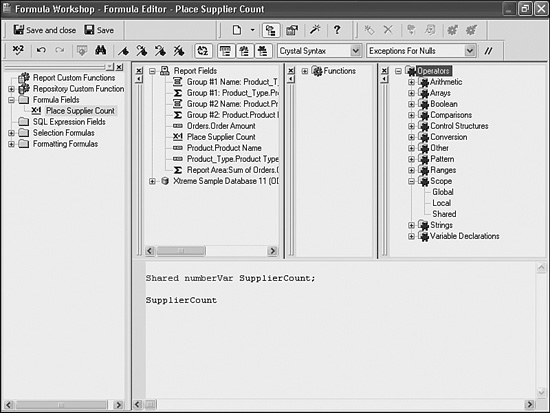
It is important that this Formula is placed in the Group Footer of the Product Type Name Group. This strategic placement ensures that the Supplier List Subreport for the involved Product Type has already completed (as it is in the Group Header) and has set the shared
SupplierCountvariable appropriately. Careful consideration needs to be given when using variables to ensure they are evaluated at the time and in the order desired.In addition to the Top to Bottom and Left to Right default evaluation times of Crystal Reports, the
EvaluateAfter()and a few other functions discussed in the Multi-Pass reporting section in Chapter 4, “Understanding and Implementing Formulas,” are useful in ensuring the desired reporting results. - Add a text field to the report to complement the Supplier Count field called
Supplier Count, hide the Details section on the main report and with a little creative formatting and group sorting, the final result should resemble Figure 12.10.
Figure 12.10 Sample report with Supplier Count sourced from a shared variable in a Subreport.
Perhaps not the prettiest report ever designed, this quick example does begin to convey the power and importance of shared variables in report design.
As you discover the power of variables, you will begin to leverage this programming feature in increasingly complex ways. The Supplier Count example just provided is a relatively simple example that scratches the surface of the power of variables. Another variable-based technique that can be used to circumvent some common reporting challenges is to use variables to manage Running Totals. The flexibility provided within the Formula Editor and with variables enables you to create flexible condition-based running totals.
Emulating Nested Subreports
Based on the title of this section, you can deduce that it is not possible to nest Subreports—why else would you need to emulate that behavior? Crystal Reports does not currently support Subreports within Subreports. Report Hyperlinks and Report Parts do, however, provide a flexible method in advanced navigation between and within reports. This form of flexible navigation can be used to emulate nested Subreports and was covered in Chapter 9, “Custom Formatting Techniques.”

Troubleshooting
Formatting the Details of a Subreport
I can’t figure out how to format the details of a Subreport.
Open the Design tab for that Subreport from within the Designer of the main report. This can be accomplished by right-clicking on a Subreport and selecting the Edit Subreport option.
Using Subreports to Write-back to a Source Database
I would like to enable report viewers (or end users) to be able to dynamically send updates back to a source database—can subreports help me accomplish this?
Using a clever combination of subreports and SQL commands, you can provide this capability to your end users. You can add On-Demand subreports to your main report and have each of the On-Demand subreports based on a SQL command that includes an INSERT SQL statement that writes back to a datasource. An example SQL command could be
![]()
Each time a report-viewing end user requests that the on-demand subreport run, this SQL statement will be executed and update the involved datasource. To make this data updating process more dynamic, the preceding example could have the inserted values fields replaced with dynamic data fields from the report (for example, Customer ID or Employee ID).
Crystal Reports in the Real World—Multiple Subreports
As discussed earlier in the chapter, a single report often needs to show data from different and frequently unrelated pieces of information. In the next example, the main report shows both customer and supplier information with two separate Subreports and each of them for a given geographic location using the main report’s regional grouping hierarchy as a filter on the underlying Subreports. You will create a main report for the hierarchical geographic structure of Country, Region, and City hierarchy and then add one Subreport to show customer information and another Subreport for supplier information. Because there is no relationship between suppliers and customers, at least one of these pieces of information must come from a Subreport. For this sample, both elements come from a Subreport to highlight the capability to use multiple Subreports in a single main report. Follow these steps to explore this capability:
- Open the report designer and select Create New Report Using the Report Wizard. Click OK and browse to the datasource Xtreme Samples Database 11 datasource, expand the list of tables, and add the Customer table to the list of report tables by clicking the > button. Click Next.
- In the Fields window, add the fields Country, Region, and City to the report and click Next. In the Grouping window, add the same fields to the Group By list.
- Click Finish to complete the report. This builds the hierarchy that is used in the report.
- Change to Design mode. Move the fields in the group header to the left and indent them slightly at each lower level. Suppress all sections of the report other than the headers and expand each of the header areas below the fields. See Figure 12.11 to view what the framework of the report should look like.
Figure 12.11 Report hierarchy to act as the framework for Subreport content.
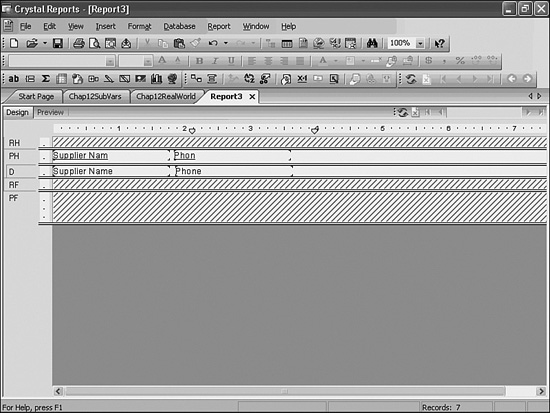
- With the framework complete, the next step is to create the content. There are different ways to create Subreports; in this instance, you will create the Subreports as separate files and later import them into the main report. Create the report for supplier information by navigating to the Start Page and selecting a new report with the Standard Report Wizard. Select the Xtreme Sample Database 11 connection, browse the list of tables for the Supplier table, and click the > button to move it to the list of selected tables. Click Next. From the Fields window, select Supplier Name and Phone and click the > button to move them to the Fields to Display. Click Finish to close the wizard. Minimize report content by changing to Design mode, moving the fields to the left edge, suppressing sections with no fields, and minimizing whitespace. Figure 12.12 illustrates a sample suppliers Subreport. Save this report to your local machine.
Figure 12.12 Supplier information Subreport, extra whitespace reduced to a minimum.
- Repeat step 5 for the customer table.
- Add each Subreport to the report three times, once each for Country, Region, and City. Use the Insert Subreport dialog accessed from the main Insert menu and, using the Choose an Existing report option, browse to the location where you have saved the recently created Subreports. Now link the regional fields (Country, Region, and City) to each of the Subreport’s associated fields. This can be accomplished by accessing the Change Subreport Links option available on the right-click menu for each Subreport. For the Subreports based in the Country Group Header, you need to link the Country field from the main report to the Country field in the Suppliers table. You will need to link both the Country and the Region fields for the Subreports in the Region Group Header and you will also need to add City for those Subreports in the City Group Header.
- For each of the Subreports, ensure that the Keep Object Together formatting option is turned off. This is accessed from the Format Subreport dialog on the Common tab. You can use the Format Painter to copy one Subreport’s format to the others to save you a few keystrokes.
- From the Report menu, select Section Expert. In the list of sections, ensure the Keep Together option is not checked for each Group Header. Click OK to close the window. Save the report. The design of the report should look like Figure 12.13 and the final result should resemble Figure 12.14.
Figure 12.13 Report with hierarchy and Subreports.
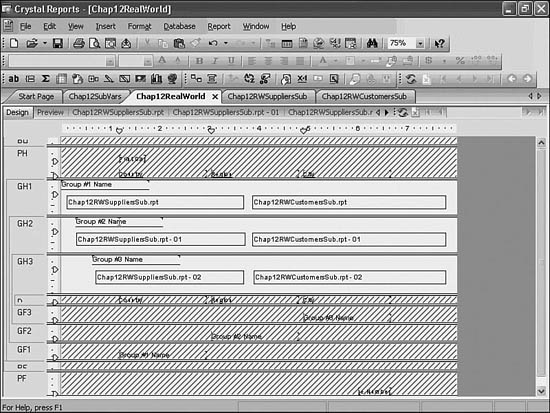
Figure 12.14 Report Preview showing a main-report hierarchy on region and multiple Subreports that are filtering their customer and supplier lists by their placement in the main report.
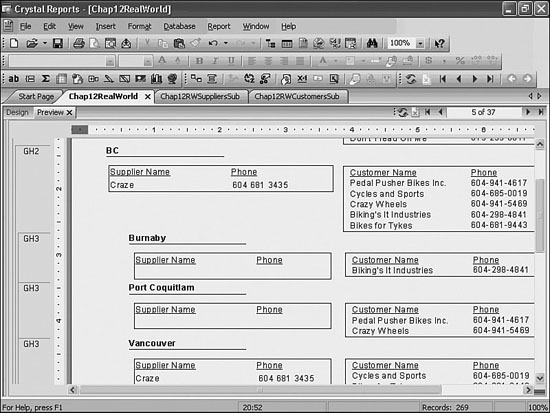
Preview the report and notice on Page 13 (Canada) that there is different and unrelated information for both Suppliers and Customers listed and that the information for both is specific to the location context.