
Chapter 6
Creating Windows 8 Style Applications with HTML5, CSS, and JavaScript
WHAT YOU WILL LEARN IN THIS CHAPTER:
- Understanding the basics of HyperText Markup Language, cascading style sheets, and JavaScript
- Accessing Windows Runtime from HTML5 applications
- Creating Windows 8 style applications with JavaScript
WROX.COM CODE DOWNLOADS FOR THIS CHAPTER
You can find the wrox.com code downloads for this chapter on the Download Code tab at www.wrox.com/remtitle.cgi?isbn=012680. The code is in the Chapter06.zip download and individually named, as described in the corresponding exercises.
Earlier in this book, you learned that Windows 8 brings new opportunities to web developers. Traditionally, web developers could use their technologies to create websites that consist of programming logic running on a web server, and a user interface (UI) that can be accessed only via a web browser. Windows 8 changes this landscape by allowing web developers to reuse their existing knowledge to create applications that run on the desktop. Technologies that previously lived only on web servers and inside web browsers are now first-class citizens for creating classic rich client applications.
This chapter provides a brief overview of these technologies. First, you learn about how to create a classic web page and how to design it, and then you learn how to use the same technologies for creating full desktop applications on Windows 8.
HTML5 and CSS on the Web
When Tim Berners-Lee invented the World Wide Web, he needed a language to describe content that is richly decorated with images, arbitrarily formatted, and consisted of pages that were connected together. Because there was no such language in 1989, he created the HyperText Markup Language (HTML), which has become the standard for building web pages.
In the past 20 years, HTML has been slowly (but constantly) changing to follow the new requirements of the emerging Internet. Today, most websites are built using HTML4, but since the World Wide Web Consortium (W3C) published the Working Draft of HTML5 in January 2008, more and more browser vendors have started supporting the new features, which opens the road for web creators to utilize the advantages of HTML5.
HTML was originally designed to describe the static content of web pages, and today this is the primary purpose of this language. However, when discussing HTML5, it often encompasses a broader scope. The term HTML5 is commonly used as an umbrella term, which covers more than 100 specifications that are used by next-generation websites. These technologies are developing standards for supporting the new requirements to play multimedia, store data, work with files, access the user’s geographic coordinates, make websites functional offline in the browser, and so on.
In this chapter, you first learn about the enhancements of the HTML language itself in version 5. Later in this chapter, you get a sneak peek into the related standards, because many of them are also available for Windows 8 applications.
Getting to Know HTML5 Technologies
In the strictest sense, HTML5 is the next version of the HTML standard that inherits most of its features from HTML4, makes a few of them obsolete, and extends them with new ones. Because the language itself is made up of HTML elements and their attributes, this essentially means that HTML5 adds new elements and attributes to the language.
You can group the new elements and attributes into the following categories:
- Semantic and structural elements
- Media elements
- Form elements and input types
- Drawing
New Semantic and Structural Elements
Previously, web developers mainly used the div container element to wrap simple elements into a bigger section, so they could refer to them as a whole and format them. For example, div elements are used to create headers, menus, and footers, too. Today, the markup code of most web pages is built up of numerous meaningless div elements embedded into each other, which are difficult to maintain.
HTML5 introduces new structural elements such as header, nav, footer, figure, summary, aside, and so on. These new elements not only help you to understand your markup more easily, but because they provide semantics to the code, they help search engines and screen readers understand the purpose of a particular content section.
New Media Elements
Previously, if a web developer wanted to embed an audio or video file into a web page, he or she was forced to rely on third-party browser plug-ins, because there was no direct support for multimedia in the browser. However, these plug-ins raise numerous questions related to their deployment, stability, and security on the desktop. Additionally, browser plug-ins are not available on most mobile devices, which makes the multimedia content unavailable on these devices.
To solve all these problems, HTML5 introduces new media elements, like audio, video, track, and so on. With these new elements, browsers are able to play multimedia content natively, without requiring the user to install any third-party plug-ins.
New Form Elements and Input Types
Forms are integral parts of the HTML standard because they are used to post data to the server. Although previous HTML versions had strong support for forms, they left tons of repetitive work for the web developers. For example, if you want to let your users enter a number, a date, an e-mail address, or a URL into a form, all you could give him or her was a generic text box, and then it was your task to validate the entered input and check if it was a valid number, date, or e-mail address.
To make your life easier, HTML5 introduces new input types, like color, date, time, e-mail, and so on. All you have to do is set your input to these types, and the browser will render the proper input field (for example, a date picker for dates) and will do the appropriate input validation, too.
Drawing
HTML5 introduces the new canvas element, which you can use to draw graphics on-the-fly via scripting. Because the graphics are no longer hard-coded into your web pages, they can adapt themselves to the devices, or the current state of your page, and they can even be interactive. Some browsers even support hardware-accelerated rendering for canvas, which makes the web a perfect environment for graphics-intensive applications and games.
As you can see, HTML5 extends the previous version in several areas. The common theme among these areas is that these new features help you to create modern websites with very clean markup, with much less coding, and without browser plug-ins.
First Steps with HTML
Before you create your first web page with HTML5, you must learn the basic syntax of HTML elements. If you understand the syntax, it is much easier to understand how your page works.
An HTML page consists of HTML elements. An HTML element usually contains content decorated with some markup. The following is a sample element that renders the text with strong typography:
<strong>This will be printed in bold in most browsers.</strong>The first part of the element is the opening tag that is followed by the content, and finally the element is finished by the closing tag. Very important is the fact that the set of tags are fixed by the HTML standard, so you cannot invent new tags, because the web browsers will not understand them.
The strong tag in the previous example instructs the browser to render the content of the element with strong highlight (that means boldfaced letters in most browsers). The tags are separated from the content using angle brackets (<>), and the closing tag is differentiated from the opening tag with a forward slash character (/) after its opening angle bracket.
Some elements do not have content, and you mark them with self-closing tags. Self-closing tags are single tags with a forward slash (/) before the closing angle bracket. For example, the following br tag instructs the browser to render a line break:
<br />Some elements require additional parameters to work properly. For example, the img element renders an image, but you must define which image file should be displayed. You can use HTML attributes on those elements that expect this kind of additional configuration. Attributes are name-value pairs that you define within the opening tag. The following example shows how you can use the src attribute of the img tag to display the image file budapest.png:
<img src="budapest.png" />A single element can have multiple attributes separated by whitespace. For example, the img tag can have an alt attribute, too, that may contain alternate text that is displayed when the image cannot be rendered for some reason:
<img src="budapest.png" alt="A nice photo of Budapest, capital of Hungary." />The next thing you must keep in mind regarding HTML elements is that you cannot overlap them. That means you can embed one element fully into another, but you cannot embed it partly. The following example correctly uses the em element to emphasize and the strong element to force the content even more. Most browsers render the em element with italic-faced and the strong element with boldfaced letters. In this example, the word important will be bold and italic.
<strong>The is <em>important!</em></strong>Note that the full em element is within the strong element. However, if you re-order the closing tags, you will get incorrect markup, because the outer strong element is closed before the inner em element, as shown here:
<strong>This is <em>important!</strong></em>This is called overlapping. You must avoid it (even if many web browsers render it correctly without any errors).
This is the basic syntax of the HTML language, and you use it in the next “Try It Out” exercise to create a web page. After the exercise, you learn how you can add some fancy design to it.
<title>My first webpage</title><h1>Hello World!</h1>
This is a link that opens the
<a href="http://wrox.com" target="_blank">Wrox homepage</a>
on a new browser window.
<h2>Text elements</h2>
<p>
This is a paragraph with a line break and
<br />
some <strong>important</strong> information.
</p>
<h2>Lists</h2>
<section>
<h3>Numbered list</h3>
This is a numbered list of programming languages:
<ol>
<li>JavaScript</li>
<li>C++</li>
<li>C#</li>
</ol>
</section>
<section>
<h3>Bulleted list</h3>
This is a bulleted list of colors:
<ul>
<li>red</li>
<li>white</li>
<li>green</li>
</ul>
</section>
<h2>Form elements</h2>
<form>
<label for="txtName">Name:</label>
<input type="text" id="txtName" /> <br />
<label for="txtEmail">E-mail:</label>
<input type="email" id="txtEmail" /> <br />
<label>Gender:</label>
<label for="radFemale">Female</label>
<input id="radFemale" name="gender" type="radio" />
<label for="radMale">Male</label>
<input id="radMale" name="gender" type="radio" />
<br />
<label for="selContinent">Continent:</label>
<select id="selContinent">
<option>Asia</option>
<option>Africa</option>
<option>North America</option>
<option>South America</option>
<option>Antarctica</option>
<option selected="selected">Europe</option>
<option>Australia</option>
</select>
<br />
<label for="chkAccept">I accept the terms:</label>
<input id="chkAccept" type="checkbox" />
<br />
<button>Save</button>
</form>Figure 6-1: Basic web page without any formatting

In the previous exercise, you created a web page by defining its content using HTML markup. Because you didn’t define how the browser should render it, the content is displayed with the default (a bit modest) style. In the next section, you learn how you can customize the visual look and feel of your web pages.
Styling Pages with CSS
Originally, HTML was an independent standard in the sense that you could use it to define the structure of the content, as well as the visual representation of the content. You could use HTML elements like big, center, and color, and attributes like align, height, and width to define how you wanted to render your page in the browser.
You can still use these elements and attributes in today’s websites, but they were removed from HTML5, because they have two important drawbacks:
- Using these elements and attributes makes your code more complex and difficult to read. Other HTML elements define the structure and semantics of the content, but these presentation elements define the visual representation of the content. Mixing the “what” with the “how” results in unnecessary complexity.
- When you use these presentational HTML elements, you tightly couple the content with the design. The content and the definition of how to display it in the browser resides in the same HTML file, and it is very difficult to give a new look to your page independently from the content.
Both of these disadvantages point to a direction of separating the structural and semantic parts of the content from the visual representation of the content. This separation has the following advantages:
- Separating the design from the content helps you to create much more maintainable code. One file contains the HTML content, and another file contains the presentation semantics.
- You can easily change the content and the visual presentation independently from each other. If you are a web developer or content manager, you must alter only the HTML file. But if you are a web designer, you must change only the design file.
- It’s much easier to create consistent design, because you can easily attach the design to all your web pages within your website.
For many years, there was a standard to help with this separation, called cascading style sheets (CSS). Thanks to its obvious advantages, CSS was a widely used technology among web creators for many years, and it is the technology you can now use to define the look and feel of your Windows 8 style application.
First Steps with CSS
Before styling your previously created web page with CSS, you must learn how CSS works.
You can describe the look and feel of some content by using CSS declarations. CSS declarations are property name-value pairs that define position, size, color, border, font, and so on. In the following example, you can see the text-align, color, and margin properties:
text-align: center;
color: red;
margin: 5px 10px;
Syntactically, the property name and the value are separated by a colon (:), and multiple declarations are separated by a semicolon (;).
You can attach the CSS settings directly to the HTML element you want to format by using its style attribute. In the following example, you can see a custom-formatted HTML paragraph:
<p style="font-style: italic; border: 1px solid blue; margin-left: 30px;
          width: 300px; padding: 10px; text-align: center;">
  Everything is difficult for one, nothing is impossible for many.
       (István Széchenyi)
</p>
This paragraph is rendered by the browser in a blue-bordered box with italic and centered text. The box has a slight internal margin (padding), and it is indented by setting a larger left margin, as you can see it in Figure 6-2.
This technique is called inline style, and although it works as expected and concentrates all formatting into the single style attribute, it does not detach the formatting from the content, because if you want another similarly formatted paragraph, you must repeat all style settings.
Figure 6-2: Simple formatted content

A better approach is to use a style block. The style block is an HTML style element within the page, which can contain multiple formatting rules, as you can see in the following code snippet:
<style type=“text/css”>
  /* Style rules come here… */
</style>
With style blocks, you can concentrate all style definitions you use into a single location within the page. You can easily reuse them within the same page. However, if you want to use the same style on multiple pages, you must repeat the style block on those pages.
To solve this, you can move all style settings into an external file, called the external style sheet. The external style sheet is a plain-text file (usually named with a .css extension) that you attach to multiple pages using the HTML link tag within the head section of the page, as shown here:
<link href="style.css" rel="stylesheet" type="text/css" />External style sheets are the most commonly used approach, because with them, you can easily reuse your existing formatting definitions on multiple pages in your website, and you can still manage your design in a single central location. If you follow the best practices, you must modify only the CSS file when you redesign your website.
Another benefit of this approach is that the browser must download the CSS file only once, and can store it in the download cache. When the next page refers to the same CSS file, the browser doesn’t have to download it, sparing network bandwidth and rendering the page much faster.
However, if you detach the style definition from the content with style blocks or external style sheets, you must specify which part of the page you want to format with it. This is where CSS selectors come into the picture. With CSS selectors you can attach a style definition to the following:
- All instances of an HTML tag (such as to all h1 headings)
- Multiple HTML elements
- A single HTML element
If you want to format all occurrences of an HTML tag, you can select them by the name of the tag. For example, if you want to format all h2 second-level headings to have underlined text, you can use the following CSS rule that consists of a selector and a declaration:
h2 { text-decoration: underline; }In this case, the CSS selector is h2, and it attaches the CSS declarations in the following {} block to all h2 elements in the page. A single CSS rule can contain multiple CSS selectors, and can contain multiple CSS declarations, too.
If you want to format multiple elements in the page, you can use CSS class selectors. Within a style sheet, you can define a new CSS class by giving it a name and typing a period (.) before it, as you can see in the following example:
<style type=“text/css”>
.famous
  {
    font-style: italic;
    font-size: 120%;
  }
</style>
Then you can attach your new class to any HTML element using the class HTML attribute, as shown here:
<p class=“famous”>Albert Wass</p>Note that the CSS class itself does not define the name of the tag you can format with it. That means you can attach the same CSS class to various HTML elements, as shown here:
<span class=“famous”>László Bíró</span>Now you know how you can style all or some elements in a page. However, if you want to format only a single HTML element, classes are overkill. Thankfully, there is a third type of CSS selector you can use to select a single HTML element — by its HTML id attribute. The id attribute, as the name suggests, must contain an arbitrary value that uniquely identifies a single element within the page. You can refer to this value by the CSS id-selector that starts with a # sign, as you can see in the following example:
<style type=“text/css”>
#first
  {
    font-weight: bold;
    color: red;
  }
</style>

<p>
  Lake <span id=“first”>Balaton</span> is the largest lake in Central Europe.
</p><p>
Did you know that <span class=“important”>Harry Houdini</span>
was born in Budapest?
</p>Now that you have learned about the three basic types of selectors, you are ready to combine them. For example, you can select only those list items (li elements) that have the important class attached (which is useful if the important selector is also attached to other elements):
<style type=“text/css”>
.important
  {
    color: red;
  }
li.important
  {
    font-variant: small-caps;
  }
</style>

<p class=“important”>
  This paragraph will be rendered with red letters.
</p>

<ul>
  <li>orange</li>
  <li class=“important”>apple</li>
  <li>grape</li>
</ul>
In the preceding example, the paragraph and the second list item will be rendered as red, thanks to the important CSS class. Additionally, the second list item will be rendered in small capitals, because of the li.important mixed selector.
HTML elements inherit most of their style settings from their parent element, which is very useful because you don’t have to define every style setting on every element. If you format a parent element, its style will be propagated to its child element. Because the body is the outermost element that wraps all content elements, it is a good practice to define page-level settings on the body element, as you can see in the following example:
body
{
  font-family: Verdana, Arial, Sans-Serif;
  font-size: 75%;
}
This selector sets the font family and font size for all elements on the page, because these CSS attributes are inherited. However, not all CSS properties behave this way, and CSS has a very good reason for that. For example, the border property is not inherited, because in most cases, when you add a border to an element, you don’t want to add a similar border to all of its child elements.
Now you know that a value of a CSS property can come from various sources:
- From the default style of the browser
- From an external style sheet
- From an in-page style block
- From an inline style attribute
- From a parent element
Another aspect of CSS that relies on the element hierarchy is hierarchical selectors. With descendant selectors, you can select elements that are a descendant of another. In the following code snippet, you can see two CSS rules. The first applies to all links (HTML anchors), but the second applies only to those links that are used within a list item.
a { text-decoration: none; }
li a { text-decoration: none; }
Of course, you can also use class and ID selectors with hierarchical selectors, too. The following CSS rule applies to all links that have the error class within a list item that has the errors value in its id attribute:
li#errors a.error { font-weight: bold; }This section briefly introduced the syntax of CSS. However, it could only present the most frequently used parts of it, which you will probably also use in your Windows 8 application. If you want to learn about pseudo-classes, pseudo-elements, child, adjacent sibling, and attribute selectors, visit the “Understanding CSS Selectors” article in the MSDN Library at http://msdn.microsoft.com/en-us/library/aa342531.aspx.
Now you have everything you need to style a full web page. In the next exercise, you format your previously created HTML5 web page with CSS.
body {
  font-family: "Segoe UI";
  font-size: 11pt;
  font-weight: 300;
  line-height: 1.36;
  margin: 20px;
}

h1, h2, h3 {
  color: #8c2633;
  clear: both;
  font-weight: 200;
}
h1 { font-size: 42pt; margin-top: 0; margin-bottom: 10px; }
h2 { font-size: 20pt; margin-bottom: 5px; }
h3 { font-size: 11pt; margin: 0; }

a { text-decoration: none; }
a:hover { text-decoration: underline; }

.left-column  { width: 60%; float: left; margin-right: 10%; }
.right-column { width: 30%; float: left; }

form { line-height: 2; }

label {
  display: inline-block;
  width: 120px;
}
label[for^=rad] { width: auto; }

input[type=radio] { margin-right: 20px; }
input[type=checkbox] { padding: 0; }

button {
  background-color: rgba(182, 182, 182, 0.7);
  line-height: 1;
  border-width: 0;
  padding: 6px 8px 6px 8px;
  min-width: 80px;
  margin-left: 124px;
} <link rel="stylesheet" type="text/css" href="default.css" /><section class="left-column">
<h3>Numbered list</h3>
This is a numbered list of programming languages:
<ol>
<li>JavaScript</li>
<li>C++</li>
<li>C#</li>
</ol>
</section>
<section class="right-column">
<h3>Bulleted list</h3>
This is a bulleted list of colors:
<ul>
<li>red</li>
<li>white</li>
<li>green</li>
</ul>
</section>Figure 6-3: The formatted web page

label[for^=rad] { width: auto; }In the previous exercise, you customized the look and feel of an HTML page. However, the page is still static, which means it doesn’t react to user actions. If you want to create an interactive page, you have to learn how you can write code that runs in the browser.
Running Client-Side Code
The HTML and the CSS standards provide you with an elegant and convenient way to create a web page, and define the look and feel of it. However, these standards focus on the static content, and they don’t give you any option to create interactive pages. To create web pages that can react to user actions and change dynamically, you need some code that can execute on the client side, within the browser.
Currently, only one language is supported by all major browsers without installing any plug-ins, and allows you to create client-side logic: JavaScript. JavaScript is an interpreted, object-oriented, dynamic scripting language, which means it has types, operators, core objects, and methods. Its syntax comes from the Java language, which itself inherits from the C language, so if you know the C language or C#, many coding structures will be familiar to you.
First Steps with JavaScript
Just like many other languages, the basic building blocks of the JavaScript language are the types. It has five basic types: number, string, boolean, object, and function.
When you declare a variable, you don’t have to specify its type. It is automatically inferred by the browser from the value you store in the variable:
var a = 9;               // Number
var b = "Hello World!";  // String
var c = true;            // Boolean
JavaScript is a dynamic language, which means that the types are associated with values, not with variables. As a result, you can change the type of a variable by storing a different type of value in it, which naturally can change how the various operators work on the variable:
var d = 9;        // d is of type Number
var e = d + 27;   // e is 36
d = 'September';  // d is of type String now
var f = d + 2;    // f is 'September27'
This dynamic nature provides the power of the language. For example, you can create an object and dynamically add properties to it later when you need them, as shown here:
var city = { Name: 'Budapest', Population: 2551247 };
city.Founded = 1873;
// Here you can access the values as city.Name, city.Population and city.Founded.
Note that you don’t have to specify the class you want to instantiate. Instead, you just define the values you want to store in the object. JavaScript is an object-oriented language with objects, but without classes.
Functions are also first-class citizens in JavaScript. They can take zero or more parameters, and can optionally return a value using the return statement, as shown here:
function add( a, b )
{
  return a+b;
}
Function parameters are also weakly typed, which means that it’s up to you how you use them. For example, you can call the previous add function with number or string parameters, as shown here:
add(5, 21);              // returns 26
add('Hello', 'World'),   // returns 'HelloWorld'
You can even omit any number of parameters from the end of the parameter list, as shown in the following:
add(1998);   // This returns "NaN" which means “Not-a-Number”,
             // that indicates that the return value is not a legal number.
If you don’t give a value to a function parameter, or don’t assign a value to a variable, it becomes undefined:
add('May'), // Returns 'Mayundefined'You can check whether a variable has a value by testing it against undefined:
function add( a, b )
{
  if( b !== undefined )
    return a+b;
  else
    return a;
}
add('May'),       // Returns 'May'
add('May', 'a'),  // Returns 'Maya'
A very unique feature of JavaScript is that functions behave just like any other variables; therefore, you can use them in objects as well. For example, you can create an object that has properties and functions, as shown here:
function getPerson( title, firstName, lastName )
{
  return {
    Title: title,
    FirstName: firstName,
    LastName: lastName,
    getDisplayName: function()
    {
      return title + ' ' + firstName + ' ' + lastName;
    }
  };
}
var p = getPerson( 'Dr.', 'James', 'Plaster'),  // The parts of the
                                                // name are accessible
                                                // via the p.Title,
                                                // p.FirstName and
                                                // p.LastName properties here.

var name = p.getDisplayName();                  // name is 'Dr. James Plaster'
You can also pass functions as parameters, just like any other variables:
function getEnglishName( firstName, lastName )
{
  return firstName + ' ' + lastName;
}

function getHungarianName( firstName, lastName )
{
  return lastName + ' ' + firstName;
}

function getPerson( firstName, lastName, nameFunc )
{
  return {
    FirstName: firstName,
    LastName: lastName,
    getDisplayName: function()
    {
      return nameFunc( firstName, lastName );
    }
  };
}

var en = getPerson( 'Ernő', 'Rubik', getEnglishName ).getDisplayName();
var hu = getPerson( 'Ernő', 'Rubik', getHungarianName ).getDisplayName();
// en is 'Ernő Rubik' and hu is 'Rubik Ernő' here
You can even use functions as parameters without giving them a name and inline them in the function call, as shown here:
var p = getPerson( 'Flórián', 'Albert', function(fn, ln) {
  return fn + ' ' + ln;
} );
var en = p.getDisplayName(); // en is 'Flórián Albert' In the next exercise, you use JavaScript to react to a user action on the web page you created in the previous exercise.
function load() {
  var btn = document.getElementsByTagName('button')[0];
  btn.disabled = true;

  btn.addEventListener('click', function (event) {
    var lbl = document.getElementById('lblMessage'),
    var txt = document.getElementById('txtName'),
    var name = txt.value;

    txt.addEventListener('keypress', function () {
      lbl.innerText = '';
    });

    lbl.innerText = name.length === 0 ?
      'Please enter your name!' :
      'Thank you, ' + name + '!';

    event.preventDefault();
  });

  var chk = document.getElementById('chkAccept'),
  chk.addEventListener('click', function (event) {
    btn.disabled = !this.checked;
  });
}<script type="text/javascript" src="default.js"></script> <head>
<title>My first webpage</title>
<link rel="stylesheet" type="text/css" href="default.css" />
<script type="text/javascript" src="default.js"></script>
</head>onload="load();"<body onload="load();"><span id="lblMessage" />#lblMessage { color: red; }Figure 6-4: The interactive form
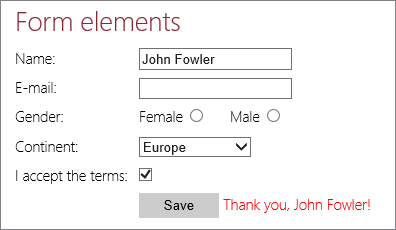
var name = txt.value;lbl.innerText = name.length === 0 ?
'Please enter your name!' :
'Thank you, ' + name + '!';if(name.length === 0)
{
lbl.innerText = 'Please enter your name!';
}
else
{
lbl.innerText = 'Thank you, ' + name + '!';
}if(this.checked === true)
{
btn.disabled = false;
}
else
{
btn.disabled = true;
}In this exercise, you learned the basic JavaScript techniques to manipulate objects on the page. In the subsequent parts of this chapter, you learn how you can use this knowledge to create a Windows 8 style application.
HTML5 Applications on Windows Runtime
Earlier in this chapter, you learned the basic technologies that web developers use to create applications that run in the web browser. Traditionally, it was only the web browser that understood HTML, CSS, and JavaScript, and was capable of executing complex application logic built with these technologies. If a developer wanted to utilize web technologies in a desktop application, he or she had to embed the web browser into the application, because desktops were not able to execute web code directly.
However, with Windows 8, Microsoft extended this web platform for client applications, and now you can create a Windows 8 style application that runs fully on the client using HTML, CSS, and JavaScript. The Windows 8 platform contains everything built in that is required to execute web code natively.
In Figure 6-5, you can see how Windows 8 style applications written in JavaScript compare with the traditional desktop applications. On the right, you can see that for desktop applications, the web browser is responsible for hosting and running the JavaScript application code. On the other hand, for Windows 8 style applications, Microsoft provides a JavaScript Engine (codename “Chakra”) that hosts and executes the HTML, CSS, and JavaScript code of the application.
Figure 6-5: The difference between Windows 8 style and desktop applications

You can also note another component for Windows 8 style applications called the Windows Library for JavaScript, which you learn about in the next section.
The Windows Library for JavaScript (WinJS)
If you are a web developer, you can love or hate JavaScript. You can love JavaScript because it is a very powerful and flexible programming language. It is fully focused on the web, and you can write quite complex logic with very few lines of code, thanks to its weakly typed nature. However, writing good code or debugging faulty code is another story. JavaScript coding and debugging tools are not as advanced as the C# and Visual Basic tools, because of the characteristics of the language.
JavaScript developers usually solve this problem by using client-side libraries that provide ready-made solutions for the typical programming tasks. With libraries, you can speed up your application development, and give standard solutions for similar problems. Several libraries are available for download, but none of them is optimized for Windows 8. To make a developer’s life easier, Microsoft created a new library called the Windows Library for JavaScript (WinJS) that contains tons of useful namespaces, classes, and functions that you can rely on when you create your Windows 8 style application in JavaScript.
WinJS provides the following components:
- Helper functions to organize your code into namespaces and classes
- A WinJS.Promise object that encapsulates the functionality of JavaScript promises and is used by all asynchronous functions in WinJS
- An application model that manages the life cycle of your application
- A navigation framework that you can use to create multi-page user interfaces
- Template-based data binding to seamlessly flow data from the storage variables to the UI elements
- User interface (UI) controls that wrap and enhance the typical HTML controls
- Default CSS styles and animations to build UIs consistent with other Windows 8 style applications and the Windows 8 OS itself
- Helper functions that solve typical coding tasks
As you can see from this list, WinJS is a huge and very useful library that provides natural integration of Windows Runtime features into the JavaScript programming language.
Creating Windows 8 Style Applications with JavaScript
In the next sections, you learn about the various aspects of creating Windows 8 style applications with JavaScript. First, you learn about the new filesystem application programming interface (API), then about the data binding services of Windows Runtime for JavaScript. After understanding data management, you learn about querying device properties and adding direct touch manipulation to your application. In the final sections of this chapter, you create images and Windows 8 style animations dynamically.
Accessing the Filesystem
Windows Runtime provides a brand new API for applications that require access to the filesystem to read and write files. Because file operations can be lengthy, methods of the new API are asynchronous, thus forcing developers to avoid blocking the UI thread and creating responsive applications. In JavaScript, you can conveniently manage the asynchronous methods via promises, and chain them using the then method.
The FileIO class in the Windows.Storage namespace provides the following methods for reading and writing files:
- appendLinesAsync
- appendTextAsync
- readBufferAsync
- readLinesAsync
- readTextAsync
- writeBufferAsync
- writeBytesAsync
- writeLinesAsync
- writeTextAsync
These methods can work on an IStorageFile instance that provides information about the file and its content, and ways to manipulate them. You typically get an IStorageFile object by showing the user the file open or the file save pickers. File pickers are very similar to the old file open and file save dialog boxes, but they are completely redesigned for Windows 8 style applications. You can find the FileOpenPicker and the FileSavePicker classes in the Windows.Storage.Pickers namespace.
In the next exercise, you create a simple Notepad-like application, which you can use to open, edit, and save text files.
<p>
  <button id="btnOpen">Open...</button>
  <button id="btnSave">Save as...</button>
  Selected file:
  <span id="lblPath">(No file selected, click Open to select a file)</span>
</p>
<textarea id="txtContent" style="width: 100%; height: 100%;"></textarea>var btnOpen = document.getElementById('btnOpen'),
btnOpen.addEventListener('click', onOpenButtonClicked);
var btnSave = document.getElementById('btnSave'),
btnSave.addEventListener('click', onSaveButtonClicked);
function onOpenButtonClicked() {
  var picker = new Windows.Storage.Pickers.FileOpenPicker();
  picker.suggestedStartLocation = Windows.Storage.Pickers.PickerLocationId.desktop;
  picker.fileTypeFilter.replaceAll(['.txt', '.ini', '.log']);

  picker.pickSingleFileAsync().then(function (file) {
    if (file !== null) {
      var lblPath = document.getElementById('lblPath'),
      lblPath.innerText = file.path;

      Windows.Storage.FileIO.readTextAsync(file).then(function (content) {
        var txtContent = document.getElementById('txtContent'),
        txtContent.value = content;
      });
    }
  });
}

function onSaveButtonClicked() {
  var txtContent = document.getElementById('txtContent'),
  var content = txtContent.value;

  var picker = new Windows.Storage.Pickers.FileSavePicker();
  picker.suggestedStartLocation = Windows.Storage.Pickers.PickerLocationId.desktop;
  picker.fileTypeChoices.insert('Plain text', ['.txt']);
  picker.pickSaveFileAsync().then(function (file) {
    if (file !== null) {
      Windows.Storage.FileIO.writeTextAsync(file, content).then(function () {
        var dlg = new Windows.UI.Popups.MessageDialog(
          'Your content is successfully saved to ' + file.path, 'Save completed'),
        dlg.showAsync();
      });
    }
  });
}Figure 6-6: The main screen of the text editor application

Figure 6-7: The main screen of the text editor application after a file is opened

Figure 6-8: The notification dialog box after successful save

- The default.html file contains the HTML markup that defines the UI elements of your application.
- The default.js file contains the JavaScript logic that defines the behavior of your application.
Managing Data
Data management is a key component of every application. The data is read from a database, from a file, or from a network service, and then it is displayed on the UI. The user searches the data and modifies it, and later the changes are propagated back to the original data source. The data is flowing first from the data source to the UI, and then from the UI to the data source.
Because data management is a typical programming task, modern programming environments have several features to make it easier. Typically, they have data source components that you can use to connect to the database, file, or network service, and UI controls that can display the data and provide input features to the users. The connection between the data source and the UI components is set up via data binding.
Data binding ensures that there is seamless data flow to and from the UI elements. One-way data binding pumps the data from the storage variable to the UI, and ensures that the UI is updated automatically when the underlying data is changed. Two-way data binding extends the functionality of the one-way binding by pumping the data back to the underlying data source after the data is modified on the UI.
Based on the size and structure of the data, two types of binding exist:
- Simple binding connects a single value to a single property of a single UI element. For example, you can display a name, stored in a string variable, in a text box.
- List binding connects multiple values to a UI element that can manage lists. For example, you can take a list of country names stored in a string array and display it in a table or a combo box.
In Windows 8, the WinJS supports only one-way binding, which means you can easily pump data from a variable to the UI. To handle data modifications, you must wire up event handlers for change events of the UI elements, and manually write the modified data back to the data source.
You can define your binding in a declarative or programmatic way. With declarative binding, you extend the HTML markup with expressions that describe which properties of the data object should be bound to an attribute of the current element. For example, the following img element renders an image whose URL is stored in the avatarUrl property of the data object:
<img data-win-bind="src: avatarUrl" />The WinJS also supports programmatic binding. This means that you can use objects and functions in the WinJS.Binding namespace to set up and manipulate data bindings from your JavaScript code. For example, the following code displays an image whose URL is stored in the data.avatarUrl property:
var data = WinJS.Binding.as({ avatarUrl: 'myphoto.png' });
data.bind('avatarUrl', function (newValue, oldValue) {
    var target = document.getElementById('picture'),
    target.src = newValue;
});
In the next exercises, you create an image browser application, and learn how you can declaratively bind data in an HTML5 Windows 8 style application.
<h1>
  Your
  <span data-win-bind="innerText: name"></span>
  Library
</h1>h1 {
margin: 20px;
}
h1 span {
font-weight: bold;
}args.setPromise(WinJS.UI.processAll().then(function () {
var lib = Windows.Storage.KnownFolders.picturesLibrary;
var data = WinJS.Binding.as({ name: lib.name });
var element = document.getElementById('span'),
WinJS.Binding.processAll(element, data);
}));Figure 6-9: The main screen of the image browser application

Figure 6-10: The Access Denied exception thrown only in Debug mode

In the previous exercise you learned how you can bind a single data value to an attribute of a single HTML element. This is called simple binding. In the next exercise you learn how you can bind multiple values to a single UI control using list binding.
<div id="tmpl" data-win-control="WinJS.Binding.Template">
  <div>
    <img src="#" data-win-bind="alt: name; src: url; title: path" />
    <br>
    <span class="name" data-win-bind="innerText: name"></span>
    <br />
    <span class="date" data-win-bind="innerText: date"></span>
  </div>
</div>

<div id="lv"
  data-win-control="WinJS.UI.ListView"
  data-win-options="{itemDataSource : files.dataSource, itemTemplate:
       select('#tmpl')}">
</div>#lv.win-listview
{
height: 500px;
width: 500px;
}
#lv .win-container {
margin: 20px;
padding: 10px;
}
#lv .win-item {
width: 205px;
height: 165px;
}
#lv .win-item img {
width: 192px;
height: 120px;
}
.name {
font-weight: bold;
}
.date {
font-size: small;
}var files = new WinJS.Binding.List;lib.getItemsAsync().then(function (items) {
items.forEach(function (item) {
if (item.isOfType(Windows.Storage.StorageItemTypes.file)) {
files.push({
url: URL.createObjectURL(item),
name: item.name,
path: item.path,
date: item.dateCreated
});
}
});
});Figure 6-11: The image browser application with images

- The itemDataSource property defines the object that contains the data to display by the ListView control. In this case, it is the dataSource property of the files object created in a later step.
- The itemTemplate property points to another HTML element in the page that is used to render a single item in the ListView. In this case, it is the div element that precedes the ListView. Because the template is referenced by the ListView, the template must be declared before the ListView within the page.
You have seen in the previous exercise that data binding provides a convenient way to display data from a variable on the UI. In the next exercise, you see that data binding builds a live connection between the data source and the UI control, and can update the UI automatically when the underlying data changes. To demonstrate this, you extend your image library browser application and provide remove functionality for the image list.
args.setPromise(WinJS.UI.processAll().then(function () {
var lib = Windows.Storage.KnownFolders.picturesLibrary;
var data = WinJS.Binding.as({ name: lib.name });
var element = document.getElementById('span'),
WinJS.Binding.processAll(element, data);
lib.getItemsAsync().then(function (items) {
  items.forEach(function (item) {
    if (item.isOfType(Windows.Storage.StorageItemTypes.file)) {
      files.push({
        url: URL.createObjectURL(item),
        name: item.name,
        path: item.path,
        date: item.dateCreated
      });
    }
  });
});
// Place code in this exercise here.
}));var lv = document.getElementById('lv'),
lv.addEventListener('iteminvoked', function (eventObj) {
eventObj.detail.itemPromise.then(function (listViewItem) {
var binding = files.dataSource.createListBinding();
binding.fromIndex(listViewItem.index).then(function (dataItem) {
files.dataSource.remove(key);
binding.release();
});
});
});args.setPromise(WinJS.UI.processAll().then(function () {
var lib = Windows.Storage.KnownFolders.picturesLibrary;
var data = WinJS.Binding.as({ name: lib.name });
var element = document.getElementById('span'),
WinJS.Binding.processAll(element, data);
lib.getItemsAsync().then(function (items) {
items.forEach(function (item) {
if (item.isOfType(Windows.Storage.StorageItemTypes.file)) {
files.push({
url: URL.createObjectURL(item),
name: item.name,
path: item.path,
date: item.dateCreated
});
}
});
});
var lv = document.getElementById('lv'),
lv.addEventListener('iteminvoked', function (eventObj) {
eventObj.detail.itemPromise.then(function (listViewItem) {
var binding = files.dataSource.createListBinding();
binding.fromIndex(listViewItem.index).then(function (dataItem) {
var key = dataItem.key;
files.dataSource.remove(key);
binding.release();
});
});
});
}));In the previous three exercises, you learned how you can use data binding to render and manipulate data on the UI. Data binding is a very powerful tool because it helps you eliminate several lines of code, so you will use it every day when you create data-driven applications.
Respecting the User’s Device
Previously, client applications could run only on classic desktop computers and laptops. But Windows 8 brings a new type of device to the picture: the tablet. The tablet differs significantly from the desktops and laptops, because it provides new types of interactions. You can take a tablet with you, hold it in your hand in landscape or portrait mode, and control the applications using touch gestures. Tablets usually have a set of built-in sensors that your applications can access to detect the position of the device, the location of the user, the light level in the environment, and so on.
Windows 8 can run on a broad range of devices, and your application must gracefully handle the various characteristics of these devices. Even if your application doesn’t rely on the built-in sensors, it must respect at least the different screens of the various devices. Your application must adapt itself to the four characteristics of the screen:
- Size — This is the physical size of the display of the device.
- Resolution — This is the number of pixels in the display. The minimum resolution to have all Windows 8 features enabled is at least 1366 × 768 pixels.
- Orientation — This indicates how the user is holding the device in his or her hand (that is, in landscape or portrait mode).
- Mode — On Windows 8, the user can run Windows 8 style applications in full-screen mode or in snapped mode. In full-screen mode, the application consumes the whole screen, whereas in snapped mode, the application is docked in a 320 pixels-wide column to the edge of the screen.
Windows Runtime provides APIs to query the device parameters and react to screen changes. To provide the best user experience, your Windows 8 style application must use these APIs to optimize itself to the current display conditions. When the user rotates the device or changes the application from full-screen mode to snapped mode, you can reposition or resize your UI elements.
In the next exercise, you create a picture browser application that adapts itself to the various screen sizes.
<div id="tmpl" data-win-control="WinJS.Binding.Template">
  <section>
    <img src="#" data-win-bind="src: url" />
    <div>
      <span class="name" data-win-bind="innerText: name"></span>
      <br />
      <span class="date" data-win-bind="innerText: date"></span>
    </div>
  </section>
</div>

<div id="host">
  <div id="lv" data-win-control="WinJS.UI.ListView"
               data-win-options="{ itemDataSource: data.items.dataSource,
                                   itemTemplate: select('#tmpl'),
                                   layout: {type: WinJS.UI.GridLayout} }" />
</div><script src="/js/data.js"></script>#host {
height: 100%;
width: 100%;
}
#lv {
height: 100%;
width: 100%;
}
#lv .win-item {
width: 410px;
height: 350px;
padding: 10px;
}
#lv .win-item img {
width: 400px;
height: 300px;
}
.name {
font-weight: bold;
}
.date {
font-size: small;
}(function () {
"use strict";
var images = new WinJS.Binding.List;
var lib = Windows.Storage.KnownFolders.picturesLibrary;
lib.getItemsAsync().then(function (items) {
items.forEach(function (item) {
if (item.isOfType(Windows.Storage.StorageItemTypes.file)) {
images.push({
url: URL.createObjectURL(item),
name: item.name,
date: item.dateCreated
});
}
});
});
WinJS.Namespace.define("data", {
items: images
});
})();Figure 6-12: Starting the application in the Simulator

Figure 6-13: The image browser application in the Simulator

Figure 6-14: The rotate icons of the Simulator

Figure 6-15: The application in portrait mode

Figure 6-16: The application in snapped mode

Figure 6-17: The Change Resolution feature in the Simulator

@media screen and (-ms-view-state: snapped) {
  #lv .win-item {
    width: 100%;
    height: 210px;
    padding: 5px;
  }

    #lv .win-item img {
      width: 280px;
      height: 210px;
    }

    #lv .win-item div {
      display: none;
    }
}

@media screen and (-ms-view-state: fullscreen-portrait) {
  #lv .win-item {
    width: 100%;
    height: 310px;
  }

    #lv .win-item div {
      display: inline-block;
      margin-left: 10px;
      height: 300px;
      vertical-align: bottom;
      font-size: 20pt;
    }

  .date {
    font-size: 14pt;
  }
}var appView = Windows.UI.ViewManagement.ApplicationView;
var appViewState = Windows.UI.ViewManagement.ApplicationViewState;args.setPromise(WinJS.UI.processAll().then(function () {
window.addEventListener('resize', onResize);
}));function onResize(eventArgs) {
refresh(appView.value);
}
function refresh(newViewState) {
var newLayout;
switch (newViewState) {
case appViewState.snapped:
newLayout = new WinJS.UI.ListLayout();
break;
case appViewState.filled:
newLayout = new WinJS.UI.GridLayout();
break;
case appViewState.fullScreenLandscape:
newLayout = new WinJS.UI.GridLayout();
break;
case appViewState.fullScreenPortrait:
newLayout = new WinJS.UI.ListLayout();
break;
}
var lv = document.getElementById('lv').winControl;
WinJS.UI.setOptions(lv, {
layout: newLayout
});
}Figure 6-18: The optimized layout in portrait mode
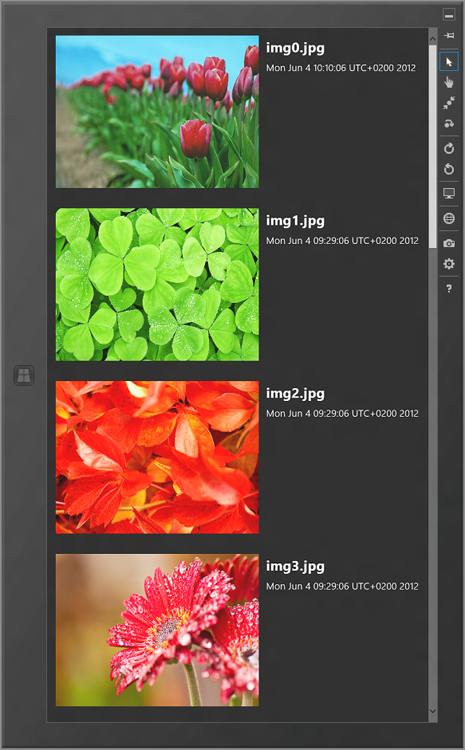
Figure 6-19: The optimized layout in snapped mode

- The itemDataSource property configures the data object that will be bound to the ListView control. You created the data.items.dataSource object in Step 14 in the data.js file you connected to this page in Step 8.
- The itemTemplate property points to the div element above the ListView that is used to define the layout and the content of every single item in the list.
- The layout property is very important here, because it defines the layout of the whole list. The default that you set here is the WinJS.UI.GridLayout object that provides horizontal scrolling, and renders the items in multiple rows and columns. This is the default rendering that is used in landscape mode.
As you saw in the previous exercise, creating flexible UIs is very easy with HTML5 and CSS3 in Windows 8. Media queries provide a convenient way to change the look and feel of your application using only CSS, and Windows 8 provides events and APIs to fine-tune your application in JavaScript code.
Scrolling and Zooming
Touch gestures are the primary way of interacting with Windows 8 style applications on modern, touch-based devices. Direct manipulation is a natural way of controlling applications, but only if the gestures are used consistently in the operating system and all applications. Microsoft did profound research to develop the Windows 8 touch-interaction scheme, and integrated the best implementation of touch handling deep into the operating system. To ensure that gestures are handled consistently and optimally in every application, the controls in the WinJS have built-in support for touch interactions.
Because a lot of content cannot fit on small screens, the two basic interactions are scrolling and zooming. You can scroll content using a slide and zoom with a pinch gesture. Users quickly become familiar with the scroll and zoom gestures, because they can navigate within the Windows 8 Start screen and other Windows 8 style interfaces with them as well.
In the next exercise, you create an image browser application in that you can zoom, pan, and scroll using touch gestures.
<div class="step">
  <img src="images/img1.jpg" />
</div>.step {
overflow: auto;
-ms-content-zooming: zoom;
-ms-content-zoom-limit-min: 10%;
-ms-content-zoom-limit-max: 500%;
width: 100%;
height: 100%;
}
.step img {
width: 100%;
height: 100%;
}Figure 6-20: Starting the application in the Simulator

Figure 6-21: The touch buttons of the Simulator

As you saw in the previous exercise, implementing zooming and panning is very easy using nothing more than CSS. In the next exercise, you extend the previous application with scrolling.
<div id="scroller">
  <div class="step">
    <img src="images/img1.jpg" />
  </div>
  <div class="step">
    <img src="images/img2.jpg" />
  </div>
  <div class="step">
    <img src="images/img3.jpg" />
  </div>
  <div class="step">
    <img src="images/img4.jpg" />
  </div>
</div>#scroller {
overflow: auto;
display: -ms-flexbox;
width: 100%;
height: 100%;
}-ms-scroll-snap-type: mandatory;
-ms-scroll-snap-points-x: snapInterval( 0%, 100% );#scroller {
overflow: auto;
display: -ms-box;
width: 100%;
height: 100%;
-ms-scroll-snap-type: mandatory;
-ms-scroll-snap-points-x: snapInterval( 0%, 100% );
}Canvas Graphics in Windows 8 Style Applications
Many applications require a drawing surface, where users can paint custom shapes, render text, and manipulate images on the fly. This challenge has been solved for a long time on the desktop, but in the browser, programmatic drawing was a painful issue before HTML5.
HTML5 introduces the <canvas> element, which provides a rectangular area where you can draw anything you want using the canvas drawing API. With the canvas element, you can do the following:
- Draw shapes
- Fill them with colors
- Create gradients and patterns
- Render texts and images
- Manipulate pixels
In short, you can use canvas to dynamically create raster images in JavaScript.
It’s important to note that the canvas element behaves like a real canvas: it remembers only the last painted image. canvas doesn’t support layers, objects, or event handlers, so you cannot manipulate the previously created graphics. If you want to modify the image, you must redraw the canvas.
The disadvantage of this low-level API is that you cannot easily add interactivity to your drawings. On the other hand, this direct image drawing is really fast in modern web browsers. The latest browsers also support hardware-accelerated rendering that further speeds up the canvas operations, and makes the canvas element a perfect host even for graphics-intensive applications and games.
In Windows 8, you can use the canvas API in your Windows 8 style applications. In the next exercise, you learn the basics of the canvas API by drawing a smiling face in JavaScript.
<canvas id="canvas" width="400" height="400"></canvas>canvas {
background-color: White;
border: 3px solid orange;
margin: 15px;
}var canvas = document.getElementById('canvas'),
var ctx = canvas.getContext('2d'),
var line = '#000';
var head = '#ffff00';
var eye = '#fff';
var pupil = 'green';
var mouth = '#FF0000';
var nose = 'BLACK';
ctx.save();
ctx.shadowColor = "#999";
ctx.shadowBlur = 20;
ctx.shadowOffsetX = 5;
ctx.shadowOffsetY = 5;
ctx.fillStyle = head;
ctx.beginPath();
ctx.arc(200, 200, 100, 0, Math.PI * 2, false);
ctx.fill();
ctx.restore();
ctx.strokeStyle = line;
ctx.lineWidth = "2";
ctx.stroke();
ctx.strokeStyle = mouth;
ctx.beginPath();
ctx.moveTo(135, 225);
ctx.quadraticCurveTo(200, 285, 265, 225);
ctx.stroke();
ctx.moveTo(135, 225);
ctx.quadraticCurveTo(200, 310, 265, 225);
ctx.stroke();
ctx.strokeStyle = line;
ctx.fillStyle = eye;
ctx.lineWidth = '1';
ctx.beginPath();
ctx.arc(160, 160, 15, 0, Math.PI * 2, false);
ctx.stroke();
ctx.fill();
ctx.beginPath();
ctx.arc(240, 160, 15, 0, Math.PI * 2, false);
ctx.stroke();
ctx.fill();
ctx.fillStyle = pupil;
ctx.beginPath();
ctx.arc(162, 162, 6, 0, Math.PI * 2, false);
ctx.fill();
ctx.beginPath();
ctx.arc(238, 162, 6, 0, Math.PI * 2, false);
ctx.fill();
ctx.save();
ctx.fillStyle = nose;
ctx.translate(200, 190);
ctx.rotate(45 * Math.PI / 180);
ctx.beginPath();
ctx.fillRect(0, 0, 16, 16);
ctx.fill();
ctx.restore();
ctx.font = '48px Calibri';
var text = 'Smile!';
var textSize = ctx.measureText(text);
var textx = 200 - textSize.width / 2;
ctx.strokeText(text, textx, 360);
ctx.fillText(text, textx, 360);Figure 6-22: The drawing on the canvas

ctx.strokeStyle = line;
ctx.lineWidth = "2";
ctx.stroke();ctx.strokeStyle = line;
ctx.fillStyle = eye;
ctx.lineWidth = '1';Figure 6-23: The translated and rotated coordinate space

Using the Windows 8 Animation Library
Animations play an important role on the Windows 8 platform, because they bring Windows 8 style applications to life. Good animations are not just beautiful, but they also enhance the user experience by giving users the confidence of knowing what has happened, or what will happen. Animations are an integral part of the Windows 8 design language.
However, creating good animations is difficult. Although animations can add beauty and unique personality to your application, they must be consistent throughout the whole platform to be purposeful and not distracting. Additionally, in the world of battery-powered devices, animations must be optimized and fully respect the user’s device.
To answer these challenges, Microsoft provides the Windows 8 Animation Library, which helps you to easily add optimized and consistent animations to your Windows 8 style application. The Windows 8 Animation Library covers the following scenarios:
- Application navigation
- Animating content
- Revealing or hiding UI elements
- Animating collection changes
- Animating selections
Just like many other functions within the WinJS, animations are also using promises. To provide a fast and fluid user experience, animations are played on a separate thread and not blocking the UI. The functions are all asynchronous, and return promise objects that you can use to chain animations. Internally, the animations are built on standards-based CSS3 animations and transitions, and optimally utilize the hardware capabilities of the device.
In the next exercise, you create a Windows 8 style application and enhance the user experience by adding the most common animations.
<h1>Animations</h1>

<h2>Content</h2>

<p id="content1">
  Lorem ipsum dolor sit amet, consectetuer adipiscing elit, sed diam nonummy nibh
  euismod tincidunt ut laoreet dolore magna aliquam erat volutpat. Ut wisi enim ad
  minim veniam, quis nostrud exerci tation ullamcorper suscipit lobortis nisl ut
  aliquip ex ea commodo szeretlek. Tucsok autem vel eum iriure dolor in hendrerit
  in vulputate velit esse molestie consequat, vel illum dolore eu feugiat nulla
  facilisis at vero eros et accumsan et iusto odio dignissim qui blandit praesent
  luptatum zzril delenit augue duis dolore te feugait nulla facilisi.
</p>

<p id="content2">
  At vero eos et accusamus et iusto odio dignissimos ducimus qui blanditiis
  praesentium voluptatum deleniti atque corrupti quos dolores et quas molestias
  excepturi sint occaecati cupiditate non provident, similique sunt in culpa qui
  officia deserunt mollitia animi, id est laborum et dolorum fuga. Et harum quidem
  rerum facilis est et expedita distinctio. Nam libero tempore, cum soluta nobis est
  eligendi optio cumque nihil impedit quo minus id quod maxime placeat facere
  possimus, omnis voluptas assumenda est, omnis dolor repellendus. Temporibus autem
  quibusdam et aut officiis debitis aut rerum necessitatibus saepe eveniet ut et
  voluptates repudiandae sint et molestiae non recusandae. Itaque earum rerum hic
  tenetur a sapiente delectus, ut aut reiciendis voluptatibus maiores alias
  consequatur aut perferendis doloribus asperiores repellat.
</p>

<button id="btnShow">Show content</button>
<button id="btnNext">Next content</button>
<button id="btnHide">Hide content</button>

<h2>Panels</h2>

<p>
  <button id="btnShowPanel">Show panel</button>
  <button id="btnHidePanel">Hide panel</button>
</p>

<div id="panel">
  <p>Hello from a side panel!</p>
</div>body { margin: 15px; }
p { line-height: 1.8em; }
h2 { margin-top: 20px; }
#content1 { opacity: 0; }
#content2 { display: none; }
#btnNext { display: none; }
#btnHide { display: none; }
#panel
{
position: fixed;
right: 0px;
top: 0px;
width: 450px;
height: 100%;
background-color: #323232;
opacity: 0;
z-index: 1;
}
#panel p
{
position: absolute;
top: 45%;
text-align: center;
width: 100%;
} var headings = document.querySelectorAll('h1, h2'),
WinJS.UI.Animation.enterPage(headings, { top: '100px', left: '500px' });
btnShow.addEventListener('click', onBtnShowClicked);
btnNext.addEventListener('click', onBtnNextClicked);
btnHide.addEventListener('click', onBtnHideClicked);
btnShowPanel.addEventListener('click', onBtnShowPanelClicked);
btnHidePanel.addEventListener('click', onBtnHidePanelClicked);function onBtnShowClicked() {
WinJS.UI.Animation.enterContent(content1);
btnShow.style.display = 'none';
btnNext.style.display = 'inline';
}
function onBtnNextClicked() {
WinJS.UI.Animation.exitContent(content1).then(function() {
content1.style.display = 'none';
content2.style.display = 'block';
btnNext.style.display = 'none';
btnHide.style.display = 'inline';
return WinJS.UI.Animation.enterContent(content2);
});
}
function onBtnHideClicked() {
WinJS.UI.Animation.exitContent(content2);
content1.style.display = 'block';
content2.style.display = 'none';
btnShow.style.display = 'inline';
btnNext.style.display = 'none';
btnHide.style.display = 'none';
}
function onBtnShowPanelClicked() {
panel.style.opacity = '1';
WinJS.UI.Animation.showPanel(panel);
}
function onBtnHidePanelClicked() {
WinJS.UI.Animation.hidePanel(panel).then(function () {
panel.style.opacity = '0';
});
}Figure 6-24: The animations sample

- An h1 and two h2 tags that render the title and the headings of the application.
- Two p tags that contain the content that is animated when you click the “Show content,” “Next content,” and “Hide content” buttons. The first paragraph is displayed when the application starts, and it switches over to the second paragraph when you click the “Next content” button.
- The buttons are rendered using button elements.
- The right panel is created using a div element.
- Most elements have an id attribute to make them uniquely accessible from JavaScript and CSS code.
Summary
In the browser, HTML, CSS, and JavaScript have already been proven to be suitable for creating real-world applications. In the past few years, the techniques and the practices have evolved, and web developers also have become ready to implement complex solutions using mature patterns with pure HTML and JavaScript. With Windows 8, Microsoft opens the Windows developer platform to web developers by enabling them to reuse their existing knowledge and develop Windows 8 style applications. The same technologies that power all websites are now first-class citizens on the client as well.
The features and services of Windows Runtime are fully available to JavaScript applications. A specific component, the Windows Library for JavaScript (WinJS), ensures that JavaScript developers can access these features and services in a well-known and natural way, regardless of the characteristics and limitations of the language.
Additionally, this library provides helpers to common coding tasks to make the lives of developers easier. With the WinJS controls, you can quickly create Windows 8 style applications that can easily manage data using declarative or programmatic data binding. The Windows 8 Animation Library helps you to add beauty, energy, motion, and personality to your applications via device-optimized animations.
Exercises
What You Learned In This Chapter
| Topic | Key Concepts |
| HTML5 | HTML5 is the next generation of the HyperText Markup Language standard that enables you to create rich Internet applications in the browser. |
| Windows Library for JavaScript (WinJS) | The Windows Library for JavaScript (WinJS) is a JavaScript code library that publishes system-level features and helpers for common coding patterns to simplify creating Windows 8 style applications in JavaScript. |
| document.getElementById and document.getElementsbyTagName | With the document.getElementById and the document.getElementsByTagName functions, you can get references to DOM elements in JavaScript code. |
| addEventListener | With the addEventListener function, you can attach a function to a DOM element to react to user actions. |
| Simple binding | Simple binding is a type of data binding that connects a single data value to a single UI element. |
| List binding | List binding is a type of data binding that connects an array of values to a complex UI element that can handle multiple values in a list or table. |
| WinJS.UI.ListView | ListView is a WinJS control that provides the standard listing behaviors in Windows 8 style applications. |
| @media | The @media keyword introduces a CSS media query that you can use to tailor your CSS selectors to devices with specific capabilities. |
| Snapped mode | Snapped is one of the display modes of Windows 8 style applications. In snapped mode, the application is docked to the edge of the screen in a 320-pixel-wide frame. |
| canvas | canvas is an HTML5 element that enables you to create raster graphics with JavaScript. |