
Chapter 2
Using Windows 8
WHAT YOU WILL LEARN IN THIS CHAPTER:
- Using Windows 8 with the mouse and keyboard
- Using Windows 8 with multi-touch devices
- Leveraging the features of the Start screen, Live Tiles, and the charm bar
- Switching to the desktop and using traditional Windows applications
Windows 8 changes a lot in terms of the user interface (UI). It was built with a more touch-centric approach in mind. The desktop has a few slightly changed features, but most of the traditional, mouse-based workflows remain untouched. On the new Windows 8 style interface, virtually everything is new. Live Tiles aren’t just shortcuts; Windows 8 style applications aren’t handled like traditional Windows apps. Even the Start screen contains features the old Start menu didn’t.
Although the user may learn these things intuitively, for a developer, it is imperative to know all the nooks and crannies of using the Windows 8 UI. Only with extensive knowledge of these capabilities can you build really engaging and intuitive apps that users use not just to complete a task, but enjoy doing so.
Two Worlds, One Operating System
Windows 8 has two distinct UIs: the ordinary desktop UI (which probably you are used to) and the completely different and new Windows 8 UI. Why is the Windows 8 UI so important?
In the past few decades, users have experienced the triumph of the mouse over nearly every other controlling device on PCs. For an ordinary Windows user, using a mouse is considered to be the easiest way to use a desktop computer’s graphical user interface (GUI). In addition to the mouse, power users rely on the keyboard, too. Keyboard shortcuts such as Ctrl+Alt+Del and special keys, like the Windows key, speed up their work.
Microsoft built its Windows operating systems on the assumption that you will use a mouse and a keyboard to control the operating system and the programs. This premise led Microsoft to create a GUI, which coordinates user interactions performed with these devices. It is always assumed that you have a pixel-precise pointer, and you can click on a small icon without any trouble.
Smaller devices such as Personal Digital Assistants (PDAs) and smartphones used to have hardware buttons or styluses to operate their interfaces. Because of their size, these devices are less effective when creating content than when consuming it. That being said, mimicking the desktop GUI on these devices might not have been the best choice. However, at the time when smartphones and PDAs started to become common, it was the best choice. The operating systems of these smart devices tried to re-create a simplified GUI of their bigger, desktop counterparts to preserve the user experience and ease the learning curve as much as possible.
In 2001, Microsoft created a third category of devices: the tablet PC. Tablet PCs were basically small laptops with reversible touchscreens. They were fully capable computers, but they were more mobile. With the touchscreen, you were able to manipulate the objects on the screen in a more natural way, without using a mouse or keyboard.
Because of its inherent shortcomings, the form factor of the tablet PC had little impact on the market back then. They were small devices — but still heavy. They were good devices for content creation and consumption — but they lacked a long battery life, and so on. Along with the hardware-related issues, a more pressing problem hindered tablet PCs from prevailing: the absence of a GUI like those built for (multi-) touchscreens. Windows XP merely enabled users to use their fingers instead of the mouse pointer.
In the past decade, another type of GUI has risen. Ordinary cell phones have become bigger and smarter. At one point, they became much like PDAs — digital companions, organizers, and content-consuming devices. However, if you look at a contemporary big-screen smartphone, you almost never find a stylus. And, more importantly, the GUI is totally different from what you’d find on a Windows desktop PC or on an older PDA.
This new kind of GUI was built from the ground up to let you manipulate objects on the screen naturally without using some additional hardware device like a stylus or keys. You can simply touch objects on the screen with your fingers, without any pointer or using a hardware device. The majority of these devices have a multi-touchscreen, so they can recognize manipulations done with multiple fingers — commonly referred to as multi-touch gestures. These features enable a more natural way to interact with your handheld device.
Though it is possible to use smartphones for content consumption like browsing the web or reading documents, the small, 3- to 4-inch screen often becomes a hurdle. Laptop computers are considered to be the other extreme. They are too big, too heavy, too noisy, and not mobile enough to do such simple tasks. They were built to let you do everything a computer can do. As content creation devices, they provide unparalleled possibilities, but this comes at a price.
To fill the gap between smartphones and laptops, a third kind of device reappeared — with a twist. They are still called tablets (sometimes slates), but most of the time they lack the hardware keyboard. They have 7- to 10-inch multi-touchscreens and only a handful of hardware buttons. Some of them have styluses, but primarily they leverage touch gestures as a user interaction method. And, because of this, they have inherited smartphone operating systems with a touch-centric GUI. Using these tablets often feels really natural, even for someone who hasn’t used a computer yet.
The new kind of tablet can be considered a descendant of the smartphone. Unlike the older devices, they share almost nothing with desktop PCs, but they are decent content-consuming devices. Their GUI is completely different. They require different interaction methods to be powerful, and, just as importantly, they don’t run the same applications.
Operating systems built on one of these UIs are predestined to be best for only one of two worlds. They are either good for a content-consuming device or for a content-creating device, but not for both.
Today’s hardware has evolved to the point where the original tablet concept could become real, without all the illnesses it had ten years ago. Software, however, just isn’t ready yet, because no operating system fits both of the two distinct usage methods.
With Windows 8, Microsoft created the first operating system that tries to be best of both worlds by providing a mix of the two UI paradigms. The well-known desktop applications are best suited for content-creating scenarios (such as writing books or programs), whereas Windows 8 style apps are best at consuming content (such as reading the aforementioned books).
The two-faced makeup of Windows 8 makes it the first operating system to be flexible enough to let you choose the method you want to use for any device that runs the operating system. Whether you are using a new-generation tablet with an external keyboard dock, an ultrabook with a built-in keyboard and a touchscreen, or a powerful laptop or desktop PC, you can always use the same, familiar operating system. Additionally, your Start screen, your settings, and your Windows 8 apps follow you through all the devices you use.
The seemingly complex nature of the Windows GUI and the improvements in the core of the operating system let you, the developer, build apps that run on every device that has a 7- to 70-inch screen (and, of course, adheres to certain hardware requirements). The apps are equally engaging when used with a multi-touchscreen, or controlled with a mouse and a keyboard. This no-compromise operating system offers a new level of comfort for the users, and, just as importantly, an unprecedented market opportunity for developers.
Input Methods
If your device or PC has USB ports, you can use the mouse and the keyboard to interact with it. But with Windows 8, it is important to be aware of the other methods you can use to control a device.
Multi-Touch Input
Whereas the previous versions of Windows were primarily for desktop and laptop computers, Windows 8 opens up possibilities for a whole new range of devices — ARM-based tablets, tablets built on x64 architecture, the new ultrabooks, and so on. A common feature of these is the multi-touch-capable, capacitive touchscreen. While building Windows 8 style apps, it is best to create the UI with that in mind.
Microsoft helps you with two things in building touch-centric apps:
- The out-of-the-box controls that arrive with Visual Studio 2012 for Windows 8 style apps are suited for mouse and touchscreen use as well. You learn about these controls in later chapters of this book.
- Microsoft ensures a consistent usage of specific single- and multi-touch gestures throughout the operating system, and a clear and concise way to describe them. These are user interactions done with one or two fingers.
Following are all the gestures defined for Windows 8. It is a good practice to keep them in mind, because all Windows users will know them, and you can build your apps to adhere to this quasi-standard.
- Tap — This is the main interaction with an object on the screen, such as starting an app by touching its Live Tile on the Start screen. You can think of this as the touch counterpart of a mouse click.
- Tap and Hold — This is a secondary interaction with an object, such as bringing up the context menu by touching the object for a second without releasing it. This is much like the right-click with the mouse.
- Slide — Programs without any kind of list are very rare. Scrolling a list usually means clicking (or tapping) a scrollbar to move the view. Though this is still possible to do, it is much more natural for touchscreen users to move the view by touching the list with one finger, and flicking it. The list will pan, or scroll in that direction.
- Swipe — Use this gesture to select an object on the screen. A swipe is similar to a slide. You touch an object with one finger, and pull it down slightly without releasing it. When you stop and release, you complete a swipe gesture. If you don’t stop moving your finger downward, when you release the screen, it’ll likely to be interpreted as a slide gesture.
- Pinch — This multi-touch gesture involves two fingers touching the screen at the same time, and moving them toward each other or apart. Usually, this gesture is linked to zooming effects, either magnifying or shrinking an image or any other object.
- Rotate — This gesture is performed by using two fingers to touch the screen, and turning around a center point (which can be one of the fingers). This gesture can be used for turning or rotating an object.
- Swipe from the Edge — As you see later in this chapter, edges and corners of the screen have important functions in Windows 8. Thus, a swipe gesture on one of the edges on the screen might be used to activate something useful. For example, if you swipe from the right edge of the touchscreen, you will always open the charm bar (which, as you learn later in this chapter, contains the Start button and several other useful features). If you swipe from the bottom of the screen, that usually activates the context bar for application commands (which you also learn more about later in this chapter).
Figure 2-1 shows all these gesture interactions.
Figure 2-1: Windows 8 touch gestures

The Software Keyboard
A lot of Windows 8 devices will be too small to have a hardware keyboard. Keyboard input on these devices is done by using an on-screen, software keyboard. When a user taps in a text box (or some other control that awaits keyboard input), the software keyboard automatically pops up on the bottom of the screen. On smaller screens, this means that the keyboard takes up most of the space. Thus, when designing an app that receives alphanumeric user input, you must ensure that the control is sized well enough to fit the smallest screen resolution when the software keyboard is open.
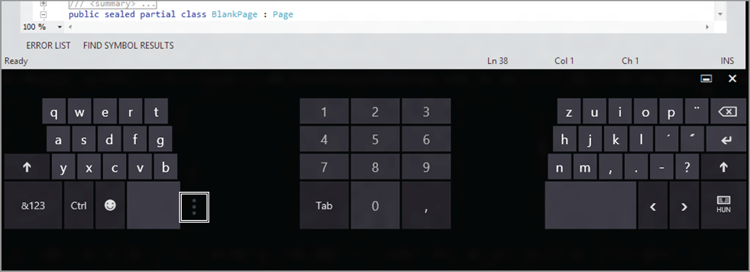
Windows 8 ships with multiple software keyboard layouts, which help you to be able to type on the keyboard as comfortably as possible. On certain layouts, the size of the buttons can be modified, too. However, the layout of the software keyboard and the size of the buttons don’t affect the space the whole keyboard requires.
Figure 2-2 shows the new “two thumbs” keyboard layout, which helps you to type comfortably only with your thumbs while holding a Windows 8 tablet with both of your hands. The vertical ellipsis in the upper-left corner lets you choose the size of the buttons (with the biggest setting being shown in the figure).
Figure 2-2: The software keyboard with a special layout
Other Input Devices
Most of the time, your apps will be used in conjunction with either a mouse or touchscreen. But that doesn’t mean that other input devices aren’t supported by Windows 8.
Some devices — mostly handheld ones — are equipped with a stylus. A stylus is a touchscreen aid that provides much greater precision than using bare fingers. But, because a stylus is not common, you should build the UI for normal touch input.
A more important kind of input device is the sensor. The vast majority of new Windows 8 tablets are going to have built-in equipment to detect the device’s location and attitude (the way you hold the device), among other things. If the device or computer has a sensor, its data can be used in your Windows 8 style app.
Following are some examples of sensors:
- A global positioning service (GPS) tells you the geographical location of the device.
- An accelerometer informs you about the change of the device’s velocity.
- A gyroscope tells you the rotation speed of the device.
- A magnetometer or compass tells you the angle of the north direction.
- An ambient light sensor informs you about the lighting conditions of the device’s surroundings.
You can incorporate the sensory input into your app easily by using the APIs provided by Microsoft, and this gives you the opportunity to create more engaging or easy-to-use applications.
Logging In
Logging in to the operating system is not really an important thing from a Windows 8 app developer’s standpoint — apart from the fact that you can’t write apps if you don’t log in. But it is worth noting that Windows 8 was built to be used with Microsoft Accounts (which is basically a new name for Live ID), as opposed to plain, local user accounts on every computer.
This means that if you log in with your Live ID e-mail address and password, Windows 8 enables you to reach everything stored in Live Services as easily and seamlessly integrated as possible. For example, if you open http://live.com in Internet Explorer, you’ll be logged in immediately with the login and password you use to log in to Windows. Or, if you want to select a picture in an app, you’ll see not only images on the computer you’re using, but all the images you store on your SkyDrive — just as though they were stored locally. (Of course, this is true only if the computer can access the Internet to get these pictures from SkyDrive.)
When you build an app, you can leverage this Live integration, and allow your app to use the user information and data just as seamlessly as if it were built by Microsoft into Windows 8. The first time the user starts the app and it tries to log in to Windows Live, the user is presented with a screen that asks for permissions for the app. After the user reads the details and clicks or taps OK, the app will be able to do all the things the user has approved — reading e-mails, accessing personal data, downloading or uploading files to SkyDrive, and so on. The user can revoke these permissions at any time.
In addition to Microsoft Accounts, using ordinary local accounts is still a possibility.
Two new login types are also worth mentioning. Because strong passwords might take a long time (and some effort) to type, this can be especially cumbersome on a touchscreen device without a hardware keyboard. Windows 8 lets you create an image and/or a personal identification number (PIN) login, in addition to the traditional strong password login.
Picture password lets you choose a picture, draw three figures on it (points, lines, and circles), and the next time you have to log in, lets you log in without having to type a possibly long password. You just have to repeat drawing the three figures in the same sequence and at the same places — which is very easy using a touchscreen.
The PIN password option simply lets you choose a four-digit personal identification number, which is easier to type in than a long password.
The Start Screen
After logging on to your Windows 8 device, the first screen you encounter is the new Start screen. Windows 8 takes a giant and bold leap — the Start menu you knew for decades is no more. However, as you will see, every function the old Start menu had lives on in the Start screen, so you will get used to it very fast.
Evolution of the Start Menu
Basically, the Start screen represents an evolution of the Start menu. As a result of this evolution, instead of icons or plaintext, you get the fascinating Live Tiles. If you are familiar with Microsoft’s latest mobile phone operating system (Windows Phone 7), you already have the gist of these. If you are new to the Windows 8 design, they might seem like simply bigger icons. But they can do much more — they can contain rich and changing content!
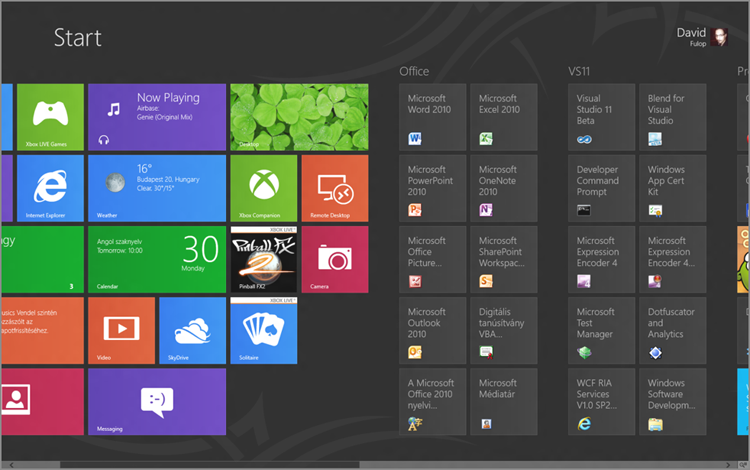
The Calendar Live Tile synchronizes with your online calendars (Windows Live, Hotmail, Exchange, and so on), and presents you with information about your next appointment. When you look at your Messaging Live Tile, you can see how many instant messages are waiting to be answered. On the Weather Live Tile, you can see basic weather information, and the People Tile tells you about status updates for your friends on various social networks. Figure 2-3 shows the Start screen in action.
Figure 2-3: The Windows 8 Start screen

These Live Tiles represent applications and programs, just like the Start menu did before. But they also provide basic information regarding the purpose of the application. So, you don’t even have to start these applications — you just take a glance on your Start screen, and all the important information is available right there.
Of course, it is very likely that you will want to have more Live Tiles than can fit on one screen. The number of tiles placed vertically on your Start screen is adapted to the resolution of your screen, so on a bigger monitor, you will automatically get more rows of tiles. However, your tiles can overflow horizontally. By leveraging this feature, you can place an arbitrary number of Live Tiles on your Start screen. You learn more about placing Live Tiles on the Start screen later in this chapter.
A list control is a basic programming and UI concept that you should be aware of. A list control is a part of an application that represents an arbitrary number of UI elements, usually in a unified manner. Under All Programs in the Windows 7’s Start menu, you can see a basic example of a list control — all your programs represented as icons and simple strings.
The item panel in Windows Explorer is a more complex list control. It can represent the contents of a folder in many ways (small or large icons, details, or a simple list), and it has grouping and sorting capabilities.
List controls may be different from each other, but they share a few common features that every Windows user has become familiar with over the years.
Because the Start screen is a kind of list control, it shares these usability features. If you happen to use a mouse and a keyboard, scrolling the Start screen works just as you would think. There is a scrollbar at the bottom of the Start screen, which you can use to move the view to the left or the right. Just like any list control you may have previously encountered, you can use the wheel on your mouse to scroll the Start screen. Additionally, try to put your mouse pointer on the right edge, and move it to the right. As you can see on Figure 2-4, the view moves to the right.
Figure 2-4: Sliding the Start screen
If you have a touchscreen device, you can leverage the natural user interactions. Just touch the Start screen anywhere (except the very edges of the screen), and slide your finger horizontally. The view follows your gesture.
Although scrolling or sliding the screen can be quite convenient, there is a way to look at all the Live Tiles from a zoomed-out view. The zoomed-out view shrinks your Live Tiles on the Start screen, and lets you see all of them at once. This way you can quickly jump to a point (a particular Live Tile) in lieu of having to scroll through all of them. Figure 2-5 shows the Start screen in zoomed-out view.
Figure 2-5: The Start screen in zoomed-out view

You dive into using and managing Live Tiles, as well as using the zoomed-out view, a bit later in this chapter. However, let’s first see how you can look for apps on the Windows 8 Start screen.
Browsing and Searching for Installed Apps
In a way, your apps define the capabilities of your entire system. Therefore, adding new features and facilities means adding and installing new apps. You could quickly find yourself in a situation where you have more apps than you want to appear on the Start screen as Live Tiles.
Certainly, you will prioritize, and hide (unpin) some apps. Where (or more specifically, how) can you find these apps?
In previous versions of Windows, the Start menu’s All Programs section was the central place to list all the installed software, browse the installed software, and search for a particular application. As stated earlier, every function of the old Start menu lives on in the Start screen — but you won’t find a Live Tile named, “All Programs.”
On the Apps screen, you see groups identified by letters. These contain apps whose names start with the letters in the group’s name. Some of them have a very less-than-expressive name (such as “Windows System”). These groups are like folders in the old Start menu. They contain programs that were installed along with each other, and they are accordingly tied together by some relationship.
The new Apps screen (and its features) helps you to be able to browse in your numerous apps — a fast and fluid experience compared to the old Start menu with one long list.
This is an efficient way to get to the app you have been looking for. Ever since the release of Windows Vista, the old Start menu had a rather splendid trait — searching programs. Upon opening the Start menu, you were presented with a text box, and you just had to start typing. The Start menu filtered its contents. When you knew that you were looking for something specific like the Control Panel, you just clicked Start, typed co, and clicked the Control Panel icon without having to go through a long list.
In Windows 8, you can leverage this familiar workflow, as you see in the next exercise. Also, you learn how to browse applications that have already been installed on your computer or device, and how to pin apps on the Start screen.
Figure 2-6: The “All apps” command in the bottom menu of the Start screen

Figure 2-7: The Apps screen

Figure 2-8: Application groups in the Apps screen

Figure 2-9: The charm bar with the Search command

Figure 2-10: Applications with “co” in their names

Figure 2-11: A selected app icon with the opened context bar

Both the charm bar and the Search function are central features of Windows 8, which you learn about later in this chapter. But now let’s see what you can do with the central parts of the Start screen — Live Tiles.
Using Live Tiles
As you learned earlier, a Live Tile could be considered a shortcut because it represents an application. But Live Tiles aren’t merely grown-up icons. They channel out some of the data consumed by the application to let you be more efficient. You don’t have to open an e-mailing application to see whether you have new e-mails waiting. You just have to take a peek at the app’s Live Tile.
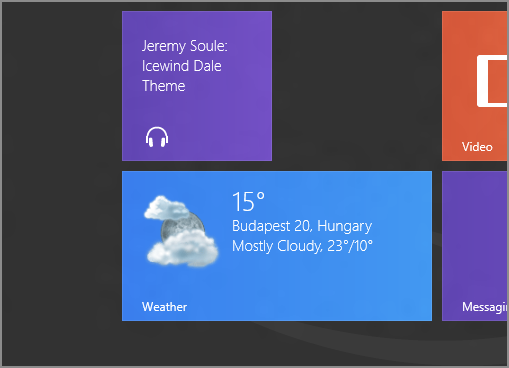
Actually, some applications could have more than one Live Tile. For example, you can tell certain weather apps to pin a Live Tile on the Start screen that shows the weather of one city, and pin another Live Tile to show information on another. This feature is optional, though. The only applications that provide this feature are the ones that were prepared (programmed) to do so.
To start an application, just click its Live Tile (or tap it, if you use a touchscreen device). On most of the Live Tiles, this action causes the app to simply start. But it’s good to know (not just as a developer) that special Live Tiles (secondary tiles) can contain some initialization information for the app. This feature (called deeplinking) allows the user to not just start the application, but specify what part of the app he or she wants to use. For example, if the user pins a Live Tile about the weather of Budapest using the aforementioned weather application, and later starts the weather app through this Live Tile, the app will open and show the forecast on Budapest.
Now, let’s take a look at the basic operations with and on Live Tiles.
The Context Bar of a Live Tile
When you use Windows (or any graphical desktop operating system, for that matter), you are introduced to the notions of context and pop-up menus. These provide extra operations on a graphically represented object — whether that is an icon on the desktop, or the desktop itself. Context menus appear in Windows 8 in a more controlled manner — at least in terms of place and design. When you right-click the Start screen to bring up the context bar, you see Windows 8’s context menu.
Every Live Tile has its own context menu, and, of course, the items residing in those menus may vary a bit. When you bring up the context bar of Windows 8 style apps, you will probably find the following buttons:
- Pin/Unpin from Start — Clicking (or tapping) this button makes the selected Live Tile appear on the Start screen, or disappear from it — as you have already seen in the previous “Try It Out” exercise.
- Uninstall — Clicking or tapping this button erases the app behind the selected Live Tile from your device. You can reverse the effect by installing the app again from the Windows 8 Marketplace.
- Larger/Smaller — Some apps provide two kinds of the same Live Tile — a small, square-shaped one, and a twice-as-big, rectangular one, which provides more information. When a Live Tile is selected, and the app linked to it can have these two sizes of tiles, you will see a button either called Larger or Smaller on the context menu. These let you choose whether you want to use a small or a double-sized Live Tile with this app, but they appear only if the application supports large tiles.
- Turn live tile off/on — This button lets you turn off the notifications on a Live Tile, or turn them on again. When turned off, a Tile shows only a default icon representation of the app. These buttons appear only if the application behind the Tile supports notifications.
Windows 8 style apps are just half of the story. Windows 8 can run traditional Win32/.NET apps, too. When one of these apps is pinned on the Start screen, its corresponding Live Tile isn’t really live; it will not be updated. Traditional software applications currently lack the means to do this. Also, the context bar of these programs will be a bit different.
When bringing up the context bar of traditional apps, in addition to the buttons of context bars for Windows 8 style apps, you will mostly find the following buttons:
- Pin to taskbar — You can use this button to permanently pin this program on the desktop’s taskbar.
- Open new window — Use this button to open a new instance of the application on the desktop.
- Run as Administrator — Use this button to run the application on the desktop with Administrator privileges. Note that you don’t need to be an Administrator to see this button, but upon using it, you will be prompted to type in an administrator’s password.
- Open file location — Use this button to open the folder that contains the executable file for the application in Windows Explorer — and, of course, on the desktop.
As you can see, all of these buttons are related to the Windows desktop. Another difference from Windows 8 style apps is that you won’t find Larger/Smaller and “Turn live tile on/off” buttons on the context bar for obvious reasons. In the next exercise you learn how to use the context bar of a Live Tile.
Figure 2-12: The context bar of the Music Live Tile

Figure 2-13: The Music Live Tile gets smaller
You can select more than one Live Tile with the right-click action or the swipe gesture. When multiple Live Tiles are selected, only the “Unpin from Start” or the “Clear selection” button appears. The latter lets you deselect all the selected Live Tiles. To clear the selection of a single Live Tile, right-click the Live Tile again, or swipe it again.
Relocating Live Tiles
Live Tiles reside on the Start screen in a clean, ordered fashion. A column of tiles is comprised of two small (square) Live Tiles, and when tiles reach and occupy the final row (determined by the screen resolution), the next tile is placed in a new column.
To provide and maintain a consistent and familiar experience when using any Windows 8 device, the operating system will not allow anyone to change this layout mechanism. Customization, however, is well within reach. Apart from the actions previously described, users are able to assemble Live Tiles into groups, or simply transpose them to change the ordering.
Let’s try changing the ordering.
Figure 2-14: Relocating a Live Tile

Live Tile Groups
As you might have already noticed, Live Tiles on the Start screen are divided into groups. This grouping is very subtle. The only thing that gives it away is the bigger horizontal space between two columns of Live Tiles. Also, groups can have their own names, which are shown above the Live Tiles.
Creating a Live Tile Group
Creating Live Tile groups is fairly easy, but, oddly, you won’t find a command button for this task on the context bar. When you drag a Live Tile to a new location, and the Live Tile hovers between two groups, a thick, light gray horizontal line appears. If you release the dragged Live Tile, it becomes the first item in a new Live Tile group.
Using Live Tile Groups
When you create a new Live Tile group, it has no name. If you want to give a name to the group, or you want to place it somewhere else among the other groups, you can enter the zoomed-out view of the Start screen. In this view, you see all the Live Tiles and groups at once. You cannot select individual Live Tiles in this overview, but you can select the groups (one at a time). Selecting a group opens up the context bar on the bottom of the screen with one command that reads “Name group.” Selecting this command lets you add a name to the group, or modify it if it already exists.
Rearranging groups works somewhat similarly to relocating Live Tiles. In the zoomed-out view, you can select a Live Tile group, and drag it to where you want to place it. As you drag the group, the other groups move away to make space for the dragged one.
Figure 2-15: Creating a Live Tile group

Figure 2-16: Zoomed-out view

Figure 2-17: Renaming a Live Tile group

Figure 2-18: Arranging Live Tile groups
Using Windows 8 Style Apps
Windows 8 and Windows 8 style apps are designed to be controlled easily with a mouse or with the touchscreen, too. There are a few (multi-) touch gestures with which you can accomplish specific tasks with — such as closing an app or switching between apps. Therefore, some differences exist between using Windows 8 style apps and using the good old Windows desktop and programs running on it, and you must be aware of these differences.
Closing a Windows 8 Style App
First of all, you can’t really close a Windows 8 style app (unless, of course, you kill by using code, or by using the Task Manager). You can tell the operating system that you’d like the running application to be closed, but it won’t release the app for a while.
This is mostly unimportant from a “how to use Windows 8” perspective, but as a result of this and several other design decisions, Windows 8 style apps don’t have a close button. In fact, they don’t have a frame, a header, or anything that could be considered chrome. (Microsoft usually refers to things in the design that have no function as chrome.)
Furthermore, Windows 8 style apps have no window; they are always full screen — except when used in split screen, but let’s not get into that just yet. Therefore, closing a Windows 8 style app could be difficult at first, because most of these apps won’t have a close button.
To close a Windows 8 style app, you can use a simple gesture that can be done with one finger or with the mouse. If you grab the “header” of the application (that is, the top few pixels of the screen), and drag it down to the bottom edge of the screen, the app closes, and you are thrown back to the Start screen.
It’s really easy to use this gesture, and you should build your apps according to its implications. Don’t place buttons or any other command controls too near to the top edge of the app. If it is not necessary, don’t incorporate a “close” button in your app, because the users will be accustomed to using the gesture described previously.
Switching between Windows 8 Style Apps
What happens if you want to switch to another Windows 8 style app when using one? When you run a Windows 8 style app, it consumes all the pixels on your screen. There is no taskbar in Windows 8, so you can’t just click the app’s icon.
If your computer has a keyboard, you can use the old Alt+Tab or Windows key+Tab shortcuts to switch between apps. To do this with the mouse entirely, or to do this on a touchscreen device, you have to learn about another mouse movement or another gesture.
If you want to switch between Windows 8 style apps using a mouse, move the mouse to the top-left corner of the screen. The thumbnail picture of the app previously used will appear. If you click it, the current app goes to the background, and switches places with the last used one. If you don’t click it, but move the mouse pointer down along the left edge of the screen, a black stripe appears, and on this stripe, every Windows 8 style app that runs in the background appears. You can click any of them to bring that one app to the screen.
If you use a touchscreen device, the method of switching apps is somewhat different. If you want to switch between apps, use the “swipe from the edge” gesture on the left side of the screen. The thumbnail picture of the previous app will appear. If you keep dragging this picture with your finger, and release it somewhere on the screen, it becomes active and full-screen again. With this gesture, you can go through all the running Windows 8 style apps.
To choose the exact app you want to switch to, use the “swipe from the edge” gesture on the left, and when the previous app’s thumbnail appears, swipe it back to the edge. This opens the same black sidebar that you can see when using the mouse to access the running apps. When the apps sidebar is open, you can release the screen, and the sidebar will stay open. Then, just tap the app you want to reactivate.
Using Multiple Windows 8 Style Apps at the Same Time
It is very likely that you will want to run two apps at the same time without having to switch back and forth between them. To support this very common scenario, Windows 8 style apps have three visual states.
Apart from the full-screen state that is the default, apps can be “filled” or “snapped.” When you want to use two apps at the same time, one of them can be snapped, meaning it consumes only a small portion on one side of the screen. Meanwhile, another Windows 8 app can be filled, which means it takes up the rest of the space. By clicking or tapping and holding the narrow line between a snapped and filled app, and dragging the separator horizontally, you can make the apps switch their state (one from snapped to filled, and the other vice versa). Or, if you drag the line all the way to the edge of the screen and then release it, the app that was behind the line will be closed.
In the following “Try It Out” exercise, you will see these features in action by using their corresponding mouse- or touch-gestures.
Figure 2-19: The sidebar shows the running Windows 8 apps

Figure 2-20: Filled-state Windows 8 app on the left, Snapped-state Windows 8 app on the right

Figure 2-21: The open charm bar

The Windows Charm Bar
A few common tasks of the operating system need a central place to be easily accessible at any time. These tasks include things like getting back to the Start screen (akin to pressing the Windows button in previous Windows versions to open the Start menu), searching, switching between apps, and managing devices or settings. Moreover, because Windows 8 style apps fill the entire screen, these functions must be invisible, but still readily accessible.
As you have learned, app switching is tied to the left side of the screen. Gestures performed on the top edge are related to closing an app, or changing its size between the three layout states. The bottom edge of the screen is used to bring up a command or context bar. That leaves only the right edge to contain all the important operating system functions that are yet to be placed.
Introducing the Charm Bar
No matter whether you are on the Start screen, working in a Windows 8 style app, or on the desktop, if you move the mouse to one of the right corners of the screen (or use the “swipe from the edge” gesture on the right side of it), five buttons will appear on the right side. This is the charm bar.
The charm bar is sort of a central hub you use to work with your apps and with the operating system in general. It always contains the same five buttons — Start, Search, Share, Devices, and Settings — and it’s always there, one swipe or mouse move away. Applications cannot override this behavior.
Figure 2-21 shows the Start screen with an open charm bar.
Also, when you open the charm bar, a little information box appears on the lower-left side of the screen that tells you the current date and time, the strength of the network signal, and the remaining battery strength.
The Start Button
With its central position and different color from all the other buttons, the Start button really stands out as something special. Given the important function of the Start button in previous Windows versions throughout history, this is quite understandable. Note that, in Windows 8, there is no permanent Start button on the screen, and if you have a touchscreen device that lacks a hardware keyboard, without this button you have no means to return to the Start screen.
When you click or tap the Start button while using some app, it opens the Start screen. When you click or tap it again (while the Start screen is open), you are returned to the last app you used. This may seem like a somewhat different behavior from the previous Windows versions, but it is exactly the same. The difference actually lies in the new Start screen. It takes up the whole screen, not just a small portion of it like the Start menu did. But the app you were running when you clicked or tapped Start keeps running in the background; it is not suspended.
The Search Button
Finding files or apps on the PC or the device quickly is really important. Windows Vista made it quicker by placing a search box in the Start menu itself. In the earlier “The Start Screen” section and in its corresponding “Try It Out” exercise, you learned how to use this feature to find apps. But Windows 8 can do more!
When you bring out the charm bar, and click or tap the Search button, you’ll get to the app search page you saw earlier. By default, Windows will look for apps that contain the text you type in their names. But, below the text box you type into, you can see three buttons: Apps, Settings, and Files. As you type, numbers appear on these buttons. These numbers tell you how many apps, Windows settings, or files have the text you typed in their names, and how many files contain the text you’re looking for.
The Search screen shows only apps as you type, but when you click or tap the Settings or Files button, apps disappear, and you are presented with the filtered list of Windows settings or files. When looking for files, even categories show up on the top of the Search screen to help you speed up your search. Figure 2-22 shows the Search screen in Files mode.
When you build a Windows 8 app, you can set it up as a search provider. This means that the app is working with data that can be searched from outside the app — from the Windows Search screen. Provided that you indicated to Windows that your app can search in its data, Windows will enable you to search the app’s data without having to start the app first.
Under the three main buttons are the apps that indicate to Windows that they have a search function inside them. When you click (or tap) one of these icons, the corresponding app is started, and you are immediately presented with the search results inside that app.
Figure 2-22: Searching files

The Share Button
Sharing information — links, documents, and so on — has become an everyday task over the past decade. Usually, this requires starting an app that “has” the information (like a browser that can open a specific web page), then starting another app that can be used to communicate with others (like an e-mail-client), then setting up the sharing method (creating a new e-mail), and copying the information from one app to another.
With Windows 8, this commonplace task becomes part of the system, which, in turn, simplifies it to save you time and effort. The Share button on the charm bar can be used in an app that can share data with other apps, to bring up a sidebar that enumerates the apps that accept this data. Clicking or tapping on one of the apps brings up that app, and immediately sets up everything it can, to be able to share the information with someone as quickly as possible (like creating an e-mail, and setting the sender and the message body).
In the following exercise, you can see how easy this is.
Figure 2-23: Apps that can accept the data provided by IE

Figure 2-24: Sharing the data from IE using the Mail app

The Devices Button
PCs and tablets aren’t standalone, monolithic hardware. They almost always can connect to some kind of peripherals — external monitors, input devices, docks, and so on. Desktop PCs have a constant set of these most of the time, because they aren’t moved a lot. Laptops and tablets, on the other hand, are mobile devices, and they might be used in different environments all the time. Different environments could lead to different peripherals. If you use your laptop while travelling, you use it all by itself, but when you arrive back at your office, you’ll probably connect a mouse and a second screen to it.
The Devices button lets you access these connected external hardware devices in one central place. You don’t have to go to the Control Panel or My Computer to see the devices. Just open the charm bar, and click or tap on the Devices button to see a list of them.
The Settings Button
Figure 2-25: The Settings bar
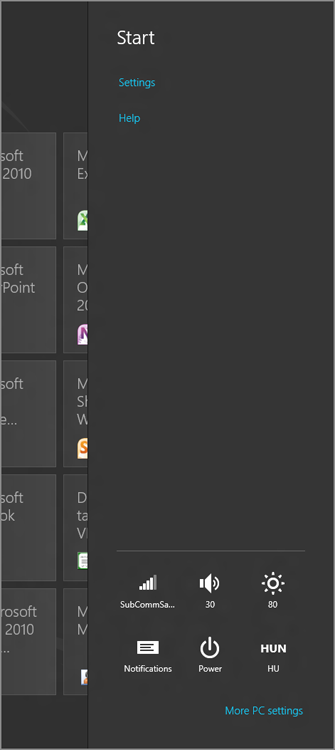
The last button on the charm bar is “everything else” that is useful in the everyday use of your device. When you click or tap on the Settings button, the Settings bar opens. This contains slightly different things when opened from Windows 8 (that is, when opened from the Start screen, or while using a Windows 8 app), than when opened from the desktop. (You learn more about the desktop shortly.) Figure 2-25 shows the Settings Bar opened in Windows 8 mode.
On the lower end of the Settings bar you will find six icons. From left to right (and from top to bottom), these include the following:
- Network — This indicates whether your PC or device has an active local area network (LAN) or Internet connection, and the signal strength (when using Wi-Fi). Clicking or tapping it opens the Networks sidebar that you can use to connect to networks.
- Volume — This shows the volume setting of the speakers or headphones attached to the computer. Clicking or tapping it opens the volume slider, which you can use to adjust this setting.
- Brightness — This shows the brightness setting of the screen, if available. Clicking or tapping this icon opens the brightness slider, which you can use to adjust this setting.
- Notifications — Some applications (and Windows 8 itself) can create pop-up (or toast) notifications. These are little boxes that appear on the screen with some information, and they disappear after a few seconds. By clicking or tapping this button, you can enable or disable these notifications to stop all the apps that might be disturbing you.
- Power options — Click or tap on this button to shut down, restart, hibernate your PC, or send it to sleep mode. Available power options may vary, depending on various other settings or policies.
- Keyboard locale — This icon indicates the current locale and layout of the software and hardware keyboards. Click or tap on this button to switch to another keyboard layout.
Under these six buttons is a link that reads “More PC settings.” If you click or tap on it, the PC Settings app opens. Here you can manage the most important settings of your computer.
The Settings bar can function as a settings page for your app. You can add custom content to it, and by using these, the user can manage the active app’s settings.
The Windows Desktop
As you learned in Chapter 1, Windows has a very long history — one that dates back to the early 1990s. Microsoft has always kept backward compatibility as a primary goal when releasing new incarnations of its operating systems. Windows 8 changes a lot of things with its Windows 8 UI, Windows 8 style apps, and turning the Start menu into a full-screen Start screen. After logging in, you were always presented with the Windows desktop — the place where all the programs run in separate windows. Now, in Windows 8, you are immediately sent to the Start screen. What happened to the desktop, and what about the non-Windows 8 apps you used to use?
Introducing the Desktop App
On the Start screen, you’ll find a somewhat unique app, called the Desktop app. When you click or tap it, you get to the good old Windows desktop that hasn’t changed too much since Windows 7. Note that if you unpin it for some reason, you can always pin it back from the Apps search page. See the earlier section, “The Start Screen,” for more information.
It is imperative to understand that the Desktop app itself can be treated like any other Windows 8 app! You can close it by pulling it down. You can make it snapped or filled, and it’ll show up as any ordinary app on the apps sidebar on the left side of the screen when you open the sidebar. What makes it special is that it runs all the legacy desktop apps created for previous Windows versions, and all the non-Windows 8 apps created for Windows 8. Figure 2-26 shows the Desktop app in filled-state while another Windows 8 app is taking the snapped position.
Apart from starting the Desktop app itself from the Start screen, there is another way to switch to the Windows desktop. When you start a non-Windows 8 app in Windows 8, that app immediately starts the Desktop app. This is quite reasonable, because without this behavior, starting non-Windows 8 apps would result in a lot of running (but inaccessible) desktop apps.
If the Desktop app is closed, all the desktop programs it was running are kept running in memory. Nothing will happen to them; they are just inaccessible until you re-open the Desktop app.
Figure 2-26: The Desktop app and another Windows 8 app sharing the screen

Switching between Desktop Programs
If you have a keyboard, you can switch between all the programs (Windows 8 and non-Windows 8 apps as well) by pressing and holding the Alt key, pressing the Tab key repeatedly, and releasing the Alt key when you reach the app or desktop program you want to use.
On a touchscreen device that lacks these keys, you can just bring the Desktop app to the foreground, and tap an application’s icon on the taskbar. Of course, mouse users can do the same by clicking the icon, just like in older Windows versions.
Desktop apps won’t show up on the apps sidebar on the left side of the screen, only the Desktop app itself that runs them.
Where Is the Start Button?
In Windows 8, Microsoft decided to break the tradition of putting a Start button on the bottom-left corner of the screen. But this doesn’t mean you have to learn a new workflow to open the Start screen.
Between the left edge of the screen and the leftmost icon on the taskbar, there is always a small empty space. When you move the mouse cursor to this bottom-left corner of the screen, the thumbnail of the Start screen appears. Click it to open the Start screen. It’s really not that different from what you’ve done in previous Windows versions.
Of course, pressing the Windows key on a keyboard results in the same effect.
For touchscreen users, the previously described options are available to open the Start screen from anywhere, including the Desktop app. You can open the charm bar by swiping the right edge of the screen, and then just tap on the Start button. Or, you can swipe the left edge to open the app bar, and then tap the Start screen thumbnail in the bottom of the sidebar.
Summary
With Windows 8, you can harness the power of a new breed of applications and infrastructural services. Windows 8 applications provide a way to build tablet-friendly applications while preserving all the advantages of traditional desktop software. With the aid of Windows 8, you can build apps that will run on a wider spectrum of devices — desktops, laptops, and tablets. By leveraging multi-touch gestures and mouse gestures, the functionality of corners and edges, share, and search contracts, you can build more intuitive applications — but this comes at a price. As a developer, you must know how to use the UI effectively, either with mouse or with a touchscreen.
The purpose of the Start screen is not just to serve as a full-screen Start menu. Users are more likely to pin an app on the Start screen if its Live Tile continually provides them with useful information.
The charm bar is a central place where users look for features like searching and sharing things. If an app provides searching and/or sharing functions, it is a good practice to provide these by hooking up the app to the Search and Share hubs on the charm bar.
In Chapter 3, you learn a few internal details about the architecture of Windows 8 to understand what components help you build Windows 8 style applications.
Exercises
What You Learned In This Chapter
| Topic | Key Concepts |
| Multi-touch gestures | The tap, press-and-hold, slide, swipe, pinch, swipe from the edge, and rotate gestures let the user interact with an app more intuitively and naturally when using a touchscreen device. |
| Login modes | Although the traditional password login is still available, you can use a four-digit personal identification number (PIN) password and a more touch-friendly picture login, too. |
| Start screen | This is the descendant of the old Start menu. This is the central screen to work with your PC or tablet. |
| Live Tile | A Live Tile is a shortcut to an app, but it can show information that is continuously updated from the background, even when the corresponding app is not running. Live Tiles reside on the Start screen, and can be grouped. |
| Apps sidebar | You can open the Apps sidebar on the left side of the screen, and it shows all the currently running Windows 8 apps. |
| Full screen, snapped, filled | Windows 8 apps can have these three layout states. The screen of the device can accommodate one full-screen app, or a snapped and a filled one. The snapped app resides on either side of the screen, and can provide full functionality, despite the smaller size. The filled app takes all the remaining screen space left by the snapped app. |
| Charm bar | The charm bar is a central place in Windows 8 that you use to do common tasks. Here you can find the Search and the Share buttons, which serve as hubs for apps providing searching or sharing features, respectively. The Start button is also placed in the charm bar. |
| Share | This button on the charm bar provides you with the option to send data from one app to another. |
| The Windows desktop | This is the place where all the non-Windows 8 apps reside and run. It still has a central and crucial function on desktop and laptop PCs, and is accessible by starting a non-Windows 8 app, or by starting the Desktop app itself from the Start screen. |