
Chapter 14
Advanced Programming Concepts
WHAT YOU WILL LEARN IN THIS CHAPTER:
- Understanding the scenarios in which solutions using more than one programming language (hybrid solutions) are advantageous
- Getting acquainted with the role and implementation of background tasks in Windows 8
- Learning how to query for the capabilities of internal and external input devices connected to your computer
WROX.COM CODE DOWNLOADS FOR THIS CHAPTER
You can find the wrox.com code downloads for this chapter on the Download Code tab at www.wrox.com/remtitle.cgi?isbn=012680. The code is in the Chapter14.zip download and individually named, as described in the corresponding exercises.
As the title suggests, in this chapter you learn several concepts that enable you to develop more advanced Windows 8 apps. By now, you should be familiar with all four Windows 8 languages (C++, C#, Visual Basic, and JavaScript). In previous chapters, you used them as exclusive choices to implement apps. Here you learn how you can mix these languages to provide an optimal solution in terms of productivity, user experience, and performance.
In Windows 8, for the sake of providing the best available user experience, only the application in the foreground receives resources from the system. Applications in the background (that is, suspended apps) cannot run code. However, in some situations even the suspended apps should have a connection with the external world, such as checking new e-mails, downloading information from the Internet, and so on. Windows 8 provides the concept of background tasks, as described in this chapter.
Windows 8 supports many input devices. A great app is prepared to use different input devices, depending on availability, device features, and on the user’s choice. In this chapter, you learn how to query about input device capabilities so that you’ll be able to provide the best user experience in your apps.
Building Solutions with Multiple Languages
In previous chapters, you learned about peculiarities for each Windows 8 programming language. You already know that HTML and JavaScript are great for utilizing your existing web programming knowledge. C# and Visual Basic are great with XAML, especially if you already have Silverlight and/or Windows Presentation Foundation (WPF) experience. C++ is about performance and direct access to system resources.
When you’re about to design an application and prepare the development project, one of your most important decisions is the choice of a programming language. It is often difficult to choose the best trade-off when selecting the right language for a certain application, because you have multiple choices. For example, say that you would like to create a web-page like application and use your HTML/JavaScript knowledge, but you still have a large amount of the existing codebase written in C#. Or, say that you must create a very fast algorithm with a great user interface (UI), and you know C# and XAML, but you guess C++ Accelerated Massive Parallelism (AMP) would provide the best solution.
Well, you are not tied to a single programming language when creating Windows 8 apps! You can create solutions that allow the mixing of programming languages. If you have an existing codebase, you can reuse it with minimal effort. You can decompose your application into components, and you can use different programming languages for each of them. Visual Studio 2012 supports the mixed-language model.
Hybrid Solutions
Solutions using multiple programming languages are often referred as hybrid solutions. A Visual Studio hybrid solution contains at least two projects with two different programming languages. Of course, a single Visual Studio project may use only one programming language, because the project is the smallest physical compilation unit. However, each project can use already built binary components that can be created with another language.
An application generally can be decomposed into software layers. Following is one possible separation:
- The UI layer of the application — This layer is responsible for rendering and displaying the UI, and allowing user interactions (including navigation).
- The application logic layer — This layer implements the logic (workflows, algorithms, and rules) of your application, generally using a more detailed component model.
- Data and service access layer — This layer provides access to the data and services used by your app. Either data or services can belong to your application, or can be provided by third parties.
- Device access layer — In certain cases, you must access special devices (such as bar-code readers, security devices, special hardware, and so on) from your application.
You can choose a separate programming language for each software layer. Moreover, if you have more than one physical component in one layer, you can implement each component in its own programming language.
If you actively use .NET Framework, you already know that assemblies written in separate .NET languages can easily refer to each other. In a Visual Studio solution, you can add a project (written in Visual Basic) as a referenced project to another one (written in C#), and so types and operations in the referenced project can be accessed in the host project. For example, a C# project can invoke an operation implemented in a Visual Basic project.
The Windows 8 programming languages are more diverse. C++ is compiled to CPU-specific code. .NET languages use an intermediate language that is compiled to machine instructions only when running the application. JavaScript provides a third approach, because it has its own run-time engine. How is it possible that such dissimilar languages can cooperate and access each other’s objects and operations?
The answer is Windows Runtime. Each programming language is capable of consuming Windows Runtime objects. If you want to utilize a component in any other language, expose the functionality through Windows Runtime objects! With Visual Studio, it is fairly easy.
Creating a Hybrid Solution with C# and C++ Projects
To learn how to work with hybrid solutions, let’s create a very simple Windows 8 app that displays prime numbers between 1 and 5,000. Assume that you are expected to create an app with great performance that still uses low memory. You decide to use the Sieve of Eratosthenes to collect prime numbers between 2 and an upper-bound value that can be specified by the user. If the upper-bound value is n, this algorithm uses an array of n Boolean values. You choose C++, because it provides the best performance, and you can also be frugal with the memory representing eight flags in a single byte. However, you are a seasoned C# developer, so you decide to create the UI of this Windows 8 app in C#.
In the following exercise you start with a prepared sample, which you can find in the CSharpHybrid Start folder within the Chapter14.zip download. This project contains the skeleton of the UI, and you extend it with a C++ project that implements the Sieve of Eratosthenes.
Figure 14-1: Creating a new project with the C++ Windows Runtime Component DLL template

Figure 14-2: Referencing the PrimeNumbers project from CSharpHybrid

Figure 14-3: PrimeNumbers among the references of CSharpHybrid

Figure 14-4: PrimeNumbers.dll with the related .winmd file

Figure 14-5: IntelliSense offers the PrimeNumbers continuation
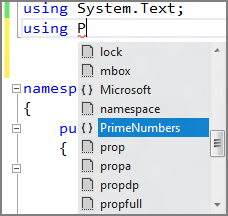
using PrimeNumbers;Your hybrid project’s skeleton is ready, but you must implement the prime number collection algorithm, and integrate it with the UI.
Creating and Consuming Windows Runtime Components
Windows Runtime components can be consumed from any Windows 8 language. So, if you want to create reusable artifacts that can be utilized from any Windows 8 app independently of the programming language implementing a particular application, implement them as Windows Runtime components. You can use C++, C#, and Visual Basic for this purpose, but, because of its nature, you can’t create these components in JavaScript.
Windows Runtime components are compiled into a .dll file, and the build process always generates a .winmd (Windows Metadata) file that exposes information about the public types of the component library. Although you can use this internally at any time in your Windows Runtime component projects, restrictions exist about types and members you intend to publish.
These restrictions are specific to the programming language used to implement the component. However, the most important rule is that public types and their members (including fields, properties, operations, parameters, and return values) must be Windows Runtime types — and it’s independent from the language used.
Fortunately, the build process always raises an error when you’re trying to expose an invalid type or member on the public interface of a Windows Runtime component. If you experience unusual errors and warnings for code that otherwise (compiled as a non-Windows Runtime component) are not raised, there is a high likelihood that you have violated a restriction.
In the next exercise, you implement the PrimeNumbers component you prepared in the previous exercise.
#pragma once
#include <collection.h>

namespace PrimeNumbers
{
    public ref class Prime sealed
    {
    public:
        Prime();
        Windows::Foundation::Collections::IVectorView<unsigned long long>^
            GetPrimes(int upperBound);
    };
}#include "pch.h"
#include "WinRTComponent.h"
#include <cmath>
using namespace PrimeNumbers;
Prime::Prime() {}
Windows::Foundation::Collections::IVectorView<unsigned long long>^
Prime::GetPrimes(int upperBound)
{
// ~DH- Create an array of bits and initialize all of them to 1
int length = upperBound/8 + 1;
char* numberFlags = new char[length];
for (int i = 0; i < length; i++) numberFlags[i] = (char)0xff;
// ~DH- Use Sieve of Eratosthenes
int seekLimit = (int)sqrt(upperBound);
for (int i = 2; i <= seekLimit; i++)
{
if (numberFlags[i>>3] & (0x80 >> i % 8))
{
for (int j = i + i; j < upperBound; j += i)
{
numberFlags[j>>3] &= ~(0x80 >> j % 8);
}
}
}
// ~DH- Collect prime numbers
std::vector<unsigned long long> primeNumbers;
for (int i = 2; i < upperBound; i++)
{
if (numberFlags[i>>3] & (0x80 >> i % 8)) primeNumbers.push_back(i);
}
return (ref new Platform::Collections::
Vector<unsigned long long>(move(primeNumbers)))->GetView();
}using Windows.UI.Xaml.Controls;
using Windows.UI.Xaml.Input;
using System.Text;
using PrimeNumbers;
namespace CSharpHybrid
{
public sealed partial class MainPage : Page
{
public MainPage()
{
this.InitializeComponent();
}
private void DisplayPrimesButton_Tapped(object sender,
TappedRoutedEventArgs e)
{
var builder = new StringBuilder("Prime numbers between 1 and 5000:
");
var primes = new Prime().GetPrimes(5000);
bool appendComma = false;
foreach (var prime in primes)
{
if (appendComma) builder.Append(", ");
builder.Append(prime);
appendComma = true;
}
OutputText.Text = builder.ToString();
}
}
}Figure 14-6: The CSharpHybrid project in action

Hybrid solutions are very useful, because they provide a way to combine the best features of Windows 8 programming languages into a great application. In the next section, you learn how to harness your application with background tasks that may run automatically, even if your app is not in the foreground.
Background Tasks
As you already learned in Chapter 9, Windows 8 introduces a new model of application behavior. Windows 8 apps are in the foreground while the user interacts with them, and they get the system resources to provide great user experience with continuous responsiveness. However, when an application is not in the foreground, it is suspended, and cannot run any code. When the user again brings the application into the foreground, the app can continue its work. In some situations, a suspended app is terminated because of limited system resources. This model ensures that the user experience is not impacted by delays or lags, because applications running somewhere in the background cannot gobble up resources.
However, sometimes suspended apps still must be able to communicate with the outside world. For example, a mailing app must be able to check your inbox, even if it is not in the foreground. Moreover, this mail app should be able to display the number of new messages when you see the Windows 8 lock screen, without explicitly starting the app.
Several mechanisms in Windows 8 make an app update its content even when the app is not in the foreground (that is, when it is suspended):
- You can play audio in the background with Playback Manager. (For more information on developing audio-aware apps and using Playback Manager, see http://msdn.microsoft.com/en-us/library/windows/apps/hh452724.aspx.)
- With the Background Transfer API, you can download and upload files in the background. (The article on the MSDN page at http://msdn.microsoft.com/en-us/library/windows/apps/hh452979.aspx will help you use this feature.)
- You can keep the app tiles updated with push notifications, as you learned in Chapter 9.
These mechanisms are optimized for system performance and battery life, but they are specialized for a particular kind of task. Windows 8 also offers the capability to create background tasks. With them, suspended applications can run their own code to execute tasks and keep the suspended application’s content up-to-date.
Understanding Background Tasks
Most developers know that the Windows operating system has a concept called Windows services to run background tasks. Many components of the operating system run in Windows services, and a lot of programmers develop Windows services as a part of their systems. Well, Windows services are still available in Windows 8, and they are still a fundamental part of the operating system. So, the obvious question is why does Windows 8 have a separate concept for background tasks?
Windows services are kings in their own fiefdoms, and although the operating system has full control over them, they can devour system resources. They exist to implement heavy background processing tasks, such as parsing and executing SQL queries, compressing files, providing a web server, and so on.
In contrast to Windows services, background tasks are lightweight constructs that use a limited amount of system resources to carry out a certain chore. They are primarily designed for real-time class applications, such as chat, e-mail, voice over IP (VOIP), financial dashboards, weather displays, and so on.
Background Tasks and System Resources
Because of the limited amount of system resources, you should use background tasks for small task items that do not require user interaction, and provide only the necessary minimal effort to keep an application up to date (such as downloading new e-mails, sending a chat message typed in by the user, or downloading ticker information from a stock exchange portal). Compressing an image taken by a tablet’s camera, or executing heavy and time-consuming mathematical operations, are definitely not for background tasks.
Background tasks can interact with the Windows 8 lock screen. This is very important from the point of view of a user’s experience, because the lock screen is a perfect place to catch the user’s attention. For example, displaying the number of unread e-mails, incoming chat messages, friend requests from a social portal, and so on, can shepherd the user immediately to the relevant application without having to browse applications one by one just to see what’s new.
How Background Tasks Work
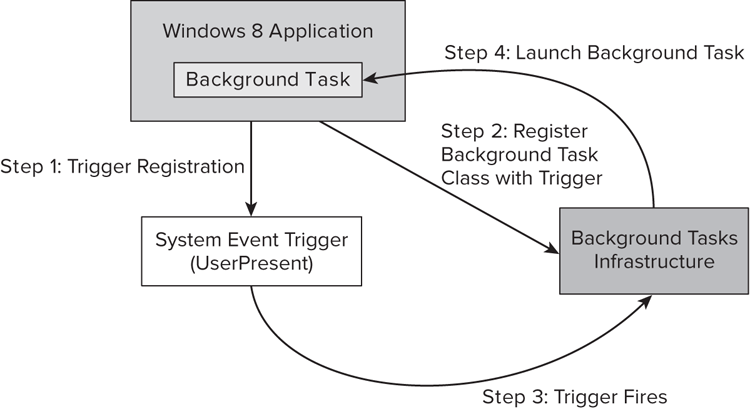
A background task can run while the application is suspended. But, if the application is suspended, it cannot run any code. So, how does a background task know when to run? Of course, the suspended application cannot start it! Background tasks are run by the operating system. They are tied to a trigger that signals the task to run, and they can be tied to an optional set of conditions, too.
For example, there is a trigger called UserPresent. This trigger represents the event when a user logs in to the computer, or returns from a break while there was no user activity on the computer for a while. Combined with this trigger, the InternetAvailable condition means that the background task will start as soon as a user is present and the Internet is available. If the user returns to the computer, but the Internet is not available, the background task will not launch.
Of course, the operating system must know that an application has one or more background tasks, and it also must know the trigger and conditions the specific task is bound to. It is the responsibility of an application to negotiate with the operating system the scenarios concerning its own background tasks. As shown in Figure 14-7, the whole process takes the following steps:
Figure 14-7: Registering and triggering a background task
Trigger Events and Task Conditions
The Windows 8 background task infrastructure defines more than a dozen trigger events. Most of them are system event triggers. Following are a few of them:
- UserAway — The user is away (for example, he or she leaves the computer while having a coffee break).
- UserPresent — The user is present (for example, he or she returns from the coffee break, unlocks the device, and resumes working).
- TimeZoneChange — The time zone changes on the device (for example, when the system adjusts the clock for daylight saving time, or the user changes the current time zone in the Control Panel).
- NetworkStatusChange — A network change occurs, such as a change in cost (for example, moving from the wireless company network to a paid cellular network) or connectivity (for example, the Internet becomes unavailable).
Table 14-1 summarizes the roles of a few other trigger events.
Table 14-1: Special Trigger Events
| Trigger Name | Description |
| TimeTrigger | Represents a time event that triggers a background task to start. |
| PushNotificationTrigger | Represents an event that invokes a background task item of the app in response to the receipt of a raw notification (that is, a push notification that does not involve the UI). |
| ControlChannelTrigger | Enables real-time communication to be received in the background for several network transports, primarily the ones in the Windows.Networking.Sockets namespace. |
| MaintenanceTrigger | The operating system periodically executes maintenance tasks, provided that the system is on AC power. This event is raised when such background tasks should be launched. |
When registering a trigger, you can optionally add conditions, as summarized in Table 14-2.
Table 14-2: Background Task Conditions
| Condition Name | Satisfied When |
| InternetAvailable | The Internet is available. |
| InternetNotAvailable | The Internet is unavailable. |
| SessionConnected | The session is connected. |
| SessionDisconnected | The session is disconnected. |
| UserNotPresent | The user is away. |
| UserPresent | The user is present. |
The Lock Screen and Background Tasks
Users can add applications to the lock screen, and these applications can display important status information (such as the number of unread e-mails, the number of chat messages, the number of newly connected friends, and so on). By placing these applications on the lock screen, the user indicates that those applications are especially important for him or her.
Background tasks are the keys to communicating between the lock screen and the apps. The application for which particular status information is displayed may not run when the user sees the lock screen, so adding the background task to the lock screen is the way to display up-to-date information in real time.
Certain triggers are restricted to only applications on the lock screen. If an app that is not on the lock screen tries to use such a trigger, the background task will not be launched, even if the event is triggered. All triggers except SystemTrigger and MaintenanceTrigger require the app to be added to the lock screen. This means, for example, that you cannot use a TimeTrigger to periodically execute a background task, unless the app is assigned to the lock screen.
The BackgroundTaskHost.exe Program
As mentioned previously, background tasks can be triggered even when their host application does not run. This means that these tasks should be hosted in such a way so that the operating system can manage them separately from their owner app (in other words, from the app that the tasks provide services for).
Background tasks are implemented in a class library, and this class library can run either within its main application, or in a system-provided executable, BackgroundTaskHost.exe. When you create your application, in the package manifest file, you must declare the host to let the system know your intention. However, several rules exist for background task trigger types and host processes:
- Tasks registered with TimeTrigger, SystemTrigger, or MaintenanceTrigger must be hosted in BackgroundTaskHost.exe.
- Tasks listening with ControlChannelTrigger can run only in the hosting application.
- Background tasks working with PushNotificationTrigger events can be hosted either in the main app, or within the BackgroundTaskHost.exe.
Communicating between Foreground Applications and Background Tasks
Background tasks can communicate with the main application in two ways:
- The progress of the background task can be reported back to the application.
- The application can be notified about the completion of tasks.
Both mechanisms assume that the main application is running in the foreground; otherwise, notifications coming from the background tasks cannot be caught by the main app. These notifications are implemented as events, so event handlers must be used in the foreground app to respond to them. These event handlers are generally used to update the UI.
Because background tasks may run even when the foreground application is terminated, there is a mechanism to rebuild the event handlers when the foreground application starts. The app in the foreground can query its own background tasks and re-associate the completion and progress event handlers.
Canceling Background Tasks
In some situations (such as a low battery level, disconnected network, and so on), the system can cancel a background task. To save battery power and CPU bandwidth, canceled tasks should finish their own work as soon as possible, and they also have the opportunity to save their state. To receive cancelation notifications, background tasks should register a cancelation event handler. A task must respond to this cancelation notification — and return from the handler — in 5 seconds; otherwise, the application gets terminated.
A well-behaving application uses the cancelation notification to save its state, so that later, when the background task is launched again, the task can continue from the saved state.
Application Updates
Background tasks are registered in the system so that they persist across application updates. This registration contains the entry points of these tasks by means of the full name of a Windows Runtime class responsible for servicing the task. However, when an application is updated, there is no guarantee that the background task that existed in the previous version still exists in the updated version, too.
Applications can register a background task for the ServicingComplete trigger (it’s a type of SystemTrigger) to be notified when the application is updated. When the notification arrives, the application can unregister those background tasks that are no longer valid in the new application version.
Now that you have learned all basics required to create background tasks, the best way to proceed with this knowledge is to try it out in a few exercises.
Implementing Background Tasks
A background task is a Windows Runtime object that implements the IBackground interface located in the Windows.ApplicationModel.Background namespace. Background tasks are declared in the application manifest, where the full name of the Windows Runtime type is passed as the task entry point. A task is registered with its entry point, and from this registration, the system knows exactly where to find and launch that task.
Creating a Simple Background Task
In the following exercise, you learn the basic steps for creating and using a background task. You create a task that is triggered when the Internet connection becomes available, and reports it back to the foreground application. To implement this task, you use the InternetStatusTaskSample - Start solution, which you can find in the Chapter14.zip download.
Figure 14-8: Background Task manifest properties

using System;
using System.Diagnostics;
using Windows.ApplicationModel.Background;
using Windows.Storage;

namespace InternetStatusTask
{
    public sealed class StatusWatcherTask : IBackgroundTask
    {
        public void Run(IBackgroundTaskInstance taskInstance)
        {
            var settings = ApplicationData.Current.LocalSettings;
            var key = taskInstance.Task.TaskId.ToString();
            settings.Values[key] = string.Format(
                "StatusWatcherTask invoked at {0}", DateTime.Now);
        }
    }
}using System;
using Windows.UI.Core;
using Windows.UI.Xaml;
using Windows.UI.Xaml.Controls;
using Windows.UI.Xaml.Input;
using Windows.ApplicationModel.Background;
using Windows.Storage;
namespace InternetStatusTaskSample
{
public sealed partial class MainPage : Page
{
private CoreDispatcher StatusDispatcher;
public MainPage()
{
this.InitializeComponent();
StatusDispatcher = Window.Current.CoreWindow.Dispatcher;
UnregisterTaskButton.IsEnabled = false;
}
private void RegisterTask_Tapped(object sender, RoutedEventArgs e)
{
var builder = new BackgroundTaskBuilder();
builder.Name = "StatusWatcherTask";
builder.TaskEntryPoint = "InternetStatusTask.StatusWatcherTask";
builder.SetTrigger(new SystemTrigger(
    SystemTriggerType.NetworkStateChange, false));
IBackgroundTaskRegistration task = builder.Register();
task.Completed += OnCompleted;
RegisterTaskButton.IsEnabled = false;
UnregisterTaskButton.IsEnabled = true;
OutputText.Text += "StatusWatcherTask registered.
";
}
private void UnregisterTask_Tapped(object sender, TappedRoutedEventArgs e)
{
foreach (var cur in BackgroundTaskRegistration.AllTasks)
{
    if (cur.Value.Name == "StatusWatcherTask")
    {
        cur.Value.Unregister(true);
        OutputText.Text += "StatusWatcherTask unregistered.
";
    }
}
RegisterTaskButton.IsEnabled = true;
UnregisterTaskButton.IsEnabled = false;
}
private async void OnCompleted(IBackgroundTaskRegistration task,
BackgroundTaskCompletedEventArgs args)
{
await StatusDispatcher.RunAsync(CoreDispatcherPriority.Normal,
() =>
{
try
{
var key = task.TaskId.ToString();
var settings = ApplicationData.Current.LocalSettings;
OutputText.Text += settings.Values[key].ToString() + "
";
}
catch (Exception ex)
{
OutputText.Text += ex.ToString() + "
";
}
});
}
}
}Figure 14-9: The InternetStatusTaskSample application in action

var builder = new BackgroundTaskBuilder();
builder.Name = "StatusWatcherTask";
builder.TaskEntryPoint = "InternetStatusTask.StatusWatcherTask";
builder.SetTrigger(new SystemTrigger(
SystemTriggerType.NetworkStateChange, false));
IBackgroundTaskRegistration task = builder.Register();
task.Completed += OnCompleted;foreach (var cur in BackgroundTaskRegistration.AllTasks)
{
if (cur.Value.Name == "StatusWatcherTask")
{
cur.Value.Unregister(true);
OutputText.Text += "StatusWatcherTask unregistered.
";
}
}var key = task.TaskId.ToString();
var settings = ApplicationData.Current.LocalSettings;
OutputText.Text += settings.Values[key].ToString() + "
";Managing Task Progress and Cancelation
The background task in the previous exercise was a very lightweight one. It simply saved a message. In real life, background tasks are often more complex, and sometimes they need several seconds (or even a minute) to complete, so it is a great feature to have background tasks report their progress back to the UI. If your task runs for a long time, it is always subject to cancelation (for example, the task may become unregistered). Your task can catch the cancelation notification and stop the task gracefully.
using System;
using System.Diagnostics;
using Windows.ApplicationModel.Background;
using Windows.Storage;
using Windows.System.Threading;

namespace InternetStatusTask
{
    public sealed class StatusWatcherTask : IBackgroundTask
    {
        private volatile bool _cancelRequested = false;
        private BackgroundTaskDeferral _taskDeferral = null;
        uint _progress = 0;
        ThreadPoolTimer _timer = null;
        IBackgroundTaskInstance _instance;

        public void Run(IBackgroundTaskInstance taskInstance)
        {
            taskInstance.Canceled +=
                new BackgroundTaskCanceledEventHandler(OnCanceled);
            _taskDeferral = taskInstance.GetDeferral();
            _instance = taskInstance;
            _timer = ThreadPoolTimer.CreatePeriodicTimer(
                new TimerElapsedHandler(TimerCallback),
                TimeSpan.FromMilliseconds(2000));
        }

        private void OnCanceled(IBackgroundTaskInstance sender,
            BackgroundTaskCancellationReason reason)
        {
            _cancelRequested = true;
        }

        private void TimerCallback(ThreadPoolTimer timer)
        {
            if (_cancelRequested == false && _progress < 100)
            {
                _progress += 10;
                _instance.Progress = _progress;
            }
            else
            {
                _timer.Cancel();
                var settings = ApplicationData.Current.LocalSettings;
                var key = _instance.Task.TaskId.ToString();
                settings.Values[key] = _cancelRequested
                    ? "Task cancelled." : "Task completed.";
                _taskDeferral.Complete();
            }
        }
    }
}IBackgroundTaskRegistration task = builder.Register();
task.Completed += OnCompleted;
task.Progress += OnProgress;private async void OnProgress(IBackgroundTaskRegistration task,
BackgroundTaskProgressEventArgs args)
{
await StatusDispatcher.RunAsync(CoreDispatcherPriority.Normal,
() =>
{
try
{
OutputText.Text += String.Format("Background task progress: {0}%
",
args.Progress);
}
catch (Exception ex)
{
OutputText.Text += ex.ToString() + "
";
}
});
}Figure 14-10: The InternetStatusTaskSample application reports progress

Figure 14-11: The background task is canceled

taskInstance.Canceled += new BackgroundTaskCanceledEventHandler
     (OnCanceled);
_taskDeferral = taskInstance.GetDeferral();
_instance = taskInstance;
_timer = ThreadPoolTimer.CreatePeriodicTimer(
    new TimerElapsedHandler(TimerCallback),
TimeSpan.FromMilliseconds(2000));_timer.Cancel();
var settings = ApplicationData.Current.LocalSettings;
var key = _instance.Task.TaskId.ToString();
settings.Values[key] = _cancelRequested
? "Task cancelled." : "Task completed.";
_taskDeferral.Complete();OutputText.Text += String.Format("Background task progress:
{0}%
",
args.Progress);Now that you know the basics of background tasks, let’s learn about input devices.
Input Devices
When you create an application, you must be prepared for several input devices. In contrast to desktop computers where the keyboard and mouse are the essential input devices, portable devices and tablets have pens and touch or similar digitizer devices. A great Windows 8 app should be prepared to provide the best user experience available on a particular device.
Without knowing what kinds of input devices are available for your application, it is not easy to select the best for your user. Windows Runtime provides you with easy-to-use objects to enumerate input devices and their capabilities.
Querying Input Device Capabilities
The Windows.Devices.Input namespace encapsulates a few object types that help you to query specific device capabilities. Table 14-3 describes these types.
Table 14-3: Helper Classes to Query Input Device Capabilities
| Type | Description |
| KeyboardCapabilities | You can use this class to determine the capabilities of any connected hardware keyboard, including wired and wireless keyboard devices. |
| MouseCapabilities | You can use this class to query the capabilities of any connected mouse devices. |
| TouchCapabilities | You can use this class to determine the capabilities of any connected touch digitizers. |
Each class has a set of properties to access device capability information. Using these properties, you can obtain all information about input devices.
Keyboard Capabilities
The KeyboardCapabilities class has a single integer property named KeyboardPresent. When this integer value is 0, there is no hardware keyboard connected to your computer; otherwise, there is. Technically, you can connect more than one keyboard to your computer, but from the point of view of input capabilities, it does not matter how many of them you have, as long as there is at least one connected.
This code snippet shows that it is easy to work with KeyboardCapabilities. (This code may be found in the InputDevicesMainPage.xaml.cs downloadable code file.)
var output = new StringBuilder();
// ...
output.Append("
~DH- Querying keyboard capabilities
");
var keyboardCaps = new KeyboardCapabilities();
output.Append(keyboardCaps.KeyboardPresent == 0
    ? "No keyboard device is present.
"
    : "There is a keyboard device present.
");
// ...
OutputText.Text = output.ToString();
Mouse Capabilities
The MouseCapabilities class has a few properties, as summarized in Table 14-4.
Table 14-4: Properties of MouseCapabilities
| Property Name | Description |
| MousePresent | This property gets an integer value indicating whether the mouse is present on the computer. A value of 0 indicates that no mouse is connected to the computer; 1 indicates there is at least one mouse connected. The value does not indicate the number of mice that are present. |
| NumberOfButtons | This property gets a value representing the number of buttons on the mouse. If multiple mice are present, it returns the number of buttons of the mouse that has the maximum number of buttons. Some mice have programmable buttons. This property gets only the number of buttons reported by the mouse driver, which may be different from the actual number of physical buttons. |
| SwapButtons | This property gets a value indicating whether any of the mice connected to the computer has swapped left and right buttons. Left-handed users often swap mouse buttons. |
| HorizontalWheelPresent | This property’s value indicates whether any of the mice connected to the computer has a horizontal wheel. |
| VerticalWheelPresent | This property’s value indicates whether any of the mice connected to the computer has a vertical wheel. |
This code snippet shows a brief sample of using MouseCapabilities. (This code may be found in the InputDevicesMainPage.xaml.cs downloadable code file.)
var output = new StringBuilder();
// ...
output.Append("
~DH- Querying mouse capabilities
");
var mouseCaps = new MouseCapabilities();
output.Append(mouseCaps.MousePresent == 0
    ? "No mouse is present.
"
    : "There is a mouse present.
");
output.AppendFormat("The mouse has {0} buttons.
", mouseCaps.NumberOfButtons);
output.AppendFormat("The user has {0}swapped the mouse buttons.
",
    mouseCaps.SwapButtons == 0 ? "not " : "");
output.Append(mouseCaps.VerticalWheelPresent == 0
    ? "No vertical mouse wheel is present.
"
    : "There is a vertical mouse wheel present.
");
output.Append(mouseCaps.HorizontalWheelPresent == 0
    ? "No horizontal mouse wheel is present.
"
    : "There is a horizontal mouse wheel present.
");// ...
// ...
OutputText.Text = output.ToString();
Touch Device Capabilities
The TouchCapabilities class has only two properties, as summarized in Table 14-5.
Table 14-5: Properties of TouchCapabilities
| Property Name | Description |
| TouchPresent | This property indicates whether the computer has any touch digitizer device (pen or human touch). Any non-zero value means that there is at least one touch digitizer device connected. |
| Contacts | This property gets the minimum number of contacts supported by all touch devices. This property returns the value 1 in most cases, even if the device allows multi-finger touch, because often pen devices are also enabled, which support only one contact. |
Here is a short code snippet demonstrating the use of TouchCapabilities. (This code may be found in the InputDevicesMainPage.xaml.cs downloadable code file.)
var output = new StringBuilder();
// ...
output.Append("~DH- Querying touch capabilities
");
var touchCaps = new TouchCapabilities();
output.Append(touchCaps.TouchPresent == 0
    ? "No touch device is present.
"
    : "There is a touch device present.
");
output.AppendFormat("The touch device supports {0} contacts.
",
    touchCaps.Contacts);
// ...
OutputText.Text = output.ToString();
Querying Pointer Device Information
Your computer may have one or more pointer devices. In many applications, it is important to know which devices are available. The Windows.Devices.Input namespace has a class named PointerDevice that you can use to query pointer device information. You can invoke the static GetPointerDevices() method to enumerate all pointer devices installed on your system. The use of this class is best explained by this code snippet. (This code may be found in the InputDevicesMainPage.xaml.cs downloadable code file.)
var output = new StringBuilder();
// ...
output.Append("
~DH- Querying pointer device information
");
var index = 0;
foreach (var device in PointerDevice.GetPointerDevices())
{
    string deviceType;
    switch (device.PointerDeviceType)
    {
        case PointerDeviceType.Mouse:
            deviceType = "mouse";
            break;
        case PointerDeviceType.Pen:
            deviceType = "pen";
            break;
        case PointerDeviceType.Touch:
            deviceType = "touch";
            break;
        default:
            deviceType = "unknown";
            break;
    }
    output.AppendFormat("Device #{0} is an {1} {2} device with {3} contacts.
",
        index, device.IsIntegrated ? "internal" : "external",
        deviceType, device.MaxContacts);
    var rect = device.PhysicalDeviceRect;
    output.AppendFormat(
        "Device #{0} supports the [{1},{2}]-[{3},{4}] rectangle.
",
        index,
        rect.Left, rect.Top, rect.Right, rect.Bottom);
    index++;
}
OutputText.Text = output.ToString();Each device is represented by a PointerDevice instance, and the foreach loop iterates through them. The PointerDeviceType property indicates the type of a particular device that can be any of the Mouse, Pen, or Touch values. Devices can be built into the computer hardware, or can be connected to the machine (for example, through a Bluetooth controller). The IsIntegrated property indicates whether the device is integrated with the hardware, or it is an external one. Touch devices can have a number of contacts, as indicated by the MaxContacts property. A touch device can address virtual points in a two-dimensional coordinate system that can be queried with the PhysicalDeviceRect property.
Querying all device capabilities on a Windows 8 tablet with an external keyboard and mouse will result in the information shown in Figure 14-12. The output of the program tells a few important facts:
Three pointer devices are attached to the tablet, as you can see at the bottom of Figure 14-13. One of them (Device #2) is an external mouse; the other two internal devices are pen and touch, respectively. At the top of the figure, the message says that “The touch device supports 1 contacts,” although the touch device (Device #1) can handle up to 8 contacts. Remember, the message at the top was the value of the Contacts property coming from TouchCapabilities, and this property retrieves the minimum number of contacts of any touch devices. It is one, because the pen (Device #0) has only one contact.
Figure 14-12: Device capabilities of a Windows 8 tablet

Another interesting thing is that pointer devices use different coordinate maps. Whereas the mouse device retrieves [0,0][1366,768] (or the exact resolution of the screen), other devices use different values, depending on the resolution and sensitivity of the particular device.
Summary
You are not constrained to using a single programming language when creating Windows 8 apps, because with Visual Studio, you can create hybrid solutions using a mix of Windows 8 programming languages. If you create Windows Runtime component DLL projects, you can use C++, C#, and Visual Basic for this purpose. These projects can be referenced from any other programming languages, including JavaScript. Each language has its own strength, so using a mix of them enables you to leverage the best features out of them, and make you more productive.
Although suspended Windows 8 apps do not receive resources from the operating system, with background tasks, you can carry out activities while apps are not in the foreground. Background tasks can use only a limited amount of CPU time, and their network throughput is constrained when the computer runs on battery. So, they are suitable for lightweight tasks, such as checking e-mail, downloading small pieces of data, managing instant messages, and so on. Heavy tasks (such as background processing of pictures, or making CPU-intensive computations) are not for Windows 8 background tasks. In these cases, you should use Windows services.
Background tasks are assigned to triggers, such as when the user becomes present, the Internet becomes available, the time zone is changed, and so on. When you register a background task, the task is always associated with a trigger and with optional conditions. Background tasks can be added to the lock screen (assuming they are associated with a certain set of triggers), and these tasks can have roughly twice as many resources as background tasks not on the lock screens. Foreground applications can subscribe to the OnCompleted and OnProgress events, so they have a way to communicate with the task.
Windows 8 computers can have many input devices (mice, hardware keyboards, pens, and touch devices), depending on their form factors. For the best user experience, your application should use the input device (or a combination of them) that is best suited for a certain application function. The Windows.Devices.Input namespace provides you with a number of classes to query input device capabilities, such as the KeyboardCapabilities, MouseCapabilities, TouchCapabilities, and PointerDevice classes.
In Chapter 15, you learn several useful testing and debugging techniques that are great tools for creating solid Windows 8 apps, and also help you in troubleshooting.
Exercises
What You Learned In This Chapter
| Topic | Key Concepts |
| Hybrid solution | A solution in Visual Studio that contains a set of projects using different programming languages. For example, a foreground application project in this solution can be implemented in C#, while an embedded runtime component can be implemented in C++. |
| Windows Runtime component library | A project that contains reusable Windows Runtime objects. The main goal of such a component library is to produce objects that can be utilized in Windows 8 applications independently of the consuming programming language. |
| Creating Windows Runtime component library in C# and Visual Basic | Use the File &menuarrow; New Project command, and in the New Project dialog box, select C# or Visual Basic, then choose the Windows Runtime Component template. |
| Creating Windows Runtime components library in C++ | Use the File &menuarrow; New Project command, and in the New Project dialog box, select Visual C++, and then choose the WinRT Component DLL template. |
| Background tasks | Windows 8 provides the concept of background tasks to allow suspended (or even terminated) applications to carry out lightweight background activities (such as checking e-mail messages, downloading small packets of data, and so on). Background tasks can use limited CPU time, and when they run on battery, their network throughput is constrained. |
| Trigger events | Background tasks are activated in response to triggered events (such as the user becoming present/absent, the Internet becoming available/unavailable, a certain amount of time expired, a change in the time zone, and many more). |
| Task conditions | Background tasks may have optional launch conditions in addition to triggers. For example, a task can be assigned to the “time zone changed” trigger with the “Internet is available” condition. The task will be launched only after the Internet becomes available when the time zone has been changed. |
| Lock screen applications | Applications can be assigned to the lock screen. The background tasks of these apps can have about twice as much resource consumption as the background tasks of applications not on the lock screen. |
| Communicating with foreground applications | Foreground tasks can subscribe to the OnCompleted and OnProgress events of their registered background tasks to manage when tasks are completed, or when they report progress, respectively. With the help of a CoreDispatcher instance, the UI can be refreshed from these event handlers. |
| Cancelling background tasks | Background tasks can be canceled by the operating system after they are launched (for example, when their application unregisters them). Tasks can respond to cancelation by subscribing to the OnCanceled event. |
| Querying input device capabilities | The Windows.Devices.Input namespace defines a number of classes to query the capabilities of input devices connected to the computer, such as KeyboardCapabilities, MouseCapabilities, and TouchCapabilities. |
| Querying pointer devices | With the PointerDevice class of the Windows.Devices.Input namespace, you can query all pointer devices connected to the system, including the internal and external ones. |