
Part II
Creating Windows 8 Applications
- Chapter 5: Principles of Modern Windows Application Development
- Chapter 6: Creating Windows 8 Style Applications with HTML5, CSS, and JavaScript
- Chapter 7: Using XAML to Create Windows 8 Style User Interfaces
- Chapter 8: Working with XAML Controls
- Chapter 9: Building Windows 8 Style Applications
- Chapter 10: Creating Multi-Page Applications
- Chapter 11: Building Connected Applications
- Chapter 12: Leveraging Tablet Features
Chapter 5
Principles of Modern Windows Application Development
WHAT YOU WILL LEARN IN THIS CHAPTER:
- Grasping the concepts of the Windows 8 design language
- Understanding the difference between synchronous and asynchronous programming
- Using the new asynchronous patterns in C# 5.0
- Creating asynchronous logic in JavaScript
WROX.COM CODE DOWNLOADS FOR THIS CHAPTER
You can find the wrox.com code downloads for this chapter on the Download Code tab at www.wrox.com/remtitle.cgi?isbn=012680. The code is in the Chapter05.zip download and individually named, as described in the corresponding exercises.
In this part of the book, you learn about creating Windows 8 applications. Windows 8 supports numerous programming languages, including JavaScript, C#, and C++, and you will see all of them in the following chapters.
Before you start to program, however, you first must understand the basic principles of modern Windows application development. In this chapter, you learn about the key concepts of the Windows 8 design language, and then you explore and try out the asynchronous programming patterns in C# and JavaScript.
Windows 8 Style Applications
Before you learn about the principles and characteristics of the new Windows 8 style applications, you must first turn back the clock to understand what brought the Windows 8 design language to life. So, let’s look into the history and talk about retro-style applications.
A long time ago, when people started to use computers, they needed aids to understand how the various computer software worked. To simplify the user’s life, software developers started using metaphors and built their software on concepts that were well-known from real life. Probably the most widely used metaphor is the “desktop.” With modern operating systems that follow this metaphor, users see documents and applications on their computer as very similar to what they might see on their desk in the real physical world.
Although the desktop metaphor is more than 40 years old (according to Wikipedia) it was first introduced by Alan Kay at Xerox PARC in 1970), you can find the same concepts in today’s devices. New devices have much more powerful hardware that has helped to portray objects on the desktop more realistically.
For example, if you look at the home screen of even the smallest cell phone today, you can see icons that are beautifully painted. Numerous colors, shadows, and three-dimensional (3-D) effects make them look like the original objects in the physical world. If you start an e-book reader application, you will probably first see a bookshelf that looks absolutely real with a wooden texture and well-aligned books. Then, when you open an e-book, it opens like a real book, and animations make you feel like you are reading a physical book when you turn the pages.
This is the iconographic design style that uses metaphors from the physical world, and portrays objects with hyper-realistic graphics in the digital world.
However, the world has changed since these concepts were born. A new generation of users has grown up that doesn’t need aids to understand and use computers. Instead of the gorgeous graphics, people now prefer simplicity and productivity. Users don’t care anymore if an application is drawn beautifully or super-beautifully, but they are delighted with applications that can help them to quickly solve their problems. In today’s fast-paced world, consuming information quickly is the key to success. This is called the infographic design style, and the user interfaces (UIs) of Windows 8 style applications follow these principles.
What Is the Windows 8 Design Language?
Microsoft created a new design language for Windows 8 that follows the infographic design principle. Although every application has its own appearance, they have common patterns and common themes that help users to understand and use them in a similar way. By following the same design concepts in your application that the operating system is using, you can help your users to be more productive with your software.
Although the origins of this design language can be found in earlier versions of the Windows Media Center and the Zune media player applications, it was with Windows Phone 7 that Microsoft fully committed to this new direction and made this language prominent. Since then, the dashboard of Xbox 360 has been adapted to this design, and Windows 8 relies heavily on it as well. In the future, you will probably see more and more applications adopting these concepts.
General Design Principles for Windows 8 Applications
Figure 5-1: A Windows 8 style icon with simplified graphic

The first thing you probably notice about Windows 8 is that it is definitely different from what you are used to. Windows 8 breaks with the old conventions, and you must be open-minded if you want to accept it.
The first thing you have to take into account is that software and devices are part of a digital world. If you see a photo of a book on your phone or computer, it reminds you of reading, because your brain connects the digital photo to the physical book. But your brain doesn’t need a perfect photo or a realistic image to have that connection, because you know that it is just a digital copy of an analog object on your device. With that, you can simplify the image — as you can see in Figure 5-1 — while keeping its original purpose.
Your software doesn’t need to copy the analog world into the digital world. It doesn’t have to look like something else — it actually is a digital application. Authenticity and simplicity can help users to understand programs faster, which is very important in the infographic design style.
The second thing you have to realize is why you create your applications. It is primarily for producing and consuming information. In this case, you must put the information into the center, and get rid of everything that doesn’t help the production and the consumption of it (remember, simplicity). The focus should be on the content, and not the frame that holds it. If your users are working with the content, then all the windows, borders, lines, and background images — the so-called chrome — are not so important to them. You can use them if they help your original goal, but not simply to make your application look fancy.
Just take a look at any of the built-in Windows 8 style applications. These are not running within a window, but instead are running in full screen to give space for the content. Windows 8 style applications even hide the classic Windows taskbar to free up some screen real estate (remember, mobile devices have small screens), and help the users to concentrate on the current application.
Today, users are flooded with data from various sources, so they really appreciate when the information is tailored to their needs. On a tablet device, the application may know who you are, where you are, in which position you hold the device, who is around you, and what information are you interested in right now. The application can customize itself to deliver content that is personal, relevant, and connected. If the device supports touch gestures, you can interact directly with the content, which is another level of user experience that rises above using the classic mouse and keyboard combo.
In the Windows 8 design language, content is king, and if you want to use it wisely, you need good typography. Typefaces, font sizes, colors, and whitespace are the keys to displaying the information in a easily readable format. Microsoft provides recommendations about the best practices, and even provides controls and typefaces you can use for free without extra licensing.
Animations are also important in the Windows 8 design language, because motion can further help the user to understand the software. The consistent use of animations makes your application more intuitive, even if the user doesn’t consciously care about them. You can use fast and fluid animations to signal to the user that your application is responsive, and bring the interface to life.
But wait a minute! What happens with the unique appearance of your application if you use the same layout, fonts, animation, and style as any other application? Windows 8 provides a set of design principles that Microsoft believes can make applications better by answering the usability challenges. This set is not a rigorous list of expectations your application should meet in order to run on Windows 8. You can definitely brand your application while you are following the Windows 8 design principles. Just look at the built-in applications or the applications that are available from the Windows Store, and you will see that they are different and reflect the brand of the author. Be inspired by the design language, but balance between Windows 8 and your own style.
Application Structure and Navigation Models
Windows 8 style applications are next-generation software in the sense that they are targeting not only desktop PCs and laptops, but also the latest handheld tablet devices. Tablet devices support touch gestures, and they often come without any other input device (including mouse and keyboard). The Windows 8 operating system is fully prepared for running on tablets (for example, it has a virtual keyboard that enables you to enter text on a touchscreen), and you should also design your application for gesture-based control. In fact, Microsoft recommends designing your Windows 8 style application for touch-first experience, meaning that you should design and optimize for gestures as the primary input method.
Unfortunately, gestures present two problems:
- Users can’t work with their fingers as precisely as they can with a mouse. This means you must enlarge the touch targets on your UI.
- Touch gestures are not easy to explore. This type of input works beautifully only if the gestures are used consistently across the system, because, in this way, users must learn them once, and can use the same gestures everywhere, even in your applications.
Fortunately, Microsoft developed a navigation system for Windows 8 style applications that solves these problems.
The basic unit of navigation in a Windows 8 style application is the page. As you may guess, the name comes from the web, because these application pages work very much like web pages. The user works with one page at a time, and navigation means going from one page to another. No windows or pop-ups appear that could break this consistency and complicate the UI.
You can organize your pages into a flat system or into a hierarchical system.
In the flat system, all pages reside at the same hierarchical level. This pattern is best for applications that contain only a small number of pages and the user must be able to switch between the tabs. Games, browsers, or document-creation applications often fall into this category. In these applications, the user can switch between the pages using the navigation bar (or nav bar) on the top of the screen, as shown in Figure 5-2.
You can represent your pages in any way on the navigation bar, but a typical technique is the use of thumbnails.
The hierarchical system is more familiar to people because it follows the same pattern in which website pages are organized. The hierarchical pattern is best for applications that have a large number of pages that can be grouped into multiple sections.
The root of the hierarchy is a hub page, which is the entry point of the application. On the hub page, users can get a glimpse of what is available in the sections of the application, so this first page should engage the users and draw them into the section pages. You can see an example of the hub page in Figure 5-3 from the Bing Finance application. This welcome page is an at-a-glance summary of the most important and relevant data in the application.
Figure 5-2: The Windows 8 style Internet Explorer with the tab navigation bar

Figure 5-3: The hub page of the Bing Finance application

From the hub page, users can navigate to the second level of the application, the section pages. Section pages often contain lists that can be grouped, sorted, and filtered. In Figure 5-4, you can see the section page of the Bing Finance application that lists the stocks available in the application.
From the list on the section page, users can select a single item and navigate to the third level of the hierarchy, the detail page. Detail pages may contain all information about the selected item, and the layout may vary depending on the type of the content. In Figure 5-5, you can see the detail page of a single stock in the Bing Finance application.
Users can go deeper in the hierarchy by activating (touching) an item on the screen, or can go back by using the Back button at the top of the page. Naturally, if your application is simpler, you can omit the hub page or the section page to make a more shallow hierarchy.
In Chapter 2, “Using Windows 8,” you learned about the charm bar and the app bar. The charm bar can slide in from the right, and the app bar can slide up from the bottom of the screen to display more options to the user. Both bars are extensible, and you can add your application-specific options to them.
The app bar should contain contextual commands, and can even pop-up menus when they have too many commands. The charm bar includes the Settings charm, which provides a single access point to all settings that are relevant in the user’s current context. This means you should add your application’s settings to the settings charm as well. In Figure 5-6, you can see how the built-in Weather application extends the Settings charm to include its options.
Figure 5-4: The Watchlist section page of the Bing Finance application

Figure 5-5: The detail page of a stock in the Bing Finance application

Figure 5-6: The Settings charm of the Weather application

At first, you may think that the navigation concept with the app bar, charm bar, nav bar, hierarchy, and Back button is really complex. Perhaps that’s true. However, if all these concepts are used consistently across the operating system and the applications, there’s no doubt that the users will sooner or later master them, and, at the end of the day, hopefully they will even enjoy them.
Now let’s take a look at how to create a basic Windows 8 style application.
Figure 5-7: The New Project dialog box

Figure 5-8: The default Grid Application type

Figure 5-9: The content of the project folder in the Solution Explorer window

Asynchronous Development Platform
Every year, client applications rely more and more heavily on data they download from the network. Because the amount of transferred data is increasing significantly, the latency of the network more often results in frozen applications that cause serious headaches not only for end users, but also for developers.
As the number of the connecting clients grows on the server side, the server should be able to scale and manage the increased workload. However, clients usually request data that the server must fetch from external services or databases before the requests can be processed. Even while the server is just waiting for the external data, its resources are allocated for the current request, which limits the scalability of the server.
A well-known programming practice, to solve both the UI responsiveness and the server scalability issues, is to design your software to do multiple things simultaneously. For example, while one part of your application is downloading data over the network (which can take a while), another part of your application can be responsible for reacting to mouse and keyboard events (which are generated by the user). If your application can handle these UI events, the user will feel that the application is working and responsive, and he or she will be satisfied, even if the network is slow. Otherwise, your program will appear to be frozen, which definitely ruins the user’s experience.
You have already seen several applications that follow this design. For example, you can browse your favorite website while you are copying files on your hard disk and listening to your favorite music in the background. To achieve this, the operating system is continuously switching over the running applications and giving them a very short time to execute. After this short time-slice has elapsed, the operating system switches to the next application, and lets it execute for the next time slice.
However, if you look under the covers, the operating system is switching not between applications, but between smaller units called threads. A thread is the smallest unit of processing that can be scheduled by the operating system. Every single application can create multiple threads and perform different tasks on them, and the operating system will take care of executing these threads simultaneously. This concept is called multithreading, and you enjoy its benefits when you browse multiple websites on multiple tabs within your web browser, or when you compose a new e-mail in your mailing program while the previous one is being sent in the background.
As you may guess, multithreaded applications are usually more user friendly than classic applications that do all their tasks on a single thread. However, creating multithreaded applications is not easy, and nowadays developers try to avoid these challenges in their code. As you see later in this chapter, the concurrent execution increases the complexity of your application, and makes your code less readable and less maintainable.
Introduction to Asynchronous Programming
You should write code in the same way that you think. When you are thinking logically, your brain creates a continuous series of thoughts that are tightly linked together. Thankfully, programming languages have a long history of supporting developers who express this way of thinking in programming logic — as a sequence of discrete steps that are executed one after the other. This is called synchronous programming, and because this is the simplest way of coding, most developers prefer to write synchronous code.
All programs consist of tasks, which are shorter or longer units of jobs that should be completed. As you can see in the synchronous programming model shown in Figure 5-10, when you arrange your tasks in a synchronous model, the next task can start only when the previous one is fully completed.
Figure 5-10: The synchronous programming model

Because the tasks are always completed in a definite order, the output of an earlier task is always available for the later one. In other words, the later tasks depend on the previous tasks.
Problems arise when a task takes too long to complete, because it performs a long-running computation-intensive operation, reads a large file from a slow disk, or connects to a server that has a slow response time. Because, by default, the operating system allocates a single thread to every process, that single thread will be busy waiting for the result of the long-running operation, and will not be able to respond to any (UI) events. In this case, the thread is blocked.
Although the program is actually running (that is, it is very busy doing nothing but waiting), the end user will feel that the program is frozen, which is a very poor user experience. In today’s world of smart mobile devices and touch-driven applications, your users are very sensitive to a rich user experience, and your application must be always responsive, independently of everything — the speed of the network, the disk, or the CPU. To achieve this ideal user experience, you must do your best to avoid blocked threads.
A natural solution to this problem is to move from the single-threaded synchronous model to the threaded model, which you can see in Figure 5-11.
Figure 5-11: The threaded synchronous model

In this model, each task is executed on a separate thread, and the underlying operating system takes care of executing them simultaneously. With this model, you can move the long-running task to a background thread and respond to the UI event in a UI thread to keep the application responsive. Because the operating system does the heavy lifting of managing the threads by allocating CPU time slices to them and switching between them, it seems to be a convenient solution, even if you have more threads than CPUs.
Still, it is not.
When you write a multithreaded application, you face some nasty problems. For example, if you have a data structure that is used by multiple threads, how can you ensure that the concurrent access is done safely? In other words, are you sure you can write thread-safe code? Do you know how to marshal data between threads, which means if you have a value on one thread, how can you pass it to another thread? Will the user be able to cancel the long-running process? Propagating an exception is another problem. If you have an error on a background thread, how can you forward it to the UI thread? How can the background thread signal progress to the user?
Although the problems represented by these questions can be properly solved, the solutions require a skilled programmer, and often result in the use of complex logic.
With a slightly simplified model, you can achieve very similar results and get rid of many of those questions. This requires the use of the asynchronous programming model shown in Figure 5-12.
Figure 5-12: The asynchronous programming model
In the asynchronous programming model, multiple tasks are executed on the same thread. However, the long tasks are divided into smaller units to make sure they don’t block the thread for a long time. This is a great difference compared to the synchronous model, in which the tasks are executed sequentially as single, complete units. In the synchronous model, the next task can start only after the previous one is completed. But in the asynchronous model, the next task can start as soon as the previous one yields execution to it. The second task does not have to wait until the first task fully completes.
For example, if the task is to download a file from a website, you can send the request (which is a quick operation), and then you can release the thread to respond to UI events. As shown in Figure 5-13, when the network card signals that the response has arrived from the server, you can then process the results. Although the tasks will not be completing faster with this model, your application will produce a much more pleasant user experience.
Figure 5-13: Downloading without blocking

Because your tasks are interleaved on a single thread, you have no more problems with thread safety, data marshaling, exception propagation, progress reporting, cancellation, and so on.
Unfortunately, the asynchronous model is still not perfect. The penalty is that after rewriting your synchronous code to the asynchronous model, you will hardly recognize it. It’s your duty to divide your tasks into smaller, non-blocking units, and make sure they release the thread when they no longer need it. This usually means writing code that starts a task, does something else, and then finally processes the results in a callback function. It takes a long time to implement, and the resulting code is difficult to read and difficult to maintain, because you completely lose the continuous flow of control.
The dilemma is obvious. Do you please the user with a responsive system, or do you please the developer with simple code that is joy to write? When you use .NET, you can do both.
Evolution of Asynchronous Programming on the .NET Platform
Since the first release of the .NET Framework, the platform has had built-in support for asynchronous programming. Throughout the numerous versions of the framework over the past ten years, multiple approaches have evolved, and now you have several design patterns you can use to create asynchronous logic in .NET.
With the first .NET Framework, you could use the Asynchronous Programming Model (APM). In the APM, asynchronous operations were implemented with two methods (BeginOperationName and EndOperationName) that started and completed the asynchronous operation (OperationName), respectively. You can see it in action in the following code snippet, which downloads a file asynchronously. (This code may be found in the NetFx NetFxAsyncHistoryAPMForm.cs downloadable code file.)
private void StartDownload( string url )
{
  HttpWebRequest req = (HttpWebRequest) WebRequest.Create( url );
  IAsyncResult result = req.BeginGetResponse( this.OnResponse, req );
}

private void OnResponse( IAsyncResult result )
{
  HttpWebRequest req = (HttpWebRequest) result.AsyncState;
  HttpWebResponse resp = (HttpWebResponse) req.EndGetResponse( result );
  Stream str = resp.GetResponseStream();
  // TODO: process the response stream here
}
The BeginGetResponse method was used to kick off the asynchronous download and to register a callback method to be called by the framework when the asynchronous operation was completed. The BeginGetResponse method returned an IAsyncResult instance that you could use to query the current state of the asynchronous operation. When the download was completed, the framework called the specified AsyncCallback callback, where you could call the EndGetResponse method to get the results and complete the download.
This was all you had in .NET 1.0, and, as you can see, it works, but requires a whole bunch of code. Besides, the APM does not support exception handling, cancellation, and progress-monitoring explicitly. These were all up to you to implement.
The second major version of the .NET Framework focused on the events and the delegates, and introduced the Event-based Asynchronous Pattern (EAP). The advantage of the EAP was that it was implemented with only a single method name (OperationNameAsync) for the asynchronous operation (OperationName). But before calling this method, you had to register the callback method that was called when the operation was completed.
The following code snippet shows how you could use the WebClient class that implemented EAP to download a string. (This code may be found in the NetFxNetFxAsyncHistoryEAPForm.cs downloadable code file.)
private void StartDownload( string url )
{
  WebClient wc = new WebClient();
  wc.DownloadStringCompleted += this.OnCompleted;
  wc.DownloadStringAsync( new Uri( url ) );
}

private void OnCompleted( object sender,
  DownloadStringCompletedEventArgs e )
{
  string result = e.Result;
  // TODO: Process the string result here.
}
This is much less code and seems much cleaner, right? However, if you were to imagine a whole application built around these few lines of code, you would realize that it is very difficult to understand which code block runs when, even if they run on a single thread asynchronously. You can’t easily follow the path of execution, because your code reflects a totally mixed control flow. What’s more, if you rewrite this code with lambda expressions (that is, a new, compact language syntax introduced in C# 3.0), you get code in which you write down first what will be executed later. (This code may be found in the NetFxNetFxAsyncHistoryEAPForm.cs downloadable code file.)
WebClient wc = new WebClient();
wc.DownloadStringCompleted += ( s, args ) =>
{
  string result = args.Result;
  // TODO: Process the string result here.
};
wc.DownloadStringAsync( new Uri( url ) );
In this example you have only a single callback, but other classes (for example, the BackgroundWorker class) may require multiple callbacks, and when you review your code, the control flow will look completely inside out. And this is only a single operation. Things just get worse if you want to complete multiple tasks asynchronously. In addition, the exception-handling issue is not solved either, because how could you propagate an exception to the caller when that call is already returned?
To solve all these difficulties, the .NET Framework 4.0 introduced a completely new approach, named the Task-based Asynchronous Pattern (TAP). Before TAP, when developers wanted to solve a problem asynchronously, they had to figure out the path of execution, and as you saw previously, it resulted in callbacks and mixed flows of control. The primary goal of TAP is to make developers work with asynchronous code just as they do with synchronous code, and help them clearly see the flow of control.
To achieve this, a new set of classes called the Task Parallel Library (TPL) was added to .NET 4.0. The most important thing in the library is the Task class that gives developers the option to break with the “path of execution” way of thinking and focus on the “unit of work.” An instance of the Task class refers to a value that will be delivered at some point in the future. You don’t have to care about how and on which thread this value is computed. All you have to know is that it takes some time to deliver the result, and you can use the Task object to prevent the blocking of the current execution flow until the result arrives.
With the Task object, you can query the status of the asynchronous execution, wait for its completion, and get the result value. There is even a generic version of this class, Task<TResult>, that you can use to access the result of the asynchronous operation in a strongly typed way.
The following code snippet shows how you can use the Task class to download a web page. (This code may be found in the NetFxNetFxAsyncHistoryTAPForm.cs downloadable code file.)
Task.Factory.StartNew( () =>
{
  WebClient wc = new WebClient();
  string result = wc.DownloadString( url );
  // TODO: Process the string result here.
} );
With tasks, you can write asynchronous logic very similar to your earlier synchronous code. It’s no surprise that Microsoft favors this approach, and .NET 4.5 contains new methods that return Task instances directly. For example, the WebClient class has a new method called DownloadStringTaskAsync (the TaskAsync postfix is the naming convention for methods that return Task objects) that further simplifies your job, as shown here. (This code may be found in the NetFx NetFxAsyncHistoryTAPForm.cs downloadable code file.)
WebClient wc = new WebClient();
var task = wc.DownloadStringTaskAsync( url );
// TODO: Process the task.Result string here.
So far, you have seen several ways to execute code asynchronously, and all of them were provided by the .NET Framework Base Class Library. The benefit of this architecture is that these classes are available for all .NET languages. But because this makes the solution generic, you cannot fully utilize the productivity and cannot enjoy the comfort of your favorite programming language. On the other hand, a language-specific solution could be more convenient for the developers working with that language. However, it would be available only for them.
Microsoft has experience in this area, because it used a similar approach with Language Integrated Query (LINQ) in .NET 3.0. LINQ relies heavily on a set of extension methods that do the heavy lifting on IEnumerable instances, but the language syntax in C# makes the usage of them much cleaner, and results in more readable code. Because this solution has proven advantages, Microsoft did the same again, and as you see later in this chapter, direct language support was added for tasks in C# 5.0. With the new language syntax, you will never write another callback.
Asynchronous Programming with C# 5.0
In C# 5.0, Microsoft further simplified asynchronous programming by adding two new keywords to the language. The new keywords were inspired by the await/async pattern in F#, and they unquestionably make your code much cleaner. However, you will definitely need some time to fully understand how they work. But after you become familiar with the new syntax, asynchronous programming turns into a joy!
The two new keywords are the async modifier and the await operator. When you use them, always keep in mind that their primary goal is to cut down the syntactical burden you face with when you use the Task class, just like LINQ does with the select keyword and the extension methods on IEnumerables. With the new keywords, you can transfer to the compiler the mechanical job of turning a synchronous method to asynchronous logic.
Let’s take a look at them in more detail with the help of a short example. The following code snippet shows a synchronous method that contains a WebClient.DownloadString call, which may take a long time to execute. (This code may be found in the CS5CS5AsyncForm1.cs downloadable code file.)
private void DownloadSync( string url )
{
  WebClient wc = new WebClient();
  string result = wc.DownloadString( url );
  this.txtStatus.Text = result;
}
You can convert this code to an asynchronous method by using the new keywords:
private async void DownloadAsync( string url )
{
  WebClient wc = new WebClient();
  string result = await wc.DownloadStringTaskAsync( url );
  this.txtStatus.Text = result;
}
The boldface code indicates the changed parts of the code. First you use the async modifier on a method or a lambda expression to indicate to the compiler that the code block is asynchronous. The method that is marked with the async modifier is referred to as an async method.
Second, within the async method, you probably have multiple lines of code, but at some point, the execution reaches an operation or function call that takes a long time to execute. This is the point where you really want asynchrony to avoid blocking the current thread.
Note that the asynchronous methods are for managing asynchrony, and not for creating asynchrony. Asynchronous methods don’t start new threads; instead, they use the well-known callbacks under the hood, but they spare you from the mechanics of creating them. In fact, the compiler does the heavy lifting by generating the code that fully manages the control flow. To make it work, the awaited operation must return a void, a Task, or a Task<T> instance. This looks like a serious restriction at first, but you will realize in practice that it fully serves your needs and helps standardize your code.
In the next “Try It Out” exercise, you create a classic Windows Forms application that downloads content from the network, while keeping the UI responsive using the new async and await keywords in C#.
Figure 5-14: The layout of the controls in the designer

private void Write( string message )
{
  this.txtStatus.Text += message + "
";
}public Form1()
{
InitializeComponent();
Write( "Ready." );
}
private void btnStart_Click( object sender, EventArgs e )
{
this.Cursor = Cursors.WaitCursor;
Write( "Click event handler started." );
// TODO: The real work comes here...
Write( "Click event handler ended." );
this.Cursor = Cursors.Default;
}Figure 5-15: Displaying the default messages

private int DoWork()
{
  string result = new WebClient().DownloadString(
    "http://gyorgybalassy.wordpress.com" );
  return result.Length;
}using System.Net;int length = DoWork();
Write( "Download completed. Downloaded bytes: " + length.ToString() );using System;
using System.Net;
using System.Windows.Forms;
namespace WindowsFormsApplication1
{
public partial class Form1 : Form
{
public Form1()
{
InitializeComponent();
Write( "Ready." );
}
private void btnStart_Click( object sender, EventArgs e )
{
this.Cursor = Cursors.WaitCursor;
Write( "Click event handler started." );
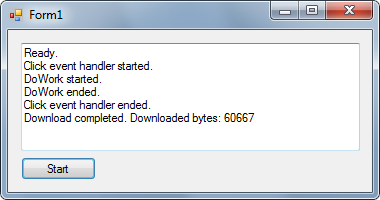
int length = DoWork();
Write( "Download completed. Downloaded bytes: " + length.ToString() );
Write( "Click event handler ended." );
this.Cursor = Cursors.Default;
}
private int DoWork()
{
string result = new WebClient().DownloadString(
"http://gyorgybalassy.wordpress.com" );
return result.Length;
}
private void Write( string message )
{
this.txtStatus.Text += message + "
";
}
}
}Figure 5-16: Synchronous execution

The code you now have as a result of this “Try It Out” exercise is completely synchronous, and the DownloadString call blocks the thread until the content is fully downloaded. Because the call is on the UI thread, the application is totally unresponsive. Notice that you can’t even move or close the window during the download.
The next exercise walks you through how to solve this problem.
private void DoWork()
{
  Write( "DoWork started." );

  WebClient wc = new WebClient();
  wc.DownloadStringCompleted += OnDownloadCompleted;
  wc.DownloadStringAsync( new Uri( "http://gyorgybalassy.wordpress.com" ) );

  Write( "DoWork ended." );
}

private void OnDownloadCompleted( object sender,
  DownloadStringCompletedEventArgs e )
{
  Write( "Download completed. Downloaded bytes: " + e.Result.Length.ToString() );
}DoWork();using System;
using System.Net;
using System.Windows.Forms;
namespace WindowsFormsApplication1
{
public partial class Form1 : Form
{
public Form1()
{
InitializeComponent();
Write( "Ready." );
}
private void btnStart_Click( object sender, EventArgs e )
{
this.Cursor = Cursors.WaitCursor;
Write( "Click event handler started." );
DoWork();
Write( "Click event handler ended." );
this.Cursor = Cursors.Default;
}
private void DoWork()
{
Write( "DoWork started." );
WebClient wc = new WebClient();
wc.DownloadStringCompleted += OnDownloadCompleted;
wc.DownloadStringAsync( new Uri(
"http://gyorgybalassy.wordpress.com" ) );
Write( "DoWork ended." );
}
private void OnDownloadCompleted( object sender,
DownloadStringCompletedEventArgs e )
{
Write( "Download completed. Downloaded bytes: " +
e.Result.Length.ToString() );
}
private void Write( string message )
{
this.txtStatus.Text += message + "
";
}
}
}Figure 5-17: Asynchronous execution
wc.DownloadStringCompleted += OnDownloadCompleted;The problem with this approach is that your code doesn’t reflect the flow of control. Your click action triggers an event handler that calls a method, then both the method and the handler return. However, the job is not yet completed, because, at some point in the future, the callback will finish it by displaying the results to the user.
Before reading any further, take a moment to think about how you would change your code if you had to download content from another URL if the first download fails, or the result is too small. Yes, you would probably need another callback.
private async void DoWork()
{
  Write( "DoWork started." );

  WebClient wc = new WebClient();
  string result = await wc.DownloadStringTaskAsync(
    new Uri( "http://gyorgybalassy.wordpress.com" ) );
  Write( "Download completed. Downloaded bytes: " + result.Length.ToString() );

  Write( "DoWork ended." );
}Figure 5-18: The control flow with an asynchronous method

private async void btnStart_Click( object sender, EventArgs e )
{
  this.Cursor = Cursors.WaitCursor;
  Write( "Click event handler started." );

  WebClient wc = new WebClient();
  string result = await wc.DownloadStringTaskAsync(
    new Uri( "http://gyorgybalassy.wordpress.com" ) );
  Write( "Download completed. Downloaded bytes: " + result.Length.ToString() );

  Write( "Click event handler ended." );
  this.Cursor = Cursors.Default;
}private async void btnStart_Click( object sender, EventArgs e )
{
this.Cursor = Cursors.WaitCursor;
Write( "Click event handler started." );
WebClient wc = new WebClient();
string result = await wc.DownloadStringTaskAsync(
new Uri( "http://gyorgybalassy.wordpress.com" ) );
if( result.Length < 100000 )
{
Write( "The result is too small, download started from second URL." );
result = await wc.DownloadStringTaskAsync(
new Uri( "https://www.facebook.com/balassy" ) );
}
Write( "Download completed. Downloaded bytes: " + result.Length.ToString() );
Write( "Click event handler ended." );
this.Cursor = Cursors.Default;
}Figure 5-19: The control flow with an asynchronous event handler

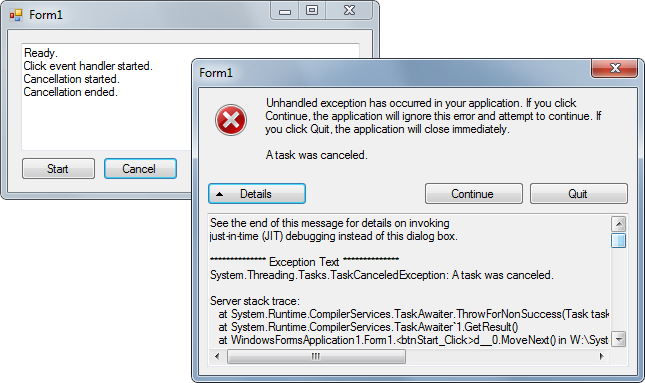
Now that you are familiar with the new keywords available in C# 5.0, let’s take a look at how to implement cancellation in C# 5.0.
private CancellationTokenSource cts;private void btnCancel_Click( object sender, EventArgs e )
{
Write( "Cancellation started." );
this.cts.Cancel();
Write( "Cancellation ended." );
}cts = new CancellationTokenSource();
WebClient wc = new WebClient();
string result = await wc.DownloadStringTaskAsync(
new Uri( "http://gyorgybalassy.wordpress.com" ), cts.Token );using System;
using System.Net;
using System.Windows.Forms;
namespace WindowsFormsApplication1
{
public partial class Form1 : Form
{
private CancellationTokenSource cts;
public Form1()
{
InitializeComponent();
Write( "Ready." );
}
private async void btnStart_Click( object sender, EventArgs e )
{
this.Cursor = Cursors.WaitCursor;
Write( "Click event handler started." );
cts = new CancellationTokenSource();
WebClient wc = new WebClient();
string result = await wc.DownloadStringTaskAsync(
new Uri( "http://gyorgybalassy.wordpress.com" ), cts.Token );
if( result.Length < 100000 )
{
Write( "The result is too small, download started from second URL." );
result = await wc.DownloadStringTaskAsync(
new Uri( "https://www.facebook.com/balassy" ) );
}
Write( "Download completed. Downloaded bytes: " + result.Length.ToString() );
Write( "Click event handler ended." );
this.Cursor = Cursors.Default;
}
private void btnCancel_Click( object sender, EventArgs e )
{
  Write( "Cancellation started." );
  this.cts.Cancel();
  Write( "Cancellation ended." );
}
private void Write( string message )
{
this.txtStatus.Text += message + "
";
}
}
}Figure 5-20: A TaskCanceledException is thrown
try
{
  string result = await wc.DownloadStringTaskAsync(
    new Uri( "http://gyorgybalassy.wordpress.com" ), cts.Token );
  Write( "Download completed. Downloaded bytes: " + result.Length.ToString() );
}
catch( TaskCanceledException )
{
  Write( "Download cancelled." );
}
Figure 5-21: Download with cancel

cts = new CancellationTokenSource();

WebClient wc = new WebClient();
try
{
  cts.CancelAfter( 100 );
  string result = await wc.DownloadStringTaskAsync(
    new Uri( "http://gyorgybalassy.wordpress.com" ), cts.Token );
  Write( "Download completed. Downloaded bytes: " + result.Length.ToString() );
}
catch( TaskCanceledException ex )
{
  Write( "Download cancelled." );
}At this point, you have learned how to create user-friendly applications with asynchronous logic. In the next section, you apply this knowledge to Windows 8 and Windows Runtime.
Asynchronous Development on Windows Runtime
In Windows 8, Windows Runtime gave Microsoft the opportunity to completely redesign the application programming interfaces (APIs) of Windows. Now history repeats itself, because the same thing happened when Microsoft started working on the .NET Framework more than ten years ago. At that time, one of the original goals was to create an advanced, object-oriented API on top of the low-level Win32 functions that you can access easily from any .NET language. This goal was reached. However, the challenges have recently changed.
As you learned earlier in this chapter, asynchronous programming became more and more important during the evolution of rich, interactive UIs. The .NET Framework continuously adapts to this new challenge by providing newer and newer methods to support the asynchronous approach. Although the architects of the .NET Framework at Microsoft do their best to offer more and more simple syntax for creating asynchronous logic, .NET developers remain the same. Microsoft realized that if a developer is given a choice of a synchronous versus an asynchronous API, most developers choose the synchronous one because of its simplicity. Even if there is a clean syntax for asynchronous methods, the synchronous logic is easier to understand.
Microsoft kept this in mind when it designed Windows Runtime, and followed a simple rule: If an API is expected to run more than 50 milliseconds, the API is asynchronous. This means that there is no way to call it synchronously. You must go the asynchronous path, whether you like it or not. The idea behind this serious decision is to ensure that Windows 8 style applications always respond to user input, and never provide a poor user experience.
In the next exercise, you learn how to use the new asynchronous file-open dialog box called the File Open Picker.
Figure 5-22: The New Project dialog box

using Windows.Storage;
using Windows.Storage.Pickers;
using Windows.UI.Popups;FileOpenPicker picker = new FileOpenPicker
{
ViewMode = PickerViewMode.Thumbnail,
SuggestedStartLocation = PickerLocationId.PicturesLibrary,
};
picker.FileTypeFilter.Add(".jpg");
StorageFile file = await picker.PickSingleFileAsync();
MessageDialog dlg = new MessageDialog(
"Selected: " + file.Path, "Selection completed");
await dlg.ShowAsync();private async void Button_Click_1(object sender, RoutedEventArgs e)
{
FileOpenPicker picker = new FileOpenPicker
{
  ViewMode = PickerViewMode.Thumbnail,
  SuggestedStartLocation = PickerLocationId.PicturesLibrary,
};
picker.FileTypeFilter.Add(".jpg");
StorageFile file = await picker.PickSingleFileAsync();
MessageDialog dlg = new MessageDialog(
  "Selected: " + file.Path, "Selection completed");
await dlg.ShowAsync();
}The return value of the PickSingleFileAsync method is of type PickSingleFileOperation that implements the IAsyncOperation<StorageFile> interface. This interface is one the most important interfaces in Windows Runtime because it is the standard for asynchronous APIs, and you will use it very frequently.
Earlier in this chapter, you learned about the Task and Task<T> types in the .NET Framework that refer to a value that will be delivered at some point in the future. Windows Runtime and .NET are very close to each other, but Windows Runtime is not equal to the .NET Framework, and its features must be available for other languages that cannot access the .NET Framework (such as JavaScript) as well.
To abstract the differences, Windows Runtime provides its own future type in the form of the IAsyncOperation interface. All asynchronous APIs in Windows Runtime return an IAsyncOperation or IAsyncOperation<T> object, and you can use its Completed property to set a callback method that is called when the asynchronous operation is completed, and its GetResults method to return the result in the form of an object of type T.
If you recall in an earlier “Try It Out” exercise, there was no IAsyncOperation<StorageFile> in the code. Instead, the PickSingleFileAsync method directly returned a StorageFile object. That’s part of the magic the await keyword does. It not only takes care of the asynchronous execution, but also unwraps the result and returns the raw result object without the packaging.
Because the IAsyncOperation is provided not by the .NET Framework but rather Windows Runtime, you can utilize its power even if you write a Windows 8 style application in JavaScript.
Asynchronous Programming with JavaScript Promises
Earlier in this chapter, you learned how Microsoft made the asynchronous coding patterns first-class citizens in its developer technologies — in the .NET Framework, in C#, and in Windows Runtime. However, Windows Runtime is open for developers who have a web development background, and directly supports JavaScript as well. In this section, you learn how you can apply asynchronous patterns in JavaScript, using a new concept called promises.
JavaScript is a single-threaded language, which means that any long-running or waiting operation that blocks this single thread can make your application look frozen. It’s been a known behavior for a long time in the web world, and it’s no surprise that most of these long-running operations (typically network calls) are implemented using callbacks. However, as you saw earlier in this chapter, callbacks often result in complicated code that is difficult to maintain.
Windows Runtime implements the Common JS Promises/A proposal to overcome these problems. A promise is a JavaScript object that returns a value at some time in the future, just like tasks in C#. All asynchronous Windows Runtime APIs that are exposed to Windows 8 style applications are wrapped in promise objects, so you can work with them in a natural way in JavaScript.
The most frequently used method on a promise object is the then function, which takes three parameters:
then( fulfilledHandler, errorHandler, progressHandler )- In the fulfilledHandler parameter, you can specify a callback method that is called when the promise completes successfully, or, in other words, is fulfilled.
- In the errorHandler parameter, you can optionally specify a callback method that is called when the promise completes with an error.
- In the progressHandler parameter, you can optionally specify a callback that is called when the promise object provides progress information. Note that not all promise objects can signal progress.
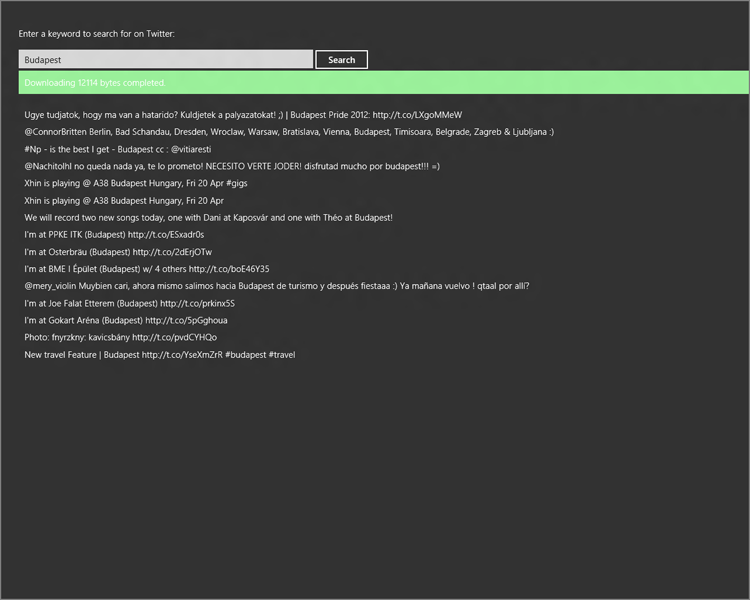
Now that you understand the basic concepts of promises, you can use them in practice. In the next exercise, you create a Windows 8 style application in JavaScript that uses promises to asynchronously search for content on Twitter.
Figure 5-23: The New Project dialog box

- The default.html file contains the markup that describes the user interface of your application.
- The default.css file in the css folder defines the look and feel of your application.
- The default.js file in the js folder contains your application logic.
<p>Enter a keyword to search for on Twitter:</p>
<div>
  <input type="text" id="txtKeyword" value="Budapest" />
  <button id="btnSearch">Search</button>
</div>
<div id="divStatus">Ready.</div>
<div id="divResult"></div>
body { padding: 30px; }
#txtKeyword { width: 500px; }
#divStatus { padding: 10px; }
#divResult { padding: 10px; margin-top: 10px; line-height: 2em; }
var btnSearch = document.getElementById("btnSearch");
btnSearch.addEventListener("click", onSearchButtonClicked);function onSearchButtonClicked(e) {
var txtKeyword = document.getElementById("txtKeyword");
var divStatus = document.getElementById("divStatus");
var divResult = document.getElementById("divResult");
var url = "http://search.twitter.com/search.json?q=" + txtKeyword.value;
WinJS.xhr({ url: url })
.then(
function complete(result) {
divStatus.style.backgroundColor = "lightGreen";
divStatus.innerHTML = "Downloading " + result.response.length +
" bytes completed. <br />";
var hits = JSON.parse(result.responseText).results;
for (var i = 0; i < hits.length; i++) {
divResult.innerHTML += hits[i].text + "<br/>";
}
},
function error(e) {
divStatus.style.backgroundColor = "red";
divStatus.innerHTML = "Houston, we have a problem!";
},
function progress(result) {
divStatus.style.backgroundColor = "blue";
divStatus.innerHTML = "Downloaded " + result.response.length +
" bytes. <br />";
}
);
}Figure 5-24: The Twitter search application in action
If you have tested the application without attaching the debugger (by using the Debug &menuarrow; Start Without Debugging menu item, or by pressing Ctrl+F5), you have probably realized that sometimes the Search button doesn’t work. The root cause is that the event subscription code is not perfect, but now that you have learned how promises work, you can fix it in the next exercise.
var btnSearch = document.getElementById("btnSearch");
btnSearch.addEventListener("click", onSearchButtonClicked);args.setPromise(WinJS.UI.processAll().then(function () {
var btnSearch = document.getElementById("btnSearch");
btnSearch.addEventListener("click", onSearchButtonClicked);
}));In the previous exercises, you called the then method as a procedure, without using its return value. However, its return value is really valuable, because the then function returns a promise, too, which, of course, also has a then function that returns another promise, and so on. This allows you to chain multiple then functions and even multiple asynchronous operations in a very natural way.
In the previous “Try It Out” exercises, you first created a Windows 8 style application that searches on Twitter. In the next exercise, you extend the previous application and save the search results into a file. Note that now you will have multiple asynchronous operations that should execute in the following order:
Thankfully, Windows Runtime provides asynchronous methods that return promises to achieve this goal.
var content;content = result.responseText;.then(
function () {
var folder = Windows.Storage.ApplicationData.current.temporaryFolder;
return folder.createFileAsync("temp.txt",
Windows.Storage.CreationCollisionOption.replaceExisting);
}
)
.then(
function (storageFile) {
divStatus.innerHTML += "Saving the results to " + storageFile.path + "<br />";
return Windows.Storage.FileIO.writeTextAsync(storageFile, content);
}
)
.then(
function () {
divStatus.innerHTML += "Done.";
}
);function onSearchButtonClicked(e) {
var content;
var txtKeyword = document.getElementById("txtKeyword");
var divStatus = document.getElementById("divStatus");
var divResult = document.getElementById("divResult");
var url = "http://search.twitter.com/search.json?q=" + txtKeyword.value;
WinJS.xhr({ url: url })
.then(
function complete(result) {
divStatus.style.backgroundColor = "lightGreen";
divStatus.innerHTML = "Downloading " + result.response.length +
" bytes completed. <br />";
var hits = JSON.parse(result.responseText).results;
for (var i = 0; i < hits.length; i++) {
divResult.innerHTML += hits[i].text + "<br/>";
}
content = result.responseText;
},
function error(e) {
divStatus.style.backgroundColor = "red";
divStatus.innerHTML = "Houston, we have a problem!";
},
function progress(result) {
divStatus.style.backgroundColor = "blue";
divStatus.innerHTML = "Downloaded " + result.response.length +
" bytes. <br />";
}
)
.then(
  function () {
    var folder = Windows.Storage.ApplicationData.current.temporaryFolder;
    return folder.createFileAsync("temp.txt",
      Windows.Storage.CreationCollisionOption.replaceExisting);
  }
 )
.then(
  function (storageFile) {
    divStatus.innerHTML += "Saving the results to " + storageFile.path + "<br />";
    return Windows.Storage.FileIO.writeTextAsync(storageFile, content);
  }
)
.then(
  function () {
    divStatus.innerHTML += "Done.";
  }
);
}Figure 5-25: Saving the results in the Twitter search application

Summary
Windows 8 brings a new generation of applications that are optimized to answer the challenges of today’s execution environments. Modern applications are more often executed on touch-driven devices, and used by people who are expecting the best user experience.
The Windows 8 design language is a key pillar to delivering a great user experience on mobile devices, as well as in the desktop world. The new infographic design concept breaks with the traditional iconographic design style, and focuses on the content instead of the chrome around it. By following the Windows 8 design principles you can create user-friendly applications that fit perfectly into Windows 8.
To have the best user experience, you need applications that are fast and fluid. In a time of large data structures and high-latency network communications, you cannot reach this goal with the classic single-threaded programming model. You must use asynchronous programming techniques, and Windows Runtime forces you to do so, by providing only asynchronous APIs for numerous features.
Thankfully, the top two programming languages in Windows 8 (C# and JavaScript) have direct support for asynchronous programming. In C# 5.0, you have two new keywords (async and await) you can use to create asynchronous methods without using callbacks and breaking the linear flow of control in your source code. In JavaScript, you can use promises to write asynchronous logic that is complex, but easy to read and maintain.
Exercises
What You Learned In This Chapter
| Topic | Key Concepts |
| Iconographic design style | The iconographic design style is a design concept that uses metaphors from the physical world, and portrays objects with hyper-realistic graphics in the digital world. |
| Infographic design style | The infographic design style is a design concept that focuses on the information and the content, instead the frame that contains it. |
| Flat navigation | Flat navigation is a navigation pattern in which all pages reside at the same hierarchical level. |
| Hierarchical navigation | Hierarchical navigation is a navigation pattern in which the pages of the application are grouped into multiple sections and levels. |
| Thread | The thread is the smallest unit of execution that can be scheduled by the operating system. |
| Asynchronous programming model | In the asynchronous programming model, multiple tasks are executed on the same thread, but long tasks are divided into smaller units to ensure that they don’t block the thread for a long time. |
| Task object | A Task is a .NET object that refers to a value that will be delivered at some point in the future. |
| async and await | async and await are two new keywords in C# 5.0 that you can use to create asynchronous methods. |
| IAsyncOperation<T> | The IAsyncOperation<T> interface is the future type used in Windows Runtime. |
| JavaScript promise | A promise is a JavaScript object that follows the Common JS Promises/A proposal, and returns a value at some time in the future. |