
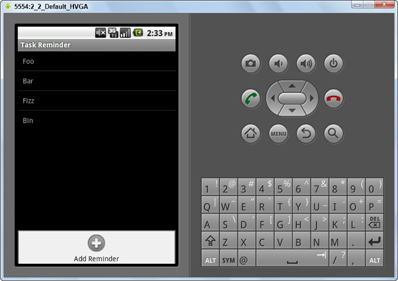
Figure 10-2: The Add Reminder menu icon.
Creating Your First Menu
You can create a menu through code or through an XML file that’s provided in the res/menu directory. The preferred method of creating a menu is to define it through XML and then inflate it into a programmable object that you can interact with. This helps separate the menu definition from the actual application code.
Defining the XML file
To define an XML menu, follow these steps:
1. Create a menu
folder in the res directory.
2. Add a file by the name of list_menu.xml
to the menu directory.
3. Type the following code into the list_menu.xml
file.
<?xml version=”1.0” encoding=”utf-8”?>
<menu
xmlns:android=”http://schemas.android.com/apk/res/android”>
<item android:id=”@+id/menu_insert”
android:icon=”@android:drawable/ic_menu_add”
android:title=”@string/menu_insert” />
</menu>
Notice that a new string resource is included (shown in bold). You’ll create that in Step 4. The android:icon value is a built-in Android icon. The ldpi, mdpi, hdpi and xhdi versions of this icon are all built into the Android platform, so you don’t have to provide this bitmap in your drawable resources. To view other resources available, view the android.R.drawable documentation at
http://developer.android.com/reference/android/R.drawable.html
 All resources in the
 android.R class give your application a common user interface and user experience with the Android platform.
4. Create a new string resource with the name menu_insert with the value of Add Reminder
in the strings.xml resource file.
5. Open the ReminderListFragment class and make sure the bold lines are in your onViewCreated():
@Override
public void onViewCreated(View view, Bundle savedInstanceState) {
super.onViewCreated(view, savedInstanceState);
setEmptyText(getResources().getString(string.no_reminders));
registerForContextMenu(getListView());
setHasOptionsMenu(true);
}
registerForContextMenu() tells Android that the ListView wants to contribute to the context menu (the one that shows up when a user long-presses the view). setHasOptionsMenu() tells Android 2.x to show the menu when the user presses the Menu button, and Android 3.x or later to show the menu in the action bar. Turn to Chapter 9 for more information about registerForContextMenu() and setHas OptionsMenu().
6. Add the onCreateOptionsMenu()
method to your class:
@Override
public void onCreateOptionsMenu(Menu menu, MenuInflater inflater) {
super.onCreateOptionsMenu(menu,inflater);
inflater.inflate(R.menu.list_menu, menu);
}
The MenuInflater inflates the XML menu layout created earlier and adds it to the menu that was passed as an argument in the method call.
7. Install the application in the emulator, and click the Menu button.
Figure 10-2 shows the Add Reminder menu icon that you just created.
Handling user actions
After you’ve created the menu, you then have to add what happens when a user clicks it. To do this, type the following code at the end of the class file:
@Override
public boolean onOptionsItemSelected(MenuItem item) { →2
switch (item.getItemId()) { →3
case R.id.menu_insert: →4
editReminder(0); →5
return true; →6
}
return super.onOptionsItemSelected(item); →9
}
The lines of code are explained in detail here:
→2 This is the method that’s called when a menu item is selected. The item parameter identifies which menu item the user tapped.
→3 To determine which item you’re working with, compare the ID of the menu items with the known menu items you have. Therefore, a switch statement is used to check each possible valid case. You obtain the menu’s ID through the MenuItem method getItemId().
→4 The ID of the Add Reminder menu item checks whether the user selected that menu item.
→5 If the user selected the Add Reminder menu item, the application is instructed to create a reminder through the editReminder() method (defined in the next section). By convention, calling edit Reminder() with an ID of 0 means the app should create a new reminder.
→6 This line returns true to inform the onMenuItemSelected() method that a menu selection was handled.
→9 If the menu selection and return isn’t handled earlier, the parent class tries to handle the menu item.
You may receive compilation errors at this time, but don’t worry! You finish the application in the following section.
Creating a reminder task
The editReminder() method allows the user to navigate to the Reminder EditActivity to edit or create a new task with a reminder. Type the following method at the bottom of your ReminderListFragment class file:
public void editReminder(long id) {
Intent i = new Intent(getActivity(), ReminderEditActivity.class);
i.putExtra(ReminderProvider.COLUMN_ROWID, id);
startActivity(i);
}
This code creates a new intent that starts the ReminderEditActivity, then calls startActivity() to, you guessed it, start the activity.
..................Content has been hidden....................
You can't read the all page of ebook, please click here login for view all page.