
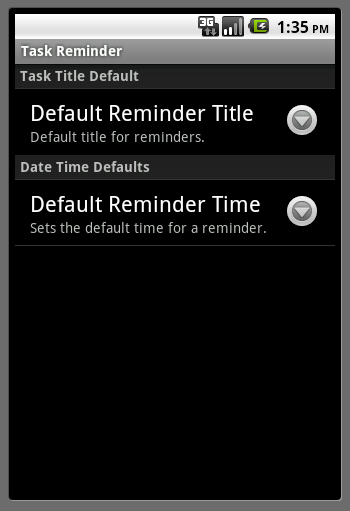
Figure 15-3: The preferences screen.
Working with the PreferenceActivity Class
Defining a preferences screen is fairly simple: Provide the values to the necessary attributes and you’re done. Though the preferences screen may be defined in XML, simply defining it in XML doesn’t mean that it will show up onscreen. To display your preferences screen, you create a PreferenceActivity.
The PreferenceActivity shows a hierarchy of preferences onscreen according to a preferences file defined in XML — such as the one you may have just created. The preferences can span multiple screens (if multiple PreferenceScreen objects are present and nested). These preferences are automatically saved to SharedPreferences. As a bonus, the preferences that are shown automatically follow the visual style of the system preferences, which allows your application to have a consistent user experience in conjunction with the default Android platform.
To inflate and display the PreferenceScreen you may have just built, add an activity that derives from PreferenceActivity to your application and name it TaskPreferences. Add the code in Listing 15-2.
Listing 15-2: The TaskPreferences File
public class TaskPreferences extends PreferenceActivity { →1
@Override
protected void onCreate(Bundle savedInstanceState) {
super.onCreate(savedInstanceState);
addPreferencesFromResource(R.xml.task_preferences); →5
EditTextPreference timeDefault = (EditTextPreference)
findPreference(getString(R.string.pref_default_time_from_now_key)); →8
timeDefault.getEditText().setKeyListener(DigitsKeyListener.getInstance()); →9
}
}
That’s all the code needed to display, edit, and persist preferences in Android. The numbered lines of code are explained in this list:
→1 The TaskPreferences class file is defined by inheriting from the PreferenceActivity base class.
→5 The call to addPreferencesFromResource() method is provided with the resource ID of the task_preferences.xml file that’s stored in the res/xml directory. This method is deprecated in favor of PreferenceFragment from the support library so Eclipse may give you a warning that you can ignore.
→8 This line retrieves the EditTextPreference for the default task reminder time by calling the findPreference() method and providing it with the key that was defined in the task_ preferences.xml file. This method is also deprecated in favor of PreferenceFragment from the support library so Eclipse may give you a warning that you can ignore.
→9 This line obtains the EditText object, which is a child of the EditTextPreference, using the getEditText() method. This object sets the key listener, which is responsible for listening to key-press events. The setKeyListener() method sets the key listener, and by providing it with an instance of DigitsKeyListener, the EditTextPreference allows digits to be typed in the EditText Preference only for the default reminder time.
 You don’t want users to enter string values such as
 foo or bar into the field because it isn’t a valid integer value. Using the DigitsKeyListener ensures that the only values passed into the preferences are digits.
At this point, you can use your activity. This PreferenceActivity allows users to edit and save their preferences. As you can see, this implementation requires only a snippet of code. The next step is displaying the preferences screen by adding a menu item.
Add your new PreferenceActivity to the AndroidManifest.xml file by using this line of code:
<activity android:name=”.TaskPreferences” android:label=”@string/app_name” />
Opening the PreferenceActivity class
To open this new activity, you add a menu item to the ReminderList Activity. To add a new menu item, you add a new menu definition to the list_menu.xml file that’s located in the res/menu directory. Updating this file updates the menu on the ReminderListActivity. The updated list_menu.xml file is shown here with the new entry in bold:
<?xml version=”1.0” encoding=”utf-8”?>
<menu
xmlns:android=”http://schemas.android.com/apk/res/android”>
<item android:id=”@+id/menu_insert”
android:icon=”@android:drawable/ic_menu_add”
android:title=”@string/menu_insert” />
<item android:id=”@+id/menu_settings”
android:icon=”@android:drawable/ic_menu_preferences”
android:title=”@string/menu_settings” />
</menu>
The last item adds a menu item for settings, which uses the built-in Android Settings icon and the menu_settings string resource. You add a new string resource named menu_settings with a value of Settings in your string resources.
Handling menu selections
After your menu is updated, the app needs to respond whenever the user taps a menu item. To make it do this, you add code to the onOptions ItemSelected() method in the ReminderListFragment. The code to handle the settings menu selection is bold in this snippet:
@Override
public boolean onOptionsItemSelected (MenuItem item) {
switch(item.getItemId()) {
case R.id.menu_insert:
((OnEditReminder) getActivity()).editReminder(0);
return true;
case R.id.menu_settings:
Intent i = new Intent(getActivity(), TaskPreferences.class);
startActivity(i);
return true;
}
return super.onOptionsItemSelected(item);
}
This code creates a new Intent object with a destination class of Task Preferences. A user who selects the Settings menu item is shown the preferences screen, to edit his preferences. If you start the app and select Settings, you should see a screen similar to the one shown in Figure 15-3.
..................Content has been hidden....................
You can't read the all page of ebook, please click here login for view all page.