
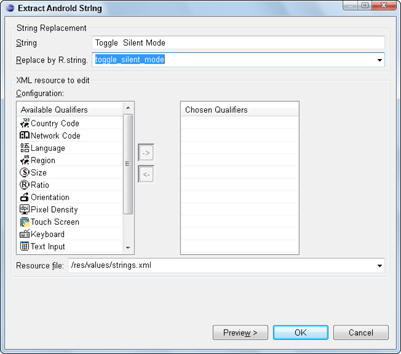
Figure 6-1: The Extract Android String dialog box.
Working with Resources
You may have worked with resources a few times in this book, and at this point you’re likely familiar with using the R class to access resources from within your application. If you’re rusty on resources and the generated R file, see Chapter 3.
Moving strings into resources
As you become an experienced programmer, you may start to take shortcuts to get your project built and working. Say that initially you forget to move strings into resources, and you have to come back at a later time to do it. You can extract a string into a resource using the built-in tools.
The long way
Here’s one way to extract a string into a resource:
1. Create a new string resource.
2. Copy its name.
3. Replace the string value in your layout with the resource identifier.
This task may not be a huge pain, but it takes time, possibly 30 to 45 seconds for the average developer.
The fast way
You can cut the time to create a string resource to fewer than 15 seconds. If you do this 30 times a day (which is feasible in an 8-hour day), you can save 15 minutes of just copying and pasting. That’s five hours a month doing the copy-and-paste dance!
Follow these steps:
1. In Eclipse, open the main.xml
file in the layouts
directory.
2. Find the following chunk of code in the file:
<Button
android:id=”@+id/toggleButton”
android:layout_width=”wrap_content”
android:layout_height=”wrap_content”
android:layout_gravity=”center_horizontal”
android:text=”Toggle Silent Mode”
/>
3. Select the boldface line “Toggle Silent Mode”
.
4. Press Ctrl+1 on Windows or ![]() +1 on a Mac.
+1 on a Mac.
A menu opens with three options.
5. Choose the Extract Android String option.
The Extract Android String dialog box opens, as shown in Figure 6-1, and you can set various options for the resource.
6. Leave the defaults alone, and click OK.
You can now see that the layout file has been modified. The text “Toggle Silent Mode” has been replaced with “@string/toggle_silent_mode”.
If you open the strings.xml file in the res/values folder, you can see a new string resource with that name and the value “Toggle Silent Mode”.
That’s pretty cool! You can see that doing this 20 or 30 times a day can add up and save you a lot of time.
Wrestling the image beast
One of the most difficult parts about resources can be images. They might look great on medium-density devices but look like garbage on high-density devices. This is where multiple-density folders come into play. These density-specific drawable folders are explained in Chapter 3.
Battling pixelation and compression
The issue you’ll most likely encounter is pixelation and compression/expansion (moving from higher- to lower-density devices and vice versa). To work around this issue, design your graphics at a high resolution, such as 300dpi in large-size format. For example, if you’re building the launcher icon, build it at 250px high and 250px wide. Although the xhdpi folder might need an image of only 96px high by 96px wide (the largest in use), it doesn’t mean that in two or three months a higher resolution device won’t be released.
This situation can be painful because working with large image files in image editing programs can be difficult if you don’t have a computer with decent capabilities. But you have to trust us on this one: Having a large raw-image file that’s high density is much easier to mold and shape into the correct densities you’ll need.
 Downsizing a high-density image doesn’t distort its quality (other than losing its fine edges and detail), but upscaling distorts it because it creates pixelation and distortion. Starting with a large file reduces the chance that you’ll ever have to upscale, which means that your app graphics will always look crisp.
Using layers
If you’re creating graphics in an image editing tool that supports layers, place each item in your graphic on a different layer. The reasons are many, but here are the key factors:
![]() Changes: At some point, you will need to change something in your graphic — its background, font, or logo, for example. If you have all these items in different layers, you can make the change without affecting the rest of the graphic.
Changes: At some point, you will need to change something in your graphic — its background, font, or logo, for example. If you have all these items in different layers, you can make the change without affecting the rest of the graphic.
![]() Localization: An example from an earlier section in this chapter talks about various strings in different languages, and graphics are no different. Many times as you develop applications, you will encounter graphics with stylized text in the graphic itself. If your application is being translated into Japanese and your graphics contain stylized English text, you can create a Japanese version of those graphics and place them in a Japanese drawable region folder, such as
Localization: An example from an earlier section in this chapter talks about various strings in different languages, and graphics are no different. Many times as you develop applications, you will encounter graphics with stylized text in the graphic itself. If your application is being translated into Japanese and your graphics contain stylized English text, you can create a Japanese version of those graphics and place them in a Japanese drawable region folder, such as res/drawable-ja. The Android platform recognizes which region it’s in (in this case, Japan). If the region’s resource folders (res/drawable-ja, res/values-ja, and so on) are available, Android uses them in the application. That being said, it’s always easier to keep your text in text resources and your images in image resources. Translating text resources is easier than making new copies of your images for every new language.
Making your apps global with resources
The Android platform surpassed the Apple iPhone in U.S. market share in the first quarter of 2010. Now carriers around the world are developing Android-based smartphones, which simply means more potential users for your apps.
What this statement means to you as a developer is that Android is a huge market with tons of opportunity waiting to be tapped. Though this opportunity is exciting, taking the greatest advantage of it requires that you understand resources and how they affect the usability of your apps. For example, if a user in the United States uses your app and it was written for an English-speaking audience (using resources or not), the user would be able to use it. However, if you hard-code all your string values into your views and activities and then need to release a Chinese version, you have to rewrite your application to use resources. When you use resources, you can have a linguist translate your strings and drawables into the region you’re targeting — such as China.
Resources allow you to extract human-readable strings, images, and viewable layouts into resources that you can reference. Various resource folders can be created to handle screens of various sizes, different languages (strings and drawables), and layout options such as landscape and portrait. Landscape and portrait views come into play when a user rotates the device 90 degrees in either direction.
If you want your apps to be viewable on as many Android devices as possible around the world, you should use resources at all times. Always put all strings into the strings.xml file because, someday, someone from another country will want your application in another language. To transport your application to another language, you simply need to have a linguist translate your strings.xml file into her language, and then you can create various values folders to hold the appropriate region’s values. Android takes care of the hard work. For example, if the user is in China and his phone is set to the Chinese character set, Android looks for the values folder named values-cn, which is where Chinese values are stored — including the Chinese version of the strings.xml file. If Android cannot find such a folder, the platform defaults to the default values folder, which contains the English version of the strings.xml file. (For more on strings, see the section “Moving strings into resources,” earlier in this chapter.)
When it comes down to it, having a linguist update your strings and creating a new folder with the new strings.xml file located within are simple tasks. Expand this concept to other languages and tablets and televisions and you can see the potential. You’re no longer looking at mobile users as your target audience. You’re looking at Android users, and with the options being released, you could be looking at billions of users. Using resources correctly can make your expansion into foreign markets that much easier.
 While nothing beats having a person to translate your app strings for you, finding a native speaker for every language you want to support can be tough. There is a simple shortcut you can take to have Google do the translation for you. Visit
 http://translate.google.com/toolkit
and upload your strings.xml file to have it automatically translated by a computer. The results may sound a little clumsy to a native speaker, but it will at least give you a head start.
Designing your application for various regions is a big topic. You can find more in-depth information in the “Localization” article of the SDK documentation at http://developer.android.com/guide/topics/resources/localization.html
.
Although designing an application to be ready for various regions sounds compelling, it also helps to know that the Google Play Store allows you to specify the targeted region of your device. You’re not forced into releasing your application to all regions. Therefore, if you have written an application for the Berlin bus route system in Germany, it probably doesn’t make sense to have a Chinese version, unless you want to cater to Chinese tourists as well as to German residents.
..................Content has been hidden....................
You can't read the all page of ebook, please click here login for view all page.