
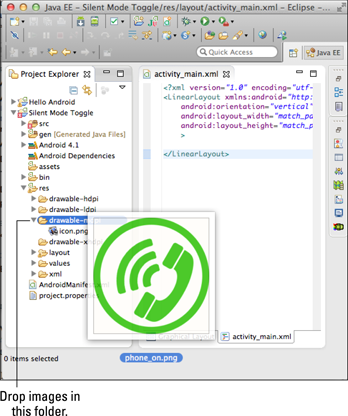
Figure 4-8: Dragging the image file into the res/drawable-mdpi folder.
Adding an Image to Your Application
Although looking at text is fun, the truly interesting components are added via input mechanisms and images. The following sections demonstrate how to include images in your application — it’s time to put some stuff on the screen!
Placing an image onscreen
The first element to add to the screen is the phone image (refer to Figures 4-2 and 4-3), so first you need the phone image, of course. You can download an image from this book’s source code, available from this book’s website, or you can use your own.
Adding images to a project is simple: Drag them from the folder where they’re stored to the res/drawable-mdpi folder, as shown in Figure 4-8.
 For the Silent Mode Toggle application, you need two phone images: normal and silent. Be sure to put both images in the
 res/drawable-mdpi folder.
To follow along in the rest of the chapter, be sure that the images are named this way:
![]() Normal mode image:
Normal mode image: phone_on.png
![]() Silent mode image:
Silent mode image: phone_silent.png
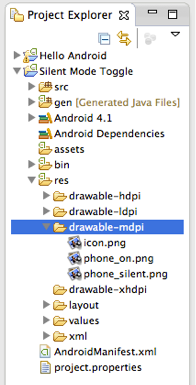
If your images aren’t named correctly, you can rename them now. Your Eclipse project should then look like the one shown in Figure 4-9.
Figure 4-9: The Silent Mode Toggle project, with phone images.
 When you drag images into Eclipse, the ADT recognizes that the project file structure has changed. The ADT then rebuilds the project because the Build Automatically selection is enabled on the Project menu. The
 gen folder, where the R.java file resides, regenerates, and the R.java file then includes a reference to the two new images you added.
You can use the references to these resources to add images to your layout in code or in XML definition. You declare them in the XML layout in the following section.
Adding the image to the layout
To add an image to the layout, type the following into the activity_main.xml file, overwriting the current content of the file:
<?xml version=”1.0” encoding=”utf-8”?>
<LinearLayout xmlns:android=”http://schemas.android.com/apk/res/android”
android:orientation=”vertical”
android:layout_width=”match_parent”
android:layout_height=”match_parent”
>
<ImageView
android:id=”@+id/phone_icon”
android:layout_width=”wrap_content”
android:layout_height=”wrap_content”
android:layout_gravity=”center_horizontal”
android:src=”@drawable/phone_on” />
</LinearLayout>
This code adds the ImageView inside the LinearLayout. An ImageView allows you to project an image to the screen on the device.
Setting image properties
The ImageView contains a couple of extra parameters:
![]() The
The android:id=”@+id/phone_icon” property: The id attribute defines the unique identifier for the view in the Android system. You can find an in-depth explanation of the android:id value nomenclature at http://developer.android.com/guide/topics/ui/declaring-layout.html
.
![]() The
The layout_gravity
property: This property defines how to place the view (both its x- and y-axes) with its parent. In this example, the value is defined as the center_horizontal constant. This value instructs the Android system to place the object in the horizontal center of its container, not changing its size. You can use many other constants, such as center_vertical, top, bottom, left, right, and many more. See the LinearLayout.LayoutParams Android documentation for a full list.
![]() The
The android:src=”@drawable/phone_on”
property: This property is a direct child of the ImageView class. You use this property to set the image that you want to show up on the screen.
Notice the value of the src property — “@drawable/phone_on”. What you’re seeing is the use of the R.java file. You can reference drawable resources via XML by typing the at symbol (@) and the resource you want.
Certain Android attributes begin with the layout_ prefix — android: layout_width, android:layout_height, android:layout_gravity are all examples. The layout_ convention tells you that the attribute relates to the view’s parent. Attributes that don’t begin with layout_ pertain to the view itself. So the ImageView’s android:src attribute tells the ImageView which image to use, but its android:layout_gravity tells the ImageView’s parent (the LinearLayout, in this case) to lay out the ImageView in the center of the parent.
Setting drawable resources
You don’t type @drawable-mdpi for the drawable resource identifier, @drawable, because it’s Android’s job (not yours) to support multiple screen sizes. The Android layout system knows only about drawables — it knows nothing of low-, medium-, high-, or extra high density drawables during design time. At runtime, Android determines whether and when it can use low-, medium-, or high-density drawables.
For example, if the app is running on a high-density device and the requested drawable resource is available in the drawable-hdpi folder, Android uses that resource. Otherwise, it uses the closest match it can find. Support for various screen sizes and densities is a broad topic (and complex, in some aspects). For an in-depth view into this subject, read the “Managing Multiple Screen Sizes” article in the Android documentation at http://developer.android.com/guide/practices/screens_support.html
.
The phone_on portion identifies the drawable you want to use. The image filename is phone_on.png. To stay within Java’s member-naming guidelines, however, the file extension is removed, leaving phone_on. If you were to open the R.java file in the gen folder, you would see a member variable with the name phone_on, not phone_on.png.
Thanks to the ADT, you can see your available options for this property via code completion. Place the cursor directly after @drawable/ in the src property of the ImageView in the Eclipse editor, and press Ctrl+spacebar. The code completion window opens, as shown in Figure 4-10. The other resource names in the window are other options you could choose for the src portion of the drawable definition.
Figure 4-10: Code completion, with resources.

..................Content has been hidden....................
You can't read the all page of ebook, please click here login for view all page.