
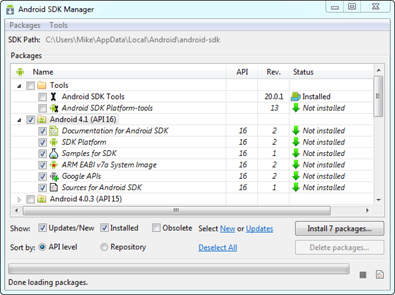
Figure 2-6: Choose packages to install.
Acquiring the Android SDK
The Android SDK is composed of a debugger, Android libraries, a device emulator, documentation, sample code, and tutorials. You can’t develop Android apps without the SDK.
Downloading the Android SDK
To download the Android SDK, follow these steps:
1. Go to http://developer.android.com/sdk/index.html
.
2. Choose the latest version of the SDK starter package for your platform to download the SDK.
You’ve just downloaded the Android SDK.
3. Open SDK Manager.
• Windows: Run the SDK Installer and install the SDK to the default location. When finished, check the Start SDK Manager check box and click Finish. If you’re prompted to accept the authenticity of the file, click Yes. The Android SDK Manager dialog box opens.
• Mac: Double-click the SDK file to unzip it. Move the resulting android-sdk-mac_x86 directory to a safe place, such as your Applications directory. Open the Terminal and enter cd to go to the android-sdk-mac_x86 directory, and then run tools/android. You may be prompted to install Java at this point if you don’t already have it. If so, click Install.
4. Select the SDK Platform Android 4.1 check box.
For the purposes of this book, select version 4.1, as shown in Figure 2-6. At this writing, 4.1 is the latest and greatest version of Android. You should also select the check boxes for the documentation and samples that correspond with Android version 4.1 (API 16).
 Every time a new version of the Android operating system is released, Google also releases an SDK that contains access to the added functionality in that version. If you want to include Bluetooth functionality in your app, for example, make sure that you have Android SDK version 2.0 or later because this functionality isn’t available in earlier versions.
5. Click Install packages.
The Choose Packages to Install dialog box opens.
6. Select the Accept radio button to accept the license, and then click Install, as shown in Figure 2-7.
The Installing Archives dialog box opens, displaying a progress bar.
7. When the archives installation is complete, click the Close button.
Figure 2-7: The Choose Packages to Install dialog box.

 While the Android SDK is attempting to connect to the servers to obtain the files, you may occasionally see the
 Failure to fetch URL error. If this happens to you, navigate to Settings, select Force https://... Sources to Be Fetched Using http://, and then attempt to download the available packages again.
Following and setting your tools path
Setting the tools path is optional, but doing so saves you from having to remember and type the full path when you’re accessing the Android Debug Bridge (adb) via the command line.
The adb lets you manage the state of an emulator or Android device so that you can debug your application or interact with the device at a high level. The adb tool has a lot of capabilities. For detailed information, see the Android documentation.
To add the Android tools to your system-path variable on a Windows machine, follow these steps:
1. Open Control Panel, and double-click the System icon to open System Preferences.
2. Click the Advanced System Settings link to open the System Properties window.
3. Click the Environment Variables button to open the Environment Variables dialog box.
4. Click the New button.
The New System Variable dialog box opens, as shown in Figure 2-8.
Figure 2-8: The Environment Variables dialog box.
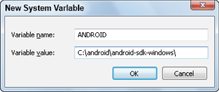
5. In the Variable Name field, type ANDROID.
6. Type the full path to the SDK directory (c:androidandroid-sdk-windows
) in the Variable Value field.
7. Click OK.
The Environment Variables dialog box opens, as shown in Figure 2-9.
Figure 2-9: Editing the PATH variable.
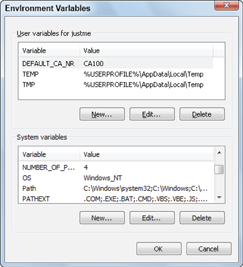
8. In the System Variables section, select the PATH
variable.
9. Click Edit and then type the following text at the end of the Variable Value field and click OK:
;%ANDROID%/tools;%ANDROID%/platform-tools
If you’re on a Mac, open the .profile file in your home directory (/Users/ <your username>) using TextEdit. If you can’t see it, press ![]() +Shift+ period in the Open File dialog box to show hidden files. At the end of
+Shift+ period in the Open File dialog box to show hidden files. At the end of .profile, add the following:
export ANDROID=<full path to Android SDK, eg. /Applications/android-sdk-mac_x86>
export PATH=$PATH:$ANDROID/tools:$ANDROID/platform-tools
Then save the file and restart your Mac.
That’s it — you’re done. Now any time you access the Android tools directory, simply use your newly created environment variable.
In most operating systems, the system PATH variable won’t be updated until you log out of and log back on to your operating system. If you find that your PATH variable values aren’t present, try logging out of your computer and logging back on to your computer.
..................Content has been hidden....................
You can't read the all page of ebook, please click here login for view all page.