We will use Esper in Activiti by performing the following steps:
- We will create a new Activiti project in Eclipse named
EsperinActiviti, and within this project, we will model an Activiti diagram namedleaverequest_withespertest.bpm. We will model the diagram as in the following screenshot and assign the user task tofozzie: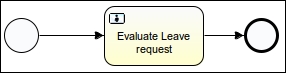
- Now we will create two execution listener classes,
ProcessStartExecutionListenerandProcessEndExecutionListener. - The
ProcessStartExecutionListenerclass will consist of the following lines of code:public class ProcessStartExecutionListener implements ExecutionListener { @Override public void notify(DelegateExecution execution) throws Exception { LeaveRequestReceivedEvent event = new LeaveRequestReceivedEvent( execution.getId(), new Date().getTime(), (Integer) execution.getVariable("leaveDay")); EPServiceProviderManager.getDefaultProvider().getEPRuntime() .getEventSender("LeaveRequestReceivedEvent") .sendEvent(event); } } - The
ProcessEndExecutionListenerclass will consist of the following lines of code:public class ProcessEndExecutionListener implements ExecutionListener { @Override public void notify(DelegateExecution execution) throws Exception { LeaveRequestProcessedEvent event = new LeaveRequestProcessedEvent ( execution.getId(), new Date().getTime(), (Boolean) execution.getVariable("requestApproved"), (Integer) execution.getVariable("leaveDay")); EPServiceProviderManager.getDefaultProvider().getEPRuntime() .getEventSender("LeaveRequestProcessedEvent") .sendEvent(event); } } - Now we will assign these listeners on the start and end events of the process, as displayed in the following screenshot:

- We will create a class file named
LeaveRequestProcessedEventwith the following code. This class file checks the time taken by the process to complete.public class LeaveRequestProcessedEvent { // For correlating the events. @XmlElement private final String processInstanceId; @XmlElement private final long processedTime; @XmlElement private final boolean requestApproved; @XmlElement private final int requestedDay; @SuppressWarnings("unused") private LeaveRequestProcessedEvent() { processInstanceId = null; processedTime = 0; requestApproved = false; requestedDay = 0; } public LeaveRequestProcessedEvent(String processInstanceId, long processedTime, boolean requestApproved, int requestedDay) { this.processInstanceId = processInstanceId; this.processedTime = processedTime; this.requestApproved = requestApproved; this.requestedDay = requestedDay; } LeaveRequestProcessedEvent method used to take process instance, processed time and request approve. public String getProcessInstanceId() { return processInstanceId; } public long getProcessedTime() { return processedTime; } public boolean isRequestApproved() { return requestApproved; } public int getRequestedDay() { return requestedDay; } @Override public String toString() { return "LeaveRequestProcessedEvent{processInstanceId="+processInstanceId+",processedTime="+processedTime+",requestApproved="+requestApproved+",requestedDay="+requestedDay+"}"; } } - Create a
LeaveRequestReceivedEventclass with the following code. This class file will check the time taken to receive the request for the process.public class LeaveRequestReceivedEvent { // For correlating the events. @XmlElement private final String processInstanceId; @XmlElement private final long receiveTime; @XmlElement private final int requestedDay; @SuppressWarnings("unused") private LeaveRequestReceivedEvent() { processInstanceId = null; receiveTime = 0L; requestedDay = 0; } public LeaveRequestReceivedEvent(String processInstanceId, long receiveTime, int requestedDay) { this.processInstanceId = processInstanceId; this.receiveTime = receiveTime; this.requestedDay = requestedDay; } public String getProcessInstanceId() { return processInstanceId; } public long getReceiveTime() { return receiveTime; } public int getRequestedDay() { return requestedDay; } @Override public String toString() { return "LeaveRequestReceivedEvent{processInstanceId="+processInstanceId+",receiveTime="+receiveTime+",requestedDay="+requestedDay+"}"; } } - Now we will create a test class,
TimeactivitiTest, for unit testing. We will split this class for better understanding. We create theTimeactivitiTestclass as follows:public class TimeactivitiTest { } - Place the following code in the test class to configure the Esper engine in Activiti:
private EPRuntime epRuntime; private EPAdministrator epAdmin; @Before public void startEsper() { Configuration configuration = new Configuration(); configuration.addEventTypeAutoName("org.activiti.event"); EPServiceProvider epService = EPServiceProviderManager.getDefaultProvider(configuration); epRuntime = epService.getEPRuntime(); epAdmin = epService.getEPAdministrator(); } - Now we will create some variables to fetch the average and maximum process time of the process, as shown in the following code:
private Queue<Double> avgProcessDurationQueue = new LinkedList<Double>();
  private Queue<Long> maxProcessDurationQueue = new LinkedList<Long>();
- Create a test method to perform the testing of the process execution, as shown in the following code:
@Test public void monitorProcessDuration() { epRuntime.sendEvent(new TimerControlEvent(ClockType.CLOCK_EXTERNAL)); EPStatement epStatement = epAdmin.createEPL(new StringBuffer() .append("select avg(endEvent.processedTime - beginEvent.receiveTime) as avgProcessDuration, ") .append("max(endEvent.processedTime - beginEvent.receiveTime) as maxProcessDuration ") .append("from pattern [every beginEvent=LeaveRequestReceivedEvent -> endEvent=LeaveRequestProcessedEvent(processInstanceId=beginEvent.processInstanceId)].win:time(5 sec)") .toString()); epStatement.addListener(new UpdateListener () { public void update(EventBean[] newEvents, EventBean[] oldEvents) { Assert.assertEquals(1, newEvents.length); Assert.assertNull(oldEvents); Double avgProcessDuration = (Double) newEvents[0].get("avgProcessDuration"); Long maxProcessDuration = (Long) newEvents[0].get("maxProcessDuration"); System.out.println ("avgProcessDuration="+avgProcessDuration+", maxProcessDuration="+maxProcessDuration); avgProcessDurationQueue.add(avgProcessDuration); maxProcessDurationQueue.add(maxProcessDuration); } } ); sendLeaveRequestReceivedEvent ( 0, "1", 100); assertMonitoredProcessDuration(null, null); sendLeaveRequestReceivedEvent ( 300, "2", 200); assertMonitoredProcessDuration(null, null); epStatement.destroy(); } - Add the following methods as we are using them in our test case:
private void assertMonitoredProcessDuration(Double avgProcessDuration, Long maxProcessDuration) {
    Assert.assertEquals(avgProcessDuration, avgProcessDurationQueue.poll());
    Assert.assertEquals(maxProcessDuration, maxProcessDurationQueue.poll());
  }

  private void sendLeaveRequestReceivedEvent(long time, String processInstanceId, int requestedAmount) {
    sendEvent(time, new LeaveRequestReceivedEvent(processInstanceId, time, requestedAmount));
  }

  private void sendLeaveRequestProcessedEvent(long time, String processInstanceId, boolean requestApproved, int LeaveedAmount) {
    sendEvent(time, new LeaveRequestProcessedEvent(processInstanceId, time, requestApproved, LeaveedAmount));
  }

  private void sendEvent(long time, Object event) {
    System.out.printf(" %1$4d : %2$s
", time, event);
    epRuntime.sendEvent(new CurrentTimeEvent(time));
    epRuntime.sendEvent(event);
  }
We went through how to use Esper in Activiti for monitoring our business process. We have also monitored a process by executing an Esper query.
Having gone through the chapter, feel free to attempt the following. You can refer to the examples implemented earlier.
- Implement a Sub-Process, either embedded or standalone, to issue a driving license based on the applicant's age, and use the same Sub-Process for the vehicle registration process
- Design a process and use task listeners to complete the user task
Q1. Which Sub-process can be used in any main process?
- Embedded Sub-Process
- Multi-instance Sub-Process
- Standalone Sub-Process
- None
Q2. Which tab is used to implement a multi-instance task?
- Listener
- Multi-instance
- Form
- None
Q3. Which gateway doesn't require conditions?
- Exclusive
- Inclusive
- Parallel
- None
..................Content has been hidden....................
You can't read the all page of ebook, please click here login for view all page.