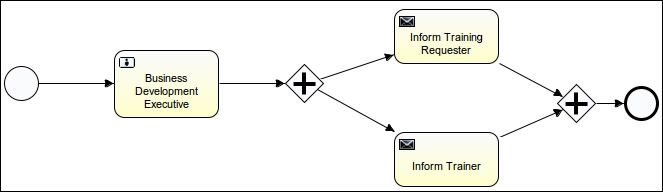
As we have discussed certain repositories, we will now use them to deploy processes. To start with the deployment, we will take an example of the Attune University where a customer registers for a training. So, in this process, the customer will provide their name, e-mail ID, date, and the topic for which they want training. Once they submit their request, it will be sent to the BDE, who will check whether or not the trainer is available on the specified date. Then, he will schedule the training with the trainer and a mail will be sent to both the trainer and trainee regarding the training schedule. The process will look as shown in the following screenshot:
- To start the implementation, we will create a new Activiti project named
AttuneUniversity-Processin Eclipse by navigating to File | New | Other | Activiti Project:
- On successful creation of the project, we will create an Actviti diagram in it with the name
trainingRequest. We can do that by navigating to File | New | Other | Activiti Diagram.
- First, we will provide an ID and name for the business process. To do that, open the Properties window as shown in the following screenshot:

- Now drag-and-drop the
Startnode into the canvas and populate the Properties Form tab to accept values from the user as in the following screenshot: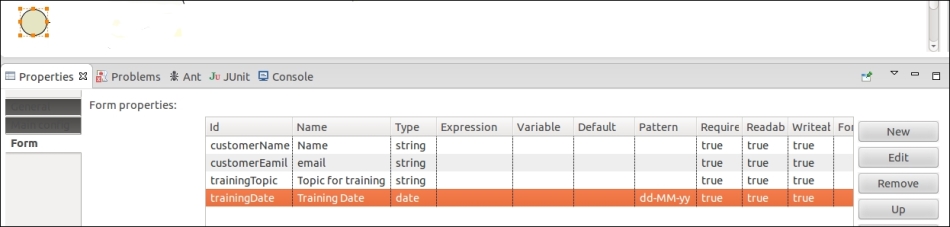
- Create a user task called Business Development Executive where the business developer will be able to view the customer's request for training and accordingly assign a trainer for them:

- We will assign the user task to
gonzoso that he can perform the task and execute the process:
- Now, as we want an e-mail to be sent to both the trainer and the trainee regarding the schedule, we will insert a parallel gateway and two mail tasks:

- As we are sending e-mails to both the trainer and the trainee, we have to populate the properties of the
Mailtask, as shown in the following screenshot; the mail will be sent to the trainee and will containtrainingTopicwith the name of the trainer,trainerName,and the date of training,trainingDate:
- A similar e-mail will also be sent to the trainer, containing
customerName,trainingDate, andtrainingTopic: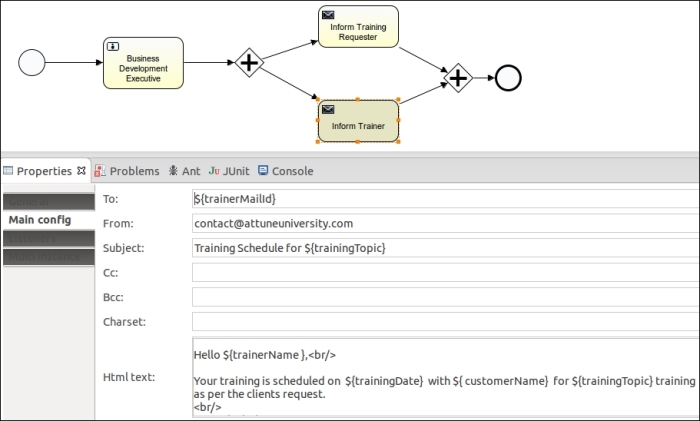
- We have created the business process using the Eclipse designer and now we want to deploy it into the process engine, but this time using the ProcessEngine API.
- We will create a class
ExecuteProcesshaving a main method configuring standalone process engine with database, as in the following code:ProcessEngine processEngine = ProcessEngineConfiguration .createStandaloneProcessEngineConfiguration() .setJdbcDriver("com.mysql.jdbc.Driver") .setJdbcUrl("jdbc:mysql://localhost:3306/activiti_book") .setJdbcPassword("root").setJdbcUsername("root") .buildProcessEngine(); - Now, to deploy the process into the repository, we have to invoke RepositoryService; so, implement the following code within the class file for the deploying process:
RepositoryService repositoryService = processEngine .getRepositoryService(); // Deploying The process into the repository repositoryService.createDeployment().addInputStream( "trainingRequest.bpmn20.xml", ReflectUtil .getResourceAsStream("diagrams/trainingRequest.bpmn")) .deploy(); - Now, to deploy the process into the repository, we need to fetch the RepositoryService instance of the process engine that we have created. For the deployment, we need to create a deployment file in which to place our process. The
createDeploymentmethod will create the deployment file for us. As we have a.bpmnfile, we need to generate a.bpmn20.xmlfile for the deployment.
..................Content has been hidden....................
You can't read the all page of ebook, please click here login for view all page.