
Chapter 20. Active Directory Lightweight Directory Services
Shortly after Microsoft released Windows 2000 Active Directory, developers and administrators started asking for a standalone Microsoft LDAP service that was similar to Active Directory, but without the overhead (e.g., DNS and FRS requirements, Group Policy, and other domain pieces like Kerberos and legacy SAM interoperability)—basically, something light and easy to set up, play with, and tear back down as required. While you can do this with Active Directory, there tends to be additional cleanup and configuration required, and things unrelated to the LDAP functionality can get confused and cause it all to malfunction.
In November 2003, shortly after Windows Server 2003 Active Directory was released, Microsoft released Active Directory Application Mode (ADAM) V1.0 to the Web. This was the product that the developers and administrators had been asking for: Active Directory Lite. ADAM allowed developers and administrators to play with Active Directory on Windows XP or Windows Server 2003 and newer servers without promoting the localhost to a full domain controller. The only DNS requirement is resolution of the hostname. There is no FRS, no Kerberos, no Group Policy, and no extra domain stuff. In fact, ADAM runs nicely as a regular Windows application that can leverage any Windows domain authentication or local machine authentication that is available, as well as offering up its own authentication that is completely application-specific. It is just as happy in a domain as it is on a standalone machine.
After ADAM’s release, Microsoft continued to invest in the product, and ADAM was bundled with Windows starting with Windows Server 2003 R2. With Windows Server 2008, ADAM was renamed to Active Directory Lightweight Directory Services (AD LDS) and made available as a server role that can be installed from Server Manager. This change has led to significantly enhanced visibility of AD LDS as a solution available to administrators.
As a result of this enhanced visibility, companies large and small (including Microsoft) have been building and deploying AD LDS–based applications. Due to the fact that AD LDS doesn’t have any legacy requirements baggage other than being programmatically compatible with Active Directory, it is, by default, considerably more locked down out of the box. Where Active Directory followed the “on/enabled/open by default” mentality, AD LDS follows the “off/disabled/closed by default” approach. From a security standpoint, this is great. Another huge benefit is that because of their similarity, many experienced Active Directory administrators and developers will be able to get familiar with AD LDS quickly, facilitating administration, management, monitoring, and application development.
There are countless scenarios to which AD LDS can be adapted, and we could fill a small book discussing these scenarios. However, this chapter is simply intended to provide an introduction to the AD LDS toolset. Throughout this discussion, we will generally refer to Active Directory Lightweight Directory Services as AD LDS, but from time to time you may see references to ADAM, the previous acronym.
20.1. Common Uses for AD LDS
As you read this chapter, you will discover that AD LDS is extremely flexible. It introduces a number of new capabilities that enable use cases you might not have been able to accomplish with a traditional forest. To get you thinking about how AD LDS might be able to help your organization, let’s take a minute to discuss a few common deployment scenarios.
The first scenario that we often see is the use of AD LDS as a test and development LDAP server for administrators and software developers alike. AD LDS can be installed on Windows 7 and used in the same manner as on a server. Administrators often use AD LDS to develop and test schema extensions in an isolated, disposable environment that mimics Active Directory. You can download AD LDS for Windows 7 from microsoft.com. Once you have downloaded the package and executed it, you can access Programs and Features from the Control Panel and click “Turn Windows features on or off” to install AD LDS and make the management tools discussed in this chapter available on your workstation.
You can also use AD LDS to provide a consolidated virtual directory that abstracts user objects across multiple trusted domains and forests into a single view for applications that expect all of the users to be in one location. Through the use of user proxies, discussed later in this chapter, you can create user objects for each user in your organization, but rely on your existing Active Directory domain(s) to store the users passwords. Since AD LDS can be installed multiple times on a single server (albeit with each instance listening on a different port), you could potentially run an instance of AD LDS for each application with customized LDAP directory requirements without requiring numerous servers or an expensive third-party virtual directory product.
Finally, some applications are beginning to take advantage of AD LDS as a lightweight, replicated, multimaster configuration store/directory. We’re aware of a number of third parties who are doing this, in addition to various Microsoft products such as Exchange Server and the Forefront Threat Management Gateway.
20.2. AD LDS Terms
There are several terms used throughout this chapter. Here are some simple definitions to help you understand the concepts:
- Instance
An instance is a single installation of AD LDS on a server. Each server can have multiple instances of AD LDS installed; they will all be independently managed and use different LDAP and LDAPS ports.
- Configuration set
A collection of AD LDS instances that replicate with each other and share a common Schema and Configuration container. Application partitions can be shared among the instances that make up the configuration set as well.
- Replica
An instance of AD LDS that is part of a configuration set and replicates with other AD LDS instances.
- Partition/naming context
A unique namespace named after the root DN. AD LDS will have at least two partitions per instance: the configuration and schema partitions. AD LDS can also have multiple application partitions.
- Application partition
A type of partition that contains application data. AD LDS can have multiple application partitions per instance.
- Configuration partition
A type of partition that contains configuration data for the instance or configuration set.
- Schema partition
A type of partition that contains the class and attribute definitions.
- Bindable object
An object instantiated from an
objectClassthat hasmsDS-BindableObjectlisted as a static auxiliary class in the schema definition for theobjectClass. The most common bindable object is theuserclass. Objects of this type are authenticated by AD LDS directly.- Bindable proxy object
An object instantiated from an
objectClassthat hasmsDS-BindProxylisted as a static auxiliary class in the schema definition for theobjectClass. The most common bindable proxy object is theuserProxyclass. Objects of this type are authenticated by AD LDS by proxying the authentication request to Windows.
20.3. Differences Between AD and AD LDS
AD LDS and AD are quite similar, but obviously there are differences, or else there would be nothing to talk about. This section isn’t intended to be a comprehensive listing of all the differences, but rather an attempt to catch the major changes and popular gotchas.
Standalone Application Service
The most obvious difference is that AD LDS is set up to run as a standalone application service; it isn’t a critical system-level service. This means that instead of the LDAP functions being handled by the lsass.exe process, they instead run from a dsamain.exe process. The not-so-obvious upshot of this is that AD LDS can be stopped or started on demand without having to reboot the machine. It also means AD LDS can be updated as needed (again, without rebooting the machine).
In addition to the benefit of stopping and starting on command, the new service implementation allows you to set up multiple instances of AD LDS on a single machine, each under a different service. So instead of having a single Active Directory instance on a machine responding to requests on port 389, you can have multiple AD LDS instances on a machine listening on various ports, with each instance having an entirely different schema.
Configurable LDAP Ports
Another difference is that with AD LDS you can actually control what ports the LDAP service is listening on. Active Directory seemed to have some registry entries you could change to specify the ports, but unfortunately, it was just a dirty trick: the ports were really hardcoded in the binaries so that you could modify them in the registry, but it didn’t do anything.
No SRV Records
AD LDS doesn’t register SRV records in DNS like Active Directory does; unfortunately, even registering your own SRV records on behalf of AD LDS doesn’t make it so the DC location API calls will work for finding AD LDS instances. A network trace shows two reasons for this. The first reason is that the DC locator service doesn’t look at the port field of the SRV record, so if AD LDS is running on a different port, the DC locator service can’t connect to it. The second reason is that the DC locator service sends a special UDP LDAP ping to the host, and AD LDS doesn’t know how to respond to that request. This, of course, all makes sense since AD LDS isn’t a domain controller, but it would be nice to have that functionality to make use of AD LDS a trifle more seamless for applications.
Instead of SRV records, AD LDS can publish serviceConnectionPoint (SCP) objects in Active
Directory for resource location. These are objects in Active Directory
that are usually published under the computer object on which the
service is installed (this is configurable). The serviceConnectionPoint objects maintain key
pieces of information about the AD LDS installation in the keywords and serviceBindingInformation attributes. An
example of this information is listed in Example 20-1.
>keywords: partition:DC=joeware,DC=net
>keywords: 1cf21445-f4f5-4451-bff2-d32f511c478b
>keywords: 42eca3c5-ee95-48c8-ab7d-7524ae887239
>keywords: partition:DC=domain,DC=com
>keywords: 9549ae64-a3ee-461a-918f-828f522b0382
>keywords: partition:CN=newpart
>keywords: 450d8cf9-19de-4c3c-817d-d5443fb968f5
>keywords: partition:CN=user
>keywords: partition:DC=test,DC=etherpunk,DC=local
>keywords: 7547aa81-51ad-416f-9ee6-7bfd1f88853d
>keywords: partition:DC=mytest,DC=com
>keywords: c4d69674-b673-45f9-ad14-b1e488d4a0c8
>keywords: 0a891bbf-1be6-4fe4-9406-3f21355e144e
>keywords: partition:DC=set-con,DC=org
>keywords: 81b58144-7068-410b-bd93-8248109a329b
>keywords: partition:DC=etherpunk,DC=local
>keywords: partition:CN=Configuration,CN={E28AE3C2-1228-4F6B-917C-56B9757DB796}
>keywords: 47abf207-536a-4ea4-9295-9ef3c7f1fb8c
>keywords: fsmo:naming
>keywords: fsmo:schema
>keywords: instance:ADAM1
>keywords: site:Default-First-Site-Name
>keywords: 1.2.840.113556.1.4.1791
>keywords: 1.2.840.113556.1.4.1851
>keywords: 14b5dcce-8584-4100-8d5b-139b1e8a95b1
>serviceBindingInformation: ldaps://adamserver.mycorp.com:636
>serviceBindingInformation: ldap://adamserver.mycorp.com:389
As you can see in the example, the serviceBindingInformation attribute shows the
actual hostname and ports in use:
>serviceBindingInformation: ldaps://adamserver.mycorp.com:636
>serviceBindingInformation: ldap://adamserver.mycorp.com:389
In the keywords attribute,
there is more good info. Here are some of the more useful pieces of
information about the partitions that are available:
>keywords: partition:DC=joeware,DC=net
>keywords: partition:DC=domain,DC=com
>keywords: partition:CN=newpart
>keywords: partition:CN=user
>keywords: partition:DC=test,DC=etherpunk,DC=local
>keywords: partition:DC=mytest,DC=com
>keywords: partition:DC=set-con,DC=org
>keywords: partition:DC=etherpunk,DC=local
>keywords: partition:CN=Configuration,CN={E28AE3C2-1228-4F6B-917C-56B9757DB796}
And here are the FSMOs held by this instance:
>keywords: fsmo:naming
>keywords: fsmo:schema
the site the instance is in:
>keywords: site:Default-First-Site-Name
the instance name that maps to the actual service name on the host:
>keywords: instance:ADAM1
and some OIDs describing functionality of the instance:
>keywords: 1.2.840.113556.1.4.1791
>keywords: 1.2.840.113556.1.4.1851
If you choose, you can add additional keywords to help your
applications select the proper instance or naming context. For more on
using the serviceConnectionPoint
objects for AD LDS, see the following:
No Global Catalog
Active Directory has the global catalog to allow you to easily
query for objects across the entire forest hierarchy. You send a
standard LDAP query to a special port, and you have access to a subset
of attributes for all objects in the forest. A single query will allow
you to search across the Configuration container, the schema, and every
default domain partition in the forest. AD LDS has multiple partitions,
but it doesn’t have the matching global catalog functionality.
Fortunately, the Windows LDAP server accepts a special LDAP control
setting that allows you to use one single query that will scan across
all of the partitions (or a subset of the partitions, like DC=com) of an AD LDS instance. Unfortunately,
this functionality is available only to LDAP API–based applications, not
ADSI scripts and programs.
Note
We just described the LDAP_SERVER_SEARCH_OPTIONS_OID LDAP server
control. This control, combined with the SERVER_SEARCH_FLAG_PHANTOM_ROOT flag,
enables the special full instance search functionality. The control is
also available for Active Directory, but generally isn’t required due
to the global catalog functionality. For more information, see this link.
There is an option that could work for ADSI and any third-party
applications that don’t implement the proper LDAP control. It involves
implementing GC functionality yourself by setting up another top-level
application partition and synchronizing certain objects and attributes
from the other application partitions. You then grant read-only access
to applications and users that need to query the entire instance, and
full control to the syncing application. If you are simply after a quick
lookup of a DN for an object based on a couple of public attributes like
sAMAccountName, this option might
work for you.
The loss of the global catalog also impacts a special protocol used by Outlook and Exchange, primarily for Address Book functionality. The Name Service Provider Interface (NSPI) and the backend Address Book support functionality are only provided in the Global Catalog code. Removing the GC functions also removes the NSPI and Address Book functions.
Top-Level Application Partition Object Classes
In Active Directory, application partitions must all be objects of
the class domainDNS. AD LDS allows
application partitions to be of any class, as long as it is a
container-type object. This means that you can have application
partitions that are of many different types, including organizationalUnit, container, o, c,
l, or even user.
Group and User Scope
The scope of an AD LDS group or user is limited to the partition in which it exists; e.g., a group or user created in partition 1 can neither be used to assign permissions on objects in partition 2 nor added to a group in partition 2. You can, however, add Windows security principals and AD LDS security principals from the configuration partition to the groups in other partitions.
FSMOs
In an Active Directory forest, you have two FSMOs for the entire forest (the schema and domain naming masters) and three FSMOs (the PDC emulator, RID master, and infrastructure master) for each domain. A single-domain forest would have a total of five FSMOs, a two-domain forest would have eight FSMOs, and so on. AD LDS, on the other hand, only has two FSMO roles regardless of the number of partitions or the number of replicas. The two FSMOs are the naming master and the schema master, whose roles map to the Active Directory domain naming master and schema master. Just like with Active Directory, if you want to add a new partition, you must contact the naming master, and if you want to update the schema, you must contact the schema master.
The missing FSMOs are generally not too surprising when you think of the functional changes between AD and AD LDS. However, the lack of the RID master role may confuse some administrators because AD LDS still uses security identifiers (SIDs), and SIDs need to be unique to be of value. The RID master in an Active Directory domain ensures that each security principal that is created has a unique SID value to uniquely identify it within the domain. This is handled in a well-known way in Active Directory: it follows the basic mechanism used for NT4, where RIDs are incremented as they are passed out. AD LDS has changed this process so that a RID master is no longer needed.
Instead of using RIDs, AD LDS has an algorithm in place based on the GUID generation algorithm to generate unique SIDs. Instead of the SIDs having just a unique RID, the last four subauthorities in the SID are all generated for each user. While one or more of those subauthorities may match those of other groups or users, there shouldn’t be a collision with all four values because AD LDS tries to enforce the uniqueness. This means a RID master is not needed. The sidebar “Windows SIDs Versus AD LDS SIDs” describes the differences in AD LDS security identifiers. For more information on Windows SIDs, see the sidebar in Chapter 2, “What’s in a Security Identifier (SID)?” (page 17).
Schema
The default AD LDS schema is very lightweight in comparison to the
default AD schema. Initially, it only has 44 classes and 268 attributes,
which is quite sparse. Microsoft supplies a couple of LDIF files with AD
LDS so you can build up the schema to instantiate some Microsoft
standard objects, such as inetOrgPerson and user objects. Extension of the schema beyond
this is fully supported and similar to the process used to extend the AD
schema.
Another difference is that you can have multiple schemas on a single machine with AD LDS. Each instance of AD LDS can have its own schema, and you can install multiple instances.
Service Account
AD runs in the LSASS process on domain controllers as Local System. The AD LDS service runs as NT AuthorityNetwork Service, or you can specify any normal Windows user ID.
Configuration/Schema Partition Names
AD LDS, like AD, has both configuration and schema partitions. Unlike with AD, however, there is no root domain or root partition, so the names of these critical partitions are based on a randomly generated GUID and have nothing to do with the application partitions that exist in the instance. For example:
CN=Configuration,CN={E28AE3C2-1228-4F6B-917C-56B9757DB796}Default Directory Security
The default security in Active Directory is extremely open. By default, any user that is from the domain or any trusted domain can look at most attributes of most every object. Attempts to lock down AD can be met with frustration, confusion, and applications not working correctly. AD LDS completely reverses this. By default, normal users do not have read access to anything but the schema. The only access control entries (ACEs) defined on the application partitions are read permissions for the Readers group, full control for Administrators, and minimal permissions for replication for the Instances group used for replicas.
User Principal Names
Active Directory user principal names follow RFC 822 email address
formatting rules. AD LDS has no such limitation; instead of using
[email protected], you can simply use
joe for the UPN. While Active Directory doesn’t
enforce userPrincipalName value
uniqueness, AD LDS does in fact enforce this uniqueness.
Authentication
There are a few differences that must be mentioned in the area of
authentication. To start with, there is some good news: you aren’t
locked into the types of objects that you can bind with. Any object can
be used for binding, as long as it is derived from a class that includes
the msDS-BindableObject auxiliary
class in the schema definition and has a valid password value set for
unicodePwd.
The next difference is that AD LDS bindable objects can only use
simple bind or digest authentication. This means that if you want secure
binding with AD LDS users or other AD LDS bindable objects without
digest authentication, you must set up a certificate and encrypt the
communication channel using SSL. In order to use secure authentication
without SSL, you have to use Simple Authentication and Security Layer
(SASL) binds with either Windows local or domain users. By default, an
AD LDS user can be authenticated over the standard LDAP port with a
clear-text simple bind. You can override this and force an SSL
requirement by setting RequireSecureSimpleBind=1 in the msDS-Other-Settings attribute of the object
CN=Directory Service,CN=Windows
      NT,CN=Services,CN=
<Instance GUID>
in the configuration partition.
The last difference to mention here is bind redirection. AD LDS allows you to configure a bindable proxy object that links to a Windows user. The user can use a simple bind to AD LDS, which then proxies the authentication request to Windows in a secure manner. This is used when an application cannot use the Windows security principals directly, or possibly if you want to disguise the backend Windows account. Bindable proxies will also proxy password changes back to AD.
Unlike with AD LDS user simple-bind authentication, the default
for using a simple bind for userProxy
objects is to require an SSL connection. This can be overridden by
setting RequireSecureProxyBind=0 in
the msDS-Other-Settings attribute of
the CN=Directory Service object
described earlier.
Users in the Configuration Partition
AD LDS allows you to create user and userProxy objects in the configuration
partition. These users can then be added to any group in any partition.
So, you could add the user to the configuration partition’s
Administrators group, which is nested in the Administrators group of all
application partitions. This change allows an AD LDS user to
administrate an AD LDS instance instead of having the requirement to use
a Windows user. To enable this new capability, set ADAMAllowADAMSecurityPrincipalsInConfigPartition=1
in the msDS-Other-Settings attribute
of the CN=Directory Service object
described earlier.
New and Updated Tools
One of the biggest initial complaints (and deployment blockers) with early versions of AD LDS was a lack of tools. Microsoft helped address this problem by creating new tools like ADSchemaAnalyzer and ADAMSync as well as updating existing AD tools like AD Sites and Services and LDP to work with AD LDS. We’ll look at some of the available tools shortly.
20.4. AD LDS Installation
The AD LDS installation is broken up into two main pieces: installation of the base components and installation of new instances. The base component installation only needs to occur once per server, while new instance installations will occur every time you want to install a new instance or a replica of an existing instance.
Installing the Server Role
The base installation is as simple as launching Server Manager and adding the Active Directory Lightweight Directory Services role. Once the installation completes, you can use the AD LDS setup wizard to configure one or more instances on the server.
Installing a New AD LDS Instance
Once you have completed the server role installation, you will probably want to install a new instance of AD LDS. This process is also quite simple, though not as trivial as the server role installation. When you install a new instance, you need to have answers to the questions listed in Table 20-1.
Question | Description | Example |
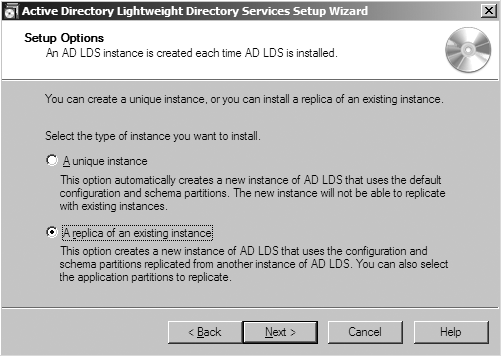
Unique instance or replica? (Figure 20-2) | Do you want to replicate the configuration and schema with an existing instance, or do you want a completely new instance? | Unique instance |
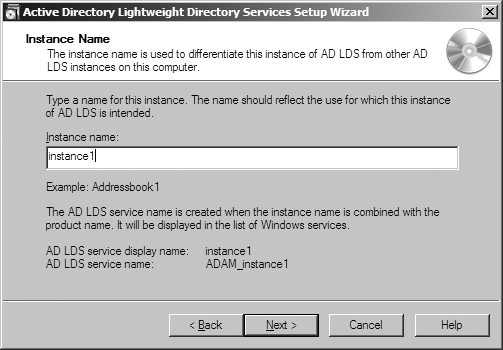
Instance name? (Figure 20-3) | This value is appended to the string “ADAM_” to specify the AD LDS service name running this instance and listed in the Add/Remove Programs dialog. | AddressBook |
LDAP port number? (Figure 20-4) | The TCP port you should listen on for standard LDAP requests. | 389 |
SSL port number? (Figure 20-4) | The TCP port you should listen on for SSL-based Secure LDAP (LDAPS) requests. | 636 |
Create application directory partition? (Figure 20-5) | Select whether you would like to have the instance creation process create an application partition. This is recommended when you first set up AD LDS. | Yes |
Partition name? (Figure 20-5) | The name to use for the initial application partition, only needed if you decide to have AD LDS create the initial partition during instance installation. |
|
Data file location? (Figure 20-6) | Where do you want the AD LDS data files located? | E:AD LDSAddressBookdata |
Data recovery files? (Figure 20-6) | Where do you want the AD LDS log files located? | E:AD LDSAddressBookdata |
Service account? (Figure 20-7) | Service account to use for running this AD LDS instance. Network Service is recommended unless the server is a member of an NT4 domain or is in a workgroup and you need replicas. | Network Service |
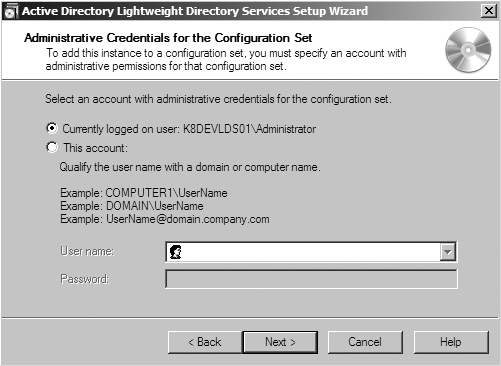
Initial administrator? (Figure 20-8) | What group or user should be initially assigned administrative rights over this instance? | Currently logged on user |
Import LDIF files? (Figure 20-9) | Specifies whether or not
you would like to import some of the basic MS schema definitions
for | Import |
Files to import? (Figure 20-9) | Select which of the displayed LDIF files you would like to import. | MS-InetOrgPerson.LDF MS-User.LDF MS-UserProxy.LDF |
When you are prepared with responses to all of the questions in Table 20-1, you initiate the instance installation by selecting the Active Directory Lightweight Directory Services Setup Wizard from the Administrative Tools section of the Control Panel or the Start menu (Figure 20-1).
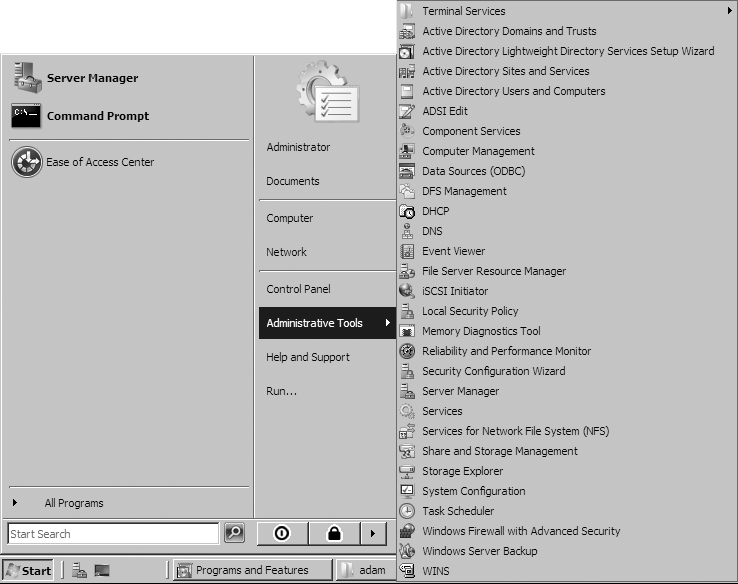
Note
You can also run %windir%ADAMADAMinstall.exe to launch this wizard.
This will launch a normal Windows installation wizard. The first dialog of consequence (see Figure 20-2) asks whether you want to install a unique instance of AD LDS or create a replica of an existing instance. Replicas will be covered in the section Installing an AD LDS Replica; for now, choose “A unique instance” (the default). When you install a unique instance, you are creating an instance that has no connection to any other AD LDS instance and that has a fresh AD LDS schema and all the default configuration settings. You will not be able to configure this instance to replicate with any other instances that currently exist, though you could create another new instance and install it as a replica of this instance.

The next dialog (see Figure 20-3)
allows you to specify the name of the instance. This name is appended to
the string ADAM_ and used for the
name of the service running the instance. The name is also used in the
Add/Remove Programs dialog, so you can later uninstall this instance if
necessary. The default instance name for the first instance installed on
a server is Instance1. If you use the name
Instance1, the next time the default instance name
will be Instance2, and so on.
After you choose your instance name, you will be presented with a dialog (see Figure 20-4) that allows you to specify the ports to use for standard LDAP and LDAPS. The default ports are 389 and 636; you should stick with these ports unless you know that your applications are flexible enough to allow you to specify different ports.

The only partitions created by default in AD LDS are the configuration and schema partitions. The instance installation allows you to create one initial application partition in the Application Directory Partition dialog (see Figure 20-5). The default for this dialog is “No, do not create an application directory partition.” If you change the default, enter the DN of the partition you would like to create in the “Partition name” field.

AD LDS allows you to choose where to place your database and log files (see Figure 20-6). The database file location is specified in the “Data files” field and includes the DIT file, as well as the temporary database EDB and CHK files. The transaction log file location is specified in the “Data recovery files” field and includes the log files that hold the database transaction information. In high-performance configurations, depending on the disk configuration of the server, it is usually recommended to split up these two sets of files onto separate physical drives. At the very least, you may want to move them from the default location, which is on the system drive in the Program FilesMicrosoft ADAM<instancename> folder.

Microsoft has written AD LDS so that, by default, it runs as the Network Service account. This is a very good thing, and you should generally stick with this default. However, if you do not want to run as Network Service, you have the option to change the security context to any Windows user you choose (see Figure 20-7). You should only need to make this change if you are running in a Windows NT4 domain, are running in workgroup mode and want to have replicas, or need to provide access to a load-balanced set of AD LDS servers with a shared name. In these cases, AD LDS will need to use a dedicated Windows account.

The next dialog you encounter is critically important; it is the dialog where you specify the initial administrator(s) of the AD LDS instance (see Figure 20-8). The default is the user installing the instance, but consider using the local Administrators group instead or, better yet, creating a domain group specific to administering this AD LDS instance.

Quite unlike with most other Windows applications, the server’s Administrators group has no control over AD LDS’s internal data or configuration unless the group is specifically added to the Configuration container’s Administrators group (or role, if you prefer). This is great from a security standpoint, unless you somehow lose access to the users placed in that group; if that happens, you have lost control of the instance.
The final dialog that requires a decision, shown in Figure 20-9, concerns what LDIF files AD LDS should import. The default is that no files should be imported, which gives you the AD LDS base schema only. However, if you want to add the functionality gained through these LDIF files, you should allow the installation to import them. If you decide at a later time that you would like to incorporate any of these schema updates, simply use ldifde.exe to import them. The LDIF files are located in the folder %windir%ADAM.
Table 20-2 shows a description of these LDIF files.
Filename | Contains |
MS-AdamSyncMetadata.LDF | Metadata schema extensions that are required to utilize AD LDS Sync. |
MS-ADLDS-DisplaySpecifiers.LDF | Display specifiers schema and data required to use the GUI tools with AD LDS. |
MS-AZMan.LDF | Objects and attributes needed for Microsoft Authorization Manager (AZMan). AZMan is a framework for roles-based access control. |
MS-InetOrgPerson.LDF |
|
MS-User.LDF | Active Directory |
MS-UserProxy.LDF | AD LDS |
MS-UserProxyFull.LDF | AD LDS |

After completing the LDIF file dialog, you will be presented with a “Ready to Install” dialog listing the choices you’ve made. Click Next if you accept the choices; the AD LDS instance will be created, and you will be rewarded with a dialog indicating that you successfully completed the AD LDS Setup Wizard. Click on Finish to complete the installation process.
Installing an AD LDS Replica
Installing an AD LDS replica, also known as joining a configuration set, is very similar to creating a new, unique AD LDS instance. In addition to the unique instance installation questions, you must answer several questions related to which configuration set you would like to join and what to replicate.
When you join a configuration set you are choosing to share the configuration and schema partitions with another AD LDS instance (or replica), just like domain controllers in the same forest. In addition, you have the option to replicate all, some, one, or none of the application partitions with all, some, one, or none of the other replicas in the configuration set. Figure 20-10 shows a complex configuration set shared between the servers SERVER1, SERVER2, and SERVER3.

This may seem very complicated, but it is actually quite simple to configure. You need a plan of what partitions should go where; then you simply install each replica one by one, setting up the proper application partitions for replication.
The additional questions you need to respond to when installing a replica into a configuration set are listed in Table 20-3.
Question | Description | Example |
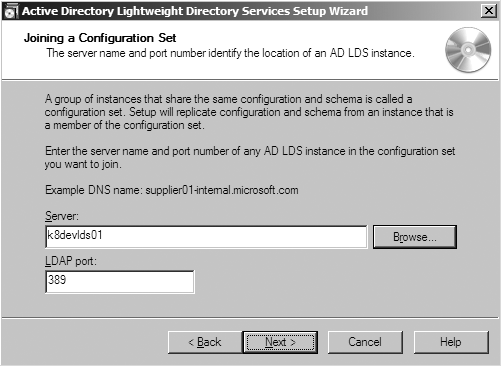
Source server? (Figure 20-12) | FQDN of any server in the configuration set to replicate initial configurations from. | k8devlds01 |
Source server LDAP port? (Figure 20-12) | LDAP port of instance to join. | 389 |
Configuration set administrative credentials? (Figure 20-13) | Credentials of user with administrative permissions in configuration set. | MYCORPadministrator |
Application partitions to replicate? (Figure 20-14) | Which application partitions, if any, you want to replicate to this specific replica. |
|
Once you are ready with the responses for the questions in Table 20-1 and Table 20-3, you start the instance creation process just as you did when you created a new instance. When you get to the Setup Options dialog, select “A replica of an existing instance” (see Figure 20-11).
The wizard will continue on the same path as when installing a unique instance, presenting the dialogs from Figure 20-3 and Figure 20-4. After that, the wizard will start presenting some new dialog boxes. The first new dialog allows you to specify the connection information for an AD LDS instance that is part of the configuration set you want to join (see Figure 20-12). You will need to specify both the fully qualified domain name (FQDN) of the server and the port the instance is listening on for LDAP connections.
After you have specified the configuration set instance connection information, you will need to specify some administrative credentials for that configuration set (see Figure 20-13). Obviously, this is so you can actually add a new AD LDS instance into the configuration set. It wouldn’t be very secure if it just let anyone add new instances.
The last new dialog that will be presented, shown in Figure 20-14, is where you get to choose which application partitions, if any, you want this specific replica to maintain a copy of. If you refer back to Figure 20-11, you can see that you have the option to select any number of the application partitions that exist in the configuration set. In a very simple configuration set, there may only be one application partition, and that partition is shared among every replica. In a very complex configuration set, you could have any number of replicas that are or aren’t replicating any number of the partitions. Again, the configuration of a complex configuration set is quite simple; monitoring and management, on the other hand, could be another story.

After this dialog you will return to the normal unique instance installation procedure, with the next dialog being the File Locations dialog, shown in Figure 20-6. Walk through the rest of the wizard dialogs, and after you click Finish at the end of the wizard, you will have a new replica.
AD LDS has a couple of additional installation options that we
haven’t mentioned yet. You have the ability to run an unattended
install, as well as to install applications from media. These options
can be specified when you launch the install process from the command
line with ADAMinstall.exe. Type
ADAMinstall /? or see the AD LDS
help file for more information.
Note
After you have configured a replica, you will often notice that the replica immediately has replication connections to the instance you specified in the “Joining a Configuration Set” dialog (Figure 20-12), but none of the other replicas have replication connections to the new replica. This is perfectly normal; it can take some time for the news of the new replica to circulate throughout the configuration set and the necessary replication topology to be built up with the new replica inserted into it.
If you would like to speed up this process, you can use the repadmin.exe command-line tool to generate the connections. Specifically, you want the /AddRepsTo switch. Help for this switch is available if you type repadmin /experthelp. repadmin is one of the most useful tools available for determining how healthy you are from a replication standpoint and correcting any sore spots you encounter. This applies equally to AD LDS and AD.
Enabling the Recycle Bin
The Active Directory Recycle Bin, discussed in Chapter 18, is available in AD LDS configuration sets running on Windows Server 2008 R2 or newer AD LDS servers. Enabling the Recycle Bin requires a number of manual steps.
If your AD LDS configuration set was originally created prior to Windows Server 2008 R2, you must first upgrade the configuration set schema and raise the configuration set’s functional level. First, upgrade the schema using this command:
C:WindowsADAM> ldifde.exe -i -f MS-ADAM-Upgrade-2.ldf -s server:portNext, using Windows PowerShell, raise the configuration set functional level:
Set-ADObject-Identity`'CN=Partitions,CN=Configuration,CN=<configuration set guid>' `-Replace @{'msds-Behavior-Version'=4}-Serverserver:port
Note
You cannot raise the configuration set functional level until all of the AD LDS servers are running Windows Server 2008 R2 or better.
Finally, you can enable the Active Directory Recycle Bin for the configuration set:
Enable-ADOptionalFeature'Recycle Bin Feature'-ScopeForestOrConfigurationSet-Serverserver:port-Target'CN=Configuration,CN=<configuration set guid>'
Warning
You cannot disable the Recycle Bin once it is enabled. Enabling the Recycle Bin also prevents you from rolling back the configuration set functional level. Make sure you have tested applications that take advantage of DirSync controls and/or search for deleted objects.
20.5. Tools
AD LDS introduces several new tools and other updated tools that should be familiar to most Active Directory administrators. It is worth loading AD LDS just to get these tools. Table 20-4 shows all of the tools included with AD LDS. The first four are located in the %windir%ADAM directory.
Filename | Description |
ADAMinstall.exe | AD LDS instance installer. |
ADAMsync.exe | Synchronizes data from Active Directory to AD LDS. |
ADAMuninstall.exe | AD LDS instance remover. |
ADSchemaAnalyzer.exe | Schema comparison tool to assist with schema differencing/synchronization. Works with AD and AD LDS. |
dsdbutil.exe | AD LDS instance database management tool. |
dsmgmt.exe | AD LDS instance configuration management tool. |
ADAM Install
ADAM Install is the GUI tool launched by the Active Directory Lightweight Directory Services Setup Wizard menu selection. You have the option to launch the application directly to enable the advanced installation dialogs, which allow you to install an application partition from a file. You can also specify an unattended installation answer file if you would like to automate the AD LDS instance installation.
ADAM Sync
This is a command-line tool that offers basic synchronization functions to populate AD LDS information from AD. This is made available to administrators who only need a one-way feed and don’t need the overhead of the Identity Integration Feature Pack (IIFP) or Microsoft Forefront Identity Manager (FIM), both of which allow two-way synchronization.
ADAM Uninstall
This tool allows you to remove AD LDS instances from a server at the command line.
AD Schema Analyzer
This is an extremely useful GUI tool that will analyze two LDAP directory schemas (live or from LDIF files) and graphically display differences between them, or “deltas.” The tool can create an LDIF file with all of the deltas between the two schemas, so that you can import the LDIF file to synchronize them. The AD Schema Analyzer is helpful to use with applications that modify the schema where the vendor didn’t supply an LDIF file showing the changes for you to easily review. You can also use the AD Schema Analyzer to export schema changes from a development environment to an LDIF file in preparation for making the changes in production.
AD Schema MMC Snap-in
You can take advantage of the Active Directory Schema MMC snap-in to manage the schema of an AD LDS configuration set the same way you would use it to manage the AD schema. To connect to an AD LDS configuration set, follow these steps:
Launch the AD Schema MMC snap-in.
Note
The AD Schema MMC snap-in is installed but not registered by default. The first time you want to use it on a server, you must first run regsvr32 schmmgmt.dll from an elevated command prompt. Once you register the DLL, you can create an MMC console with the snap-in by going to Start→Run→
mmc, and then choosing File→Add/Remove Snap-in and adding Active Directory Schema.Right-click the root node on the left, Active Directory Schema, and click Change Active Directory Domain Controller.
Select “This Domain Controller or AD LDS instance.”
Double-click on “<Type a Directory Server name[:port] here>” and enter the FQDN and port of your AD LDS server.
ADSI Edit
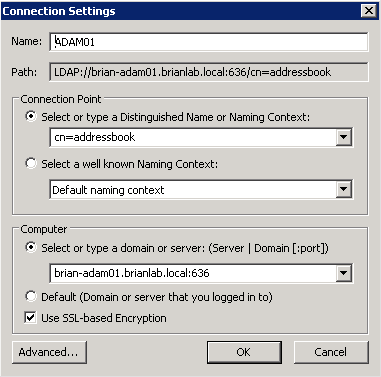
You can use ADSI Edit to connect to AD LDS instances, much like when connecting to AD domains. To connect to an AD LDS instance, right-click the ADSI Edit node on the left and click Connect To. Specify the DN of the partition to connect to and the server (and port) hosting the partition, as shown in Figure 20-15. You can optionally specify explicit credentials to connect with using the Advanced button.
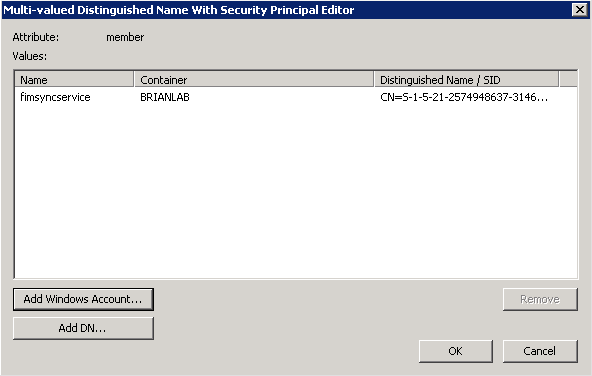
ADSI Edit includes a special group membership editor that is useful for working with AD LDS, since it can resolve SIDs to add domain users to groups as well as allowing you to nest AD LDS security principals in AD LDS groups. Figure 20-16 shows the ADSI Edit group membership editor.
dsdbutil
The dsdbutil command-line tool has a subset of the functionality present in the Active Directory NTDSUTIL tool and is only used for managing AD LDS. AD LDS servers can be managed with ntdsutil, but dsdbutil is specifically configured to be used with AD LDS and cannot be used with Active Directory. You can use this tool for all low-level database management tasks, such as authoritative restores, compacting files, integrity checks, etc.
dsmgmt
Like dsdbutil, the dsmgmt command-line tool has a subset of the functionality present in the Active Directory NTDSUTIL tool and is specifically configured to be used with AD LDS servers. You can use this tool for controlling various AD LDS configuration settings, metadata cleanup of retired AD LDS instances, and creating and deleting naming contexts.
ldifde
ldifde is a command-line tool used to import or export Active Directory objects in LDIF format. Unlike csvde, ldifde can be used to update as well as create and delete objects in AD LDS or Active Directory. LDIF is a standard format used for all LDAP-based directories and is usually the format that you receive schema update information in for applications that need schema modifications. It is important for AD and AD LDS administrators and developers to be familiar with the LDIF format in general and the ldifde tool in particular.
LDP
LDP is a GUI tool used to browse, search, or update AD or AD LDS. You have the ability to view the directory in a tree hierarchy or construct a standard LDAP query. LDP allows you to check in nearly any LDAP client or server control and to find deleted objects or other items that require special queries. If you are going to be managing security descriptors (ACLs) in AD LDS, you’ll need to get familiar with LDP.
repadmin
The base function of the repadmin command-line tool is to display and manage the replication topology of a set of directory servers. But the more you use repadmin, the more things you’ll find that it can do, from displaying object metadata to updating SPNs, displaying trusts, translating timestamps, and more. Once you have figured out everything it can do with the switches displayed when you run repadmin /?, you can start investigating the additional switches that are displayed when you run repadmin /experthelp.
20.6. The AD LDS Schema
As mentioned previously, the initial AD LDS schema is a small subset of the full Active Directory schema. You can extend the schema just as you can in Active Directory, though, so if you want to you can fully expand the schema to be the same as the AD schema. Because of this, AD LDS is a great place to test schema modifications that you want to make in Active Directory. The fact that the extensions work the same way and you can quickly destroy and recreate AD LDS instances means that you can quickly test new extensions, changing the definitions until you get exactly what you want. You can even have multiple instances on the same computer running at the same time, each with a different version of the schema so you can easily compare and contrast them. For details on working with the schema, AD, and AD LDS, see Chapters 5 and 17.
Default Security Descriptors
Quite unlike in the Active Directory schema, the base AD LDS
schema classSchema objects do not
have ACEs defined in their defaultSecurityDescriptor attributes. This
causes objects to be created without any explicit ACEs, unless a
security descriptor with explicit ACEs is specified during the object
creation. The obvious benefit of this is that all of your default
security is based on inherited ACEs. As you will recall from Chapter 16’s discussion of
Active Directory security, this makes it far easier to configure
delegation. Although you are not required to follow this model for any
classes you add to AD LDS, you are strongly
encouraged to do so. You should have very great reasons to deviate from
this practice.
Bindable Objects and Bindable Proxy Objects
As previously mentioned, any objectClass you import into AD LDS can be
configured to allow bind functionality in AD LDS. The two types of bind
functionality are covered by bindable objects and bindable proxy
objects. A bindable object is an object that is
actually authenticated directly by AD LDS. Bindable objects (such as
users) store a password in the AD LDS database. A bindable
proxy object is an object that is actually authenticated by
Windows. AD LDS simply proxies the authentication request to Windows; an
example would be a userProxy.
In order to make it possible to instantiate a bindable object or
bindable proxy object of a given objectClass, you must statically associate
either the msDS-BindableObject or the
msDS-BindProxy class as an auxiliary
class of the given objectClass. If
you associate both classes to the given objectClass, msDS-BindableObject takes precedence.
20.7. Using AD LDS
Now that you have an idea of what AD LDS is and how to install it, you are probably sitting there with an empty AD LDS wondering, “What next?” This section will walk you through some common, simple tasks, including creating an application partition and populating it with some data. These examples assume you have installed an AD LDS instance with the MS-User.LDF and MS-UserProxy.LDF files. All of the examples will use LDIF files and ldifde.exe for making the updates, because this tool is available with every server and requires no scripting knowledge. If you are familiar with scripting or other LDAP applications, they could be used as well.
Note
If you prefer command-line tools over GUI-based tools, point your web browser at http://www.joeware.net and download the admod and adfind freeware utilities. These command-line tools are specifically optimized to work with Active Directory and AD LDS and have several built-in capabilities that take advantage of special features that aren’t available through ADSI.
Creating Application Partitions
Generally, the first thing you need to do with AD LDS to add data to it is to create an application partition to house that data. If you had an application partition created during the instance install, then you don’t have to worry about this step unless you would like to create an additional application partition within the same instance.
AD LDS will allow you to use any container class as an application
partition root. If you want the application partition root to be a
container, domainDNS, organizationalUnit, c, o, or
even a user, you can easily set it
up. You only have to specify three pieces of data to create an
application partition: the distinguished name (DN), the objectClass, and the instanceType. The instanceType attribute must always be 5, so that just leaves you with two attributes
you have to figure out: the DN and objectClass.
The distinguished name is the fully qualified name for the root of
the partition. This is the value you will use any time you want to
access the application partition. The objectClass is the type of object you want the
root object to be, and the choice will impact the DN of the root. For
instance, if you choose organizationalUnit, you know the DN will start
with OU=.
The following example will create several application partitions with different object classes. If you want to create a single partition, only copy the application partition type you would like to use.
Create an LDIF file called create_app_parts.ldf with the following contents:
# Container-type application partition
dn: cn=AddressBook
changetype: add
objectClass: container
instanceType: 5

# Organizational Unit-type application partition
dn: ou=products
changetype: add
objectClass: organizationalUnit
instanceType: 5

# Domain DNS-type application partition
dn: dc=mycorp,dc=com
changetype: add
objectClass: domainDNS
instanceType: 5

# Organization (X.500)-type application partition
dn: o=mycorp,c=us
changetype: add
objectClass: organization
instanceType: 5
Once you have created the LDIF file, run the following command:
> ldifde -i -f create_app_parts.ldf -s <server>:<ldap_port>Note
You can also use ntdsutil.exe to create application partitions.
Creating Containers
Creating containers in AD LDS is identical to creating containers in Active Directory. The following example will create several containers under the AddressBook application partition root.
Create an LDIF file called create_containers.ldf with the following contents:
# Users container
dn: cn=users,cn=AddressBook
changetype: add
objectClass: container

# User Proxies container
dn: cn=userproxies,cn=AddressBook
changetype: add
objectClass: container

# Groups container
dn: cn=groups,cn=AddressBook
changetype: add
objectClass: container
Once you have created the LDIF file, run the following command:
> ldifde -i -f create_containers.ldf -s <server>:<ldap_port>Creating Users
Creating users in AD LDS is similar to creating users in Active
Directory. A rather obvious difference is that AD LDS users do not have
the sAMAccountName attribute.
Although this attribute could be defined and linked to the user class, it will not have the same special
properties as it does in Active Directory, such as enforced
uniqueness.
The following example will create several users under the previously created Users container.
Create an LDIF file called create_users.ldf with the following contents:
dn: cn=g.washington,cn=users,cn=AddressBook
changetype: add
objectClass: user
userPrincipalName: GWashington
mail: [email protected]
displayName: Washington, George
telephoneNumber: 202.555.3452
userPassword: SecureInitialPassword1!

dn: cn=j.madison,cn=users,cn=AddressBook
changetype: add
objectClass: user
userPrincipalName: JMadison
mail: [email protected]
displayName: Madison, James
telephoneNumber: 202.555.3453
userPassword: SecureInitialPassword1!

dn: cn=j.adams,cn=users,cn=AddressBook
changetype: add
objectClass: user
userPrincipalName: JAdams
mail: [email protected]
displayName: Adams, John
telephoneNumber: 202.555.3455
userPassword: SecureInitialPassword1!

dn: cn=t.jefferson,cn=users,cn=AddressBook
changetype: add
objectClass: user
userPrincipalName: TJefferson
mail: [email protected]
displayName: Jefferson, Thomas
telephoneNumber: 202.555.3454
userPassword: SecureInitialPassword1!
Once you have created the LDIF file, run the following command:
> ldifde -i -f create_users.ldf -s <server>:<ldaps_port>Warning
By default, creating enabled users in Active Directory with ldifde.exe requires a 128-bit SSL connection and Base64 encoding of the Unicode version of the password enclosed in quotes. See http://support.microsoft.com/kb/263991 for more information.
For AD LDS, Microsoft enabled the userPassword attribute to function as a
write-alias for unicodePwd and
removed the requirement for the special formatting unicodePwd required. This allows your LDIF
files to have clear-text passwords specified; however, you still have
the SSL requirement unless you have relaxed the requirement for secure
connections for password operations with dsmgmt.
Note
Windows Server 2003 and newer domain controllers have the
ability to also use the userPassword attribute instead of unicodePwd; you must enable that capability
though the dsheuristics attribute.
The userPassword attribute can
only be used for set operations in AD LDS and AD; if you need to change
a password, you must use unicodePwd,
as mentioned at http://support.microsoft.com/kb/263991.
Passwords are far easier to deal with using ADSI scripts, ldp.exe, or command-line tools, such as the previously mentioned freeware tool admod.exe.
Creating User Proxies
The userProxy objectClass is
new to AD LDS. These objects are similar to users in that they represent
trustees that can be authenticated; they are different in that they are
only references to Windows users instead of direct representations of
those users. The userProxy object
points at a Windows user via the objectSID attribute on the object; that
attribute can only be set on object creation.
When someone authenticates with a userProxy, by default, he must perform a
simple bind over SSL against AD LDS with the DN or UPN of the userproxy object. First AD LDS accepts the
userProxy DN/UPN and password, and
then the SID is retrieved from the object and resolved to a Windows user
(and domain if necessary); finally, a secure LogonUser API call is executed with the user’s
SAM name (and NetBIOS domain name if necessary) and password to
authenticate the user. If the user successfully authenticates, his
security token is generated and he has any access to the directory that
is delegated to any of the following security principals:
The
userProxyobjectAny groups the Windows user is a member of
Any groups the
userProxyis a member of
The following example will create a UserProxy object under the previously created userProxies container.
Create an LDIF file called create_userproxies.ldf with the following contents:
dn: cn=joeproxy,cn=userproxies,cn=AddressBook
changetype: add
objectClass: userProxy
objectSID: S-1-5-21-2571958876-650952397-806722693-1108
userPrincipalName: joeproxy
Once you have created the LDIF file, run the following command:
> ldifde -i -f create_userproxies.ldf -s <server>:<ldap_port>In this example, the objectSID
for a domain user is specified in the objectSID attribute for
joeproxy. Any time the
joeproxy user is used for binding to AD LDS, it
will proxy that authentication through LogonUser to Windows and validate the
credentials provided against the user with the objectSID in the sample.
Special considerations
The userProxy object can use
any Windows user that can be authenticated through the trust channels
of the server the AD LDS instance is running on. This includes local
computer users, domain users, and trusted domain users. If you choose
to use local users, you need to keep in mind that only the computer
that the user exists on will be able to authenticate the user. This
has obvious implications with replicated instances of AD LDS; only a
single instance of the configuration set will be able to authenticate
the user. Possibly this is what you are looking to do in the case of
only allowing access to a single replica, but overall this would be
confusing and difficult to troubleshoot if someone who wasn’t familiar
with this special configuration had to get involved.
Another special consideration with userProxy objects concerns object creation.
If a Windows user’s SID has already been added to the AD LDS instance
as a foreignSecurityPrincipal, you
will not be allowed to create a userProxy object with the same SID. The
directory modification will be rejected with an “unwilling to perform”
error.
Renaming Users
A common task in any address book or other application that has user information is rename operations. People are out there getting married, divorced, or just changing their names for some other reason, and they generally want to see those changes reflected in directories that contain their names.
The following example will rename a couple of previously created users.
Create an LDIF file called rename_users.ldf with the following contents:
dn: cn=g.washington,cn=users,cn=AddressBook
changetype: modify
replace: userPrincipalName
userPrincipalName: George.Washington
-
replace: mail
mail: [email protected]
-
replace: displayName
displayName: George Washington
-
dn: cn=g.washington,cn=users,cn=AddressBook
changetype: modrdn
newrdn: george.washington
deleteoldrdn: 1
dn: cn=j.adams,cn=users,cn=AddressBook
changetype: modify
replace: userPrincipalName
userPrincipalName: John.Adams
-
replace: mail
mail: [email protected]
-
replace: displayName
displayName: John Adams
-
dn: cn=j.adams,cn=users,cn=AddressBook
changetype: modrdn
newrdn: john.adams
deleteoldrdn: 1
Once you have created the LDIF file, run the following command:
> ldifde -i -f rename_users.ldf -s <server>:<ldap_port>Each rename consists of two LDAP operations. The first operation
is to replace several of the attributes that house the old name:
specifically, userPrincipalName,
mail, and displayName. The second operation is to rename
the relative distinguished name (RDN) of the object. This update forces
a change of the cn, name, and distinguishedName attributes for user objects.
Creating Groups
Creating groups in AD LDS is similar to creating groups in Active
Directory. As with creating users, you do not have a sAMAccountName attribute to be concerned with,
so you can ignore that attribute.
The following example will create several groups in the previously created Groups container.
Create an LDIF file called create_groups.ldf with the following contents:
dn: cn=group1,cn=groups,cn=AddressBook
changetype: add
objectClass: group
dn: cn=group2,cn=groups,cn=AddressBook
changetype: add
objectClass: group
dn: cn=group3,cn=groups,cn=AddressBook
changetype: add
objectClass: group
dn: cn=group4,cn=groups,cn=AddressBook
changetype: add
objectClass: group
Once you have created the LDIF file, run the following command:
> ldifde -i -f rename_users.ldf -s <server>:<ldap_port>Adding Members to Groups
Adding members to groups with ldifde.exe in AD LDS is similar to the process followed for Active Directory. You have two options:
Specify the DN of the user, group, or other object in an update to the
memberattribute of the group.Specify the SID of the user, group, or other object as a Base64-encoded string with the format
SID=S-1-xxx-yyyy....
Unfortunately, at the present time, a Windows user must be
specified in the SID format unless that user has already been added to
the AD LDS application partition as a userProxy or foreignSecurityPrincipal. Once added as one of
these objects, the Windows user can be referenced by the DN of the
object.
The following example will add users and groups as members to the groups previously created.
Create an LDIF file called add_ users.ldf with the following contents:
dn: cn=group1,cn=groups,cn=AddressBook
changetype: modify
add: member
member: cn=george.washington,cn=users,cn=AddressBook
-
dn: cn=group2,cn=groups,cn=AddressBook
changetype: modify
add: member
member: cn=george.washington,cn=users,cn=AddressBook
member: cn=john.adams,cn=users,cn=AddressBook
-
dn: cn=group3,cn=groups,cn=AddressBook
changetype: modify
add: member
member: cn=group2,cn=groups,cn=AddressBook
member: cn=john.adams,cn=users,cn=AddressBook
member: cn=james.madison,cn=users,cn=AddressBook
-
dn: cn=group4,cn=groups,cn=AddressBook
changetype: modify
add: member
member: CN=Administrators,CN=Roles,CN=AddressBook
-
Once you have created the LDIF file, run the following command:
> ldifde -i -f add_users.ldf -s <server>:<ldap_port>Removing Members from Groups
Removing members from groups with ldifde.exe in AD LDS is similar to the process followed for Active Directory. You simply specify the DN of the user, group, or other object that is currently a member that you would like to remove.
The following example will remove members from the groups previously created.
Create an LDIF file called remove_ users.ldf with the following contents:
dn: cn=group1,cn=groups,cn=AddressBook
changetype: modify
delete: member
member: cn=george.washington,cn=users,cn=AddressBook
-
dn: cn=group2,cn=groups,cn=AddressBook
changetype: modify
delete: member
member: cn=george.washington,cn=users,cn=AddressBook
member: cn=john.adams,cn=users,cn=AddressBook
-
dn: cn=group3,cn=groups,cn=AddressBook
changetype: modify
delete: member
member: cn=group2,cn=groups,cn=AddressBook
member: cn=john.adams,cn=users,cn=AddressBook
member: cn=james.madison,cn=users,cn=AddressBook
-
 dn: cn=group4,cn=groups,cn=AddressBook
changetype: modify
delete: member
member: CN=Administrators,CN=Roles,CN=AddressBook
-
Once you have created the LDIF file, run the following command:
> ldifde -i -f remove_users.ldf -s <server>:<ldap_port>Deleting Objects
Deleting objects with ldifde.exe is generally pretty straightforward. As long as you have permission to delete the object in question and it has no children, you should have no issues with the deletion.
The following example will remove previously created group and container objects.
Create an LDIF file called remove_ objs.ldf with the following contents:
dn: cn=group1,cn=groups,cn=AddressBook
changetype: delete
dn: cn=group2,cn=groups,cn=AddressBook
changetype: delete
dn: cn=group3,cn=groups,cn=AddressBook
changetype: delete
dn: cn=group4,cn=groups,cn=AddressBook
changetype: delete
dn: cn=groups,cn=AddressBook
changetype: delete
Once you have created the LDIF file, run the following command:
> ldifde -i -f remove_objs.ldf -s <server>:<ldap_port>Deleting Application Partitions
Programmatically deleting an application partition in AD LDS is
not an intuitive process. When you created a partition, you specified
the DN, objectClass, and instanceType, and that was all that was
required. When you need to delete an application partition, you have to
look at the objects in the cn=partitions,cn=configuration,cn=<instance
GUID> container. Locate the object with the nCName that matches the application partition
you want to delete and copy the DN into your LDIF file that has the
delete operations.
The following example will delete the cn=AddressBook application partition we
created earlier.
Create an LDIF file called remove_app_part.ldf with the following contents:
#>nCName: CN=AddressBook
dn:
  CN=45d599d5-9bd4-41be-9604-b8209db3f866,CN=Partitions,
  CN=Configuration,CN={92B82A0E-CEC4-4720-9035-D0CA9632C20E}
changetype: delete
Once you have created the LDIF file, run the following command:
> ldifde -i -f remove_app_part.ldf -s <server>:<ldap_port>Note
You can also use ntdsutil.exe to delete application partitions.
Controlling Access to Objects and Attributes
We discussed delegation of access to Active Directory in Chapter 16, and all of the concepts discussed there also apply to AD LDS. There are, however, two critical differences. The first, as mentioned briefly earlier in this chapter, is that unlike AD, AD LDS does not grant any read access to the directory out of the box. This means that as the administrator, you need to either grant full read access by nesting users and groups in the Readers group for your instance, or delegate permissions more granularly. The second difference is that the ACL editor and Delegation of Control Wizard you’re used to using are not available for use with AD LDS. You must instead take advantage of the ACL editor in the LDP utility, which is unfortunately not nearly as user-friendly.
You can access the LDP ACL editor by following these steps:
Launch LDP by going to Start→Run→ and entering
ldp.exe.Connect to the server from Connection→Connect. Enter the FQDN and port of the AD LDS server hosting the application partition for which you want to manage security.
Bind to the instance from Connection→Bind (Ctrl-B). You can either select “Bind as currently logged on user” to use your domain credentials, or specify alternate credentials.
Load the application partition hierarchy by selecting View→Tree (Ctrl-T) and choosing your application partition.
Right-click the object you want to edit the ACL for and click Advanced→Security Descriptor. Click OK.
Note
If you need to edit auditing settings, you’ll need to check the SACL checkbox in the preceding dialog.
Click in the DACL listbox to enable the Add ACE, Delete ACE, and Edit ACE buttons at the bottom of the dialog.
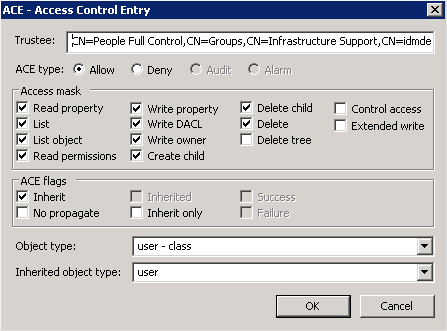
Figure 20-17 shows an example where we are granting a group called “Property Set Read – MyCorp Personal Information” (the trustee) read property rights (access mask) to the MyCorp Personal Information property set (object type) for all users (inherited object type). This is being applied to the People OU and will be inherited by all users in that OU structure.

In Figure 20-18, we are granting a group called People Full Control (trustee) most rights (access mask) to all of the users (object type) in the People OU.
20.8. Summary
AD LDS is an extremely exciting product that is certainly going to find heavy use for both Microsoft and other applications in the enterprise environment. The flexibility it offers allows Active Directory administrators to say “We can do that” more often now in order to support line-of-business applications and other functions that they would never have allowed near their domain-based Active Directory networks. Knowledge and understanding of AD LDS will become more and more important to all Active Directory administrators going forward as more and more applications start to leverage it.
In this chapter, basic AD LDS concepts, as well as some more advanced concepts, were discussed and explored. We walked through the installation of the AD LDS server role as well as the installations of a standard unique instance and a replica instance, with screenshots and tables illustrating decision points. We also introduced the new and updated tools that ship with AD LDS. Finally, many ldifde.exe examples showing most aspects of creating and deleting objects and partitions were provided and discussed to help a new AD LDS administrator quickly get up and running with a new AD LDS instance.