
Chapter 21. Active Directory Federation Services
As services have transitioned from the corporate datacenter to platforms hosted externally in the “cloud,” the need for a mechanism to extend authentication has evolved substantially. Microsoft’s answer to this is Active Directory Federation Services (ADFS). ADFS is a standalone service that carries the Active Directory brand, so naturally it is expected that Active Directory administrators will be prepared to deploy and manage ADFS.
In reality, ADFS is a skillset in its own, so we’ll take the opportunity in this chapter to introduce the service and discuss the basics of deploying and configuring it. If you’ve ever done any web development, you’ll probably find many of the concepts of ADFS and identity federation in general to be far more familiar than others who are coming in with a purely infrastructure-based background.
No doubt, either way you’ll find many of the fundamental concepts of identity federation to be strikingly similar to concepts that have existed since the early days of Active Directory (and even earlier with NT domains). If you explore the federated identity space, you’ll discover that this space is crowded and numerous vendors have solutions to this problem. Fundamentally, many of these solutions are functionally very similar. We’ll limit our discussion in this chapter to ADFS, but many of the concepts we discuss apply broadly across the market.
21.1. Introduction to Federated Identity
Fundamentally, the idea behind identity federation is that one party (the identity provider, or IdP) will be able to assert that a user is who she says she is to a second party (the relying party, or RP) with nothing more than a lightweight trust relationship established between the IdP and the RP. The term “trust” is important in this description as there is no way for the RP to actually know that the IdP is providing an entirely factual answer.
To make this example less abstract, consider a scenario where an organization (Coho Vineyard) outsources its employee payroll processing to a third party (Fabrikam Payroll). In order for employees to be able to access their payroll and tax information online, they need a way to log into the Fabrikam Payroll website that is hosted in Fabrikam’s datacenters.
Figure 21-1 outlines this scenario. In Figure 21-1, the users exist in Coho Vineyard’s Active Directory. Coho Vineyard has deployed an ADFS environment and is the identity provider in this case. Coho Vineyard and Fabrikam Payroll have worked together to establish a federation trust. In this case, the Fabrikam Payroll website is the relying party.

How It Works
At the end of the day, there are a couple of protocols that are spoken between partners in an identity federation scenario. No matter where you go, chances are you’ll be dealing with either Security Assertion Markup Language (SAML, pronounced “sam-il”) or WS-Federation (often abbreviated WS-Fed).
For SAML and WS-Fed, the conceptual semantics of how they work is the same, but the formatting of the data is different. In both cases, the IdP generates an Extensible Markup Language (XML) snippet that contains a series of claims about the user in question. Claims are simply attribute/value pairs. Common examples are data points such as the user’s name, email address, employee number, and so forth. This set of claims and the supporting data in the XML comprise the user’s token for access to the RP. The RP uses the claims in the token to authorize the user and provide the necessary functionality in the application.
In order to guarantee that the token was issued by the IdP and that it hasn’t been tampered with, the IdP digitally signs the XML with its token signing certificate. The RP has a copy of the IdP’s token signing certificate public key. When the RP receives a token from the IdP, it uses the public key to confirm that the token is valid.
Now that we’ve discussed the token that the IdP issues, let’s look at an end-to-end example whereby a user wants to access the Fabrikam Payroll website, as shown in Figure 21-2.
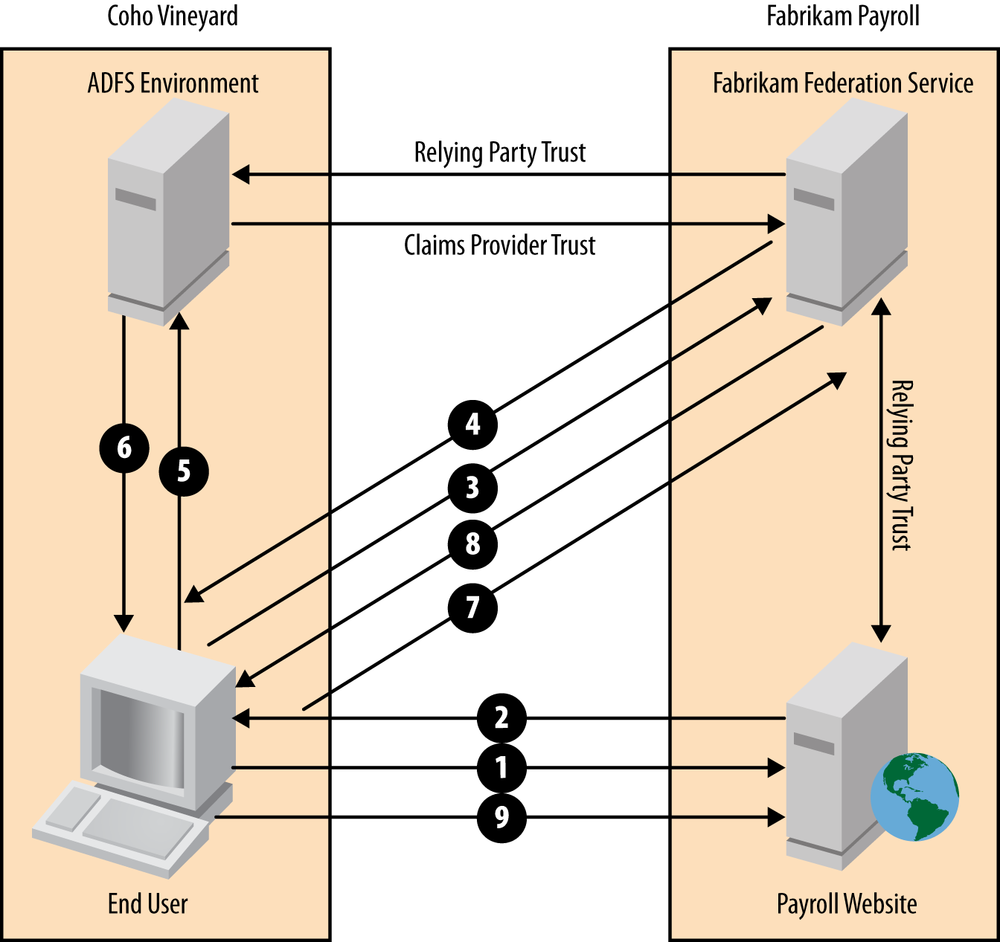
In this scenario, the following steps occur for a user to access the Fabrikam Payroll website:
The user browses to the Fabrikam Payroll website with his web browser, directing it. At the Fabrikam Payroll website, the user attempts to log in and the application discovers that the user must be logged in via federation.
The website issues an HTTP redirect to the user’s browser directing it to visit the Fabrikam Federation service URL for authentication.
The user’s browser accesses the Fabrikam Federation service.
Note
The Fabrikam Federation service could be an ADFS environment, or it could be running any one of a multitude of other federation products available on the market.
The Fabrikam Federation service looks up the URL for the Coho Vineyard IdP and issues an HTTP redirect to the user’s browser.
The user’s browser accesses the Coho Vineyard ADFS server.
The user authenticates to the ADFS server and is presented with a token that is signed with the ADFS server’s token signing certificate. The ADFS server issues an HTTP redirect to the user’s browser, directing it back to the Fabrikam Federation service.
The user’s browser presents the token to the Fabrikam Federation service.
The Fabrikam Federation service validates the token and then issues the user a new token for the Fabrikam Payroll website that is signed with Fabrikam’s token signing certificate. Finally, the Fabrikam Federation service issues an HTTP redirect to the user’s browser pointing it back to the Fabrikam Payroll website.
The user accesses the Fabrikam Payroll website and presents the token issued by the Fabrikam Federation service. The website validates the token, authorizes the user, and grants him access to the application.
You’re probably wondering how all this could possibly work or be efficient with this many redirects and round-trips. Perhaps surprisingly, the process works extremely well and is quite efficient. There are a couple of things that might not be immediately clear from the process flow described here.
The first is step 2. Why does the Fabrikam Payroll website redirect the user to the Fabrikam Federation service versus directly to Coho Vineyard’s ADFS service? The answer here is in the semantics of building applications for federated identity. There are two trust relationships that come into play in Figure 21-2. In the case of the website or applications in general, the application can only trust one federation service. The federation service, however, can trust many other IdPs. Since many customers use the Fabrikam Payroll website, the website has a trust with Fabrikam’s federation service, and then in turn Fabrikam’s federation service trusts each customer (Coho Vineyard and so forth).
Note
In some cases, the website or application also functions as the federation service. In this case, the trust relationship would be directly between the customer’s ADFS server and the relying website. This removes a couple of hops and is a bit simpler, but it is functionally identical.
With that piece of information in mind, it may become a bit clearer why we need to make two round-trips to the Fabrikam Federation service. In step 6, the user is presented with a token signed by Coho Vineyard’s ADFS server. Since the trust relationship between Coho Vineyard and Fabrikam Payroll is between the federation services, the user must present the signed token back to Fabrikam’s federation service (step 7). Fabrikam’s federation service will then validate the token, and if everything checks out, it will issue a new token that is signed with Fabrikam’s certificate (step 8). Since the Fabrikam Payroll application only trusts Fabrikam’s federation service, the website would not be able to validate the token if it were signed by Coho Vineyard’s ADFS server.
Before moving on, we’ll leave you with a comparative piece of food for thought. If you’re an Active Directory administrator, you’re undoubtedly familiar with Kerberos (Chapter 10). The fundamentals of how identity federation works, as we just discussed, are very similar to Kerberos. Functionally, you can think of the IdP as a domain controller and the RP as an application or server (e.g., a file server). When a user accesses the file server, she must present the file server with a service ticket (the federation token) in order to access the service. The service ticket is encrypted with the service’s secret to ensure that it isn’t tampered with (similar to the signing of the token from the federation service).
SAML
Security Assertion Markup Language (SAML) 2.0 is one of the two primary competing standards for passing federation tokens between environments. In the United States, you’ll find SAML to be extremely prevalent in education and government; it is also used in many third-party applications and cloud services. For the external cloud services, supporting SAML is the logical choice for achieving a broad range of compatibility with potential customers.
You can learn quite a bit about SAML on Wikipedia, of all places. We found the whitepaper “How to Study and Learn SAML” to be extremely helpful as well. Finally, the specifications for SAML are available online.
As you read documentation on SAML, you’ll probably notice that the documents discuss the term assertion at great length. In SAML, an assertion is functionally equivalent to the term “token” that we use in this chapter.
WS-Federation
WS-Federation is the protocol Microsoft has chosen to adopt in its applications and software development kits (SDKs). In fact, the first version of ADFS, only knew how to speak WS-Federation. This was an issue that greatly impacted the adoption of ADFS, as large portions of the market were inaccessible without a service to convert between SAML and WS-Fed.
If you work with developers who are building .NET applications using Windows Identity Foundation (WIF) or the classes included in the .NET 4.5 Framework, those applications will generally speak WS-Fed in their interactions with the IdP.
21.2. Understanding ADFS Components
Now that we’ve spent some time exploring the semantics of identity federation at a conceptual level, we’ll spend the rest of this chapter diving into deploying and configuring ADFS. In this section, we’ll first discuss the server roles that comprise an ADFS topology. After that, we’ll take a look at some common deployment topologies for environments of different sizes.
The Configuration Database
The first decision you’ll need to make before you begin deploying ADFS is where to store the ADFS configuration. There are two places where ADFS can store its configuration—: on a Windows Internal Database (WID) instance that’s replicated to each federation server, or in a shared SQL Server environment.
Both options have pros and cons. The WID database is extremely easy to deploy (WID is included with Windows) and comes with no additional licensing costs. WID also removes the single point of failure in a distributed ADFS environment. With WID, each federation server contains a copy of the configuration database. One federation server (usually the first federation server deployed) is designated as the “primary” server. All configuration changes are made on the primary server, and these changes are replicated to all of the “secondary” federation servers every five minutes.
The WID database also has a few limitations. First, it has limitations in terms of performance and capacity in extremely large ADFS deployments. Additionally, storing the configuration database on WID removes support for SAML artifact resolution and token replay detection.
SAML artifacts are a protocol feature specific to SAML (versus WS-Fed). SAML artifacts allow SAML tokens (assertions) to provide a pointer to a piece of data that can be independently retrieved, rather than embedded in the SAML assertion. Since the request to retrieve the artifact will come at a later time, and the request might go to a different federation server, the artifact must be stored in the configuration database to make it globally available.
Token replay detection ensures that a token that is issued by ADFS can’t be reused. ADFS stores information about each token it issues in the configuration database to ensure that a token isn’t subsequently reused. This feature also requires that the configuration database be stored in a shared SQL Server environment versus in WID.
Finally, by using a SQL Server environment, you can take advantage of SQL high-availability features such as clustering and mirroring. These features can be useful in geographic redundancy scenarios, for example. We’ll discuss geographic redundancy in the section “ADFS Topologies”.
Federation Servers
The federation server is the heart and soul of an ADFS environment. Federation servers are capable of acting as both IdPs and RPs, depending on the scenario. All of the protocols ADFS speaks (e.g., SAML and WS-Fed) are emitted by the federation server as well.
Proper security (both physical and logical) of the federation server is important. Federation servers are just like domain controllers in that they control access to applications and services. Anyone with access to a federation server could impersonate any user in the organization by creating a false token that is signed with the federation server’s token signing certificate. To a relying party, the token would appear authentic and valid and would be treated just like a token that wasn’t fraudulently issued in this manner.
Federation Server Proxies
The federation server proxy is an optional feature that is used to provide a layer between your federation servers and the Internet. Functionally, there’s nothing you can’t do with ADFS if you don’t deploy proxies, but there are some scenarios that are much easier to handle with proxies in the mix.
The main scenario that federation server proxies enable out of the box is the ability to have different authentication mechanisms for internal and external users. Internally, when users connect to your federation server on the corporate network to obtain a token, you can rely on Windows Integrated Authentication (Kerberos and NTLM) to pass the user through to ADFS without any additional prompts. Externally, however, your users may be using their home PCs or connecting at a coffee shop, for example. In this case, you will likely want to present a friendly HTML form to authenticate the user.
Federation server proxies also insulate external clients from the relatively sensitive data on the federation server—the private keys that are used to sign tokens. This provides a level of security that many organizations appreciate.
Some organizations opt to use a reverse proxy other than the federation server proxy to publish their ADFS servers, and others opt to publish their federation servers directly on the Internet. Microsoft recommends the use of federation server proxies throughout its documentation, and we’ll show you how to deploy them later in this chapter.
ADFS Topologies
There are a number of different topologies for deploying ADFS, ranging from small and simple to large, complex, and highly redundant. We’ll look at a few common options so that you’re familiar with them and then move on with a walk-through of a relatively simple deployment that we’ll use for the rest of this discussion.
As you review the designs we present in this section, think about your environment’s requirements for scalability and, more importantly, high availability. As you begin federating with services hosted by third parties, your environment (in this case, ADFS) will still be critical to maintain access to those applications and services. If your ADFS environment is down, your users will not be able to access the cloud solution.
This is a trap that many organizations fall into as they briefly rejoice in the thought that they will not need to deliver high service levels for services that they outsource. While you will no longer be on the hook for maintaining the outsourced services, you will instead be on the hook for ensuring high availability for your ADFS environment, which governs access to the hosted service.
Single federation server
The simplest topology, suitable for testing and development, involves the deployment of a single federation server. In this scenario, you simply install the ADFS server role on a server and then use the configuration wizard (as described later in this chapter) to deploy a federation server using the Windows Internal Database. Outside of testing and development, the utility of this topology is likely quite limited.
Single federation server and federation proxy
In this scenario two servers are be required, as shown in Figure 21-3. One server functions as the federation server and host of the configuration database, and the other server functions as the federation server proxy and publishes ADFS to the Internet.
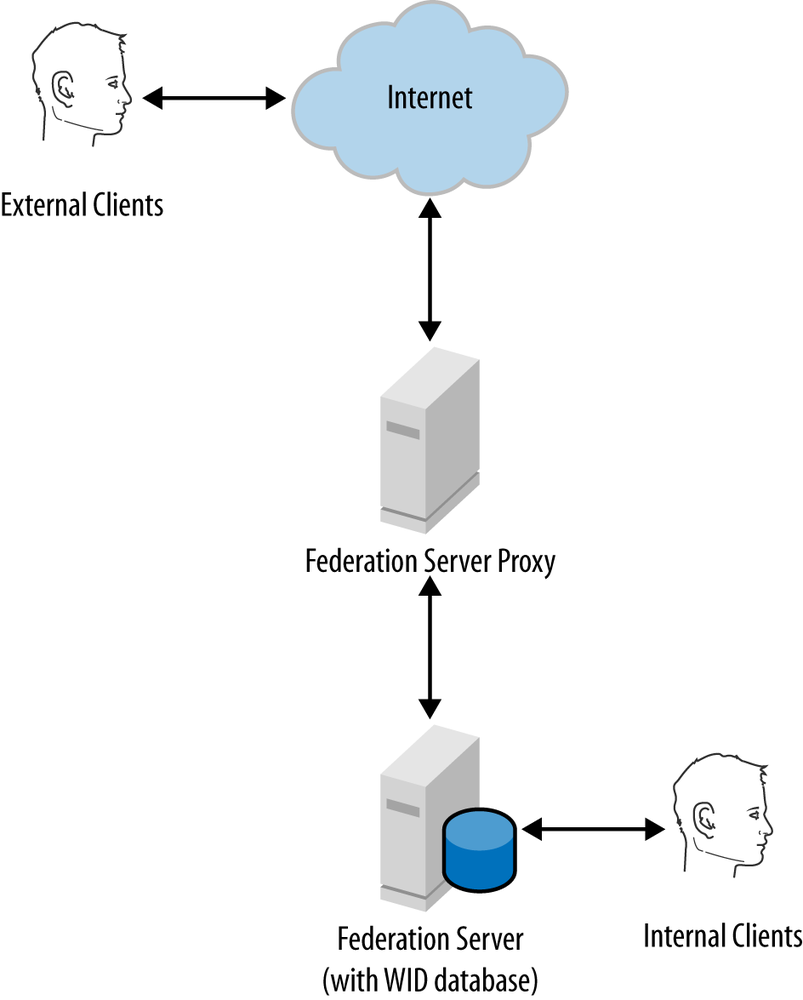
This topology is perfectly suitable for an organization that needs to federate with one or more partners and applications but does not have a need for redundancy at the server level. ADFS’s architecture makes it relatively easy to scale out this topology later to support multiple federation servers and federation server proxies.
Note
You could optionally deploy the configuration database on a standalone SQL server, but unless you have a need for SAML artifact resolution or token replay detection, it is unlikely that this will be necessary.
Load-balanced ADFS servers
As soon as you want to achieve any redundancy with ADFS, you’ll need to bring load balancing into the mix. This will likely require that you work closely with your colleagues on the network team to complete your deployment. As load balancing configurations go, the configuration for ADFS is quite simple. You will simply need to configure Layer 4 load balancing of TCP ports 80 and 443. There is no need for server affinity or SSL offloading unless you have a specific need outside of the basics. You will, however, want to configure appropriate server health monitoring on the load balancer.
Note
While it is possible to use the Windows Network Load Balancing (NLB) service that comes with Windows in lieu of a hardware load balancer, we strongly recommend that you elect to use a hardware load balancer instead.
Figure 21-4 shows a standard topology with load balancers in the mix. In this case, we have a pair of federation server proxies that are load balanced, and those proxies are connecting to a set of federation servers that are independently load balanced. We’ve opted to continue using the Windows Internal Database for configuration storage here. You could, however, deploy the database on a SQL Server cluster if necessary to support the scale of your deployment or because of a need for features such as SAML artifact resolution or token replay detection. As your requirements grow, you can easily add additional federation servers and federation server proxies behind the load balancers.

Note
While the diagram shows separate load balancers, depending on your network topology, you may simply need to configure two virtual IPs (VIPs) on one load balancer. Work with your network team to determine the best architecture.
Geographically redundant ADFS servers
The last and most complex solution involves placing ADFS servers in multiple datacenters to ensure the highest levels of availability. In this case, you will need to deploy a number of complex technologies to ensure that one DNS name (your ADFS service name) resolves to servers in multiple datacenters worldwide, and that users are directed to the datacenter that is closest to them.
In order to achieve the configuration shown in Figure 21-5, you will need a geographic load balancing service in addition to load balancing in each datacenter. There are various services and products that offer this capability, usually by acting as the DNS server for the services that are behind the global load balancer. One solution we are familiar with is the F5 Global Traffic Manager (GTM). The GTM is just one solution in a crowded market, so you should once again plan to work closely with your network team to determine the best solution.

In addition to the global load balancing solution, you will need to employ SQL Server’s mirroring capabilities to replicate the configuration database into each datacenter that hosts an ADFS environment.
21.3. Deploying ADFS
Now that we’ve taken a look at the ADFS server roles and some common topologies, we’ll go ahead and walk through the deployment and initial configuration of an ADFS environment. The environment we’ll configure is shown in Figure 21-3. Specifically, we’ll install a standalone federation server as well as a standalone federation server proxy. We’ll use the Windows Internal Database for our configuration store.
Before we go too far, we have to make one configuration decision—what should the FQDN of our environment be? This will need to be a name that is resolvable both internally and externally. This is the URL that users will be redirected to in order to authenticate and that relying parties will federate with. Technically speaking, the URL you pick has no impact as long as it can be resolved internally to the federation server and externally to the federation server proxy, but keep in mind that this is a URL you’re not going to be able to change later.
A few common examples we’ve seen are:
sts.cohovines.com
Note
STS stands for Security Token Service. STS is another term for IdP that is used by some products in the federation space.
fs.cohovines.com
auth.cohovines.com
login.cohovines.com
For the rest of this chapter, we’re going to use sts.cohovines.com as the name for our federation service.
Federation Servers
The first step to an ADFS deployment is deploying the federation server. If you’re running Windows Server 2008 R2, you’ll first need to download and install ADFS.
Warning
The version of ADFS included with Windows Server 2008 R2 is ADFS 1.0. ADFS 1.0 is markedly different from ADFS 2.0, so you’ll want to make sure you’re deploying the latest version.
If you’re running Windows Server 2012, ADFS 2.1 is that the latter is included out of the box as an optional server role. The only difference between ADFS 2.0 and ADFS 2.1 is that the latter includes the ability to send Dynamic Access Control (DAC) claims embedded in your Kerberos ticket as ADFS claims. Regardless of which version of ADFS you’re running, the directions in this chapter stand.
Both the downloadable setup for Windows Server 2008 R2 and the out-of-the-box Windows Server 2012 role setup are smart enough to install ADFS’s prerequisites. Both setup wizards will ask if you’d like to install a federation server or a federation server proxy. You should stick with the default of Federation Server for this step.
Certificates
ADFS requires a number of SSL certificates in order to function. At a minimum, you need to provide a certificate for the FQDN of your federation service (sts.cohovines.com in our case). Make sure the certificate is trusted by the clients that will be accessing the service.
In order to get an SSL certificate, you’ll need to generate a certificate signing request (CSR) and submit the request to a certification authority (CA). There are a number of ways to generate the CSR. We typically use the free utility from DigiCert, a reputable commercial CA with excellent customer service. You can download this utility from https://www.digicert.com/util/ and run it directly on the federation server. The CSR the utility creates can be submitted to any internal or commercial CA.
To create the CSR, launch the utility on your federation server and click Create CSR. Fill in the form as appropriate for your environment. The Common Name field should be the FQDN of your federation service, as shown in Figure 21-6. Once you receive the CSR, you can submit this to your CA.

When you receive the certificate back from the CA, use the Import button at the bottom of the utility to import the result. When this completes, you should see the certificate with a green checkmark, similar to Figure 21-7. If you are deploying a federation server farm or federation server proxies, you can use the Export button at the bottom of the screen to export the certificate to a PFX (Personal Information Exchange) file and then import it on the other servers.

There are two other types of certificates on the federation server—the token signing certificate and the token encryption certificate. When you install a federation server, ADFS will generate self-signed certificates for these purposes. We’ll discuss these in more detail in the section Service configuration.
Configuring ADFS
Once setup completes, you can launch the Active Directory Federation Services MMC snap-in. Inside the console, click the link to launch the AD FS Federation Server Configuration Wizard to get started. Before you proceed, take a moment to review the sidebar “ADFS Configuration Wizard Permissions” to make sure the wizard won’t fail when you get to the end.
Note
If you are going to use a SQL Server database for the configuration database in lieu of WID, you’ll need to use a command-line utility to configure ADFS. That utility is called fsconfig.exe and is available in %windir%ADFS.
The first thing you’ll be asked, as shown in Figure 21-9, is whether you want to deploy a new federation service or join an existing farm. Select the option “Create a new Federation Service.”

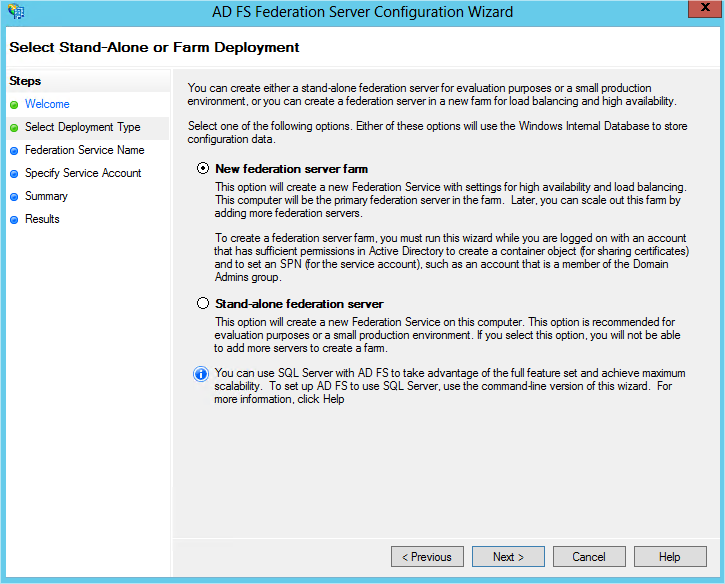
Next you’ll be given the option to create a new federation server farm or to install a standalone server, as Figure 21-10 shows. Even if you don’t plan to add additional federation servers, we recommend that you opt to create a one-server farm.
Warning
There is no transition path available to move from a standalone server to a federation server farm later.
ADFS also requires a service account in order to run in a farm
environment. This service account should be a normal Active Directory
user account, with the exception that it should have the service
principal names (SPNs) for the federation service listed on it. These
are generally similar to http/sts
and http/sts.cohovines.com.
The configuration wizard will prompt you to choose an SSL certificate to assign to the Internet Information Services (IIS) website that ADFS uses. Be sure to choose the certificate that matches your federation service name, as shown in Figure 21-11. If you need to change this, you can do so easily later in the IIS management console.

Finally, the configuration wizard will display a summary of the tasks to be performed for you to review before continuing. Once the wizard finishes, you’ll be provided with a summary of the steps taken and their results, as shown in Figure 21-12.

Service configuration
Once the wizard finishes, you can return to the ADFS management console. The first thing you’ll want to do is right-click the Service folder and click Edit Federation Server Properties. Here you can configure key details about your ADFS environment that will be published to parties you’re federating with.
On the General tab, you can configure a display name for your service. On the Organization tab, you can publish contact information for your ADFS support team that will be listed in the ADFS server’s federation metadata. Federation metadata is used to automatically configure the bulk of a trust relationship between parties. Finally, on the Events tab, you can adjust the logging and auditing for the service.
Warning
The “Federation Service name” and “Federation Service identifier” values on the General tab must be set during initial configuration. If you change these values after you have deployed ADFS, you may break the trust relationships you have with other parties!
The second configuration item that you should address before you begin federating is the topic of token signing and token encryption certificates. As we discussed earlier in the chapter, every token ADFS issues is signed with the ADFS token signing certificate. The organizations that you trust will keep a copy of the ADFS server’s public key locally so that they can validate each token they receive from your ADFS environment.
The problems that arise here are twofold. First, the token signing and token encryption certificates are self-signed. Self-signed certificates are generated locally on a server and are not issued by a trusted CA. Some federation platforms do not consider tokens signed by a nontrusted (e.g., self-signed) certificate to be valid, even if the signature is cryptographically valid. In these cases, you must either convince the other party to trust your token signing certificate, or use a token signing certificate from a commercial CA.
The second issue is the topic of certificate expiration. Since the parties you have trusts with must keep a copy of your token signing certificate’s public key on hand, they also need a mechanism to update that key when it expires. There is a protocol in place for relying parties to automatically pick up new token signing certificate public keys when they become available, but many federation platforms (and applications) don’t implement this. Consequently, when the certificate expires, the trust relationship will fail and access to the federated application will be impacted.
Since the certificate used for token signing is so important and difficult to change later, we recommend that you obtain a commercially issued token signing certificate that expires as far in the future as possible. It is well worth the added expense of buying a certificate with three (or more) years of validity up front, when you consider the cost of rotating the certificate after a year or two. The subject name on the token signing certificate does not matter at all. We typically append “-signing” to the FQDN used for the service certificate (e.g., sts-signing.cohovines.com). In addition, the CA that you purchase the certificate from must include the Certification Authority Issuer OID in the Authority Information Access (AIA) field of the certificate (see Figure 21-13 for an example). This is an obscure requirement that you’ll need to research with your CA before purchasing the certificate. At the time of publication, we know that DigiCert (mentioned earlier) and Entrust include these fields in their certificates.

We’ve mentioned the token encryption certificate but haven’t discussed it thus far. The reason for not discussing it is simple—we don’t recommend that you enable token encryption in any of your trust relationships. The contents of any transaction (including the token) between ADFS and an end user or federated party are already protected via SSL in the browser. When you enable token encryption, the token itself is encrypted using the token encryption certificate. If you need to troubleshoot the interaction between ADFS and another party, token encryption will make it nearly impossible to do so.
Federation Server Proxies
Deploying the federation server proxy is extremely easy. Outside of the deployment wizard, it has no real settings to configure. The only steps involved are installing the ADFS server role and choosing “Federation Service Proxy” in the first step (Figure 21-14), and then running the wizard.

As for the federation server role, you’ll need to import a certificate for use with the IIS website that ADFS uses. You can use the DigiCert utility discussed earlier to do this. In fact, you can simply import a copy of the certificate in use on your federation servers: just use the DigiCert utility to export that certificate to a PFX file and then import it on the federation server proxy.
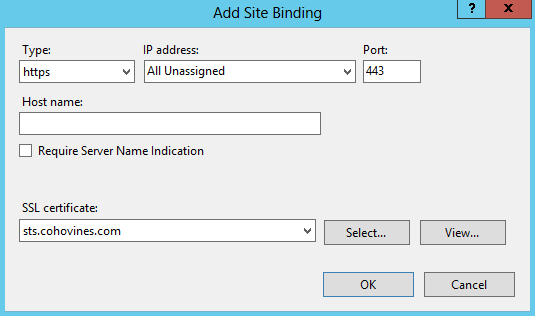
Once you have imported the certificate, launch the Internet Information Services Manager MMC snap-in. Browse to SitesDefault Web Site in the Connections pane on the left. Next, in the Action pane on the right, click Bindings, as shown in Figure 21-15. Click Add, change the Type to “https”, and select your certificate from the SSL certificate drop-down, as shown in Figure 21-16.

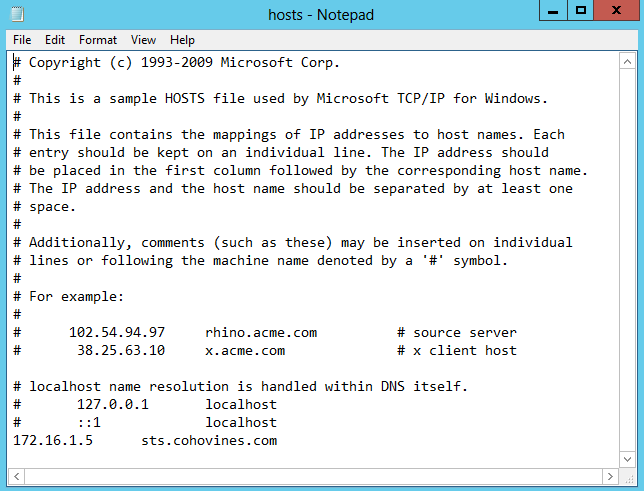
Next, you must configure the hosts file on your federation server proxy to resolve the name of the federation service to your federation server or the load balancer VIP in front of your federation server(s). You can do this by opening the hosts file in %windir%system32driversetc with Notepad from an elevated command prompt.
At the bottom of the file, enter the IP address of your federation server or load balancer VIP, press Tab, and then enter the federation service name (e.g., sts.cohovines.com) on a new line, as shown in Figure 21-17.
Warning
It is very important that you separate the IP address and hostname with a tab!
Once you have completed editing the hosts file, launch the AD FS Federation Server Proxy Configuration Wizard. The wizard will automatically populate your federation service name based on the SSL certificate imported in IIS. Click the Test Connection button shown in Figure 21-18 to ensure that there are no connectivity issues (such as firewalls or name resolution problems) before continuing.

When you click Next, you will be prompted for administrative credentials to the federation server farm. These are only used to establish the relationship between the proxy and the federation servers. The credentials you enter must have local administrator access to the federation servers. If the credentials are valid, you will be presented with a summary of the steps that will be taken.
Figure 21-19 shows the results of a successful federation proxy server configuration. There are no further steps necessary to complete the initial configuration.

21.4. Relying Party Trusts
As a typical corporate user, most of the configuration work you’ll be doing in ADFS will most likely be in the realm of relying parties. The term relying party (RP) is ADFS’s nomenclature for what you would typically think of as an application that relies on your ADFS infrastructure for authentication. This could be an internally developed application that supports claims, a cloud-hosted service such as salesforce.com, or an outsourced human resources and payroll application, for example.
There are a couple of scenarios that come into play when you’re ready to set up an RP. In the best case, the RP provides a federation metadata document. This is an XML document published by the RP on its server (or sometimes provided to you directly as a file) that contains all of the necessary details to configure the trust relationship. If you want to see the federation metadata for your ADFS environment, browse to this link, replacing the FQDN with the relevant value for your environment.
If your RP doesn’t provide federation metadata, you’ll need to enter a number of values manually in the Add Relying Party Trust Wizard. For the sake of completeness, we’ll walk through the scenario with an application that doesn’t publish federation metadata.
To get started, open the ADFS management console and browse to AD FSTrust RelationshipsRelying Party Trusts. Right-click and then click Add Relying Party Trust. Start the wizard and choose “Enter data about the relying party manually,” as shown in Figure 21-20.

Next, provide a name for the application and a description. In this example, we’ll call the application “Federation Demo.” We recommend that you use the description field to track relevant information about the application, such as the owner of the relationship with that application in your organization and the date the trust was established.
On the Choose Profile screen, use the default of ADFS profile. The Configure Certificate screen allows you to specify a token encryption certificate to use. You will need to import the public key of the relying party’s token encryption certificate to manually configure it here. As discussed earlier in this chapter, we don’t recommend the use of token encryption certificates in order to ease troubleshooting.
Figure 21-21 shows the Configure URL screen. This is where you will specify the URL that ADFS should redirect the user to once ADFS has issued a token. You must specify whether the application supports WS-Federation or SAML 2.0 on this screen. In this case, our application supports WS-Federation and the user should be redirected to this link. You will need to collect this URL from the RP’s support team before you begin the trust setup process.

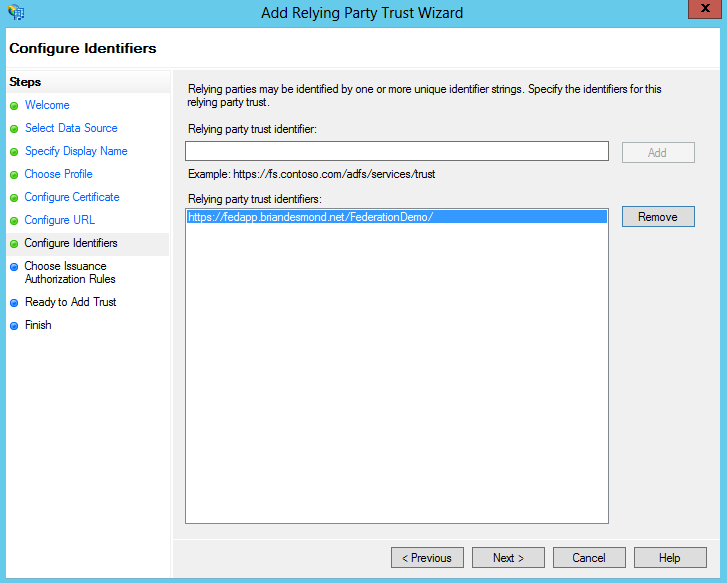
Next, you will need to specify the identifier(s) that the RP provides. This is how ADFS identifies a request from a given application. By default, the URL you provided in Figure 21-21 is populated here, as shown in Figure 21-22. The value can be arbitrary, essentially, and it is included in the authentication request from the application. Like the URL, you will need to gather this data from the RP’s support team in advance.
Click Next, and elect to simply “Permit all users access to this relying party” on the Choose Issuance Authorization Rules screen. We’ll discuss issuance authorization rules briefly in the next section on claims rules. The confirmation screen shown next will provide you with a tabbed summary of all the choices you made in the wizard. All of these choices can be changed later, but you should take a moment to review them and make sure there are no obvious mistakes.
By default, the final screen of the wizard will allow you to launch the claims rules editor for the new RP trust once you finish. We will look at claims rules in more detail in the next section; in a nutshell, they allow you to define what claims should be sent to the RP and whether or not those claims should first be transformed before passing them on to the RP.
21.5. Claims Rules and the Claims Pipeline
In the previous section, we created a relying party trust with a sample application. At the end of the process we had an established trust, but we didn’t configure ADFS to send any claims to the application. Without sending any claims, the value of the RP trust is quite limited.
In this section, we’ll talk about two extremely important concepts: the claims pipeline and claims rules. The claims pipeline is the process through which every claim that ADFS processes passes. Claims rules are used to inject and filter claims in the pipeline as they make their way onward to a relying party.
The Pipeline
There are a number of stops that claims pass through on their way to a relying party. For the purpose of this discussion, we’ll assume you are using Active Directory as your sole claims provider. Figure 21-23 shows a diagram of the claims pipeline.

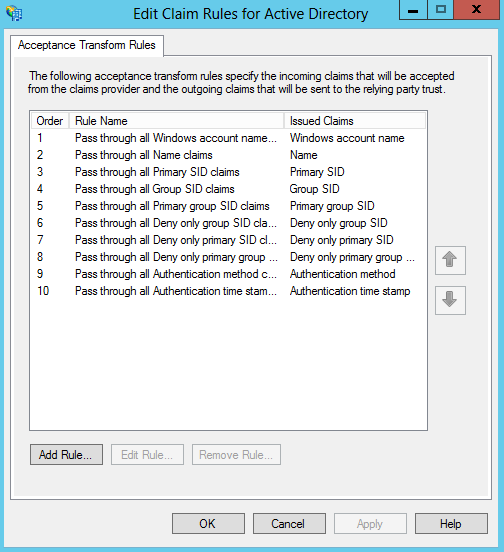
The claims provider is the where claims enter the pipeline. Claims providers provide claims to ADFS. You use acceptance transform rules to determine what claims from the claims provider are available for consumption by relying party trusts. If you look at the default acceptance transform rules for the Active Directory claims provider trust (Figure 21-24), you’ll notice that the list is quite bare.
Perhaps a bit counterintuitively, all of the attributes of a user aren’t available from the AD claims provider—just some special attributes such as group memberships, SIDs, and authentication info. Specific attributes must be requested from the Active Directory attribute store. We’ll discuss this further shortly.
Once claims have passed through the claims provider’s acceptance
transform rules, they are presented to the relying party trust in
question. The first step is to make sure that the user is permitted to
authenticate to the given relying party. This authorization step happens
in the RP’s issuance authorization rules. By default all users are
authorized to use an RP, as evidenced by the “Permit Access to All
Users” rule shown in Figure 21-25.
You can access any of the claims from the claims provider trust, or
inject more claims into the pipeline from an attribute store in order to
make an authorization decision. ADFS determines whether or not a user is
authorized based on the presence of a claim called Permit with a value
of true in the pipeline.

Finally, the claims set can be further amended or transformed using the RP trust’s issuance transform rules. The claims that are present at the conclusion of the processing of the issuance transform rules are the claims that are sent to the RP. By default, an RP trust has no issuance transform rules. This effectively means that the RP will receive no claims about the user. Let’s look at how to change this.
Creating and Sending Claims Through the Pipeline
There are two key ways you can generate claims to be sent to an RP. The first is via the claims provider trust, and the second is via the RP trust’s issuance transform rules. The advantage of defining your claims set on the claims provider trust is that you can have a central set of claims that are available to all RP trusts. This can reduce the management burden and limit the number of places you need to look when troubleshooting or making global changes.
To edit the claims rules for the Active Directory claims provider trust, browse to AD FSTrust RelationshipsClaims Provider Trusts. Select Active Directory and then click Edit Claim Rules in the task pane on the right. In order to add additional claims in the form of user attributes to the pipeline, click Add Rule.
There are five claims rule templates you can choose from. Here is a brief description of each of these templates:
- Send LDAP Attributes as Claims
This rule will inject one or more attributes of the user into the claims pipeline. In addition to injecting Active Directory attributes, you can use other LDAP-based attribute stores such as an AD LDS server.
- Send Group Membership as a Claim
If you need to insert a claim into the pipeline based on whether or not a user is in a group, use this rule. For example, if you wanted to have a claim called IsSupervisor and all of the supervisors in your organization were in a group called Supervisors, you could use this rule.
- Transform an Incoming Claim
This rule enables you to perform very basic transformations on claims that are already in the pipeline. You can change the type of a claim, perform basic string replacements, or transform an email suffix.
As you consider this rule template, notice in Figure 21-24 that each claims rule is numbered. Rules are processed sequentially. In other words, each rule has access to all of the claims that have been added to the pipeline before it within the ordered list (and earlier in the pipeline overall).
- Pass Through or Filter an Incoming Claim
This rule is similar in nature to the previous template. You’ll primarily use this template on relying party trusts. You use the pass-through function to instruct ADFS to emit a claim in the pipeline to the RP. The filtering function is useful for emitting claims only if they match a specific value or if they start with a specific value. If the claim doesn’t match the filter rule, it won’t be passed through.
- Send Claims Using a Custom Rule
ADFS has an entire custom language called the claims rule language. This language is used for expressing complex custom expressions that determine whether or not to emit a claim, enable you to perform complex transformations on claims values, and enable access to custom attribute stores and SQL attribute stores.
Explaining the claims rule language is a substantial topic and not one that we have room for in this chapter. Microsoft has documented many common examples online, and we encourage you to start there if you want to take on custom claims rules.
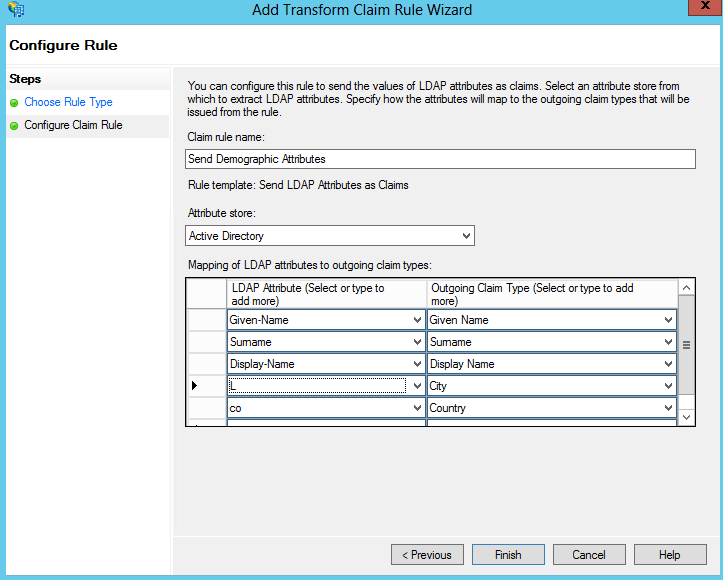
Now that we’ve discussed the types of rule templates available, let’s make use of them to add a few claims to the pipeline. In the wizard, select the “Send LDAP Attributes as Claims” rule template. Create a rule to send the user’s name and location attributes, as shown in Figure 21-26.
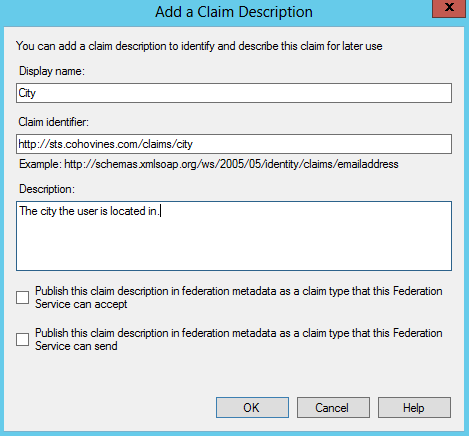
In Figure 21-26, we are sending the user’s first and last name, display name, and city and country attributes as claims. You probably will have noticed by now that the default options in the drop-down lists are missing most attributes. You can simply type in an Active Directory attribute name if you don’t see what you want. If you need to add additional outgoing claim types, you’ll need to create claim descriptions for those attributes. Refer to the sidebar “Creating Claim Descriptions” for more information on how to do this.
When you’ve completed the wizard, click Add Rule again. This time, we’ll use the “Send Group Membership as a Claim” template to create a claim for full-time employees. Figure 21-28 shows how you can specify a group and then set the value of a claim if the user is a member of that group.

Now that we’ve added some claims that will be available to all of our RP trusts, let’s configure the RP trust we created earlier to emit these claims. Find the Federation Demo RP trust in the ADFS management console, and click Edit Claim Rules. On the Issuance Transform Rules tab, click Add Rule.
First, note that the templates that were available earlier when you were editing the claims provider trust claim rules are also available here. If you want, you could perform the same configuration steps we just executed on the RP trust instead. This would have the effect of only making those claims available to this RP. Since we already have the claims we need in the pipeline, we’ll simply pass them through.
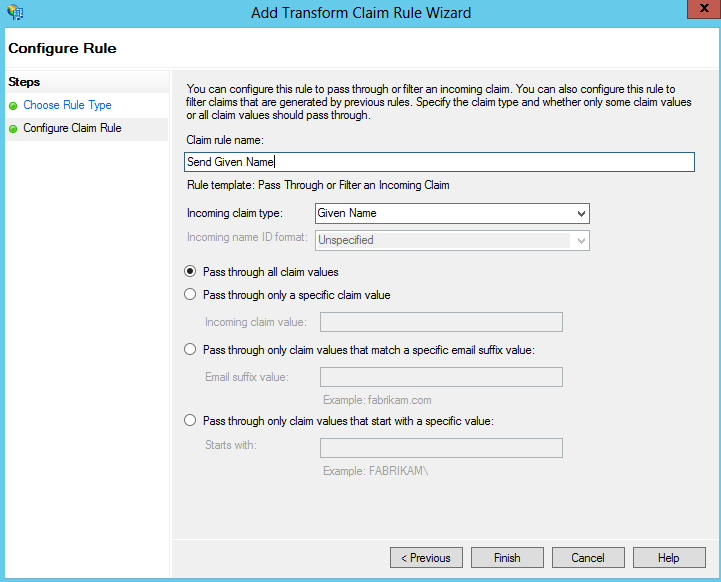
Use the “Pass Through or Filter an Incoming Claim” template and configure it to pass through the Given Name claim, as shown in Figure 21-29. Repeat this for each of the other claim types we configured:
Surname
Display Name
City
Country
FullTimeEmployee
Note
Unless you have customized your ADFS implementation already, you’ll need to complete the steps in the sidebar Creating Claim Descriptions to add the Display Name, City, Country, and FullTimeEmployee claims to ADFS.
Once you’re done, your issuance transform rules should look similar to Figure 21-30.

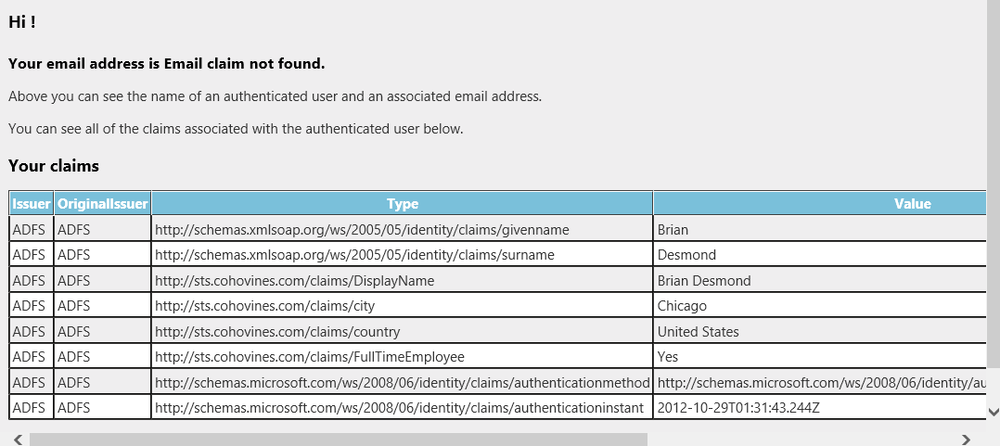
Figure 21-31 shows the results of the claims rules we just created. The screenshot shows the output from the sample application available at this link. This application simply outputs all of the claims the federation server sends. Once configured, this is a useful tool for testing your ADFS claims rules.
To summarize, in this section we configured our claims provider trust (Active Directory) to add a number of claims to the pipeline for consumption by all of the relying parties in the system. To do this, we first added claim descriptions for each custom claim, and then we used the “Send LDAP Attributes as Claims” template to add attributes of the user to the pipeline and the “Send Group Membership as a Claim” template to add a claim if the user is a member of a particular group. Finally, we added pass-through rules to the issuance transform rules of the RP trust to send the claims to the RP.
21.6. Customizing ADFS
With a bit of configuration, ADFS is usable out of the box. Chances are, though, you’ll want to customize the experience a bit. Depending on where your goals for customization lie, the scope of this project may vary quite a bit. The two main customizations that organizations take on are look/feel (or functionality) adjustments for the forms-based logon and home realm discovery pages, and the addition of custom attribute stores.
Forms-Based Logon Pages
When accessing ADFS from outside the corporate network through an ADFS proxy, your users will, by default, log on using the forms-based logon pages. The default experience for these pages is bland and gray. You’ll probably want to work with your Web or Marketing Department to customize these pages to match your corporate brand and be more visually appealing.
Microsoft has a guide for customizing the pages available at microsoft.com. The level of complexity of the modifications you want to make (e.g., changing colors or adding a logo) will dictate whether or not this is a task best given to an ASP.NET developer. All of the files you can customize are located in c:inetpubadfsls on your ADFS servers. Be sure to make a backup copy of the original pages before you begin in case you need to roll back.
If you’d simply like to add a logo, edit the web.config file in c:inetpubadfsls and change the logo setting to the name of a logo file (or
just save that file as logo.png).
Microsoft recommends that your file be 600 pixels wide and 100 pixels
tall for best results.
Attribute Stores
Attribute stores are used to provide claims from external systems. Out of the box, ADFS supports sourcing attributes from Active Directory, LDAP servers such as AD LDS, and SQL servers. If you need to provide claims from other systems (e.g., an HR system or an Oracle database), you’ll need to develop a custom attribute store to do that.
Developing a custom attribute store requires .NET development skills and is outside the scope of this book. Documentation for getting started is available at microsoft.com. Be sure to test your implementation thoroughly, especially with regard to error handling and performance.
21.7. Troubleshooting ADFS
Troubleshooting ADFS will likely come naturally to web developers, as some of the key tools used are traditional web debugging tools. For an IT pro, the learning curve will be much higher, as the amount of data you can get from traditional event logs is relatively limited.
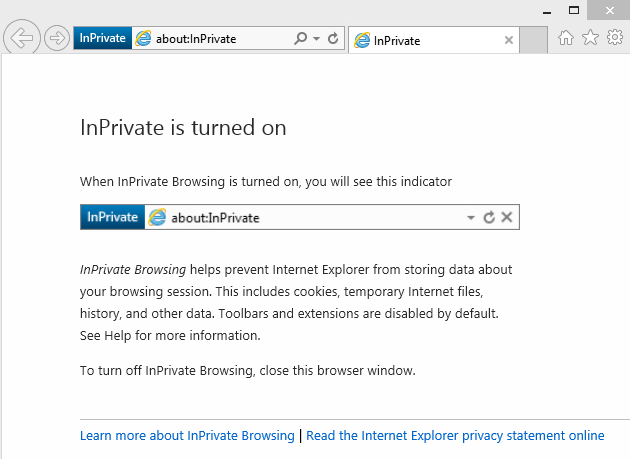
Before we look at a couple of tools in depth, the first trick to have in your toolbox is Internet Explorer’s (IE) InPrivate browsing mode. InPrivate prevents access to or saving of cookies and masks your browsing history, improving security. You can turn on InPrivate mode in IE by pressing Ctrl-Shift-P. Alternatively, you can right-click the Internet Explorer icon in your taskbar and click Start InPrivate Browsing. When you’re in InPrivate mode, you’ll see an InPrivate identifier to the left of the address bar as well as a help menu on the startup page, as shown in Figure 21-32.
Event Logs
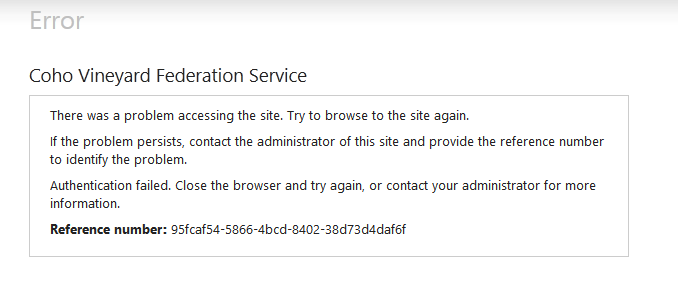
ADFS includes a number of event logs as well as a useful data point called a correlation identifier to assist you in troubleshooting issues. Any time an issue is encountered by a user in the ADFS web application, an error screen similar to Figure 21-33 will pop up. Of particular interest to you as the administrator is the reference number field.
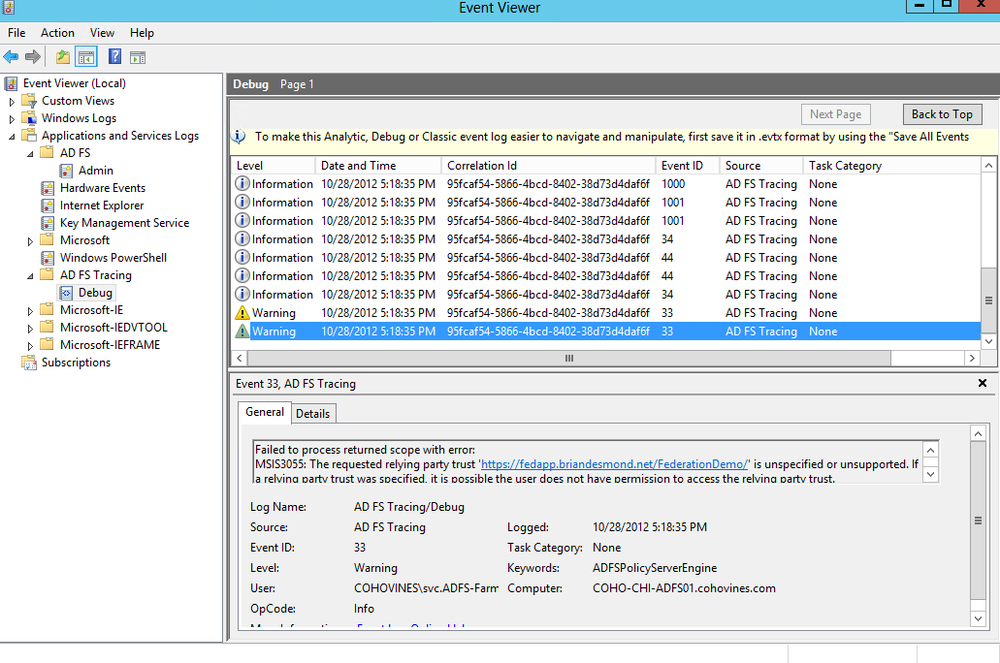
To review the ADFS logs and correlate them with the reference number shown in Figure 21-33, launch the Event Viewer on your federation server and browse to Applications and Services LogsAD FSAdmin. Next, go to View→Add/Remove Columns. Add the Correlation Id column and reorganize your displayed columns, as shown in Figure 21-34.

Note that the reference number shown in Figure 21-33 matches the value in the Correlation Id column for two events. Specifically, the event in Figure 21-35 tells us that there is not a relying party trust configured with the identifier that was sent by the application.

If the data in the Admin event log isn’t sufficient, you’ll need to enable the trace log for ADFS. To do this, go to View→Show Analytic and Debug Logs. Browse to Applications and Services LogsAD FS TracingDebug and then right-click the Debug log and click Enable Log. Reproduce your error and refresh the view. Figure 21-36 shows a helpful event confirming the diagnosis in Figure 21-35. When you’re done, be sure to right-click the Debug log and click Disable Log.
Note
You will need to repeat the same procedure to add the Correlation Id column to this log’s display.
Fiddler
The most important tool for troubleshooting ADFS is a free one called Fiddler. Fiddler is an HTTP proxy that allows you to look at the HTTP traffic in a friendly GUI. If you’ve used Wireshark or Netmon before for network tracing, you can think of Fiddler as an application-layer version of those tools. Get a copy of Fiddler and install it on your workstation. Next, go to this link and install the add-ons for Fiddler that enable you to easily work with HTML, XML, and so forth.
Finally, download the Fiddler federation inspector from this site. This add-on will enable Fiddler to decode WS-Federation and SAML markup. Extract the .zip file and browse to the binDebug folder. Copy Thinktecture.FederationInspector.dll to C:Program Files (x86)Fiddler2Inspectors. or wherever you installed Fiddler on your machine.
In order to look at encrypted ADFS traffic, you’ll need to configure Fiddler to intercept HTTPS traffic. To do this, launch Fiddler and go to Tools→Fiddler Options. On the HTTPS tab, check “Capture HTTPS CONNECTs” and “Decrypt HTTPs traffic.” Next, you will be prompted to generate a certificate for Fiddler to intercept SSL traffic and to configure Windows to trust the certificate, as shown in Figure 21-37. You’ll receive another confirmation to import the certificate and then finally a final confirmation after a User Account Control (UAC) prompt. Answer Yes to all of these prompts.

Note
If you’re using Windows Integrated Authentication on your ADFS server, you must disable Extended Protection before using Fiddler. See the sidebar Configuring Extended Protection for details on how to do this.
Once you have completed these steps, browse to a federated application and log in. You’ll see each of the steps in Fiddler that take place, as shown in Figure 21-38.

Specifically, in Figure 21-38, the following steps happen (as shown in the “#” column):
The user browses to https://fedapp.briandesmond.net/FederationDemo/.
The application redirects the user to the ADFS server configured in the application.
Note
The status codes 301 and 302 (Result column) are HTTP redirects.
The ADFS server performs an additional redirect to the correct authentication URL for the application.
The user is prompted to authenticate to the ADFS server using Windows Integrated Authentication. Figure 21-39 shows the Auth inspector in use in Fiddler that can be used to troubleshoot authentication.
Note
The status code 401 notifies the browser that the user must authenticate to the application.
The user authenticates successfully to the ADFS server. Figure 21-40 shows the Federation inspector’s decode of the WS-Federation token that was sent to the application.
Note
The status code 200 signifies that the HTTP request completed successfully.
The ADFS server redirects the user back to the application based on the URL that was configured in the relying party trust in Figure 21-21.
The user successfully accesses the application.


21.8. Summary
In this chapter, we looked at Active Directory Federation Services (ADFS). ADFS is Microsoft’s answer to a crowded space full of vendors and services that are offering identity federation options for connecting your on-premise directory to business partners and applications in the cloud.
With the name of this product including “Active Directory,” it’s a natural assumption that AD domain administrators will be able to take on ADFS as an extension of their duties. In reality, the skillset required to manage and troubleshoot ADFS is much more closely aligned with a web developer’s role than a domain administrator’s. This chapter is our attempt to bridge that gap and help get you, the domain administrator, on your way to delivering identity federation with ADFS in your organization.