
Chapter 3
Database Basics
In This Chapter
![]() Getting to know some basic terms and concepts
Getting to know some basic terms and concepts
![]() Outstanding in your field(s)
Outstanding in your field(s)
![]() Deciding to go flat-file or relational with your database
Deciding to go flat-file or relational with your database
![]() Getting a table started
Getting a table started
This may be the single most important chapter in this book. That probably sounds like a strong statement, but it’s really true. When you want to figure out how to actually do something, it’s essential to understand not just how it works, but why it works that way, and what’s going on behind the scenes. So after you’ve read about why Access is the right tool for you (in Chapter 1) and how to get around in the Access interface (Chapter 2), it’s time to really nail down how Access works and how to start building your database.
Database Lingo
Now, if the section heading (“Database Lingo”) is making you panic because you think I want you to memorize a bunch of database jargon, don’t worry. Just relax. Breathe normally. The next section, and many throughout this chapter, simply use some terms you need to know so you can figure out what Access is referring to in its various dialog boxes as well as on the various tabs it uses to give you access to commands in the Access workspace. Knowing these terms will, therefore, help you get around and get things done in Access.
Unfortunately, you simply must know technical terms — there are no two ways about it. I’m talking about only a handful of words, though — some of which you probably already know and maybe even use in reference to information in general — words like record and database. See? Nothing high tech, just some basic words and concepts you really need to absorb so you can move on and use Access effectively.
The terms in this section appear in size order, starting with the smallest piece of a database — the data — and advancing to the largest — the entire database itself. I’ve done it this way so you get the big picture, a little bit at a time, and see that the big picture is made up of smaller items. Seeing how they all fit together (and what to call each piece) is what this chapter’s all about.
Data, no matter how you pronounce it
Data is the stuff that Access stores. Information you may store in your head one way will be stored in a different way in a database program like Access. For example, you may think of someone’s name as John Smith, or you may only ever think of the guy as John — either because you don’t know his last name or because you never use his last name. A database, however, stores his name as either John Smith, in a field called Name, or as two pieces — Last Name (Smith) and First Name (John). The latter approach is best because it gives you more freedom to use the data in more ways. You can sort the data by Last Name, for example, which is hard to do if you’ve just stored the entire name as one chunk.
Get the idea? As mentioned in Chapter 1 (where you plan out your database), it’s a good idea to break down the data as much as possible. No matter how you pronounce it — “day-tah” or “dat-tuh” — it’s your information, and you want to be able to get at it in the simplest, most logical way possible. As you read on in this chapter, and when you review Chapters 1 and 2, you’ll see that Access gives you all the tools you need to do just that — it’s just a matter of using the right tools at the right time!
Fields of dreams (or data)
Because people don’t want their data to wander around homeless, the technical wizards created fields — places for your data to live. Each field holds one kind of data. For example, to track information about a baseball card collection, your fields might include Manufacturer, Player Name, Position, Year, Team, and Average (or ERA, for pitchers). If you have a name and address database, your fields might consist of Last Name, First Name, Middle Initial, Address1, Address2, City, State, Zip, Phone, Cell, and Email. When you think about it, it’s pretty logical. What are all the things you can know about a baseball player? A client? A product? These things become fields.
As with the term data, other database programs (such as FoxPro and FileMaker) all agree on what a field is. In larger database packages, however (such as Oracle and Microsoft SQL Server), you find the term column replacing field. And to make things more exciting, Microsoft Excel stores your fields in columns when you use an Excel spreadsheet to store a list. The tabular structure of a database table is what leads Oracle and SQL to refer to columns rather than fields, but for heaven’s sake — couldn’t they have stuck to a term we all know?
Records
Having fields is a good start, but if you stop there, how do you know which last name works with which first name? Something needs to keep those unruly fields in order — something like a record. All the fields for one baseball card — or one client or one product — are all collectively known as a record. If you have two baseball cards in your collection, you have two records in your database, one for each card. Fifty clients? Fifty records.
For a little more about records, check out the following:
- Each record in a table contains the same fields but (usually) has different data in those fields. And not every record must have data in every field. If someone doesn’t have a cell phone, you can’t very well have any data in the
Cellfield for that person, right? - A single record contains all the information you need about a single item (accounting entry, recipe, or whatever) in your table. That’s all there is to it.
Tables
A table is a collection of records that describes similar data. The key phrase to remember in that last sentence is similar data. All the records in a single table contain fields of similar data. The information about that baseball card collection may fit into a single table. So would the client or product data. However, a single table would not handle both baseball cards and clients because they’re unrelated databases. You wouldn’t put the records for your car’s repairs in the folder where you keep your Christmas cookie recipes, right?
Why? Because if anyone else needs to know when you last had the tires rotated, they aren’t going to know to look in the same place one finds the best recipe for Ginger Snaps. You might remember that they’re stored in the same place, but it’s just too confusing for anyone else. And too limiting. Access lets you write reports and queries based on your data, and if the data in your database isn’t all related, it’ll be chaos trying to write a report or generate a query that pulls data from that database. You could end up with a recipe that calls for motor oil or a maintenance schedule that tells you to preheat the car to 350 degrees. Such a report might be amusing, but it’s hardly useful.
The database
An Access database, or database file (the terms are interchangeable), is a collection of everything relating to a particular set of information. The database contains all the tables, queries, reports, and forms that Access helps you create to manage and work with your stuff. Instead of storing all those items individually on the disk drive — where they can become lost, misplaced, or accidentally erased — Access groups them into a single collective file.
Here’s an important point: All those parts — the tables, the reports, queries, and forms — cumulatively make a database. And that’s before you even enter any records into the tables. The database, therefore, is more than the data; it’s the tools that store, manipulate, and allow you to look at the data, too.
Field Types and Uses
A field, you remember, is where your data lives. Each field holds one piece of data, such as Last Name or Batting Average.
Because there are so many different kinds of information in the world, Access offers a variety of field types for storing it. In fact, Access puts the following field types at your disposal:
- Short Text
- Long Text
- Number
- Currency
- AutoNumber (this data type is applied, by default, to the starting ID field in any new table)
- Date & Time
- Yes/No
- Lookup & Relationship
- Rich Text
- Attachment
- Hyperlink
- OLE Object
- Calculated
- Lookup Wizard
The types just listed are those available for fields you create in addition to that first field — the ones that will contain your data.
For now, suffice it to say that the aforementioned Autonumber field is a field that contains an automatically generated number so that each record is unique in that it has a unique autonumber, or ID. You get the word about the need for (and ways to create) unique fields later on, in Chapter 4.
As for the Lookup Wizard, we also get to that one much later in the book, in terms of its actual use. But you’ll find out more about when and how this data type is used later on in this very chapter!
 For now, don’t worry about figuring out what each field type is or what it does based on its name — I go over each one shortly. As you can see, though, the list covers just about any type of data you can imagine. And remember, each one can be customized extensively, resulting in fields that meet your needs exactly. If you absolutely cannot wait to find out about modifying all the specs for your fields, Chapter 4 should be your next stop.
The upcoming bulleted list introduces the available field types and how they’re used. You’ll also find out a little bit about how you can tweak them to meet your specific needs:
- Short Text: Stores up to 255 characters of text — letters, numbers, punctuation, and any combination thereof.
-
Long Text: This replaces the Memo field type found in versions 2010 and previous. A Long Text field holds up to 64,000 characters of information — that’s almost 18 pages of text. This is a really big text field. It’s great for general notes, detailed descriptions, and anything else that requires a lot of space.
 Numbers in a text field aren’t numbers to calculate with; they’re just a bunch of digits hanging out together in a field. Be careful of this fact when you design the tables in your database — you don’t want to enter, say, a value that you intend to use in a Calculated field or to extract some other kind of information from a report and have that value stored as text, rendering it inoperable as a number. If the data is numeric, store it that way.
Text fields have one setting you need to know about: size. When you create a text field, Access wants to know how many characters the field holds. That’s the field size. If you create a field called First Name and make its size 6, Joseph fits into the field, but not Jennifer. This restriction can be a problem. A good general rule is to make the field a little larger than you think you need. It’s easy to make the field even larger at some later point if you need to, but it’s potentially dangerous to make it smaller. Surgery on fields is covered in Chapter 4.
- Number: Holds real, for-sure numbers. You can add, subtract, and calculate your way to fame and fortune with number fields. But if you’re working with dollars and cents (or pounds and pence), use a currency field instead.
- Currency: Tracks money, prices, invoice amounts, and so on. In an Access database, the buck stops here. For that matter, so do the lira, the mark, and the yen. If you’re in the mood for some other kind of number, check out the Number field.
- Date/Time: Stores time, date, or a combination of the two, depending on which format you use. Use a date/time field to track the whens of life. Pretty versatile, eh?
- Yes/No: Holds Yes/No, True/False, and On/Off, depending on the format you choose. When you need a simple yes or no, this is the field to use.
- Lookup & Relationship: If you want a field within one table to actually display content from a field in another table, choose this as the field type. A simple Lookup Wizard opens as soon as this field type is chosen, through which you select the table and field to look up through this new field in your table.
- Rich Text: Need the content of a particular field to be formatted just so? Choose this field type, and the formatting applied to the data in the field (using the Text Formatting tools on the Home tab) will be how it appears onscreen and in reports.
- OLE Object: You can use the
OLE Objectdata type to link or embed an object — such as an Excel worksheet or Word document — to an Access Table. - Attachment: Use this field type to attach files — Word documents, Excel worksheets, PowerPoint presentations, or any other kind of file, including graphics (a photo of the volunteer, product, or location, perhaps?) — to the record.
- Hyperlink: Thanks to this field type, Access understands and stores the special link language that makes the Internet such a powerful place. If you use Access on your company’s network or use the Internet extensively, this field type is for you. You’ll find out more about hyperlinks and other neat ways Access and the Internet play well together in Chapter 11.
- Calculated Field: Use this field type when you want to fill the field in question with the result of a formula that uses one or more other fields in the same table. For example, in a table that contains a list of your products, other fields might include Price and Discount. If you want to also have a field that calculates the new price (the Price, less the Discount), you’d make that a Calculated field. When you choose this as the field type, you use a submenu to choose what kind of data will house the result, and then an Expression Builder dialog box appears, through which you set up the formula.
To help you start thinking about your database and your data and to begin imagining the fields you could use for some common types of data, Table 3-1 presents a breakdown of field types and ways you might use them.
Table 3-1 Common Fields for Everyday Tables
|
Name |
Type |
Size |
Contents |
|
Title |
Short Text |
4 |
Mr., Ms., Mrs., Mme., Sir, and so on. |
|
First Name |
Short Text |
15 |
Person’s first name. |
|
Middle Initial |
Short Text |
4 |
Person’s middle initial; allows for two initials and punctuation. |
|
Last Name |
Short Text |
20 |
Person’s last name. |
|
Suffix |
Short Text |
10 |
Jr., Sr., II, Ph.D., and so on. |
|
Job |
Short Text |
25 |
Job title or position. |
|
Company |
Short Text |
25 |
Company name. |
|
Address 1, Address 2 |
Short Text |
30 |
Include two fields for the address because some corporate locations are pretty complicated these days. |
|
City |
Short Text |
20 |
City name. |
|
State, Province |
Short Text |
4 |
State or province; apply the name appropriately for the data you’re storing. |
|
Zip Code, Postal Code |
Short Text |
10 |
Zip or postal code; note that it’s stored as text characters, not as a number. |
|
Country |
Short Text |
15 |
Not needed if you work within a single country. |
|
Office Phone |
Short Text |
12 |
Voice telephone number; increase the size to 17 for an extension. |
|
Fax Number |
Short Text |
12 |
Fax number. |
|
Home Phone |
Short Text |
12 |
Home telephone number. |
|
Cellular Phone |
Short Text |
12 |
Cell phone (or “mobile phone” for you cosmopolitans). |
|
Email Address |
Short Text |
30 |
Internet email address. |
|
Website |
Hyperlink |
Web page address; Access automatically sets the field size. | |
|
Telex |
Short Text |
12 |
Standard Telex number; increase the size to 22 to include answerback service. |
|
SSN |
Short Text |
11 |
U.S. Social Security number, including dashes. |
|
Comments |
Long Text |
A freeform space for notes; Access automatically chooses a field size. |
All the field types listed as samples in Table 3-1 are really text fields, even the ones for phone numbers. This is because Access sees their content as text rather than as a number that could be used in a calculation. (Check out Table 3-2 for field-naming no-nos.)
Table 3-2 Prohibited Symbols
|
Symbol |
Name | ||
|
/ |
Forward slash | ||
|
? |
Question mark | ||
|
* |
Asterisk | ||
|
- |
Dash | ||
|
; |
Semicolon | ||
|
" |
Double quotes | ||
|
: |
Colon | ||
|
' |
Single quote | ||
|
! |
Exclamation point | ||
|
$ |
Dollar sign | ||
|
# |
Pound sign | ||
|
% |
Percent | ||
|
& |
Ampersand |
Of course, another field type (listed in the Type column) is neither a Short Text nor Long Text field — you also see the Hyperlink field. This data type is also considered text, but the Hyperlink data type stores URLs, as URLs — not just as a string of text and punctuation.
If all this text versus numbers stuff is confusing you, remember that computers think there’s a difference between a number (that you’d use in a calculation) and a string of digits, such as the digits that make up a phone number. When it comes to different kinds of text fields, it’s a matter of how much text will be stored in the field, and if it needs any special formatting in order to work properly in the database.
Choosing Between Flat and Relational Databases
Unlike ice cream, databases come in just two flavors: flat-file and relational. Also unlike ice cream, it’s not really a matter of preference as to which one you choose. Some databases require a relational approach; others would be overwhelmed by it. Read on to figure out how to tell the difference.
Isolationist tables
In a flat system (also known as a flat-file system), all the data is lumped into a single table. A phone directory is a good example of a flat-file database: Names, addresses, and phone numbers (the data) are crammed into a single place (the database). Some duplication occurs — if one person has three phone lines at home, his or her name and address are listed three times in the directory — but that’s not a big problem. Overall, the database works just fine.
Tables that mix and mingle
The relational system (or relational database) uses as little storage space as possible by cutting down on the duplicated (also known as redundant) data in the database. To accomplish this, a relational database splits your data into several tables, with each table holding some portion of the total data.
Borrowing the preceding phone book example, note that one table in a relational database can contain the customer name and address information, whereas another can hold the phone numbers. Thanks to this approach, the mythical person with three phone lines has only one entry in the “customer” table (after all, it’s still just one customer) but has three distinct entries in the “phone number” table (one for each phone line).
The key to relational databases
The key field (or linking field) is the key to this advanced technology. All related tables in a relational database system contain this special field. The key field’s data identifies matching records from different tables.
The key field works just like the claim stub you receive when you drop off your dry cleaning. To pick up your dry cleaning when it’s finished, you present the claim check, complete with its little claim number. That number identifies (or links) you and your cleaning so the clerk can find it.
Likewise, in the phone book example, each customer can have a unique customer ID. The “phone number” table stores the customer ID with each phone number. To find out who owns a phone number, you look up the customer ID in the “customer name” table. Granted, it takes more steps to find someone’s phone number than it does in the plain flat-file system, but the relational system saves storage space (no more duplicate names) and reduces the chance of errors at the same time.
If this process seems complicated, don’t feel bad. Relational databases are complicated! But that’s mostly behind the scenes, where Access is doing the stuff it does when you make a selection in a tab or ask it to run a wizard for you. A good deal of the complexity is invisible to you; all you see is the power it gives you. When you’re ready to find out more about all that behind-the-scenes stuff, check out Chapter 4.
But do your tables need to relate?
Now you at least have an idea of the difference between flat-file and relational databases. But do you care? Yes, you do. Each approach has its unique pluses and minuses for your database:
- Flat-file systems are easy to build and maintain. A Microsoft Excel spreadsheet is a good example of a flat-file database. A list of records is stored, one record per row, and you have as many records as can fit on the worksheet. Simple, easy, and in many cases, the way to go — if your database is simple and easy, too.
- Relational systems shine in big business applications such as invoicing, accounting, or inventory. They’re also a big help if you have a small business — your customer data, for example, could require several tables to store customer names and addresses, purchase history, and credit information. Storing everything you need to store about customers could be too big a job for a single, flat-file database.
 I don’t recommend that you set off to build a relational database system all by yourself after reading just some (or even all) of this book. It’s a big job; you’ll likely just end up discouraged if you dive in too quickly. If you’re sure that you need a relational database, enlist some help in the form of a friend or colleague who’s had some experience building databases. He or she can walk you through it the first time, and then, with this book (and Access help files) at your side, you can try it on your own later.
Although Access is a relational database program, it does flat-file systems quite nicely because even though it lets you set up several tables and set up relationships between them, it’s also quite happy to set up a single flat-file table if you want one. Whether you choose flat-file or relational for your database project, Access is the right program.
Building a Database
So you’ve read a few chapters here at the beginning of the book, maybe you’ve leafed ahead where I’ve referred to other chapters, and now you feel ready. You want to dive in and start building a database. Keeping in mind my previous advice to take it slowly, you can take a whack at it here.
In the following procedure, you set up a new database and then use the Table Wizard to build the first table in the database. Ready? Here we go …
-
If Access is not already running, take a moment to start it.
Chapter 1 shows you how to do this.
In the Access workspace, a series of large template icons appears, below a Search for Online Templates box, accompanied by links to likely searches for templates that store Assets, Business, Contacts, Employee, and so on.
-
Click the Blank Desktop Database icon.
A Blank Desktop Database dialog box appears, as shown in Figure 3-1.
-
Type a name to replace the generic
DatabaseX(where X is the number assigned chronologically to the database).You don’t need to type a file extension (.
accdb); Windows 7 and 8/8.1display your extensions automatically. Also, if you accidentally delete the file extension while changing the filename, don’t worry — Access adds it to the filename you type. -
If you don’t like the folder that Access picked out for you, click the little folder icon and choose where to store the new database.
As shown in Figure 3-2, when you click that little folder icon, the File New Database dialog box opens. From here, you can navigate to anywhere on your local system or on a network to which you’re connected and select the drive and folder on which to store your new database. When you’ve finished selecting a spot for your new database, click OK to return to the workspace.
-
Click the Create button.
A blank table, called Table1, appears in the central section of the workspace, and on the left, a panel lists the parts of your database (there’s just one part so far). Figure 3-3 shows your new table and the left-hand panel.
When you click Create, if a dialog box pops up and asks whether you want to replace an existing file, Access is saying that a database with the name you entered is already on the disk. - If this is news to you, click No and then come up with a different name for your new database.
- If you intended to replace that old database with a new one, click Yes and proceed.
- Create and name your fields in the table by double-clicking where it says Click to Add at the top of the second column in the table.
-
Click the arrow to the right of the words Click to Add and choose the type of field you want to add.
The many choices are discussed earlier in this chapter. For most fields, Text will be the type, but your data and its nature (and your desired uses for it) will dictate what’s best to choose here.
What’s that ID field in the first column? It’s there by default and will contain a unique number for each record you create (when you start entering records, later). This provides the unique field that each table requires, especially if you’re going to relate your tables. You can change its name by double-clicking the name “ID” and changing it to, for example, Customer Number.Later on, after you’ve set up your tables and established relationships between them, you can reassign what’s known as the primary key (another name for a unique field in a table), and at that point, if you want, the ID field can be removed.
-
Type a new field name (to replace the highlighted placeholder name), and press Enter to save the new field name.
As soon as you press Enter, a new field appears, with a blank at the top, awaiting a name.
Repeat Steps 7 and 8 until you have all the fields you think you’ll need in this table. You can always rename them later (by double-clicking the current names), so don’t worry about perfection at this point. Just start setting up fields so you can start entering data. Figure 3-4 shows a new field name in place and a new one awaiting the Enter key to confirm it.
-
To save your new table and the entire database, press Ctrl+S or click the Save button on the Quick Access Toolbar.
It’s a good idea to save each time you’ve done something important — building a table, updating some fields, adding records, and so on — essentially after anything you’d hate to have to do over again.
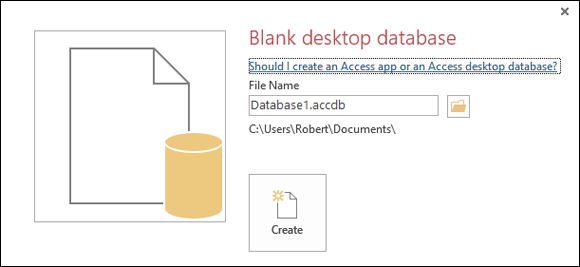
Figure 3-1: New blank databases need names. Give yours one here.
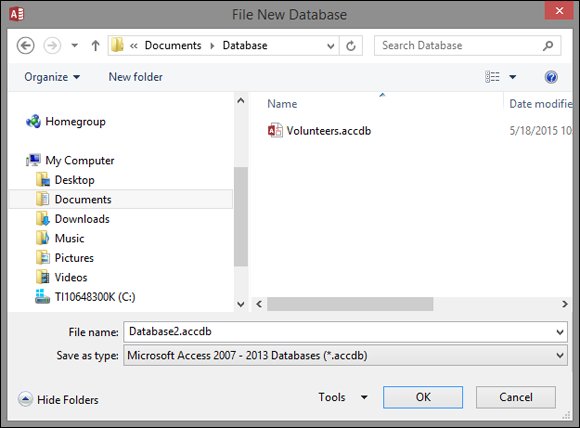
Figure 3-2: Select a home for your new database.

Figure 3-3: New table, new database.
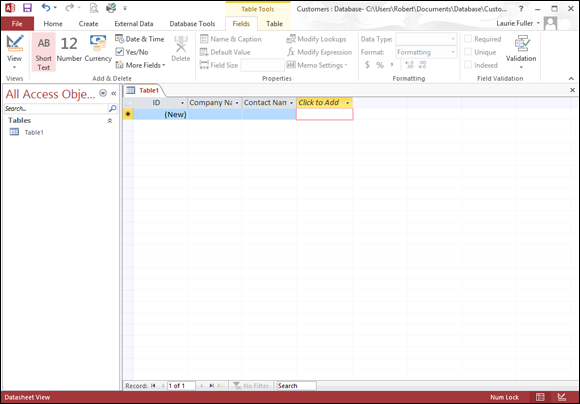
Figure 3-4: Create new fields by pressing Enter after naming each one.
Rarely is “Table1” a really useful name for a table. Before or after saving your database, renaming a table is easy. Just follow these steps:
- Right-click the Table tab.
- Choose Save from the pop-up menu that appears.
- Type a name for the table in the resulting Save As dialog box.
- Click OK to keep the name.
- Resave your database to include this change.
Adding and Removing Tables
Nobody’s expecting perfection at this stage of the game. Certainly not in your first foray into database creation, and not even on your second or third attempt. Even seasoned experts forget things now and then, realizing after they’ve built a table that they didn’t need it, or after they’ve started setting up reports and queries that they’ve forgotten a table that they needed. It can happen to anyone.
What to do? Use Access’s simple interface to add the tables you want and delete the tables you don’t.
One more, please
If, after you start building your database, you decide that your database warrants more than one table — in other words, if you realize you need a relational database — then you need to add another table. If you already knew that your database was going to need multiple tables, then — after building the first one — the only thing to do is build the rest, one by one.
To add new tables to an existing database, repeat the following steps for each new table:
-
Click the Create tab on the Ribbon.
The Create tab’s buttons appear, as shown in Figure 3-5.
-
Click the Table button on the Ribbon.
A new table, blank and awaiting the name for the first field, appears, as shown in Figure 3-6.
-
Build and name the fields for this new table as shown in the previous procedure.
Save your database periodically as you work. -
Continue adding tables, using Steps 1 through 3 for as many tables as you need in the database.
You don’t have to do this perfectly from the start — you can always go back to rename fields and add or remove tables (more on how to do that in a second). The goal here is to just do it — just get started and get the database going so you can see what you have and start working with it.

Figure 3-5: The Create tab is the logical place to go when you want to create a new table.
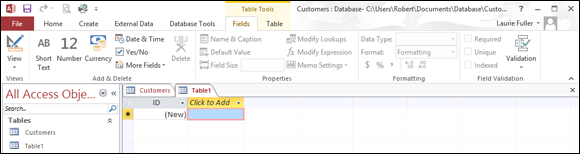
Figure 3-6: Looks familiar, doesn’t it? A new table awaits fields and field names, not to mention records.
Naming tables is important — because you’re going to need to know, at a glance at that left-hand panel, what’s in Table1 or Table2 or Table3, right? Better to name them Customers, Orders, Products, and so on, so you don’t have to remember each one by a generic number. To name a table, you can do so when you first close it and are prompted to save it. As shown in Figure 3-7, the Save As dialog box gives you a Table Name box. Type the name and press Enter. If you decide you don’t like the name later on, simply right-click the name it currently has, as displayed in the left-hand panel, and the current name is highlighted. Type the new name, and press Enter to confirm it. You can also choose Rename from the menu that appears if you right-click the table’s name in the left-hand panel that lists your database components. This also gives you the opportunity to type a replacement name.

Figure 3-7: When you close the table, you will be prompted to save the table.
Oops, I didn’t mean to do that
So you have a table you didn’t want. Maybe you realize after building Table C that you really only need Tables A and B — or that Table D, which you’ve also created, really makes Table C unnecessary. Whatever the reason, tables, even ones with records in them, are easy to get rid of.
Let me state that again: Tables are easy to get rid of. Perhaps too easy. Before you delete a table, check and recheck your database to make sure you aren’t deleting information that you need to keep. When a table is deleted, all connections to it — including all relationships and references in queries and reports — are deleted, too. A prompt appears when you choose to delete a table, reminding you of this.
Still committed to ditching the table? Here’s how it’s done:
-
With your database open, look at the panel on the left side of the workspace.
You should see a list of your tables in that panel, as shown in Figure 3-8.
- Right-click the table name in the panel on the left side of the workspace, and choose Delete from the pop-up menu, as shown in Figure 3-9.
-
Click Yes in response to the resulting prompt if, in fact, you do want to delete the table.
All gone!
Figure 3-8: Each table has its own button, emblazoned with the name you gave the table.

Figure 3-9: Choose Delete to get rid of the unwanted table.
Now, you probably think it’s time to start entering records, but no, I don’t advise doing that yet. Before you start populating your tables with data, it’s a better idea to set up your table relationships, establish the key fields that will connect your relational tables, and define the specs for each of your fields — taking advantage of those field options I mention earlier in this chapter.
Even if your database will be a (relatively simple) flat-file database, you need to iron out the settings for your fields before you start entering data — establishing the rules for entering names, numbers, dates, and so on — so that what you enter is graciously accepted by the fields you’ve set up.
Chapter 4 helps you prepare your database for its relational duties. In Chapter 5 and Chapter 6, you get a handle on customizing your fields to suit your needs. After that’s done, you can enter your data and begin taking advantage of Access’s forms, queries, and reports — all the stuff covered in the rest of the book!