
Chapter 6
Remodeling Your Data
In This Chapter
![]() Opening an existing table or database
Opening an existing table or database
![]() Adding new records to your table
Adding new records to your table
![]() Changing an existing record
Changing an existing record
![]() Renaming fields and tables
Renaming fields and tables
![]() Deleting unwanted records
Deleting unwanted records
![]() Turning back time — to before you made your mistake
Turning back time — to before you made your mistake
From remembering to change your car’s oil every 3,000 miles to cleaning out your rain gutters in the autumn, everything in your surroundings needs a little maintenance now and then. Most of that maintenance involves tidying up, getting rid of old or unwanted things, or making improvements. Sometimes all these things are part of the maintenance process.
Well, it’s no different for your database — an Access database needs a tune-up now and then, just to keep things running right. This can be as simple as checking for blank fields where you need to plug in missing data, as common as purging old or inaccurate records, or a practical matter such as changing the names of tables and fields so your database makes more sense to the people who use it.
Unlike getting your car serviced or cleaning out your gutters, however, maintaining your database isn’t expensive or difficult. Of course, not keeping your database in good working order can get expensive — it can cost you in terms of your time, the potential impact of inaccurate records on your organization, more time (and paper) wasted printing reports that include obsolete data, and the confusion that plagues those who use a database that has incorrect (or vague) field and table names.
Don’t worry, though — for all those doomsday potentialities, the solution is as simple as a few clicks, a couple of double-clicks, and a little bit of typing, and it’s free!
Opening a Table for Editing
When you open Access 2016 (as we discuss in Chapters 1 and 2), the workspace offers you a list of recently opened databases, along with templates you can use to start a new database, as shown in Figure 6-1.
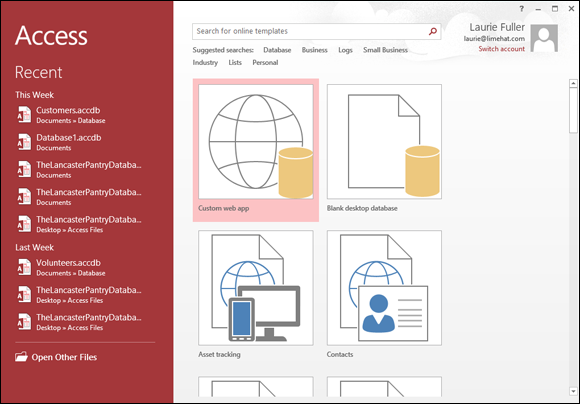
Figure 6-1: The Access 2016 workspace makes opening a database easy.
To open a database from the Recent Databases list, just point to it and click once.
If you remember where your database is stored, but it isn’t in the Recent list, use either of the following options to use the Open view:
-
Click the File tab to the left of the Home tab, and choose Open Other Files from the list of commands. Alternatively, if you’ve just opened Access, click the Open Other Files link at the bottom of the left-hand panel (shown in Figure 6-1).
Either way, the Open view appears onscreen, as shown in Figure 6-2.
By default, the Open view displays your most recently used databases.
-
If the database isn’t displayed, click This PC in the series of Open commands.
This displays the view shown in Figure 6-3.
-
When you find the database, open it by clicking its name.
The database file opens immediately, as shown in Figure 6-4.
If you don’t see your database listed in on the right-hand side of the workspace (after clicking This PC), click the Browse button instead. This opens a dialog box through which you can navigate to the folder that contains your database.
 An introductory screen known as a switchboard (or perhaps — utilizing a feature introduced in Access 2010 — a Navigation form) may appear instead of the tabbed dialog box. Access is telling you that your database either contains some custom programming or was created by the Database Wizard. You probably have some special forms that help you interact with the information in your database. If you want to find out how to create your own navigation form, check out Chapter 23.
 -
Within the All Access Objects list on the left side of the workspace, look for the table you want to open.
Each table has its own listing, accompanied by a table icon.
-
Double-click the table you want to edit.
The table opens in Datasheet view, and you can begin your maintenance of the data. You can add or remove fields or change the names of your fields — topics discussed later in this information-packed chapter.

Figure 6-2: Use the Open view to choose from recently used databases or pursue other routes to the database you’re looking for.

Figure 6-3: Open your database through the This PC option.

Figure 6-4: The database file opens, and its objects are listed on the left.
Inserting Records and Fields
Ever gone on vacation and forgotten your toothpaste? Sure, you can probably just pick up a tube at a drugstore in the place you’re visiting, but it’s still a pain. The same “Darn!” feeling overcomes you when you realize you’ve left something out of your database suitcase. (Okay, you might use a different four-letter word in that case, but this is a family publication.)
Luckily, adding a forgotten record or field to your table is about as easy as making a quick trip to the drugstore for that forgotten toothpaste — so easy that you may forget to say “Darn!” (or any other word expressing regret) when you discover a missing field. Instead, you’ll calmly launch into the following steps — one set for inserting a missing record and one set for inserting a missing field.
Adding a record
To add a record, follow these steps:
-
In the Datasheet view of the table that’s missing a record, click inside the first empty cell at the bottom of the table — below the last displayed record in the table.
Your cursor blinks in the first field in that record, as shown in Figure 6-5.
-
Type your information for the first field.
If the first field is an AutoNumber type, then you’re automatically placed in the second field when you click the row. In the second field, you can begin typing the data for that field. As soon as you start typing, the
AutoNumberfield generates a new number and displays it in the field. Don’t panic if the AutoNumberfield seems to skip a number when it creates an entry for your new record. When anAutoNumberfield skips a number, it means you probably entered (or at least started to enter) a record at some point during this (or a previous) data-entry session and then deleted it. - Press Tab to move through the fields and enter all the data for this new record.
-
When you finish entering data into the last field for the new record, you’re finished!
Because Access saves the new record automatically while you’re typing it, you have nothing more to do. Pretty neat, eh?
If you want to add another record, press Tab and type away, filling in yet another new record.
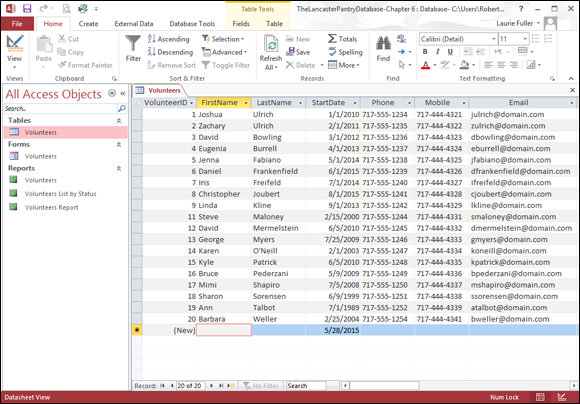
Figure 6-5: A new record awaits its data.
If you change your mind and want to kill the new addition, you have a couple of options:
- While the new record is in progress, press Ctrl+Z to undo whatever work you’ve done thus far on the new record.
- Right-click the cell to the far left of the record (the empty cell to the left of the first field). From the resulting pop-up menu, choose Delete Record. Click Yes when asked whether you’re sure about the deletion.
Inserting a field
With the field-challenged table open, follow these steps to add the field you’re missing:
-
In Datasheet view, find the field heading aptly called Click to Add (see Figure 6-6).
The column is typically placed at the end of your existing fields — so be prepared to scroll all the way to the end to see it.
-
Click the instructional Click to Add heading you found in Step 1.
A pop-up menu appears, from which you can choose the type of field this new field will be, as shown in Figure 6-7.
-
Choose a field type from the list.
The new field appears, entitled
Field1, and theClick to Addcolumn moves over one column.Field1is highlighted and awaiting your new name for it, as shown in Figure 6-8. -
Type the name of your new field and press Enter.
Your new field is created.
-
To rearrange your fields so the new field is where you want it to be among the existing fields, click the heading of the field column you just created — and then click again.
On the first click, the entire column is highlighted, and the black down-pointing arrow changes to a left-pointing white arrow. On the second click, the arrow acquires a small box just below it, indicating that you’re ready to move the column.
-
Drag to the left or right depending on where you want to drop your new field.
A thick vertical line follows you, indicating where the field will appear as soon as you release the mouse button, as shown in Figure 6-9.
-
When you’re happy with the intended location of the field, release the mouse button.
Your field is relocated.

Figure 6-6: Right there in the table is a new field, awaiting creation.

Figure 6-7: Not sure what field type to choose? Short Text is a good choice, because it was the default for new fields when you built the table originally.

Figure 6-8: Name that new field, and make it feel at home in your table.

Figure 6-9: Drag-and-drop your field to reposition it among the other fields in the table.
By default, all fields created in Datasheet view are Short Text fields. If this isn’t the type of field you want, you can change the Data Type (as well as other settings) for the new field by doing the following:
- With the field selected, click the Ribbon’s Fields tab from the Table Tools group.
- In the Formatting section of the tab, click the Data Type drop-down arrow, as shown in Figure 6-10.
- Choose a format — Short Text, Date/Time, Currency, Hyperlink, whatever — from the resulting list, as shown in the preceding Figure 6-10.

Figure 6-10: The Data Type drop-down menu gives you formatting options.
You can also tinker with settings that go with the data type you choose — for example, if you choose a Number format, you can use the buttons in the Formatting section to determine how many decimal places will appear onscreen.
Deleting a field
Getting rid of a field is no big deal — in fact, it might be too easy. Access does, at least, give you a little nudge (in the form of a dialog box) to make sure you’re positive you want to get rid of the field in question.
To get rid of an existing field that you no longer need, follow these steps:
- Right-click the heading for that field column.
- From the resulting pop-up menu, shown in Figure 6-11, choose Delete Field.
- When prompted, click Yes to confirm your desire to complete the deletion.
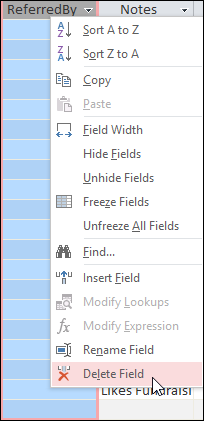
Figure 6-11: Bid your field a fond adieu with just two clicks of the mouse.
Modifying Field Content
Although your stuff is safely tucked away inside a table, you can reach in and make changes easily. In fact, editing your data is so easy that it’s hard to tell whether this is a good feature or a bad one.
 Whenever you’re browsing through a table, please be careful! Access doesn’t warn you before saving changes to a record — even if the changes are accidental. (If I were that kind of preachy author, I’d probably make a big, guilt-laden point about how this “feature” of Access makes regular backups all the more important, but that’s not my style.)
To change something inside a record, follow these steps:
- Scroll through the table until you find the record that needs some adjusting.
-
Click the field (the individual cell in the table) that you want to change.
The blinking line cursor pops into the field.
If your mouse has a wheel button, use the wheel to take a quick spin through the table. (For such a small innovation, that wheel is a big timesaver!) -
Change the field.
What you change and how you change it is up to you:
- Replace the entire field: Press F2 to highlight the data and then type the new information. The new entry replaces the old one.
- Repair a portion of the data in a field: Click the field and then use the right and left arrow keys to position the cursor exactly where you want to make the change.
-
Remove or add characters: Press Backspace to remove characters to the left of the cursor; press Delete to remove characters to the right. Insert new characters by typing.
If you’re in a time/date field and want to insert the current date, press Ctrl+; (semicolon). To insert the current time, press Ctrl+Shift+; (semicolon).If you change your mind and want to restore the original data, press Esc or Ctrl+Z to cancel your edits.
- When you’re finished with the record, press Enter.
Name-Calling
You’ve built your table, and maybe you’ve done a stellar job from the get-go — you didn’t forget any fields, you put the fields in the right order, and you set up the fields to house the right kind of data. Well done, you!
Okay, back to reality. (Of course nothing in life is that simple, is it?) It’s not uncommon to realize, after building your table (and accepting my previous “Well done, you!”) that you need to make a few changes. You may need to change the table’s name or you might need to change one or more of the field names in the table. Or both! If this happens, it doesn’t mean you messed up or anything, it just means you’re a human being who, with even the most scrupulous planning and preparation, can make a mistake or change your mind — or perhaps the terminology has changed since the table was first created, and now it needs updating. Luckily, regardless of the reason you need to do it, Access makes it easy to make either kind of change.
Renaming fields
Uh-oh. The field name you used when you first built the table has been the source of some confusion. People don’t know what “Status” means — does it mean the members have paid their dues or does it refer to whether they’re active in the organization? It’s clear enough to you, but it’s important that other folks who use the data feel confident that they understand what’s in it.
This sort of field-naming dilemma is common when you’re setting up a table for the first time, and can even crop up later on, when you’re working with a table that’s been around and in use for a while. The need to edit field names can arise for any reason, at any time; it’s never too early or too late to edit them.
So, for whatever reason, you find you have to edit a field name. What to do?
Access makes it incredibly easy to rename a field — to keep it simple, do it first in Datasheet view. The simplicity doesn’t end with how the actual renaming takes place, either — as soon as you rename a field, Access updates a whole slew of things automatically:
- All connections from that field to other tables (if you’ve already set up your table relationships, as discussed in Chapter 5)
- All queries, reports, and other goodies that already use the field
What could be easier than that?
Working in Datasheet view
So when you’re ready, follow these steps:
-
Double-click the field name, as shown in Figure 6-12.
The current name is highlighted in place, atop the column.
- Edit the name as needed:
-
To replace the current name entirely, type the new name while the current name is still highlighted.
 While the field name is highlighted, the very next thing you type will replace the current name — so don’t start typing at that point unless you want to replace the entire field name.
 - To edit the name (leaving some of the current name in place), click inside the existing, selected name and then insert or remove characters as needed.
-
-
When you like the name you see, click in any cell in the table.
The new name appears at the top of the column, and you’re ready to do whatever you need:
- Enter new records.
- Edit another field.
- Save the table (for design changes) and close it (if you’ve finished working).

Figure 6-12: A selected field name is ripe for editing.
Using the Fields tab
To rename a field in the Fields tab in Datasheet view, follow these steps:
-
Click the field name that you want to edit.
You can also click in any cell in that column — just give Access some way of knowing which field you want to rename.
- Click the Fields tab, in the Table Tools section of the Ribbon.
-
In the Properties section, click Name & Caption.
A dialog box opens (as shown in Figure 6-13) in which you can rename the field.
- Type the new name in the Name field in the dialog box.
-
Press Enter or click OK to change the name.
This tells Access to accept your change, and you return to the table, with your field’s new name in place.

Figure 6-13: Rename your field in the Enter Field Properties dialog box.
If you prefer the quick-and-easy way to change a field name (and have no other changes you need to make, such as editing the Field Size, via the Fields tab in the Table Tools section of the Ribbon), you can double-click the existing field name, and when it highlights, type the new name. Press Enter to confirm your change.
Renaming a table
Renaming an entire table is not as common as needing to rename a field, but it can happen. Maybe you misspelled the name. Maybe the name you gave it is too long, too short, or is misleading to people who have to guess which table to open when they’re looking for something in particular.
To edit the name of a table, follow these steps:
-
Open the database that contains the table you want to rename.
With the chosen database listed on the left side of your Access workspace, look for the table you wish to rename.
Don’t open the table itself. It can’t be open during the renaming process if you want those steps to work. - Right-click the table name.
-
Choose Rename from the menu that appears, as shown in Figure 6-14.
The name is highlighted.
-
Change the table name.
You can make the change in one of two ways:
- Type the new name.
- Modify the current name (use your arrow keys to move within the name and your Backspace and/or Delete keys to edit).
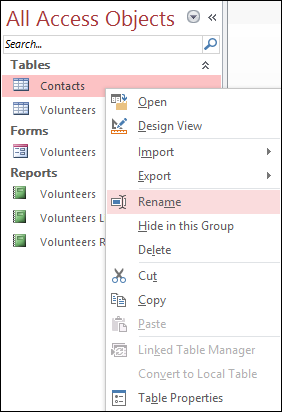
Figure 6-14: To rename a table, you have to be able to see its name listed in the All Tables panel on the left.
After you’ve renamed your table, all the items that link to or use it within your database will be updated to use the same table with the new name. You don’t need to re-create any of your queries, reports, forms, or relationships.
Turn Uh-Oh! into Yee-Hah!
It happens to everyone. You add, move, or change the name of a field and regret it later — or you rename your table and wish you hadn’t. What can you do? Call upon Access’ techniques for avoiding the panic that ensues when a mistake is made and you think you’re stuck with the results.
Now, none of the following three methods for cleaning up after a regrettable change are magical or really high-tech, but they are helpful. Here goes:
- You can recover from one addition or edit with the Undo command. Unfortunately, you cannot undo the deletion of a record. Access will warn you, though, if you attempt to delete one or more records; you can choose not to proceed if you’re not absolutely sure.
- Double-check any change you make before saving it. This sounds painfully obvious, but really — just do it. And if the change is important, triple-check it. When you’re sure it’s correct, press Enter and commit the change to the table. Until you’re sure about the change you’re making, don’t click outside of the field.
- Keep a good backup so you can quickly recover missing data and get on with your work. Good backups have no substitute. If you make good backups — which is as easy as using the File tab’s Save As command and then choosing Save Database As (I like to name the backup “DatabaseBackup-xx-xx-xxxx” where the x characters represent the date of the backup, and the word Database is exchanged for the name of the database you’re backing up). With regular backups, the chance of losing data is greatly reduced, your boss promotes you, your significant other unswervingly devotes his or her life to you, and you may even win the lottery. At the very least, you’ll sleep better, knowing that your data is safe.