Chapter 10
Automatic Data Editing
In This Chapter
![]() Fixing your mistakes
Fixing your mistakes
![]() Replacing data automatically
Replacing data automatically
![]() Finding unwanted duplications in your data
Finding unwanted duplications in your data
Correcting an incorrect entry in an Access table is pretty easy: A few clicks, some typing, and voilà — the problem is gone. But what if you need to correct 26,281 records? Manually editing so many records would involve a whole bunch of clicking and typing and clicking and typing. (Editing an entire table by hand doesn’t sound like an opportunity for a triumphant “Voilà!”)
Fortunately, Access offers some handy, large-scale housekeeping and editing tools you can use to make big changes to your database — all without wearing out your keyboard, mouse, or fingertips.
Please Read This First!
 If you’re following my not-terribly-subtle suggestion to not skip this section, you’re well on your way to successful database maintenance. Why? Because the fact that you’re reading this tells me you’re a careful person who follows advice and instructions. These traits are the key to managing thousands of records, keeping them accurate and up-to-date, and making the types of corrections I talk about in this chapter.
Why do I sound so serious, all of the sudden? Well, when you’re making large-scale changes to a database, things can go wrong and mistakes can be made. If you’re going to do anything major to your database — especially if you’re editing and/or deleting a whole lot of records — you want a backup there behind you; if you do make a mistake and wipe out the wrong records, or edit something that should have been left alone, you can easily go back to the original version of the database and start over.
It’s a wise Access user who makes a backup of his or her database table or tables before starting any task that involves a margin for error. Here’s how you back up the table you want to edit:
-
Open the database file that contains the table you want to edit.
The list of tables in the database appears on the left side of the window.
- Right-click the table name in the list on the left.
-
Choose Copy from the pop-up menu that appears (see Figure 10-1).
Access places a copy of the table on the Windows Clipboard.
-
Right-click anywhere below the list of tables, reports, and so on in the left-side panel (as shown in Figure 10-2).
A pop-up menu appears.
-
Choose Paste from the pop-up menu.
The Paste Table As dialog box appears, as shown in Figure 10-3. It offers choices for how to paste your copied table data, but you don’t really need to worry about them at this point.
-
Type a name for the new table into the dialog box’s Table Name field.
Access suggests “Copy of _____,” where the blank is the current table name (which might be a good choice).
-
Click OK.
 Don’t worry about the options in the dialog box. The default setting (Structure and Data) works just fine.
The dialog box closes, and you now have a copy of the original table.
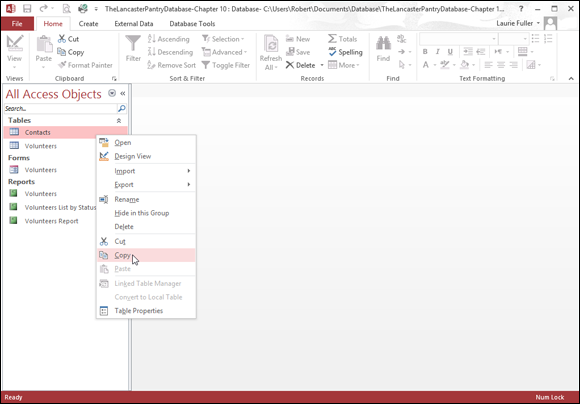
Figure 10-1: Copy that table for safekeeping.

Figure 10-2: Choose Paste to make a backup version of the table.

Figure 10-3: The Paste Table As dialog box.
With your table copy there to support you, you now have a backup — something to go back to should any of the steps in the rest of this chapter go awry when you apply them to your data.
Backup at the ready, it’s time to move on and start editing your database — automatically.
Creating Consistent Corrections
Automated editing queries have a lot of power. But before you haul out the really big guns, here’s a technique for small-scale editing. The technique may seem simplistic, but don’t be fooled; it’s really very handy.
You can practice small-scale editing by using the Replace command as follows:
- Open a table in Datasheet view.
- Click in the field you want to edit — it doesn’t matter which row you’re in; just be in any record, in the field you want to edit.
-
On the Home tab, click the Find button in the Find section.
The Find and Replace dialog box appears, as shown in Figure 10-4.
-
In the Find What box, type the value you want to change. In the Replace With box, type a new value.
With this information in place, you’re ready to start making changes. Note that the Look In setting defaults to Current Field, which is why you clicked as instructed in Step 2.
-
(Optional) Click the Look In drop-down list to choose a different field in which to search.
The Find and Replace dialog box assumes you want to search and make changes to the active table (or form, report, or query, whatever’s the open and active part of your database). As mentioned previously, it defaults to searching the current field, but you can click the Look In drop list and choose Current Document instead, which means to search all fields in the active table, form, report, or query.
-
Click one of the buttons on the right side of the dialog box to apply the changes to your table.
- To find the next record to change, click Find Next. The cursor jumps to the next record in the table that contains the text you entered in the Find What box. No changes get made at this point — Access only finds a matching candidate. To make a change, click the Replace button, explained next.
- To apply your change to the current record, click Replace. This makes the change and moves the cursor to the next matching record in the database. Click Replace again to continue the process. To skip a record without changing it, click Find Next.
- To make the change everywhere in the current field, click the Replace All button. Access won’t ask about each individual change. The program assumes that it has your permission to correct everything it finds. Don’t choose this option unless you are absolutely certain that you want the change made everywhere.
The moment you click either the Replace or Replace All button, Access permanently changes the data in your table. Access lets you undo only the last change you made, so if you clicked Replace All and updated 12,528 records, Access lets you undo only the very last record that you changed — the other 12,527 records stay in their new form. This, dear reader, is why we started out making a backup! -
When you finish, click Cancel or the X button in the top right corner of the dialog box.
The Find and Replace dialog box closes.
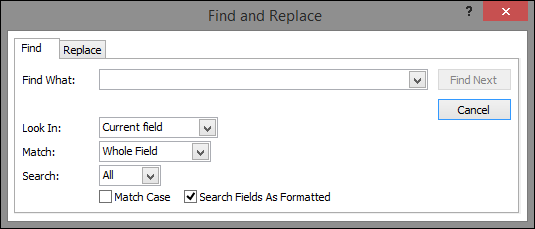
Figure 10-4: The Find and Replace dialog box.
One of the most common reasons to use Find and Replace is to correct a misspelling. We all hate it when we make such a mistake, but we hate it less when the solution is as simple as making Access go look for the error and replace it with the correction, utilizing the very powerful Find tools we’ve been discussing in this section. So … if you misspell a word, any word, throughout your data and need to change all its occurrences to the proper spelling, follow these steps:
- Open the Find and Replace dialog box.
- On the Find tab in the dialog box, type the incorrect spelling in the Find What box.
- Type the proper spelling in the Replace With box.
-
Click the Replace All button.
Your computer goes off and does your bidding, changing each instance of the word in the Find What box to the word in the Replace With box.
Access gives you a lot of control over the process. In addition to the options of the Find command (discussed in Chapter 12), Replace offers additional options:
- Match Whole Field: Selected by default, Whole Field (in the Match drop-down list) makes Access look only for cases in which the information in the Find What box completely matches an entry in the table. That is, if the data in your table includes any additional characters in the field — even a single letter — Match Whole Field tells Access to skip it.
- Match Any Part of Field: If you select Any Part of Field from the Match drop-down list, Access performs the replace action whenever it finds the text in any portion of the matching text in the field. For example, this setting picks the area code out of a phone number. Unfortunately, it also replaces those same three numbers if they appear anywhere else in the phone number, too.
- Match Start of Field: If you choose Start of Field from the Match drop-down list, Access replaces the matching text only if it appears at the beginning of the field. This option could replace only the area code in a series of phone numbers without touching the rest of the numbers.
If your editing goes awry, remember that the wonderful Undo option corrects only the very last record that Access changed. Just click the Undo button on the Quick Access Toolbar or press Ctrl+Z.
Using Queries to Automate the Editing Process
Queries, especially those created through the Query Wizard, are exceptionally easy to create (as you discover in Chapter 13). In this chapter, you create a very simple and specific query not created elsewhere in the book — a query designed specifically to look for duplicate records.
But what about correcting those 26,281 records? If Find and Replace doesn’t solve the problem, you’re looking at some serious querying (a topic covered in Chapters 12 through 17), and you may find that creating a single query that fixes all the problems is impossible.
Therefore, be prepared to use a combination of things: Create a query that seeks out certain issues, do some editing of individual records, and use Find and Replace procedures to locate consistent errors and replace them with something you can spot easily, like every place someone doing data entry placed an “X” to indicate they didn’t know what to enter or didn’t have the data to enter for a given field. This is kind of a twist on using Find and Replace to fix spelling errors (covered previously in this chapter), but instead of fixing an error, you’re using Replace to flag certain records for editing.
Generally, however, Find and Replace will do what you need because a universal misspelling, a bunch of zip codes entered accidentally into the wrong numeric field — or any repeated error of that sort — can be fixed pretty quickly by searching for the erroneous content and replacing it with what should be there instead. With a backup copy of your table preserved for safekeeping (you did read the “Please Read This First!” section, didn’t you?), feel free to experiment with Find and Replace and even some queries that you make on your own.
Looking for duplicate records
Let’s get back to that duplicate records query. What, exactly, is a duplicate record? You will have duplicated data in your database — people who live in the same city, for example, will have the same city in their records in the City field. Products that have the same price, or that come in the same colors, will have the same data in some or nearly all of their fields. What I mean here by a duplicate record is an entire record that is an exact duplicate — every field is the same in one record as it is in another record (or in several others, as the case may be).
How do duplicate records get made? It can happen quite easily:
- It happens a lot when more than one person is doing data entry; two or more people might have the same list or stack of cards or other source of data that’s being keyed into your Access table.
- If you’re relying on an Excel worksheet as the source of the table data, or if some other electronic source is providing the records, accidental duplication is still a common risk; it’s just as easy to paste the same rows of data into the table twice as it is to enter the same records twice manually. Maybe easier.
Duplicate records waste time and money. If you think that it’s no big deal to have the same person entered into your database three times, or that the record for your Green Widget with the Deluxe Carrying Case is in the database twice, consider the extra postage you would spend mailing a catalog more than once to the people who appear in the database multiple times, or the confusion when only one instance of a product is updated to reflect a price increase. Which record is correct after they’re no longer identical? So it’s a good idea not only to be vigilant about avoiding duplicates from the beginning, but also to ferret them out and get rid of them whenever they’re found.
Running the Find Duplicates Query Wizard
The Find Duplicates Query Wizard can help you spot that common curse of the database: duplicate records. Duplicates waste time and money, especially when the database is used for mailings or some similar business activities. This wizard can help your database clean up its act.
To run the Find Duplicates Query Wizard, follow these simple steps:
-
Click the Ribbon’s Create tab.
The Create tab’s sections — Templates, Tables, Queries, Forms, Reports, and Macros & Code — appear.
-
Click the Query Wizard button, found in the Queries section.
The New Query dialog box opens, as shown in Figure 10-5.
-
Choose the Find Duplicates Query Wizard from the list of available wizards.
A description of the wizard’s function appears on the left side of the dialog box.
-
Click OK.
The original Query Wizard dialog box closes and is replaced by the Find Duplicates Query Wizard dialog box, shown in Figure 10-6.
-
Choose the table in which you want to search for duplicates.
- Notice that in the View area, you can choose to see Tables, Queries, or Both, so if this isn’t your first query or if another user has created one for you, you can certainly search an existing query’s results for duplicates, too.
- If this is your first query, and your data is only in tables that you or someone else made, simply leave Tables selected in the View area.
You’ll also see your backup copy of the table in this list, so be sure you pick the right table and don’t start operating on your backup! -
Click Next.
In the Available Fields list (see Figure 10-7), double-click those fields you’re worried could have duplicate entries in them. Skip fields that are supposed to have duplicates anyway or where duplicates, however unlikely, are no problem — such as cities, states, zip codes, or last names. You can also skip your primary key field, because by its very nature (as a field containing unique data for each record), it won’t have any duplicate values.
-
When the Duplicate-Value Fields list is populated with those fields that you want the query to look in, click Next.
The next step in the wizard appears, as shown in Figure 10-8.
-
From the Available Fields list, double-click those fields you want to include in the query’s results in addition to those with duplicate values.
Such fields typically include those that help you identify records that are harboring duplicate data, such as First Name if you’re looking for records that might have identical Last Names, or Product Numbers if you’re looking for products that have the same description or price. In this example, I am looking for duplicate records in a customer table, which will prevent mailings going out to anyone more than once (or at an old and a new address for the same person).
-
Click Next.
The last step in the Find Duplicates Query Wizard appears, as shown in Figure 10-9. Here’s where you decide on a name for your new query.
-
If you don’t like the default name Access gave your query, just enter a new name into the text field.
Preferably, the name should be short but should identify the query’s purpose — Duplicate Names Query is a good name for this example. The default query name that Access offers will be “Find duplicates for _______,” where the blank is the name of the table searched-for duplicates.
-
Click Finish.
The results of your query appear onscreen, as shown in Figure 10-10.

Figure 10-5: The Query Wizard is here to help you.

Figure 10-6: The Find Duplicates Query Wizard takes you through duplicate-finding steps.

Figure 10-7: Pick the fields that might have unwanted duplicate entries.
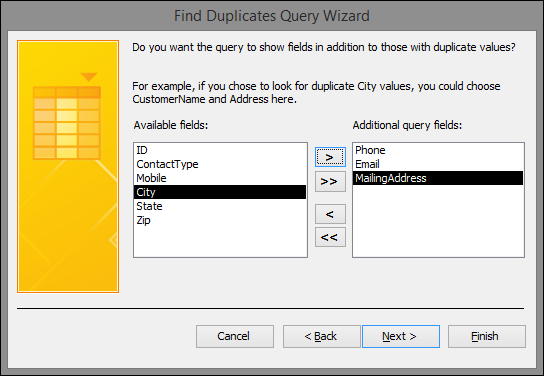
Figure 10-8: Pick the fields that will help you choose which duplicates to keep.

Figure 10-9: Name your query and finish it so you can see your duplicates onscreen.

Figure 10-10: All these records have duplicate entries in one or more fields.
Now that you know which records have duplicate data within them, you can
- Edit them individually. Just click within the records shown as duplicates and make changes to names, addresses, or whatever else might be incorrect, if an error is the cause of the duplication.
- Use Find and Replace. Use on the query results to make more targeted changes, such as taking all records with a particular word in a particular field and either
-
Change that word to something else
or
- Append a character or digit to that entry to make it different from the others.
-
- Delete the unwanted records. To do so, simply click the leftmost cell in the row for the unwanted record (the entire record/row will be selected) and then press the Delete key. Of course, be careful not to delete both records — you only want to delete the unwanted duplicate!
You’ll be asked to confirm your deletion, and you can choose Yes if you do want to get rid of the extra record.