
Chapter 23
Steer Users in the Right Direction with Navigation Forms
In This Chapter
![]() Plugging into a Navigation form
Plugging into a Navigation form
![]() Testing your Navigation form
Testing your Navigation form
![]() Keeping the Navigation form running smoothly
Keeping the Navigation form running smoothly
![]() Opening a Navigation form automatically upon opening a database
Opening a Navigation form automatically upon opening a database
If you plan for others to use your database, you may want to provide them with navigation tools so they can easily find their way around your database (especially if they know nothing about Access). You may even want this luxury for yourself. It’s much easier to move around a database with a navigation system in place. Fortunately, the Navigation form provided with Access 2016 makes it easy to build such a system. The form uses a familiar web-type interface to view various database objects. This chapter explains all there is to know about making your database user-friendly via the Navigation form.
To see a Navigation form in action, download the sample files at www.dummies.com/go/access2016. Open the file Access 2016 Dummies.accdb and open the NavigationForm form. And no, you’re not seeing double!
The Comings and Goings of a Navigation Form
Before you create your Navigation form, take a few minutes to plan out your database navigation. How do you want you and your users to navigate to the various forms and reports you’ve created? Access provides several layouts for Navigation forms; which one you choose depends on what you need:
- If you have a simple database with a few data-entry forms and several reports, use one of the simpler layouts such as the Vertical Tabs, Left layout.
-
If your database is more complex, you may need to categorize forms and reports. Use a multilevel layout such as the Horizontal Tabs and Vertical Tabs, Left layout.
For example, you might have a series of sales reports and a series of inventory reports. You may want two tabs across the top of your form — one for each series of reports. When you click a tab across the top, the associated reports for that tab show up down the left side of the form.
This multilevel scheme can make the object you (and your users) are looking for easier to find.
Whatever you decide, you can always modify the design of your Navigation form at any time. (I discuss Navigation form editing later in the chapter.)
Here’s how you build a Navigation form:
- Open the database file that will contain the Navigation form.
-
Click the Create tab on the Ribbon.
The Forms group appears toward the center of the Ribbon.
-
Click the Navigation button on the right side of the Forms group.
A drop-down list of Navigation layouts appears, as shown in Figure 23-1.
-
Select a layout from the drop-down list.
The selected Navigation form appears in Layout view, ready for design. (See Figure 23-2.)
-
Show the Navigation pane, if necessary. (If you don’t see it, press the F11 key.)
Your database objects appear.
 Don’t confuse the Navigation form with the Navigation pane. The former is a special type of form that you create from a command on the Ribbon; the latter is the built-in window that displays your database objects.
 -
From the Navigation pane, drag an object that you want your users to open on top of an [Add New] tab on the Navigation form.
The object’s name appears in place of the Add New tab; the object itself appears in the middle of the form. (See Figure 23-3 for an example.)
- Repeat Step 6 for each object you’d like added to the Navigation form.
-
Save the form using the Save button on the Quick Access Toolbar.
The form will appear in the Navigation pane along with all other database forms. (See “Displaying the Navigation Form at Startup,” later in this chapter, for instructions on launching the form automatically when the database opens.)
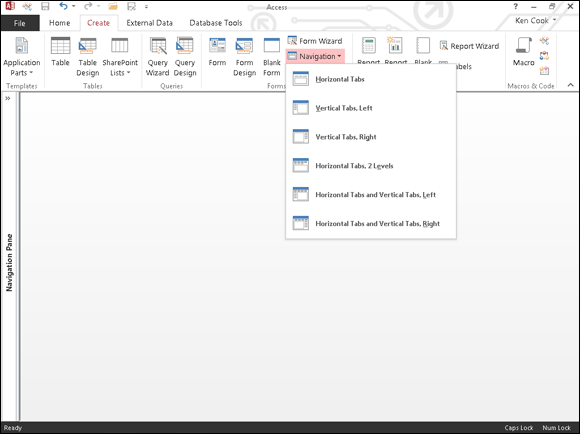
Figure 23-1: Your Navigation layout options.

Figure 23-2: The Navigation form (Horizontal Tabs and Vertical Tabs, Left layout).

Figure 23-3: Adding the Volunteers form to the Navigation form.
 If you find your Navigation form filling up because of the many forms and reports you have, you can create several Navigation forms — and have one Navigation form call another. It’s not that unusual; I’ve created databases containing well over 50 reports. In this instance, I might create a Reports Navigation form and call it from the main Navigation form. Just take care to arrange your forms and reports in a way that makes intuitive sense.
Am I in the Right Place? Testing Navigation Forms
After you’ve created your Navigation form, be sure to test it before turning your database loose on your users. You’ll want to test for two qualities:
- The legitimacy of the commands you’ve added. Can you navigate to each form and report you’d like your users to see?
- The intuitive usability of your Navigation form. Is it easy to find everything?
Put yourself in the shoes of someone who knows nothing about Access. Could you figure out how to run a report or enter a new volunteer with your Navigation form? If the answer is no, then you’d better make some modifications. If the answer is yes, then sit back and crack open a nice cool drink!
Present your database to someone who knows nothing about Access. See if your “tester” can perform the basic tasks you’d like your users to perform — without any special instructions. Use your tester’s feedback to tweak your Navigation form if necessary.
Of course, to do any testing, you’ll want to see the form as your users will. Here’s how:
-
From the Navigation pane, double-click your Navigation form.
Your Navigation form opens in Form view. Figure 23-4 shows a sample horizontal and vertical tab Navigation form.
-
Click a tab button to launch one of your forms or reports.
The form or report signified by the tab label should run. If it does, then you’ve done everything right! If it doesn’t, you need to make some modifications — which are discussed in the next section.
- Repeat Step 2 for every tab you’ve created.
If everything checks out, your Navigation form is ready for launch.

Figure 23-4: A sample Navigation form with a tab row and column.
Maintaining the Navigation Form
Almost without fail, a Navigation form will need modifications. You may (for example) have to tweak that form to:
- Correct mistakes or omissions made during initial Navigation form creation.
- Open new database objects (such as a new report).
See the “The Comings and Goings of a Navigation Form” section, earlier in the chapter, for more on creating Navigation forms. Let’s just concentrate on editing, deleting, and moving items here.
Edit a Navigation form item
If a tab is misspelled or does not perform the expected command, you need to know how to fix that command. If the form title is mislabeled, you can fix that as well. Here’s how:
-
Show the Navigation pane, if necessary.
The Navigation pane appears, showing a list of all database objects.
-
Right-click the Navigation form you’d like to edit from the Navigation pane and choose Layout View from the resulting shortcut menu.
The selected Navigation form opens in Layout view.
- To edit the Navigation form or tab name, double-click in the Navigation Form Name or Tab Name box and make your edits.
- Click Save on the Quick Access Toolbar to save your edits.
Delete a Navigation Form tab item
If a Navigation Form tab is no longer needed, it’s a snap to send that critter packing.
Here are the steps for deleting a Navigation Form tab:
- Show the Navigation pane, if necessary.
-
Right-click the Navigation form you’d like to edit from the Navigation pane and choose Layout View from the resulting shortcut menu.
The selected Navigation form opens in Layout view.
-
Select the tab you’d like to delete by clicking it.
A thick border will appear around the tab.
-
Press the Delete key on the keyboard.
The tab and its corresponding form or report are removed from the Navigation form.
- Click Save on the Quick Access Toolbar to save your changes.
Move a Navigation form item
If the tab order on a Navigation form is not quite right, it’s easy to rearrange the tabs. You can move items up or down on a vertical set of tabs and left or right on a horizontal set to put them in whatever order you like. So let’s get moving!
- Show the Navigation pane, if necessary.
-
Right-click the Navigation form you’d like to edit from the Navigation pane and choose Layout View from the resulting shortcut menu.
The selected Navigation form opens in Layout view.
-
Select the tab you’d like to move by clicking it.
A thick border appears around the tab.
-
Drag the selected tab into its new location.
A vertical or horizontal bar (depending on the orientation of the tabs) follows the tab as you drag.
-
Release the mouse button when your tab has reached its new home.
The tab moves into its new position.
- Click Save on the Quick Access Toolbar to save your changes.
Displaying the Navigation Form at Startup
The last step in implementing a Navigation form is to have that Navigation form open when the database opens. Your users might find it inconvenient to have to locate the Navigation form and open it themselves, wouldn’t you say? So you’ll have to do it for them — automatically. Does this sound too good to be true? Well, it isn’t. You can actually do it, and it’s easy. Here are the steps:
-
Click the File tab on the upper left part of the screen.
The File choices appear.
-
Click Options from the menu on the left side of the screen.
The Access Options dialog box appears.
-
Click Current Database from the list on the left.
The Current Database options appear. Note the Application Options section near the top of the dialog box.
-
Select your Navigation form from the Display Form drop-down list, as shown in Figure 23-5.
I called my Navigation form “NavigationForm.” I do like to state the obvious, don’t you think?
Want to control the Title Bar name and icon that appears onscreen when you launch your database? Complete the Application Title and Application Icon text boxes; they’re at the top of the Current Database options. Hide the Navigation pane from your users by removing the check from the Display Navigation Pane check box located farther down in the Current Database options. Doing so forces them to use your navigation system, thereby keeping them out of database objects you don’t want them to mess around with. -
Click OK to save the change.
A message box appears indicating you must close and then reopen the database to see the change take effect.
- Click OK in the message box window.
-
Close the database file and then reopen it.
The Navigation form opens automatically for the entire world to see. Ain’t life grand!

Figure 23-5: The NavigationForm form launches automatically when this database is opened.