Chapter 2
Navigating the Access Workspace
In This Chapter
![]() Getting started
Getting started
![]() Checking out the tabs, buttons, and menus
Checking out the tabs, buttons, and menus
![]() Using your mouse to get from here to there
Using your mouse to get from here to there
![]() Letting your fingers do the walking
Letting your fingers do the walking
If you skipped Access 2007, 2010, and 2013 and are coming to Access 2016 from the 2003 version, you’re probably surprised by the new interface, which was introduced with Microsoft Office 2007. If you did upgrade to Access (or Office) 2007, 2010, or 2013, then the 2016 interface looks very familiar — and you’ll find much of it to be the same as what you’re accustomed to.
For those to whom the Office 2016 interface is a big change, take note of the following changes to the interface, which are strikingly different from what you may have used in previous versions:
- Menus have given way to tabs and buttons arranged in a strip across the top of the screen — known as the Ribbon.
- Toolbars are no longer made up of distinct 3-D buttons. Instead, there are buttons and graphic examples of formatting, pictures of what the buttons create, and drop-down lists.
For users of Access 2007: Notice the new File tab and resulting panel. Instead of spawning a square menu, the button now displays the panel shown on the left in Figure 2-1, where common tasks such as saving and printing are available. It even looks different than it did in 2010 and 2013 — so users of those two versions will also be surprised at the look of this panel and how it appears onscreen when you click the File tab.

Figure 2-1: The File tab displays a list of file-related commands – including Open, Save, and Close.
You also see features in the center and on the sides of the workspace, which change depending on what you’re doing or which button you’ve clicked:
- If you’re starting a new database, options for doing so appear in the center pane (click New in the red panel on the left).
- If you’re working with an existing database, clicking Info (as shown in Figure 2-1) displays a link to “View and edit database properties”, which shows you information about the open database, or to Compact & Repair your database, or to Encrypt with Password, to secure the database with a password.
- Clicking Save, Save As, Print, and Options open dialog boxes through which you can perform those tasks. Options, of course, displays settings you can change to control how Access looks and works.
I won’t go into every possible combination of onscreen features in this chapter — you get to know a lot of them in subsequent chapters. For now, I’ll show you the basic workspace in three states:
- When Access first opens up
- When a new database is being built, either from scratch or when you’ve started with one of Access’s database templates
- When you’re working on an existing database
As you read through the following sections, you can refer solely to the accompanying figures or, if you want, try to work along with the procedures — you’ll find doing what you see described here boosts your confidence when you’re using Access later, on your own.
Diving Right In
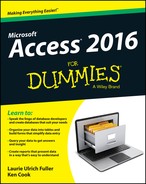
So you’re ready to dive in. Well done, you! It’s easy to start Access. You can start the application in multiple ways, accommodating nearly any situation you’re in. (Chapter 1 discusses most of them.) Whether you’re starting Access to view and edit an existing Access database (which gives you what you see in Figure 2-2) or are about to create your own (which opens the application and displays the list of Recent databases and template icons, shown in Figure 2-3), you can get to the tools you need right away. Figure 2-2 shows an existing database open to one of its tables; its other components are listed on the left side of the workspace.
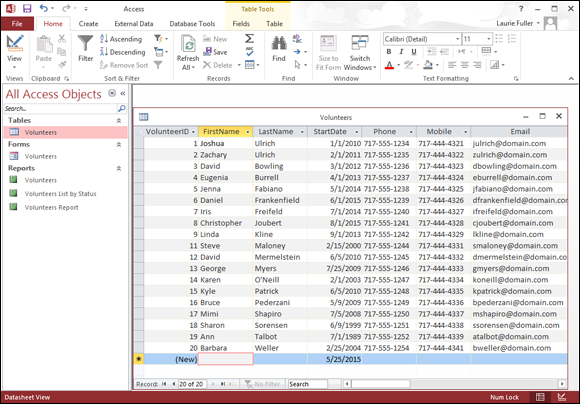
Figure 2-2: Open Access and your existing database in one fell swoop.

Figure 2-3: You can build a database from nothing or from something — in the form of an Access template.
You can open an existing database by double-clicking it by name in the Explorer window or from an icon on your Desktop; you can start Access from the Start menu in Windows 7 or the Start screen in Windows 8.1, and then pick which existing database you want to work with; you can start a new, blank database from scratch; or you can start out with one of the Access templates.
Figure 2-3 shows the various template icons displayed when you choose New from the left-hand panel.
If you opened Access by using the Start menu or Start screen or a Desktop/Taskbar icon and now you want to open an existing database, you can use the Open command in the panel on the left (see Figure 2-4). This allows you to open either a recently used database or browse for one you haven’t opened in a while. The Open command’s list of options includes
- Recent: Shows a smaller version of the Recent list
- OneDrive: Opens your OneDrive cloud account if you have one
- This PC: Allows you to search your computer
- +Add a Place: Adds SharePoint and OneDrive locations
- Browse: Opens an Open dialog box

Figure 2-4: Open an existing or recently used database.
When you use the Recent list, clicking any one of the Recent Databases listed opens that sucker right up, displaying its parts on the panel on the left side of the workspace.
So that’s it, really — any way you want to get started is available either by opening the Access application from the Start menu (Windows 7) or Start screen (Windows 8/8.1) or an application icon, or by clicking the File tab after you’ve got a database open.
After you get to working, however, it’s time to use the onscreen tools that don’t appear until you open a database. Read on for a whirlwind tour of the Access workspace, including views and explanations of all the major bells, whistles, and buttons.
Working with Onscreen Tools in Access
When you open a database — be it an existing one or one you’re just starting from a blank database or a template — the workspace changes, offering the Ribbon and its tabs shown in Figure 2-5 (Home, Create, External Data, and Database Tools). These tabs are not to be confused with the database components’ tabs, which appear in the center of the workspace for whichever tables, reports, queries, or forms you’ve chosen to open from the list on the left.

Figure 2-5: The main Ribbon tabs appear when you open a database.
When the Ribbon tabs first appear, many of their buttons are dimmed — because they don’t become available until you’re doing something that warrants their use. For example, if you haven’t opened any tables, forms, reports, or queries in your open database, the tools for editing or formatting your database will appear on the tabs, but they’ll be dimmed, which indicates that they’re unavailable. Tools for creating new components are available on the Create tab, but anything that works with existing data will be dimmed.
After you open a table, report, query, or form, the tools for that table, report, query, or form become available. Displaying a form, for example, adds the Form Layout Tools group to the main set of five tabs, as shown in Figure 2-6.

Figure 2-6: The buttons relevant to what’s open and active in your database are available when you need them.
Clicking tabs
To move from one tab on the Ribbon to another, simply click the tab’s name. It’s easy to see which tab is currently open — as shown in Figure 2-7, the Create tab is bright, and you can see all its buttons. When you mouse over another tab, its name turns dark red (notice the Database Tools tab in the figure); the active tab remains bright, though, until you click a new one, making that the active tab.

Figure 2-7: You can easily tell the active tab (Create) from the inactive ones.
 When you have a table open, the Home tab is displayed, and a new label — Table Tools — appears above the Fields and Table tabs.
Using buttons
Access buttons come in two varieties:
- Buttons that do something when they’re clicked: Either opening a dialog box or wizard or performing some change or task in your open table, report, query, or form.
- Buttons that represent lists or menus of choices: This latter variety comes in two flavors of its own:
-
Drop-down list buttons are accompanied by a small, down-pointing triangle, appearing to the button’s right. When you click the triangle, a list of options appears, as shown in Figure 2-8.
- Some buttons have a down-pointing triangle at the bottom of the button (as shown in Figure 2-9). Click the bottom half of the button (or on the triangle), and a menu appears.
-
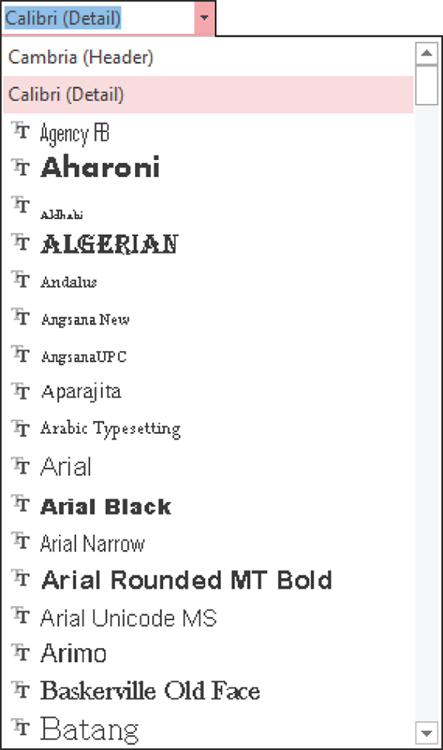
Figure 2-8: Click the triangle to the right of the button and make a choice.

Figure 2-9: Menu buttons display a — surprise! — menu when clicked.
The File tab and Quick Access tools
If you’re fresh from using a pre-2007 version of Office (XP and previous), you’ll be relieved to see a File tab. Office 2007 users lost that familiar word in that version’s interface, replaced then by an Office button, with no comforting word “File” on it. The word File came back in 2010, however, displaying Backstage view, for opening files, saving files, starting new files, printing, and customizing Access through the Options command. The File tab remains in Access 2016, and is shown in Figure 2-10.

Figure 2-10: Craving the File menu’s tools? Click the File tab to choose from a series of commands on the left.
When you’re in a database and click the File tab, you’re taken to the Info display, showing information about the open database.
 Where’s the Quick Access Toolbar? It appears while you’re in a database, but it disappears when you go to the File tab. No problem; to see it again, just click the Back button in the File panel, and you’re back to your database, with the Quick Access Toolbar in the upper left of the workspace. If you want to customize the Quick Access Toolbar, click the triangle at the right end of the toolbar. It offers a pop-up menu with several choices, from Customize Quick Access Toolbar to Show Below the Ribbon. In between, you’ll find some of the same commands found on the File panel.
Accessing panes, panels, and context-sensitive tools
Depending on what’s going on within the workspace — that is, what you’ve just done as you edit your table, report, query, or form, or which button you’ve clicked on one of the Ribbon tabs — Access offers relevant onscreen tools and panels. As an example of this context-sensitive feature, if you open a table and click the Report button on the Create tab (see the Reports section of the Create tab), not only does a report appear, but you also get new tabs — Design (shown in Figure 2-11), Arrange, Format, and Page Setup, under the heading “Report Design Tools”.

Figure 2-11: Reporting-related tools appear precisely when they’re needed.
To find out more about reporting, including the capability to group, sort, and total your data, see Chapters 18 through 20.
As you work with Access, you’ll get a feel for what’s going to appear when you do certain things. Things appear and disappear as you work because Access offers you just what you need for the task you’re performing or feature you’re using.
Customizing the Access Workspace
Any good application provides some capability for the user to customize the workspace — from adding and rearranging buttons on the toolbar to dragging toolbars and panes around to optimize the layout.
Access is certainly a good software application, so it does what any good application does: It allows you to customize the workspace. You can move the Quick Access Toolbar, you can add buttons from the main tabs to the Quick Access Toolbar, you can resize the Ribbon, you can tweak the status bar, and you can decide how (or if) your ScreenTips are displayed as you mouse over the tools.
There’s no need to do any customization, really — the default settings for toolbar locations, button combinations, and onscreen help are designed with the average or most common user in mind, and they’re pretty good. On the other hand, you may just want to tweak things to feel at home. (Think of the times you’ve fluffed the pillows on the couch before lying down — they may not have needed it, but you want to make your mark on your environment, right? Right.)
Repositioning the Quick Access Toolbar
For the position of the Quick Access Toolbar, you have two choices:
- Above the Ribbon, which is the default location
- Below the Ribbon
To move the Quick Access Toolbar, simply right-click it and choose Show Quick Access Toolbar Below the Ribbon. Figure 2-12 shows the pop-up menu with this command available. Note that if you click the down-pointing triangle at the right end of the Quick Access Toolbar, the command is Show Below the Ribbon.

Figure 2-12: Display your Quick Access Toolbar options to move it above or below the Ribbon.
When you place the Quick Access Toolbar below the Ribbon, you’ll notice that the same command (viewed by right-clicking the toolbar in its new location) is now Show Quick Access Toolbar Above the Ribbon. So it toggles like that, switching from Above to Below, depending on its current location.
You don’t have to right-click specifically the Quick Access Toolbar in order to reposition it. The aforementioned command (Show …) is available in the pop-up menu that appears when you right-click the tabs, too.
Adding buttons to the Quick Access Toolbar
Speaking of the Quick Access Toolbar and all the ways you can access commands for customizing it, try this to add commands:
-
With any database open (so that the Ribbon tabs are displayed), right-click any of the buttons on any of the tabs.
You can also right-click the Quick Access Toolbar or any Ribbon tab. -
Choose Customize Quick Access Toolbar (or More Commands, if you’re already looking at the Quick Access Toolbar’s menu from 2-12).
The Access Options dialog box opens (shown in Figure 2-13), with its Customization options displayed.
-
Click the Choose Commands From drop-down list and choose a command category.
A list of Popular Commands appears by default.
-
From any (or each) category, choose the commands you want to see at all times in the Quick Access Toolbar by clicking them one at a time and then clicking the Add button.
As you click the Add button, the command you choose is added to the list on the right. Note that you have up- and down-pointing triangles on the right side of the list of commands you’ve added — with one of the commands you’ve chosen to add selected, use them to reorder the list, which rearranges the left-to-right order in which they’ll appear on the toolbar.
-
Continue selecting categories and commands on the left and using the Add button to add them to the list on the right.
Not all commands will be usable at all the times that the Quick Access Toolbar is displayed. For example, if you choose to place the Filter button from the Home tab on the Quick Access Toolbar, the button won’t be available until and unless a table or set of query results is open. -
When you’ve added all the commands you want to add, click OK to add them and close the dialog box.
When you click OK, the changes to the Quick Access Toolbar are applied. The toolbar’s space on the top of the workspace grows to accommodate all the new buttons, as shown in Figure 2-14.
Figure 2-13: Pick a command category and a command to add to the Quick Access Toolbar.

Figure 2-14: Add as many buttons as you want — the toolbar will expand horizontally to accommodate them.
If you’re in a hurry to add a specific button to the Quick Access Toolbar, and you’re looking right at the button you want to add, just right-click the button and choose Add to Quick Access Toolbar from the menu that appears. The button you right-click instantly appears on the toolbar and remains in the tab where it was living when you right-click it.
Why, then, would you use the Access Options dialog box if a simple right-click takes care of business? Because it gives you the ability to select buttons from all the various tabs in one place — no need to go hunting on the tabs for the buttons you want to add. But when there’s just one you want and you can see it at the time, the right-click method can’t be beat.
Removing buttons from the Quick Access Toolbar
Want to remove a command from the Quick Access Toolbar? It’s easy:
- Point to the unwanted button on the Quick Access Toolbar and right-click.
-
Choose Remove from Quick Access Toolbar from the pop-up menu (see Figure 2-15).
Voilà! It’s gone.
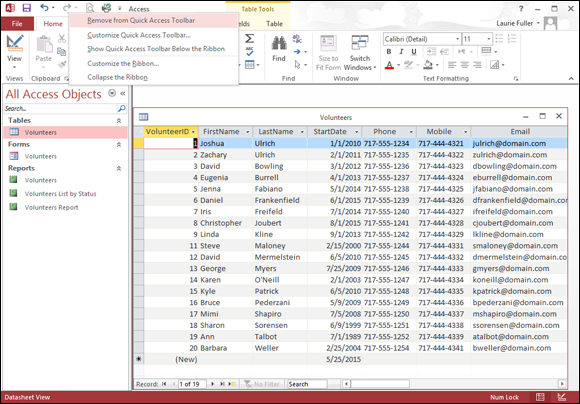
Figure 2-15: Reconsidering that added button? No problem. Say bye-bye with a simple right-click.
Because the button remains on the tab where it originally lived, it’s not lost — it’s just not taking up space at the top of the Access workspace.
Be careful not to remove the default buttons — Save, Undo, and Redo. Why? Because they’re used so often that it’s silly to remove them from such a great location. If you do remove them, you’ll have to use the Quick Access menu button and select them from that menu when you want to use them. That’s two steps (opening the menu and making a selection) instead of one, and who wants to increase steps by 100 percent? Not me!
Minimizing the Ribbon
Need more elbow room? If you need to spread out and want more workspace, you can make the Ribbon smaller, reducing it to just a strip of the tab titles (whichever tabs are in place at the time you choose to minimize the Ribbon). When it’s minimized, you can bring it back to full size with minimum fuss.
To minimize the Ribbon, follow these steps:
-
Right-click anywhere on the Ribbon.
A pop-up menu appears. Note that you can right-click a button, a Ribbon tab, or a section name (such as “Reports” on the Create tab, or “Font” on the Home tab) and the appropriate pop-up menu will appear.
-
Choose Collapse the Ribbon.
The Ribbon is reduced to a long bar with just the tab titles on it, as shown in Figure 2-16.
-
To bring the Ribbon back to its full glory, right-click the reduced Ribbon and then choose Collapse the Ribbon.
Note that the command is now checked, indicating that the Ribbon is currently minimized. Performing this step — reselecting the command — toggles this setting off, and the Ribbon returns to full size.
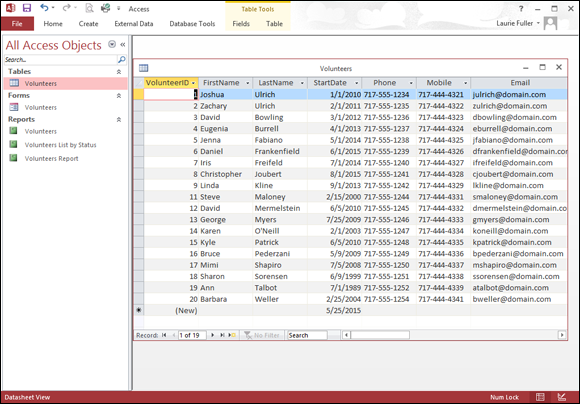
Figure 2-16: The Ribbon, minimized.
Working with ScreenTips
ScreenTips are the little names and brief descriptions of onscreen tools that appear when you put your mouse pointer over buttons, commands, menus, and many of the other pieces of the Access workspace.
Not all onscreen features have ScreenTips, but for anything you can click to make something happen — as when a dialog box opens, Access performs some task for you, or something is created — these typically have associated ScreenTips that you can choose to view or not view. If you choose to view them, you can choose to see very brief or more elaborate tips.
To tinker with Access’s ScreenTips settings, follow these steps:
-
Click the File tab.
The File menu (the red panel on the far left) and the Info view appear on the workspace, as shown in Figure 2-17.
-
Click the Options command, near the bottom of the menu.
The Access Options dialog box appears onscreen.
-
From the list on the left side of the Access Options dialog box, select General.
The options in the dialog box change to show other options related to ScreenTips, file formats and folders, and how your name and initials are stored, as shown in Figure 2-18.
- In the first section of the dialog box, click the ScreenTip Style drop-down list.
- Choose from the following options:
- Show Feature Descriptions in ScreenTips: This option displays ScreenTips with extra information, as shown in Figure 2-19. Here you see that in addition to the name of the button, a brief description of how it works (or its effect) is displayed for your benefit. It even points to more assistance and information — through the “Tell me more” link at the bottom of the screentip.
- Don’t Show Feature Descriptions in ScreenTips: If you want just the facts, ma’am, this is for you. ScreenTips will show just the button name with no further explanation.
- Don’t Show ScreenTips: Want to go it alone? Turn off ScreenTips.
- Click OK to close the Access Options dialog box.

Figure 2-17: The File tab’s panel of commands gives you an Options command, which you can use to adjust how Access looks and works.

Figure 2-18: The settings for just about everything you can see and use in Access are available through the Access Options dialog box.

Figure 2-19: View the helpful button and tab names and information.
Establishing the level of detail included in ScreenTips isn’t the end of your options. You can also choose whether to include keyboard shortcuts in ScreenTips. This is on by default, and it’s pretty useful.
Mousing Around
Access, like all Windows applications, is meant to be used with the mouse. The mouse is assumed to be your main way of communicating with the software — clicking Ribbon tabs, buttons, and drop-down lists, and making choices in dialog boxes to use things like the Report Wizard and the Access Options dialog box discussed in the previous sections of this chapter.
You can left-click to make standard choices from onscreen tools and right-click to access pop-up menus — also known as context-sensitive menus because the menu choices vary depending on what was right-clicked. If you right-click a Ribbon tab or button, you get choices for customizing toolbars and buttons. If you right-click a database component tab (say, the Table tab while that table is open), you get choices related to the table.
Not a big fan of the mouse? Check out the online Cheat Sheet for this book, available at www.dummies.com/cheatsheet/access2016. It’s full of powerful keyboard shortcuts.
Navigating Access with the Alt Key
If you like to use the keyboard as much as possible when you’re working with software, Access makes it somewhat easy to do that. I say somewhat because you need to use a special key in order to make the rest of the keyboard work as a commander.
When you want to switch tabs and issue commands with the keyboard (rather than with the mouse), press the Alt key. As shown in Figure 2-20, pressing Alt causes numbers and letters to appear in small squares on the Quick Access Toolbar and the Ribbon’s tabs. When the numbers and letters are visible, you can press one of those characters on your keyboard to issue a command (such as pressing 1 to Save) or to switch to a tab (such as pressing C to get to the Create tab).
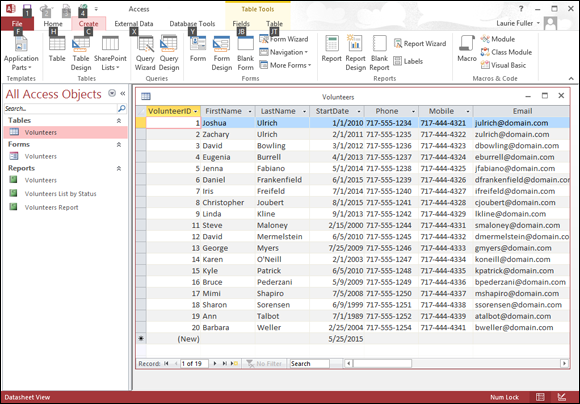
Figure 2-20: Rather press a letter or number than click a tab or button with your mouse? The Alt key shows you how.
When you’re on a tab (but only if you press its letter key to activate it), the individual buttons on that tab have their own keyboard shortcuts displayed. Instead of single numbers or letters, however, now you’re looking at pressing key combinations, such as F + Z (displayed as FZ onscreen) to activate the Form Wizard. Figure 2-21 shows the keyboard shortcuts for the Create tab.

Figure 2-21: Each button on a tab has its own keyboard shortcut.
 The goal is not to try to press the two keys at the exact same time. Instead, press the first one listed — and with that key still pressed, tap the second key. Voilà!