Now that you've gotten your feet wet, programming your first three iPhone and iPad apps, I want you to ask yourself: Where do I go from here? The answer to that question is what this chapter is all about.
I intentionally held off on this orientation until you had a little programming under your belt. With the taste of the code fresh in your mind, you are now poised to appreciate the sequence and the variety of challenges ahead. Read on!

To help you get better oriented, I have divided this overview chapter into three sections. In Section One (§I), I explain why I have chosen the road map set forth in Chapters 4 through 9, and I give you a brief description of each chapter.
In Section Two (§II), I discuss the relationship between the iPhone and the iPad (Figure 3-1), and how this may affect your approach to the upcoming material and related exercises, perhaps giving you a new perspective on your own creative priorities and objectives.
In Section Three (§III), we venture under the hood of the hardware, and we consider some deeper structures implied by the code that runs these devices. It isn't imperative that you read either §II or §III immediately, but I suggest you at least scan §III—even if you don't think you're absorbing it all. Just let your eyes flow over the text. You'll probably find that you benefit from a quick glance back here from time to time.
I based the iPhone/iPad class that I run at the University of Colorado on the six most common components of all iPhone/iPad apps: navigation, actions (with single and multiple outlets), switching views, touches and gestures, tables, and maps. Here is the schedule of how these elements are addressed.
Chapter 4: An Introduction to the Code
Buttons & Graphics
Chapter 5: Buttons & Labels with Multiple Graphics
IBOutlets & UILabels
Chapter 6: Switch View with Multiple Graphics
Three Different Approaches
Chapter 7: Dragging, Rotating & Scaling
Touches, Gestures, and Events
Chapter 8: Table Views, Navigation, and Arrays
Designing a Series of Linked Tables
Chapter 9: MapKit
Annotations, Map Views & Map Controls
Introducing Chapter 4—An Introduction to the Code
In Chapter 4, I will have you do what I have my regular students do: help me learn your name. You are going to manipulate a picture of yourself to work with and learn about buttons and graphics. If you don't have a picture of yourself, you are welcome to download the picture I use in the example (Figure 3-2). By the time you are done, we will have moved from the "Hello World!" stage of coding to the placing of buttons that control graphics. In this chapter, we will use buttons and graphics that interact with one view only.
Our work with buttons and labels will stir up some juicy questions, and I will do my best to address the more pressing ones. For instance, the geeky guys who developed Cocoa Touch, the underlying code that controls how humans interact with the iPhone and the iPad, used a concept they called the Model-View-Controller (MVC). An essential part of this model is the code that makes up the Graphic User Interface (GUI, pronounced "gooey"). The GUI is the way that users relate to, talk to, and communicate with the computer. We delve into the MVC components in the third section of the present chapter, §III: A Look Under the Hood.

Introducing Chapter 5—Buttons & Labels with Multiple Graphics
Buttons and graphics that interact with one view are fun, but how do we have a button interact with more than one view? It's really not about making a graphic program interact with multiple views; it's about configuring your program, whatever it is (a map, a game, code for calculations), to efficiently and effortlessly jump between various views. This concept is important for all your future programming, and your experience in this chapter will serve you well for the remainder of the book.
Chapter 5 is not only a step up in terms of the complexity of coding, but we will also transition to more technical language. Don't worry, though–you'll be OK! Everything is laid out with discrete steps and humorous analogies. You will see that we perform a little visual sleight of hand by taking a picture of a scene and then superimposing another picture onto it (see Figure 3-3). This technique is used all the time in games, and some of the related ideas will be touched on in our discussion of INDIO at the end of this chapter.

Introducing Chapter 6—Switch View with Multiple Graphics
This is the longest chapter in the book because we work through three examples that do the same thing, but in three different ways. Chapter 6 is all about tabs and switching views with tabs–something that is standard in nearly every iPhone and iPad app I've ever seen (see Figure 3-4). In the first example, we code the graphics the long way. In the second example, we see how the no-brainer way works so easily–yet how it also fails to educate us or let us experience the code underlying tabs and switching views. Thus, we utilize the third example to compose a hybrid of these two approaches; you gain the experience and stamina of one method and the time-saving shortcuts of the other.
Your success in Chapter 6 will advance you from the novice stage to that of a legitimate programmer-in-progress. By tackling some difficult coding issues, you will have earned respect in the iPhone/iPad programming community. The good news is that you will be ready and able for the next step, for you will have followed the path I have prepared on the basis of my previous teaching experience.
A big part of my philosophy is that we prepare ourselves for future challenges by mentally stretching and visualizing. This requires or involves organizing our abstractions into pieces we can manipulate and repurpose, in whatever new context comes along. This is a flexibility dance! So, begin now to breathe into these future exercises and challenges, and to appreciate that they are not just about displaying random images at the push of a button.
It's vital that you see that each picture stands for a different part of your code, which gives the user of your app access to a new view, a new set of options, or a new level of the program. We use pictures at this part of the learning process because it's easier than code. It also makes troubleshooting far easier; if the image doesn't do what it's supposed to do, you know that your "switching" code is the problem.
Be prepared to be catapulted into the programming stratosphere!

Introducing Chapter 7—Dragging, Rotating, and Scaling
Leveraging the power of Multi-Touch on the iPhone and iPad can be pretty awesome, and that is what we begin to learn in this chapter. Creating an image that will rotate, scale, and move with an intuitive flick of your fingers will confirm just how powerful these devices are. (see Figure 3-5.)
Think about it. Before the iPad or iPhone, we used a mouse and the keyboard. Now it's all about touching. There is an old acronym that some of you probably know: WYSIWYG. It stands for "what you see is what you get," when a word processing document is printed the way you expect. Now, in the Apple world of Multi-Touch, we see a new paradigm forming– one that reflects that touching the screen in certain ways accomplishes some natural and logical task in an easy and intuitive manner. The computer will say to you, as the genie said to Aladdin, "Your touch is my command!"
In Chapter 7, I will introduce you to the code that interacts with the different kinds of touches and gestures users will employ when they run your app. If you are like my past students, you will delight in learning the grammar that directs the images to move according to our touches, swipes, pinches, drags, etc.

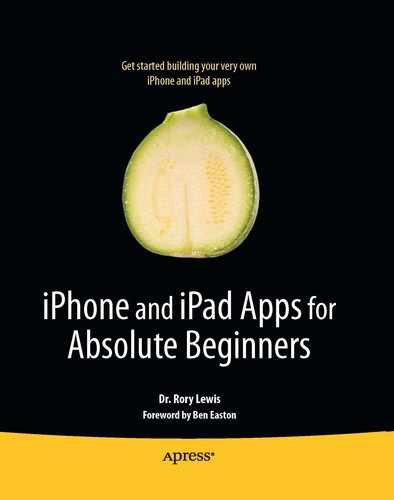
Introducing Chapter 8—Table Views, Navigation, and Arrays
Table Views and navigation are essential elements in the vast majority of apps. Ever wonder how the App Store makes those really cool lists of apps? Ever need to keep a list of items on hand, but you aren't sure which application to use? Worry no more! You will be creating a table view application capable of switching among multiple views (see Figure 3-6). Can't find what you want on the App Store? Make it for yourself–and others!
While this all sounds warm and fuzzy, there is a problem. To get beyond the essentials of table views and navigation, you will need to get your head wrapped around a notorious programming beast: the array.
Due to the degree of difficulty with this programming concept, it is generally conceded that arrays should never be taught to beginners. I was not going to include this chapter in the book, but because so many of my students wanted to utilize tables in their final projects, I had to rethink my strategy. I decided to teach my students, and you readers of this book, how to work with and control arrays with very little understanding as to how they actually work.
Therefore, I want you to consider Chapter 8 as an optional chapter. When we get there, I will walk you through the process of deciding whether you even want to learn arrays, and then I actually urge you to go directly to Chapter 9. Let's cross that bridge when we come to it.
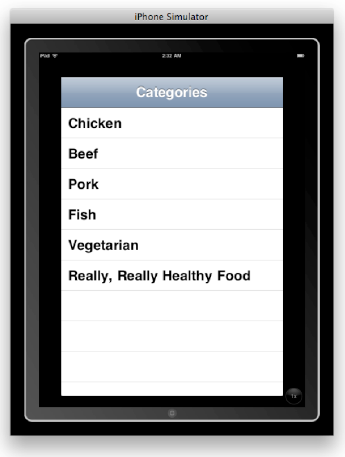
Introducing Chapter 9—MapKit
Chapter 9 is my favorite, and I predict you will find it the most enjoyable as well. By the time you get there, you'll know the basics well enough to start enjoying MapKit–the code we use to interact with maps on the iPhone and iPad. We'll find our location in the world and realize how tiny but how very smart we are (Figure 3-7). Creating our own annotations, map views, and map controls are just a few of the delights in store!
I will also take you on a tour of some excellent existing apps that use the mapping functions, in the hopes of inspiring you and stirring up ideas for future creations. In that vein, I will share some of my students' projects that vividly demonstrate how quickly and impressively it is possible to apply the knowledge acquired in this course to produce apps with a decent level of sophistication.
Right off the bat, let's understand what the iPad is all about. In fact, let's think about what all the Apple geeks were doing after the iPad was launched. Within the first 24 hours of the iPad's release, chances are many of the Mac-heads were scratching their heads and complaining. "What's in it for me? There's nothing new here. This really sucks!" This crowd was tuned into the fact that, with their Macs and their iPhones, they had everything they needed already, and many of them quickly concluded that the iPad wouldn't be serving any immediate need.
Well, then, who is the target audience for the iPad?
Knowing why the iPad was developed, and for whom, will help you understand which kind and style of apps have the greatest chance at succeeding. I spent close to two years following the events that led up to the introduction of the iPad—from initial speculation, to whether it would be called the iTablet or the iSlate, to mid-release reports and news updates–everything.
Note
The target market of the iPad is NOT the Mac user. Nor is the target market the average iPhone user.
Believe it or not, the iPad design is aimed at older users who are new to the computer world and who don't want to spend more than $1,000. These are people who have just figured out how to turn the computer on and off and use e-mail! The iPad is also targeted at young students in an attempt to outdo the Kindle. One of the iPad's primary goals is to make the purchase of textbooks obsolete by offering a digital bookstore, in the same manner that iTunes offers music. So there you have it: older and younger generations of users are the target markets, instead of the standard set of geeks that normally goes for high-tech devices.
In this book, I present you with the knowledge and techniques to create applications that work with the iPhone and the iPad. The app images in this book include the iPad Simulator, which inherently implies the iPhone Simulator. Be sure to check out the various figures that contain images of results, and study the differences between the iPad and the iPhone. It will be important to know how the iPad does differ from the iPhone.
All the apps illustrated in this book run on both the iPad and the iPhone. I know this because I personally tested them–not only on the simulators, but also on my actual devices. Some of the images could have been made with larger (higher resolution) files had they been of apps coded exclusively for the iPad, but I chose to keep everything compatible with both devices.
The best way to tell if a future app you create works for both the iPhone and iPad is to simply plug in your iPad to your Mac; iTunes will display the apps that work on the iPad (Figure 3-8).

Note
Some of the apps featured on the iPad—in the normal view—look a little fuzzy; this is because the images are being stretched beyond their optimal 100% size. For those of you interested in programming apps exclusively for the iPad, you will need to make sure your image resolutions stay at or below 100%.
The physical dimensions of the iPad are a little more than twice the height of the iPhone, and slightly more than triple the width, but the depth is increased by only 1.1 millimeters! The result is a roughly six-fold increase in the surface area, at practically the same depth, so this is truly a much bigger device that still possesses an extremely slender and light body. The physical dimensions are not, however, the same as the display dimensions.
Note
The iPhone display contains 320 × 480 pixels; the iPad display contains 768 × 1024 pixels. This gives the iPad a relative increase in usable screen space over the iPhone of just over five times.
This extra space has very important implications. Most obviously, quite a bit more information can be presented to the user at any given time. This means the organizational mindset that programmers are using on their existing iPhone apps may not always translate directly to the new, relatively expansive platform. Also, it turns out that migration from iPhone to iPad involves classes—preprogrammed sub-routines—that are not shared between the devices, and accomplishing this may require some specialization inside applications. Handling the user interface changes and application programming interface (API) differences will be addressed a little later. Right now let's consider the implications of the increased real estate the iPad boasts.
The iPad has the ability to run iPhone applications without changing the code one iota. Moreover, the iPad can run these applications at double their original size using a magnification function. This makes the migration process nearly painless for current iPhone developers. However, we are dealing with much more here than an oversized iPhone! There are numerous legitimate improvements over the iPhone that went into this newer device–not just incremental change, but quantum change. Because of this, we want to leverage these improvements and knock the socks off our future users.
More screen space means more information and more eye candy. A user can now see multiple pieces of data at once without having to navigate through the application. More room for videos, pictures, text, or game graphics means more flexibility and longevity for your app. The iPad structure supports all of the same features of the iPhone, including UIKit, Core Graphics, Media Kit, and OpenGL ES. Simply put, these are tool kits from which a bunch of different applications can be built. The increased processing power and larger screen size, however, mean that the iPad—and therefore your apps—can do significantly more with the same set of tools.
This increase in screen area, with improved high-resolution multi-touch sensors, also means more space for the user to interact with your application–with finer articulation. Complex gestures can now be used to navigate and manipulate an application in ways that are impossible on the relatively small iPhone screen. Keep this in mind as your application begins to take shape.
Note
Users can now use their entire hand, or even both hands, to interact with elements in an application.
What gestures make sense here? What kinds of input could trigger this or that? In addition to the increased ability to support input from key gestures that stand for shortcut commands, the large screen size makes toolbars and accessory views possible. Providing the user with a toolbar is no longer taboo, and this may actually be encouraged to help your users leverage the increased interface of the iPad.
When you take all of these changes collectively, it behooves us to carefully consider our applications' designs. The creativity you and your fellow programmers wield must not only take advantage of the ability to display greater quantities of information in an easy-to-read, intuitive format, it must border on a total reorganization and transformation of the user experience.
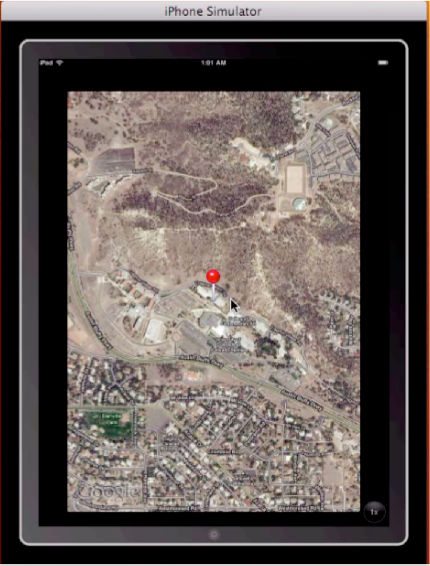
One of the central features of the iPad, not found on the iPhone, is the master-detail interface. It's been around for a while on Mac operating systems, and now it has blossomed in a new form. Master-detail is an interface layer that sits on top of a list or a table and acts as an intermediate stage in place of a "Go back" or "Go to" button. On the iPhone, either the master or the detail can be seen, one at a time, but never both at the same time. This dual-purpose layer can serve the user in the e-mail realm, for instance, with the master as inbox and the detail as individual letter, or in countless other contexts as a table of contents and selected data. As you can see in this image from Apple (Figure 3-9), the iPad presents the master-detail in either orientation.
Some applications will scale up from the iPhone without problems. However, these applications are likely to be in the minority, as the input capabilities and display space of the iPad completely change an application's fundamental character. To accommodate this, we need to bring some specialized user interface design needs into the picture in order to present your application on both platforms.
Note
Be aware that although the iPad can enlarge images on an iPhone, my testing of iPad apps (as of April 3, 2010) showed that large images would not convert seamlessly to an iPhone application.
The new interface elements introduced with the iPad allow for highly stylized and powerful data flow and interaction within an application. The smart folks at Apple have done most of the work for you, providing incredibly rich and easy-to-use interface elements that let you focus on the functionality of your application.
That's all fine and good, but obviously there are some things that the iPad can do that the iPhone cannot–and vice versa. We already know there are additional classes the iPad uses that the iPhone will not recognize. So what must we do to make our application behave correctly depending on which device it is currently running? This is, unfortunately, not as straightforward as one would hope, but it can be done.
For this reason, we are not going to worry about checking the current platform. Instead, we will just change the nib files to do what we need them to do on the iPad. Don't worry–nibs and Interface Builder work exactly the same way for the iPad as for iPhone.
However, if you absolutely must know, there are a variety of techniques used to check the current platform of an application. These all involve checking for the existence of platform specific classes, functions, or features. For example, you could check the width of the screen to determine the platform. An iPhone app will return a screen width of 320 pixels, while an app written for the iPad will return a screen width of 768 pixels. Clearly, if the returned screen width is less than 768, we know we are working on an iPhone or, perhaps, an iPod Touch. Of course, there are other ways of checking the current platform. You can also check a function called UI_INTERFACE_IDIOM(). This function can return either UIInterfaceIdiomPhone or UIInterfaceIdiomPad. These examples are pretty self-explanatory, I hope, and can be used to accurately determine the device. Of the many different techniques to determine the current platform, you will learn to use the one that is the most convenient in the given context.
Note
As stated previously, each device can do certain things the other can't. The iPad can't make phone calls, take photographs, or record video. Case by case thought should be applied to apps regarding location-aware services and accelerometer functions—for although both devices are portable and shakable, size may matter!
The release of iPhone OS 3.2 has changed a lot of basic functionality we are all used to on our iPhones and iPod Touches. However, not everyone will be using 3.2, so we need to make sure our applications are compatible with previous versions, specifically 3.1.2 and 3.1.3. Fortunately, doing so is quite simple. In your new iPhone OS 3.2 project, you need only set the "Base SDK" in your project settings to 3.1.2 or 3.1.3 and run your application.
Note
As we all know, the downside of rapid technological advance is that we must always be prepared for a new upgrade to come along. Thus, regardless of present compatibility, an upgrade may be needed six months hence. The instructions here should still work by setting the SDK version to the latest one.
If you want to run your application in the iPad Simulator to see what it looks like, click on the pop-up button in the upper left corner of Xcode. From there, choose iPhone Simulator 3.2 (or higher). This will automatically move your application into the iPad Simulator. While your application is running in the iPad Simulator, you can zoom in on the action by pressing the 2x button in the lower right-hand corner of the Simulator. Additionally, you can zoom even further by opening the Window menu, hovering your mouse over the Scale item, and then choosing your desired zoom scale.
Thus far, we've gone through three examples where we said "Hello world!" from inside the iPhone/iPad. The first example was from the View-Based Application template; the next two (related) examples were built from the Navigation-Based Application template. Most importantly, we've had an opportunity to tinker around with Xcode, Interface Builder, and the iPhone and iPad Simulators.
Indeed, the most important aspect of Chapter 2 was familiarizing you with the creative process in the context of programming apps: go in with an idea and come out with a tangible, working product. Several times I asked you to ignore heavy-duty code that I judged would be distracting or daunting. You may have also noticed that when you did try to understand some of this thicker code, it made sense in a weird, wonderful, chaotic way. Well, as we progress forward, we are going to make the "chaos" of the unknown less unsettling.
Before dealing with this issue, let me also put you at ease that when it comes to Objective-C, our programming language, I have yet to meet a single advanced programmer who actually knows every symbol and command. Just as in other industries, people tend to get very knowledgeable in their specific domains and specialize (e.g., integrating Google Maps to a game or an app).
An analogy I like goes like this: Car mechanics used to be able to strip an engine down completely and then build it back up–presumably better than it was. Nowadays, car mechanics are very specialized, with only a handful knowing how to completely strip down and rebuild a specific modern-day car. We get an expert in Ford hybrid engines, or an expert in the Toyota Prius electrical circuitry, or a specialist in the drum brakes that stop big rigs and so on. There is nothing wrong with this!
This is similar to how you are proceeding. You have just gotten your hands greasy and dirty by successfully programming three apps. And now, if all goes according to plan, you are going to walk toward the future brimming with confidence. I know from experience that confidence in my students can be derailed if they are intimidated or blown away by too much complexity or technicality. I have found that students can handle bumps in the road if they know where they are going, and if they know that the rough stretches won't get too scary or dangerous.
We can divide most iPhone and iPad apps into four different functions: Interaction, Navigation, Data, and I/O (Input/Output). We have seen enough apps to know that we can interact with them; we can navigate from one screen to another; we can manipulate and utilize data; and, we can provide input (type, paste, speak) and receive output (images, sounds, text, fun!).
Before we zoom in again to approach a program from any one of these specific areas, we need to first have a better grasp of how these different aspects of iPhone/iPad programming work, look, and behave. We also need to learn about their limitations and the pros and cons in terms of the projected or desired user experience. And, because of the differences discussed above, whether the app is for the iPhone or the iPad.
As you gain a working knowledge of where any limitations and barriers exist, your journey through these four domains, all parts of a vast "forest," will be more powerful and productive. A very important part of my job is to show you how to conduct yourself safely through the Forest of INDIO. Some sections of the forest are more daunting than others, but the good news is that you will be getting a nice, high-level view, as from a helicopter! After our aerial tour, we will parachute down to the forest floor, open Xcode, and continue to explore the paths, the watering holes, and the short cuts–to mark off the unnecessary sections and to be on the lookout for wild animals.
As mentioned previously, the programmers who developed Cocoa Touch used a concept known as the Model-View-Controller (MVC) as the foundation for iPhone and iPad app code. Here is the basic idea.
- Model:
This holds the data and classes that make your application run. It is the part of the program where you might find sections of code I told you to ignore. This code can also hold objects that represent items you may have in your app (e.g., pinballs, cartoon figures, names in databases, appointments in your calendar).
- View:
This is the combination of all the goodies users see when they use your app. This is where your users interact with buttons, sliders, controls, and other experiences they can sense and appreciate. Here you may have a main view that is made up of a number of other views.
- Controller:
The controller links the model and the view together while always keeping track of what the user is doing. Think of this as the structural plan–the backbone–of the app. This is how we coordinate what buttons the user presses and, if necessary, how to change one view for another, all in response to the user's input, reactions, data, etc.

Consider the following example that illustrates how you can use the MVC concept to divide the functionality of your iPhone/iPad app into three distinct categories. Figure 3-10 shows a representation of your app; I've called it "MVC Explained." You can see that the VIEW displays a representation–a label–of "Your very cool fantastic App Includes 3 layers: A, B and C."
In the CONTROLLER section of the app, we see the three individual layers separated out, Layer "A," Layer "B," and Layer "C." Depending on which control mechanism the user clicks in the VIEW domain, the display the user sees, the CONTROLLER returns the appropriate response–the next view from the three prepared layers.
Your app will probably utilize data of some type, and this information will be stored in the MODEL section of your program. The data could be phone numbers, players' scores, GPS locations on a map, and so on.
As the user interacts with the VIEW section of the app, it may have to retrieve data from your database. Let's say your data contains the place your user parked her car. When the user hits a particular button in your program, it may retrieve the GPS data from the MODEL. If it's a moving target, it may also track changes in the user's position in relation to a car in the parking lot. Lastly, the CONTROLLER may change the state (or mode) of your data. Maybe one state shows telephone numbers, while another shows GPS positions or the top ten scores in a game. The CONTROLLER is also where animation takes place. What happens in the animation can affect and perhaps change the state in your Model. This could be done by using various tools, such as UIKit objects, to control and animate each layer, state, etc.
If this sounds complicated, bear in mind that you've already done much of this without even knowing it! In Example 1, you had the user press a button and up popped a label saying "Hello World!" This shows how you have already built an interaction with a ViewController. We will be delving further into these possibilities, of course. In Chapter 4, we will venture deeper into the Interaction quadrant of the Forest of INDIO, and allow the user to add and delete table view items.
When we do this, I will do my best to keep you focused on the big picture when it comes to interactions ... via Navigation. Our goal will be to have the user move from less-specific information to more specific information with each new view.