The first program we shall attempt, as mentioned in Chapter 1, will be a basic and generic "Hello World" application. I need to clarify, though, that as regarding most things in the Objective-C context, it will not necessarily be simple.
Our first adventure with this new set of tools will be saying "Hello" to the world from the View-based Application template in Xcode. Later, we will say "Hello" to the world from the Navigation-based Application template, first in a very basic way and then with some modifications.
Besides the information I present here in this book, including various screenshots, I also offer you screencasts, which are available at my website. In this chapter we will work through three examples, and you can access the screencasts at these links:
http://www.rorylewis.com/docs/02_iPad_iPhone/06_iphone_Movies/001_helloWorld_001.htm |
http://www.rorylewis.com/docs/02_iPad_iPhone/06_iphone_Movies/002_helloWorld_002.htm |
http://www.rorylewis.com/docs/02_iPad_iPhone/06_iphone_Movies/003_helloWorld_003.htm |
Before opening Xcode, first close all open programs so that you will be able to optimize your processing capabilities and focus your undivided attention on this new material. Press Command + Tab and then Command + Q to close everything until only the Finder remains on your screen. Find and click the Xcode icon in your Dock to open it. You will be presented with the Xcode "Welcome" screen discussed in Chapter 1. See Figure 2-1.
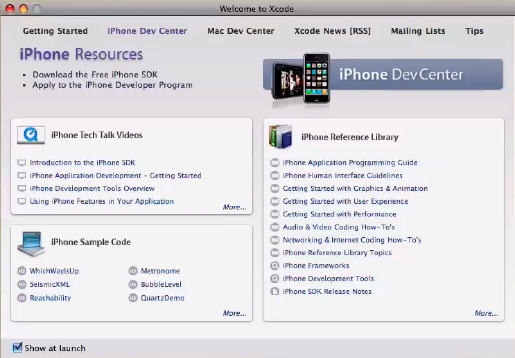
Figure 2.1. Click the Xcode icon in your Dock to open it. You will be presented with the "Welcome to Xcode" frame, as discussed in Chapter 1.
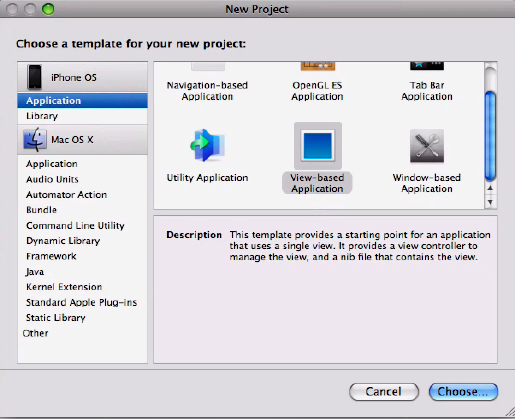
Now, open a new project in Xcode. The two ways to accomplish this are by using keyboard shortcuts or by clicking your mouse. I strongly suggest that you use keyboard shortcuts. These will save you time and make you feel like a pro. Be aware that the best way to not get work as an iPhone and iPad App developer is to use your mouse for functions that can be done via shortcuts. Using your keyboard, press Command + Shift + N at the same time. These three keystrokes appear in Figure 2-2 as

Note
My View-based Application template icon was highlighted by default; yours may not be. Regardless, click on it, and save the new project to your desktop as
helloWorld_001.As soon as you save this project to your desktop, Xcode instantiates the item
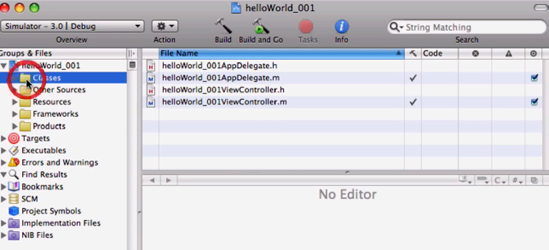
helloWorld_001as indicated by the name on the top of the window (see Figure 2-3). If this looks a bit complicated, stay cool ... don't freak out! This is Apple's way of arranging all the goodies that you will eventually use to write complex apps. For now, just follow along and try to set aside all the questions you may be asking. As shown in Figure 2-3, double-click to open up the Classes folder. (Don't ask yourself what "Classes" means yet. Just open the folder. In due time, you'll know plenty about classes.)As you can see in Figure 2-4, Xcode has created four files, each starting with a prefix identical to the name of our project,
helloWorld_001. We are going to select what is called the interface file; it has the name of our project followed byViewController.h. Joining these together creates the filehelloWorld_001ViewController.h.At this point, don't worry about the.hextension. Later, I'll explain all the gory details about what we're doing, and it'll make more sense. Next step!In Figure 2-4, you probably noticed several lines of code in green; these are internal comments, from one coder or programmer to another. These comments are "invisible" to the computer and because we are presently interested in code that talks to the computer, focus on the line immediately following these comments:
#import <UIKit/UIKit.h>
This line of code imports something we call the UIKit framework. It provides your application with goodies and shortcuts that make it easier to manage your user interface. This command brings in code that is organized into classes, which you can think of as preprogrammed packets of sub-routines. As a result of the presence of the UIKit, you don't have to write or rewrite a lot of fundamental technical code, but can instead take advantage of certain ready-to-go interface packages to help you design your app. These classes facilitate in the presenting of data to the user and in the responding to user input.
Note
When naming things in code, we will represent "User Interface" with the initials UI.
After that line, we see:
@interface helloWorld_001ViewController : UIViewController {There are two things to note here. First, the @ symbol tells the innermost part of Xcode, which transforms your code into action, that it's got something essential and important to announce. In fact, we call any statement beginning with @ a "directive." This @interface directive tells Xcode that we have interface stuff to tell it concerning "helloWorld_001," and that the particulars will be enclosed within brackets {}.
But look at your screen, right after the opening bracket, {. It's empty! We're not saying anything yet –right? We know what we want to do, though, and that is to say "Hello" to the world from inside our iPhone/iPad. Now that we've got the compiler's attention with the @interface directive, we want to tell it that we first want our Interface Builder outlet, IBOutlet, to say something ... and that something will be written on a UILabel.
Note
In our code, we will represent "Interface Builder" with the initials IB.
I want you to do this now by typing the following on the line below the open bracket:
IBOutlet UILabel *label;
Don't forget the semicolon ";" at the end of the line. This symbol tells the compiler that you're finished talking to it for the moment. Don't worry about the * in front of the word "label." We'll get into this later.
Thus, your code should look like this - with the boldfaced line indicating your insertion. Also, you can refer to Figure 2-5.
// // helloWorld_001ViewController.h // helloWorld_001 // // Created by Rory Lewis on 6/13/09. // Copyright __MyCompanyName__ 2009. All rights reserved. // #import <UIKit/UIKit.h> @interface helloWorld_001ViewController : UIViewController {IBOutlet UILabel *label;} @endNote
If you want to know more of the technical details, that's great! Go to the slide show at
http://www.rorylewis.com.Now that you have written your first line of code, we need to instruct the compiler about one more thing here. Specifically, we want to have the button on our iPhone or iPad screen use methods that Apple has already coded for us. We want to add an
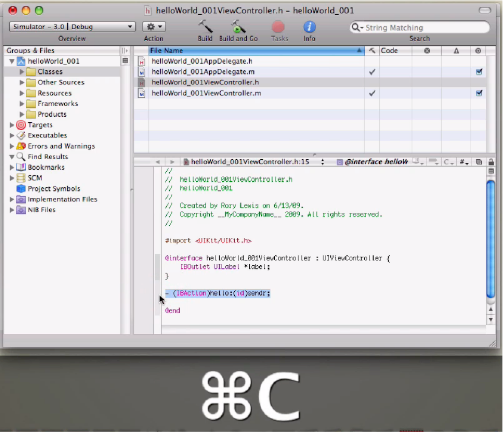
IBAction, to which we will refer as "hello." To accomplish this, insert the following line after the closing bracket.- (IBAction)hello:(id)sendr;
Again, make sure that you remember to put the semicolon at the end of the line, and don't worry about the hyphen (minus sign). I'll get to that later.
Next, highlight the line exactly as shown in Figure 2-6. Using your keyboard, enter Command + C. This useful shortcut is depicted in Figure 2-6 as

This is what your file should look like now.
// // helloWorld_001ViewController.h // helloWorld_001 // // Created by Rory Lewis on 6/13/09. // Copyright __MyCompanyName__ 2009. All rights reserved. // #import <UIKit/UIKit.h> @interface helloWorld_001ViewController : UIViewController { IBOutlet UILabel *label; }- (IBAction)hello:(id)sendr;@endNow that you are finished with this file, save it by using the shortcut Command + S, highlighted in Figure 2-7 as

As you can see in Figure 2-8, we are finished working on the file named
helloWorld_001ViewController.h.Now, we want to work on a different file,helloWorld_001ViewController.m.This file has an identical name - except for the one letter extension!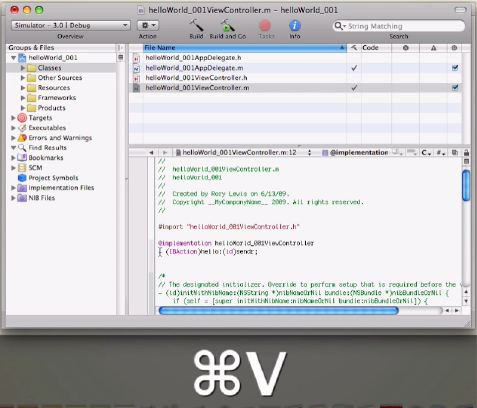
Figure 2.8. Add to your new View-Based Application file by pasting the saved line of code (from the previous file) into the indicated area.
Let me talk a little bit about the difference between these two files: one with the .h suffix, the other with the .m suffix.
The
ViewControllermanages the interactions your code has with the display, and it manages the user's interactions with your code. It contains a view, but it is not a view itself. TheViewControlleris a class, of which you only have a minimal understanding so far. What I want you to get, though, is that every class consists of two parts: the header (.h) file and the implementation (.m) file.I want you to read this next part aloud, and I don't care if you're in the bookstore! OK? "We tell the computer in a header file what types of commands we will execute in the implementation file."
Now, let's say it again in context to our code: "We tell the computer in the
helloWorld_001ViewController.hfile what types of commands we will execute in thehelloWorld_001ViewController.mfile."Well, admit it - that wasn't so bad!
Because you have now handled the first half of this arrangement, let's move to the implementation file and execute the commands that we have announced. To do this, we open
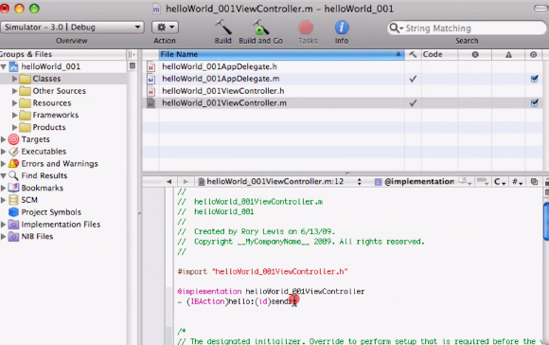
helloWorld_001ViewController.m, and then we scroll down past the green lines - i.e., all of the comments.I want you to use the shortcut Command + V to paste the copied line from the last step in our dealings with the header file:
- (IBAction)hello:(id)sendr;
Refer to Figure 2-6, if necessary. This shortcut is shown in Figure 2-7 as

//
//  helloWorld_001ViewController.m
//  helloWorld_001
//
//  Created by Rory Lewis on 6/13/09.
//  Copyright __MyCompanyName__ 2009. All rights reserved.
//
#import "helloWorld_001ViewController.h"

@implementation helloWorld_001ViewController
- (IBAction)hello:(id)sendr;
As you can see in Figure 2-9, I want you to delete the semicolon at the end of the line that you just pasted, which consisted of us declaring an action.
Now that we're in the implementation file, we don't want to declare an action, we want to implement. Here is what the code looks like before you insert the actions that do this:
//
//  helloWorld_001ViewController.m
//  helloWorld_001
//
//  Created by Rory Lewis on 6/13/09.
//  Copyright __MyCompanyName__ 2009. All rights reserved.
//
#import "helloWorld_001ViewController.h"

@implementation helloWorld_001ViewController
- (IBAction)hello:(id)sendr
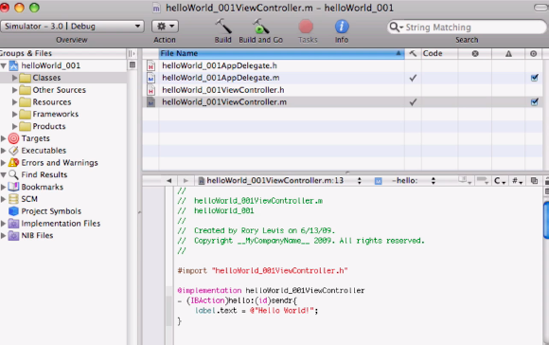
Having deleted the semicolon after the "sendr" term, you are now ready to insert a command to accomplish our objective. We want to link the label you created (in step 6) to the means by which we may provide text to the screen. Enter this code immediately after "sendr":
{label.text = @"Hello World!";}Hit Return after the opening bracket, and then hit Return again after the semicolon. Your file should now look like this:
// // helloWorld_001ViewController.m // helloWorld_001 // // Created by Rory Lewis on 6/13/09. // Copyright __MyCompanyName__ 2009. All rights reserved. // #import "helloWorld_001ViewController.h" @implementation helloWorld_001ViewController - (IBAction)hello:(id)sendr
{label.text = @"Hello World!";}Refer to Figure 2-10 to see the results.
Now, using the shortcut Command + S, save the implementation file. See Figure 2-11.
Now, it's time to open Interface Builder. Rather than opening the application and then searching for the file we need, we will just double-click on that file to automatically launch Interface Builder. The file that we need is in the Resources folder. Once you have opened that folder, you will see the
ViewController.xibfile.We pronounce this as the View Controller Nib File. I say this because it's important to know a little jargon. When a programmer says, "Open your view controller nib file," that means you open the Resources folder and then open the
ViewController.xibfile.The name we gave to the project will precede the text in the
ViewController.xibfile. We named our projecthelloWorld_001, so Interface Builder will insert that beforeViewController.xib, giving the full name ofhelloWorld_001ViewController.xib, as depicted in Figure 2-12. Now, click onhelloWorld_001ViewController.xibto open IB.Once Interface Builder opens, it will look something like Figure 2-13. Before I ask you to arrange your windows to resemble the placement that I have in mine, we need to first make sure that your Library is open. Use the shortcut

We want to drag a label onto what the general public calls your View window. I will use the same name in this book, although it's not really accurate. If you are interested in the technically correct way of saying this, in geekspeak, you might say: let's drag a label onto our "Hello World 001 View Controller nib" file. In Figure 2-13, this file is represented by a frame (or window) that has the label "View" in its header.
If you like, click on the markers or boundaries of the label and make it larger by stretching it out. Then, in the Label Attributes window (to the right), delete the default text "Label" from the top field. I'm having you do this so that you can then enter "Hello World!"
Also note that you can center the text by selecting the Center button in the Layout row (four rows below the Text row).
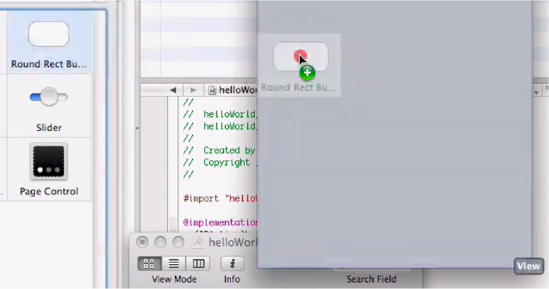
Now, scan the other options and parameters that are available in this window. There are many opportunities here to tweak the look of your apps. The more attention you pay to details, the better the UI, the more sophisticated and clever you appear, and the more likely your creations are to be on the list of "Most Downloaded Apps!" Now, drag a button onto your View window. You may want to expand the frame by clicking, holding, and dragging a lower corner, as shown in Figure 2-14. We want to create more space here to accommodate more text. We want the user to press this button, which will produce a label that says "Hello World!" This means that we need to communicate to the user to press the button. So we need enough room to enter the text: "Press Me."
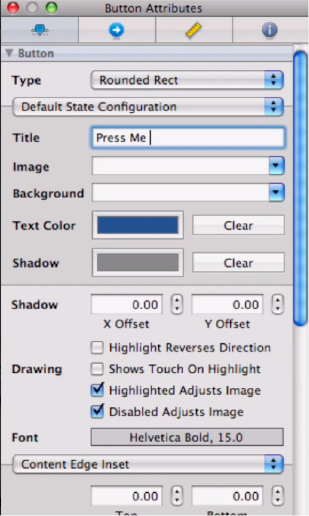
As depicted in Figure 2-15, you now want to enter the words "Press Me" into the Title field attribute of your Button Attributes window. We also want to align both the button and the label with each other and center them in context to the screen. We do this by selecting the Ruler tab, which controls size and alignment; it is located at the upper-right side of this window. Once it is selected, go down to the Alignment row and select the Align Vertical Centers icon (second from the right), and then go down one row and click the Align Horizontal Center in Container tab at the very right. This centers both the label and the button with each other, as well as with the interface.
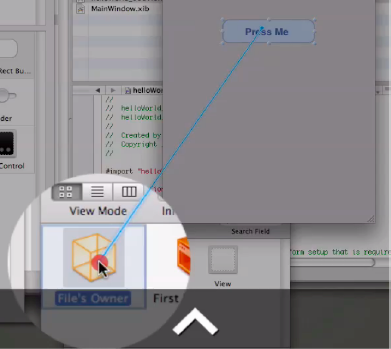
Go to the
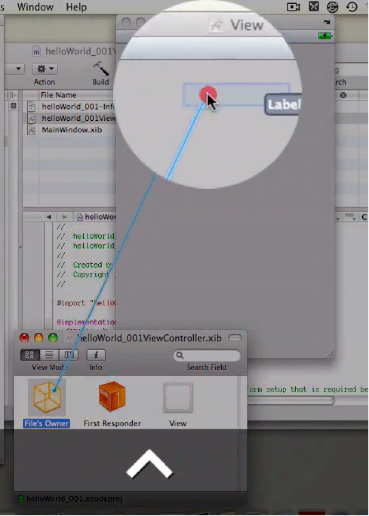
helloWorld_001ViewController.xibwindow as depicted in Figure 2-16, which contains three icons: File's Owner, First Responder, and View. Go to the File's Owner icon and connect it to the label by holding down the Control key (represented by^)and clicking the File's Owner icon. Then drag your mouse cursor to the text label in the View window, as depicted in Figure 2-16. Notice that a "fishing line" is being drawn from the File's Owner icon to your Text Label. This indicates that the connection that you desire to create is working. (If there were no line, it would mean that you had not established the connection.) As you near the vicinity of the Text Label, you will notice a black option box extend from the Text Label, containing the word "Label." Recall that, back in step 5, we referred to code that appeared as*label. Well, now you are seeing the mechanism to which it pointed. This is exactly where we want to connect our File's Owner–the Label. So drag that fishing line right onto the word "Label" in the black drop-down box, as depicted in Figure 2-16.Take a deep breath and think about what you just did. Let's see if we can connect some of the pieces of this puzzle. I want you to pause for a moment, and go look at four figures–carefully, and then come back to this passage.
First, go to Figure 2-5, and then go to Figure 2-10. Be thinking of the word "label." Then, jump forward slightly to Figures 2-17 and 2-18 ... still thinking of "label." Okay? See you soon.
Okay ... finished? What did you notice?
I'm hoping that you saw signposts on the trail that are leading us to our destination, which you just glimpsed in Figure 2-18.
Do you remember how, in Step 10, you entered
{label.text = @"Hello World!";}, and then, in Step 16, you connected the File's Owner icon to the Text Label? Do you recall how you changed that Text Label to say "Hello World!"? You're probably saying, "Okay, I kinda get that, Dr. Lewis, but you forgot about Figure 2-5!"You began this chain of events way back in Step 5, which gave rise to Figure 2-5. You attached a deep connection between the Outlet and the Label when you entered the line
IBOutletUILabel *label;... and the rest of the pieces fell into place from there. I know this probably didn't completely connect the dots in your head, but I'm quite satisfied if it at least connected some of them.So, we're standing in the Forest of Objective-C, and you've seen traces of some interesting connectivity as you reviewed your path. Now that you've been debriefed, we have one more juicy detail we need to clarify and then take care of. Here's a hint ... what about the button that says Press Me?
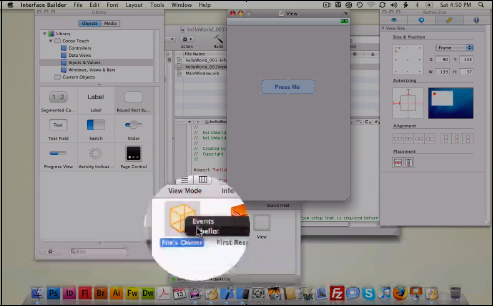
Just as you made a connection in step 16, from the File's Owner icon to your Text Label, you now need to connect your button that has the text "Press Me" to the File's Owner. Go to the Button icon and connect it to the File's Owner by holding down Control on your keypad (represented as ^ in the screenshot) and clicking on the Button icon. Now, drag your mouse cursor to the File's Owner, as depicted in Figure 2-19. Again, you will see your "fishing line" being drawn from the Button icon to your File's Owner. This indicates that the connection is working.
As you near the vicinity of the File's Owner icon, you will notice a black option box appear with the word "hello." Do you remember, back in Step 6, when you entered
- (IBAction)hello:(id)sendr?Well ... guess who's comin' to dinner! Mr. Hello is saying, "Don't you think you should pull that fishing line toward me? Remember - it is I who will tell that label guy out there to say Hello World!"
Therefore, you should keep on dragging that line until it connects to the "hello" label in the black drop-down box, as shown in Figure 2-20.
Save your work:
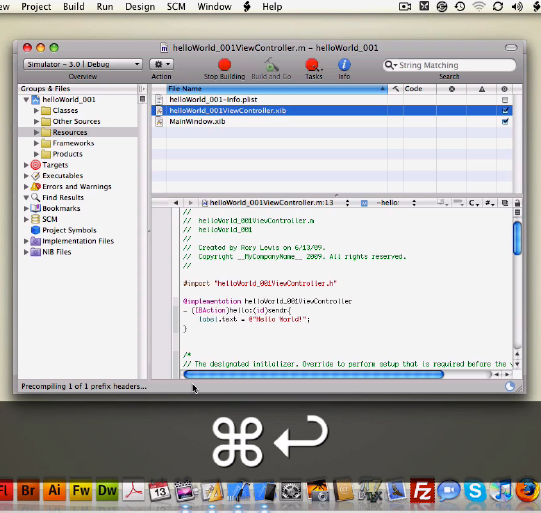
The final step is compiling the code. You will do this by entering

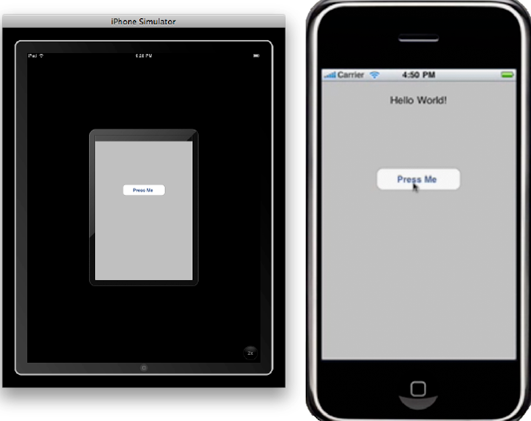
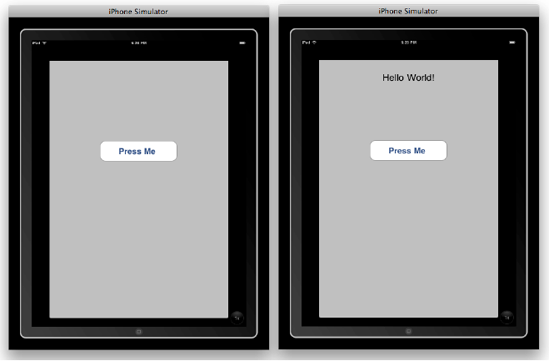
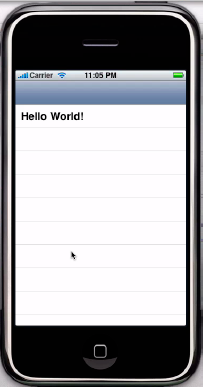
After compiling is complete, test your app. Push the "Press Me" button, and you will see your result. Figure 2-22 shows the iPad Simulator in full (2x) view mode, before and after pushing the button.
You have just completed your first iPhone and iPad application. Congratulations!


In your first program, "helloWorld_001," you said "Hello" to the world from the View-based Application template in Xcode. Now, it's time for your second example, helloWorld_002, which will be created via the Navigation-based Application template in Xcode.
Before we get started with the next method, you need to save helloWorld_001 in a folder of your choice that is not on the desktop. Create a folder in your Documents folder called My Programs, and then save the file named helloWorld_001 there by dragging it to that folder. Now, with a fresh, clean empty desktop, close all programs. Press Command + Tab and then Command + Q to close everything until only the Finder is left on your screen.
Now, just as you did in the first example, launch Xcode and open a new project by using your keyboard shortcut:
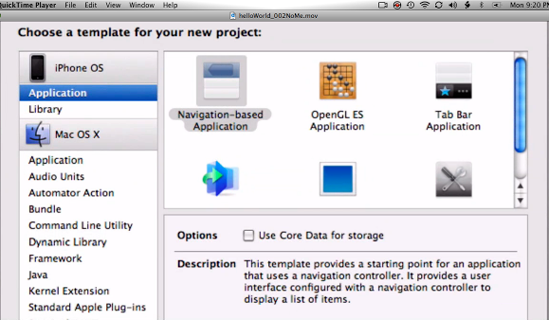
Figure 2.23. Open Xcode, select the Navigation-based Application template, and then save a new project file to your desktop.
Once you save this project to your desktop, Xcode instantiates a file named
helloWorld_002with a group called Classes, just as you saw in the first example ... see Figure 2-24. In this navigation-based template, we see that it consists of two pairs of subfiles: an AppDelegate header and main, along with a RootViewController header and main. Then, when you click on theRootViewController.h(header) file, you will see it has what we call a subclass of UITableViewController, which handles all the cool things necessary for displaying tables in an iPhone/iPad app. Tables are actually used much more than most users probably realize. Because we use tables for so many apps, I thought you should also learn how to say "Hello World!" in this context. In fact, right now, we have everything we need to call up a blank table.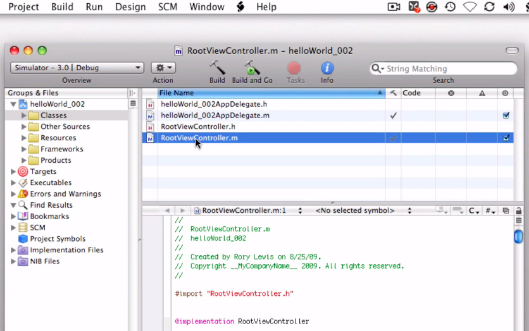
Figure 2.24. Open the Classes folder and click on the RootViewController.m file to examine the pre-existing boilerplate code.
Recall that, at the end of the first example (Figure 2-22), we compiled our code by entering
Within Xcode, go ahead and enter

Figure 2.25. Within Xcode, we use the shortcut to compile and run our program—even though we haven't entered a single line of code!
As you can see in Figure 2-26, compiling a generic bit of ready-made code may be possible, but it lacks anything specific. The table view is laid out - but, of course, the computer has no idea what we want it to say or display. We must tell it!
The iPhone/iPad Simulator has some powerful structures that have been prepared ahead of time, and we are seeing one of the typical projections via the Navigation-based Application template. What do you think is causing this to happen?
The answer: the
UITableViewController. This contains code that we will eventually examine, but right now just file it under unsolved mysteries.There is something we need to accomplish here, though. We want to use one row of the table to say "Hello World!" Let's do it.
First, quit the iPhone/iPad Simulator by entering


Figure 2.27. By using the indicated shortcut, we exit the Simulator and go back into Xcode, so that we may begin entering our new code.
When you first open up
RootViewController.m, there are a lot of green statements. Some of these comments refer to canned functions, which the guys at Apple have kindly programmed, knowing that, at times, these will come in handy for us programmers. We won't be using any yet, but later on we will.One thing we will do is go to the section that has to do with the number of rows in our table. You will make a simple change there to achieve our objective in this exercise. Refer to Figure 2-28.
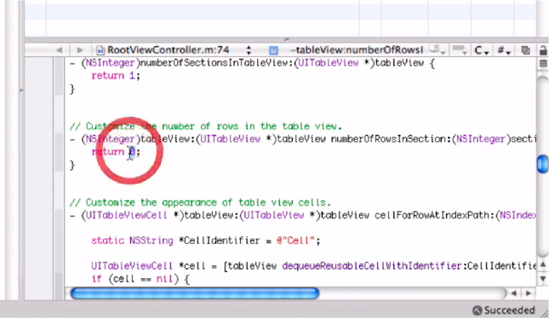
Scroll down in the
RootViewController.mfile until we get to the code that determines how many rows we will have in our app's table. In this simple app, we only need to have one line of output, so you will have to ask it to return not zero, which is the default number of rows, but one. The red circle in Figure 2-28 indicates the place to make this change.So, delete the 0, and replace it with 1.
Change this:
// Customize the number of rows in the table view.
- (NSInteger)tableView:(UITableView
 *)tableViewnumberOfRowsInSection:(NSInteger)section {
return 0;
}
to this:
- // Customize the number of rows in the table view- (NSInteger)tableView:(UITableView *)tableViewnumberOfRowsInSection:(NSInteger)section { return1; }Now, I want you to add a little code that will change the properties of that one row we want to manipulate. We want to say "Hello World!" in that one row. Below the line on which you entered
return 1in the previous step, we see a green commented section: "Customize the appearance of table view cells."Scroll down to where it says, "Configure the cell," as shown in Figure 2-29. Highlight that line and delete it.
Now, in that same place, I want you to type:
[cell.textLabelsetText"@"Hello World!"];
This command says we need a cell that has the Apple code required to insert text into a label. Furthermore, we want the words "Hello World!" to populate the cell. Here is the full code:
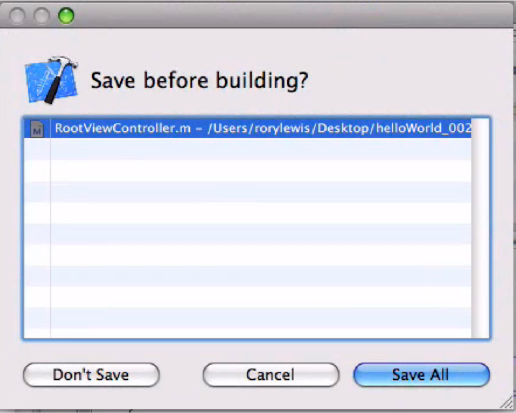
- // Customize the appearance of table view cells- (UITableViewCell *)tableView:(UITableView *)tableViewcellForRowAtIndexPath:(NSIndexPath *)indexPath { staticNSString *CellIdentifier ="@"Ce"l"; UITableViewCell *cell = [tableViewdequeueReusableCellWithIdentifier:CellIdentifier]; if (cell == nil) { cell = [[[UITableViewCellalloc] initWithStyle:UITableViewCellStyleDefaultreuseIdentifier:CellIdentifier] autorelease]; }[cell.textLabelsetText"@"Hello World!"];return cell;You will be prompted to save your work upon entering the shortcut for compiling and running your new code (
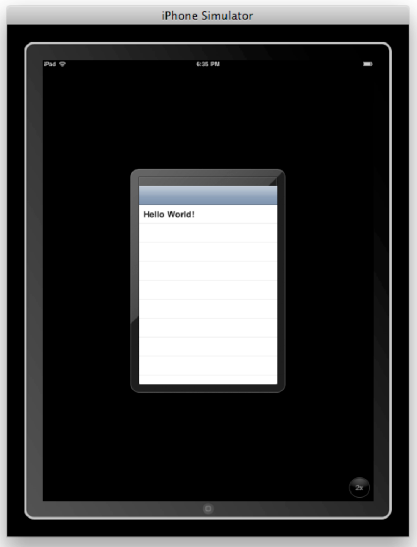
Once this crucial step is complete, we will see a table that contains one row with the desired text: "Hello World!" See Figures 2-31 to 2-34.
Great job! You have now written your second iPhone and iPad application.


In our final example for this chapter, you will repeat the steps you took for the previous app, helloWorld_002, and make some simple modifications. Select the Navigation-based Application template once again, and name your project helloWorld_003.
Scroll down in the
RootViewController.mfile, and, just as you did for helloWorld_002, enter this line of code:[cell.textLabelsetText:@"Hello World!"];
At this point, the complete RootView Controller file looks like this:
// Customize the appearance of table view cells.
- (UITableViewCell *)tableView:(UITableView *)tableView
 cellForRowAtIndexPath:(NSIndexPath *)indexPath {
static NSString *CellIdentifier = @"Cell"; UITableViewCell *cell = [tableView dequeueReusableCellWithIdentifier:CellIdentifier]; if (cell == nil) { cell = [[[UITableViewCell alloc] initWithStyle:UITableViewCellStyleDefault reuseIdentifier:CellIdentifier] autorelease]; }[cell.textLabel setText:@"Hello World!"];return cell; }Now, I want you to center the text. To accomplish this, you can either type the following code directly, or you can copy and paste the line you just inserted above itself ... and then edit it to appear as follows:
[[cell textLabel] setTextAlignment:UITextAlignmentCenter];
The file should now appear as:
// Customize the appearance of table view cells. - (UITableViewCell *)tableView:(UITableView *)tableView cellForRowAtIndexPath:(NSIndexPath *)indexPath { static NSString *CellIdentifier = @"Cell"; UITableViewCell *cell = [tableView dequeueReusableCellWithIdentifier:CellIdentifier]; if (cell == nil) { cell = [[[UITableViewCell alloc] initWithStyle:UITableViewCellStyleDefault reuseIdentifier:CellIdentifier] autorelease]; }[[cell textLabel] setTextAlignment:UITextAlignmentCenter];[cell.textLabel setText:@"Hello World!"]; return cell; }In essence, this command is calling out, "Hey, cell with text label,
[cell textLabel], listen to the directions being issued by your superior,setTextAlignment, and obey the User Interface text alignment command we've just given it."To our output row of text it means, "Center it up, buddy!"
But hold on, we're not done yet. For this little exercise, I also want you to make the text editable, to a degree. We'll put up an Edit button that, when pressed, will give the user the ability to delete our "Hello World!" text.
How do we do this? Back in step 4 of example 2, I mentioned that there are many functions that we programmers are, at times, not using. Well, this is one time that we will dip into that area to make a change.
I introduced the idea of comments earlier, telling you that these are in green and that they include or introduce information or functions that are invisible to the processor. Earlier, the comments we considered were denoted by the double slash symbol, //. There is another style of comments that is bound by /* at the beginning of the content and */ at the end of the content.
Go toward the top and you will see the code saying "Uncomment the following line to display an Edit button in the navigation bar ..." It looks like this:
/*
- (void)viewDidLoad {
    [super viewDidLoad];

    // Uncomment the following line to display an Edit button in the navigation bar for this view controller.
    // self.navigationItem.rightBarButtonItem = self.editButtonItem;
}
*/
You need to delete the two comment markers: /* and */, and then delete the line comments starting with the // so the section now appears like this:
- (void)viewDidLoad {
    [super viewDidLoad];
}
Excellent! Now, let's go through the remaining steps similar to the way you proceeded in helloWorld_002, starting with saving your work on the RootView Controller file. Using your shortcuts, save and compile the code.
Congratulations! You have just finished your third iPhone/iPad app!
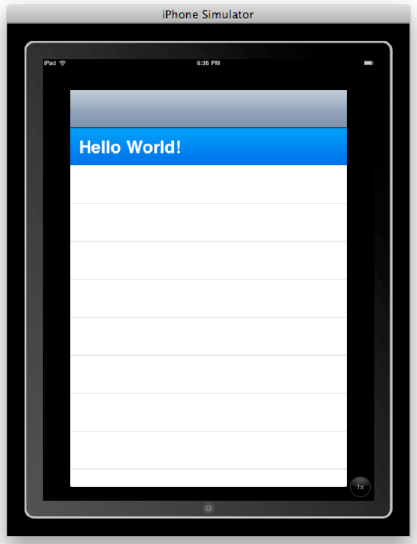
Figure 2-35 reveals the crisp results of your hard work.
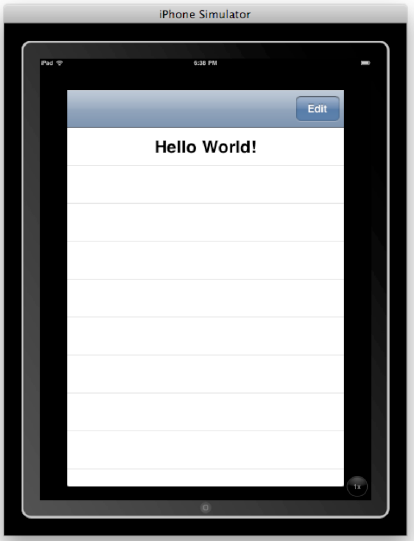
Figure 2.35. With these simple modifications, you get a nice clean table view with centered text on the top row, along with an Edit button.
As simple as this is, consider the mechanisms that have been pre-coded to allow this functionality, which you have unleashed by making a few basic changes to the file. Clicking on the Edit button triggers the display of the red and white button; it also causes the text on the original button to read "Done." See Figure 2-36.
