In this chapter, we will explore one of the most remarkable aspects of the iPhone: its unique ability to switch seamlessly between one view and another. We have all seen the wonderful iPhone and iPad ads on television, in which a person's fingers direct an amazing flow of vivid images, within interactive applications, and cause one view to just slide or roll directly into another, giving the impression of performance art. The concept behind this is what Apple calls Switch View methodology. As a professor of computer science, I have learned of several pitfalls regarding the teaching–and learning–of the Switch View methodology.
I intend to take advantage of the interesting variety of results that I have experienced as I have presented my students with some of the shortcuts those smart people at Apple have given us. As I introduce new concepts and techniques, I will be contrasting several tried-and-true pathways to the goal of creating an app with the capabilities I've described. Specifically, you will become familiar with the Tab Bar application template; it creates an Xcode SDK that lays everything out for a simple tab bar look and feel. For our goal of coding switch views with multiple graphics, you will barely have to program anything–the boilerplate code within the template does most of the work!
Ironically, this "easier and softer way" was a disaster for some of my students. I now realize that when too many shortcuts are taken, without due exploration of the underlying code, some programming students get confused. I knew that implementing switch views in Objective-C was by no means a trivial undertaking, and I had originally supplied my class with a way of simply pulling levers via the Tab Bar Application template. When this didn't have the positive results I had hoped for, I went back to the drawing board.
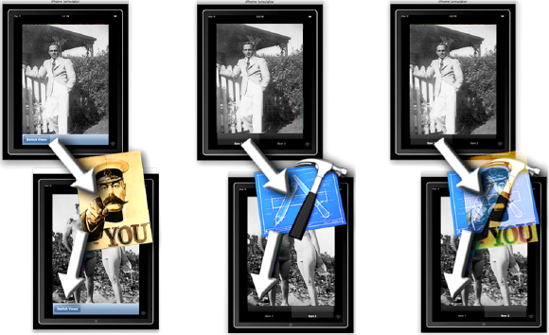
I held a Saturday workshop in which I divided the lesson into three sections–each of which would be a variation on my original plan. Each of the three alternative methods would use the same two pictures as depicted in Figure 6-1.
Note
One thing you may have noticed already is that this is a long chapter. This is due to the point I just made - that this is actually a three-in-one chapter. Because it really will be instructive to show you the long, detailed way; the short, no-brainer way; and the combination way ... to meet the same basic objective, I decided to keep this all in the same chapter. Nevertheless, I expect you to pace yourself ... breaks are important! Please treat Chapter 6 as a long sub-chapter, followed by a short sub-chapter, then followed by a medium sub-chapter. Happy Coding!
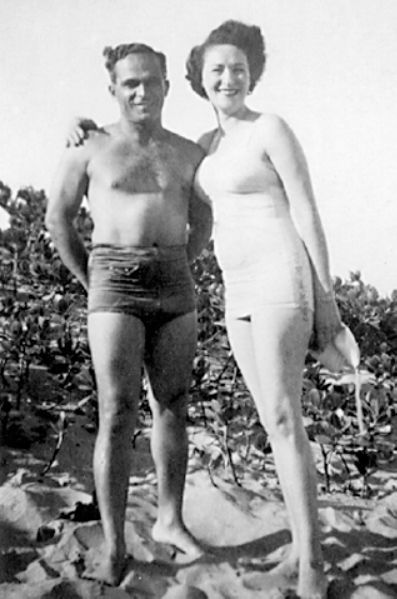
As you can see, there are three ways in which we will accomplish our switch view objectives in this chapter. In each scenario, we will start with the first view - a photo of my grandfather as a handsome young bachelor, and then switch to the second view - of my grandfather and grandmother, both of whom raised me as their son. When I was a child, he was a larger than life figure, my first hero, and thus I've labeled this exercise with the nickname of another "smart guy," by which I apparently called him on occasion: Einstein.
The first way we will accomplish the switch view (left) has the "YOU" there because you, my good friend, will be writing the code. Note that the buttons/tabs are a bluish color, which is how you will create them.
The second way (middle) is represented with an icon of XCODE that takes us from the one picture to the next. This pathway is where you build the app using the no-brainer Tab View Application template. Note that the tab keys are not bluish in color, but black, since that is the default in the boilerplate code within this utility.
The third way to switch the views (right) represents a combination of the two other approaches. Note that we will use the ready-made black tabs, but there will be areas that you will personally build and customize. This path is a bridge approach, a morph between YOU and Xcode.
So that was how we proceeded on that Saturday morning workshop, and it worked like a charm. One more thought about this three-way agenda: every student still expressed a preference for a given method, but there was unanimous appreciation for the presentation of all three in a side-by-side lesson.
There are three more points to note before we begin:
Point 1: Don't become too comfortable. Something I realized on the Saturday sessions was that students would gloss over steps they thought were the same, but which were slightly different. So please pay careful attention to steps that may seem familiar to you.
Point 2: Get over using the same pictures. After the weekend was over, one student complained, "Dr. Lewis, the pictures are boring. Can't we use our material?" My response to her was, "We're all using the same 'boring' pictures so you can better focus on the mechanics of how these three approaches to creating Switch Views work." If we keep these two pieces of the puzzle nice and consistent, then we'll be able to stay on task.
Point 3: The three versions and their screencasts. It may be instructive to first see me go through all three methodologies on three separate screencasts. I will walk you through them here in detail, explaining parts that I purposefully skip over in the screencasts for the sake of expediency. Go ahead, then, and check out the three videos. I will meet you back here. Note also the "Correct Code" links for each exercise provided here for your future reference:
From Scratch: einSwitch_001
Video:
http://www.rorylewis.com/docs/02_iPad_iPhone/06_iphone_ Movies/006_einSwitch_001.htmCorrect Code:
http://www.rorylewis.com/cCode/006a_einswitch01.zipTab-Bar: einSwitch_002
Video:
http://www.rorylewis.com/docs/02_iPad_iPhone/06_iphone_ Movies/007_einSwitch_002.htmCorrect Code:
http://www.rorylewis.com/xCode006b_enswitch02.zipCustom Tab-Bar: einSwitch_003
Video:
http://www.rorylewis.com/docs/02_iPad_iPhone/06_iphone_Movies/008_einSwitch_003.htm
Correct Code: http://www.rorylewis.com/xCode006c_enswitch03.zip
OK ... take a deep breath, turn off your cell phone, and calm yourself. The next part of our journey will earn you some bragging rights within the Xcode community. Soon enough, you'll be able to say, "Yeah, I code in Objective-C to perform switch views. I can do it the long way, the short way, or by customizing templates. Move aside!"
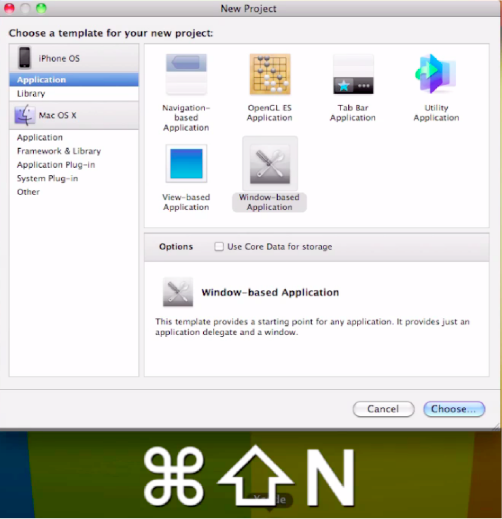
Go back for a moment, if you will, and recall the analogy of the automobile showroom, with six different body styles. As you see from this heading, we are hopping into one of our more versatile and sturdy vehicles: the window-based application. Although we will drive to the same destination in each section of this three-part chapter, we will do a little car hopping. Don't let this distract you; instead, let this be an adventure in test-driving different models.
As always, let us start off with a clean desktop. Then we will prepare for this first example by adding four items to our desktops to join the ever-present Macintosh HD icon: three .png image files and a text file. As shown in Figure 6-2, download these from the zip file located at http://www.rorylewis.com/xCode/006_Chapter6h_EinSwitch01.zip. Once you have downloaded the zip file, you may need to go to your Downloads folder.
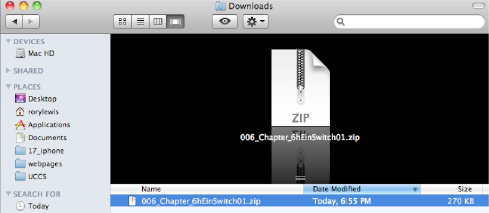
After you have located the zip file, drag it onto your desktop, as shown in Figure 6-3. Double-click on the file to access the 006_Chapter_6hEinSwitch01 folder and extract the four items onto your desktop, as shown in Figures 6-3 and 6-4.

Figure 6.3. Extract 006_Chapter_6hEinSwitch01.zip from your Downloads folder and move it to your desktop.

Note
I changed the desktop image in Figures 6-3 and 6-4 because the dark background blended into the black background inside the folder. Don't let this confuse you.
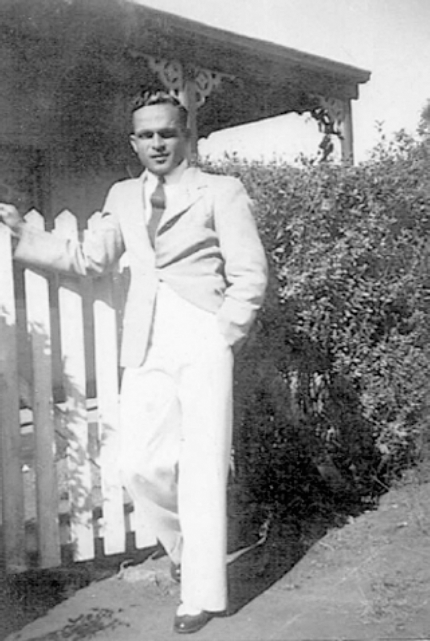
The first two items are the black and white photographs of my grandfather, alone and with his bride. As I stated in Point 2, I really want you to use these images I have supplied, for it will make the rest of the chapter flow more easily and be less distracting. One less variable to worry about!
The third item in the 006_Chapter_6hEinSwitch01.zip file is the icon image for our app, with smaller dimensions of course. Once you have all three of these images: the bottom layer - my grandfather as a bachelor (Figure 6-5), the top layer - grandpa and his bride (Figure 6-6), and the icon (Figure 6-7), save them on your desktop.

The fourth item in the zip file is the SwitchViewController.txt document, which has boilerplate code that you will see again and again. In this chapter, you will be directed to copy and paste portions of this text into your code to manage certain functions. We will go over it all, and I will explain it to you at length, but, at this point in your coding journey, just save it conveniently on your desktop.
At the point when we do insert this ready-made code, we call it a Lazy Load. You can see what it looks like below ... mark this page. I will be referring back to this code in a little while–when it is time to copy and paste it.
#import "SwitchViewController.h"
#import "Ein1Controller.h"
#import "Ein2Controller.h"

@implementation SwitchViewController
@synthesize ein1Controller;
@synthesize ein2Controller;

- (void)viewDidLoad
{
Ein1Controller *ein1Controller = [[Ein1Controller alloc]
 initWithNibName:@"Einstein1View"
bundle:nil];
        self.ein1Controller = ein1Controller;
        [self.view insertSubview:ein1Controller.view atIndex:0];
        [ein1Controller release];
}

- (IBAction)switchViews:(id)sender
{
        // Lazy load - we load the Einstein2View nib the first time the button
 is pressed
        if (self.ein2Controller == nil)
        {
                Ein2Controller *ein2Controller =
                [[Ein2Controller alloc] initWithNibName:@"Einstein2View"
                                                bundle:nil];
                self.ein2Controller = ein2Controller;
                [ein2Controller release];
        }

        if (self.ein1Controller.view.superview == nil)
                //This is with no animation
        {
                [ein2Controller.view removeFromSuperview];
                [self.view insertSubview:ein1Controller.view atIndex:0];
        }
        else
        {
                [ein1Controller.view removeFromSuperview];
                [self.view insertSubview:ein2Controller.view atIndex:0];
        }
}

-(id)initWithNibName:(NSString *)nibNameOrNil
                           bundle:(NSBundle *)nibBundleOrNil {
        if (self = [super initWithNibName:nibNameOrNil
                                 bundle:nibBundleOrNil]) {

        }
        return self;
}
initWithNibName:@"Einstein1View"
bundle:nil];
self.ein1Controller = ein1Controller;
[self.view insertSubview:ein1Controller.view atIndex:0];
[ein1Controller release];
}
- (IBAction)switchViews:(id)sender
{
// Lazy load - we load the Einstein2View nib the first time the button
is pressed
if (self.ein2Controller == nil)
{
Ein2Controller *ein2Controller =
[[Ein2Controller alloc] initWithNibName:@"Einstein2View"
bundle:nil];
self.ein2Controller = ein2Controller;
[ein2Controller release];
}
if (self.ein1Controller.view.superview == nil)
//This is with no animation
{
[ein2Controller.view removeFromSuperview];
[self.view insertSubview:ein1Controller.view atIndex:0];
}
else
{
[ein1Controller.view removeFromSuperview];
[self.view insertSubview:ein2Controller.view atIndex:0];
}
}
-(id)initWithNibName:(NSString *)nibNameOrNil
bundle:(NSBundle *)nibBundleOrNil {
if (self = [super initWithNibName:nibNameOrNil
bundle:nibBundleOrNil]) {
}
return self;
}-(BOOL)shouldAutorotateToInterfaceOrientation:(UIInterfaceOrientation)interfaceOrientation { return (interfaceOrientation == UIInterfaceOrientationPortrait); } - (void)didReceiveMemoryWarning { [super didReceiveMemoryWarning]; if (self.ein1Controller.view.superview == nil) self.ein1Controller = nil; else self.ein1Controller = nil; } - (void)dealloc { [ein2Controller release]; [ein1Controller release]; [super dealloc]; } @end
Note
Before we move on, you need to DELETE the 06_Chapter_6hEinSwitch01 folder. You've taken the three images and one file out of it, so it's empty. Now delete it. This is critical. If you open up Xcode and save one of your files with the same name as the one above, there will be mass confusion. Drag the empty 06_Chapter_6hEinSwitch01 folder to the trash now, along with the original zip file item, if you haven't already deleted that.
Open Xcode and enter


A ROAD MAP: HOW SHALL WE PROCEED?
Note
You may jump ahead to the Create the first UIViewController Subclass section and skip this slight digression. Because this is the most complex code you will have encountered so far, we will use a road map. Most students find this useful—just as we all do when it comes to large-scale projects.
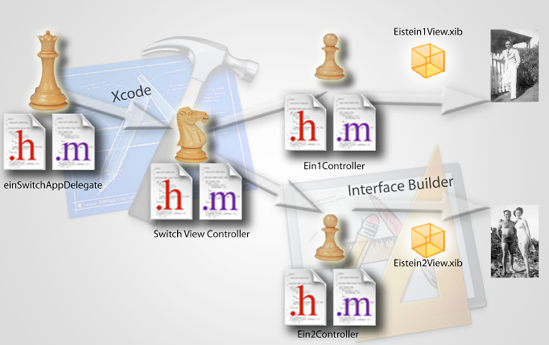
Let's sit back and draw out a road map. This project is going to allow a person to switch between two views, each of which contains a photograph of my grandpa at different stages in his life. Look at Figure 6-10 to see a diagram of an analogy that I hope you will find useful. The top-level character, einSwitchAppDelegate, tells SwitchViewController when to activate. The second-level character tells the Ein#Controllers to use their .xib tools to hold up their respective photos. You can also see how we use Xcode to program einSwitchAppDelegate and SwitchViewController and then how we use Interface Builder to work with the two Ein#Controllers and the .xib files.

Here's a summary:
Head Honcho Delegator: Delegates work to the Switch View Controller
Switch View Controller: Tells which Controller to appear on the screen
Einstein 1 Controller: Carries the 1st photo
Einstein 2 Controller: Carries the 2nd photo
Unfortunately, we cannot use the aforementioned nomenclature. In Objective-C, as in many other computer languages, we need to use a special style of designation: camelCase. Referring to the "hump" in the middle, that's the name for the way geeky coders write compound words or phrases. The first letter is usually not capitalized, the elements are joined without spaces, and each element's initial letter is capitalized within the compound. As some of you now realize, we have already been using this nomenclature throughout the book. It's a very easy pattern, and you'll catch on immediately.
For example, if you were to write code that gets a map from a Google parser, you might call it getMapFromGoogleParser. This is a personal thing, and it's up to you ... but try to be consistent. I will typically use lower case for the first word as long as it's not a proper noun (for example, the name of a city or a person) or a Class. Using these basic guidelines, let's rename the players in our code.
In essence, follow Apple's lead in their naming of entities. In general, when making up your own names, letTheFirstLetterNotBeCapitalized! Here are the names we'll use:
einSwitchAppDelegate: Delegates work to the Switch View Controller
SwitchViewController: Tells which Assistant Controller to appear on the screen
Ein1Controller: Carries the bottom layer photo
Ein2Controller: Carries the top layer photo
Now that we've named our characters, we need to define the tools the carriers use to hold up those pictures. They will pick up and present the photographs with nib (.xib) files, which we've come to love. This is what we have then:
einSwitchAppDelegateSwitchViewControllerEin1ControllerNib file:
Einstein1ViewwxibbEin2ControllerNib file:
Einstein2View.xib
The last step in identifying all the files we will need is to remember that each of those files needs both a header and an implementation file, as shown in Figure 6-11. Redrawing our road map we have:
einSwitchAppDelegate.handeinSwitchAppDelegate.mSwitchViewControllerr.handSwitchViewController.mEin1Controller.handEin1Controller.mEinstein1View.xib
Ein2Controller.handEin2Controller.mEinstein2View.xib
Cool, huh?! Now we need to create them. Specifically, we need to create three Cocoa Touch sub-classes called SwitchViewController, Ein1Controller, and Ein2Controller, and we will also create each player's header and implementation files. Then, we need to make two nib files: Einstein1View.xib and Einstein2View.xib.
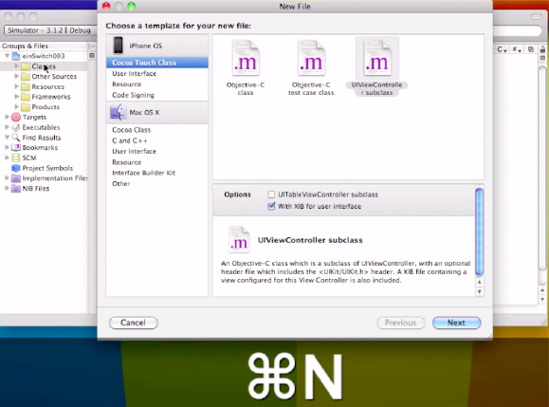
Once you have saved your window-based application as einSwitch01 to your desktop, click the Classes folder in your Groups and Files sidebar. Enter
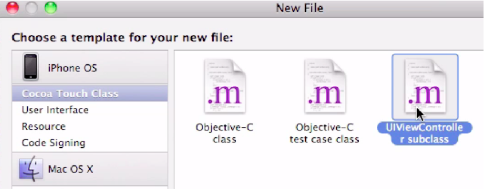

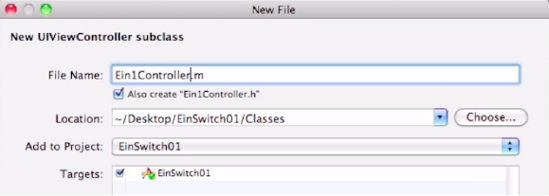
Figure 6.13. Save the file as "SwitchViewController.m." Remember to check the box Also Create "SwitchViewController.h."
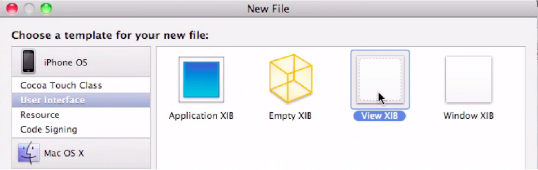
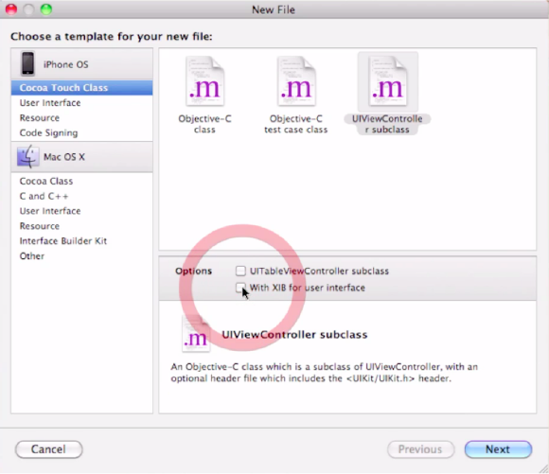
In this chapter's other projects, we will select the With XIB for User Interface option, but right now we are going to build our nib files from scratch. Once you've done it here, you will feel good knowing what happens when you let Apple build the nib files. This way, you can always make a change and add your own bells and whistles when you want. On the other hand, if you always have this key file built for you, you won't ever get to know what's going on under the hood.
According to our road map ...
einSwitchAppDelegate.handeinSwitchAppDelegate.mDoneSwitchViewController.handSwitchViewController.mDoing NowEin1Controller.handEin1Controller.mEinstein1View.xib
Ein2Controller.handEin2Controller.mEinstein2View.xib
Here, we repeat what we have just done to create the second and third of the three Cocoa Touch UIViewController subclasses. We name them Ein1Controller and Ein2Controller. Remember–these two aforementioned characters are the subordinates of SwitchViewController, and they will present the photos to the user of your app. If you can do this on your own, go ahead now and try it. If not, just read along and follow me. You'll see that we're just repeating these steps again.
Once you have saved SwitchViewController, enter
According to our road map ...
einSwitchAppDelegate.handeinSwitchAppDelegate.mDoneSwitchViewController.h and SwitchViewController.mDoneEin1Controller.h and Ein1Controller.mDoing NowEinstein1View.xib
Ein2Controller.handEin2Controller.mEinstein2View.xib
Quickly check to see that both the header and implementation files have been created for Ein1Controller. This step may seem redundant, but often we forget to check all the appropriate boxes, such as the one to create the .h file. If I can help you get into the habit of double-checking this requirement here, you will save time in the long run. Once you proceed and write actions to one file without the other, it can be a real drag trying to recreate matching files down the road.
Also, while we are here, let's quickly review the relationship between an item's header and implementation files. Recall from Chapter 1 that all classes consist of two parts: a header (.h) file and an implementation (.m) file. Do you remember how I asked you to read aloud the following phrase? "We inform the computer in our header files about the types of commands we will have it execute in the implementation files." This is still the case, but now I'd like you to add a little phrase in front: "Each class is a product of its header (.h) and implementation (.m) files. We inform the computer in our header files about the types of commands we will have it execute in the implementation files."
First, we inform; then, we execute!
Once you have saved Ein1Controller, select

According to our road map ...
einSwitchAppDelegate.handeinSwitchAppDelegate,mDoneSwitchViewController.handSwitchViewController.mDoneEin1Controller.handEin1Controller.mDoneEinstein1View.xib
Ein2Controller.handEin2Controller.mDoing NowEinstein2View.xib
We created the einSwitchAppDelegate.h and einSwitchAppDelegate.m files when we created the Window-based app at the very beginning of this example. We have just finished creating the Cocoa Touch UIViewController subclasses and named them SwitchViewController, Ein1Controller, and Ein2Controller. At this point, we have created all the characters in our play, but we still need to equip some of them with the tools they will use to display the bottom and top layer photographs - i.e. our switch view images.
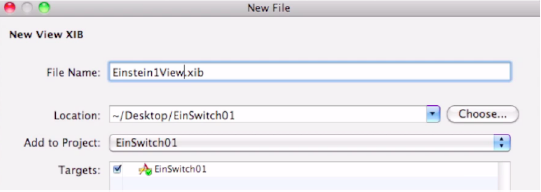
For this, we will create two sets of tools, .xib files, that each of our helpers will use. In the New File dialog, go to your Resources folder, give it a click, enter
Before moving on through the Objective-C forest, let's take a break and see where we are:
einSwitchAppDelegate.handeinSwitchAppDelegate.mDoneSwitchViewController.handSwitchViewController.mDoneEin1Controller.handEin1Controller.mDoneEinstein1View.xibDone
Ein2Controller.handEin2Controller.mDoneEinstein2View.xibDoing Next
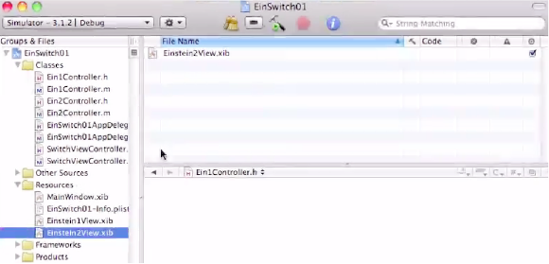
Save Einstein2View.xib as shown in Figure 6-18, and check that your Resources folder contains both the .xib files you have created. Now, as we glance at our road map, we see that we have come a long way:
einSwitchAppDelegate.handeinSwitchAppDelegate.mDoneSwitchViewController.handSwitchViewController.mDoneEin1Controller.handEin1Controller.mDoneEinstein1View.xibDone
Ein2Controller.handEin2Controller.mDoneEinstein2View.xibDone
So, you're looking at this list and thinking that we've got all our characters now, and we can start to code. Right?! Hmm ... not so fast. Do you see what is missing?
We do indeed have all our characters and their tools, but we lack some essential materials. We need to insert three items into our Resources folder: the top and bottom layer photos, as well as the icon image.
As you did in Chapter 5, Step 7, drag your first image into the Resources folder. Make sure, as you did before, to check the "Copy items into destination's group folder (if needed)" box, as well as the "Recursively create groups for any added folders" box. Then, click Add or press Return. Similarly, drag the second image into the Resources folder, and grab the icon image while you're at it.
As some of you may not know, you can multi-select by click-dragging and boxing in all the desired items, by control-clicking (non-adjacent items), or by shift-clicking (adjacent items) the first and last items desired (in a list). See Figures 6-19 and 6-20.


As you did before, you need to associate the icon image with this project. Open up the Info.plist file in the Resources folder and double-click the Icon file Value cell. In that space, type in the name of your icon file, icon.png, as shown in Figure 6-21. Now, save your work by entering

OK! We've created all the players, we've associated all the files, and we've associated the icon file with the program. This means only one thing my fellow geeks! We're ready to code!
Let's go back to the Classes folder, as shown in Figure 6-22, and do what we always do: open the application's delegate header file. As we do this, let's review what we now know about how the file structures are created. When Xcode instantiates our project, it creates the role that's going to delegate and preside over the other files, EinSwitch01AppDelegate (see Figure 6-11). In the instantiation process, we saw how the system creates both a header (.h) and an implementation file (.m) for our AppDelegate, and it places the program name right before the phrase AppDelegate.
To summarize, because we named our program EinSwitch01, Xcode then automatically labeled our AppDelegate file EinSwitch01AppDelegate. Furthermore, within this file, the system generated the two more specific files: EinSwitch01AppDelegate.h and EinSwitch01AppDelegate.m.
Go to your Classes folder, then, and open up your EinSwitch01AppDelegate.h file. It should look as follows:
#import <UIKit/UIKit.h>

@interface EinSwitch01AppDelegate   NSObject <UIApplicationDelegate>{
UIWindow *window;
}

@property (nonatomic, retain) IBOutlet UIWindow *window;

@end
At this point, we could easily do what we did in the past: enter the three lines of code we want to add ... and move on in blindness. But this time, we're going to open the hood on our car and examine the engine. I am not going to overload you with too much information. I don't expect you to remember everything. My goal is to challenge you here, and to see if you can make sense of some of the details of the code.
Going back to Figure 6-10, you will notice that EinSwitch01AppDelegate communicates with and delegates work to SwitchViewController. The SwitchViewController.h file needs to have all the goodies and stuff that the SwitchViewController.m needs to have in order to tell the SwitchViewController which pawn will display its image. We provide this by adding the SwitchViewController class that we created (see Figures 6-12 and 6-13).
Recall that when we add a class, we put the @ symbol in front of it to get the computer's attention. We will insert what is called an @class precompiler directive that announces our intention to call the SwitchViewController in the implementation file. These @class compiler directives tell the compiler that a class (of whatever type we're interested in creating) will be accessible for our use. Some programmers call this a forward declaration because we're giving the compiler a head's up before the class is declared in the implementation file. Therefore, we add @class SwitchViewController right after the #import code as follows:
#import <UIKit/UIKit.h>

@class SwitchViewController;
@interface EinSwitch01AppDelegate : NSObject <UIApplicationDelegate> {
    UIWindow *window;
}

@property (nonatomic, retain) IBOutlet UIWindow *window;

@end
We now know that when we code the implementation file that corresponds with this header file, to delegate work to the SwitchViewController, it will have the ability to do so. Cool!
Next, we move to the IBOutlet for the UIWindow portion of the code: the user interface window and its associated pointer window. We need to create an IBOutlet for all of the SwitchViewController bells and whistles. Therefore, after the UIWindow *window section, add SwitchViewController *switchViewController into the code. Once this is done, we can add an @ property directive and take care of the IBOutlet:
#import <UIKit/UIKit.h>

@class SwitchViewController;

@interface EinSwitch01AppDelegate : NSObject <UIApplicationDelegate> {
        UIWindow *window;
        SwitchViewController *switchViewController;
}

@property (nonatomic, retain) IBOutlet UIWindow *window;

@endTo address the property directive line, we shall use a shortcut. Highlight and copy this entire line
@property (nonatomic, retain) IBOutlet UIWindow *window;and then paste it below itself. Then, highlight and copy this line:
SwitchViewController *switchViewControllerSee Figure 6-23.

As shown in Figure 6-24, paste the
SwitchViewController *switchViewController;
code by entering (
IBOutlet UIWindow *window;
portion of the code you just inserted.
#import <UIKit/UIKit.h>

@class SwitchViewController;

@interface EinSwitch01AppDelegate : NSObject <UIApplicationDelegate> {
        UIWindow *window;
        SwitchViewController *switchViewController;
}

@property (nonatomic, retain) IBOutlet UIWindow *window;
@property (nonatomic, retain) IBOutlet SwitchViewController *switchViewController;
@end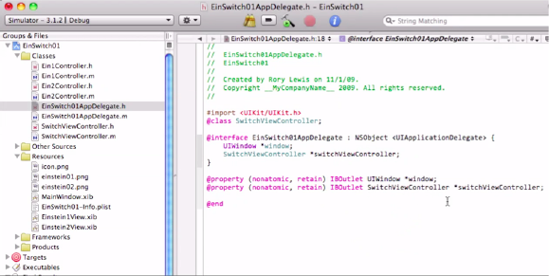
Remember that the @property directive declares that our object has a property with a specific type, while the @synthesize directive, which we are just about to address, puts into play the methods we declared in the @property directive. Save your work on the header file and move on to the implementation file, eEinSwitch01AppDelegate.m. See Figure 6-25.

In the Classes folder, scroll down to the corresponding implementation file, EinSwitch01AppDelegate.m, and open it. As shown in Figure 6-26, you will see that it looks as follows.
#import "EinSwitch01AppDelegate.h"

@implementation EinSwitch01sAppDelegate

@synthesize window;
- (void)applicationDidFinishLaunching:(UIApplication *)application {
// Override point for customization after application launch
    [windowmakeKeyAndVisible];
}
- (void)dealloc {
    [windowrelease];
    [superdealloc];
}
@end
As you can see, Apple has been kind enough to import the header file of the AppDelegate on which we have been working, EinSwitch01AppDelegate.h. Therefore, all the shout-outs we asked it to send this implementation file will be in here. Hmm ... let's think about this for a second.
What other shout-outs or notices do we need here? If you go back to Figure 6-10, then you may recall that EinSwitch01AppDelegate orders the SwitchViewController to tell its subordinates to do specific actions–like hold up photographs of our subject. Thus, we need to also import all the shout-outs of the SwitchViewController.h, as seen here:
#import "EinSwitch01AppDelegate.h"
#import "SwitchViewController.h"
@implementation EinSwitch01AppDelegate

@synthesize window;

- (void)applicationDidFinishLaunching:(UIApplication *)application {

    // Override point for customization after application launch
    [window makeKeyAndVisible];
}
- (void)dealloc {
    [window release];
    [super dealloc];
}
@end
Note that the following line has code that Apple automatically instantiated for us:
@implementation EinSwitch01AppDelegate
This line has been something that we have skipped over in the past, but let's consider it now. One way that we can think of this, or pronounce this, is: "In this implementation file, we hereby realize those commands and directives that were announced and defined in the EinSwitch01AppDelegate header file.
Note
I often use the concept "realize" to deal with the term "instantiate." When the computer automatically instantiates a role or piece of the program structure, it is creating an object (i.e., making that character real).
What else do we need to insert here? Recall that the @property directive, which is always located in the header file, declares that our object has a property with a specific type. In contrast, the @synthesize directive, located in the implementation file, notifies the compiler about these directives. Recall, too, that we had an @property directive
@property (nonatomic, retain) IBOutlet UIWindow *window
for the window IBOutlet. Then we added another @property directive for the SwitchViewController IBOutlet:
@property (nonatomic, retain) IBOutlet SwitchViewController *switchViewController
The @synthesize directive for the window is done for us already by Apple, but we need to add the missing element, the @synthesize directive for the switchViewController. Let's do this as illustrated in the following code:
#import "EinSwitch01AppDelegate.h"
#import "SwitchViewController.h"

@implementation EinSwitch01AppDelegate

@synthesize window, switchViewController;
- (void)applicationDidFinishLaunching:(UIApplication *)application {

    // Override point for customization after application launch
    [window makeKeyAndVisible];
}

- (void)dealloc {
    [window release];
    [super dealloc];
}

@end
Cool, huh? I hope you are beginning to see the logic behind adding these statements. Now, look at the next line:
(void)applicationDidFinishLaunching:(UIApplication *)application
and right-click on the applicationDidFinishLaunching portion. Scroll down and click on the Find Selected Text Documentation option. This will take you to a place where we have not yet ventured in this book, a wonderful little rabbit hole that leads to the Apple documentation of Xcode and Objective-C. Whatever portion of the code you do not know in the months and years to come–no problem, just check it out in the Apple documentation.
By clicking on it, we see that it states - in part - the following:
applicationDidFinishLaunching: Tells the delegate when the application has finished launching. - (void)applicationDidFinishLaunching:(UIApplication *)application Parameters application The delegating application object. Discussion This method is the ideal place for the delegate to perform various initializationand configuration tasks, especially restoring the application to the previous stateand setting up the initial windows and views of the application...
What this is basically saying is: "Hey, I wrote this out for you without you having to really deal with it. If you really must know, it's where your delegates perform various initialization and configuration tasks."
Right below this, inside the brackets, Apple has indeed handled the initialization and configuration of an essential task: [window makeKeyAndVisible]. This bit of code causes the UIWindow to become visible and makes it the "first responder" of touches by the user when your app is run on the iPhone/iPad.
We need something else here, though. Can you think of it? We also need to make sure that the character that the Head Honcho Delegate is ordering around, the SwitchViewController, is visible to the user. We do this by adding a subview. The code that accomplishes this is [window addSubview:switchViewController.view].
As the name suggests, this procedure adds a view to switchViewController's subviews. What's going on here is that, when switchViewController tells its subordinates to display the photographs of my grandpa, we want to add a view to a window as its subview. So, we're really asking switchViewController for the view it controls, which, when handled, displays the window to the user and enables it to accept touches and other input. Insert that line as shown here:
#import "EinSwitch01AppDelegate.h"
#import "SwitchViewController.h"

@implementation EinSwitch01AppDelegate

@synthesize window, switchViewController;

- (void)applicationDidFinishLaunching:(UIApplication *)application {

    // Override point for customization after application launch
    [window addSubview:switchViewController.view];
    [window makeKeyAndVisible];
}

- (void)dealloc {
    [window release];
    [super dealloc];
}
@end
Our last step here is to deallocate the memory of all these actors in our play. Apple knows it has to deallocate the memory of various windows, and, for safety, it also performs a "super-deallocation." Just accept it for now ... we're close to brain overload here.
We need to deallocate the memory we are using for ... what? Hmm. Have a guess. The one item to which we have been continually referring in this section? The switchViewController?
Yes. Let's do it!
#import "EinSwitch01AppDelegate.h"
#import "SwitchViewController.h"

@implementation EinSwitch01AppDelegate

@synthesize window, switchViewController;

- (void)applicationDidFinishLaunching:(UIApplication *)application {

    // Override point for customization after application launch
    [window addSubview:switchViewController.view];
    [window makeKeyAndVisible];
}

- (void)dealloc {
    [window release];
    [switchViewController release];
          [super dealloc];
}

@end
Now enter
You have taken care of the EinSwitch01AppDelegate in terms of both its header and its implementation files. Referring back to Figure 6-10, we see that we have created the code for the einSwitchAppDelegate–represented by the chess queen!
Whew - time for a break!
Continuing with our chess metaphor, you can tell yourself that you are finished working with the AppDelegate file–the queen. Now it's time to focus on her immediate subordinate, the SwitchViewController. As you know, this figure, represented by the knight, has the role of commanding either of its underlings to hold up its image. In the steps ahead, we will deal with the header (.h) file and the implementation (.m) file of the SwitchViewController.
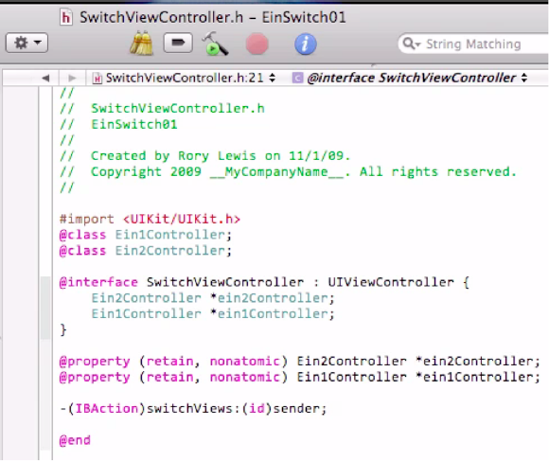
Now we need code that tells the Ein1Controller to displays its photograph of our subject; then we can tell the Ein2Controller to display its photograph. So, scroll down in your Classes folder and open up the header file: SwitchViewController.h. We first need to make sure that the precompiler will even know who the Ein#Controllers are. See Figure 6-27. Remember that the @ symbol gets the computer's attention for the establishment of a specific relationship, and we use the @class precompiler directive to do this.
#import <UIKit/UIKit.h>@class Ein1Controller;@class Ein2Controller;@interface SwitchViewController : UIViewController { } @end

Figure 6.27. Copy the @class precompiler directive for Ein1Controller in order to create one for Ein2Controller.
Next, we need to make sure that the implementation file will know who these Ein#Controllers are ... that they even exist. In technical terms, we say that we need to declare the instance variables that we need to use throughout the class. This is done inside the brackets, immediately following the directive @interface SwitchViewController: UIViewController.
We do this by using a pointer–yes, the asterisk, which, thus far, I've been telling you to ignore. Well, it's time to consider it. We need to tell the implementation file to reserve a place in memory for Ein1Controller and Ein2Controller, and we do this by using a pointer ... for each of the subordinate roles:
#import <UIKit/UIKit.h>
@class Ein1Controller;
@class Ein2Controller;

@interface SwitchViewController : UIViewController {
        Ein1Controller *ein1Controller;
        Ein2Controller *ein2Controller;
        }
@end
Next, we need to use the @property directive to define these variables as properties, and we do this with the same code we've used many times before:
@property (retain, nonatomic) Ein#Controller *ein#Controller
making sure to do it individually for each Ein#Controller that presents the user with a photograph of my grandfather. We do this as follows:
#import <UIKit/UIKit.h>
@class Ein1Controller;
@class Ein2Controller;

@interface SwitchViewController : UIViewController {
        Ein1Controller *ein1Controller;
        Ein2Controller *ein2Controller;
}

@property (retain, nonatomic) Ein1Controller *ein1Controller;
@property (retain, nonatomic) Ein2Controller *ein2Controller;
@end
Our next item to address is that we need an action of some type to switch views. We've called this an instance before, and we will still do so. Technically, we say: "We need an instance method (and use the "minus" sign) to advertise to the implementation file that we will be incorporating an IBAction." In other words, it will "shout out" to the implementation file that a method in your code needs to be triggered, or called into action, and that these commands will be implemented in Interface Builder.
We need to give this new action that's going to switch views a name, so let's call it ... hmm ... switchViews! Yeah! Thus, we will enter this code:
-(IBAction)switchViews:
This segment of our code, in turn, needs to point to a specific construct or role, and we use (id) for this purpose. Finally, we will need to add the "sender" component that will trigger the event.
Thus, our latest code insertion is
(IBAction)switchViews:(id)sender
By the way, remember that we generally follow up all these lines of code with a semicolon, to alert the computer that we are finished with that line.
#import <UIKit/UIKit.h>
@class Ein1Controller;
@class Ein2Controller;

@interface SwitchViewController : UIViewController {
        Ein2Controller *ein2Controller;
        Ein1Controller *ein1Controller;
}
@property (retain, nonatomic) Ein2Controller *ein2Controller;
@property (retain, nonatomic) Ein1Controller *ein1Controller;

-(IBAction)switchViews:(id)sender;
@end
As shown in Figure 6-28, it's time to enter
In the Classes folder, go to the SwitchViewController's implementation file, SwitchViewController.m, and click it open. When you open it, you will see all the basic code we've seen before, which Apple automatically and conveniently instantiates for us. As shown in Figure 6-29, the details of this code are invisible to the compiler because each set of classes is placed inside a comment. I think now is a good time to address the nature and function of comments–in the context of coding apps.

We know that Xcode uses, and is based on, the programming language Objective-C, and that applications are run by virtue of code getting compiled into ones and zeroes that microprocessors understand. In Objective-C, as in other languages–particularly the C language it's based on, our preprocessor supports two styles of comments. These comments, in essence, make things invisible to the innards of the machine.
We have already examined and discussed the double forward slash signal: //, after which comments can be inserted–and which prohibits the compiler from seeing those comments. These are called BCPL-style comments. There is also the slash-asterisk: /* and the asterisk-slash: */, between which comments can be placed. These are known as C-style comments. For example, we might see something like this:
/* This is material that will be "invisible" to the compiler. */
Apple knows that, most of the time, we will use at least one of the classes, so it inserts comments for our convenience as follows:
#import "SwitchViewController.h" @implementation SwitchViewController /* // The designated initializer. Override if you create the controllerprogrammatically and want to perform customization that is not appropriatefor viewDidLoad. - (id)initWithNibName:(NSString *)nibNameOrNil bundle:(NSBundle *)nibBundleOrNil { if (self = [super initWithNibName:nibNameOrNil bundle:nibBundleOrNil]) { // Custom initialization } return self; } */ /* // Implement viewDidLoad to do additional setup after loading the view, typicallyfrom a nib. - (void)viewDidLoad { [super viewDidLoad]; } */ /* // Override to allow orientations other than the default portrait orientation. - (BOOL)shouldAutorotateToInterfaceOrientation:(UIInterfaceOrientation)interfaceOrientation { // Return YES for supported orientations return (interfaceOrientation == UIInterfaceOrientationPortrait); } */ - (void)didReceiveMemoryWarning { // Releases the view if it doesn't have a superview. [super didReceiveMemoryWarning]; // Release any cached data, images, etc that aren't in use. } - (void)viewDidUnload { // Release any retained subviews of the main view. // e.g. self.myOutlet = nil; } - (void)dealloc { [super dealloc]; } @end
Going further into this brief tangent on comments would not serve us at this time. I wanted you to take a quick peek, though, so that you would have some appreciation for where and how some of the details are hidden away. I want you to realize that there are some very successful iPhone/iPad app developers out there who do not understand all the gobbledy-gook in the example above. However, a good developer does know how to utilize these comment styles when the need arises–and even how to beg, borrow, and steal other developers' work along these lines.
At the beginning of this chapter, I mentioned that we would be dumping–into the implementation file–one of the most widely used, generic, boilerplate chunks of code that loads views onto the iPhone or iPad. This method is called a Lazy Load. This process has this name for a number of reasons. First, we are somewhat lazy for using it! True enough.
Second, it's lazy in terms of memory management. This is OK for smaller programs, but as we move to creating larger applications, we will need to get more sophisticated. We will probably use Shark and other tools to fix "memory leaks," which are often caused by lazy loads. Don't worry, though! You can still create excellent (and lucrative) apps that rely on a lazy load.
Earlier in this chapter you downloaded the 006_Chapter_6hEinSwitch01.zip file. Inside this zip file, you found and copied the SwitchViewController.txt file to your desktop. Now it's time to open this file and to select all the contents by entering

Figure 6.30. Click the SwitchViewController.txt file on your desktop, click inside the window, select all by entering
With your Lazy Load copied onto your clip board, open the implementation file, SwitchViewController.m, enter

Figure 6.31. Open the SwitchViewController.m file and paste your lazy load into it by entering
Guess what? You're done with the code for that particular character of our play! You can now move directly to the next step, if you like, and start connecting everything in your nib files. That would be perfectly acceptable.
Note
Following is a brief review of the boilerplate Lazy Load. If this doesn't interest you at this time, it will be fine to go directly to the Select the File's Owner section.
You don't have to memorize it, or understand every symbol, but I do want you to come away with at least a vague understanding of how this all works. The first portion of this file is code I programmed for you, which I included in the Lazy Load. I simply imported and synthesized the two Ein#Controller.h header files as follows:
#import "SwitchViewController.h"
#import "Ein1Controller.h"
#import "Ein2Controller.h"

@implementation SwitchViewController
@synthesize ein1Controller;
@synthesize ein2Controller;

// We've done the above about 7 times already, so I figured you'd be cool
with me inserting the import // and synthesis files for you. The next piece of code in here is the(void)viewDidLoad. - (void)viewDidLoad { Ein1Controller *ein1Controller = [[Ein1Controller alloc] initWithNibName:@"Einstein1View" bundle:nil]; self.ein1Controller = ein1Controller; [self.view insertSubview:ein1Controller.view atIndex:0]; [ein1Controller release]; }
The - (void)viewDidLoad method, given to us by Apple, is called after the SwitchViewController view is loaded into memory. You may recall that this method, or process, is called (or activated) regardless of whether the views were stored in .xib files or created programmatically via the loadView method. Right now, give all this code a simple and friendly nod of acknowledgement. You will find yourself cutting and pasting this stuff as you do further work, and I want to help you make sure that your .xib files properly load. Moving on, the next method we view is the essence of the Lazy Load:
- (IBAction)switchViews:(id)sender
{
        // Lazy load - we load the Einstein2View nib the first time the button
 is pressed
        if (self.ein2Controller == nil)
        {
                Ein2Controller *ein2Controller =
                [[Ein2Controller alloc] initWithNibName:@"Einstein2View"
bundle:nil];
                self.ein2Controller = ein2Controller;
                [ein2Controller release];
        }

        if (self.ein1Controller.view.superview == nil)
                //This is with no animation
        {
                [ein2Controller.view removeFromSuperview];
                [self.view insertSubview:ein1Controller.view atIndex:0];
        }
        else
        {
                [ein1Controller.view removeFromSuperview];
                [self.view insertSubview:ein2Controller.view atIndex:0];
        }
}
Can you gather what is going on with this portion of the code? You can see that we first command the computer to load our second photograph and then, depending on whether the other one is loaded or not, we swap them around–according to when the user presses the button to switch views. Apple provides us with the next set of methods. These initialize the nib files, enable the screen to use certain tools (such as "auto-rotate," if the user rotates the iPhone), receive memory warnings (if the user starts to run out of memory), and deallocate memory once the user is done with the app.
// Initialization code
- (id)initWithNibName:(NSString *)nibNameOrNil
                           bundle:(NSBundle *)nibBundleOrNil {
        if (self = [super initWithNibName:nibNameOrNil
                                                           bundle:nibBundleOrNil]) {
        }
        return self;
}
- (BOOL)shouldAutorotateToInterfaceOrientation:(UIInterfaceOrientation)
interfaceOrientation {
        // Return YES for supported orientations
        return (interfaceOrientation == UIInterfaceOrientationPortrait);
}
- (void)didReceiveMemoryWarning {
        [super didReceiveMemoryWarning]; // Releases the view if it doesn't
 have a superview
        // Release anything that's not essential, such as cached data
        if (self.ein1Controller.view.superview == nil)
                self.ein1Controller = nil;
        else
                self.ein1Controller = nil;
}
- (void)dealloc {
        [ein2Controller release];
        [ein1Controller release];
        [super dealloc];
}
@end
This brief overview is sufficient given your level of understanding. Meanwhile it's worth mentioning that, at a recent conference, I heard a husband and wife team, who are making about $50K/month, admit to hundreds of iPhone developers that they barely understand Apple's boilerplate implementation code. The key, as you may be gathering, is that they are clever enough to know where to paste the names of their views! For instance, do you see where I inserted Einstein1View and so forth in the (void)viewDidLoad method? Very good!
Let's go to Interface Builder and connect everything up. We're almost done!
As indicated by Figure 6-32, go to the Resources folder and open the MainWindow.xib file. As always, this will open Interface Builder.

Once Interface Builder is open, go to your Library window by entering
Note
The Document window is the window that holds your documents. It is not the open window of your desktop.
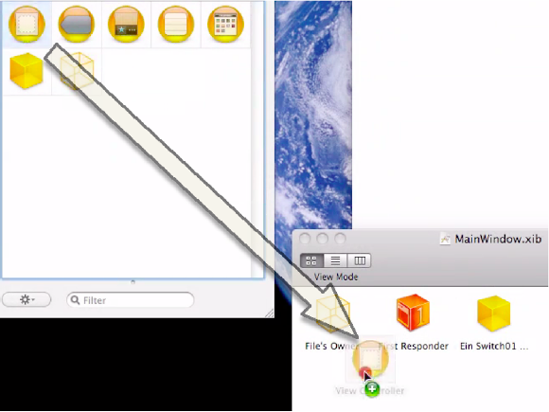
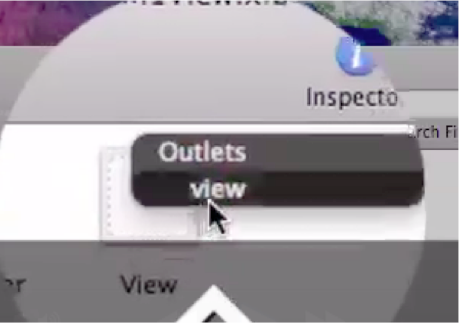
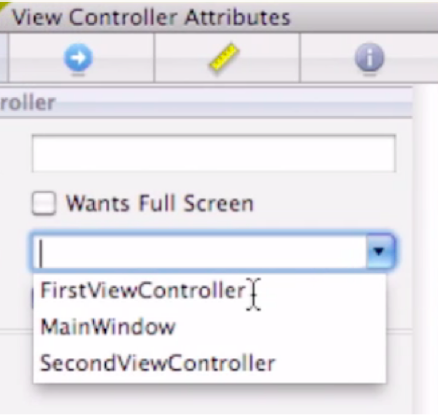
With the View Controller still activated (if it isn't, click on it once), have a look in the Inspector window and note that, by default, it is associated with a generic UIViewController. We really don't want that, though. We want our View Controller interacting with the code that we programmed for our own creation–a character that we have named SwitchViewController. So, click on the drop-down menu and select SwitchViewController, which will be associated with this View Controller in the Document window. Refer to Figure 6-34.

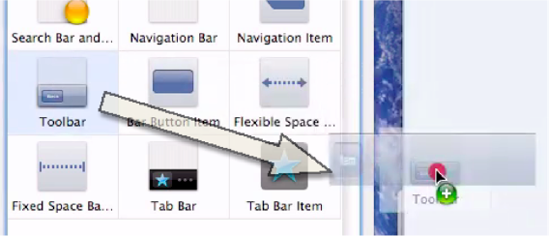
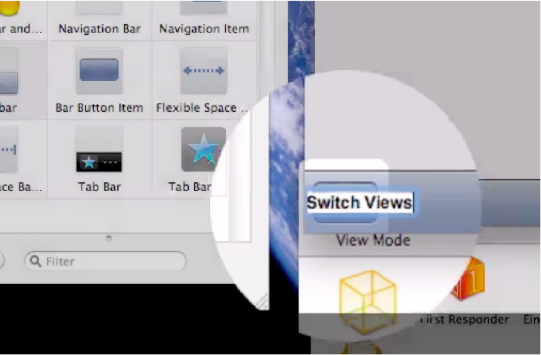
Scroll down to the Windows, Views & Bars folder in your Library and drag a view onto your screen as shown in Figure 6-35. We are doing this because we need views for the SwitchViews that we are generating. We could make our own buttons to switch between the different views, but we've already done this. You know how to do that. So, I thought it would be nice to use one of the pre-coded buttons that is in the Windows, Views & Bars folder. Go ahead then and drag a Toolbar onto your screen, and place it at the bottom of the workspace. Refer to Figure 6-36. We now want to give the button on the toolbar a name. Click on it, and call it Switch Views, as demonstrated in Figure 6-37.

We need to connect the mechanism inside the Switch Views button to the code we have now associated with the SwitchViewController. Control-drag from the Switch Views button downward to the Switch View Controller icon. At this point, your screen should look similar to Figure 6-38.
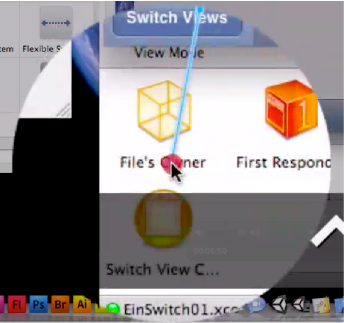
Figure 6.38. Control-drag from the Switch Views button downwards to the Switch View Controller icon.
Now we want to connect the Switch Views button to the appropriate option. As you drag over the Switch View Controller icon, the Sent Actions black drop-down menu opens, and you can select the switchViews option, as shown in Figure 6-39.

What is going on here? Remember, back in Step 14, when we created an action that would advertise that we have a switch view? It looked like this:
-(IBAction)switchViews:(id)sender
The code we're seeing here, in the drop-down menu, is a result of that code. I have bolded it below to jog your memory.
#import <UIKit/UIKit.h>
@class Ein1Controller;
@class Ein2Controller;

@interface SwitchViewController : UIViewController {
        Ein2Controller *ein2Controller;
        Ein1Controller *ein1Controller;
}

@property (retain, nonatomic) Ein2Controller *ein2Controller;
@property (retain, nonatomic) Ein1Controller *ein1Controller;

-(IBAction)switchViews:(id)sender;
Now we have connected the SwitchViewController to the View Controller, and that is why we see the file in the drop-down menu. We connect the code that we have previously entered to the button so that, when the user presses the Switch Views button on the toolbar, it invokes and runs this code.
Now, we want to connect the Ein1Controller to the SwitchViewController. So ... start to control-drag from the Ein1Controller to the View Controller that houses your SwitchViewController.
Note
We start with one of the images present on the screen, and, as we decided in the Lazy Load if statements, we make Ein1Controller the active subordinate in charge of this initial display. See Figure 6-40.

Again, as you drag your cursor over the View Controller, you will see a black drop-down menu appear with SwitchViewController in it. Connect the fishing line to it, and then let go, as shown in Figure 6-41. Now, enter

We're almost done!
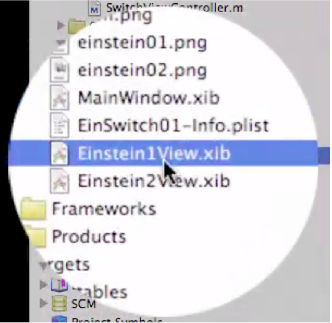
In reference to our network of characters depicted in Figure 6-10, we have everything working except for the two nib files, Einstein1View.xib and Einstein2View.xib. We have referred to these nib files as the tools that the Ein#Controllers use to hold up and display their respective photographs of my grandpa.
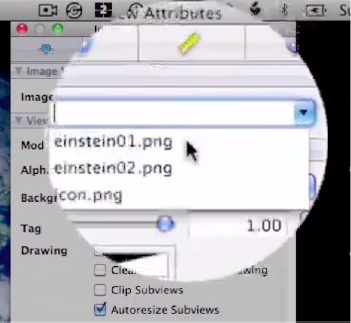
Let's open up Einstein1View.xib as shown in Figure 6-42. Both of these nibs are doing one thing, and one thing only, and that is holding up an image. Hence, it makes perfect sense that the first thing we do here is to drag in an Image View from the Data Views folder in our Library, as shown in Figure 6-43. We need to associate a specific image file with the Image View that we've just dragged onto the screen. As depicted in Figure 6-44, go to the property inspector and, after clicking on the pull-down menu, select einstein01.png, the image file to be associated with the Image View of the first of the two Ein#Controllers.

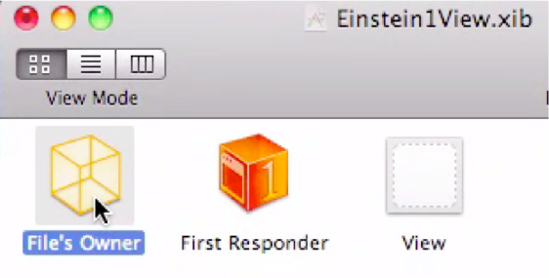
Now, we need to address the toolbar button and make sure we assign the correct action to it. First, click the File's Owner icon as shown in Figure 6-45. Watch out here. For some reason, students forget that, before changing the label of the File's Owner icon, they need to first click on it.
Once the icon is selected, go up to the Inspector Box. Once you get to the label, choose the Label option on the black drop-down menu, as shown in Figure 6-46.

Do you recall how we entered code that directed the Ein#Controllers to use nib files to display their images? Well, we need to make clear that the guy who controls everything here, the File's Owner, is indeed Ein1Controller. Click the File's Owner icon and then associate it, via the drop-down menu in the property box, with Ein1Controller, as shown in Figure 6-46.
Now, we need to control-drag from the File's Owner icon to the View icon. When you control-drag over the View icon, a drop-down menu appears with View as an option. Point to this option and then release. See Figures 6-47 and 6-48. With this done, we have completed working on the Einstein1View.xib file. Enter

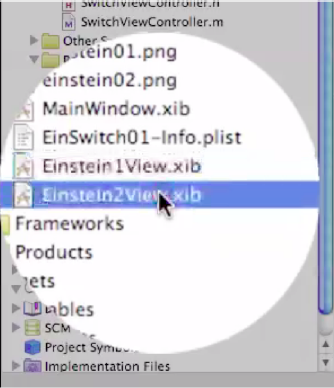
We need to repeat the same steps shown in Figures 6-42 thru 6-48 in order to connect the second photograph, with both my grandparents, to Ein2Controller. Begin this final series of actions by opening the Einstein2View.xib file and going back into Interface Builder, as shown in Figure 6-49.
Just as for the first image, we need an Image View to house the second photograph. So, drag it onto the screen of the Einstein2View.xib, and, as we did before, click on the File's Owner icon, and associate it with the code in the Ein2Controller. Control-drag the File's Owner icon of this second character to its View. Recall that when you control-drag over the View icon, a drop-down menu appears with View as an option. Point to this option and then release. With this done, we have completed working on the Einstein2View.xib file. Enter
You are done. Congratulations!
Enter


Remember, we've only done the first of the three Switch Views examples!
From Scratch: einSwitch_001
Video:
http://www.rorylewis.com/docs/02_iPad_iPhone/06_iphone_Movies/006_einSwitch_001.htmCorrect Code:
http://www.rorylewis.com/xCode/006a_einSwitch01.zipTab-Bar: einSwitch_002
Video:
http://www.rorylewis.com/docs/02_iPad_iPhone/06_iphone_Movies/007_einSwitch_002.htmCorrect Code:
http://www.rorylewis.com/xCode/006b_einSwitch02.zipCustom Tab-Bar: einSwitch_003
Video:
http://www.rorylewis.com/docs/02_iPad_iPhone/06_iphone_Movies/008_einSwitch_003.htmCorrect Code:
http://www.rorylewis.com/xCode/006c_einSwitch013.zip
Holy cow! You should feel good about this accomplishment.
The hardest of our three exercises is behind us! Most people never do switch views this way. They do it the no-brainer way. Boy, is this next example going to be easy for you!
So come on–let's go for the no-brainer Switch View app. Check out how easy it is compared to what you've just done.
As always, let us start off with a clean desktop. All you should have on your desktop are the einstein01.png and einstein02.png images from the 006_Chapter_6hEinSwitch01.zip you downloaded for the previous example. Delete, or just file away in your Resources folder, the 57 × 57 pixel icon and the Lazy Load text file. Save the two images on your desktop so that it is organized like mine, as shown Figure 6-55.

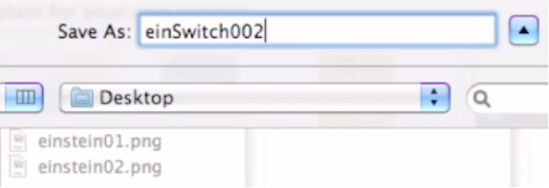
Figure 6.55. A clean desktop at the start of the einSwitch002 example. We see only three icons: Mac HD and two image files.
Open Xcode and enter

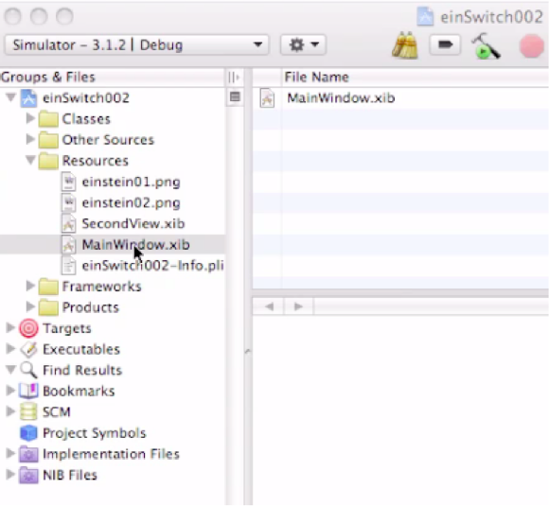
Open up your Resources folder. Go back to the desktop and select both of your images and drag them into your Resources folder as shown in Figure 6-58. While in the Resources folder, open up the
MainWindow.xibfile as shown in Figure 6-59.We will first work on the Main View, and then the Second View. Double-click on the
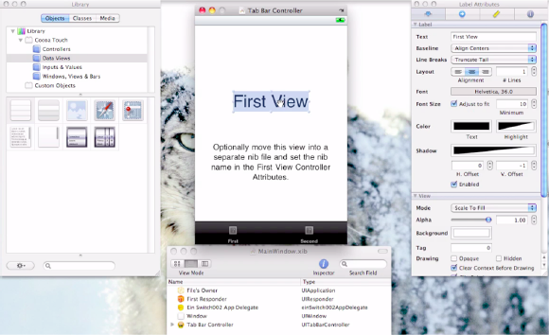
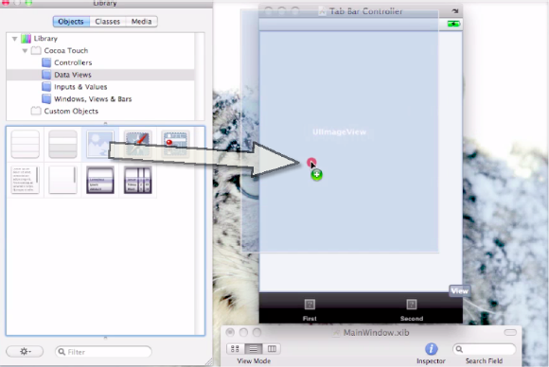
MainWindow.xibfile, which will automatically open Interface Builder. Once it opens, start by taking out the default text of the Tab Bar Controller frame, as shown in Figure 6-60.Once you've deleted all the default text, bring in a
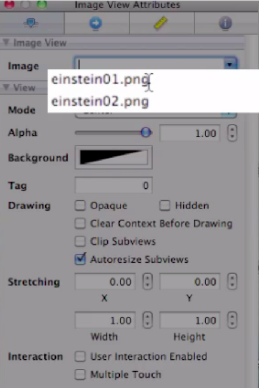
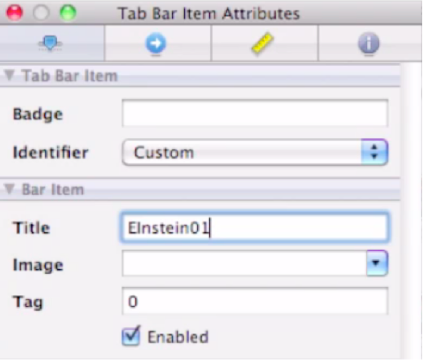
UIImageViewfrom your Library, as shown in Figure 6-61. Once this object is placed in the screen, and while it is still active, go to your Image View Attributes window and select theeinstein01.pngfile from your two choices, as shown in Figure 6-62.Click the bottom-left black tab labeled "First," and then immediately go to your Tab Bar Item Attributes window. Click on the Title cell to delete the default title "First," and then enter Einstein01, as shown in Figures 6-63 and 6-64. You may have to click twice in the cell to place your cursor properly.
You know ... it probably took you several hours to get to this point in the first example, coding this all from scratch. This is a bit easier, isn't it?
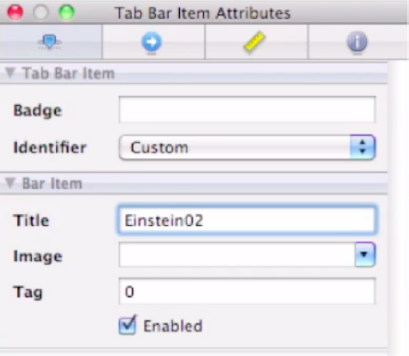
Click on the right-side black tab labeled "Second," and then immediately go to your Tab Bar Item Attributes window. Click on the Title cell to delete the default title "Second," and then enter Einstein02, as shown in Figures 6-65 and 6-66.
Hit Return. Save it and go back to Xcode.
Note
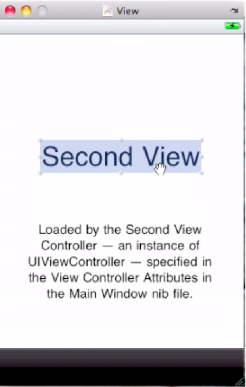
When you start a Tab Bar application, the first View is called the Main View, and then those that follow are called the second, third, and so on. We've just connected the dots for the first View: the Main View. If we want the user to click on a tab that leads to another view, such as the second photo (both grandparents), we need to configure that View here.
Double click on the
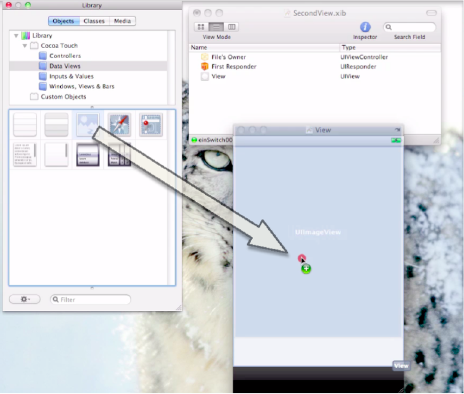
SecondView.xibfile in your Resources folder as shown in Figure 6-67. As you did before, delete all the text on your Second View. See Figure 6-68.Drag in a UIImageView from your Library as shown in Figure 6-69 and place it inside the View frame.
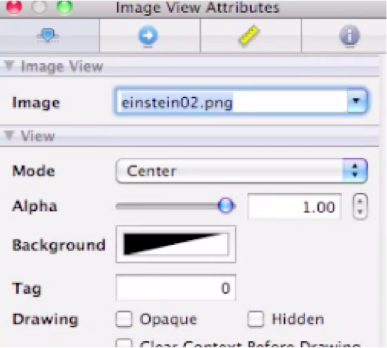
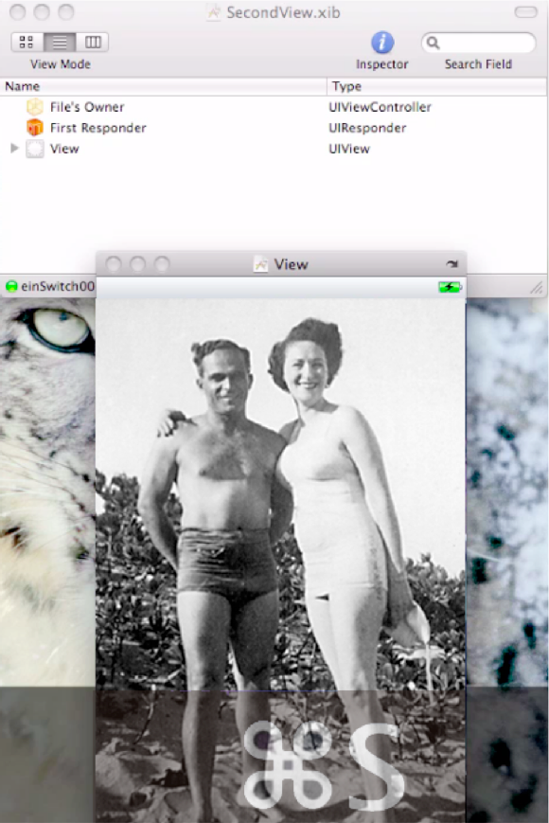
While the screen is still active, go to your Image View Attributes window and select the
einstein02.pngimage file, as shown in Figures 6-70 and 6-71.Save your work by entering

Go back to Xcode, open up your Classes folder, open a file, and Enter

I know ... you hate me for making you do the first example. If you had known that this no-brainer method was this easy, you would never have agreed to proceed with that one. Take it from me, though: students who depended on this simple path were not equipped to make any changes to their tabs or to be effectively creative.
Wait until the next example, einSwitch003. It is a hybrid of sorts, and you will love it!
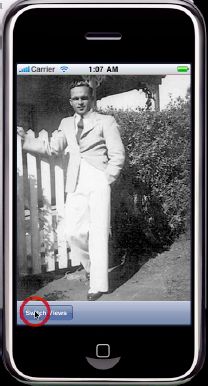
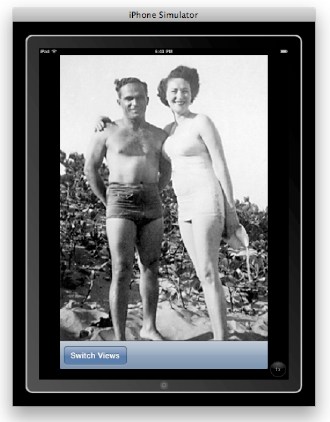
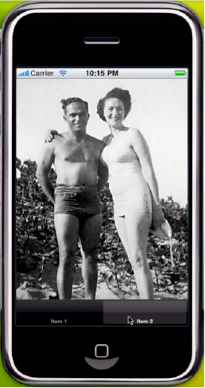
As you can see in Figure 6-73, the no-brainer method yields very decent results. The initial image is displayed—and the Einstein01 tab is highlighted.
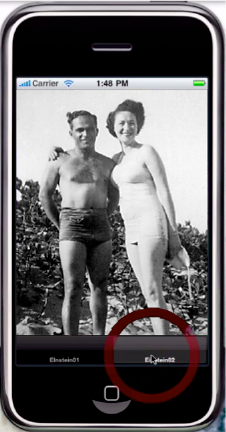
Figure 6-74 illustrates the switched view by virtue of clicking the other tab, Einstein02. The second image appears, thanks to the boilerplate code you activated.
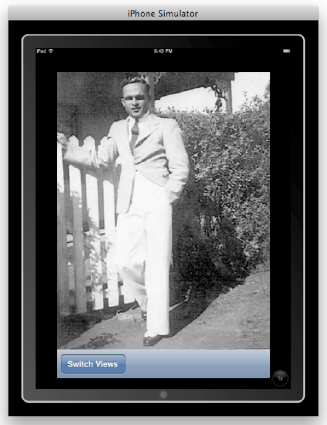
In Figure 6-75, we see the same nice results: the initial image is displayed and the Einstein01 tab is highlighted, but in the iPad mode ... with the iPhone view activated.
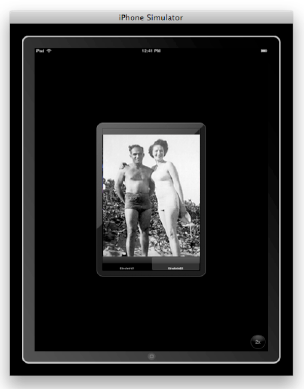
Figure 6-76 demonstrates that the iPad mode has no problem switching the view; the Einstein02 tab is highlighted, and we see both grandparents.
Figure 6-77 shows the 2x magnification of the initial image. The resolution is crisp as the Einstein01 tab is highlighted.
The final variation is depicted in Figure 6-78. The no-brainer method appears to have done its job ... and, of course, with minimal effort. Realize, though, that having completed the first exercise, your knowledge extends far beyond this simple two-tab project.


Possibilities are endless!

OK, we've completed two of the three switch view examples:
From Scratch: einSwitch_001
Video:
http://www.rorylewis.com/docs/02_iPad_iPhone/06_iphone_Movies/006_einSwitch_001.htmCorrect code:
http://www.rorylewis.com/xCode/006a_einSwitch01.zipTab-Bar: einSwitch_002
Video:
http://www.rorylewis.com/docs/02_iPad_iPhone/06_iphone_Movies/007_einSwitch_002.htmCorrect code:
http://www.rorylewis.com/xCode/006b_einSwitch02.zipCustom Tab-Bar: einSwitch_003
Video:
http://www.rorylewis.com/docs/02_iPad_iPhone/06_iphone_Movies/008_einSwitch_003.htmCorrect code:
http://www.rorylewis.com/xCode/006c_einSwitch03.zip
You've seen how easy the "no-brainer" method was, and you really appreciate it because the first approach was a royal pain. In this third iteration, I will show you how to tweak things a little bit. Your creative brain will connect the dots and find it relatively easy to make minor adjustments because now you understand the logic under the hood.
The preliminary actions to take for einSwitch_003 are identical to einSwitch_002. The only items on your desktop will be the einstein01.png and the einstein02.png image files from the 006_Chapter_6hEinSwitch01.zip you downloaded for einSwitch_001. Your desktop should be organized like mine, as shown in Figure 6-79.

Open Xcode and enter
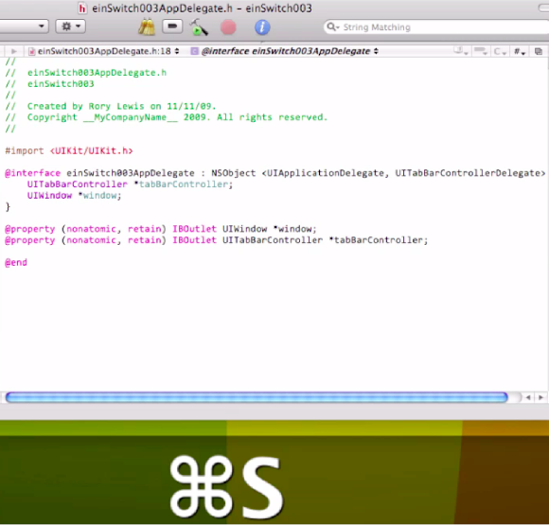
One of the first things we need to do is go to the Classes folder. Click it open, and then open the header file by clicking open
einSwitch003AppDelegate.h. Let's take a look at some of the places where modifications and customizing of the existing code might potentially serve us.

We need to bring in as much of the cool stuff that made the no-brainer methodology work while still being able to keep control over things.
Let's take a look at some boilerplate code that some clever Apple programmers have written, a chunk of code that is encapsulated in a Class Reference called the UITabBarController. It has all the code prewritten that displays tabs for selecting between different modes and for displaying the views for that mode. The UITabBarController class inherits from the code you programmed yourself in the first example, specifically the UIViewController class. Tab bar controllers have their own view made accessible through the view property.
See Figure 6-82 for a diagram that depicts how the views are assembled in the tab bar interface. We can change the look and feel of the tab bar, and toolbar views can change, but the views that manage these do not change.
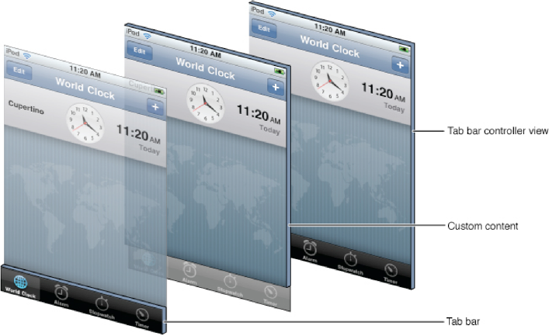
Figure 6.82. Apple's UITabBarController diagram. This arrangement looks simple at first, but trying to implement it can be quite complex ... unless you have already completed this chapter's first example!
So rather than struggling with this now, we will do three things:
Adopt the
UITabBarControlleDelegateby inserting it into our@interface einSwitch003AppDelegate : declaration.Add in a new declaration of
UITabBarController*tabBarControllerafter theUIWindow*windowdeclaration, but before the}bracket.Add a
UITabBarControlleroutlet.Once you have added these three steps, as shown in the boldface code below, enter
#import <UIKit/UIKit.h>
@interface einSwitch003AppDelegate : NSObject <UIApplicationDelegate,UITabBarControllerDelegate> {UITabBarController *tabBarController; UIWindow *window; } @property (nonatomic, retain) IBOutlet UIWindow *window;@property (nonatomic, retain) IBOutlet UITabBarController *tabBarController;@endWe now need to code the implementation file. The first things we'll do here are
Synthesize our
tabBarControllerAdd a subview View controller
Release the
tabBarController
Once you have added these three steps, as shown in the boldface code following, your result should appear as in Figure 6-84. After this is all done, enter
#import "einSwitch003AppDelegate.h" @implementation einSwitch003AppDelegate @synthesize window;
@synthesize tabBarController;- (void)applicationDidFinishLaunching:(UIApplication *)application {[window addSubview:tabBarController.view];[window makeKeyAndVisible]; } - (void)dealloc { [window release];[tabBarController release];[super dealloc]; }When we used the no-brainer method for the Tab Bar Application in einSwitch_002, it added all kinds of bells and whistles, files that we now need to add here. Let's think about this for a second. The challenge is this:
How can we figure out what files we need to add, but that, as yet, we do not have?
In the future, when you get to this crucial point, ask yourself: "How many views does my iPad/iPhone application need?" You may have eight different views in your program. This means you would have to add eight new views. We have two photographs, so we only need to add two views. We do this by going to the Classes folder, entering

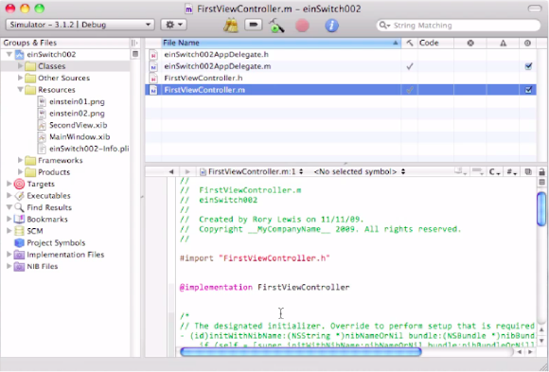
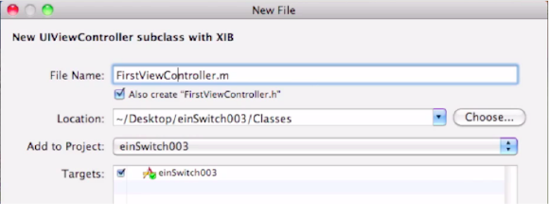
Being incredibly creative, we shall name the first View Controller implementation file,
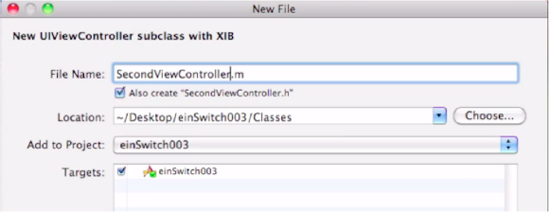
FirstViewController.m, as shown in Figure 6-87.Now, we need to create and name the second View Controller. So, go back to your Classes folder, enter
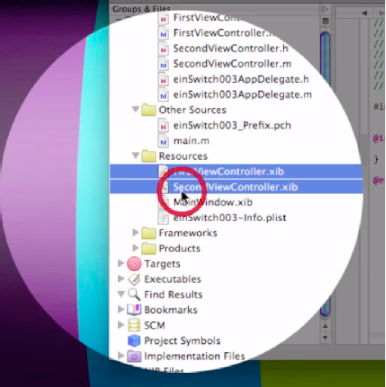
It's a very good habit to keep all your nib files in your Resources folder. However, the two automatically created nib files you just created are still in the Classes folder. Let's move them into your Resources folder, as demonstrated in Figure 6-89.
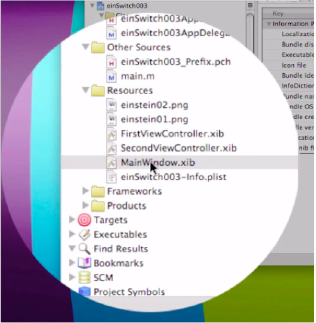
The next item on the agenda is to move our image files into the Resources folder. Go to your desktop, select both of our photographs, and drag them into your Resources folder, as illustrated in Figure 6-90. Make sure that, when you drop them into your Resources folder, you check the "Copy items into destination group's folder (if needed)" box. See Figure 6-91.
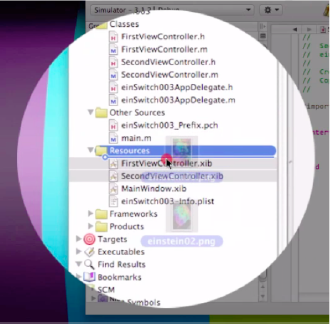
Figure 6.90. Drag the two image files, einstein01.png and einstein02.png, into the Resources folder.
Tip
This is (perhaps) the last time I will remind you of this. From here on, YOU will remember this!
It's time to edit the ViewControllers. From your Resources folder, open the
FirstViewController.xibfile. When Interface Builder opens, drag an Image View onto your screen, as shown in Figure 6-92. Of course, we want the first image to show in the first View Controller. To accomplish this, go to your Image View Attributes Inspector and, in the Image drop-down menu, selecteinstein01.png, as shown in Figure 6-93. After this is done, enterOf course, we need to repeat this entire process for the second View Controller file. So, open
SecondViewController.xib, and then drag an Image View onto your screen. From the image drop-down menu, selecteinstein02.png. As before, enterAs indicated in Figure 6-94, go to the Resources folder and click
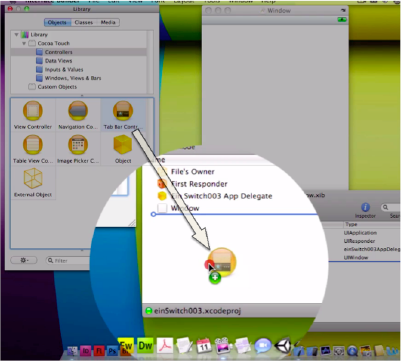
MainWindow.xib. The first thing we need to do is to drag a Tab Bar Controller from the Library, into your Main Window frame, as shown in Figure 6-95.Next, we need to connect our Tab Bar to the
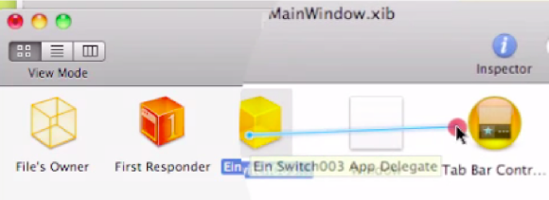
EinSwitch_003 App Delegate. Control-drag from theEinSwitch_003 App Delegateto the Tab Bar Controller, as shown in Figure 6-96. As you pull in toward the Tab Bar Controller, the black drop-down menu appears with the option of one outlet being thetabBarController, which is exactly what we want. See Figure 6-97.This is where we see that we have the best of both worlds: 1) We have control of what's under the hood, and 2) We have the luxury of having most of the code pre-written by Apple!
If this were a larger, more complex program, we could have connected with other controllers that, for example, change the icon pictures based upon where a user is in a game, or what language a user prefers within an app. There could be a million reasons why your program or game may need to have flexibility in the type of tab bar look and feel. Remember that, in the "no-brainer" approach, we had very few options. Here, though, with things looking still very much easier than in the first example, we see that control-dragging from one icon to another is relatively easy and intuitive.
We're getting close to the end of our journey! Now, we want to connect our View Controllers to the correct nibs & UIViewControllers.
We first need to expand the contents of our icons. Click your View Mode's middle button, located on the top left-hand side of your
MainWindow.xib(Figure 6-98).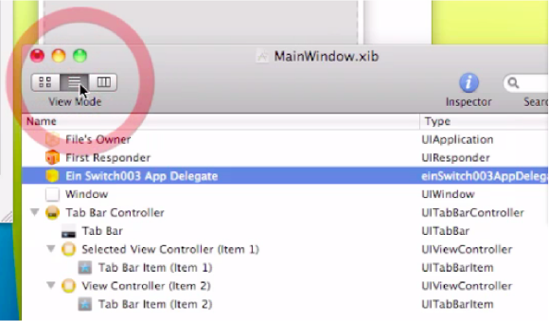
Figure 6.98. Select the middle button in the View Mode to expand the contents of the Tab Bar Controller.
Select the first View Controller, labeled "Selected View Controller (Item1)," as shown in Figure 6-99, and give it a click.
Then immediately go to your View Controller Attributes inspector, and connect it to the
FirstViewControllernib file, as shown in Figure 6-100.Next, we need to connect the
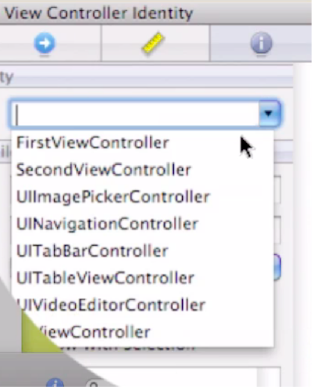
UIViewController. Go to the View Controller Attributes window and click on the Identity tab. Then, from the drop-down menu, as shown in Figure 6-101, select FirstViewController.Connecting the second View Controller will be done in the same way. Of course, you will make sure to select the second, not the first, View Controller. Select it from the
MainWindow.xib, as shown in Figure 6-102.With the View Controller Attributes tab still open, select SecondViewController from the drop-down menu, as shown in Figure 6-103.
Our last action, before running the code, is to choose the
FirstViewControllernib and enterWow—you did it! Figure 6-105 shows the result.


Years ago, when I was learning how to program in C as a struggling electrical engineer at Syracuse University, I practiced these steps again and again. It took me literally two weeks of 6-10 hours per day to become fluent in the C programming language; I worked with handmade objects, classes, and methods that would run a larger operating system. It was a semester-end project.
Over the break, I repeated the whole program again, referring to my notes often. I then created a scorecard and made a dash each time I looked at my notes. When I went through the program the third time, I think it took me about 5 hours or so. I forget how many times I redid the code, from scratch, but I was eventually able to code the entire program in just under an hour without making a single reference to my notes. Most of the time, it was my terrible typing that held me up.
Yes, I am recommending that you do the same with this Switch View app. Take all the items off your desktop, except for the four files with which we started. If you are willing to try this, I bet that–by your fifth time through–you will be looking at your notes fewer than 10 times. I am also confident that, after 10 to 15 practice runs, you will be able to code the whole thing, as I do, in less than five minutes–without reading any notes!
I know this may sound extreme to some of you, but my main point is that practice does indeed make perfect. This is true in the mental realm as much as it is in the physical one. I know you've heard this before: A mind is a terrible thing to waste.
The more committed you are now, the more assured your future success!