To teach or not to teach ... arrays, that was the question. In my original plan for this book, I had decided to not teach arrays, for a couple of reasons:
They are difficult for computer science majors–let alone absolute beginners.
They are considered boring.
They are even more complex placed in the context of Objective-C.
But I needed to teach arrays! Students in my iPhone/iPad class wanted to write Final Projects that utilized tables - which required the use of arrays - and I realized just how essential they were.
To help you decide whether to read this chapter, I want you to consider three things.
Why I was not going to teach this chapter.
Why you may want to skip this chapter.
Why I decided to teach it after all ... and to teach it my way!
Why I was not going to teach this chapter:
I have had many conversations with colleagues about what takes place when computer science students first come into contact with arrays. My experience is that understanding arrays has nothing to do with being smart. Often I see my brightest and most diligent students struggle and stumble as they plunge into the jungle of arrays. Conversely, I see students who have no business walking the halls of the Computer and Engineering Building grasp the concept as if it were their native language. One student who struggled with the "Hello World" chapters actually nailed arrays!
Why you may want to skip this chapter:
One thing I'm clear about is this: you don't have to know arrays to be a successful programmer. At a recent conference on programming the iPhone and the iPad, I attended a presentation by a very cool team of programmers about their new apps. One guy was talking about this goofy game in which users throw things into a garbage can.
The company consists of two guys in their mid-50s. They have 11 games and make over $20,000 per month. Get this–two years ago they were interior designers who had never programmed before. After they gave their talk, they opened the floor to questions. When asked about the mechanics of how they processed their arrays, they gave this response to a full room of several hundred high-tech geeks:
"We don't know anything about arrays. We just use stubs and boilerplate ins and outs—and then we pray!"
Why I decided to teach it after all ... and to teach it my way!
In the early stages of this book, I stayed on the fence regarding this topic. I knew that at some point, though, I would have to decide, and my publishers would want to know as well. To array or not to array!
From the students' point of view, this fork in the road was tough as well, but because of the requirements of academia, it looked to most of them something like Figure 8-1. For most of my students, Option 1–give up and drop out of engineering–was really no option at all. And if they landed in my class, my objective was, of course, to lead them to Option 2–become committed enough to learn the material.

Figure 8.1. The traditional options for dealing with arrays: 1) Give up, drop out of engineering, and go home, or 2) get committed and do whatever it takes to learn this torturous material!
Figure 8-2 illustrates my take on the "Arrays" conundrum. You can see that it consists of three options–the added one being a blend of the classical dichotomy:
Avoidance: "Arrays–who needs 'em! I'm outta here! Chapter 9, "MapKit," here I come!"
Lewis's Array Method: I will present specific boilerplate code, by which you'll learn where and how to insert functioning arrays into your code. In this pragmatic approach, you'll get a basic introduction to what arrays are and learn a few helpful tricks. Because I will have simplified the technical aspects in a major way, you'll end up with only a taste about how arrays function. Still, your code will work, and you'll feel really clever!
Learn Arrays Completely: There's a good reason why Dave Mark and Jeff LaMarche waited until their advanced book, More iPhone 3 Development: Tackling iPhone SDK 3 (Apress, 2010), to teach arrays. They referred to this area of programming as " ... the Devil ..."

Figure 8.2. Lewis's take on the issue of arrays: 1) Avoid the issue altogether, 2) Trust in Dr. Lewis's pragmatic approach and learn a few helpful tricks here and there, or 3) Go to Chapter 4 of Dave and Jeff's advanced book and shake hands with the Devil!
If you're still here–and haven't skipped ahead to Chapter 9, or put the book away entirely–then I am assuming you are willing to go along with the program for this next part of our journey. It is important that I communicate two caveats:
You will, at times, think that I'm not giving you enough details about arrays.
You will, at times, think that I'm giving you too many details about arrays.
In other words, please show the same awesome flexibility and patience that you have demonstrated up to this point in our give and take partnership. Trust me! Fair enough?
OK–then let's get down to business.
To understand how arrays are used in iPhone/iPad apps you need to understand the role of table views and navigation stacks, very powerful and helpful pieces of the iPhone OS. So far, we have talked only a little about tables. These are commonly used to show lists of items, and they allow the user to select and organize those items.
When you need to list things to buy from the grocery store, for instance, what steps do you take to prepare? First, you find a piece of paper, and then you list all of the things you need. A table view acts just like that piece of paper: it organizes the items in a list so that you can easily find anything you need.
Using table views to display lists is only part of the picture, though. A navigation stack lets us move between table views and even between "normal" views.
Let's keep our subject simple for as long as we can. Right now then, I want you to keep in mind five things about table views:
A table view is nothing more than a list of stuff, a list of data.
In the iPhone/iPad, a table view contains the code for a view object–the thing that displays your table's data on the iPhone's/iPad's screen.
The UITableViewCell controls every row in a table view. Don't question this; just accept it.
A table view does not store your table's data. It stores only code–to display the rows that are currently visible on the user's iPad/iPhone screen.
Table views involve at least two chunks of data:
Information about which types of data are present and how these are to be configured–by the UITableViewDelegate object;
Information about how specific data is arranged and displayed–by the UITableViewDataSource object protocol.
Similarly, arrays are just lists of stuff–and happens that table views are great at displaying and organizing arrays. But I first need to run by you a thought that vaguely describes how an array works:
An array is an ordered collection of objects, starting at zero, which can store any number of objects.
Imagine a vending machine filled with a wide variety of goodies, numbered A1 to H6 from top left to bottom right. You see a snack that looks too tempting to pass up, so you enter that snack's number and receive your delicious treat. The number used to access your candy, identifying its position in the sequence, is called an index. We use indexes (or "indices") to find objects in an array in the same way we would get candy from a vending machine. One important distinction is that an object remains in an array–even after you find it using its index. The candy, fortunately, does not stay in the vending machine!
Let's imagine that it is your job to report the kinds of candies available in the vending machine. But you can't just look in and count. Instead, the glass has been replaced with a big sheet of opaque plastic, and all the numbers have been removed.
You are therefore playing the role of the table view. First, you need to know how many goodies are in the machine. Fortunately, the vending machine already has a read-out that tells you this, and that read out is what will appear on the screen of your iPad or iPhone.
For this example, we are going to use arrays, views, and tables to make a very simple app. It will be built upon the master-detail paradigm and use table views to display delicious dinner entrees! Our approach will be very similar to the way that the App Store presents choices on the iPhone/iPad. We will seek to implement a pattern in which the user starts in a table view that presents categories, moves on to a list of all of the items in a selected category, and finally navigates to a page with detailed information about a specific choice.
We will use our boilerplate code that can be used to form arrays, and we will use stubs in other applications that produce results similar to the App Store interface just described.
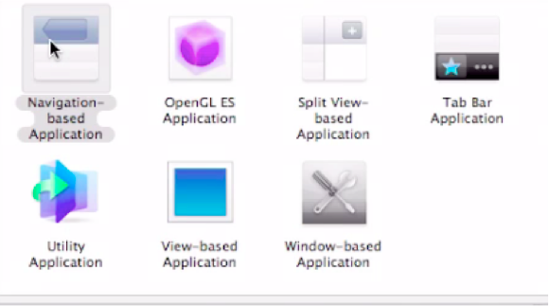
As usual, we open up Xcode and begin a new project using our shortcut, or by selecting the option from the File drop-down menu, as demonstrated in Figure 8-3. Choose the Navigation-based Application template, as shown in Figure 8-4.

Figure 8.3. Start a new project in Xcode. You are right – I didn't use the usual shortcut ... I just wanted to see if you were awake!
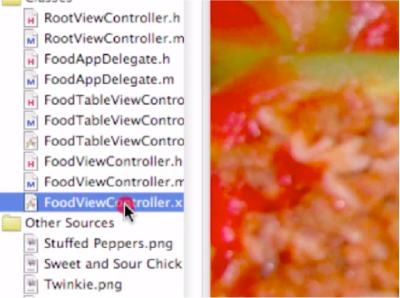
Make sure the images we're going to use are in the Xcode project, as in Figure 8-5.
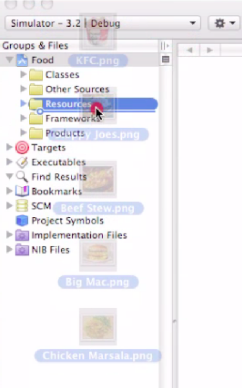
Figure 8.5. Copy the images into the Xcode project. Don't forget the icon file. Note that these images look like they're being dropped into the Resources folder, but they're actually en route to the Other Sources folder.
The images can be found on the book's download page at www.apress.com website, along with all of the source code for this project. Drag and drop the images into the Other Sources folder, and make sure to check the Copy Into box. When your screen looks like Figure 8-6, you're ready to go.

At this point we're still just setting up your table–in the same way that you would set up a list or an Excel chart. We have not yet begun the boilerplate stuff.
In order to populate the list of category names, we need to be able to store them inside the RootViewController. So, we need to move into the RootViewController.h file and set up a field to hold the categories. We also need to make sure our RootViewController can drill down on the information the user wants by creating a new View Controller. To do this, we add an import line and a new field in the header, as shown in Figure 8-7.
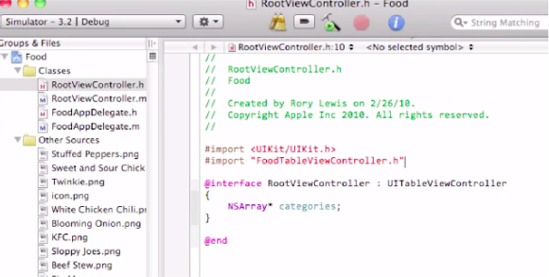
Add the line #import "FoodTableViewController.h" at the top of the header file. This instruction will import a class that we will create in a later step, but we're putting it in here now since we're already where we need to be.
Next, add a field to the class with the line NSArray* categories. This array will hold the category names for use in the table view:
//
//  RootViewController.h

#import <UIKit/UIKit.h>
#import "FoodTableViewController.h"

@interface RootViewController : UITableViewController
{
        NSArray* categories;
}

@endMoving into the RootViewController implementation file, we need to set up how the category names are going to be displayed. First, we need to create our category names and hold onto them for later. We will store our array of names in the Categories field that we previously created.
In RootViewController.m, we override the -viewDidLoad method to set up what we need. First, as always, we call [super viewDidLoad] to let the superclass respond to the loaded view as normal. We create the array with all of the names we want and set "categories" equal to that new array. Note the @ symbols and the nil item at the end; those are important!
On the next line, we set the title of the View Controller so that when the navigation controller needs to display a title, "Categories" will be displayed. This title is displayed at the top of the table view in the navigation bar. The code looks like this:
- (void)viewDidLoad
{
    [super viewDidLoad];

        categories = [[NSArray alloc] initWithObjects:@"Chicken", @"Beef", @"Pork",
 @"Fish", @"Vegetarian", @"Really, Really Healthy Food", nil];
        [self setTitle:@"Categories"];
}
@"Fish", @"Vegetarian", @"Really, Really Healthy Food", nil];
[self setTitle:@"Categories"];
}The UITableView class uses delegation and data source objects in order to get data to display and handle input from the user. The methods we are most interested in for the data source, which is already linked to the RootViewController, are the following:
-(NSInteger)numberOfSectionsInTableView:(UITableView*)tableView -(NSInteger)tableView:(UITableView*)tableView numberOfRowsInSection:(NSInteger)section -(UITableViewCell *)tableView:(UITableView *)tableView cellForRowAtIndexPath:(NSIndexPath *)indexPath
These are not the only data source methods, but they are the methods we will be using in this exercise. Let's start with -numberOfSectionsInTableView. This method returns the number of sections in the argument table view. Sections break up the table into chunks, each presenting information based on that section. Make sure you have "return 1;" in this method, because that tells the table view that it only has one section. This means that everything will be displayed together. Here's the code:
-(NSInteger)numberOfSectionsInTableView:(UITableView *)tableView
{
    return 1;
}
Next, for -tableView:numberOfRowsInSection, I want you to remember something for all your future table view adventures:
We return the number of items we want to display.
In this case we want to display all of the items in the categories array, and the code for this method is
return [categories count]This asks the categories array for the number of items it contains and returns that number to the table view for the number of items it will display:
-(NSInteger)tableView:(UITableView *) tableView numberOfRowsInSection: (NSInteger)section
{
    return [categories count];
}
Finally, we need to override –tableView:cellForRowAtIndexPath: for our data source methods. This method creates a UITableViewCell, modifies that cell to display the appropriate data, and then returns that cell to the table view for display. We want to change the text of the cell to display the category names we created earlier. To do this, we need to create a cell with a reuse identifier, change it, and then return it.
Note
What is a reuse identifier? To learn about these little gems, check out the "Digging the Code" section at the end of the chapter.
it regarding the topic of data source methods! Here's the revised code:
- (UITableViewCell *)tableView:(UITableView *)tableView cellForRowAtIndexPath:(NSIndexPath *)indexPath { static NSString *CellIdentifier = @"Cell"; UITableViewCell *cell = [tableView dequeueReusableCellWithIdentifier:CellIdentifier]; if (cell == nil) { cell = [[[UITableViewCell alloc] initWithStyle:UITableViewCellStyleDefaultreuseIdentifier:CellIdentifier] autorelease]; } NSString* text = [categories objectAtIndex:[indexPath row]]; [[cell textLabel] setText:text]; return cell; }
Next, we need to set up delegation in the RootViewController for our table view. Delegation tells the table view what to do when the user taps on an item in the table. We'll use
-(void)tableView:(UITableView*)TableViewdidSelectRowAtIndexPath:
(NSIndexPath*)indexPath
as our method to accomplish this.
The first line in this method simply creates a pointer to an array, which we initially set to nil. We do this so that our later check will fail if the user does not hit a row that we support. A switch statement comes afterward; it determines which row the user picked. If it is one of the rows we support, namely rows 0 (the first row), 1 (the second row), ... or 5 (the sixth and last row), we set the array pointer we made before to an array that holds the data we want to display in the next view controller.
We then check to see if the array pointer has been set to something other than nil. In this world, "nil" will always evaluate as False, while any object will evaluate as True. If the array is valid, we create a new FoodTableViewController with the array and push that new controller onto the navigation stack. After all of this, we have the table view deselect the row that was selected, asking it to animate itself to make the deselection process.
You'll notice that all of the names in the array assignments that we make in this method are identical to the names of the images used in the project. This is no accident. We use the items in the arrays to get those images later.
The code for our delegation method looks like this:
- (void)tableView:(UITableView *)tableView didSelectRowAtIndexPath:(NSIndexPath*)indexPath { NSArray* names = nil; switch ([indexPath row]) { case 0: names = [NSArray arrayWithObjects:@"Chicken Marsala",@"White Chicken Chilli", @"Sweet and Sour Chicken", nil]; break; case 1: names = [NSArray arrayWithObjects:@"Beef Stew",@"Sloppy Joes", @"Stuffed Peppers", nil]; break; case 5: names = [NSArray arrayWithObjects:@"Big Mac",@"Twinkie", @"KFC", @"Blooming Onion", nil]; break; default: break; } if (names) { FoodTableViewController* ftvc = [FoodTableViewControllerfoodTableViewControllerWithFoodNames:names]; [[self navigationController] pushViewController:ftvc animated:YES]; } [tableView deselectRowAtIndexPath:indexPath animated:YES]; }
We need to create the next level of detail for our application. The first level was categories of foods, but now we want more detail ... in this case, food choices within a category. We do this by creating a new view controller, our FoodTableViewController, to display more specific information (Figure 8-8). When adding the new file, be sure to make FoodTableViewController a UITableViewController subclass using the checkbox on the file template Options section, as shown in Figure 8-9.

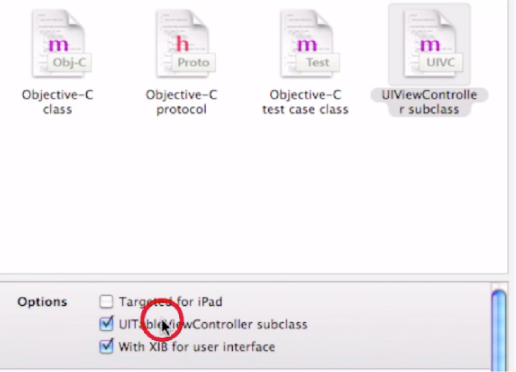
Figure 8.9. Make the FoodTableViewController a UIViewController subclass by checking the UITableViewController Subclass box.
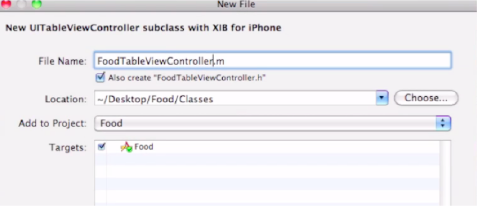
Once you have named and saved your new FoodTableViewController class, as shown in Figure 8-10, open up the FoodTableViewController.h file. Within this file, we're going to add some code that's very similar to the RootViewController.h code, but with a few tweaks. First, insert the #import" FoodTableViewController.h" line. This will import the FoodViewController class once we are underway.
Next, we want to make a new field: NSArray* names. This array will hold the food names for this table view controller. This array functions very much the same as the categories array from the RootViewController. However, we need to make the names array visible to other classes so that the RootViewController can pass the data the FoodTableViewController needs. To do this, we create a property with the line @property(nonatomic, retain) NSArray* names. This allows us to call setNames: on an instance of this class. We will also create a "convenience constructor" named foodTableViewControllerWithFoodNames.
What in the world is a convenience constructor?! Why would we bother making one? Well, a convenience constructor creates an object, usually taking some initialization parameters, and does the work of memory management for us. This means that calling the convenience constructor does not require us to release the object when we are done using it. So not only can we create an object with defined starting data, but we also don't have to worry about tracking its lifetime to avoid memory leaks. Additionally, convenience constructors are really easy to make!
Note
See "Digging the Code" to learn more about memory management.
You may remember from Chapter 4 that the plus sign, "+," in front of the convenience constructor makes that method a class method. If not, just remember that this means we can simply ask the class to create a new instance for us instead of having to alloc and init the object ourselves.
//
//  FoodTableViewController.h

#import <UIKit/UIKit.h>
#import "FoodViewController.h"


@interface FoodTableViewController : UITableViewController
{
        NSArray* names;
}

+ (FoodTableViewController*) foodTableViewControllerWithFoodNames:(NSArray*)foodNames;
@property (nonatomic, retain) NSArray* names; @end
Inside FoodTableViewController.m we will start by creating the meat of the convenience constructor we declared in the header. But first, we need to add the line @synthesize names; so that our property is available to us. Next, we prepare for our convenience constructor by making a C compiler directive (a special way of making something really easy to change and use) that will be called FoodTableViewControllerNibName. A few spaces later, we will define this directive to be @FoodTableViewController, since that is the name of the .xib file we want this view controller to use.
Why are we doing this? We will use this name with our convenience constructor. By creating this directive in the implementation file, we hide how our convenience constructor works and make sure that the right .xib file is used to build this view controller. In short, it makes creating a new FoodTableViewController easier by not requiring a nib name when called from elsewhere.
After we make our directive, we want to insert our convenience constructor code. You can simply copy and paste the declaration from the header into the implementation file, remove the semicolon at the end, add brackets, and we're ready to start filling it out!
The first thing we do in the convenience constructor is create a new FoodTableViewController instance using the -initWithNibName:bundle method, passing our directive name as the first parameter, and "nil" as the second. This keeps the implementation and nib name hidden from prying eyes and makes this method very easy to use.
Before we return the instance, however, we want to set the names of the controller to the names that the user passed to the convenience constructor. We call the property we established in the header to set the names. We then call return [theController autorelease] to make sure the caller does not have to worry about memory management for this instance.
That's it. We're done with the convenience constructor!
/
//  FoodTableViewController.m

#import "FoodTableViewController.h"

#define FoodTableViewControllerNibName
@"FoodTableViewController"

@implementation FoodTableViewController

@synthesize names;
+ (FoodTableViewController*) foodTableViewControllerWithFoodNames:(NSArray*)foodNames
{
        FoodTableViewController* retController = [[FoodTableViewController alloc]
 initWithNibName:FoodTableViewControllerNibName bundle:nil];
        [retController setNames:foodNames];
        return [retController autorelease];
}Our table view won't do very much at this point, for we haven't told it what to display. Just as before, we need to set up our data source and delegate methods. And just as before, we want to return 1; for –numberOfSectionsInTableView: and similarly return [names count]; for –tableView:numberOfRowsInSections. That's all pretty straightforward and functions exactly like the code from RootViewController. And as you might expect after all of this, for tableView:cellForRowAtIndexPath: all we have to do is change categories to names and we are done with data source methods for FoodTableViewController:
- (NSInteger)numberOfSectionsInTableView:(UITableView *)tableView
{
    return 1;
}

- (NSInteger)tableView:(UITableView *)tableView numberOfRowsInSection:(NSInteger)section
{
    return [names count];
}

- (UITableViewCell *)tableView:(UITableView *)tableView cellForRowAtIndexPath:
(NSIndexPath *)indexPath
{
    static NSString *CellIdentifier = @"Cell";

    UITableViewCell *cell = [tableView dequeueReusableCellWithIdentifier:
CellIdentifier];
    if (cell == nil) {
        cell = [[[UITableViewCell alloc] initWithStyle:UITableViewCellStyleDefault
 reuseIdentifier:CellIdentifier] autorelease];
    }

        NSString* text = [names objectAtIndex:[indexPath row]];
        [[cell textLabel] setText:text];

    return cell;
}
On to delegation! Of course, for delegation we will have to change a lot more to do what we need in FoodTableViewController. Inside -tableView:didSelectRowAtIndexPath: we need to create the next level of detail and pass it some information. That next level is our FoodViewController, which we will create in the next step. For now, though, we will assume it is completed and use a convenience constructor we will create later.
We first create a string that will be used to get the image for the next level of detail. However, we can't just use the name from the names array; we have to add the extension before UIImage will load the image for which we are looking.
So, we use the NSString method +stringWithFormat: passing@%@%@, to return the name from the array, and the extension we want to use, in this case @".png". The %@ token for the first argument is used to denote that an object goes in that position. Since we are passing NSStrings for both positions, this has the effect of concatenating the strings together, which is precisely what we are after.
WHAT DO THE @%@%@ SYMBOLS MEAN?
The answer to that is out of the scope of this book. If you really want to know the meaning of the %@ symbols, though, consider this. In format strings, @'%' character announces a placeholder for a value, with the characters that follow determining the kind of value expected, and how to format it. For example, a format string of "%d houses" expects an integer value to be substituted for the format expression '%d'. NSString supports the format characters defined for the ANSI C function print(f), plus '@' for any object. If the object responds to the description withLocale: message, NSString sends that message to retrieve the text representation; otherwise, it sends a description message.
Next, we pass the string we made to the convenience constructor for the FoodViewController we want to make. Once we have called the convenience constructor we push the new FoodViewController onto the navigation stack, and we ask this push to be animated. Finally, as before, we deselect the row and set animated: YES, thereby finishing the delegate methods for FoodTableViewController.
- (NSInteger)tableView:(UITableView *)tableView didSelectRowAtIndexPath:(NSIndexPath *)indexPath { NSString *text = [NSString stringWithFormat:@"%@%@", [names objectAtIndex:[indexPath row]], @".png"]; FoodViewController* retController = [FoodTableControllerfoodViewControllerWithImageNamed:text]; [[self navigationController] pushViewController:retController animated:YES]; }
The FoodViewController is still missing. This is the last piece of the application and the class handling the highest level of detail in our navigation-based app. When adding the new file for the FoodViewController, be sure to uncheck the "UITableViewController subclass" checkbox on the file template chooser, as shown in Figure 8-11. Instead, we are going to use a simple view to show the food when the view controller is loaded.

Open the FoodViewController.h header file. We first want to add a few fields that should be pretty straightforward by now. Add a UIImageView* field and an NSString* field, and name these fields imageView and imageName, respectively. The UIImageView will be an IBOutlet to which we will link later. This image view will display the image of the food the user has selected. The NSString field will hold onto the desired image name until it is needed. We will make properties for both of these fields. Make sure to put "IBOutlet" in front of the UIImageView.
Another task that we must handle is to declare the convenience constructor. This class method takes a single NSString argument, as shown here:
//
//  FoodViewController.h
#import <UIKit/UIKit.h>

@interface FoodViewController : UIViewController
{
        UIImageView* imageView;
        NSString* imageName;
}
+ (FoodViewController*) foodViewControllerWithImageNamed:(NSString*)name;

@property (nonatomic, assign) IBOutlet UIImageView* imageView;
@property (nonatomic, copy) NSString* imageName;
@endThere are only two things we need to do in the FoodViewController implementation file: create the convenience constructor, and load an image for when the view loads.
Let's start with the constructor. Just like before, we start by creating a directive with the name of the nib called FoodViewControllerNibName, with the appropriate nib name. Next, we need to make sure we have all of our properties synthesized. Copying and pasting the method signature should get us started on our convenience constructor.
The first line in the convenience constructor creates the FoodViewController instance that we will return, passing the directive to -initWithNibName:bundle. The image name is then set through a "property method call," a sub-routine that helps manage resources efficiently. Finally, the newly created instance is sent an autorelease message, and the result from that message is returned.
//
//  FoodViewController.m

#import "FoodViewController.h"

#define FoodViewControllerNibName
@"FoodViewController"

@implementation FoodViewController

@synthesize imageView;
@synthesize imageName;

+ (FoodViewController*) foodViewControllerWithImageNamed:(NSString*)name
{
        FoodViewController* retController = [[FoodViewController alloc]
 initWithNibName:FoodViewControllerNibName bundle:nil];
        [retController setImageName:name];
        return [retController autorelease];
}The last bit of code we need is to override -viewDidLoad in FoodViewController.m. All we need to do is add a few lines of code. The image for the UIImageView outlet that was created in the header needs a photo to display. So we simply create a UIImage with the class method call of +imageNamed. This creates an image with the data from the file with the passed name. Setting this image on the UIImageView will make it visible. We also don't need imageName anymore, now that the image has been loaded, so we release it.
- (void) viewDidLoad
{
[imageView setImage:[UIImage imageNamed:imageName]];
[imageName release];
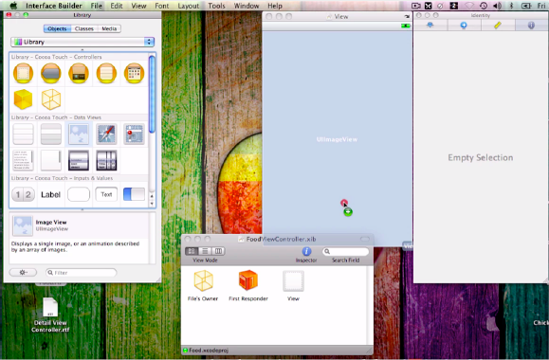
}Finally, open the FoodViewController.xib file, as shown in Figure 8-12, for we have some familiar moves to arrange our view.
Drag a UIImageView onto the View, as indicated in Figure 8-13, and resize it to occupy the entire space. Right-click and drag from the File's Owner icon to the new UIImageView, as in Figure 8-14. Then, connect the imageView outlet, as shown in Figure 8-15.


Our food-browsing app is done! But what good is an app with no icon? The icon draws the user to run your app, to buy your app. It is the user's first and last impression of your app. With this in mind, let's set an icon for this project.
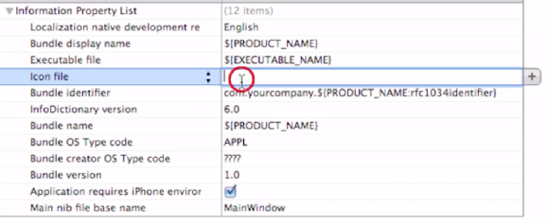
The icon, a .png image of 52 × 52 pixels, has already been added to our arsenal of images in the "Resources" folder. So, open the Food Info.plist file and set the Icon File entry to the name you wish to use as an icon. Refer to Figure 8-16.
By the way, the extension, usually .png, does not need to be included in the name.
Congratulations! You are finished with Chapter 8's exercise!
So let's test-drive it. Running the "Food" application allows the user to select categories of dishes, to scan specific dishes in a category, and to view a picture of the dish, in all its mouth-watering glory. Figures 8-17 through 8-20 show the sequence from the menus to viewing a selected entree.
With the power of UIKit, specifically UINavigationController, the drill-down navigation interface is provided with virtually no code on our part. The folks at Apple built UIKit with a lot of helpful classes and pieces of code that significantly reduce the amount of work required to produce a powerful and polished application in a short period of time.
Nice going!


Two general concepts caught my fancy as good destinations for our end-of-chapter detour this time around. The first topic, memory management, is obviously a central and important aspect of computers and programming, and I hope you find this piece edifying. The second topic, reuse identifiers, is at first obscure and odd, but I think you'll see that it's a sort of table space recycling.
Why do we want to release the imageName object when we are done using it? How many objects can we make? What do I do if I don't want an object anymore? Memory management on the iPhone and iPad is a critical and challenging issue. The iPhone is a very small device compared to your average desktop computer. This makes the available memory on an iPhone comparably small, and we must take every step we can to make sure we use as little memory as possible. The iPad has considerably more memory than the iPhone, but memory management is still crucial. There are three concepts in the arena of memory management that I want you to wrap your brain around: retain, release, and autorelease.
Imagine if you will a piece of paper in a busy restaurant. One of the chefs walks over to the paper and jots something down, something he needs to know. Before he leaves, however, he adds this line to the top of the note: "Don't throw this away. I need it!" Several other chefs and kitchen staff walk by and also write things down on this piece of paper, and they add their own requests to keep the important piece of paper. Through the course of the day and evening, these busy people return and, one by one, scratch off their notes and requests. Finally, the last chef comes by and scratches off her particular line of notes. She notices that no one claims to need the paper anymore, and she proceeds to throw the paper away.
This is exactly how retain and release work. Retain tells an object: "Hey, stick around, I still need you for something." Release tells an object: "I don't need you anymore." The retain and release mechanisms create a count that is increased and decreased, respectively, depending on an object's ongoing usefulness. This official count is called the retain count. It keeps track of how many things need the object to stick around. In the example above, the retain count would be the total number of signatures on the paper. When an object's retain count reaches zero—meaning that no one needs that object anymore—the object is deallocated; that is, thrown away.
Those are the basics of memory management on the iPhone and iPad. Is that all? Well, not quite. We also need to understand what kinds of conventions are in place for memory management in Objective-C. Fortunately, these are pretty easy and, if you follow them, they will never steer you wrong. The first rule is that methods containing any of the following terms are "owning" references: alloc, init, copy, new. Methods containing any of those words return an object with a retain count of +1. This means that YOU (that's right, you!) are responsible for calling release on that object when you are done with it, to reduce the object's retain count back to zero. Any method that does not contain any of those words is an autoreleased object, so you do not need to track its retain count or worry about it. In fact, you should never attempt to release an autoreleased object returned from such a method unless you first send it a retain message.
Autorelease works by releasing objects at some time in the future. Let's say you just called alloc/init on an object, but you aren't sure how long you need to hold onto this object. As I just explained, these commands are owning references and, therefore, it is your job to signal their release. Because you often aren't sure of how long to hold on, you instead send this object an autorelease message. This makes sure that release is eventually called on this object, but you can still use it for a short period of time. Exactly how long depends on many things. If you know you need the object for an extended period, you should really retain it instead.
We are not out of the woods quite yet. There are some other conventions about modifying an object's retain count that we haven't yet covered. Most containers (all Cocoa containers, at any rate) retain their contents. Any methods with the words "add," "remove," or "set" typically change the retain count of the objects that are sent to them. For example, the -addObject: method of NSMutableArray retains the object passed as an argument. This means that if we don't need the object around anymore, we want to send that object a release method to relinquish ownership. If you've been keeping up, you will know that the object added to the array will still stick around since it started with a 1 retain count, was added to the array for a retain count of 2, and then we released it, returning its retain count to 1.
See? Memory management isn't that bad! A few simple rules and you're golden. Remember: alloc/init/copy/new in methods return owning references and require a release when you are done using the object. Methods without alloc/init/copy/new return autoreleased objects, and this means they will be discarded sometime in the future. If you need to use an autoreleased object for a long time, make sure to retain (and subsequently release) that object. On that note, remember to retain autoreleased objects when you are creating your own methods.
A reuse identifier lets the table view reuse old cells without having to make more. It's a clever technique used by efficiency-minded programmers that makes table views fast and easy to use. And, yes, it is digital recycling!
Once we have a viable cell, we need to change its text label. We grab the text that will be used from our "categories" array, since that array holds the text we want to display. We call objectAtIndex: to access our array, passing it [indexPath row] for the index. This gets the object that we need for the row in the table (that the table view is trying to display). We then set the cell's Text Label text to the text we got from the "categories" array, and then we return the cell to be displayed.
Yes, I know, it's a whirlwind of variables, exchanges, counts, and releases. You'll catch on, though. Remember: this is just a quick tour—a bit of dessert after a tasty chapter!