Before examining specific pieces of code and the way we will create the apps set forth in this chapter, we need to spend a moment assessing our approach. We will be going through the material in this chapter a little differently than in the previous chapters.
I have included short bursts of information about each step, but without the details of the previous instructions. You will see many similarities between the functions and methods we are going to use in this next program and ones we utilized previously. If you need to go back and look at the detailed instructions, that is perfectly OK. It is for the sake of streamlining and saving space that I am giving fewer detailed instructions on the oft-repeated steps.
Another difference is that, after you have completed the upcoming program, we will do a code review. This section will appear after each major example throughout the remainder of the book, and we will call it "Digging the Code." In these reviews, we will go over some of the code we have written, and I will reference familiar code and explain processes in more detail. Here, I will begin to introduce you to more technical terms that you will use in future chapters and in correspondence with other programmers.
Consider this analogy: Thus far, I have taught you how to get into a car, turn the ignition, press on the accelerator, and steer as you move forward. In this chapter, I will guide you with similar directions, but in a different model of automobile on the way to a new destination–with fewer detailed instructions. After we get to our destination, I will open the hood and show you how, when you pressed the accelerator, it pumped gasoline into the engine, or how, when you pressed the brakes, it activated the disc brakes. By Chapter 8, we will go into the amount of gasoline being squirted into the pistons by the carburetors, and we will discuss how the brake pads heat up when going at a particular speed, and so on. Guess what–you'll be able to handle it!
So let's get on with the next application. Be ready to go back with me to review lines of your input as we focus on certain portions of the code, and as we look at how it all works together.
As indicated in Chapter 3, we will now embark on a journey in which we will explore the four categories of iPhone and iPad apps, abbreviated as INDIO: Interaction, Navigation, Data, and I/O. Our fourth example is very similar to the elementary "Hello World!" programs we have been creating so far, except that it shows how to do something that is not as intuitive as it may seem at first glance–how to handle buttons and graphics.
One of the ways I make sure I learn the names of all my students is to have them include photographs of themselves in one of the exercises. The students are told they must paste the pictures as the background to a simple "Hello World!" app. Invariably, they all think this is far too easy for them. It turns out that not only is there a struggle with sizing and placing the images on their apps, but then they also hide their code with the picture once they have it on there.
In this project, I have created a picture just as I ask my students to do, and I have placed it as a type of wallpaper. So when they place their faces in the appropriate spot, their photographs say "Hello" to me and tell me who they are. This exercise goes step by step through this process so that you can do the same thing with your photo. It will get a little tricky at times, so follow along carefully. Try not to fall into the trap of thinking that you can skip steps because you've already practiced on a significant portion of the initial code.
Take a deep breath, relax, and go through each step. You will learn some valuable tools in this exercise. Everything you need is right here in this book: screenshots and step-by-step instructions. I want to remind you that all the screenshots are directly from my screencast, available at:
http://www.rorylewis.com/docs/02_iPad_iPhone/06_iphone_Movies/002_helloWorld_002.htm |
As always, let's start with a clean, uncluttered desktop. Close all programs using the Command + Tab and Command + Q shortcuts until only the Finder remains open.
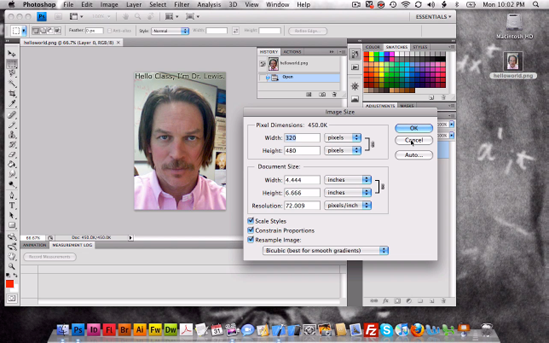
You will see that I have created a picture of myself to use as an example in this app. So, whenever you see my photo in the book, you will want to see a photo of yourself there. Use any program you want to create an image that is 320 pixels in width by 480 pixels in height. If it is not exactly in conformity with the size as depicted in Figure 4-1, your iPhone may give you all kinds of zany effects, including not displaying the image at all. For good practice, just accept that you need to keep full images sized to 320 × 480. Later, when we have bars on the top, it will all change. For now, let's get 320 × 480 into your brain.
As you can see in the screenshot, I have used Photoshop. You can copy all the parameters exactly from Figure 4-1 to help make sure that your photo will fit correctly into your app. Save the picture to your desktop as a
.pngfile namedhelloworld.png. We do this because iPhones talk to.pngfiles–not to.jpgor anything else. Don't question it. Just accept it. You need to use a program that can create, edit, and save.pngfiles.If you do not have Photoshop, or a similarly powerful editing application, and you plan to program iPhones/iPads with graphics, I strongly suggest that you invest in a copy. Once your image is created and saved to your desktop, quit Photoshop (or equivalent). At this point, you should have a beautiful, empty desktop, except for the image.
Let's start by opening a View-based Application in Xcode. Open Xcode, and then enter

Save your View-based Application to the desktop as
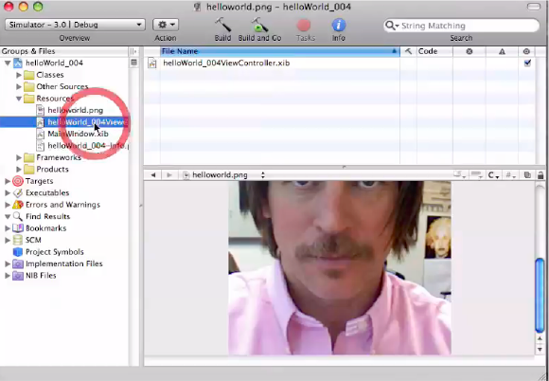
helloWorld_004. See Figure 4-3.As shown in Figure 4-4, once you save your project to your desktop, Xcode instantiates a project named
helloWorld_004, as indicated by the name on the top of the window. (If you're not already familiar with the term instantiate, see "Digging the Code" at the end of this chapter.) By clicking on the root file of yourhelloWorld_004, you can see theplistfile, theAppDelegatefiles, and theViewControllerfiles. These files are going to be your friends, and, as we move through each new example, you we will get to know them better and better.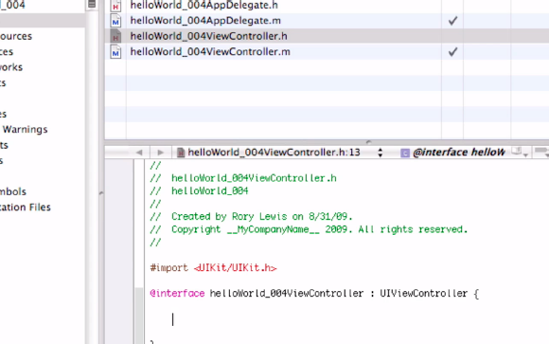
Figure 4.4. This is the view of your helloWorld_004ViewController file before you've entered your new code.
Looking at the files, we see that some end with
.hand others end with.m. The.mrepresents implementation files, and the.hrepresents header files. At this point, you should know that header files contain classes, types, functions, and constant declarations. In contrast, implementation files contain the lines that use already coded material we have declared. In this exercise we'll be using the.hfiles. This is enough for now, so let's move on to the next step.Just as we did back in the very first exercise, after opening the interface file, let's scroll down past
#import <UIKit/UIKit.h>, which is the command that imports the UIKit framework. Keep scrolling, past@interface helloWorld_004ViewController : UIViewController {and then hit Return to make space for the code that you will enter in the next step.
As before, add onto the line that is below the open bracket (the
{character) the following command:IBOutlet UILabel *label;
This adds an Outlet to a label, just as we did in previous examples. Do not forget the semicolon (;) at the end of the line, as this tells the compiler you're done talking to it for the moment.
We now need to add an action to a button. Enter the close bracket (
}) and write the following:- (IBAction)hello:(id)sendr;
Make sure to put the semicolon at the end of this line. In the following code, you see what your file should look like.
// // helloWorld_004ViewController.h // helloWorld_004 // // Created by Rory Lewis on 6/13/09. // Copyright __MyCompanyName__ 2009. All rights reserved. // #import <UIKit/UIKit.h> @interface helloWorld_004ViewController : UIViewController { IBOutlet UILabel *label; }- (IBAction)hello:(id)sendr;@endAfter selecting the line
- (IBAction)hello:(id)sendr;copy it by highlighting and using the shortcut

Save your file by entering

Now that we have set up our header file, we want to move to our implementation file:
helloWorld_004ViewController.m. This file manages how your code interacts with the display. Open this file, scroll down past the green comment lines, and insert the line that you just copied, by clicking in the correct location and using the shortcut
#import "helloWorld_004ViewController.h"

@implementation helloWorld_004ViewController
*** THIS IS WHERE YOU PASTE ***
Delete the semicolon at the end of the line you just pasted and replace it with an open bracket as shown in Figure 4-6.
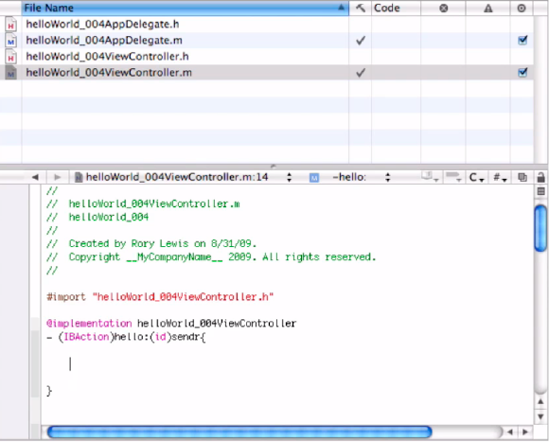
Figure 4.6. This is the implementation file after you insert the copied line of code and enter an open bracket "{" in place of the deleted semicolon.
#import "helloWorld_004ViewController.h"

@implementation helloWorld_004ViewController
- (IBAction)hello:(id)sendr{
After you delete the semicolon and replace it with an open bracket, go to the next line and enter this code
label.text = @"OK I'm repeating myself!";
followed by a close bracket on the line below that. Refer to Figure 4-7.

Figure 4.7. Enter the command that will generate the text "OK I'm repeating myself!" Then, save your file by using the indicated shortcut.
#import "helloWorld_004ViewController.h"

@implementation helloWorld_004ViewController
- (IBAction)hello:(id)sendr{
label.text = @"OK I'm repeating myself!";
}
Now, save your work on this interface file (
Click the
Resourcesfolder. I want you to activate it so that you can save your image file there. See Figure 4-8.Locate your
helloworld.pngimage on your desktop and drag it into the Resources folder. I'd like you to get into the habit of saving your images here. It's a good habit that will help you to stay organized. Later on, if you begin working with huge, image-driven files, you may want to create your ownImagesfolder. For now, drop your images into theResourcesfolder.Check the box that states: "Copy items into your destination group's folder." Doing so ensures that even if you change the location of your folder or delete the image, this image will still appear in your application file because Xcode has made a copy of it in your
Resourcesfolder.For example, right now you have the image stored on your desktop. If you delete it from there, or send this folder to the Internet or an iPhone, without checking this box, then it will not be a part of your program. Checking this box guarantees that the
helloworld.pngyou're putting into theResourcesfolder will be wherever the program is. To complete this step, click the Add button or hit your Return key.Once you have opened the
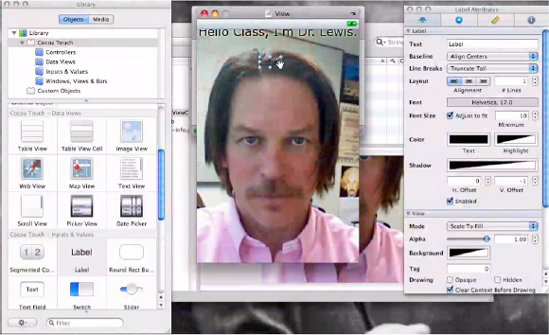
Resourcesfolder, double-click on the nib file, as shown in Figure 4-9. As you know already, this is the file that ends with.xib–specifically thehelloWorld_004ViewController.xibfile–and opening a nib file automatically opens up Interface Builder, which is how and where we visually control our app. We want to do this because it's time to connect pictures, buttons, and labels to the code you've been writing.We need to have some wallpaper of your image that lies underneath all the buttons and labels we will be including in our app. This means that we need a place where the image can reside. In Interface Builder, you can place images on the Image Views. Scroll down in your Library until you see the Image View icon. Drag one onto your View frame, as shown in Figure 4-10.
We want to connect your
helloworld.pngto your image view so that it will appear. The way that you do this is go to the Information tab of the File Attributes window, open the drop-down window, and select your saved image.We need to make sure that your image,
helloworld.png, appears in your View frame. If the image that you prepared earlier doesn't display properly, you need to stop right now and carefully go through all these steps again.If there is a problem at this point, potential reasons might be that the image file was not properly saved into your Resources folder, or that it was not saved in the proper format, as a
.pngfile.Go back to your Library, scroll down to the Label icon, and drag it onto your image. You can place it anywhere you like. I chose to place it on my head. See Figure 4-11.
Just as we did in previous exercises, we want to remove the default label. So delete the text that's already there. Also, go to the color box and give it a click; we want to change it to a different color. See Figure 4-12.

Figure 4.12. Remove the default text inside the Text field, which is at the top of the Label Attributes frame, and then insert "OK I'm repeating myself!"
You can change the color of the text inside the label to any color you want. I chose to change mine to white because my hair is brown. If your hair is blonde, for instance, you may want to select a darker color for contrast.
We want to expand the label to be of sufficient size to hold our text. Drag one of the dots (size indicators) on the label to get to a size you believe will hold the text, which in my case is "OK I'm repeating myself!"
As shown in Figure 4-13, we now need to drag a button onto the view. When a user presses the button, it will display the label.
As shown in Figure 4-14, we also want to change the button's default text. On the Button Attributes tab, change the text in the Title field to "Press Me."
On the Attributes frame, you can also adjust the transparency so that we can partially see through the button. Go to the bottom of the window and change the Alpha slider to a level that looks right to you. This effect is illustrated in Figure 4-15.
With both the button and label selected, line them up by choosing a Placement option at the bottom of the View Size frame.
Next, hold down the

As shown in Figure 4-17, establish the connection between the File's Owner and the Label by choosing from the drop-down menu.
Now, hold down the
Finally, enter


Congratulations! You have integrated user/programmer interaction with some cool graphics. You've also been able to get through this with fewer instructions from me.
Well Done!

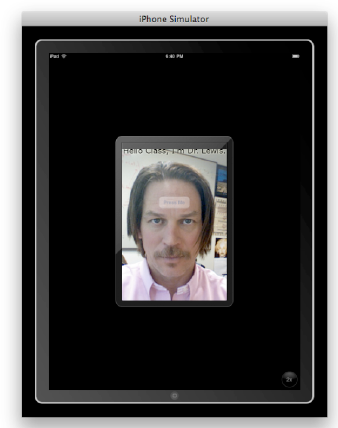

Figure 4.21. Here is the iPad Simulator in full (2x) view mode - before the button gets pressed. The "1x" button at the lower-right will change the view to the one in Figure 4-20.
In this new section of the chapter, we will be examining several concepts that have been mentioned but that are probably still shrouded in some degree of mystery. This is an opportunity to read along without definitive understanding. I hereby give you permission to partially "get it." Of course, if you happen to attain full comprehension of the subject matter in all its details, let me be the first to commend you. Meanwhile, see if holding on more loosely doesn't, in fact, give you a firmer grasp on the big picture.
These "items" are basically all the same thing, but different people refer to them in different ways. At a recent conference in Denver, "360iDev for iPhone Developers," it was interesting to hear how so many presenters referred to .xib files as "nibs" or "zibs." Most programmers prefer to say "nib" files. No matter how we refer to them, it's important for us to understand what's going on with these files. What are they? Do we need them? Do you need to know how they work?
Do you recall, from step 16, how we opened Interface Builder? That's right - it happened automatically when you clicked on a nib file. Once it opened, you saw that the file contained all the code associated with our buttons and images, and that, in fact, this information is stored there. That way, when you run the app, all the objects and all the links associated with the objects are integrated properly, and they can then "magically" come together and give the user the experience that you envisioned.
It turns out that nib files, when examined at the level of Cocoa or Objective-C, contain all the information necessary to activate the UI files, transforming these into a graphical iPhone or iPad work of art. It's also possible to join separate nib files together to create more complex interactions, and you'll see this in the next chapter.
All the information that resides in these files is put there so that it can create an instance of the buttons, the labels, the pictures, and so forth that you've entered. This collection of commands is plonked down and saved into your nib files to become the UI. The code and the commands taken together become real, and they are sensed by the user - seen or heard, or even felt.
We sometimes use the term instantiate in a similar fashion. For example, when you first save a new project, the computer instantiates - makes real and shows you the evidence for - a project entity by virtue of assigning it a body of subfiles, as it were. In helloWorld_004, you saw how the project was instantly given "arms and legs" ... two AppDelegate files and two ViewController files.
We say we've "created an instance of" something when we've told the computer how and when to grab some memory and set it aside for some particular process or collection of processes such that, when the parameters are all met, the user has an experience of this data (i.e., whatever was assigned in memory). Sometimes we refer to these collections or files of descriptions and commands as classes, methods, or objects. In this code-digging session, these terms might seem to run together and appear as synonyms, but this is not the case. As you read on, you will come to understand each term as a distinct coding tool or apparatus, each to be employed in a particular situation, relating to other entities in a grammatically correct way.
When we say that you created an instance of the buttons and labels in your nib file, what we're really saying is that, when you run your code, a specific portion of your computer's memory, known by its address, will take care of things in order to generate the UI - the user experience - you have designed. Each time your application is launched on an iPhone or iPad, the interface is recreated by the orchestrated commands residing in your nib files.
Consider the nib file associated with the action depicted in Figure 4-13. You dragged a button from the Library into the View window, and thus you created an instance of this button. If somebody were to ask you what that means, you might look them in the eye, with a piercing and enigmatic look, and say, "By creating an instance of this button, I have instructed the computer to set aside memory in the appropriate .xib file, which, upon the launching of my app, will appear and interact with the user, precisely as I have intended."
The next concept I would like to explore a little more deeply is that of methods. As I did with nibs, I am only going to give you a high-level look at this time. You've already used methods pretty extensively, so I'm simply going to tell you what you did.
Looking at Figures 4-18 through 4-21, recall how you
Looking way back to step 7, I want you to understand that when you copied and pasted the command
- (IBAction)hello:(id)sendr;
you were instructing the computer to associate an action with a button. The first symbol in this piece of code is a minus sign (−). It means that IBAction is something we call an instance method. On the other hand, if you had entered a plus sign (+) there, as in + (IBAction), we would have called it a class method. One symbol announces (to the processor) an instance, while another symbol announces a class. What these two statements have in common, though, is the method: IBAction. Furthermore, just by the name alone, we see that this is an action that will be performed in Interface Builder.
Meanwhile, let's look at what we know about instances. Back in step 9, I remarked that we had finished our work on the header file, and that it was time to work on the implementation file, helloWorld_004ViewController.m. This is the file that manages the code, and that is why you were instructed to open it. I had you insert a line of code in this (.m) file by virtue of copying and pasting from the header file: - (IBAction)hello:(id)sendr;
#import "helloWorld_004ViewController.h"

@implementation helloWorld_004ViewController
- (IBAction)hello:(id)sendr;
@end
You deleted the semicolon at the end of that line and replaced it with an open bracket ({). The important issue here is that the (.m) file then contained the commands for the object, and that these go in between the "@implementation" section and the final "@end" command. Our method then appeared like this:
#import "helloWorld_004ViewController.h"

@implementation helloWorld_004ViewController
- (IBAction)hello:(id)sendr{

}

@end
But wait - I really haven't explained the term method yet. OK, see if this helps. Methods are the packets of code that the computer executes when a particular input is received and must be processed–such as the pressing of a button.
Consider this analogy: a programmer says, "Here comes an app that will assist you in drawing a nice, pretty house." That is a header type of announcement. Then, the programmer enters specific instructions for how the house will be constructed, how it will sit on/against the landscape, what kind of weather is in the background, and so on. "Draw a slightly curving horizon line one third from the bottom of the display, and midway on this place a rectangle that is 4 × 7, on top of which is a trapezoid with a base length of ...," and so on. These specific, how-to instructions belong in the implementation file, for they describe the actual actions - the method - of drawing the house.
So, to connect your button to a method named "hello," you added this code:
- (IBAction)hello:(id)sendr;
This created an instance of your hello method. Then, you created a place in memory to execute the code inside your hello method.
To summarize:
You first dragged a button from the Library into the document window and created an instance of that button.
You then
The moment you entered the code
- (IBAction)hello:(id)sendr;you created this "hello" instance method:The (
-) means thatIBActionis an instance method.(IBAction)is the returned type.hellois the method name.(id)is the argument typesendris the argument name
That's all we'll do with methods for now. We'll be repeating these steps of creating and using methods in the chapters ahead, and as you practice, the concept will become clearer and clearer.