In this chapter, we'll be tackling our ninth programming exercise together. This app will be one of your first to include an advanced feature of iPhone and iPad apps: the ability to drag, rotate, and scale objects on the screen with your fingers. This is just one of the unique features of the iPhone and iPad that have contributed to their phenomenal success.
The ability to interact directly with items on the screen–in an easy and intuitive way–is very important for your application. Capitalizing on this integral feature, by accommodating these natural actions, is what we're after in this chapter. We will consider these interactions from the underside of the application–in the same way that mechanics raise a car off the ground hydraulically to gain fuller access to the engine and transmission. After we tune the car up and activate these bells and whistles according to our design, and hand the customer the keys to his shiny new car, he will have no choice but to get in and say "Aaah, this multi-touch transmission is so fine–so smooth!" We, as developers and programmers, must know how to generate these capabilities ... and experiences–at the source. So how do these components work?
The simple answer is mathematics; the complex answer is trigonometry. Matrix math and transforms make this kind of object and image manipulation possible. Now that you're on the verge of becoming an advanced iPhone and iPad programmer, you're in full geekdom at this point, and you can cope with looking deep inside the machine. Breathe it in. Embrace it!
Let's take a look at some of the guts of the iPhone OS, then, and get started. Our first consideration is "multi-touch." What does that mean? Why is it such a big deal?
Note
As I move through the chapter, I sometimes seem to be referring only to the iPhone, but be aware that I include the iPad by implication – just as I include the iPod touch.
Back in the early days of hand-held computing, a person would use a plastic pen-like object called a stylus to interact with the device. This stylus was somewhat bothersome and tended to rebel, occasionally going on strike or getting lost. Runaway styluses were epidemic!
Well, the innovation of the multi-touch screen made this accessory obsolete. Multi-touch rendered the stylus irrelevant, for this super-sensitive surface tracks the touch of one's fingers, which, thankfully, tend to stay close at hand! OK, so that's the origin of the "touch" part of the name. What about the prefix, "multi-"? That is pretty straightforward, too, for humans generally have ten fingers, or digits. Although people tend to use only one at a time for pointing, some clever engineers realized that we could create or represent a host of new actions if we would just consider using some of those other fingers as well.
Thus, Multi-Touch was the term given to this platform (now patented), implying that a combination of simultaneous inputs is possible–and maybe also desirable. This immediately expanded the palette of choices, allowing for complex gestures and subtle interfacing. This was a big deal–and it still is a big deal!
The ingenuity and flexibility of this sexy, lightweight device–a tool that can be directed so quickly and intuitively with one's fingers–caught on, as you know, even before it hit the shelves. Multi-Touch is only one of the reasons that the iPhone and iPad are so popular, but it is our focus for this chapter.
Some of you are probably thinking, "Nice history lesson - but what's your point?" Basically, that it's OK to be excited about our work, and to acknowledge how cool it is. The hardware for which we are creating our apps is radical and magical, and I want you to harness your excitement and wonder, and live up to this standard. I'm here to help you translate that into something astounding and new–something your users have not imagined yet.
The first step toward this creative challenge is to interpret your users' input and decode their gestures. Of course, to do this elegantly, you need to understand how Multi-Touch input works. In this chapter, we will tell the iPhone and iPad processors what to do when the user pinches, or swipes, or taps the screen. Only upon understanding the input conventions can you begin to speak the touch-based language of your users.
As I mentioned in Chapter 3, the programming exercises in Chapters 7–9 are designed to continue the trend of advancement over the material in the earlier chapters. As with previous chapters, we have made available supplemental videos for these exercises, but you can program all of these apps without referring to the screencasts.
However, because the apps in these final three chapters are considerably more complex than earlier examples, you may want to audit some of them to give yourself some extra perspective. If you do check these out, you will see me, or a teaching assistant, zooming along at a pretty good clip. Don't hesitate to pause, stop, or rewind as many times as you need to in order to become comfortable with the coding sequences.
Something else to be aware of is that in the screencasts we use a lot of boilerplate code. We just paste the ready-made components directly into the apps in progress. But here, in the book, we go line by line through all of the code. So, check out the screencasts ... and then set aside a big block of time to go through this app, step by step.
When you're done, try to build it on your own. Then keep on doing it, again and again, until you don't have to make a single reference to the book. You'll find the screencast at http://www.rorylewis.com/docs/02_iPad_iPhone/06_iphone_Movies/009_Drag%20and%20Rotate.htm
As you did in Chapter 6, please download and extract images and code for this chapter. If you need refreshing on how to do this, review Figures 6-2 thru 6-4. As usual, start off with a spotlessly clean desktop. Then, open a browser and navigate to http://rorylewis.com/xCode/009_DragRotateAndScale.zip and download its contents to your desktop. Then, extract the files onto your desktop.
There will be four text files, one image file, and a folder containing the final working code for DragRotateAndScale (in the event you encounter trouble coding it yourself). The image file is the image I used in the example—of my puppy Shaka. The text files consist of sections of boilerplate code from which I will ask you to copy and paste various pieces. You are welcome to use these files in any of your future programs that involve touches. You'll find Translate.rtf, HelperFunctions.rtf, TranslateRotateScale.rtf, and ViewController.rtf.
Once you have extracted all the files, remember to delete the 009_DragRotateAndScale.zip and 009_DragRotateAndScale folders. Also, file the DragRotateAndScale Xcode to a safe place, for if you leave it on your desktop it will be overwritten and conflict with your exercise code. Monkeys will start writing Shakespeare, and the world will collapse and disappear ... all because you did not file it away. After you follow these directions, you will have five files on your desktop.
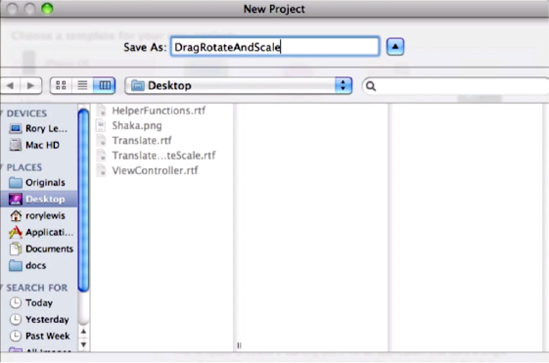
To start our DragRotateAndScale application, we need to make a new project in Xcode as we've always done. Open Xcode and select the View-based Application template item (as shown in Figure 7-1).

Make sure the Product menu is set to iPhone before continuing. Name the project DragRotateAndScale and click the Save button, as shown in Figure 7-2.
Next, choose and prepare an image file as your main object for this exercise. Choose whatever is appealing, and save it on your desktop. By the way, we have chosen a smaller image than earlier exercises have used (100 × 100 pixels), to allow for manipulating and sizing.
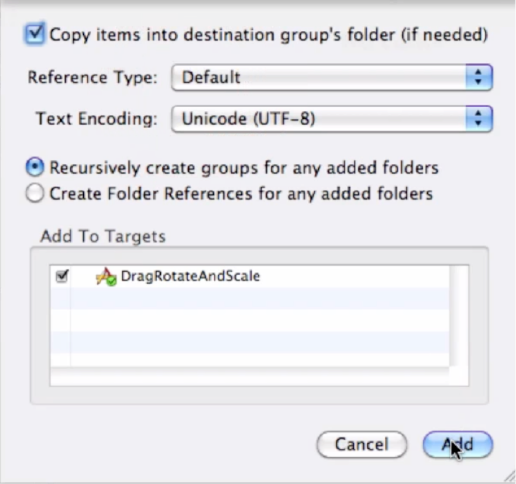
Copy the handy image file into the project's folder, as shown in Figure 7-3. Click the usual boxes and radio buttons to ensure proper management of this image file down the road.
We are going to add a new file to our project: a UIImageView subclass called TransformView. This class will intercept touch events and change their transforms accordingly. We are making TransformView a UIImageView subclass so that we can assign an image to our instance and then see it rendered on the screen. Technically, a UIView subclass can do what we want, but, for this example, we want to focus on the transforms and not worry about custom drawing code for a UIView subclass.
Creating a custom view isn't strictly necessary for this application, but we will do it anyway–to flex our subclassing muscles. The DragRotateAndScaleViewController could technically do everything we need to make this application work, without the need for a custom UIView subclass, but subclassing makes the code simpler and more robust. Thus, we select a new Objective-C class in the New File window, as shown in Figure 7-4.

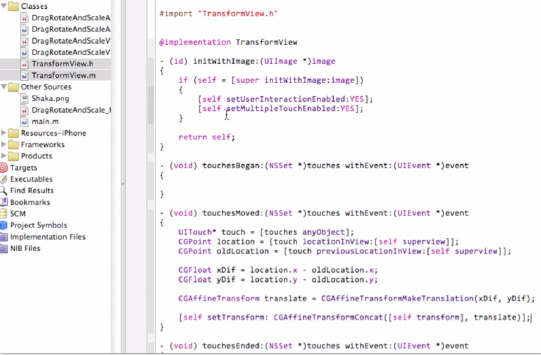
In the header file, TransformView.h, make sure the superclass–that is, the statement after the colon (:)–is specified as UIImageView. We do this so we'll be able to assign an image quickly and easily. Your header file should look like the one in Figure 7-5.
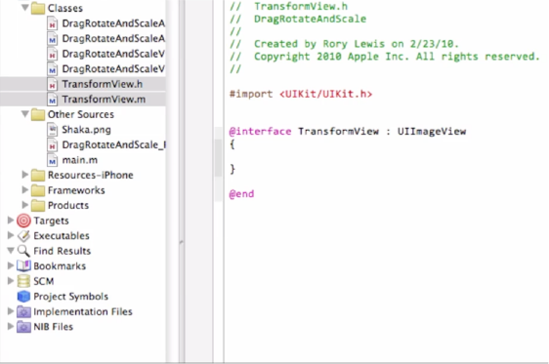
//
//  TransformView.h

#import <UIKit/UIKit.h>

@interface TransformView : UIImageView
{

}

@endFor the implementation file, TransformView.m, we want to handle the creation of our view a little differently than normal. UIImageViews do not handle touch input by default, and they therefore reject any touch input they receive. This would not serve us! We want our view to handle not only touch input, but multiple touches.
To do this, we override the method (id) initWithImage:(UIImage*)image. Inside of our override, we will insert the lines [self setUserInteractionEnabled:YES] and [self setMultipleTouchEnabled:YES]. Of course, we end each line with a semicolon.
The first line will allow our view to respond to touch events. The second will allow TransformView to receive multiple touch events, which we'll need if we're going to enable users to pinch and spread their fingers to scale and rotate. Your code should look like Figure 7-6.

//
//  TransformView.m

#import "TransformView.h"

@implementation TransformView

- (id) initWithImage:(UIImage *)image
{
        if (self = [super initWithImage:image])
        {
                [self setUserInteractionEnabled:YES];
                [self setMultipleTouchEnabled:YES];
        }

        return self;
}

@endNow we want to begin the process of creating the pieces of code that define the extent to which the users' touches affect the images and other interface parameters. To do this, we override various methods whose names literally start with the term "touches." These touches methods are called into action whenever a user touches the device, moves a touch, or stops touching the device. The four "reversal" methods we will add are these:
- (void) touchesBegan:(NSSet*)touches withEvent:(UIEvent*)event
- (void) touchesMoved:(NSSet*)touches withEvent:(UIEvent*)event
- (void) touchesEnded:(NSSet*)touches withEvent:(UIEvent*)event
- (void) touchesCancelled:(NSSet*)touches withEvent:(UIEvent*)event
Note
You can see these methods overridden as stubs in Figure 7-7. A stub is a skeleton of a boilerplate set of code made to be easily adaptable to your code as a timesaving device. In our case, pasting these four stubs is an efficient means of programming when a touch begins, moves, ends, or is canceled.
Note that touchesCancelled:withEvent: calls, or refers, to –touchesEnded:withEvent:. This is because we generally want a cancelled touch to behave as though the user had ended that touch. "Cancelled" is what we call any user input (in this case a touch) that is called off by performing the identical input; for example, a button is pushed ON, but then pushed again OFF. An "ended" touch is an intentional input that is the cessation, or stopping, of an ongoing touch, or swipe, which proceeds for more than just an instant. This distinction may not always apply, but it's a good approach for our purposes.

Note
We are not even going to attempt to have you understand every word of the touches code. It's enough to know that whenever you deal with touch-related code, and you are trying to decide which default code to keep and which to delete, you can forget your worrying and use these lines of ready-made and adaptable code known as "stubs." Do not think too much about this; just use it!
We may not end up adding details in all of our touches methods, but we want to override them all anyway. This is so that we are in complete control–so that we claim administrative ownership of the touches at all times. It is simply good practice.
//
//  TransformView.m

#import "TransformView.h"

@implementation TransformView

- (id) initWithImage:(UIImage *)image
{
        if (self = [super initWithImage:image])
        {
                [self setUserInteractionEnabled:YES];
                [self setMultipleTouchEnabled:YES];
        }

        return self;
}

- (void) touchesBegan:(NSSet *)touches withEvent:(UIEvent *)event
{

}

- (void) touchesMoved:(NSSet *)touches withEvent:(UIEvent *)event
{

}

- (void) touchesEnded:(NSSet *)touches withEvent:(UIEvent *)event
{

}

- (void) touchesCancelled:(NSSet *)touches withEvent:(UIEvent *)event
{
        [self touchesEnded:touches withEvent:event];
}
@endLet's start on the section of our code that will allow for moving the image around–in other words, the code that enables us to drag objects. This means that, for now, we are going to zero in on one line of code: -touchesMoved:withEvent:.
For the time being, the other touches methods will remain unchanged. Your touchesMoved method should look like Figure 7-8.
- (void) touchesMoved:(NSSet *)touches withEvent:(UIEvent *)event
{
                CGPoint newTouch = [[touches anyObject] locationInView:[self˜CCC
 superview]];
                CGPoint lastTouch = [[touches anyObject] previousLocationInView:[self˜CCC
 superview]];

                float xDif = newTouch.x - lastTouch.x;
                float yDif = newTouch.y - lastTouch.y;

                CGAffineTransform translate = CGAffineTransformMakeTranslation(xDif,˜CCC
 yDif);
                [self setTransform: CGAffineTransformConcat([self transform],˜CCC
 translate)];
}
Let's step through this code and see if we can determine what's really happening.
First of all, what is this CGPoint business? CGPoint is core code that has been programmed for us by the clever people at Apple; it is the part of the program in the CoreGraphics module that describes a point in 2D space, with members x and y. Finger touches by the user result in CGPoints when their location is appropriate and requested–by the nature of the application.
This information can yield the distance between the two points using some very simple math. Now, take a look at the call to [[touches anyObject] locationInView:[self superview]]. This code grabs a touch object from the NSSet of touches and requests its location in this object's superview. In other words, we are simply asking for the location of the touch in relation to the superview.
This is different than one might expect. Why are we asking about the position in the superview and not about the position in the TransformView itself? Because we want to know where to move the TransformView in the superview. Thus, we get the current and previous positions of the touch in the superview.
Note
The IPad and iPhone keep track of which view is currently being shown by treating it as a window instance. The instances are arranged in a pyramid order with the top-level view instance called the content view which is the root of all the other views, called subviews. The parent of any view to which one is attending, at a given point of time, is referred to as its superview.
The next two lines work together to calculate the difference between the old position and the new position on the x- and y-axes.
The following line creates a translation out of the position difference, storing this translation as a temporary CGAffineTransform. That's a big term, but it simply means a matrix that stores the change in position for the view. Since the "translation" matrix is relative, we have to add it to our current transform. We do this on the last line of highlighted code, concatenating (merging or combining) the view's "current" transform and the "translation" transform to get a transform that holds our new position. Once we have that new transform, we set the view's transform to the new one.
So, our TransformView is ready for its first test run. We need to make an instance somewhere and add it as a subview to something else. Our DragRotateAndScaleViewController is where this is done. Moving into the DragRotateAndScaleViewController header file, all we need to do here is import our TransformView.h file, as you can see in Figure 7-9.

//
//  DragRotateAndScaleViewController.h

#import <UIKit/UIKit.h>
#import "TransformView.h"

@interface DragRotateAndScaleViewController : UIViewController {

}

@endIn the DragRotateAndScaleViewController implementation file, we want to create a TransformView and make it visible to the user. We want to make sure the view is ready, so we perform this action in the viewDidLoad method override. Your code should come out looking like Figure 7-10.

- (void)viewDidLoad
{
    [super viewDidLoad];

        TransformView* theTouchView = [[TransformView alloc] initWithImage:[UIImage˜CCC
 imageNamed:@"Shaka.png"]];
        [theTouchView setFrame:CGRectMake(110, 180, [theTouchView frame].size.width,˜CCC
 [theTouchView frame].size.height)];
        [[self view] addSubview:theTouchView];
        [theTouchView release];
}
Let's see how close you are as you analyze these lines and predict what we are creating and defining. In the first bolded line, we begin by creating a new TransformView object, passing it a UIImage object with the name of the image we dragged in at the beginning of the process. This will call the method override we wrote earlier, allowing the TransformView to take touch input.
Next, we set the frame of the TransformView in order to position it initially within the view. The numbers were derived from the dimensions of the iPhone and the dimensions of the image, 100× 100 pixels.
The third line of code adds the TransformView as a subview to the self view, so that our TransformView will be drawn.
The last line sends a release call–for memory management purposes.
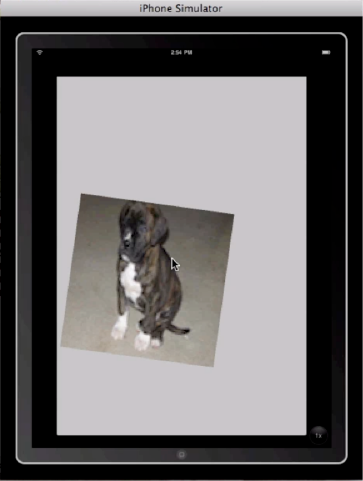
That ought to do it! We should be able to run the code at this point and be able to move the TransformView around–just by touching and dragging. Figure 7-11 shows the first step of testing the TransformView, which is to select the appropriate platform on which to simulate the app.
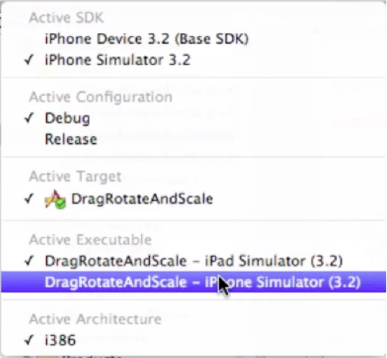
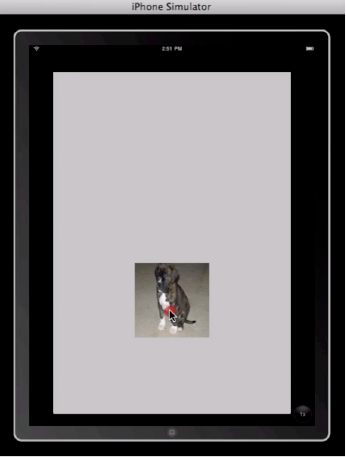
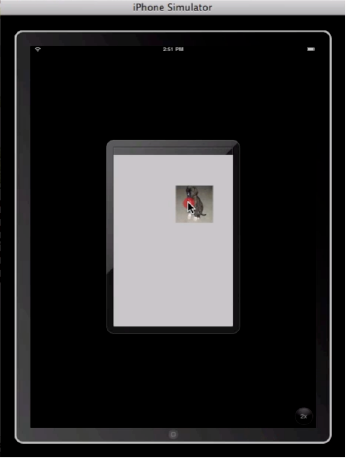
Figure 7-12 demonstrates the iPhone Simulator loaded with your single image. I need to be able to move the image – so, touch and drag your photo. Yes, this is a simple test, but Rome wasn't built in a day.

Having controlled the image with the simulated fingertip, let's switch over to the other platform. Figure 7-13 shows the frame in which to switch the executable to select the iPad Simulator. You need the TransformView to function there as well as it does on the iPhone.
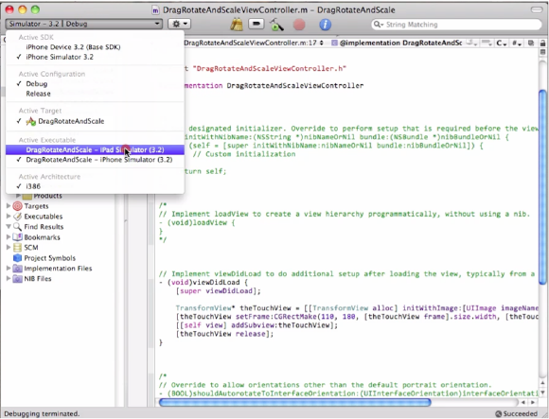
Figure 7-14 depicts the iPad Simulator in a normal view mode, which expands the relative size of the image so that it continues to occupy a proportional amount of the screen. Touch it and drag it to prove the fluency of the iPad platform.
And, because there is also an embedded iPhone view within the iPad Simulator executable, we need to test that as well. Figure 7-15 shows that option, vividly demonstrating the relative sizes of the identical image in these two modes.
Excellent–we're on a roll! Let's keep going.
Your application looks pretty cool so far, but it can be made even better by allowing the user to zoom and rotate the picture. This requires more complex computation and touch monitoring. As you already know, we must track two concurrent touches and determine their relative positions. To accomplish this, we need to modify our TransformView header file.
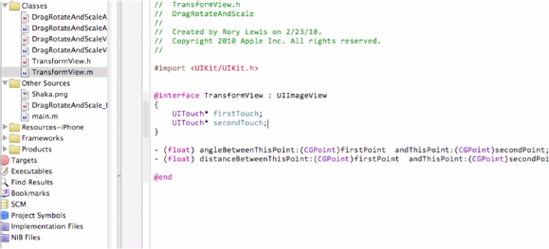
In the TransformView.h file, we are going to add two UITouch* fields: firstTouch and secondTouch. These touch objects will track the distance and angle between the touch points that fall on this view. Additionally, we will add method prototypes for the helper methods that we will be using to calculate the transform changes, as you can see in Figure 7-16.
//
//  TransformView.h

#import <UIKit/UIKit.h>

@interface TransformView : UIImageView
{
      UITouch* firstTouch;
      UITouch* secondTouch;
}

- (float) angleBetweenThisPoint:(CGPoint)firstPoint ˜CCC andThisPoint:(CGPoint)secondPoint;
- (float) distanceBetweenThisPoint:(CGPoint)firstPoint andThisPoint:˜CCC
(CGPoint)secondPoint;

@end
We declare the instance variables for the class:two UITouch objects that will be used to track the user's touch inputs. At the bottom, you will see the prototypes for the helper methods we will use to change the transform.
You might be asking, "Why even bother with passing CGPoints to the helper functions? Why not use UITouch* instead?" Because we may decide at some later date to change the way touch input is handled, potentially off-setting or changing the touch positions from their real positions (for whatever reason). That would require us to change our helper code, which is not ideal. Instead, the helper code should always function in the same manner while the calling code changes the input if needed.
Now that we have our instance variables and method prototypes, we can build out the implementation file. These helper methods could have been declared in a private interface, but that would have been overkill for this type of application.
Inside the TransformView.m file, create the helper methods as shown in Figure 7-17.
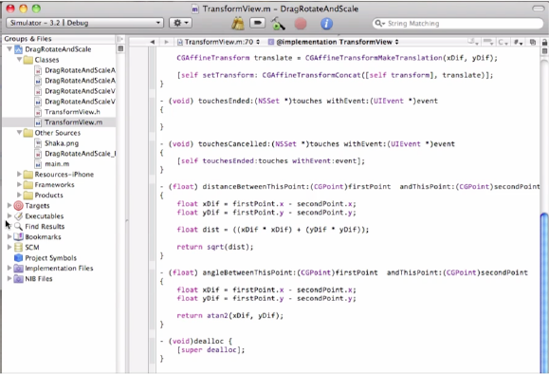
- (float) distanceBetweenThisPoint:(CGPoint)firstPoint andThisPoint:(CGPoint)secondPoint { float xDif = firstPoint.x - secondPoint.x; float yDif = firstPoint.y - secondPoint.y; float dist = ((xDif * xDif) + (yDif * yDif)); return sqrt(dist); } - (float) angleBetweenThisPoint:(CGPoint)firstPoint? andThisPoint:(CGPoint)secondPoint { float xDif = firstPoint.x - secondPoint.x; float yDif = firstPoint.y - secondPoint.y; return atan2(xDif, yDif); }
Fortunately, these "helper methods" are relatively straightforward. They simply calculate the distance and the angle in radians, respectively, between the two touches -. These will be used by our touches methods to create scaling and rotation transforms that will be applied to the TransformView.
The -distanceBetweenThisPoint:[*]andThisPoint: term finds the x and y position differences between the two points and utilizes the good old Pythagorean Theorem to calculate the straightline distance between the points.
Similarly, -angleBetweenThisPoint:[*]andThisPoint: finds the angle from the first point to the second point in relation to the x-axis, returning the result in radians.
We'll start with the easier part of this next section of our code. You will need to add some code to touchesBegan:withEvent: in order to track our touches. This looks pretty daunting, but you're beginning to operate at a pretty advanced level ... and, for some, this'll be a cakewalk.
We are still in the implementation file, TransformView.m, and we are going to rewrite our touches methods to handle multiple touches and to utilize our helper functions in order to change the transform.
- (void) touchesBegan:(NSSet *)touches withEvent:(UIEvent *)event
{
      //Single touch
      if ([touches count] == 1)
      {
        if (!firstTouch)
        {
               firstTouch = [[touches anyObject] retain];
        }
        else if (!secondTouch)
        {
              secondTouch = [[touches anyObject] retain];
        }
      }
      //Multiple touch
      if ([touches count] == 2)
      {
       NSArray* theTouches = [touches allObjects];
       [firstTouch release];
       [secondTouch release];
       firstTouch = nil;
       secondTouch = nil;
       firstTouch = [[theTouches objectAtIndex:0] retain];
       secondTouch = [[theTouches objectAtIndex:1] retain];
      }
}
All right ... see if you can tell what's happening here. First, we check to see if there is only one touch–by checking the count of touches. If there is only one touch, we direct the computer to hold onto it–in memory–for later use, in whichever field we aren't already using.
If there are two touches, we grab all of the touches from the set, release our previous touches, and set the fields to the first two touches in the array of touches. This approach gives us the two touch objects we need and it ignores any extraneous touches. Easy, huh?
Copy this code from the TranslateRotateScale.rtf file that you downloaded at the beginning of the chapter and saved to your desktop, as shown in Figure 7-18. Then, paste these lines into the implementation file.
Take a deep breath. Relax! The next chunk of code may look intimidating, but it's actually quite simple. We'll walk through it together, and you'll see exactly what's happening.
This code modifies the -touchesMoved:[*]withEvent: method, and it also utilizes our helper methods. We use the data from the touches and helper methods to create transforms that are concatenated with the current transform.
- (void) touchesMoved:(NSSet *)touches withEvent:(UIEvent *)event
{
      if ([touches count] == 1)
      {
       CGPoint newTouch = [[touches anyObject] locationInView:[self superview]];
       CGPoint lastTouch = [[touches anyObject] previousLocationInView:
       [self superview]];

       float xDif = newTouch.x - lastTouch.x;
       float yDif = newTouch.y - lastTouch.y;

       CGAffineTransform translate = CGAffineTransformMakeTranslation(xDif, yDif);
       [self setTransform: CGAffineTransformConcat([self transform], translate)];
       }
       else if ([touches count] == 2 && firstTouch && secondTouch)
       {
       //Rotate
       float newAngle = [self angleBetweenThisPoint:[firstTouch locationInView:
       [self superview]]

       andThisPoint:[secondTouch locationInView:[self superview]]];
       float oldAngle = [self angleBetweenThisPoint:
       [firstTouch previousLocationInView:[self superview]]

       andThisPoint:[secondTouch previousLocationInView:[self superview]]];

       CGAffineTransform rotation = CGAffineTransformMakeRotation(oldAngle - newAngle);

       [self setTransform: CGAffineTransformConcat([self transform], rotation)];

       //Scale
       float newDistance = [self distanceBetweenThisPoint:
       [firstTouch locationInView:[self superview]]

       andThisPoint:[secondTouch locationInView:[self superview]]];
       float oldDistance = [self distanceBetweenThisPoint:
       [firstTouch previousLocationInView:[self superview]]
       andThisPoint:[secondTouch previousLocationInView:[self superview]]];

       float ratio = newDistance / oldDistance;

       CGAffineTransform scale = CGAffineTransformMakeScale(ratio, ratio);
       [self setTransform: CGAffineTransformConcat([self transform], scale)];
       }
}
First, we direct the computer to check whether only one touch moved. If that is the case, then we call forth exactly the same code we had for translation before. It doesn't get much easier than that!
If there are two touches, however, we begin calculating the rotation and scaling transforms. The rotation calculation is started by using our helper method to find the angle between the current touch points. We follow that by finding the angle between the old touch points. A rotation transform is made by finding the difference between the two angles. This creates a relative rotation transform that, just like before, needs to be concatenated with the current transform.
Next, we calculate the appropriate scaling that needs to be done based on the position of the touches. We use our helper method to find the distance between the touch points for both the current touches and the previous touches. We then find the ratio of the new distance to the old distance. This gives us a scaling factor by which we will scale the current transform. Using this factor, we create a relative scale transform and subsequently concatenate it with the current transform.
See? I told you it wasn't that bad! You can show this code to your friends and watch their jaws punch a hole in the floor while you flash them your knowing smile.
Running this code now allows the user to drag the image with one finger or rotate and scale it with a pinch gesture, as shown in Figure 7-19 and Figure 7-20.

You're done! Check out your draggable, rotatable, and scalable custom UIImageView subclass!
So, how is this approach useful? Where should it be used and what are some things to watch for? As we discussed earlier, this is a very intuitive and friendly interface, even for users who are new to the iPhone/iPad. This approach should be considered for any application that has objects that sport lots of detail and benefit from direct user interaction.
Note
With the current code, a user can actually shrink an image so small that it cannot be pinched and spread in order to return it to a useful size. Some limit on a scaling factor should be considered for this reason. It is also possible for the user to move an image completely off the screen, so positional constraints are recommended.
We will now focus on one of the concepts I mentioned earlier only in passing: eventhandling The four lines of code that follow deal with related events and the methods by which we want the computer to deal with these events.
- (void) touchesBegan:(NSSet*)touches withEvent:(UIEvent*)event
- (void) touchesMoved:(NSSet*)touches withEvent:(UIEvent*)event
- (void) touchesEnded:(NSSet*)touches withEvent:(UIEvent*)event
- (void) touchesCancelled:(NSSet*)touches withEvent:(UIEvent*)event
In order to dig this code, we first need to remind ourselves what methods and arguments are. These four touch methods are called event-handling methods.
Explaining an event-handling method is a bit tricky because it's a very abstract tool – like using a time warp in order to advise Thomas Jefferson about drafting The Declaration of Independence on a computer. So before we talk about these four event-handling methods, let's take a close look at how a generic event-handling method works.
Suppose you hear your phone ring. You know that somebody from the outside world is calling you. Do you:
A) pick up the phone and say, "Hello?"
B) pick up the phone and say "Sorry–I need to call you back."
or ...
C) let the phone ring through to voicemail?
These are event-handling methods. You have different methods of handling a phone call, and choosing one depends on several factors: who is calling, what you are doing, how tired you are, how hungry you are, and so forth.
Bearing this analogy in mind, the lines we're examining are event-handling methods for handling a touch from the user who is operating your iPhone or iPad app. The programmers at Apple have created event-handling methods that make it easy for you to decide whether you are going to pick up the phone, answer it, and so on.
In our case though, we want to handle four different kinds of events. These touch events are events that are propagated through the responder chain. What's a responder chain? Here's another analogy.
The phone rings, but you don't want to answer it. You ask somebody (brother, sister, mother) to pick up the phone for you. What they do with the phone is totally up to them–because you gave up your chance to answer the phone. That is how the responder chain works: events come in and objects can either handle the events (answer the phone yourself) or continue to pass the event down the responder chain (tell someone else to pick up the phone).
Along these same lines you may see the term first responder in Interface Builder or some of the Apple documentation. This is the first object in the responder chain, and the first responder always gets the first opportunity with generated events. In the phone example, you would be the first responder, since you were given the opportunity to handle the phone call first. Most controls without targets (such as a button that does not have its target set) send their actions to the first responder by default.
When a touch is placed on the device, the window uses "hit testing" to determine which view the touch was in and then passes the touch event information down the responder chain. If a view's userInteractionEnabled property is set to NO, the event will continue down the responder chain until a view is able to handle that event. A touch and its associated view are linked for the lifetime of the touch. This means that, even if the touch moves off the view that received the touch initially, that view is still in charge of that touch and no other views will receive touch information about that touch ... no matter where it moves.
The generated events hold information on the touches that triggered them, as well as a timestamp, the event's type, and the event's subtype, all of which can be accessed through corresponding properties.
New to iPhone OS 3.0 are motion events that are triggered similarly to touch events. They are targeted events that default to the first responder. The event object for a motion may have its subtype set to UIEventTypeMotionShake, which provides an easy way to detect shake events. The types and subtypes of a UIEvent object provide lots of useful information that can help to determine how an incoming event should be handled.
Cocoa Touch, the view system of the iPhone OS, works according to a hierarchy. That is, views handle drawing themselves and their subviews. When a call like [[self view] addSubview:aView]; is made, a view is made a subview of self's view.
Pretty simple, right? Well, each view has a transform that describes the view's location, rotation, scaling, and other factors relative to that view's superview. This is exactly what we need in order to make our custom view scale, rotate, and move around in its superview, whenever a touch is sensed and identified.
We can change the transform in many ways, but, for the most part, we only need to deal with distances and angles between touches to do everything we need. The structure CGAffineTransform is used to store and manipulate the transforms of views. Now that you're in the world of advanced programming, you should be comfortable using the C-style calls for CGAffineTransform. Take some time to peruse the documentation on CGAffineTransform and take a look at the view programming guides to get an Apple-approved in-depth description of how all this stuff works.
The iPad SDK contains two never-before-seen commands (3Tap.plist and LongPress.plist) that are nowhere to be found in any iPhone SDK up to 3.1. What do 3Tap and LongPress do? Exactly what their names say. The iPad will recognize three quick taps and an extended long press–different from the one already used for copy and paste.
My prediction is that a primary use of the iPad in future years will be as a textbook medium; students will be able to write notes on their ebooks and display them on their iPads. Bear in mind that we already allow a swipe to delete messages and emails, just like pressing the Delete key. When a student is writing notes on an iPad etext, maybe a swipe will be a neat way to erase some of the contents, just like using a pencil eraser.