
In This Chapter
Setting up your environment
Test-driving the SDK
Programming: Hello World
Now that you have had an introduction to the iPhone SDK, it's time to get your hands dirty. In the grand programming tradition, we are going to assist you through writing the Hello World application for the iPhone. If you follow the steps in this chapter, you will get to see your first application happily running in the palm of your hand.
But before you start coding, you need to be sure that your development environment is set up correctly. This is similar to a pilot performing a preflight check of the plane before takeoff. Things can go wrong in the air, but you will minimize them if you confirm everything is correct before you leave the ground.
You will need to download and install all the necessary iPhone SDK tools. Following this you will then download and run one of the example applications provided in the iPhone SDK tutorials. The example will verify your environment and whet your appetite. Finally, you will be ready to write your first application from scratch, and as a bonus you will become oriented with the tools and processes that will become your friends as you move forward.
As we've mentioned, it's important to make sure that your development environment is up and running before you begin writing code. If this is the first time you have installed the iPhone SDK, you should have no problems. If you have tried to install it before, you may need to follow a few more steps to ensure that you get started properly. Once you get the SDK installed, you will need to be sure everything you need is installed properly. The best way to test things out is to fire off some code and watch it run. We know you want to get started, but when you start trying to track down errors, you will find it frustrating to pinpoint the issue if your environment or setup is contributing to the problems you are experiencing.
This section will guide you through the process of downloading and installing the tools you will need in order to develop applications for the iPhone. The tools you need can be found at iPhone Dev Center, so start by going to http://developer.apple.com/iphone/.
If this is your first time visiting iPhone Dev Center, you will need to register to be able to download the iPhone SDK. Once at iPhone Dev Center, look in the right column right below the login button and you will see a Not a Registered iPhone Developer? section. Click the Start Now link. You will be guided through a simple wizard, and shortly you will have a valid Apple ID with which to log in. This process is free and painless, but it does not allow you to publish your applications to the App Store or even install and test on your device. In order to do these things you will need to apply for the iPhone Developer Program. The Developer Program membership is $99 as of this writing. Once you're a member of the program you can create and debug applications on your device. You will also have a license to distribute your creations on the App Store. To get started in the iPhone Developer Program, go to http://developer.apple.com/iphone/program/ and click Learn More for the next page, where you can click Apply Now to get started. Unfortunately, this is not an instant process and it may take several weeks for your application to get approved. However, you can continue to develop on the iPhone Simulator with a large amount of success until you are approved.
Note
Learn more about the iPhone Developer Program in Chapter 1.
Once you have your Apple ID you can begin downloading the tools. If you are waiting on approval for the iPhone Developer Program, you can still download the SDK and get started. Tune your browser back to the iPhone Dev Center, http://developer.apple.com/iphone/, and log in with your Apple ID. Scroll down to the iPhone OS 3.0 Downloads section. Once there, your screen should look similar to Figure 2.1.
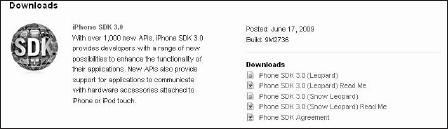
Figure 2.1. The Downloads section of the iPhone Dev Center is where you go to download the iPhone SDK.
This section changes its form from time to time depending on which version of the OS is currently available. If a version of the OS is available to download that is not currently published for public use, you will have an option to download the latest usually non-released beta version of the iPhone SDK for it or the one that is currently available to consumers. We like to stick with the version that is available to consumers.
It is still safe to download the latest version because you can select the OS version you would like to build for. However, unless you have an extra device that has the current OS installed on it for testing purposes, you may feel more confident sticking with the currently distributed OS. Also be aware that Apple has forced developers to test their applications on upcoming new OS releases. For example, before iPhone OS 3.0 came out there was a period when apps had to work on both iPhone OS 2.0 and iPhone OS 3.0.
On the iPhone Dev Center page, scroll down to the Downloads section (Figure 2.1) to find the following links:
iPhone SDK. This is the download link for the iPhone SDK. It includes iPhone SDK frameworks, Xcode, Interface Builder, iPhone Simulator, and more.
iPhone SDK Read Me. This PDF tells you what is in the latest and greatest SDK, how to install or uninstall it, and more.
iPhone SDK Agreement. This PDF is your SDK license agreement. Make sure you read through the agreement and familiarize yourself with any special restrictions that may affect your project efforts. It is a good idea to read this agreement again after you scope out your project to make sure you are in compliance with your agreement.
If you are a registered developer, at times you will have access to pre-release beta versions of the iPhone OS. Down the road you may find it useful to begin developing for a beta OS if you are expecting an extended development cycle. If a beta OS is available, from the iPhone Dev Center page select the beta OS version and you will find these additional links (Figure 2.2):
iPhone OS. This is the download link for the iPhone OS beta. Once downloaded you can drag this package onto your Xcode icon to install.
iPhone OS Pre-Install Advisory. This PDF contains some important information about setting up your environment and device for development purposes. It is very important to follow the advice of this document before you begin. Some of the steps highlighted within can help prevent you from damaging your iPhone or iPod touch.
Tip
If you do not have a link to a beta version of the iPhone OS anymore, chances are it has been released and you can install directly from iTunes.

Now you are ready to install the iPhone SDK. The SDK is a pretty hefty download. Version 2.2.1 was 1.7GB and version 3.1 was 2.4GB, so, depending on your connection speed, be prepared to wait.
Installing the iPhone SDK is a fairly straightforward process if you are installing the SDK for the first time. However, it is still nice to have this process broken down for you if you are taking your first steps in the Mac environment. This section will guide you through this process.
In order to install the iPhone SDK, you will need to:
Download the iPhone SDK if you have not done so already.
Locate the downloaded SDK, and double-click to mount the DMG file.
From the mounted DMG file folder, double-click the installer.
Follow the on-screen instructions given to you by the installer.
That's all there is to installing the iPhone SDK. You now have the tools you need to start writing iPhone games. Take a few minutes to open your new toolbox and discover all the tools inside the iPhone SDK.
Note
If you are experiencing strange compile and runtime errors that leave you frustrated, you may want to uninstall the SDK completely and start over. Sometimes starting over with a clean plate can clear up these issues.
If you run into some issues you feel could be occurring because you installed one version of the SDK on top of another, we recommend that you take time to uninstall the SDK and then reinstall it. You can find the latest uninstall procedure in the iPhone SDK Read Me file, or follow these steps:
If you would like to uninstall Xcode developer tools on the boot volume, along with the <Xcode> directory, from a Terminal window use this command:
$ sudo <Xcode>/Library/uninstall-devtools --mode=all
If you would like to remove the underlying developer content on the boot volume but leave the <Xcode> directory and supporting files untouched, from a Terminal window use this command:
$ sudo <Xcode>/Library/uninstall-devtools --mode=systemsupport
If you would like to remove just the UNIX development support on the boot volume but leave the <Xcode> directory and supporting files untouched, from a Terminal window use this command:
$ sudo <Xcode>/Library/uninstall-devtools --mode=unixdev
If you would like to uninstall just the <Xcode> directory, you can simply drag it to the trash, or from a Terminal window use this command:
$ sudo <Xcode>/Library/uninstall-devtools --mode=xcodedir
Unless you are experienced, we recommend that you uninstall using the first option. By default the <Xcode> folder is installed in DeveloperLibrary. To run this uninstall command from the default location, follow these steps:
Open a terminal window.
Type cd / and press Enter.
Type sudo Developer/Library/uninstall-devtools --mode=all and press Enter.
Note
During installation and when running the uninstall command, you will be prompted for a password. Don't worry; this is your Mac OS protecting you. You will need to supply the administrative password that was used when setting up for your Mac.
Now that you have installed your environment, it's time to run one of the samples from the iPhone Sample Code library. This tests your setup and makes sure your environment is in good health. We understand you are eager to get started, but you don't want to spend hours chasing a bug in your app only to find out there was a problem with your environment setup. Here is what you need to do to test your environment with one of Apple's Code Samples.
Go back to iPhone Dev Center (http://developer.apple.com/iphone/) and scroll down to the Sample Code link under the Resources for iPhone section, as shown in Figure 2.3. From there click the Sample Code link to navigate to a full listing of Apple's sample applications.

Figure 2.3. There are many useful resources in the Resources for iPhone section of iPhone Dev Center, including many examples in the Sample Code section
You will now be on the Sample Code page, which lists all available iPhone Dev Center sample applications (see Figure 2.4).
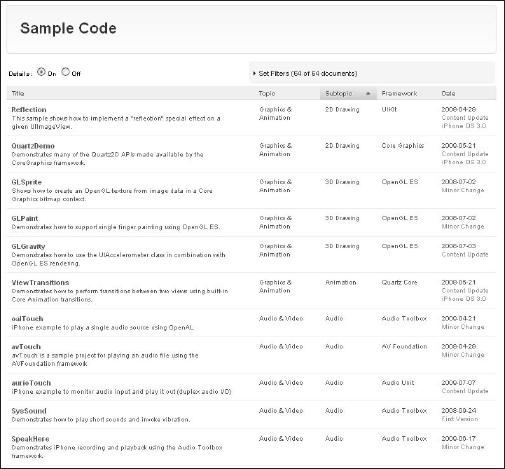
Figure 2.4. You will find a plethora of example applications in the iPhone Dev Center's Sample Code library.
Scroll down to the GLPaint example and click on it. This example takes advantage of the touchscreen and the accelerometer. When the page loads, you should be presented with a screen similar to Figure 2.5. Click on the Download Sample Code link.
Wait for the sample to finish downloading, then open it. Finder will unzip the GLPaint.zip archive and you will see the GLPaint folder in your download folder.
Now you should move the GLPaint folder to a new location if you do not want to keep it in the download folder. Open the GLPaint folder and double-click GLPaint.xcodeproj. You should now see the main Xcode window open with the GLPaint project open, as shown in Figure 2.6.
Tip
If you have not already docked Xcode on your Dock, now is a good time to do so. Click Keep in Dock from the Dock icon option menu.


Now you will finally get to experience an iPhone application in action! From the GLPaint project toolbar, click Build and Go and the example will launch in the iPhone Simulator. If everything has been installed properly, you should see the GLPaint application up and running, as shown in Figure 2.7.
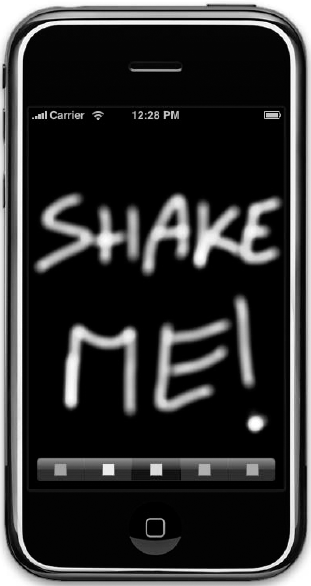
Figure 2.7. The GLPaint example running in the iPhone Simulator. Starting with the iPhone SDK 3.0, you have an option to "shake" the iPhone Simulator.
Play around with the example and the iPhone Simulator to start familiarizing yourself with the tools. You can rotate the device and use your mouse to draw on the screen as you would if you were touching the device. There is even an option to rotate the device under the iPhone Simulator Hardware menu. The screen on the iPhone Simulator is screaming "SHAKE ME!". At the time of writing, 3.0 did not include support for the accelerometer in the iPhone Simulator, so you may not be "shaking" anything until you install this example on your device.
Note
A new feature of the iPhone SDK 3.0 allows you perform a "shake gesture" in the iPhone Simulator. Unfortunately, this is not the same as accelerometer support in the iPhone Simulator and will not work in the GLPaint example yet. Shake is a new gesture that joins a family of gestures, including swipe and pinch. To perform the shake gesture in the iPhone Simulator, go to the menu bar and choose Hardware
If that did not get you a little stoked, then this next exercise will. You are going to run this same application on your iPhone or iPod touch. The first thing you will need to do is plug your device into your Mac. If you have Xcode open, you can open Organizer to confirm that it has been detected. To open Organizer, choose Window
While in Organizer you should go ahead and install the Provisioning Profile on your device. In Chapter 1 we talked about creating Provisioning Profiles; now it's time to use them. Download the Provisioning Profile that you created for your device. Once the download has completed, drag the Provisioning Profile onto the Xcode icon on your Dock. Head back into Organizer and make sure your Provisioning Profile has been added to your device in the Provisioning section. If not, click the + (plus) button and click the file you just downloaded.
Now that your device has a Provisioning Profile installed, you can deploy, execute, and debug the sample directly on your device. Even though you have installed the Provisioning Profile on your device for development, you also need to tell your application about the Provisioning Profile. This pairing allows you to test applications on your device while also ensuring that you cannot freely distribute your app without going through the App Store. This may seem like a pain, but today distributing through the App Store has major advantages.

Figure 2.8. Organizer is your tool for installing Provisioning Profiles on your development devices, installing the beta version of the iPhone OS, and more.
Now you are ready to walk through the steps necessary to run the example on your device:
Launch Xcode if you have not already done so.
Set the Overview pull-down menu to the version of the SDK that you wish to test against, as shown in Figure 2.9.
Choose Groups & Files

From the New File dialog box, choose iPhone OS
You will now be in the New File dialog box. In the File Name edit box, change the name from untitled.plist to Entitlement.plist and click Finish (see Figure 2.11).
Select the newly created Entitlements.plist and make sure the property get-task-allow is checked off (Figure 2.12).
Choose Groups & Files
Click the Information icon in the toolbar.
If not previously selected, you will need to click on the Build tab.
Select your Provisioning Profile under Code Signing
For the property Code Signing
Click OK and then click Build and Go, and you should see your application up and running on your iPhone or iPod touch.


Tradition dictates that the first program we explore creating should be the well-known Hello World application. At its simplest, Hello World is a computer program that simply displays the text "Hello World." Considered a classic of computer science, Hello World is the first application many new developers write when learning a new programming language. There are a few reasons for this. Hello World is simple enough for beginning programmers to fully understand what the application will do. And since the application does just one simple thing, you only have to learn how to do that one thing to see results. A more advanced application would require you to have a more advanced understanding before you would be prepared to create it.
One thing that really sets iPhone developers apart from other developers is the expectation placed on them to always raise the bar with everything they create. This is a part of the iPhone's fit and finish that Apple has been able to create. Everything has to both look great and work great. So why should it be any different when it comes to creating your first iPhone application, Hello World? An iPhone application is expected to stand out when judged against other non-iPhone applications. Today's iPhone owners want to be surprised and delighted by any and all iPhone applications they try. And you don't want to let them down!
Before you tackle how to create a Hello World application of your very own, review Apple's Hello World sample from the iPhone Dev Center at http://developer.apple.com/iphone/library/samplecode/HelloWorld_iPhone/index.html. Apple describes their Hello World as "Say hello with style. See how you can transform the mundane into the memorable with graphical flair." As you can see in Figure 2.15, Apple has done a pretty good job of taking the mundane Hello World application and making it a first-class citizen that seems perfectly at home on the iPhone.
How did they do it? Some might say they did it with style. Every detail has to be just right, and nothing can be left to chance. Although the minimum requirement for a Hello World application is to simply display the text "Hello World," this app goes so much further. Everything about the application looks and feels good, even the application icon. There are professionally published applications on many desktops right now that have only the same dull default icon.
We see planet Earth at the center of the screen, from a fascinating vantage point of someone perhaps standing on the moon. Functionality is not sacrificed for the sake of form, either, because not only does the application display "Hello, World!" but it takes any input the user provides and displays it as the output. It just happens to default to "Hello, World!" Once again, the app does more than the bare minimum required.
Tip
While the Hello World application may not appear to do much, it does accomplish one important task: You can use it to validate that the compiler, development environment, and run-time environment are all correctly installed and working as expected.
Take a step back and decide how you can raise the bar for your remake of the classic Hello World application. There are two areas to focus on: form and function. It's usually a good idea to think of a lot of ideas first, and then decide on the best ones to actually do.

Form and function are important with many things. Think about how they apply to cars, for example. People expect their cars to function properly, but they also want them to look great. What's the difference between a low-end car and a high-end car? Usually you will find great quality in how the high-end car runs, works, and looks. And along with this increase in quality you will find an increase in profit to the manufacturer. Keep this in mind when you are deciding how much time and money to invest in your future iPhone applications.
Here are some ideas to consider for making the Hello World app even better:
Have an animated Earth graphic that revolves.
Have the Earth graphic zoom in from far away to up close.
Get the user's location programmatically from his device. Then center the Earth graphic on this location, and finally zoom out to space to see the full Earth graphic.
Have the Earth graphic respond to user touch, allowing rotation and zooming options.
Have the Earth graphic respond back by displaying the user name from the device database.
Have the device play a Hello World audio recording.
Display the Hello World text first in one language and then in others over time.
Have the Hello World text scroll across the screen in a large, banner-size font.
Start from a star field perspective and zoom in on the Earth graphic when the user touches the screen.
Have an animated star field background behind the Earth graphic to show motion effect.
Have an animated moon graphic, or at least a full-sphere moon graphic similar to the Earth image.
All of these ideas are great, but of course, you cannot do every one of them. Since this is the first application you will create, don't make it your most challenging. Instead, focus on a single feature that will give you the most return for your investment of time and effort. Here is the idea that will be the most exciting for end users to experience, and easy for new developers to program: Display the Hello World text first in one language and then in others over time. You will learn to make the foundation for this application in the sections ahead. From there you should be in a position to experiment and try some of the ideas listed above on your own.
Now you are ready to create a Hello World app of your very own. Open Xcode and choose File
Xcode now generates all the base code files required for your HelloWorldEx utility project (Figure 2.17). Specifically, Xcode creates a Main View, a Flipside View, and all the navigation controls and plumbing you need to move between these two views. You will use the Main View for all of the core functionality of the application, and save the flipside view for an About Us screen.
The iPhone's screen resolution is 320 pixels wide by 480 pixels tall. You will make your Hello World application run full-screen so that you can take advantage of every pixel of screen space. But first you will add all of your application's graphic assets to the application project. You can either create your own or use the ones included in the book's sample code. The first file is called starfield.png and is a nice image of stars in space. This will be used as your background image. On top of this you will place the earth.png file, an image of the Earth. This is the main graphic of the application, and will be placed in the center of the screen.


On the left-hand side of the Xcode Project Explorer you will see a Groups & Files list. Double-click on the Resources folder to expand it and choose Project
Tip
Using separate image files for the Earth and stars images allows you to keep the application flexible enough to make future changes. For example, someday you might decide to make the star field image scroll horizontally across the screen behind the Earth image, or replace the static image of the Earth with a series of images you could play as an animation of the Earth revolving.
On the left-hand side of the Xcode Project Explorer you will see a Groups & Files list. Double-click on the Resources folder to expand it and then double-click on the MainView.xib file to open the Main View in Interface Builder (Figure 2.18). Click in the Main View window, and from the Interface Builder menu choose Tools

From the Library window click the Image View item and drag it over to the Main View window. If you do not see the Image View item, be sure that you have Objects selected, and that you are in the following section: Library

Choose Tools

Now that you have added your application's basic graphic controls, you need to add a label to the Main View to be able to show the user the "Hello, World!" text. In the Library window, under Objects, choose Library
Make sure that this label control is still selected in the Main View window and choose Tools

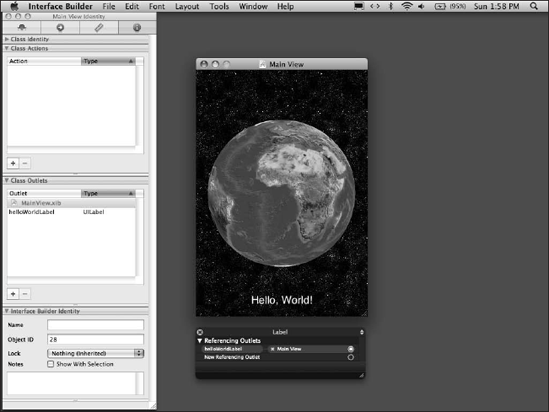
Now you need to wire up your controls. This allows you to respond to any events that occur to your application's controls and to change any of your controls' attributes at run-time. Since in this version of the application both the Earth and stars images will remain static at run-time, you can leave both of these UIImageViews as they are. However, in order to update the label's text at run-time, you will need to take the following steps. Open the Inspector window, if you do not already have it open. Select the label control and click on the Identity tab at the top of the Inspector window.
Notice that the Inspector window is dynamic and updates to match which control you have selected at any given time. Click on the Main View window's title bar and the Inspector's title should change to Main View Identity. You should find a Class Outlets section that lists Outlets and Types. Click the add class outlet button (the small plus sign), add a new outlet named helloWorldLabel, and set its Type to UILabel.
Now the Main View class has an outlet named helloWorldLabel that can accept a UILabel control. But what if you had multiple UILabel controls on your form? How would the Main View class know which UILabel it should use for the helloWorldLabel outlet? Actually, right now it doesn't, even with only one UILabel. Basically you have a box that a UILabel control can fit into, and now you need to assign a UILabel control to it. To do this, right-click the label control and choose New Referencing Outlet. Click the little circle on the left of New Referencing Outlet and drag it to the title bar of the Main View's window. You should now see helloWorldLabel and Main View listed in the displayed menu, as shown in Figure 2.22.
Interface Builder generates the matching classes and code that you will need in Xcode for the user interface you have created thus far. On the Interface Builder, choose File
You are asked if you want to replace the existing files with the new files Interface Builder has generated (Figure 2.24). You can safely click Replace, since you do not have any code you have hand-written at this point. If you did have existing code of your own, you could click Merge to merge the two code sets. For the most part, Xcode can merge code safely, but it can be a little too advanced for new developers first starting out, so it is best to avoid this option for now. (The third option, Cancel, is available in case you decide you are not ready to generate code.)

A lot of the heavy lifting is done now. You have all of your graphics and text controls placed and ready. If you like, you can click the Build and Go button in the main toolbar of the Xcode Project Explorer, or simply press
You're not quite done. You still need to write a little code to make the real magic happen. Go back into Xcode and choose Groups & Files
#import "MainView.h"
@implementation MainView
-(void)awakeFromNib {
   helloWorldLabel.text = "Hello, World!";
}
@end
The awakeFromNib method is an event that is by design automatically called when a view is first being loaded. You can try changing the helloWorldLabel text and then use Build and Go to see the results in the iPhone Simulator. Even better, you can write some code to do it for you. We are going to use an NSTimer object to update the helloWorldLabel every three seconds. Update your MainView.m file to look like the following:
#import "MainView.h"
@implementation MainView
static int timerCount = 0;
- (void)awakeFromNib {
   helloWorldLabel.text = "Hello, World!";
   [NSTimer scheduledTimerWithTimeInterval(3.0) target:self selector:@selector(onTimer)
      userInfo: nil repeats:YES];
}
   - (void)onTimer {
      timerCount++;

      switch (timerCount % 5) {
         case 0:
         // say "Hello, World!" in English
         helloWorldLabel.text = @"Hello, World!";
         break;
         case 1:
         // say "Hello, World!" in French
         helloWorldLabel.text = @"Bonjour, monde!";
         break;
         case 2:
         // say "Hello, World!" in Spanish
         helloWorldLabel.text = @"Hola, Mundo!";
         break;
         case 3:
// say "Hello, World!" in German
helloWorldLabel.text = @"Hallo, Welt!";
break;
case 4:
// say "Hello, World!" in Italian
helloWorldLabel.text = @"Ciao, Mondo!";
break;
}
}
@endYou now have a fairly functional application. Go ahead and give it a try by clicking Build and Go. What's left? You need to remove the iPhone Status Bar at the top of the screen. You need to add content to your Flipside View—it will make a great About Us screen when you're done. And you need to give your application a custom icon.
To remove the Status Bar from the top of the screen, add one line of code to the beginning of your awakeFromNib function:
[[UIApplication sharedApplication] setStatusBarHidden:YES animated:NO];
Next, you will add the Flipside View content. From the Xcode Project Explorer, choose Groups & Files
You can either use the aboutus.png from the sample code or create one of your own. We will add this graphic to the screen in the same manner as the starfield.png and the earth.png files. Under Groups & Files in Xcode, find the Resources folder under HelloWorldEx. Right-click on the Resources folder and choose Add
Now locate the aboutus.png image you will use and choose Add. Check the Copy items into destination group's folder (if needed) check box and keep everything else on their default settings. Set Reference Type to Default, set Text Encoding to Unicode (UTF-8), and make sure the option Recursively create groups for any added folders is selected. When you're done, click the Add button.
From inside Interface Builder, choose Tools
Click Build and Go in Xcode to see the application as it now stands. To get to the About Us screen, click the small info icon in the bottom-right corner of the screen. We do have a little touching up left to do on the About Us screen. By default the Flipside View's title text is set to the application's project name, which is HelloWorldEx in our case. This is not the most user-friendly message we could give, so we should go ahead and change it now.
Going back to Xcode, one way to update the text is to choose Edit

Finally, you need to add a custom icon to your application and set the application name to finish it off. Again, you can use either the icon.png file we provided or one of your own. Use Xcode to add your selected icon.png to the Resources folder as you did with previous images. Once you have done this, in Xcode choose Groups & Files

Now that you have completed your first application, we can officially welcome you to the exciting world of iPhone programming! We have only begun to scratch the surface of all of the possibilities that are open to you. By now you have the skills you need to begin exploring many of those possibilities. You are ready to create your own iPhone applications from scratch. You have the knowledge to display text and graphics. And you know how to make the application respond to timers repeatedly. It's time for you to begin thinking of ideas for your next iPhone application; to take what you know and push it a little further.
You have covered a lot of material in this chapter. Now you should take a moment and review the most important topics. First you learned about setting up your environment. This included information on registering, downloading, and installing the iPhone SDK. Then you learned how to run an iPhone SDK sample application both in the iPhone Simulator and on a real device. After learning how to run a sample application, you then learned how to program a new application on your own. You should now understand the process of defining your goals, examining your options, and coding the application. And by now you should be familiar with the basic tools of Xcode, including the Xcode Project Explorer, Interface Builder, and the Library and Inspector tools. Finally, you should have an understanding of the different kinds of files Xcode uses to make your application, especially code and image files. There is still a lot more to learn, but you should feel that you could write a simple iPhone application on your own now. And we highly encourage you to do so, because that way you will learn even more.