In This Chapter
Getting to know Facebook
Connecting to Facebook accounts
Creating a Facebook application
Using the Facebook Platform API
Analyzing business aspects
It's not enough to have the best graphics, the best sounds, and the best game play. Today's gamers expect the total package. They want it all. They expect high scores, badges, and achievement systems. They want to be able to compete against their friends and share their game experiences wherever they are. Building community is becoming an important part of making a successful top-notch iPhone game.
Today people are more connected than ever. While you can still use the iPhone to keep in touch with friends through phone calls, there are many new and exciting ways to stay in touch. The iPhone allows developers to take advantage of these technologies. With everything from e-mail to text messaging and instant messaging, it is almost like you are carrying your friends with you wherever you go.
How could you be any closer? What about if you could pull all of your friends in from Facebook and interact with them in apps on your iPhone? With Facebook Connect, you can do just that. In this chapter we'll show you how.
Facebook (www.facebook.com) is a social utility that connects people with friends and others who work, study, and live around them. In other words, Facebook helps you connect and share with the people in your life. Considering Facebook has over 200 million active users, or users who have returned to the site in the last 30 days, it is very likely you are already familiar with Facebook. If you are not already a member of Facebook, now is the time to join. The more you learn about Facebook today, the more you will be able to use it tomorrow—and Facebook is not going anywhere anytime soon.
We have even created a Facebook fan page ourselves for this book (Figure 6.1).

Facebook is made up of pages, and some of the most popular pages for users on Facebook are their Profile, Friends, Networks, and Inbox pages. While a Facebook page can contain user stories, it can also contain Facebook applications. Some of the most popular built-in Facebook applications are Photos, Notes, Groups, Events, and Posted Items.
Note
Facebook is one of the most popular Web sites on the Internet today; it is currently the fourth-most popular Web site in the world. It is also one of the most popular development platforms on the Web. According to Facebook, there are more than 52,000 applications currently available in the Facebook Application Directory, and there are more than 660,000 registered developers and entrepreneurs from more than 180 countries using the Facebook platform today.
Today you can easily find your Facebook friends on any Facebook Connect–enabled iPhone application. You just log in using your Facebook member account on your iPhone. That iPhone application can then access the same information as on the Facebook site, controlled by your privacy settings. You can even publish stories back to your profile, allowing you to share experiences you have from any Facebook Connect–enabled iPhone application.
Figures 6.2, 6.3, and 6.4 show a few of these applications.


The first thing you need to do in order to create iPhone applications that can integrate with Facebook is to download the Facebook Connect for iPhone SDK. You should be able to find the zip file you need at the following address:
http://svn.facebook.com/svnroot/platform/clients/packages/fbconnect-iphone.zip

Inside the zip file you will find a samples folder and a source code folder named src (Figure 6.5). First you will explore the Facebook Connect sample project, and then you will go through the steps of creating an iPhone application from scratch to integrate with Facebook Connect.
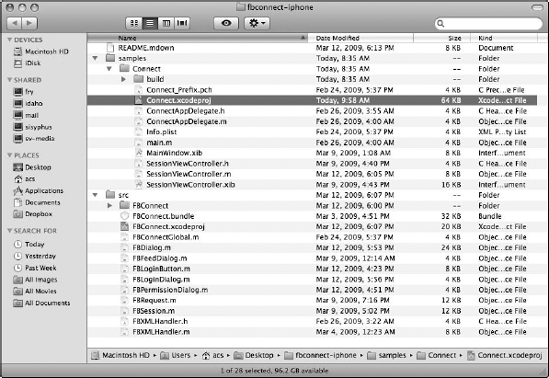
You must open the sample project in Xcode in order to run it. Find the fbconnect-iphone.zip file that you downloaded earlier. Extract the files from the zip file into a folder of your choosing. Open this folder, then open the samples folder, and finally go into the Connect folder. You should now see a file named Connect.xcodeproj. In Figure 6.5, the Connect.xcodeproj file has been selected. Double-click this file to automatically open the project in Xcode.
Now that you have the sample project loaded into Xcode, your screen should look something like Figure 6.6. You can run the sample application by clicking on Build and Go in Xcode. The application should compile and start fine, but you will not be able to connect to Facebook successfully because by default the sample project does not have a correct Facebook API key or application secret. Facebook uses your API key to identify your application. You will need to pass it into any API call you make. The application secret is used by Facebook to authenticate any API calls you make. Effectively these are your applications' user names and passwords, just with fancier names.

You must do several things before you can get a Facebook API key of your own. First, if you have not already done so, you need to join Facebook and become a member. Just go to www.facebook.com and sign up. It only takes a few minutes to join.
Once you are a member of Facebook, you need to register as a developer on Facebook. Again, this is a very simple process: Go to the Facebook Developers page at http://developer.facebook.com and click the Start Now button. Be sure to take a few minutes and explore the wealth of information Facebook has to offer developers.
On the Facebook Developers page you can find online documentation, forums, events, information on getting started, and more. It's a good idea to bookmark this site and refer to it frequently as you become more and more familiar creating Facebook-enabled iPhone applications.
After you click the Start Now button on the Facebook Developers page, you are redirected to a special "getting started" page where you are asked to install the Facebook Developer App. Click the Allow button to install the Developer App (Figure 6.7).

By now you should be a member of Facebook and a registered Facebook developer, and you should have the Facebook Developer App installed on your Facebook account. In order for a Facebook-enabled iPhone application to function correctly, it must have a Facebook application available to connect to on Facebook itself.
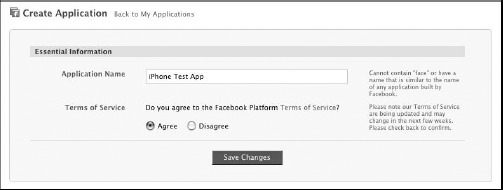
You can get a basic Facebook application up and running in a matter of minutes. In the bottom-left corner of Facebook you should see an Applications button. If you click this and choose the Facebook Developer application, which you added to your profile earlier, you should see a Set Up New Application button in the upper-right corner. Click this button to make your new Facebook application. You are then taken to the Create Application page, where you need to assign your new Facebook application a name, as shown in Figure 6.8. You can use the name iPhone Test App or another name of your own choosing. You will have to agree to the Facebook Terms of Service. Once you have entered all of the necessary information, click the Save Changes button to proceed.
You have just created a new Facebook application and are now on the Edit iPhone Test App page (Figure 6.9). Here you can edit and configure your iPhone Test App as needed. At first you might be a little overwhelmed by all the options being presented to you, but there is nothing to be concerned about. You can keep the default settings for most options for this sample project. After you become more familiar with the Facebook API, you can come back and take advantage of some of the more advanced options available here.

Although it is safe to leave most of the iPhone Test App's options on their default settings, it's a good idea to familiarize yourself with what the most important ones are. At the very least, you will want to be aware of the following settings:
Application Name. This is where you assign the name for your Facebook application.
Application ID. This is the unique ID that Facebook assigns to your application.
API Key. This is your public API key. You need to set this in your iPhone application.
Secret. You also need to set your application secret in your iPhone application.
Description. This is the public description for your application.
Icon. This is the 16 × 16 icon that is displayed on Facebook next to your application's name.
Logo. This is the 75 × 75 image that is shown in the Facebook Application Directory.
Language. This is the language that text in your application is in.
Developers. This is a list of Facebook members who have developer access to this application.
Take some time and explore all the additional developer options available to you. These are located in the tabs on the left-hand side of the iPhone Test App page: Basic, Authentication, Profiles, Canvas, Connect, Widgets, and Advanced. One setting of special note is the Sandbox Mode, which can be enabled or disabled from the Advanced Settings section under the Advanced tab. When an application is in Sandbox Mode (Figure 6.10), it is visible only to developers.
Once you have finished updating your Facebook application's settings, click the Save Changes button on the bottom of the screen.
Tip
Facebook allows you to set up accounts to use for testing purposes. You can learn more about Facebook test accounts at http://wiki.developers.facebook.com/index.php?title=Test_Accounts.

You are now ready to return to the Facebook Connect sample project in Xcode and update the project to use your Facebook API key and application secret. On icon folder to expand it, and then click on the Source folder. Choose the SessionViewController.m file, as shown in Figure 6.11.

You should see a section of code that matches the following listing:
#import "SessionViewController.h"
#import "FBConnect/FBConnect.h"
////////////////////////////////////////////////////////////////////////////////
// This application will not work until you enter your Facebook application's API key here:
static NSString* kApiKey = @"<YOUR API KEY>";
// Enter either your API secret or a callback URL (as described in documentation):
static NSString* kApiSecret = nil; // @"<YOUR SECRET KEY>";
static NSString* kGetSessionProxy = nil; // @"<YOUR SESSION CALLBACK)>";
///////////////////////////////////////////////////////////////////////////////////////////////////
}
You will need to replace the <YOUR API KEY> text with your actual API key, and you will need to update <YOUR SECRET KEY> with your actual secret key. You can find both your API key and your secret key on your iPhone Test App's settings page.
Notice how Facebook allows you to provide either your API secret or a callback URL. Since you want to use your secret key, be sure to uncomment the section of code that assigns your secret key to the kApiSecret variable by removing the two leading forward slashes from that line. When you are done, your code should look similar to the following code listing. The only real difference should be your API key and secret:
#import "SessionViewController.h"
#import "FBConnect/FBConnect.h"
////////////////////////////////////////////////////////////////////////////////
// This application will not work until you enter your Facebook application's API key here:
static NSString* kApiKey = @"0123456789abcdefghijklmnopqrstuv";
// Enter either your API secret or a callback URL (as described in documentation):
static NSString* kApiSecret = @"abcdefghijklmnopqrstuv0123456789";
static NSString* kGetSessionProxy = nil; // @"<YOUR SESSION CALLBACK)>";
///////////////////////////////////////////////////////////////////////////////////////////////////
}
Now, if you click the Build and Go button in Xcode, you should see a screen appear on your iPhone with a button labeled Connect with Facebook. Click this button to bring up the Connect to Facebook screen, where you can connect your sample iPhone application to your iPhone Test App Facebook application (Figure 6.12).

Tip
There is an official free Facebook iPhone application on the App Store. It's a great example of what can be done in an iPhone application. Be sure to check it out.
Once you have logged in to Facebook Connect by entering your Facebook e-mail and password credentials, you will see a screen like the one shown in Figure 6.13. The sample iPhone Facebook Connect application has a few options available for you to test. Even though it is very basic, it really delivers the key features and functionality you will need to implement in your iPhone applications, so feel free to explore its details.

You should see a label in the center of the screen that indentifies who you are logged in as. At the top of the screen is the Facebook Logout button, and in the bottom half of the screen are two large buttons: Get Permission and Publish to Feed.
Before you can fully experience all the features of the sample iPhone Facebook Connect application, you still have a little more work left to complete. In order for the Publish to Feed button to work, you need to create at least one feed template for your Facebook application. Go back to the Facebook Developers page located at www.facebook.com/developers/. Open your iPhone Test App on Facebook and go back to Edit Settings. From here click on the Connect tab on the left-hand side of the page. If you scroll down the page, you should locate the Template Bundles section, as shown in Figure 6.14.

You can also create feed templates using the Feed Template Console tool. To find this useful tool, go to http://developers.facebook.com, click the Tools button at the top of the screen, and then click on the Feed Template Console tab. Or you can access the tool directly by going to http://developers.facebook.com/tools.php?feed.
Tip
Learn all the details of creating template feeds on the Facebook Developer wiki at http://wiki.developers.facebook.com/index.php/Template_Data.
Start by creating a One Line Story template with the Feed Template Console. In the text box under the label One Line Story, enter the following example feed template:
{*actor*} just earned {*score*} points, and has achieved the rank of {*rank*} in Rochambeau.This example feed template contains three template tokens: {*actor*}, {*score*}, and {*rank*}. The {*actor*} token is a special reserved Facebook template token. Facebook automatically replaces the {*actor*} token with the name of the currently logged-in Facebook user. You can see the final registered template bundle in Figure 6.15.

The other tokens are replaced with the values provided from your application, as you will see later in this chapter. But you can supply the Feed Template Console with sample data. Enter the following text into the Sample Template Data field:
{"score":"53324", "rank": "Captain"}Click the Next button to test-run your feed template (Figure 6.16). When you are done testing your feed template, click the Next button again to proceed. You are given the option to Create a Short Story template. Short Story templates have a few more options than One Line Story templates. For one thing, you can use Facebook Markup Language (FBML) inside them. But for now you only need to use the One Line Story template, so click the Skip button.
Tip
Facebook Markup Language (FBML) enables you to build Facebook applications that deeply integrate into a user's Facebook experience. Learn more at http://wiki.developers.facebook.com/index.php/FBML.

You now have the option of creating an action link—a short string of text that accompanies a Feed story and invites the user to take some action related to that story. An action link is actually a hyperlink to a URL on Facebook, your Web site, or another third-party Web site. You can either skip this option or create an action link pointing to a URL of your choosing. For example, you might decide to create an action link that allows users to click their score and see a more complete high-score board with scores and ranks of other players.
When you're ready to review and register your feed template, click the Register Template Bundle button. You should now see a Template Bundle Registration Succeeded dialog box that presents you with your new template bundle ID.
You will need to update your publishFeed to use your new template bundle ID. Once you have done this, click the Build and Go button. You should then be able to navigate to the Publish Story screen (Figure 6.17). After you agree to allow the application to update your profile, you should see a new item on your Facebook page, which should look like Figure 6.18.


It's your choice whether you use your Facebook application's Template Bundle section or the Feed Template Console Tool, but either one of these techniques lets you create a new feed template, which will be used by Facebook to publish messages from your application to each of your user's feeds. This is done through the publishFeed method located in the SessionViewController.m file:
- (void)publishFeed:(id)target
{
  FBFeedDialog* dialog = [[[FBFeedDialog alloc] init] autorelease];
  dialog.delegate = self;
  dialog.templateBundleId = 0123456789;

dialog.templateData = @"{"score": "key1", "rank": "value1"}";
  [dialog show];
}
Imagine if the example feed template had the template bundle ID of 0123456789 in Facebook, which would then match the template bundle ID being used in the publishFeed method. The following output would be generated by Facebook to be published on the currently logged-in user's feed. See if you can guess the produced output before reading ahead.
Apps Amuck just earned key1 points, and has achieved the rank of value1 in Rochambeau. Seeing this should help make what is happening click in your mind. You should now update the publishFeed method to fill in the example feed template with more appropriate test data. Try setting the points to the value of 53324 and the rank to Captain on your own, and then check the following code listing to see how you did:
- (void)publishFeed:(id)target
{
  FBFeedDialog* dialog = [[[FBFeedDialog alloc] init] autorelease];
  dialog.delegate = self;
  dialog.templateBundleId = 9876543210;

dialog.templateData = @"{"score": "53324", "rank": "Captain"}";
  [dialog show];
}
Even though feed templates can be a little tricky to understand at first, they become easier to use with practice, and they are incredibly powerful and flexible. You now have a basic understanding of how all the parts of a Facebook feed template work.
Some actions—like updating the user's status, sending the user e-mail, or publishing information to a user's feed—require extended permission from a user before Facebook allows your application to perform them. This is very similar to some features of the iPhone SDK. Even though your application has been approved by Apple to run on any iPhone device, your application must still request explicit permission from the end user to gain access to the device's location data. Even the App Store requires you to reenter your password after a short span of time.
Here's a test you might find interesting. Try clicking the Publish to Feed button without first clicking the Get Permission button. What do you expect will happen? Do you think Facebook will allow you to publish anything to a user's feed without that user's explicit permission? If you said Facebook would prevent this unauthorized access to the user's feed, then you are correct. Facebook Connect protects users from both intentional and accidental threats to their privacy.
Tip
Be sure to check out the video "How To: Implement Facebook Connect on the iPhone in 5 Minutes," located at www.vimeo.com/3616452.
Now you will learn how to create a Facebook Connect iPhone application from scratch. Open Xcode and choose File

Name the new project Facebook or another name of your own choosing, and then click the Save button. Facebook recommends reusing the FBConnect code they provide you in the fbconnect-iphone.zip file, versus trying to re-create this base code every time yourself. That is the approach we will follow here.
Go back to the files you extracted from the fbconnect-iphone.zip and click on the included src folder to open it. Double-click on FBConnect.xcodeproj to open the FBConnect project in Xcode. Find the FBConnect folder that is listed directly under the FBConnect project in the Groups & Files listing on the left-hand side of Xcode (Figure 6.20).
Drag the FBConnect folder from the FBConnect project into the other Facebook project. Be sure to drag it under the Facebook project, and not into another folder already in the Facebook project. After you finish copying the FBConnect folder, Xcode shows an options dialog box. Be sure to uncheck the Copy items into destination group's folder (if needed) check box. Also confirm that the Reference Type field is set to Default and that Text Encoding is set to Unicode (UTF-8). Once you have verified the settings, click the Add button.

If you try to build the application now, Xcode will return with many errors and warnings. In order for Xcode to successfully compile this project, you will need to add a new framework to this project. Again in the Groups & Files listing, find the Frameworks folder under the FBConnect project. Right-click on the folder and choose Add
Open the Frameworks folder and select the CoreGraphics.framework folder, then click Add. You will see the add file options dialog box once more, and again be sure to uncheck the Copy items into destination group's folder (if needed) check box. Make certain that the Reference Type field is set to Default and that Text Encoding is set to Unicode (UTF-8). Once you have verified the settings, click the Add button.

Because some of the source code for the Facebook Connect for iPhone is stored outside of your Facebook application, you will need to add the path for this code to your Facebook project. To do this, choose Project

There are lots of project settings, but we are only interested in one of them, Header Search Paths. You could either find this setting yourself through manual searching, or you can enter it in the filter at the top of the screen. Once you locate this setting, double-click in the cell to the right of the field to open the Header Search Paths screen (Figure 6.23). Click the small plus sign located in the bottom-left corner of the form to add a new header search path. Then double-click the cell under the path column to enter the new header search path. If you have spaces in your path, be sure to enclose your path inside double quotes, as we've done in the previous sentence. This will keep Xcode from reading your path as a list of paths separated by spaces.

If you build your Facebook application now, you should see the Build succeeded message in the Xcode bottom Status Bar.
Now you will work on making your Facebook project a more functional application. The FBSession object is the key component in the FBConnect API. This object contains a user's authorization and login information. The FBSession object requires you to provide your Facebook application's API key and application secret:
session = [FBSession sessionForApplication: @"<YOUR API KEY>"
  secret: @"<YOUR SECRET KEY>" delegate:self];
Find the MainViewController.m file in your Xcode project in the Groups & Files list. It is under the Facebook folder, and then inside the Main View folder. Look in this file for the following code:
/*
If you need to do additional setup after loading the view, override viewDidLoad.
 - (void)viewDidLoad {
 }
 */
You need to uncomment (by removing the leading forward slash) this section of code so that Xcode compiles it into your application and runs any code you add inside of the viewDidLoad method. Add the FBConnect session line of code you saw in the preceding code listing. Your viewDidLoad method should now match this code listing:
- (void)viewDidLoad {
session = [FBSession sessionForApplication: @"<YOUR API KEY>" secret: @"<YOUR
  SECRET KEY>" delegate:self];
 }
This one piece of code will actually be the plumbing that allows your application and Facebook to communicate with each other. But in order for this plumbing to work smoothly, you still have some work to do. Just like with the Facebook-supplied sample, you need to replace the API key and application secret with yours. You also need to include the FBConnect.h header file using the following line of code. Add this import statement at the top of the MainViewController.m file under the existing import statements:
#import "FBConnect/FBConnect.h"
By adding this, Xcode will understand what the FBSession object is and does. That enables the FBSession object and its sessionForApplication method. In the previous block of code, notice at the end of the main line of code that you set the sessionForApplication's delegate to self. By doing this you are telling Xcode that this class will be responsible for handling any of the needs of the sessionForApplication method.
Here is a great way to learn what a class will have to implement in order to meet a delegate's requirements. A delegate is a way for a class to call out to another class to respond to an event that occurred to it. A simple example might be a button class that tells another class that it has been clicked on. Right-click on the object—in this case it's the FBSession object—and choose Jump to Definition. Scroll down the file a bit until you find the sessionForApplication. It should look like the following code listing:
+ (FBSession*)sessionForApplication:(NSString*)key secret:(NSString*)secret
    delegate:(id<FBSessionDelegate>)delegate {
  FBSession* session = [[[FBSession alloc] initWithKey:key secret:secret
    getSessionProxy:nil] autorelease];
  [session.delegates addObject:delegate];
  return session;
}
If you look on the second line you will see the FBSessionDelegate class. Right-click on FBSessionDelegate and select Jump to Definition. This opens the FBSession.h file and locates the definition of the FBSessionDelegate delegate:
@protocol FBSessionDelegate <NSObject>
/**
 * Called when a user has successfully logged in and begun a session.
 */
- (void)session:(FBSession*)session didLogin:(FBUID)uid;
@optional
/**
 * Called when a session is about to log out.
 */
- (void)session:(FBSession*)session willLogout:(FBUID)uid;
/**
 * Called when a session has logged out.
 */
- (void)sessionDidLogout:(FBSession*)session;
@end
A protocol in Objective-C is functionally equivalent to an interface in most other modern programming languages. More specifically, a protocol is a list of methods that any class that wishes to adopt the protocol must implement. You can also look at it as a contract that must be met and that the compiler will enforce before allowing the application to compile.
Protocols can have both required and optional methods. By default, methods are required in a protocol. If you read through the FBSessionDelegate listing, you will first see the didLogin method, followed by the willLogout and sessionDidLogout methods. Notice the @optional keyword; all methods following this keyword are optional. So the didLogin method is required, and the willLogout and sessionDidLogout methods are optional.
Tip
Become a fan of the "iPhone Game Programming Book" on Facebook at www.facebook.com. We will be sure to provide updates and announcements here.
If you were to try and build the application now, the compiler would generate the following warning:
Warning: class 'MainViewController' does not implement the 'FBSessionDelegate'
   protocol
This is because when you wrote the following line of code you assigned the FBSessionDelegate to self at the end of the line:
session = [FBSession sessionForApplication: @"<YOUR API KEY>" secret: @"<YOUR
  SECRET KEY>" delegate:self];
Now the compiler is holding you to your end of the bargain. You have learned that the FBSessionDelegate protocol has three methods, two of which are optional. You should add the missing required protocol method to the MainViewController class. We will leave implementing the optional methods as an exercise for the reader.
There is more to implementing a protocol than simply adding the required methods. You also have to mark the containing class with the name of the protocol. Think about it this way: Just because your class has a didLogin method doesn't mean you really intended for it to be used by the FBSessionDelegate. Compilers are not designed to trust coincidences.
Here is how to mark your MainViewController class so that the compiler will know you wanted to implement the FBSessionDelegate. First open the MainViewController.h file and find the following section of code inside it:
#import <UIKit/UIKit.h>
@interface MainViewController : UIViewController {
}
To label the MainViewController as implementing the FBSessionDelegate protocol, you need to add the name of the protocol to the inside of a pair of angle brackets right before the curly braces:
#import <UIKit/UIKit.h>
#import "FBConnect/FBConnect.h"
@interface MainViewController : UIViewController <FBSessionDelegate> {
}
Also notice how you will need to add a new import statement to the MainViewController.h file. This instructs the compiler where to search to learn what makes the FBSessionDelegate work.
By adding the FBSessionDelegate to your MainViewController.h file, you are promising the compiler that it will be able to find any methods required by the FBSessionDelegate in your MainViewController.m file. That means at a minimum you will need to implement the didLogin method of the FBSessionDelegate in your MainViewController.m file.
Add the following didLogin method to your MainViewController class. This code displays an alert view to the user when the application is able to log in to Facebook Connect. The alert view displays the text "Oh Yeah!" and waits for the user to click the OK button to close the dialog box:
////////////////////////////////////////////////////////////////////////////////
// FBSessionDelegate
- (void)session:(FBSession*)session didLogin:(FBUID)uid
{

UIAlertView *alert = [[UIAlertView alloc] initWithTitle:nil message:@"Oh Yeah!" delegate:self cancelButtonTitle:@"OK" otherButtonTitles:nil];
[alert show];
[alert release];
}
Take a moment to examine the code for the UIAlertView. One way to learn more about a class in Xcode is to right-click on it, and chose Find Selected Text in API Reference.
Note
You will likely create many alert view dialog boxes in your iPhone applications. They are a great way to present information to users.
Do this now for the UIAlertView. You can now read through the official API Reference documentation, as shown in Figure 6.24. Here you can find much more detailed information about the selected object:
The Overview section offers a quick synopsis of the object's function and features.
The Tasks section highlights the most common tasks for that object.
The Properties section gives you a detailed listing of all properties and methods with full explanations of how each one works.
We recommend referring to the official API Reference frequently. You will learn more about Objective-C and iPhone programming every time you do so.
Did you notice that the UIAlertView has a delegate of its own? This delegate gives you a way to be notified when the user responds to the alert view by clicking one of its buttons. You could learn more about this delegate by choosing Jump to Definition on the UIAlertView, or you could look it up in the API Reference documentation by choosing Find Selected Text in API Reference. Either way, you will learn that the UIAlertView implements the UIAlertViewDelegate, and that all of its methods are marked optional. The default behavior of the alert view is to close the view when the user clicks the Cancel button, but you can optionally implement the alertViewCancel method and respond as needed.

Xcode has another useful tool for finding more information about the code you are writing. It is called the Research Assistant. You can enable the Research Assistant by choosing Help
The Research Assistant provides real-time, context-sensitive help. This means that as you type, the Research Assistant shows information related to what you have just typed. It contains the following types of related information: a simple abstract, availability of the feature, related APIs, related documents, and even links to sample code. There is no question that the Research Assistant feature of Xcode can help you learn more and do more in less time. And it's easier than trying to learn everything on your own.

Now you should be able to build your project without any warnings related to FBSessionDelegate. But you will get a warning related to using an undeclared variable named session:
Error: 'session' undeclared (first use in this function)
That is because back when you wrote your line of code to assign the FBSession object to your session object, you did not declare the session variable:
session = [FBSession sessionForApplication: @"<YOUR API KEY>" secret: @"<YOUR
  SECRET KEY>" delegate:self];
The compiler cannot implicitly tell if the session variable is an FBSession object, a string, or even an int field. Since the session variable needs to be an FBSession object, you should update your project to correct for this:
FBSession *session = [FBSession sessionForApplication: @"<YOUR API KEY>" secret:
   @"<YOUR SECRET KEY>" delegate:self];
If you try to build your application now, you should be rewarded with a Build succeeded message from Xcode. However, if you run the application, it will not function as expected. You will not see the alert you added to the didLogin method. This is because the session variable scope is limited to the viewDidLoad method. It is only "alive" during this time.
By the time Facebook has enough of a chance to respond to the application's session request, Xcode has already cleaned up the session variable. You will need to use the retain method to tell Xcode to keep this variable until you are done with it. According to Xcode's API Reference, "You send an object a retain message when you want to prevent it from being deallocated without your express permission." And that is exactly what you want to do in this case.
The last thing you need to do to receive the didLogin event is to promote a local session variable inside viewDidLoad to a property. Open the MainViewController.h file and declare a new FBSession variable named session. Your MainViewController.h file should now match the following code listing:
#import <UIKit/UIKit.h>
#import "FBConnect/FBConnect.h"
@interface MainViewController : UIViewController <FBSessionDelegate> {
     FBSession* session;
}
@end
You will also need to update the MainViewController.m file. Since you have declared the session variable already in the MainViewController.h file, you do not need to declare it again in the MainViewController.m file. Update your viewDidLoad method to match the following:
session = [[FBSession sessionForApplication: @"<YOUR API KEY>" secret: @"<YOUR
  SECRET KEY>" delegate:self] retain];
Since you have used retain to tell Xcode you want to keep the session variable active, you are responsible for telling Xcode when you are done with the session variable. You will want to keep the session variable around for the whole lifetime of the application, basically for as long as it is running. When the application is closed, it will call the dealloc method inside the MainViewController.m file. You can use the following code to tell Xcode to release the variable session from usage:
- (void)dealloc
{
  [session release];
  [super dealloc];
}Once you have a session for your application, you can ask the user to log in. The easiest way to do this is to add a standard login button to your application. The following line of code automatically displays the login dialog box when the user touches it:
FBLoginButton* button = [[[FBLoginButton alloc] init]
   autorelease];
button.style = FBLoginButtonStyleWide;
[self.view addSubview:button];
If you update your viewDidLoad method with this code, it should now look something like this:
- (void)viewDidLoad
{

   session = [FBSession sessionForApplication: @"<YOUR API KEY>" secret: @"<YOUR
   SECRET KEY>" delegate:self];
FBLoginButton* button = [[[FBLoginButton alloc] init] autorelease];
button.style = FBLoginButtonStyleWide;
[self.view addSubview:button];
 }
The FBLoginButtonStyleWide is an enumeration setting to tell Xcode to use the wider button style when creating the button to show on the screen. You can also try FBLoginButtonStyleNormal, which is the default, to see how you like it. Now if you click Build and Go, you should see the Facebook Connect–enabled iPhone application screen shown in Figure 6.26.
One cosmetic feature that is different between your application and the Facebook Connect sample application is the background color. Let's take a moment and learn how to set your application's background to the color of your choosing. In Xcode, find the Groups & Files listing, and then locate the Resources folder under the Facebook project. Click on this folder to expand it and find the MainView.xib file.

Double-click on this file to open it in Interface Builder. Click in the Main View window, and then choose Tools

You don't have to use the FBLoginButton to allow users to connect to Facebook. You can force the Facebook Connect login dialog box to show manually by calling the following code:
FBLoginDialog* dialog = [[[FBLoginDialog alloc] initWithSession:session]
   autorelease];
   [dialog show];
The FBLoginDialog works very similarly to the UIAlertView that you learned about earlier in the chapter. Once the user has successfully logged in, the session object passed to initWithSession will have a valid session key from Facebook. One good feature that you get for free by using the FBLoginButton is that it automatically becomes a Logout button once the user has logged in.
Whether you allow users to log in to Facebook using the FBLoginButton or the FBLoginDialog in your Facebook application, once the user has logged in successfully, the didLogin method you created is fired and the user sees the screen shown in Figure 6.28.

If the user checks the Keep me logged in check box in the Connect to Facebook dialog box, the session never expires. By default, the session object expires after two hours. The FBSession object stores the session information in your application's preferences so that it can be reused later automatically.
The FBSession object has a special method named resume, which you can call to automatically resume a previous session if it is still valid. Update your viewDidLoad method to match the following code listing to enable this functionality:
- (void)viewDidLoad
{
    [session resume];
    session = [[FBSession sessionForApplication:@"<YOUR API KEY>" secret:@" <YOUR SECRET KEY>" delegate:self] retain];

    FBLoginButton* button = [[[FBLoginButton alloc] init] autorelease];
    button.style = FBLoginButtonStyleWide;
    [self.view addSubview:button];
 }
The resume method returns a YES or a NO, depending on whether it found an active session, which you can use to customize your application to the current situation. The FBLoginButton is session aware. If the resume method is able to restore an active session, the FBLoginButton works as a Logout button; otherwise, it functions as a Login button.
The FBLoginButton can automatically handle the details of logging out the user, or you can programmatically do this yourself by calling the following code:
[session logout];
You are able to access many of the Facebook API calls from your application once you have an active session. But as we mentioned earlier in the chapter, some actions require additional permission before the Facebook Connect API allows your application to perform them. These actions require the user to directly give you explicit permission to perform them. Some examples of tasks that require extended permissions are updating the user's status, sending the user e-mail, or accessing the user's information when the user isn't logged in to your application. To ask your users for extended permission, you need to call FBPermissionDialog.
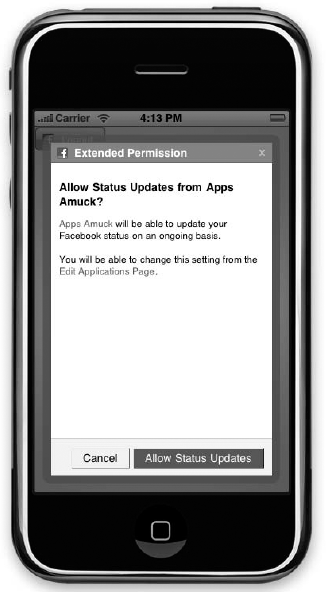
The following code listing shows how to create an FBPermissionDialog that requests permission from the user to update his Facebook status, as shown in Figure 6.29:
FBPermissionDialog* dialog = [[[FBPermissionDialog alloc] init] autorelease];
dialog.delegate = self;
dialog.permission = @"status_update";
[dialog show];
You might have noticed that on the second line you set the FBPermissionDialog's delegate to self. That means that the FBPermissionDialog has a delegate that you will need to implement in the MainViewController, just like you did for the FBSessionDelegate.
The FBPermissionDialog's definition is named FBDialogDelegate. All of its methods are optional, and it has three methods available for you to take advantage of: dialogDidSucceed, dialogDidCancel, and didFailWithError methods. Notice that all of the methods have meaningful names. A method has a meaningful name when it is easy for other developers to guess what the function does from reading its name.
If you show the user the FBPermissionDialog and then the dialogDidSucceed method is called, you know the user wanted to grant your application an extended permission and Facebook made it happen. If instead the dialogDidCancel method is called, you know the user did not want you to perform the requested action. If the didFailWithError function happens, you know something went wrong, and you will have to look at the provided NSError object to learn exactly what happened.
Note
Always try to give your methods meaningful names. This not only helps prevent confusion when others read your code, but it also makes it easier for you to remember a function's purpose when you return to it later.
You will use the status_update extended permission with the FBPermissionDialog to get permission from the user to access his profile information. If the user agrees to give you permission, you will read his user name and display it in an alert view. In order to be able to do this, you need to implement the FBDialogDelegate's optional method dialogDidSucceed so that your application will be notified if and when the user agrees to share his profile information. For good measure, you will implement all three of the FBDialogDelegate's optional methods.
First, update your MainViewController.h file by adding the FBDialogDelegate to the MainViewController's declaration:
#import <UIKit/UIKit.h>
#import "FBConnect/FBConnect.h"
@interface MainViewController : UIViewController <FBSessionDelegate, FBDialogDelegate> {
     FBSession* session;
}
@end
Next, edit your MainViewController.m file to add all of the FBDialogDelegate methods:
/////////////////////////////////////////////////////////////////////
// FBDialogDelegate
- (void)dialogDidSucceed:(FBDialog*)dialog
{
    NSLog(@"dialogDidSucceed Called");
}
- (void)dialogDidCancel:(FBDialog*)dialog
{
    NSLog(@"dialogDidCancel Called");
}
- (void)dialog:(FBDialog*)dialog didFailWithError:(NSError*)error
{
    NSLog([NSString stringWithFormat:@"Error(%d) %@", error.code,
    error.localizedDescription]);
}
NSLog provides one of the most important debugging tools for your iPhone arsenal. It allows you to write debug output to Xcode's Debugger Console window (see Figure 6.30). The code you wrote to implement the FBDialogDelegate uses NSLog to record which method was called. And in the case of didFailWithError, it records the error code as well.

As applications become more and more complex over time, NSLog allows a developer a back door into the application's workings so that troubleshooting is as little trouble as possible. You can pass variables into NSLog as well, as shown in the following code:
NSLog(@"Logged in as %@", name);
Tip
NSLog is an iPhone developer's best friend. Be sure to look up NSLog in the Research Assistant, in the API Reference, or online again and again until you learn to fully master its capabilities.
Now you need to update the dialogDidSucceed method to display the name of the logged-in user. The following code does just that:
- (void)dialogDidSucceed:(FBDialog*)dialog
{
    NSLog(@"dialogDidSucceed Called");
    NSArray* users = result;
    NSDictionary* user = [users objectAtIndex:0];
    NSString* name = [user objectForKey:@"name"];
    UIAlertView *alert =
    [[UIAlertView alloc] initWithTitle:nil message:name delegate:self
    cancelButtonTitle:@"OK" otherButtonTitles:nil];
    [alert show];
    [alert release];
}
There are currently ten extended permissions that your application can request. Each extended permission must be authorized by a user individually. In other words, you cannot request more than one extended permission at a time without showing the FBPermissionDialog multiple times.
Here is a listing of available extended permissions:
email. Allows an application to send e-mail to the logged in user
offline_access. Allows an application to access a user's data even when the user is not online and does not have an active session
status_update. Grants an application permission to set the user's Facebook status
photo_update. Allows the application to post photos to the user's profile without the user having to approve them
create_event. Grants an app permission to create and modify events for the user
rsvp_event. Allows an application permission to RSVP to an event for the user
sms. Allows an application the ability to send and respond to the user via text messages
video_upload. Allows an app a way to upload videos to post videos to the user's Facebook profile
create_note. Allows the application to write, edit, and delete notes on the user's profile
share_item. Grants an application the right to post links to the profile of the logged-in user
The ability to publish stories to a user's profile is one of the most exciting features you gain by using the Facebook Connect API. The key to publishing your application's story to your user's profile is the FBFeedDialog object. You can see the screen that is generated from this code in Figure 6.31:
FBFeedDialog* dialog = [[[FBFeedDialog alloc] init] autorelease];
    dialog.delegate = self;
    dialog.templateBundleId = 30126546835;
    dialog.templateData = @"{"score": "53324", "rank": "Captain"}";
    [dialog show];
You can use the Facebook Platform API directly from the iPhone or you can use it remotely from servers of your own. The advantage of using it from the iPhone is convenience; the advantage of using your own servers is power and flexibility. If you want to use your own servers, you would send the session key and the session secret to your servers, and have them return the result. The following code shows you how to use the Facebook Connect API to call the Facebook Platform API to get the user's name:
- (void)getUserName
{
NSString* fql = @"select name from user where uid == 1234";
NSDictionary* params = [NSDictionary dictionaryWithObject:fql forKey:@"query"];
[[FBRequest requestWithDelegate:self] call:@"facebook.fql.query" params:params];
}
 - (void)request:(FBRequest*)request didLoad:(id)result
{
NSArray* users = result;
NSDictionary* user = [users objectAtIndex:0];
NSString* name = [user objectForKey:@"name"];
NSLog(@"Query returned %@", name);
}
The full Facebook Platform API is a much richer, more complete, and more powerful API compared to the Facebook Connect API. Whatever functionality Facebook lets developers have access to can be accomplished through using the Facebook Platform APIs.
Tip
You can learn more about the Facebook Platform APIs at http://wiki.developers.facebook.com/index.php/API. This is where the developer's wiki is located with information regarding all of the API methods.
Notice how the Connect to Facebook dialog box uses information from your iPhone Test App's settings. The application name is shown to the user in the text at the top of the screen. Additionally, your application's logo image is displayed in the dialog box. By doing this, Facebook announces your application to users using text and images.
By taking advantage of Facebook Connect for iPhone, you have let Facebook do all the heavy lifting for you. You don't have to build your own community portal for your iPhone application. You can take advantage of one of the largest online communities in the world. Facebook has a great reputation and people trust Facebook with their digital lives.
You are getting to use Facebook's trusted authentication system. Users never give you their Facebook credentials, which protects them and you. Not only do you not have to worry about securing this information, you don't have to worry about supporting the infrastructure required to maintain this system. Facebook pays the bills for all the hardware, electricity, and people needed to make everything work. This saves you both time and money.
Another benefit of using Facebook Connect for iPhone is that users of your applications can make sure of their Facebook identity information. People have already set up their profiles on Facebook, with their real names, photos, and personal information. Instead of having to enter in yet another user for yet another application and duplicate their information once again, they can simply click an Allow button and do it in one simple step through Facebook Connect.
Your application can also be granted access to the user's friends list stored on Facebook. This could be used for in-game chatting, multiplayer games, and more.
Because Facebook uses dynamic privacy, users can allow and disallow access to their personal information as needed and as they see fit. This keeps users in power, and helps them feel safe sharing their personal and confidential information with people who are, in effect, strangers. Users always have the option to not allow an application access to their information. An application can never have permanent access to a user's personal data.
Facebook is all about helping people connect and share with other people in their lives. Because it is built from the ground up to accomplish this one goal, it is a great mechanism to enable social distribution of your application. Many Facebook applications have millions of monthly active users. By tapping into this resource, you open your application up to many new users who may not have heard of your application otherwise.
Note
It is up to iPhone developers like you to create tomorrow's great iPhone game experiences. Now take what you have learned and create something amazing. Start from the foundation we have provided you and add something great to it!
You have now learned a great deal about the technical aspects of Facebook Connect on how to integrate and take advantage of this great new technology. It is time to consider the business side of the coin and how you can leverage Facebook Connect into creating more successful iPhone apps.
With all the great capabilities you have seen so far, it might surprise you to know that we have not yet covered one of the best features of the Facebook Connect API: It is completely and entirely free. Not only that, you don't have to pay Facebook anything to register as a Facebook developer. Facebook spends well over one million dollars per month on electricity alone to power all the servers in their datacenters. When you start to add up hardware, bandwidth, and personnel costs, the overhead expense becomes truly large (for them, not you). Any time your application can freely use services provided by and paid for by another party, it is effectively money in the bank for you.
Another great feature of using the Facebook Connect API is that your application can stand out in the crowd of other iPhone applications on the App Store. Now that there are currently more than 35,000 applications on the App Store, it's more important than ever to differentiate your product from your competitors' products. Each user profile update on Facebook from your app is effectively free advertising for your application. Links to a Web page can even be included, which makes this an effective form of viral marketing. Currently there have been more than one billion applications downloaded from the App Store, and users want to see something new and exciting. If two applications have the same basic features and functionality, then one of them is unnecessary—and the market will likely reflect and react to this over time.
Another great feature of using the Facebook Connect API is that you might qualify for seed funding from the fbFund, a fund focused on continuing to create incentives for the development of social and engaging experiences with Facebook Connect. Seed funding is when an established company provides funding for another company's idea at a very early stage. The fund started with 10 million dollars in capital, which is given out in investments ranging from $25,000 to $100,000.
Tip
You can learn more about the fbFund at http://developers.facebook.com/fbFund.php, or go to www.facebook.com/fbFund and become a fan.
Here is a list of the selection criteria from the fbFund home page:
Originality of concept. Have you created something new and original?
Market. Will this application appeal to the masses or just your close friends?
Social/useful. Can this application bring people together? And will users both enjoy it and find it useful?
Expressive. Does this application allow people to better express themselves?
Intuitive. Is the application easy to use and user friendly?
Potential. Will the application make money, and if so, how much and how soon?
Team. Why should people believe that you will succeed?
Facebook Connect represents a win-win situation for both the iPhone application developer and the user. The developer wins because Facebook Connect–enabled applications become a part of the user's social ecosystem. It is the user who will promote her application experience to her friends, request her friends to play against her on her device, and choose to invite your application further into her digital life and her friends' online lives on Facebook.
The user wins because he can bring his friends with him into any Facebook Connect–enabled application. Some games allow you to play against the computer, some games allow you to play against a nearby friend, and some games even allow you to play against others online. But with Facebook Connect, you have the opportunity to play against your friends, wherever they may be, and the results can be posted to the player's profiles for the world to see.
Because Facebook Connect gives your iPhone application access to the full Facebook Platform API, you can look to other traditional Facebook applications for ideas on how you can create the next great iPhone app. Since Facebook applications can have leader boards, chat rooms, and much more, this is a great opportunity to make something truly unique to the App Store.
The decision to use Facebook Connect is almost a marketing strategy in and of itself. Marketing is one of the most compelling reasons why you should use Facebook Connect. Facebook Connect effectively comes with its own built-in viral marketing system that includes over 200 million active users. Your application users are your best salespeople; Facebook Connect makes it easy for them to close the deal.
An idea that has become really powerful in building community in many modern games is creating an achievement system. The idea is to reward the user for accomplishing some game achievement with a badge or status. For example, say you have created a Facebook Connect–enabled iPhone game called Zombie Warrior. If the player makes it through a level without taking on any damage, you offer him an "Untouchable" badge that he can proudly post to his Facebook profile page. Or the player could win a "Zombie Slayer" badge if he makes it through the town and destroys all the zombies in his path.
Be sure to think outside the box when it comes to Facebook. Don't limit yourself to using Facebook Connect for the iPhone. For example, if you create a great iPhone application, consider whether it could be a great Facebook application as well. If so, how about letting Facebook users play against iPhone users? You could even create a special scoreboard to see who the best is.
Tip
Be sure to become a fan of "Apps Amuck" on Facebook at www.facebook.com/pages/AppsAmuck/106607134124. We will provide updates and announcements here.
Today many companies and brands are setting up pages on Facebook and elsewhere. If soda companies have fan pages on Facebook for their products, why don't you? Even Facebook does this. For example, not only can you install the Facebook developer application, you can become a fan of it, and you interact with both the Facebook developer application team and other fans. Again, you can do all of this for free, and without having to set up or provide any of the infrastructure.
Now that Facebook Connect is available for the iPhone, you can integrate the power of the Facebook platform into your iPhone application. Users of your Facebook Connect iPhone applications can share their experiences with their Facebook friends. Users know that their private data is still safe and secure in your application even though they may not know you.
In this chapter you learned how you could build community for your iPhone app creations using the Facebook Connect API. First you covered the basics of what Facebook is and what it offers members and developers. Next you looked at how to get started developing for Facebook and Facebook Connect.
You reviewed the Facebook Connect iPhone sample and then tackled creating a Facebook Connect iPhone application from scratch. You also learned how to create a Facebook application that runs inside of Facebook itself. You used the application to create template bundles for publishing stories to user feeds. You learned the details of the FBSession and FBLoginButton objects. Then you learned how to directly access the Facebook Platform API from your iPhone application using Facebook Connect.
Users have come to expect to be immersed in great experiences on the iPhone, but now they want to be able to share those experiences with their friends. Facebook has provided a great tool for developers to use to make this happen with Facebook Connect. We have only begun to see what is possible today. Go to http://appsamuck.com to send us a note and show us what you've done!