In This Chapter
Examining turn-based game play
Understanding game design: Strategy
Choosing your connection options
Finding friends to compete against
Programming: Amuck-Tac-Toe
Analyzing business aspects
Now that you have been exposed to connecting players in real time, the transition to turn-based game play should be relatively straightforward. Turn-based games do not carry the technical obstacles you face in real-time game development. The game state in a turn-based game is much more portable and the players' moves are not as time sensitive. With fewer obstacles, you can connect players in many more ways.
Of course, you can (and should) still use peer-to-peer and head-to-head connections, but now you can easily connect players who are miles away with the assistance of a Web server. In this chapter we'll guide you through the process of creating the client side of an app that calls Web services to share messages between players. This by itself is powerful, but then you are going to throw fuel on the fire by adding push notification. With push notification you can give a player the power to initiate a game with a friend who may not even have your application up and running. Push notification can update a badge, display an alert, and play a sound. When the opponent accepts the challenge from the alert, the game can launch as soon as his friend is ready.
We have chosen to discuss these topics in the context of our version of the classic game tic-tac-toe, which we are calling it Amuck-Tac-Toe. Most turn-based games closely follow the same pattern as a board game. This version of Amuck-Tac-Toe is no different. There are turns, moves, and a common game state for the server to manage and the client to display.
You have probably heard about the value of viral sales time and again. From a business perspective, viral sales should be your overriding goal in turn-based games. For example, assume you want to play Amuck-Tac-Toe with a friend and you know he has an iPhone; however, you don't know if he has the app installed. You could supply your friend's e-mail address and then make your first move, which can send an e-mail to your friend asking her to play. The e-mail she receives contains an iTunes App Store link to install your application. You can expect more and more sales to come from word of mouth as friends ask other friends to compete.
We mentioned that turn-based games present fewer technical obstacles to developers than real-time games do. While packet latency is still present, it does not adversely affect game play, and that makes a huge difference in implementation. In a turn-based game, the client generally only needs to send updates to the other player at the close of each turn. Since latency usually falls in the sub-second range, the other player won't even notice the small delay. In fact, the players spend most of their time waiting on the other player to make a move not on the network.
Note
For more on packet loss and packet latency, see Chapter 7.
Let's examine the flow of the classic tic-tac-toe game to understand the fundamentals of the process. In tic-tac-toe, players take turns placing Xs or Os on a three-by-three grid until one player places three in a row or the game is declared a draw (Figure 8.1).

Now let's break down a full game into all of the moves and steps necessary to carry the play from beginning to end. This will help in understanding how a system could be designed to emulate the same behavior. For this example, we examine the moves when Bob and Laurie play a game of tic-tac-toe (Figure 8.2):
Bob moves first, placing an X in the top-right square.
Laurie places an O in the middle square.
Bob places an X in the bottom-left square.
Laurie places an O in the top-left square.
Bob places an X in the bottom-right square.
Laurie places an O in the bottom-middle square.
Bob places an X in the right-middle square, giving him three Xs in a row and winning the game.
This is simple enough, especially when it is carried out with pencil and paper. Our challenge is to understand the process so we can translate it to game logic.
Reflecting on what you just saw in the game, you can extract the different stages and the actions necessary to move through the process. With this information you can construct a diagram that defines and illustrates the relationship between your states and actions (Figure 8.3).

Your application should carry the players through each of these stages. Along the way make sure to keep track of the following game attributes:
Record information on each player. Make sure you can reconnect later if the connection is lost or if the game play is suspended. Use this same information to quickly start up new matches.
Record the state at each step in the process. Make sure the game can pick up where it left off.
Record the game board after each move. For example, in tic-tac-toe you would record the value of every cell in the three-by-three grid.
As a bonus, keep track of win/loss results between players to foster competiveness.
In the real-time game world we did not try to store the state as it progressed. That would not have been feasible, but it is also much less valuable in a head-to-head or peer-to-peer game. It's important to save the game state so that your players can pause and resume the game at their leisure. This feature of turn-based games can be a huge draw. Games that players would normally never have time to engage in become feasible. A player can spend a few moments making a move, then stick his iPhone back in his pocket until he is alerted that his opponent has made a countermove. In this way games can last for hours or even days.
Some turn-based games carry an element of luck, but the best ones are all about strategy. For example, as you saw in Chapter 3, chess is a turn-based game where strategy rules. In chess, players are equally yoked and one does not have an advantage over the other, nor does luck really play a part. Players' moves are based on strategic decisions and not by the roll of the dice or the luck of the draw. The element of strategy is probably one of the reasons this game has stood the test of time. Even though there are only half a dozen different pieces on the board, players develop thousands of different strategies for playing the game.
Tip
A game that requires strategy will hold your players' interest much longer than a game based on luck. Make it your goal to create a game that encourages players to develop and devise strategies. A rich set of rules, boundaries, and options will equip players with the tools necessary to develop personalized strategies they can use to defeat their opponents.
While there is some strategy involved, it's not a strong point of classic tic-tac-toe, because players soon discover what the optimal move is in every situation. If two players know the strategy, their game will always end in a tie. If players had more options, they could mix it up a little and begin to develop more than one strategy to throw at their opponent. This allows players to surprise each other by changing their angle of attack. The lesson here is to make sure your game has enough depth. Challenge your players, help them develop strategy, and you'll keep them coming back for more.
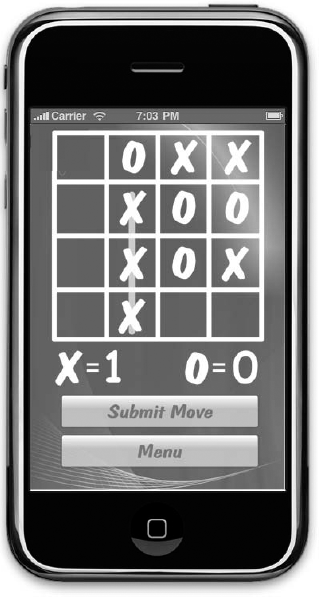
If you look at the current version of Amuck-Tac-Toe, you will see that it is not your typical version of tic-tac-toe (Figure 8.4).
In the design process of the Amuck-Tac-Toe game, we chose to follow the advice we are offering here. Amuck-Tac-Toe is a spiced-up version of classic tic-tac-toe. This was done in an effort to create the additional opportunity for players to develop strategy. We expanded the board to four-by-four. If a player gets three Xs or Os in a row, she scores a point instead of winning. When the board has been filled, the player with the most points wins.
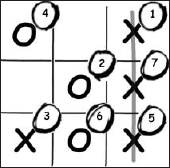
After some test runs on paper, it became obvious that the player who moves first always has the upper hand in the game and can always win. In order to balance the game more, a special cancel move was added. This move can be used by each player once during the game. Here's how the cancel move works. When a player decides to use the cancel move, she chooses a square that the opposing player occupies. For example, if your opponent is using Xs, the cancel move must be placed on a square that already has an X in it. When the cancel move is placed, the X square is converted to the cancel symbol (a circle with a slash through it, shown in Figure 8.5). Now that square will be ignored for the remainder of the game. Neither player can use that square again.

Figure 8.5. Amuck-Tac-Toe after a player uses the special cancel move to cancel one of the opponent's squares
Simple changes like these are often enough to add a little extra dimension to a classic pastime. See if you can devise your own strategies to add even more variety and depth to the game.
Turn-based games afford you a great deal of flexibility when it comes to connectivity options. Most of the time the information necessary to represent a game can be transported and stored with ease. When developing turn-based games, the game state carries a smaller footprint, the latency becomes negligible, and reliable messaging becomes the norm. Here are just a few of your many different connection options:
Head-to-head
Peer-to-peer
Web services
Push notification
Head-to-head is not just for real-time games. Old-school tic-tac-toe played on paper is a perfect demonstration of a head-to-head game in one of its oldest forms. Usually it does not take a lot of additional effort to incorporate this connection style into your game if it makes sense.
Here are some pros and cons of supporting head-to-head:
Two players can play against each other with just a single device.
It does not require an Internet connection.
It is usually an easy addition to an existing game.
Players do not have to deal with establishing a connection to another player.
In Chapter 7 we discussed establishing peer-to-peer connections. Most of the same lessons apply to turn-based games. All you need to do is follow the same steps as you did in the last chapter to establish a connection. The good news is that when you send messages, you don't need to deal with unreliable messages.
Here are some pros and cons of supporting peer-to-peer:
It's the easiest way to connect two devices.
It does not require an Internet connection.
It does not require a Web server to manage connections.
It provides more than enough throughput for just about any turn-based game.
Another option is to connect your players through a central server using Web services. To do this you will need to construct a centralized server that can relay messages between players who are connected. For turn-based games, this can be accomplished with an HTTP server that can serve dynamic content. This should be a straightforward task for anyone who is familiar with hosting dynamic Web pages. To service the needs of a turn-based game, you could use a server side language like PHP, Perl, Java, .NET... and the list goes on and on. Whichever technology you pick, you will need to expose services that your application can consume. We'll go into more depth on this topic later in this chapter.
Here are some pros and cons of using Web services:
Players can connect to anyone in the world who can connect to the Internet.
It has a strong potential for viral sales.
It can connect with all models of iPhones and iPod touches that are connected to the Internet.
The game state can be stored, so a single game could be played with intermittent interaction over the course of several days.
It requires an active Internet connection.
It requires that the application is running for it to receive messages from the other player.
You must host your services on a central Web server. This requires monthly fees and ongoing maintenance.
You have to implement a system for players to advertise, discover, and connect game sessions with players who are miles apart.
Push notification is the newest option you have in your bag of tricks. Using push notification in your game will yield results that are very similar to using Web services. The biggest difference is that you have the ability to send messages to players who do not have your application running. As with Web services, we will cover push notification in more detail when we examine the application later in this chapter.
Here are some pros and cons of using push notification:
Players can connect to anyone else in world who can connect to the Internet.
The application is not required to be running for it to receive notifications from other players.
It has a strong potential for viral sales.
It can work in conjunction with a game using Web services to connect.
The game state can be stored, so a single game could be played with intermittent interaction over the course of several days.
It requires an active Internet connection.
It requires that you host your services on a central Web server, which requires monthly fees and ongoing maintenance.
It requires that you implement a system for players to advertise, discover, and connect game sessions with players who are miles apart.
It require users to be running on iPhone OS 3.0 version. Not all users necessarily upgrade to the latest firmware, particularly in the case of iPod touch users, where the firmware carries an additional expense.
If you choose to play with a head-to-head connection, your opponent is obviously sitting right next to you since you are playing on a single device. Likewise, if you choose to play with a peer-to-peer connection, you're playing with a known opponent who is in close proximity. However, when connecting with a friend using Web services, finding an opponent or friend to play with can be a challenge.
When looking at the pros and cons of connecting with Web services, we mentioned that there are some challenges involved in getting players connected. This is an opportunity for you to be creative; however, implementing a system to connect players in a fun and engaging way can be very time consuming. Be sure to carve out sufficient time in your schedule to make it happen, or you might end up with a great game that does not encourage players to connect. On the other side of the coin, if you do a good job here you can increase sales virally.
When finding friends to connect with, you have many options to consider. There are several user stories you can follow that lead to two players becoming connected. It all depends on how much time you want to put into it. Here are a few questions a player should ask about connecting to other players:
Can I challenge a friend if he has not registered with the game server?
Can I challenge a friend if she does not have the application running?
Can I challenge a friend if he does not have the application installed?
Can I store game results on a leader board?
Can I connect with random players who are looking for a challenge?
In order to establish a connection, you will need a server to relay the messages between the two players. The messaging required by a turn-based game can be managed with a standard HTTP server. HTTP servers are commonplace these days and you can program them to manage the game on the server side. You can develop this server logic using a host of different languages. Developing a Web server is outside the scope of this book, but we'll focus on the client side code necessary to connect to such a server. For more information on server side services, go to our Web site, www.appsamuck.com/gameservices/. There we have links to resources that will help you build and host your own server side services.
Once you have access to a server with the services you need, you can start your connection process. If both of the connecting players have the application installed, establishing a connection is a much smoother process than when it is not installed. There are many ways to approach this process, but the way we have chosen to proceed works much like an e-mail server. In fact, we have chosen the e-mail address to be the value that uniquely identifies players. Here are the basics of the process (see Figure 8.6):
If the application has been launched and no e-mail address has been supplied, prompt the user for his e-mail address. Preferably you would confirm that the e-mail address actually belongs to the user.
If the e-mail address is available, search the game server with the e-mail for friends who are challenging the user.
If the user chooses, he can enter the e-mail address of a friend he wishes to play against. When friends search, they'll see that a buddy is asking to play against them.
You should start with this basic process, but you can (and should) expand on this system to make the process more engaging. For example, you could keep track of a friend list for the user and constantly poll to see if the friends are online. Then the user can just click the name of an online friend and ask him to play.
Note
It is paramount that you make it easy for players to connect or your game will fail. If the connection process is difficult, many players will get frustrated, delete your app, and give you a bad rating.

Connecting players without the application installed is a slightly bigger challenge. However, this is your opportunity to increase your sales virally. It was no accident that we chose to use the e-mail address as the unique identifier. Not only is it unique and verifiable, but we can also use it to communicate with players outside of the constraints of our application. If a player does not have the application installed, we can simply send an e-mail and ask him to install it. Here is an expanded version of the workflow you just looked at, but now we are sending out an e-mail to player 2 if he does not already have the application installed (Figure 8.7).
Push notification is an exciting feature added to the iPhone SDK beginning with version 3.0. Without push notification, you are limited to receiving game requests via e-mail, via SMS, or when your game is open. When you add push notification, you can alert players whenever a friend challenges them to a new game or even when they make a new move. With push notification, you can issue the following alert types:
Alert box. An alert box is a standard alert box similar to the one you see when you receive an SMS text message without the application open.
Sound. A sound alert is exactly what you would expect: a sound that plays when the notification is received. The sound that is played must be in your application bundle.
Badge. A badge is a counter that appears in the corner of your application's Home screen. This is the same badge that you see on other applications such as Mail. For example, when you receive e-mails without the e-mail client open, the number in the e-mail badge will be incremented. You can use badges in your application; however, push notification allows you to set the badge value without opening your application.

Adding push notification to your process definitely enriches the user experience. Implementing push notification is a little more of a challenge than setting up a simple Web server. Your server must maintain a connection to the Apple Push Notification server in order to send push notifications. Figure 8.8 shows a modified version of the workflow you saw earlier, but with the Apple Push Notification server included.
Notice in this workflow that player 2 is interrupted with a phone call. Push notification helps you continue the game flow with a user-friendly experience. Again, building the server side of push notification is outside the scope of this book, but there is good documentation on the Apple Developer Connection site, and example implementations of the server can be found in the user forums for several different server side languages. This information is changing daily; for more information, see Appendix A or check our site, www.appsamuck.com/gameservices/.

If you have followed all of the examples we've presented so far in this book, you already know what is necessary to create iPhone games. The example we explain next will add a few more skills to your repertoire. Amuck-Tac-Toe has a very simple game board and set of rules. We like this because we do not want you to have to spend all of your time learning the details of what makes the game tick. Instead, we want you to focus your attention on the new technologies needed to develop this application. After touching on its design and concepts, you will dig into the details of the app and learn to build turn-based applications of your own.
Any application begins with a good design. Always take time to write down your ideas, even if you just use a napkin. The game screen for Amuck-Tac-Toe is easy enough to envision. We just need a normal tic-tac-toe board with four cells instead of three (Figure 8.9).

We like Balsamiq Mockups (www.balsamiq.com). Using this tool, it is almost as easy to make the mock-ups as if you were sketching them by hand. We used Balsamiq to mock up the game screen. This game has a lot of menu options, so it was handy to mock up the menus before committing a design to code.
The following figures show the menu screens that we mocked up. The first one is the main menu screen—this is the screen that you see when the application first loads (Figure 8.10).

This screen organizes all the options the user needs to be presented to begin playing a game:
Head-to-Head. Choose this option if a player wishes to play a friend sitting next to him using the same device.
Nearby. Choose this option if a player wishes to play a friend nearby on a second device.
Internet. Choose this option if a player wishes to play a friend remotely over the Internet.
Continue. Choose this option if a player wishes to continue a previous game that has not been completed. This allows for a game to be played over the course of days or weeks.
Internet Settings. This option allows the player to change his e-mail address used for identification.
About. This option loads a standard About screen with information about the creators of the game.
In this chapter we're focusing on Internet connections, so we will continue with the mock-ups for these screens. Whenever you click New Internet, the player is given the opportunity to invite or challenge another player to play. When this screen loads, it should look like the one shown in Figure 8.11.
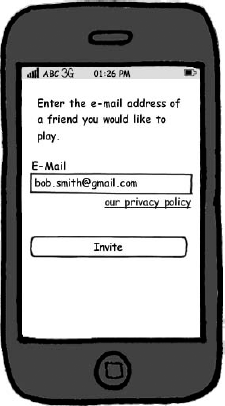
This is the screen that collects the e-mail address necessary to initiate a game with a friend. Once he clicks the Invite button, the player who initiated the game must wait until the player he challenged accepts the challenge. In the event that the initiator closes the Amuck-Tac-Toe application before the friend accepts the challenge, the game is not aborted. The initiator can click Continue at any time to see if the opponent has accepted the challenge (Figure 8.12).
Note
If you are clever in your implementation, you can allow your players to manage several games at once with different friends. This is a great advantage of turn-based games that may not always be feasible in real-time games. When you add push notification to your game, the process gets really powerful. Now, when your friend accepts the challenge, the notification can display as an alert even when the Amuck-Tac-Toe application is closed.

In Amuck-Tac-Toe, we allow players to connect using three different methods. Each of the three methods of connectivity follows a different paradigm. However, the game follows the same rules and workflow regardless of the connection method. For this reason we should abstract the connection details away from the game controller. One way to handle this is to put all of our connectivity logic in a black box that implements the same properties and methods for each of our connectivity types.
To achieve this type of abstraction, a factory pattern works well. You need a factory that instantiates each of your connection types and returns each of them on demand as a common interface. Following is the definition for the base interface and supporting types used in the example:
#import <Foundation/Foundation.h>
typedef enum {
   GameConnectionMessageError = 0,
   GameConnectionMessageConnect,
   GameConnectionMessageDisconnect,
GameConnectionMessageSessionId,
GameConnectionMessageData,
GameConnectionMessageCustom
} GameConnectionMessageType;
@protocol GameConnectionDelegate <NSObject>
@optional
- (void) receiveMessage:(NSString*)message
ofType:(GameConnectionMessageType)messageType;
@end
@interface GameConnection: NSObject {
id <GameConnectionDelegate> _delegate;
}
@property(nonatomic,assign) id /*<GameConnectionDelegate>*/ delegate;
- (void) connectWithPlayerName: (NSString*)playerName;
- (void) connectWithSessionId:(NSString*)sessionId;
- (void) sendMessage:(NSString*)message
asType:(GameConnectionMessageType)messageType;
+ (GameConnection*) createWithName:(NSString*)gameConnectionClassName delegate:(id)gameConnectionDelegate;
@endThere is very little in the implementation of this interface. This class defines how a game connection should send and receive messages in a common fashion. Now the implementation can be deferred to overloading classes. This gives you the ability to extend your application by adding new implementations of the GameConnection class. Each implementation can introduce a new type of connection without changing the actual code for the Game View.
This class can also create the overloading class by passing in the name of the game connection class you want to create to the method createWithName: delegate:. Here are the details of this powerful method:
+ (GameConnection*) createWithName:(NSString*)gameConnectionClassName
   delegate:(id)gameConnectionDelegate {
   id obj = [[NSClassFromString(gameConnectionClassName) alloc] init];
   if (obj == nil) {
      [NSException raise:@"Invalid game connection class name" format:
         @"The game connection class '%@' was not found and cannot be created",
         gameConnectionClassName];
   }
   GameConnection *gameConnection = (GameConnection*)obj;
   gameConnection.delegate = gameConnectionDelegate;
   return gameConnection;
}
This method uses NSClassFromString to instantiate a GameConnection class from its name. If the class cannot be constructed, the method throws an exception. This method is very nice because now the class GameConnection can be completely oblivious to the implementation of any other GameConnection derivative classes.
Now that you have an understanding of how to separate your connection concerns, you can look at the details of this example that differ from the applications you have reviewed up until now. There are a lot of details to this application, but most should be quite familiar to you by now. You can download the full application source to the completed version (Figure 8.13) of Amuck-Tac-Toe from http://appsamuck.com/gamedevbook/amktactoe.

Here are a few items that you may not be familiar with:
These items are fairly straightforward to grasp, and they add a tremendous amount of power to your application. We will start by examining the table view.
Even though we have not covered it, you should be familiar with the appearance of a table view. The UITableView is a very common element in iPhone development. You see it in many of the native apps, such as Settings, Contacts, and Phone. The UITableView is an ideal choice for you to use in your game menus, as shown in Figure 8.14.
In most cases, the UITableView works in close relation to a UINavigationBar. Together these two components create the slide in and out navigation you have become accustomed to on the iPhone. To create this effect, you need to implement the UITableViewDelegate method and push and pop view controllers to the navigation stack. The following listing comes from the main menu screen of Amuck-Tac-Toe, which does just that.
The method viewDidLoad is used to set up a background color that is tiled. This is done by creating a pattern image color:
- (void)viewDidLoad {
    [super viewDidLoad];
   // The title of the main view controller will be used as the title of the
   // navigation bar.
   // This is actually a nice feature of the MVC architecture because if you
   // decide to use a tab view instead it will use the same title.
   self.title = @"Amuck-Tac-Toe Menu";
   UIImage *backgroundImage = [UIImage imageNamed:@"chalkGreen.png"];
   self.view.backgroundColor = [[UIColor alloc]
      initWithPatternImage:backgroundImage];
   self.tableView.sectionHeaderHeight = 30.0f;
   [backgroundImage release];
}

The method numberOfSectionsInTableView: returns the number of sections in a given table view. In our table view we have two. The first is Connection Types and the second is About and Options:
#pragma mark Table view methods
- (NSInteger)numberOfSectionsInTableView:(UITableView *)tableView {
    return 2;
}
Next, we need to implement the method tableView:numberOfRowsInSection. In this method we inform the UITableView how many rows to render per section.
// Customize the number of rows in the table view.
- (NSInteger)tableView:(UITableView *)tableView
   numberOfRowsInSection:(NSInteger)section {
   if (section == 0) {
      return 4;
   }
   else {
      return 2;
   }
}
The method tableView:cellForRowAtIndexPath: (Listing 8.1) is more involved, but you will get the hang of it soon enough. In this method you must return a properly initialized cell view for every row that is requested. You are given the section and row that are requested in the form of an NSIndexPath. Also notice that the cell views are being cached. This is very beneficial for performance. Constructing an object for every row takes time and consumes resources. Be sure to use the cache available to speed up your views.
Note
To download Listing 8.1, go to www.wileydevreference.com and click the Downloads link.
Example 8.1. Supplying Cell Data When the tableView:cellForRowAtIndexPath Method Is Called
// Customize the appearance of table view cells.
- (UITableViewCell *)tableView:(UITableView *)tableView
   cellForRowAtIndexPath:(NSIndexPath *)indexPath {
   static NSString *CellIdentifier = @"Cell";
   static NSString *SubtitleCellIdentifier = @"SubtitleCell";
   UITableViewCell *cell = [tableView
      dequeueReusableCellWithIdentifier:CellIdentifier];
   UITableViewCell *subtitleCell = [tableView
      dequeueReusableCellWithIdentifier:SubtitleCellIdentifier];
   if (cell == nil) {
   cell = [[[UITableViewCell alloc]
      initWithStyle:UITableViewCellStyleDefault reuseIdentifier:CellIdentifier]
      autorelease];
    }
   if (subtitleCell == nil) {
      subtitleCell = [[[UITableViewCell alloc]
initWithStyle:UITableViewCellStyleSubtitle
reuseIdentifier:SubtitleCellIdentifier] autorelease];
}
if (indexPath.section == 0) {
switch (indexPath.row) {
case 0:
cell.textLabel.text = @"Head-to-Head";
cell.accessoryType = UITableViewCellAccessoryDetailDisclosureButton;
return cell;
case 1:
cell.textLabel.text = @"Nearby";
cell.accessoryType = UITableViewCellAccessoryDetailDisclosureButton;
return cell;
case 2:
cell.textLabel.text = @"New Internet";
cell.accessoryType = UITableViewCellAccessoryDisclosureIndicator;
return cell;
default:
if (self.activeGameCount > 0) {
subtitleCell.textLabel.text = @"Continue";
NSString *gameText =
self.activeGameCount > 1 ? @"games" : @"game";
subtitleCell.detailTextLabel.text = [NSString
stringWithFormat:@"%d %@ currently active",
self.activeGameCount, gameText];
subtitleCell.accessoryType =
UITableViewCellAccessoryDisclosureIndicator;
return subtitleCell;
}
cell.textLabel.text = @"Continue";
cell.accessoryType = UITableViewCellAccessoryDisclosureIndicator;
return cell;
}
}
else {
switch (indexPath.row) {
case 0:
cell.textLabel.text = @"Internet Settings";
cell.detailTextLabel.text = @"Change your connection options";
cell.accessoryType = UITableViewCellAccessoryDisclosureIndicator;
return cell;
default:
cell.textLabel.text = @"About";
cell.accessoryType = UITableViewCellAccessoryDisclosureIndicator;
return cell;
}
}
}The method tableView:viewForHeaderInSection: has been used to customize the appearance of the head on each of our sections. All we need to do is supply a UIView for each header callback:
- (UIView *)tableView: (UITableView *)tableView viewForHeaderInSection:
  (NSInteger)section {
   UIView *headerView = [[UIView alloc] initWithFrame:CGRectMake(0, 0,
      self.tableView.bounds.size.width, 30)];
   UILabel *headerLabel = [[UILabel alloc] initWithFrame:CGRectMake(10, 0,
      headerView.bounds.size.width, 30)];
   headerLabel.backgroundColor = [UIColor clearColor];
   headerLabel.font = [UIFont boldSystemFontOfSize:18];
   headerLabel.textColor = [UIColor whiteColor];

   if (section == 0)
      headerLabel.text = @"Game";
   else
      headerLabel.text = @"Preferences";

   [headerView addSubview:headerLabel];
   return headerView;
}
There are a handful of methods that push a view on the UINavigationBar. The one here serves as a sample of how to accomplish this. The push occurs when pushViewController:animated: is called:
- (void) startNewInternetGame {
   NewInternetGameMenuViewController *newInternetGameMenuViewController =
      [[NewInternetGameMenuViewController alloc]
         initWithNibName:@"NewInternetGameMenuViewController" bundle:nil];
   [self.navigationController
      pushViewController:newInternetGameMenuViewController animated:YES];
   [newInternetGameMenuViewController release];
}
A little deeper in the code, the Game View is loaded. Following is an example of how this is done. This is where the abstraction we talked about earlier in the chapter comes into play. The GameViewController is created and a game connection is injected into it. This injection type is based on the game class name we pass to GameConnection:createWithName: delegate: as follows:
GameViewController *gameViewController = [[GameViewController alloc] initWithNib
   Name:@"GameViewController" bundle:nil];
gameViewController.gameConnection = [GameConnection
   createWithName:@"InternetGameConnection" delegate:gameViewController];

gameViewController.modalTransitionStyle = UIModalTransitionStyleFlipHorizontal;
self presentModalViewController:gameViewController animated:YES
   [gameViewController release];
Finally, the method tableView:didSelectRowAtIndexPath: is implemented to fire the appropriate response to the main menu selection:
- (void)tableView:(UITableView *)tableView didSelectRowAtIndexPath:
   (NSIndexPath *)indexPath {
    if (indexPath.section == 0) {
       switch (indexPath.row) {
          case 0:
             [self startNewHeadToHeadGame];
             break;
          case 1:
             [self startNewNearbyGame];
             break;
          case 2:
             [self startNewInternetGame];
             break;
          case 3:
             [self continueGame];
             break;
       }
   }
   else {
       switch (indexPath.row) {
          case 0:
             [self showSettings];
             break;
          case 1:
             [self showAbout];
             break;
       }
   }
}At this point you can handle many of the basics of game development. A new challenge is connecting to other players who are connected to the Internet. We discussed this feature earlier, and fortunately, it is actually a very straightforward process to code on the client.
Earlier you reviewed the GameConnection class and how it is used to abstract the connection details away from the game. We are now going to focus on the class InternetGameConnection that extends the class GameConnection and handles Internet-based connections:
#import <Foundation/Foundation.h>
#import "GameConnection.h"
#define SERVICE_END_POINT @"http://services.appsamuck.com/turnbased/"
@interface InternetGameConnection : GameConnection {
NSString *serviceEndPoint;
NSString *responseData;
NSURLConnection *urlConnection;
}
@property (nonatomic, retain) NSString *responseData;
- (void) apiConnectWithSessionId: (NSString*)sessionId;
- (void) apiConnectWithPlayerName: (NSString*)playerName;
- (void) apiSendMessage:(NSString*)message
asType:(GameConnectionMessageType)messageType;
@endIn GameConnection, the method connectWithPlayerName: is called when a player wants to initiate a new game with a friend. This method is actually implemented in the class InternetGameConnection. Walking through this call shows you how Internet connectivity is achieved. This method is simply a pass-through with a sentinel. The parameter playerName is checked with the sentinel and the pass-through call to apiConnectWithPlayerName is issued:
- (void) connectWithPlayerName:(NSString*)playerName {
   [super connectWithPlayerName:playerName];
   if ([playerName length] == 0)
      [NSException raise:@"Parameter required"
         format:@"Parameter playerName cannot be null or empty"];
   [self apiConnectWithPlayerName:playerName];
}
The method apiConnectWithPlayerName issues a request to the Internet server, which begins the Web request process. This is the same process that is followed when you start a Google search in your browser.
Note
We have chosen to issue our request as an HTTP POST. With a POST, the parameters can be bundled as in the body of the request. This has two advantages: First, it's easy to extract the parameters in your server implementation; and second, you can switch to SSL, which encrypts the parameters that are embedded in the request body.
The method builds an NSMutableURLRequest and uses an NSURLConnection to issue the request with a call to connectionWithRequest. The call to connectionWithRequest is followed by a call to start, which starts the request process. The important thing to observe is that this is only the beginning of the process. InternetGameConnection implements the NSURLConnectionDelegate methods necessary to receive the server response:
- (void) apiConnectWithPlayerName: (NSString*)playerName {
   NSString* content = [NSString stringWithFormat:@"playerName:%@", playerName];
   NSMutableURLRequest *request = [NSMutableURLRequest requestWithURL:
      [NSURL URLWithString: [SERVICE_END_POINT stringByAppendingString:
      @"connectWithPlayerName"]]];
   [request setHTTPMethod: @"POST"];
   [request setHTTPBody:[content dataUsingEncoding: NSASCIIStringEncoding]];
self.responseData = [NSString stringWithString:@""];
urlConnection = [NSURLConnection connectionWithRequest:request
delegate:self];
[urlConnection start];
}After the request has been sent, NSURLConnection receives a response either in the form of data or an error (hopefully it's data). If you do receive data, it arrives as a call to the delegate method connection didReceiveData:. It is also possible—and likely—that the response will be too large to arrive in one piece. If this happens, the data is broken up and arrives in chunks. This results in multiple calls to connection:didReceiveData:. Each call appends the received chunk to the property responseData. Finally, connectionDidFinishLoading is fired, which informs you that all the pieces of the response are received and the complete reconstituted data can be retrieved from the property responseData:
#pragma mark NSURLConnection delegate methods
- (void)connection:(NSURLConnection *)connection didReceiveData:(NSData *)data {
   NSString *stringReply = [[NSString alloc] initWithData:data
      encoding:NSUTF8StringEncoding];
   self.responseData = [self.responseData stringByAppendingString:stringReply];
}
The data you receive from the server is entirely up to you and depends on how you wish to communicate with your Web server. If you are looking for a standard, REST (representational state transfer) is a good choice for iPhone development because making calls to REST is very straightforward. The class URLConnection is all you need on the client. There is a lot to implementing a Web server, a discussion that is outside the scope of this book. Check out www.appsamuck.com/gameservices/ for more information.
REST is not the only protocol available; Web services come in many different flavors. For example, SOAP (originally defined as Simple Object Access Protocol) is a mature protocol that has been around for a while. However, there is currently no native support for SOAP in the iPhone SDK. You could spend countless hours building a SOAP client from scratch. Fortunately, there are tools available that have already done the work for you. For example, RemObjects Software (www.remobjects.com/iphone) has a SOAP Web service framework that fills this gap. They also offer a free tool for quickly setting up a push notification server. Third-party tools do come with a price, but they can be huge timesavers and the cost is almost always less than what it would cost you to take the time to do it yourself.
As we've mentioned, connectionDidFinishLoading is called whenever the complete response has been received from the server. When this happens, you call receiveMessage:ofType:, which sends the complete message to the delegate GameControllerDelegate:
- (void)connectionDidFinishLoading:(NSURLConnection *)connection {
   GameConnectionMessageType messageType = GameConnectionMessageData;
   [self.delegate receiveMessage:self.responseData ofType:messageType];
}
When an error is encountered, connection:didFailWithError: is called. You retrieve the message description and again call receiveMessage:ofType:, which sends the complete error message to the delegate GameControllerDelegate:
- (void)connection:(NSURLConnection *)connection
   didFailWithError:(NSError *)error {
   GameConnectionMessageType messageType = GameConnectionMessageError;
   NSString *message = [error localizedDescription];
   [self.delegate receiveMessage:message ofType:messageType];
}You can completely implement an Internet-ready game without push notification. However, push notification adds that extra piece that allows your game to behave as if it were always running. You should still use the methods we just discussed to send, receive, and manage game messages. It is better to use push notification to accomplish tasks that enrich your game that only push notification can achieve.
Sending a message with push notification must be done from a server connected to the Apple Push Notification server. This means that for your app to send a push notification to another device, it must do so through a server that you build. Since this is the case, you can choose any method you like to send the message to your server.
Coding your application to receive push notifications is another matter. Before you can receive a message, you must first register your app to receive notifications. You can register your app for notifications by calling the method registerForRemoteNotificationTypes:. Apple recommends that you call this in the method applicationDidFinishLaunching as follows:
- (void)applicationDidFinishLaunching:(UIApplication *)app {
   [[UIApplication sharedApplication]
      registerForRemoteNotificationTypes:(UIRemoteNotificationTypeBadge |
      UIRemoteNotificationTypeSound | UIRemoteNotificationTypeAlert)];
}
If the registration is successful, you will receive notification via the delegate method didRegisterForRemoteNotificationsWithDeviceToken. When you receive this message you'll know that you have successfully registered for push notification. After this, the GameConnection can send the device token and the user's e-mail address to your server as needed for this example:
- (void)application:(UIApplication *)app
   didRegisterForRemoteNotificationsWithDeviceToken:(NSData *)devToken {
   self.devTokenBytes = [devToken bytes];
   self.registered = YES;
}
If the registration fails, you will receive a call to the following method. Be sure to alert the user and, if necessary, disable any options that depend totally on push notification:
- (void)application:(UIApplication *)app
   didFailToRegisterForRemoteNotificationsWithError:(NSError *)err {
   NSString *message = [NSString stringWithFormat:@" Error in registration.
      Error: %@", err];
   UIAlertView *alert = [[UIAlertView alloc] initWithTitle:@"Error"
      message:message delegate:nil cancelButtonTitle:@"OK"
      otherButtonTitles:nil];
   [alert show];
   [alert release];
}
In this case, you can simply poll your server for messages when your application fires up. Once the app is registered for push notification, your app could be loaded as a result of a user simply clicking Accept on a push notification alert. If your app is loaded in this manner, the method application:didFinishLaunchingWithOptions will be called. You can use this event to trigger your app to load with a game already in progress if the situation warrants it.
The major business aspect of turn-based games connected over the Internet is the opportunity for viral sales. This is key—if your game is fun and engaging, then friends will want to play other friends, which will lead to more sales. Play up this feature by allowing players to invite friends through means other than e-mail. Use Facebook, Twitter, and other social media avenues. Post game results to social news stories and leader boards. Create an environment that fosters competition. The more competition and rivalry, the more friends will want to connect and interact, which leads to better sales.
Turn-based games allow for a game to be played over the course of days instead of at a single sit-down. This can attract a different audience to your game. Some people have families and small kids, which may make it difficult to find time to sit down and play a long, drawn-out game. However, if you can start a game and continue to take turns when you can steal five minutes to make a move here and there, it becomes possible to cobble time together over the course of a day or week to complete a full game. This is an attractive feature to potential buyers. In your application description, tell the story of busy family guys and gals and how this game is designed with them in mind.
Turn-based games are well suited for the iPhone. Since the iPhone is an on-the-go device, it is especially well suited for games that you can play during the day. You can start a turn-based game, make a few moves, head to work, make a few more moves at lunch, and finally finish up when you get home. Turn-based games complement the on-the-go lifestyle, which embodies the culture of iPhone owners.
In this chapter you learned technologies useful for implementing turn-based games. You learned that the best and most entertaining games require more strategy than luck to master. You reviewed tic-tac-toe and saw how it lacks strategy, and from there you saw some changes we made in an effort to introduce more strategy to this classic game. You reviewed new ways to connect players that work well for turn-based games. Locating friends to play against is an integral part of a successful multiplayer game. For this reason, you need to allow sufficient time in your development cycle to design and develop a system for connecting friends. Finally, you reviewed the technical details of the turn-based game, Amuck-Tac-Toe.
Games connected over the Internet are positioned to be king in viral sales, especially small games with a small price. It is worth a dollar or two to play even a single round of a game with an old college buddy. Also, remember when you get two or more people to play, your profit is multiplied. As always, make your game fun and engaging, but invest the time into making it simple and straightforward. The social interaction with friends should be effortless, fun, and competitive. Your game can build and strengthen relationships between players. This will keep them coming back.