In This Chapter
Reviewing famous examples
Understanding game design: Excitement and achievement
Programming: AmuckRacer
The road ahead
What's next?
Analyzing business aspects
You should now be ready to create your first action game. Remember, the games developed in this chapter can be found on the App Store and the source code can be downloaded from our Web site, http://appsamuck.com.
Action games are extremely popular in the game marketplace today. They are challenging and exciting, and most are some kind of test of skill, usually with a time limit. Many people enjoy beating this implied dare. Some players will try to beat a well-done action game almost religiously, playing hours on end and even through the night.
Consider one of the most famous action games ever produced, Pac-Man. Guinness World Records officially named Pac-Man as the most successful coin-operated game in history, with nearly 300,000 units of the arcade machine sold from 1980 to 1987. This is just one of many famous examples of great action games. Let's review some of the best. Maybe they will motivate you into creating the next chart-topping action game for the iPhone.
Even though action games come in all shapes and sizes, there are a few common features. Action games tend to involve some type of test of skill; for example, hand-eye coordination or reaction time. Players are usually given a time limit in which to complete a challenge. The challenge might be to save all the villagers before the bomb goes off or to survive the zombie horde long enough for the rescue helicopter to arrive. The developers face a challenge as well: how to make sure their action game is neither too hard, causing players to become frustrated and give up early, nor too easy, causing players to quit the game due to boredom. This is an important part of the formula for creating a great action game, and something to keep in mind as you consider the following successful action games:
Pac-Man.
http://en.wikipedia.org/wiki/Pac-ManSpace Invaders.
http://en.wikipedia.org/wiki/Space_InvadersAsteroids.
http://en.wikipedia.org/wiki/Asteroids_(video_game)Paperboy.
http://en.wikipedia.org/wiki/Paperboy_(video_game)Robotron: 2084.
http://en.wikipedia.org/wiki/Robotron:_2084Doom.
http://en.wikipedia.org/wiki/Doom_(video_game)Frogger.
http://en.wikipedia.org/wiki/FroggerSuper Mario Bros.
http://en.wikipedia.org/wiki/Super_Mario_BrosUnreal Tournament.
http://en.wikipedia.org/wiki/Unreal_Tournament
You have probably played at least few of these games before. If not, consider finding some videos on the Internet of people playing a few of these games. You will learn a lot about what makes an action game both fun and exciting for players. If you have played these action games before, consider what made these games great for you. You will want to look back on these games' traits when you start coming up with your own ideas for action games.
Most of these games are considered classics, and one thing true of the classics is that they don't have a lot of clutter. Someone once said that a great song, no matter how fancy, should always be hummable. This is true for any great game as well. It is a lot easier to learn from and reproduce a great game by looking at classic games because they have so very little waste. Again, consider that less is often more when the "less" is of better quality.
Tip
Go back and play some of your favorite classic action games. Take a step back and consider them from a developer's point of view. Have a little fun and you'll probably learn a lot about applying tried-and-true techniques to your games.
Think back to our developer challenge of how to create games that are hard enough but not too hard for players. How have games accomplished this in the past? Many action games have an introductory level or phase that is much easier than the rest of the game; this allows players an opportunity to learn the basics of the game. Sometimes there are fewer enemies for the player to avoid or defeat. For example, the game Asteroids initially starts the player's spaceship in the center of the screen with only a few asteroids located at the very edge of the screen. Over time, more and more asteroids appear, making the player's task of surviving more and more challenging.
Another common approach used in action games is for the early levels to be at a much slower pace. Many of the games from our list take this approach, including Pac-Man, Space Invaders, and Frogger. Unreal Tournament has a feature called spawn protection, which is a period of invulnerability that a player has during only the first 2 to 4 seconds from when his character enters the game.
This gives the player a chance to look around and move around as needed before other players can attack. On the other hand, Doom simply provides the player a menu from which to choose a skill level. All of these approaches allow a wider range of players a chance to enjoy their favorite action games regardless of their current skill level.
Game balance—finding a balance between hard enough but not too hard—is one of the most important aspects of any action game. But it takes more than that to make a truly great action game. Think back to our list of famous action games. What other features do some of the games have in common?
Here are a few ways these games present challenges:
Creating time pressure. When beating the challenge, the player has only a limited amount of time to complete the task.
Levels. The player must complete a series of increasingly challenging levels.
Health and lives. The player's character has either a limited amount of health or a limited number of lives.
Score. It's common for action games to keep track of the player's score. Many of these games even have a high score feature. This presents another goal for players. Players not only want to win, but to be the best.
Action games can be more difficult to create than many other types of games. They tend to require more assets, such as graphics and sounds. They usually need more logic, and logic that is more complex than most puzzle games. Even though they can be more work, many times they are more rewarding to create.
A well-done action game, even a simple one, can become a world unto itself. Some of the most popular action games have gone on to become everything from cartoon shows to television shows to movies. The next time you are in a store with a toy department, look around and see how many toys you can find that are based on one of these types of games.
What have you learned from the examples we have covered to ensure that your game is successful?
Make sure your action game ...
Has good game balance—it's neither too easy nor too hard.
Makes a good first impression and has an attractive overall appearance.
Is free of any and all bugs and usability issues.
Engages the gamer in an increasingly challenging series of stages or levels.
Is addictive enough to keep the gamer coming back and telling his friends about the game.
Tip
Don't lose sight of how important quality is to the overall success of any game, especially action games. Remember, form and function first. If you can make every detail both look and work great, you have the most important ingredients for a successful application.
One reason people play games is to escape from their everyday ordinary lives. It is a release, a way of letting go of day-to-day pressures. In games we are able to become and do almost anything we can imagine. If, as a child, you wanted to become a famous race car driver, as Apple's recent iPhone commercials say, "There's an app for that." Or maybe you wanted to win an Olympic medal in skiing? Guess what, there's an app for that as well.
If you're thinking that with the tens of thousands of applications already on the App Store, you have missed your chance to be a part of the mobile app revolution, you're wrong. Just as grocery stores do better when they have more products by having more competitors offering more varieties, so does the iPhone App Store.
Another example is car dealerships. A lone car dealership in an area will actually tend to do worse than a car dealership in another area where there are many dealerships because people will go out of their way to find choice, variety, and options that go along with what the large group of car dealerships offer. Markets with more competition tend to have more opportunities.
You can even consider the iPhone App Store itself to see this effect. By having an App Store on the iPhone, Apple created a single place where there are a huge number of iPhone applications and a lot of competition to create iPhone applications. On many other phones, you either cannot install applications or you have to find each application yourself on the Internet.
When each application is located at something that is similar to the lone car dealership, you can see the difference competition makes. On many phones, fewer than one in ten people have ever added an application to their phone. On the iPhone, we suspect nine out of ten people have installed as many as ten or more applications.
Some of the most popular applications on the iPhone are the ones with the most competition. The more choices people have, the more likely they will find the product that has exactly what they want. When people find a product that is exactly what they want, they usually buy it. And this is exactly what you want.
You want competition for your applications for the same reason: It will make your products better, and better products sell better. Obviously, with more competition comes more risks—but also more rewards. Learn from your competition, because they will learn from you.
When it comes to games, one of the key elements that contributes to excitement and enjoyment of the game is the game's graphics. Figuring out that people want great game graphics is easy, but creating them can be another story. Some people are great programmers and some people are great artists. Very few people are both. Not only that, but programmers tend to be especially challenged at creating quality graphics. Many times game graphics are referred to as game sprites. There's even a term for it: "programmer's art."
There is probably no worse insult an artist can receive than to have someone refer to a piece of his work as programmer's art. That said, programmer's art is great for temporary graphics, storyboarding, and prototyping. Unless you are both a programmer as well as an artist, creating great graphics will always be an area you will have to pay extra attention to.
What about the 99 percent of programmers who are not both great programmers and great artists? How do they create great game art? That's a good question. You can, of course, buy game graphics. Either you can pay a designer to create custom graphics for your application, or you can try to find a collection of game graphics already made that you can use. However, paying for custom graphics can be quite expensive. Many new iPhone developers would have a hard time affording this. But finding a collection of ready-to-use game graphics may not be possible.
So you may find yourself thrust upon the horns of a dilemma. You need great graphics. You cannot create them yourself, you cannot afford to have someone else create them for you, and you cannot find a cheap alternative to use instead. Sometimes you have to settle for the next best thing and hope that it is good enough. You are bound to run up against this wall or another just like it when first starting out.
The important thing to remember is that your application is not carved in stone. The second version of your application can be much better than the first version of your application, and so on. A great feature of the iPhone App Store is that iPhone applications can be automatically upgraded. It's important to always do your best to produce a quality piece of work, but perfection may have to wait for another day. Good software released today is always better than perfect software never released, and you never release bad software. Remember, sometimes it takes years to become an "overnight" success.
Note
Thomas Edison had to endure as many as 10,000 failures before he perfected a long-lasting light bulb. Hopefully, it will not take you as many tries to create your first successful iPhone application. Don't give up!
One thing the Internet has done for us is to virtually collapse space and distance between people all around the world. So even though car dealerships have to be physically in the same area to compete with each other, people who create digital goods do not. The Internet has made us all a world of virtual neighbors.
In some ways this is what made the App Store possible, and over time we will see other digital marketplaces appear. We are already starting to see this shift occur. Instead of going to a brick-and-mortar store to buy music, we can buy music online through services like iTunes. While there are many online marketplaces that target the average consumer, there are some that iPhone developers should take note of.
The Open Clip Art Library (http://openclipart.org/) offers an archive of free clip art for any use. There are nearly 10,000 public domain clip art files available on this Web site. There are many ways you can look for the right piece of clip art; for example, you can browse the clip art by tag, by date, or by artist. You can, of course, search the clip art, and there is an advanced search option. There is even a "request a clip art" option that you can use to look for a specific piece of clip art. You can download an archive of many of the library's clip art as a large zip file.
Depending on your game's goals, you may be able to find many of the graphics you need on this single site. Some of the library's most popular categories are animals, cartoons, people, plants, and icons. Sometimes a little creativity will take you a long way. Instead of coming up with the perfect game idea and then trying to find the perfect clip art, consider finding some clip art you really like and then coming up with the perfect game in which to use it. This kind of brainstorming can really open up some new opportunities.
The clip art you see in Figures 5.1 and 5.2 is from an RPG Map collection, which includes over 50 drawings created by Nicu Buculei. We really like the look and feel of all the items in the collection. We also like the fact that you get both a colored version of the buildings and a non-colored blueprint version of the buildings. These would be perfect to create many different games.


The player sees a 4 × 6 grid of square cards, facedown. The cards are on a table with a nice wood-texture background. The backs of the cards have a medieval fantasy graphic, perhaps a crossed pair of swords or a knight's shield. The player chooses two cards and the selected cards rotate into view. On the front of each card there is a random image from the RPG Map collection that can be seen when selected. The player's goal is to match all of the pairs of cards in as little time as possible.
The game should have a high score feature based on best time. This could be loaded with a default score for new players. The game should take the best time and display it during play at the top of the screen as a countdown. This way the player can effectively race against the current best player, providing additional challenge and bragging rights. When a player makes a correct match, consider playing a reward sound such as a trumpet fanfare and having the matching cards fade away.
When the player makes an incorrect match, you could play the sound of a crowd jeering and heckling someone. (We discuss creating sounds later in this chapter.) Since there are two sets of RPG buildings, you could have the cards start with the blueprint style and then have the normal style come into full view. This would create a great animation that your players would enjoy. Check out Figure 5.3 to see a mock-up of the user interface.
Real-time strategy games have become extremely popular, and it is reasonable to expect that this type of game would do very well on the App Store. Real-time strategy games are very complex and would likely prove challenging for a single developer to accomplish in a short period of time. But having a good library of appropriate graphics could go a long way toward making this possible.
Here's another idea for a creating one possible version of a real-time strategy game and how it might work on the iPhone. The player sees an open area in the center of the screen that is surrounded by a black fog all the way around the edge of the screen. This fog prevents a player from seeing any area that has not been explored. This matches real life, because until you explore an area you do not know what it contains. This area is just a small part of the entire area that the player can explore.
The game world could be much taller and wider than what the player sees. In the top-right corner of the screen there is a mini-map that shows the player the entire playing area. At the bottom of the screen there are command and production controls that the player can use to create new units and buildings. Take a look at Figure 5.4 to see a prototype of this user interface.


Tip
Always do a quick prototype of the application user interface, even if it's on the back of a napkin. This helps to weed out bad ideas early in the design process.
The player is in control of a new village of either humans or possibly elves. But the player is not alone in this world. The land is also occupied by tribes of terrible trolls, or possibly some ornery orcs. Either way, the only thing the other occupants of this land want more than to see the humans leave their land is to have them for dinner. The player's goal is to help his people first survive, and then to thrive in their new homeland. To do this he will need to take steps to defend the human's land, explore surrounding lands, and eventually attack enemies and remove their threat to his people once and for all.
The Lost Garden (http://lostgarden.com) is an amazing blog devoted to indie game developers. Not only does it have a wealth of great essays on game development, there's also a large number of free game graphics. The site belongs to Daniel Cook, who lists his occupation as Delighter. And we think you'll agree he is good at what he does. Here you can find a great set of game tiles for a 2-D RPG game. This set includes wilderness tiles, building interior tiles, and exterior village building tiles. There are also graphic sets from many games Daniel has worked on in the past, including Tyrian, Sinistar, and Hard Vacuum.
One last graphics set you might want to take note of is PlanetCute. PlanetCute was designed to be useful to the widest range of developers for the widest range of game genres. This graphics set is available as both vectors and bitmaps. Vectors can be resized freely but usually have to be converted before using in a game. Bitmaps can usually be used directly, but editing them can cause a loss of quality.
99 Designs (http://99designs.com) bills itself as "a thriving community of nearly 30,000 designers." While most of the listings on 99 Designs are for logos, business cards, and Web sites, that's not all they are designing these days. Many of the icons used by iPhone applications were originally created by a designer found at 99 Designs. And many of these applications even had their user interfaces designed at 99 Designs.
Not surprisingly, if you compare modern Web site design with the iPhone applications being created today, you will find the same kind of quality, variety, and attention to detail in both. Most Web sites are first designed in graphics software and then developers convert them to HTML. A developer can take a similar process to convert graphics to a user interface in Xcode.
99 Designs is not free, but the price is affordable to many. You post on 99 Designs what you need designed. As of this writing there is a fee of $39 to do this. Then you assign a prize to your design contest, generally ranging from $100 to $600 depending on what you're looking for. Designers from around the world then submit designs for you to consider.
Finally, you select the winning design and pay the designer, and your completed design is sent to you along with its copyright. If you need a simple one- or two-screen user interface that looks great, you might want to consider this option.
Having great visuals for your applications is important, but don't underestimate how important audio is to a great end-user experience. Movie studios invest a huge amount of time, effort, and money into creating the perfect soundtrack for the latest blockbuster movie. You can hear the same attention to detail in many modern video games. After having compelling graphics, one of the best ways to pull the player into your game world is to have first-rate audio. The average developer isn't much better at creating music and sound effects than at creating graphics. Fortunately for us, there are other options:
SoundsXtras (
www.soundsxtras.com/). SoundsXtras provides absolutely royalty-free sounds. It's a very large sound library with over 22,000 audio files.PodSafe Audio (
http://podsafeaudio.com/). This is an online community of independent artists who you could work with to use their music in your projects.The Freesound Project (
www.freesound.org/). The Freesound Project is an online community for free and open exchange of sounds. Since all sounds are released under the Creative Commons Sampling Plus License, you are free to create applications using them. The Freesound Project has everything from audio snippets to samples to recordings.Soundsnap (
www.soundsnap.com/). Another online community-driven sound library, Soundsnap maintains an audio library with 100,000 high-quality sound effects and loops. You can get a free account that allows up to five free downloads a month, or get a pro membership. The unlimited annual pro membership fee is currently $149.AudioJungle (
http://audiojungle.net/). AudioJungle is another audio community that has thousands of stock music loops and audio effects. Each audio file has a small fee associated with it, but it's a great place to pick up something special. In many cases a sound effect is around $1, and a song is less than $10.
Gentlemen and ladies, start your engines! You are now ready to take what we have learned in this chapter and create your next exciting iPhone game: AmuckRacer. First, you will need to gather the right graphics for the game. Before you get started writing code, we will go over some design and analysis materials to make sure you are on the right track.
In AmuckRacer the goal is to create a simple but exciting racing simulation. We are going to use sprites, or game graphics, for our images so the game will be in 2-D. Here are our goals for AmuckRacer:
The player should be able to steer by tilting the iPhone to the left and right.
The player should be able to brake by tilting the iPhone backward and accelerate by tilting the iPhone forward.
The game needs to increase in difficulty as it's played.
If the player drives off the road, the car should drastically lose speed.
If the player collides with another car or an oil slick, the car should come to a stop.
The player must make it to a checkpoint in order to continue playing to the next round.
The game should include some viral aspect to help increase sales.
It is important to always review your goals and consider your options before you begin actually coding an application. As the saying goes, you want to measure twice and cut once. This way if you ever change your mind you will only have lost design time and not coding time. It is always easier to think of something than it is to code something.
Consider our first two goals: "The player should be able to steer by tilting the iPhone to the left and right" and "The player should be able to brake by tilting the iPhone backward and accelerate by tilting the iPhone forward." Both of these goals can be achieved by using the iPhone's accelerometer. You could take a simple digital reading of true or false for each of the four directions—up, down, left, right. Or you could take a more advanced analog reading with a range from, say, 0 to 1 for each of the four directions—up, down, left, right.
Using a digital reading would be more like playing a racing game on a desktop computer and using the keyboard to drive the car. Either you are pressing one of the left, right, up, or down arrow keys or you are not. Most players feel this is a little awkward and unrealistic. (We doubt anyone would want to drive a real car using only the left, right, up, and down keys to steer!) By using the iPhone's accelerometer, you create a natural range of motion more akin to a real steering wheel. Players can turn a little bit to the left or turn really hard to the left. Happy players make happy developers, so we will cover using the accelerometer for analog driving controls in the AmuckRacer example later in this chapter.
The next goal is "The game needs to increase in difficulty as it's played." This is usually a very easy goal to achieve. You could simply make the car go faster and faster over time. Or you could increase the frequency of road obstacles, such as other vehicles or oil slicks. Another option would be to have the course become more challenging over time. The more the road veers to the left and right, the harder it becomes to stay on the track.
Another goal is "If the player drives off the road, the car should drastically lose speed." You can check the car's position against the road's location, and if the car is off the road, lower the car's speed sufficiently. This will require using the collision detection methods we will cover later in this chapter.
Similarly we have the requirement of "If the player collides with another car or an oil slick, the car should come to a stop." When you check to see if the car is on the road, you can also check to see if the car sprite is touching any other obstacle like another car or an oil slick. If there is a collision, you can bring the car to a stop and require the player to try and make up the lost time.
Consider the goal of "The player must make it to a checkpoint in order to continue playing to the next round." How can we best accomplish this requirement? It would make sense that the player would have to make it to a checkpoint that is a certain distance away in a certain amount of time. Distance is just speed multiplied by time. You can track time very easily using the iPhone SDK's NSTimer object. You can track the player's speed with an application variable.
Then, using these two values, you can calculate the distance the player has covered at any given point in the game. Let's plan on having a display that shows the user how much time he has remaining and how much distance he has left to make it to the next checkpoint.
For the goal that "The game should include some viral aspect to help increase sales," let's plan on letting the player send his friends an e-mail anytime he breaks the game's high score. This way we get the word out about our game, and friends can race amongst themselves.
You know the basics of how the game will work, and what it will take to make it all happen. You have reviewed the goals and steps required to accomplish those goals. Now you are ready to start creating this application. Before we open Xcode, it's a good idea to create an application mock-up or storyboard to help visualize what the end application will look like. See Figure 5.5 for one possible idea.
This prototype is intentionally rough, but in a way it helps us simplify the problem and focus on what is really important. We have the latest model red rectangle car, a road, and a lot of area that is not road. That is the meat of the application, and you will probably agree that, at its core, things are pretty straightforward.
We will continue to use the Utility Application template for this application. We will use the Main View for the main game screen, and we will use the information screen for an About Us screen (see Figure 5.6).


This About Us screen follows the pattern of previous info screens. Feel free to modify this screen to suit your purposes. We will use this info screen to do the following:
Show some information and a description for the game.
Show the player's current high score.
Provide a button that allows players to brag to their friends about their high score.
Tell people about this book and show them how to get it.
Tell people about other games in this book.
Let's write some code. Launch Xcode and choose File

Click the Choose button to create a new utility application. You will want to save the new project to a location on your machine that you will remember. We recommend setting aside a special folder for all of your iPhone applications and giving it a straightforward name such as Apps, Projects, or Code. Once you have picked out your destination folder, save the new project with the name AmuckRacer.
You will now see the Xcode Project Explorer (Figure 5.8). On the left you will see a Groups & Files listing, to the right near the top you will see a file details listing, and to the left near the bottom you will see an editor window. You should first import any graphics that will be needed to create AmuckRacer.
In the Groups & Files listing, click the folder named Resources to expand it. Right-click on the Resources folder and choose Add

You should now see a small dialog box with options for how to add the selected files to your project (see Figure 5.9). Be sure to click in the top check box labeled Copy items into destination group's folder (if needed) to copy the images to your project's location instead of just making a link to the file. This way if you copy the folder containing the project you will have all the related resource files as well. Choose Default for the Reference Type and Unicode (UTF-8) for the Text Encoding. Below this you should see two options, with Recursively create groups for any added folders selected. Finally, under Add To Targets, you should see the AmuckRacer project listed and selected.
Now that you have the required image files imported into the AmuckRacer project, you can begin laying out the images on the screens. You should still have the Resources folder open in Xcode. Double-click on the MainView.xib file to open this file in Interface Builder. It is here that you will design the AmuckRacer's user interface.

Start by choosing Tools
To do this you need to assign the AmuckRacerBackground.png to your first Image View. Click on the original Image View to select it. From Xcode's Tools menu, choose Inspector. Be sure to select the left-most toolbar item named Image View Attributes. The AmuckRacerBackground.png is 320 pixels wide by 480 pixels tall, which matches the iPhone's screen size. Set the Image combo box to AmuckRacerBackground.png.
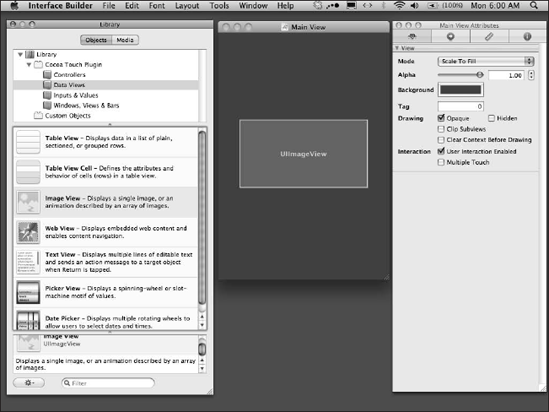
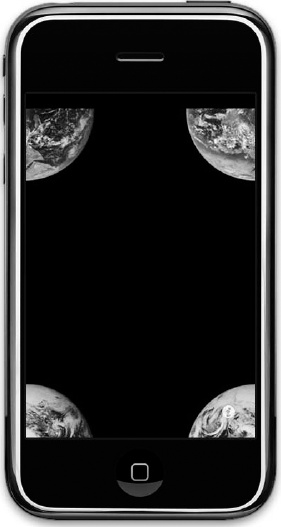
Next, you will assign the car.png to the second Image View. Click on the second smaller Image View that is located near the bottom of the screen in the center. From Xcode's Tools menu, choose Inspector. On the Image View Attributes toolbar tab, set the Image field to car.png. From the Inspector's Image View Size tab, resize the car's Image View to 48 pixels by 102 pixels. The W field is for width; set this to 48. The H field is for height; set this to 102. You'll probably have to reposition the car's Image View after making these changes. This time you can decide where to place the car; just be sure to have it on the road. If you run the code in Xcode now, you should see something like Figure 5.12.

You will now use Interface Builder to wire up the user interface. Drag the road image over a little to the left so you can see the Main View's gray background. Click the Main View's background. Then choose Tools
Right-click on the car image and drag the small circle to the right of the New Referencing Outlet label and release it above the Main View's gray background. You should see a list with the car and road class outlets you created previously; be sure to choose the car option. Now do the same for the road image, and assign it to the road option.

You can now take advantage of Interface Builder's Write Class Files feature. To do this, first move the road image back to where it fills the entire screen. Make sure the Main View window now has the focus by clicking the title bar at the top of the window. Go to the Interface Builder's File menu and choose Write Class Files. You should see a dialog box that states that MainView.m and MainView.h already exist. You are asked whether you want to replace these files. Click Merge to combine the newly generated code for the car and road Image Views with the preexisting code for the Main View form. Click Save to save your changes and then click Close to exit Interface Builder.
You probably noticed that the iPhone Status Bar is still at the top of the screen. While this will not hurt the functionality of the application, many players find this unrelated user interface distracting. For a game to be truly immersive, players must be able to suspend their disbelief. Some will find this difficult if they are being reminded of remaining battery life, current time, and signal strength changes. By removing the iPhone Status Bar you can give the player a full-screen experience without any nongame distractions.
Tip
Remember, it's the attention to details that separates a good game from a great game!
To remove the Status Bar from the top of the screen, you need to add one line of code:
-(void)awakeFromNib {

   [[UIApplication sharedApplication] setStatusBarHidden:YES animated:NO];
}
This line of code needs to be added to the MainView.m file, which is located in Xcode's Groups & Files. Choose AmuckRacer
Note
To download all of the code listings in this chapter, go to www.wileydevreference.com and click the Downloads link.
Example 5.1. AmuckRacer MainView Listing
#import "MainView.h"
@implementation MainView
-(void)awakeFromNib {

   [[UIApplication sharedApplication] setStatusBarHidden:YES animated:NO];

}
- (id)initWithFrame:(CGRect)frame {
if (self = [super initWithFrame:frame]) {
// Initialization code
}
return self;
}
(void)drawRect:(CGRect)rect {
// Drawing code
}
- (void)dealloc {
[super dealloc];
}
@endAction games and collision detection go hand-in-hand. It is the rare action game that does not need some form of collision detection, and AmuckRacer is no exception. Collision detection is how games are able to tell when one game sprite makes contact with another game sprite. Many famous action games, from Asteroids to Pac-Man, use this concept.
You will need to add collision detection to AmuckRacer for several important pieces of game functionality:
If the player's car stops touching the road and begins touching the off-road area, the car will respond by decreasing speed.
If the car collides with another vehicle or an oil slick area, the car will respond by coming to a complete stop.
If the player makes it to a checkpoint finish line, the player's remaining time will be increased.
The road will be the player's primary focus, so it should be one of yours. Consider what the road needs to do:
Make the player feel that the car is in motion, and give the player the ability to accelerate and decelerate, even allowing the car to come to a complete stop.
Appear to move to the left and right over distance (very few roads are straight for too long).
Have checkpoints located along its path and end with a finish line.
Modern programming guidance recommends being agile. While agile software development practices are the topic of whole books by themselves, one of the most important principles is to create software by making small changes in many iterative steps. So, instead of trying to add code to do all three of the preceding goals at once, you should consider and code each goal separately. The wisdom of this principle is evident every time you climb a set of stairs to reach the next floor, versus climbing the exterior wall to the next floor. You might have to walk a longer distance overall, but it's much easier than to take the more direct route straight up. This is true in software development as well. It might appear to be more effort to take many small steps, but in the end it will almost always be less work.
Our first goal is to create the appearance of motion in the road. This creates the illusion that the car is in motion. This is kind of like when you are riding in a car, the car appears motionless relative to you and everything else appears to be moving instead. There are several ways to create a moving road. Let's consider a few:
3-D generated world with a road bitmap applied as a texture to large scrolling surface
2-D overhead scrolling world with road tiles added from edges of screen
Full-screen animation of road that is translated horizontally and vertically
Long bands of road images fall vertically from top of screen and move horizontally
One advantage to a 3-D generated world is the extreme flexibility it would allow. You could zoom in and zoom out, and even rotate the camera all the way around the player. But creating a professional-quality, 3-D generated world is both difficult and challenging. Of all the options, this is the hardest, the riskiest, and the most expensive to do. For the beginning iPhone developer, this is probably not the best choice.
Note
For every 25 percent increase in problem complexity, there is a 100 percent increase in complexity of the software solution. The ultimate success of many software projects often comes down to successfully minimizing complexity.
Another option is to create a 2-D overhead scrolling game board. Since the iPhone is 480 pixels by 320 pixels, the screen could be divided into a grid of 15 squares by 10 squares, with each square 32 pixels by 32 pixels. Each of these squares, more commonly known as tiles, would then be used to draw the game board.
Then we move the game board in response to the player's actions. As tiles move off the screen, we remove them and add new ones where needed to replace them. This is a common technique that has been used in countless games over the years.
This technique is much easier than creating a 3-D generated world, but it can still be challenging to pull off without the right graphics. One interesting advantage to the 2-D option is that multiple tile sets can be created and used interchangeably. You could have a snow level, desert level, and jungle level very easily. Once you have one level working, all you really need for a new level is the graphics. Even though this technique is easier, it's an option that is best left until you have a few iPhone applications under your belt.
The next technique is pretty clever and very easy to do. You have probably seen an animated GIF image on the Internet. Imagine that you have an image of a road and that it is almost twice as wide as the iPhone's screen, which is 320 pixels wide. You could then move this image left and right very easily and create the illusion of a moving road.
There are a few questions. Will it be fast enough? Will it be realistic enough? And will it be fun? If not, we will have to find another solution. Another way to think of this technique is to imagine you have a piece of paper with an image of an iPhone printed on it. Now imagine you cut out the iPhone screen from this piece of paper. If you had a somewhat larger image of a road printed on another piece of paper, you would be able to hold it under the iPhone picture and create a simple moving road effect. It's a simple but powerful idea.
The last technique is another brainy solution to our problem. This is an important skill that you should try to learn and apply whenever possible. Instead of working harder and longer, try to find ways to work smarter. Take the problem at hand and look for ways to make it simpler. Sometimes you may find a way that completely collapses the problem into a much smaller and manageable task.
In this case, we have effectively taken the 2-D option and simplified it from having 150 tiles that are 32 pixels by 32 pixels to having 15 bands that are 320 pixels by 32 pixels. Even if we had 480 bands that were 320 pixels by 1 pixel, the code complexity has collapsed. The idea will work, but we will need to test it to see if it is good enough for our players. Another way to think of this method is to imagine you have a piece of paper with an image of an iPhone printed on it. Now imagine you cut out the iPhone screen from this piece of paper. Next, consider if you had a somewhat larger image of a road printed on another piece of paper, and you took this road image and cut it into 15 strips of paper. Now if you took these bands of road and put them under the iPhone picture, you could move the bands left and right independently and create the illusion of a moving, winding road.
As an experiment, let's try making two versions of AmuckRacer, one that uses the full-screen animation and the other that uses the river of image bands, and see which we like better. Sometimes the best way to decide which way is the best is to try them both. Usually you will learn something along the way that will make you glad you went the extra mile.
The full-screen animation method can be broken down into two agile development iteration steps: First, have the image move to the left and right over time, and second, have the image animate its motion over time. We could do these steps in any order, but let's add horizontal motion before we add animation to the image since it's a simpler step.
One of the most basic game patterns is the concept of the game loop. At its simplest, there is a loop that calls an update method and then a draw method until the game ends. Figure 5.13 shows a basic game loop. A more advanced game loop might do much more and look something like the following code:
while( playerHasntExit )
   {
      checkForUserInput();
      runAI();
      moveEnemies();
      resolveCollisions();
      drawGraphics();
      playSounds();
   }
There are two ways you can create a game loop inside your application. The first is to use a looping command like the while keyword used in previous code selection. The other is to create a timer that calls your game methods repeatedly. For this example you will use the timer to create your game loop.
Update your awakeFromNib method so that it matches the following code:
-(void)awakeFromNib {

   [[UIApplication sharedApplication] setStatusBarHidden:YES animated:NO];
   // start a timer that will fire every second
   [NSTimer scheduledTimerWithTimeInterval:(1.0) target:self selector:@selector(onTimer) userInfo:nil repeats:YES];
}
Now add the following onTimer method right below the awakeFromNib method. We will update this method as we progress through the creation of AmuckRacer:
- (void)onTimer {
}
You'll notice when you are working with Xcode that it always creates a pair of files for you to write code in. The first is an h file, which is a header file; and the second is the m file, which is the main file. By default, Xcode expects you to implement your code as an interface. This means you will list your methods inside your header file as a contract, and then you will implement your methods fully in your main file. Let's update our header file to list our new functions so Xcode will be able to understand our class:
#import <UIKit/UIKit.h>
@interface MainView : UIView {
    IBOutlet UIImageView *car;
    IBOutlet UIImageView *road;
}
- (void)onTimer;
@end
You use NSTimer objects to create timers in Xcode. In this case we are using the scheduledTimerWithTimeInterval to specify we want the timer to call the onTimer method every 1 second. This will give us an effective frame rate of about one frame per second. That's not very fast by today's gaming standards, but don't worry, we'll decrease our time interval as we move forward.
Note that you cannot simply change the time interval from 1.0 to 0.001 to get 1,000 frames per second unless the hardware is fast enough to allow it. If the hardware is not fast enough to perform 1,000 frames per second, it will either drop requests or potentially cause the system to become unresponsive and possibly unstable. Think about how elevators work. More people pressing the same call elevator button does not necessarily make the elevator come more quickly. The elevator has a hardware-limited maximum speed, and so does the iPhone.
Something else you should be aware of is that all devices are not created equal. The iPhone Simulator on your computer is likely to have access to more powerful hardware overall than an actual iPhone device. This is why it is important to performance test with an actual iPhone device. It's fine to do most of your development on the iPhone Simulator, just be sure to do periodic testing on a real device to ensure both performance and quality. Since the iPhone Simulator is not a true emulator, it is possible to have bugs on a real device that you do not see on the Simulator. Also, be aware that newer devices like the iPhone 3GS can be significantly faster than earlier devices.
Note
While you can write software for the iPhone using only the Simulator, you risk releasing a product that will not run when installed on an actual device. Always test software on a real device before submitting it to the App Store.
You should now update your onTimer method to include calls to new update and draw methods that you will add next. Update your MainView.m file to match Listing 5.2.
Example 5.2. Adding the onTimer Method to the MainView.h File
#import "MainView.h"
@implementation MainView
-(void)awakeFromNib {

   [[UIApplication sharedApplication] setStatusBarHidden:YES animated:NO];

   // start a timer that will fire every second
   [NSTimer scheduledTimerWithTimeInterval:(1.0) target:self selector:@selector(onTimer) userInfo:nil repeats:YES];
}
- (void)onTimer {
   update();
   draw();
}
- (void)update {


}
- (void)draw {


}
- (id)initWithFrame:(CGRect)frame {
   if (self = [super initWithFrame:frame]) {
      // Initialization code
   }
   return self;
}

- (void)drawRect:(CGRect)rect {
   // Drawing code
}

- (void)dealloc {
    [super dealloc];
}

@end
In the update method you will add an updateRoad method. While breaking each part out like this does make the code a little wordier, by keeping things separated we increase organization and decrease complexity, which is basically a win-win situation. Modify your MainView.m to include and call the updateRoad method. When you are done, your update method and updateRoad method should look like the following code listing:
- (void)update {
   updateRoad();
}
- (void)updateRoad {

}
You will also need to update your MainView.h header file so Xcode will be able to match your class interface. Make sure your header file matches the following code listing:
#import <UIKit/UIKit.h>
@interface MainView : UIView {
    IBOutlet UIImageView *car;
    IBOutlet UIImageView *road;
}
- (void)onTimer;
- (void)update;
- (void)updateRoad;
- (void)randomRoadUpdate;
- (void)draw;
@end
We now have the basic scaffolding in place for the application. The code you are going to add now will be the real muscles of the program. This code will move the road image to the left and to the right to create a more realistic winding road effect. There are a lot of ways this effect could work, but let's consider two:
The road could move a random amount to the left or right.
The road could move a random amount but always toward one direction until it reached the edge of the screen, then it could reverse direction and repeat the effect.
This first pattern could be the random road update pattern. The second pattern could go by the more exciting name of the sidewinder road update pattern. We will cover how to create both of these road update effects and then you can decide which to use in your version of AmuckRacer.
Consider the following method:
- (void)randomRoadUpdate {
   CGPoint oldPosition = road.center;
   road.center = CGPointMake(oldPosition.x, oldPosition.y + 10);
}
The first thing this code does is save the road's center position to a variable named oldPosition. Then it creates a new center position that is 10 pixels further down from the old position. The first line inside the method creates a variable of type CGPoint named oldPosition. A CGPoint object is a structure that contains a point in a two-dimensional coordinate system. It has two fields: One is named x and holds the x-coordinate of the point, and the other is named y and holds the y-coordinate of the point.
Add this method to your version of your AmuckRacer's MainView.m file under the existing updateRoad method. Be sure to update your MainView.h file as well. You will also need to update your updateRoad method to call the new randomRoadUpdate function. You can do this by adding the following line of code to the updateRoad method:
[self randomRoadUpdate];
When you are done making all of these changes, your MainView.m file should match Listing 5.3.
Example 5.3. Adding the randomRoadUpdate Method to the MainView.h File
#import "MainView.h"
@implementation MainView
-(void)awakeFromNib {
   [[UIApplication sharedApplication] setStatusBarHidden:YES animated:NO];
   // start a timer that will fire every second
   [NSTimer scheduledTimerWithTimeInterval:(1.0) target:self selector:@selector(onTimer) userInfo:nil repeats:YES];
}
- (void)onTimer {
   [self update];
}
- (void)update {
   [self updateRoad];
}
- (void)updateRoad {
   [self randomRoadUpdate];
}
- (void)randomRoadUpdate {
   CGPoint oldPosition = road.center;
   road.center = CGPointMake(oldPosition.x, oldPosition.y + 10);
}
- (void)draw {

}
- (id)initWithFrame:(CGRect)frame {
if (self = [super initWithFrame:frame]) {
// Initialization code
}
return self;
}
- (void)drawRect:(CGRect)rect {
// Drawing code
}
- (void)dealloc {
[super dealloc];
}
@endNow save and run your changes by clicking the Build and Go button in Xcode. You should see the road image moving down the screen by 10 pixels every second—very nice! You are on your way to creating your first iPhone action game. Instead of moving the road down 10 pixels every second, try moving the road down a pixel every tenth of a second. To do this, you will need to first update the NSTimer code to fire 10 times a second by making the following change:
// start a timer that will fire every tenth of a second
[NSTimer scheduledTimerWithTimeInterval:(0.1) target:self
   selector:@selector(onTimer) userInfo:nil repeats:YES];
Next, update the randomRoadUpdate function to only move 1 pixel instead of 10 by making the following modification:
- (void)randomRoadUpdate {
   CGPoint oldPosition = road.center;
   road.center = CGPointMake(oldPosition.x, oldPosition.y + 1);
}
Save and run your update code. You should experience a much smoother animation now. Feel free to modify the code yourself and experiment with different settings to see what outcome they produce. There is more than one way to do just about anything. If you are always looking for a better way to do something, you will learn so much more and your programs will be all the better for it. Not to mention, it's fun to play the role of the mad scientist and see what happens!
Our original goal was to have the road move left and right by a random amount. To do this correctly, we will have to use the random() method. Here is the code to pick a random number from 0 to 9:
int randomNumber = random() % 10;
Tip
Random numbers are responsible for a lot of the magic in many games, especially action games. Look for ways you can use random values to create variety and surprises in your games for players.
The percent (%) sign is used to denote the modulus operator. This means divide the first number by the second number and return the remainder. It is a clever math trick to perform a useful operation. Here's an example. Pick any ten-digit number; let's say 3141592653. So, 10 can be divided into 3141592653, a total of 314159265 times with a remainder of 3. This is effectively how we are using the random() method to create random numbers. The random() method picks a huge random number and we scale this down to the range we need by using the modulus operator.
What if we needed a number from −5 to 5? How could we use the random function to achieve this? One way is to use the following line of code. Since −5 to 5 includes 11 numbers, we change the 10 to an 11. Then we subtract 5 from the result to make the range from 0 to 10 to the range of −5 to 5:
int distance = (random() % 11) - 5;
Modify the randomRoadUpdate method to take advantage of what you learned in the preceding section. Instead of moving the road vertically, change the code to move the road horizontally. When you have finished making your changes, your randomRoadUpdate method should look similar to the following code:
- (void)randomRoadUpdate {
   int distance = (random() % 11) - 5;
   CGPoint oldPosition = road.center;
   road.center = CGPointMake(oldPosition.x + distance, oldPosition.y);
}
Again, feel free to make any changes of your own to the code. It's a great way to learn more. You now have a road object that can move to the left and to the right. This means the player is going to have to pay attention or risk running off the road. There is one potential snag in the road's behavior that could be cause for concern. It is possible for the road to move in one direction more than the other, even to the point of moving off the screen. You want to limit this behavior. If a player has to keep his car on the road, the least you can do is keep the road on the screen. It's only fair.
You need to test the road position and check if moving it will move it outside of a certain allowed range. If so, you want to block this move. Start out by only allowing the road to move 20 percent of the screen's width to the left or to the right of the center of the iPhone's screen. Since the iPhone is 320 pixels wide, its center is at 160 pixels from the left. Ten percent of 320 is 32; therefore, 20 percent is 64, and 160 minus 64 is 96, and 160 plus 64 is 224. This gives you an allowed range of 96 to 224. If moving the road by a random distance is within the range of 96 to 224, you should allow it; if not, you should block it. You will have to use an if statement to perform this test.
We can now focus on how to best animate the road to create the illusion of traveling down the road in a car. There are many ways we could do this. Consider the following options:
Scroll new road images down from the top of the screen as needed.
Cut the road image up into horizontal pieces and when one falls off the bottom, move it back to the top of the screen.
Take advantage of the iPhone SDK's ability to tile an image on the screen for you.
The first option is fairly easy, but it would mean you would have to keep track of multiple road objects. This introduces additional complexity that you should try to avoid. The next option goes back to the idea of cutting up the road into many pieces and working with them as a group. This option is related to the first option, except instead of using a second option it reuses itself—not an ideal solution, since it is actually a little harder than the first solution. The best solution is the third idea, which is to let the iPhone SDK figure it out for you.
The iPhone SDK has a great method called CGContextDrawTiledImage that will tile an image for you. Its job is to repeatedly draw an image, scaled to the provided rectangle, to fill the current clip region. The CGContextDrawTiledImage method does all the heavy lifting, but it does expect a few parameters from you:
Context. The graphics context in which to draw the image. Basically this is any object that knows how to display an image.
Rect. A rectangle that specifies the tile size and offset. You can increase or decrease the image size.
Image. The image to draw.
You already know the image you want to display. It is the road.png file. And you already know the size you want to display this image. You want it to match the iPhone screen size of 320 pixels wide by 480 pixels high. You want to use the Main View's background to show the road image so you know what the context is.
One thing you may not know is what the offset values are for. They allow you to start reading the image from a location other than the top-left corner. For example, by default Quartz draws an image to the screen by reading from the (0, 0) position in the image file (see Figure 5.14).
But if you tell Quartz to start at another location—say (160, 0)—Quartz will slide the image over 160 pixels to the left, and any pixels that got moved off of the screen to the left will be wrapped around the right of the screen. Consider what Quartz would do if you used an offset of (160, 240). Figure 5.15 shows an example of the output that would be produced.
One way to imagine this would be to take a piece of paper that is 320 mm wide and 480 mm tall and cut it in half at the 160 mm wide mark. Now take the left piece of the paper and move it to the right side of the other piece of paper. You could do a similar action for the top and bottom 240 mm parts of the paper. This would represent a vertical offset of 240 pixels.
The important thing to realize is this creates the effect you want to achieve. When any of the road falls off the bottom of the screen, you want it to reappear at the top of the screen. This way the road could go on forever if you needed it to. You will have to do a little work to get the CGContextDrawTiledImage function to work as needed.
You will need to add a class level variable named currentImage to keep an instance of the road image in memory to avoid reading from the device memory each time. Many developers think of programming as the art of caching data. If you can read an cached image ten times faster than reading it from a file, you can make that part of your application ten times faster simply by taking advantage of caching. Add a variable named tileOffset to keep up with the road's current vertical offset. Then you will need to assign the road.png image to the currentImage inside the awakeFromNib method. It's best if the road has its own timer that can be increased or decreased separately from the main game loop. When this loop fires you will need to increase the tileOffset by 1 pixel and refresh the screen. Last but certainly not least, you will need to update the road image in the Main View's drawRect method. All of these changes have been made in Listing 5.4, with the changes you need to make shown in bold.

Example 5.4. Adding a Timer and the CGContextDrawTiledImage Method
#import "MainView.h"
@implementation MainView
UIImage *currentImage;
int tileOffset = 0;
-(void)awakeFromNib {
   [[UIApplication sharedApplication] setStatusBarHidden:YES animated:NO];
   [car setAlpha:0];
   [road setAlpha:0];
   currentImage = [UIImage imageNamed:@"road.png"];
   // start a timer that will fire every second
   [NSTimer scheduledTimerWithTimeInterval:(1.0) target:self selector:@selector(onTimer) userInfo:nil repeats:YES];
   // start a timer that will fire every hundredth of a second
   [NSTimer scheduledTimerWithTimeInterval:(0.01) target:self selector:@selector(onTimerRoad) userInfo:nil repeats:YES];
}
- (void)onTimerRoad
{
   tileIndex += 1;
   [self setNeedsDisplay];
}
- (void)onTimer {
   [self update];
}
- (void)update {
   [self updateRoad];
}
- (void)updateRoad {
   [self  randomRoadUpdate];
}
- (void)randomRoadUpdate {
   int distance = (random() % 11) - 5;
   CGPoint oldPosition = road.center;
   if(oldPosition.x + distance < 96 || oldPosition.x + distance > 224)
      return;
   road.center = CGPointMake(oldPosition.x + distance, oldPosition.y);
}
- (void)draw {

}
- (id)initWithFrame:(CGRect)frame {
   if (self = [super initWithFrame:frame]) {
      // Initialization code
   }
   return self;
}
- (void)drawRect:(CGRect)rect {
CGImageRef image = CGImageRetain(currentImage.CGImage);
CGRect imageRect;
imageRect.origin = CGPointMake(160, 240);
imageRect.size = CGSizeMake(320.0, 480.0);
CGContextRef uiContext = UIGraphicsGetCurrentContext();
CGContextClipToRect(uiContext, CGRectMake(0.0, 0.0, rect.size.width, rect.size.height));
CGContextDrawTiledImage(uiContext, imageRect, image);
}
- (void)dealloc {
[super dealloc];
}
@endNow that the road is functioning properly, you want to make the player's race car zoom down the highway as expected. Your first objective is to allow the player to move the car to the left or right using the iPhone's built-in accelerometer. The iPhone SDK makes this very easy. Let's review the code that you will need to add to make this happen.
You will need to create a share instance of the UIAccelerometer and set its update interval to every second. At the top of the form you will need to define a constant that stores the accelerometer's refresh rate. Then you will need to point the UIAccelerometer's delegate at the Main View by setting the delegate using the keyword self:
// Constant for the number of times per second (Hertz) to sample acceleration.
#define kAccelerometerFrequency 40
// Configure and start the accelerometer
[[UIAccelerometer sharedAccelerometer] setUpdateInterval:(1.0 / kAccelerometerFrequency)];
[[UIAccelerometer sharedAccelerometer] setDelegate:self];
This will inform the iPhone OS that your application would like to be notified of accelerometer changes every second. The following method is the delegate that the iPhone accelerometer will call when the device accelerates:
// UIAccelerometerDelegate method, called when the device accelerates.
- (void)accelerometer:(UIAccelerometer *)accelerometer didAccelerate:(UIAcceleration *)acceleration {
   [self updateCar:-acceleration.x* 30];
}
The delegate will call our worker function, and this function will update the screen as needed to match the player's input:
- (void)updateCar:(CGFloat)positionInDegrees {
   int distance = positionInDegrees;
   CGPoint oldPosition = car.center;
   car.center = CGPointMake(oldPosition.x + distance, oldPosition.y - 1);
}
Remember to always update your header file to match any changes you make in your main files. Here's the correct header file for the changes we have made so far:
#import <UIKit/UIKit.h>
@interface MainViewController : UIViewController <UIAccelerometerDelegate> {
}
- (void)updateCar:(CGFloat)positionInDegrees;
@endYou want to reward the player's success by adding points to his score. If the player does well, he gets a bonus; if the player makes a mistake, consider imposing a penalty such as taking away points.
Tip
Some people may hate statistics, but players love knowing theirs. Consider tracking your player's accomplishments during a game; for example, by total number of zombies slain or total amount of treasure found. Many players will replay a game to fully "complete" a level or game.
Let's start by creating a very simple scoring system and then allowing you to customize it as you see fit from there. Open the MainView.xib file in Interface Builder. Start in the Groups & Files listing in Xcode. Find the AmuckRacer folder and then locate the Resources folder; inside it you should find the MainView.xib file. Double-click it to have Interface Builder open it. Open the Library that is found inside the Interface Builder's Tools menu. Make sure you have the Options tab selected instead of the Media tab. Expand the Library folder, then the Cocoa Touch Plugin folder, and finally choose the Inputs & Values folder. Drag a Label control onto the Main View window. Set the label's text to Score: 0. Move the label to the location of your liking (consider placing it at the top in the middle of the screen).
We need to create mappings from Interface Builder's user interface to Xcode classes so that the two can talk with each other. From the Interface Builder's Tools menu, choose Inspector. Make sure that the Inspector window is focused on the Main View by click the Main View's window title. Once you have the Main View selected, you will see Main View appear in the title bar of the Inspector window.
Go to the fourth tab in the Inspector window, named Main View Identity. You should see the two class outlets you created earlier named car and road. Add another one called score by clicking the button that has a plus sign on it. Be sure to set its Type to UILabel. Your screen should now look like the one shown in Figure 5.16.
As before, you will now use Interface Builder's Write Class Files feature to update your Main View's class files with the new control. Make sure you have the Main View window selected before running the Write Class Files command. You should see a screen like Figure 5.17.


You can find this menu item under Interface Builder's File menu. Next, you will see a merge or replace prompt, as shown in Figure 5.18. Be certain you choose the Merge option; if you choose the Replace option, Interface Builder will replace your edited files with empty new ones. This is a painful lesson to learn!
You have now created the user interface for the player's score. You need to add the code that will update the UI. To do this, you will need a new variable named score that will keep up with the player's score for the duration of the game. By default we will add to the player's score upon updating of the game loop. Here are the code changes needed to update the player's score.
First, you will need to initialize the score variable:
int score = 0;
You will also need to modify the update method as follows:
- (void)update {
   [self updateRoad];
   score += 1;
}
And finally, you should update the draw method to set the label's text to the player's score:
- (void)draw {
   score.text = [NSString stringWithFormat: @"Score: d%", currentScore];
}
Now when you run AmuckRacer, you should see the player's score at the top of the screen, as shown in Figure 5.19.
It's always important in an action game to decide how the player wins and loses. In this game you will have the player lose if the car ever reaches the bottom of the screen, using a simple form of collision detection. You will make this possible by causing the player's car to slow down if it drives off the road. You can always find the road's position and the player's car position. Using this and what you know about the road, you can calculate whether the player is on the road.

Here is an overview of the math. You know the iPhone screen is 320 pixels wide, and the road is the same size. You know or you can check that the car image width is 42 pixels wide. Even though the road.png image is 320 pixels wide, the road in the image is really only 200 pixels wide. But that is not all you need to determine whether the player is keeping the car on the road. You will need to perform two checks: one to see if the car has driven off the left-hand side of the road, and the other to see if the car has driven off the right-hand side of the road.
To check if the car has driven off the left-hand side of the road, use the road image's center to find the center of the actual road, and subtract 100 to find the road's left-most edge. Compare this to the car's left-most edge to determine if the car remains on the actual road. To calculate the car's left-most edge, you use the car's center and subtract 24. You use the numbers 100 and 21 because these values are half of the widths of the road and car images, respectively. And the center of an image is at the halfway point from the left-most and right-most edges.
Now that you understand the concept, here is the code to make it happen:
- (void)updateCar {
   CGPoint roadPosition = road.center;
   int roadLeftPosition = roadPosition.x - 100;
   int roadRightPosition = roadPosition.x + 100;
   CGPoint carPosition = car.center;
   int carLeftPosition = carPosition.x - 21;
   int carRightPosition = carPosition.x + 21;
   if(carLeftPosition < roadLeftPosition)
      car.center = CGPointMake(carPosition.x, carPosition.y + 1);
   if(carRightPosition > roadRightPosition)
      car.center = CGPointMake(carPosition.x, carPosition.y + 1);
   if(carLeftPosition > roadLeftPosition && carRightPosition < roadRightPosition)
      car.center = CGPointMake(carPosition.x, carPosition.y - 1);
}
Make sure you add this call to your main update method:
- (void)update {
   [self updateRoad];
   [self updateCar];
}
Don't forget to update your MainView.h header file with the new method name:
#import <UIKit/UIKit.h>
@interface MainView : UIView {
    IBOutlet UIImageView *car;
    IBOutlet UIImageView *road;
    IBOutlet UILabel *score;
}
- (void)onTimer;
- (void)update;
- (void)updateRoad;
- (void)updateCar;
- (void)randomRoadUpdate;
- (void)draw;
- (void)drawScore;
@endYou have been exposed to a lot of ideas and material in this chapter. You are probably already thinking of a few ideas of your own. Everything we have covered in this chapter is great material to take and build upon to create even bigger and better ideas. Here are a few for your consideration:
Convert the road into water and the car into a boat. Only the center of the water is deep enough for the boat to go fast.
Convert the road into outer space and the car into a spaceship. The edge of the screen is filled with asteroids that cause the spaceship to slow down.
Convert the road into snow and the car into a skier. Only the center of the snow is free from trees to allow the skier to ski his fastest.
Add oil slick images to the game and if the car hits an oil slick, it ignores player input for 2 seconds.
Add additional cars to the game that force the player to drive around them to avoid collisions.
Have random nitro canister power-ups that the player can acquire to gain a temporary speed boost.
Create a variable to track how far the player can maintain on-road status. If the player does very well, give a score bonus and an extra speed boost.
Feel free to use these ideas along with any you may have to "power up" a racing game of your own design. We can't wait to see what you come up with!
You have learned a lot about developing action games for the iPhone in this chapter. But there is more to making a successful action game than writing lines of code and designing game sprites. You also need to master the business aspects of making iPhone action games.
While action games can be more costly and difficult to produce than some other types of applications, such as puzzle applications, they can have a greater return on investment. Because a well-made action game can become a world in itself, action games have the ability to generate a lot of attention and excitement. Once you have finished the game engine that your action game will use, you can reuse it either for a follow-up game or for an entirely new action game. If you plan on this early, many times you can design features and functionality that make this reuse even easier.
Tip
Hollywood makes it a point to reuse sets and props. You should consider doing the same with your game's graphic and audio assets, and with any game engines you create. This helps to increase your return on investment and will help your business grow faster.
The action game market is a little less crowded than some of the other game genres. One reason for this is it takes more time, effort, and skills to create a complete action game than it does to create, say, a novelty or puzzle game. Even so, the best action games find a way to stand out in the crowd. The same way players compete to be the best players with the best scores, action games compete with each other to be the best games with the best players. If this sounds like fun to you, consider making an action game for your next iPhone application.
Even though there are fewer action games than some other kinds of applications, there are still tens of thousands of applications on the App Store. That's a lot of apps, and plenty of competition in all categories. You will want to focus on coming up with ideas that help your application rise above the rest.
You will also want to spread the word about your application. Successfully marketing a new iPhone application is almost its own game. To be really good at it, it takes a lot of practice, hard work, and a little luck. It's a little like running for office—nobody is going to vote for you if they don't know who you are, so get the word out there and promote your game. Tell your friends, write a blog post, and contact every iPhone application review site you can find and let them know what they are missing. The better your application is, the easier it will be to spread the word. Have you considered creating a YouTube video for your action game? Action games look great in video, and many people are hesitant to buy an action game without seeing some live video from an actual game.
Don't underestimate the power of social networking sites like Facebook, Twitter, and Digg. These sites have been able to springboard many an app into top-ten status. Facebook is a great place for fans of your application to meet and discuss ideas. Make sure you have some way for users of your application to give you feedback about what they liked and didn't like. This feedback can result in a version 2.0 of your application that is many times better than the 1.0 version.
At the beginning of this chapter you learned from famous examples of action games. Then you looked at how action games create challenges and excitement by using limited time, levels, health, and score. You also reviewed what makes an action game successful, including game balance, attractiveness, being free of bugs, being challenging, and addictive game play. You learned how competition isn't all bad. Next, you learned various techniques for creating game graphics, from home-brewed programmer's art to third-party, royalty-free clip art to professionally created, custom designs. From there you were introduced to various methods programmers use to produce great audio for their applications.
After this you began work on creating an action game from the ground up. You learned how it is important to define your goals before you do anything else. Then you examined your options for how to best achieve your set goals. Only then did you begin to actually write any code. You used the tools of the trade for creating iPhone applications, including Xcode, Interface Builder, and its Library and Inspector tools. You saw the value of using programmer's art to generate a quick prototype for applications.
Then you rolled up your sleeves and got into some of the more technically challenging aspects of writing iPhone applications. You saw the value of using info screens for an application. You learned how to remove the iPhone Status Bar. You learned some of the basics of collision detection and collision calculations. You used the concept of a game loop to update and draw both the player's character and the player's game world. After reviewing the details of creating random numbers, you created realistic game motion with only minimum effort. You implemented a very clever method of scrolling the road using image tiling. You reviewed the business of iPhone software development, including marketing and return on investment. And to wrap it all up, you tracked the player's score so he would have something to brag about to his friends. We hope you are beginning to see the power and possibilities of iPhone programming. Don't stop now; we are just getting warmed up!