In This Chapter
Facing the challenges of real-time multiplayer games
Understanding game design: Competition
Choosing your connection options
Hooking up with your peers
Programming: AmuckPuck
Analyzing business aspects
We could have covered multiplayer apps in a single chapter; however, the technologies exposed in the 3.0 SDK warrant two separate discussions. In this chapter we focus on peer-to-peer (P2P) connectivity. Real-time games are well suited to this technology, so our example game will employ peer-to-peer and head-to-head connections. In Chapter 8 we will cover push notification. Even though push notification was not designed for gaming, it makes a perfect fit for turn-based gaming. It's important to cover peer-to-peer first because you will be able to use what you learn in this chapter to add peer-to-peer connectivity to your turn-based games.
In this chapter, you'll examine multiplayer connectivity in the game AmuckPuck. Air hockey has been a hit on the iPhone, probably because it is such a natural fit for the device. We cover it here partly because of this natural fit and the great illustration it serves for this material; however, it's also one of our personal favorites. We are hoping that you will take this example and build some really cool new versions of air hockey that we can all enjoy.
Finally, since there are already so many versions of air hockey currently available, we will consider how to make a game attractive in a replacement market, adding some value and separation to this app for it to be a success. From a business aspect we will discuss entering a replacement market and review techniques for making your games stand out in the crowd.
Simply stated, multiplayer games allow more than one gamer to play in the same game environment at the same time. In this environment a player is no longer limited to competing against algorithms and artificial intelligence. Players can enter a world of social interaction with friends, peers, and even players on the other side of the world.
In this world players can do the following:
Experience dynamic human interaction.
Play competitively against rivals.
Play cooperatively with friends.
Communicate and socialize with other players.
Form friendships and interact with distant players.
Connectivity is another area of interest and variety. Multiplayer games have changed a lot over the years and new technologies have been introduced that allow gamers to connect in more ways than ever before:
Head-to-head. Players play against each other on the same device with separate or shared controllers.
Peer-to-peer. Players in close proximity can connect with each other with wireless technologies like Bluetooth, with a shared network, or simply by using a cable between two devices.
Internet. Players connect with one or more other players on the World Wide Web.
Massive multiplayer. Players connect to a central server that is responsible for coordinating interaction between players and the game.
A game can be considered real-time if a player's interaction with the game environment is fluid and not suspended by another player's turn or input. In real life a game of air hockey at the arcade would be considered real-time. Playing a round of checkers would be an example of a turn-based game. It is important to understand the distinction between the two types of multiplayer games because the strategies employed to connect the players can be very different.
Connecting players on separate devices has some real challenges. Once connected, packets are continually and rapidly exchanged between participants. These packets contain information about player input, status, and anything else necessary to communicate changes in your virtual world. When exchanging packets, there are two issues that must be reckoned with: network latency and lost packets. Dealing with these issues can be a science of its own; however, for now, you need to at least be aware of the problems.
Latency is the time it takes for a packet to travel from one device and to be processed by the connected device. This latency is generally short, but for real-time games it can be enough to render your game unplayable. Most real-time games deal with latency by being predictive, in which you measure the latency and use this information to predict the future move you expect the other player to make. For example, in some scenarios you can use the direction and speed of the remote player to calculate a player's next position, assuming the direction and speed will not change. When the next packet is received, you can correct incorrect predictions by making a smooth transition to the proper location. This generally goes unnoticed by players because they are not looking at the same device as remote players who see their actual location. The downside to this method is that occasionally a player may experience anomalies. For example, a person may walk through a wall or see a bullet appear 20 pixels in front of the cannon whenever a missed prediction is corrected.
Lost packets are easier to deal with than latency. Usually if you lose a packet you can interpolate the missing information. For instance, if you lose packet 2 you can interpolate it from information in packets 1 and 3. In other cases you can ignore lost packets and let your prediction logic for latency compensate for the missing data. This just means the latency will span a larger time interval if a packet is lost. At times you will need to send packets containing data that must be delivered. For example, if you are reporting that a player was destroyed, that message must be received on the other end. If critical messages like this are not received, the integrity of the game state is lost. When messages must be reliable, the recipient needs to issue a return receipt once the critical message arrives. If the sender does not receive the receipt in a timely manner, the original packet should be resent until a return receipt is received.
It is human nature for people to want to compete. Every day we are faced with a desire to compete. Since the dawn of time we have been in competition for food, water, and mates. Think of all the things you and others compete for:
Basic needs (food, clothing, and shelter)
Money and wealth
Pride and prestige
Fame and popularity
Notoriety and attention
High scores and bragging rights
Competition in gaming is a combat between two or more players. Players want to prove they are better than their rivals. Victory is about pride—we all want bragging rights! Your games should appeal to our instinctive desire to compete.
Competitive games should pave a path that allows players to increase their skill level the more they play the game. This encourages players to play your game longer and harder to get an edge over their opponents. In air hockey, for example, players learn the sweet spots to bounce the puck off of. They learn how to fake out the opponent and make more accurate shots at the goal the more they play. However, the better you become, the better your opponent becomes at defending against you. The stroke of the paddle gives a visual cue to the direction it will send the puck when it strikes. At some point players will learn all the tricks and cues and gain the agility necessary to be an expert at your game. The key to making your game great is to create enough depth that players will not reach that skill level until they have spent many, many hours immersed in your game. If mastery is easily obtained, gamers will grow bored quickly, leave you a bad review, and move on to the next challenge.
Some games, like air hockey, have a natural learning curve. Just mastering the controls and learning the physics take time. In other games you need to build the learning curve in yourself. In order to build new challenges and content that extend the learning curve, we can mimic characters of naturally occurring paths of learning.
In most sports you learn to play both offense and defense. Air hockey is no different—you are on offense if you are in control of the puck and on defense if you are not. For every offensive action there should be a defensive action against it. Each offensive technique should be more difficult to learn and the counter should be equally difficult to learn. Offensive actions should provide cues when they are invoked even if the cue is artificial. If cues are not provided, the defensive player cannot prepare or learn to defend against the move. Just by using this simple technique, you now have a path to systematically add depth and interest to your game.
Let's add some depth to our air hockey example. Many fighting games have special moves that unleash powerful or magical attacks that level the opponent. In many instances these moves are triggered by memorized controller patterns. One way to translate this to the iPhone is to fire off attacks when special gestures are drawn to the touchscreen. For example, when a player draws a "V" shape (Figure 7.1), a stun blast is fired from your puck (Figure 7.2). If the blast strikes the opponent, he is immobilized for a few moments, giving the attacker a free shot at the goal.

If a player draws a greater than symbol (>) (Figure 7.3), a confusion blast is fired from the puck (Figure 7.4). If this blast strikes the opponent, the puck moves opposite to where the player directs it for a few seconds. Notice that the confusion blast is a more difficult stroke than the stun blast. Also, the confusion blast fans out a little, making it more difficult to avoid.


Earlier in the chapter we listed the available connection options:
Head-to-head
Peer-to-peer
Internet
Massive multiplayer
For our example we are going to support head-to-head and peer-to-peer.
Head-to-head does not really require a connection and therefore is fairly straightforward to implement. However, do not dismiss the importance it carries. Most players will have only one device to play on, so this style may make up the bulk of your market.
At the time of this writing, peer-to-peer is the new kid on the block. Peer-to-peer provides a great gaming experience for those with two compatible devices.
Note
Peer-to-peer support requires iPhone OS 3.0 and is only available for the iPod touch second generation, iPhone 3G, and above.
Internet and massive multiplayer connections would be an awesome addition to the game, but the topic is too broad to cover here, especially connecting a real-time game this way.
Now we are going to walk you through the basics of peer-to-peer connections. In the next section we will take you through the code for AmuckPuck, but for now we need a smaller example that is not cluttered with concerns outside of peer-to-peer. At the time of this writing, a simple example of peer-to-peer was not available from Apple. We have supplied the example "P2P Chat," which you can download from http://appsamuck.com/gamedevbook/p2pchat.
Peer-to-peer is at the core of the Game Kit framework introduced in the iPhone 3.0 SDK. Apple has provided documentation and getting started videos that outline the features and uses of tools available in Game Kit. Also, Game Kit was new at the time of this writing, so we recommend that you read through the material and watch the videos Apple provides to see what may have been added since this book was written.
Load the project in Xcode and run it in the Simulator so you can get your first experience with the app. To get the full experience, you will need an additional device to connect, but thankfully Apple was kind enough to enable the Simulator to connect with an external device as two physical devices would.
Tip
Remember that the Simulator is just that—a simulator, not an emulator. There is a difference between the two. The Simulator utilizes the processor and other resources directly. An actual device will not perform at the same level. On a physical device, graphics will be rendered more slowly and packets will take longer to arrive. The Simulator is a great way to test, debug, and tune; however, you should always perform testing on a physical device (or two) before you submit your app to the App Store.
Once you have loaded the project, click Build and Go. You will see a simple screen in text view with a Find button, a text field, and a Speak button (Figure 7.5).
Click the Find button to launch the peer picker (Figure 7.6). The peer picker is a nice controller that Apple has provided for you in the SDK. It takes care of all the logic and workflow necessary to connect two players in a peer-to-peer session.

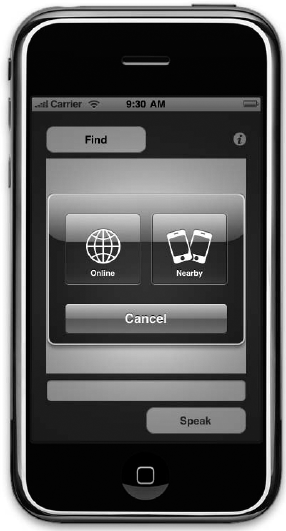
The first screen in the peer picker workflow allows the player to select the connection type. Currently, if a user selects Online, the peer picker informs you of this decision and it is up to you to complete the connection. P2P Chat does nothing but close the picker since it is just an example. However, if the user clicks Nearby, this tells the picker that the player wants to connect over Bluetooth using peer-to-peer. If Bluetooth is not enabled, the player will be given an opportunity to turn it on (Figure 7.7).

If Bluetooth is already on, you will not receive this prompt. If you really want to see it anyway, you can force it to prompt you by going to the Settings application on your device and turning off Bluetooth (Figure 7.8). Then try P2P Chat again, and you will be prompted to turn it on.

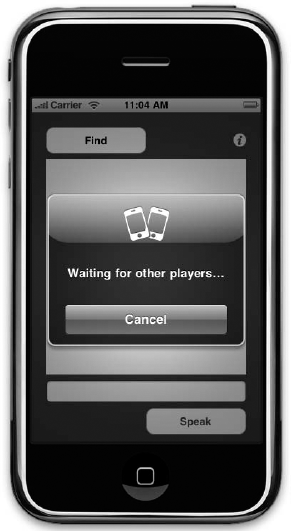
One way or another, you should have Bluetooth on at this point. The next screen in the workflow waits for nearby players to join (Figure 7.9). P2P Chat uniquely identifies itself with a session ID so only nearby devices that have P2P Chat loaded will show up.
As soon as another player is found, the name of that player's device appears in a list (Figure 7.10). One player can then select the other player he wishes to connect with and wait for that player to click Accept on the screen (Figure 7.11).
Once connected, the devices can send messages to each other (Figure 7.12). Okay, sending text messages to someone only a foot or two away isn't exactly revolutionary. However, this illustrates a straightforward implementation of the peer-to-peer connection process.

Now that you are more familiar with P2P Chat, let's look at the code and see what makes it tick. P2P Chat utilizes features of the Game Kit frameworks to connect devices. Game Kit introduces features that allow different devices to connect. At the time of this writing, Game Kit includes two technologies:
Peer-to-peer connectivity. This enables you to create a Bluetooth network between two devices. Even though it was designed for games, Apple encourages its use for any application that can benefit from an ad hoc network between two devices.
Note
As of the iPhone 3.0 OS, peer-to-peer has a two-device limit.
In game voice. This provides voice communication between multiple devices over any network. This can be layered on top of a Bluetooth connection or a wireless Internet connection.
In P2P Chat we used the peer-to-peer connectivity currently available in Game Kit. When utilizing this feature you need to utilize two new classes introduced in the frameworks:
GKPeerPickerController. This controller manages the peer picker we looked at earlier. You will need to activate an instance of the class as well as implement a delegate that it provides to receive and respond to the messages it sends.GKSession. This is the class that implements the Bluetooth network between two devices. Use an instance of this class to configure and manage the connection between the two devices.GKSessionalso supplies a delegate that is literally used to receive messages.


Before working with a session, we need to connect to another device. Thankfully, Apple has provided the GKPeerPickerController that does just that. The peer picker comes complete with its own user interface for locating and accepting connections.
Here are the steps needed to add peer picker to the P2P Chat example:
Whenever the Find button is clicked, create an instance to the class
GKPeerPickerControllerif one did not already exist:GKPeerPickerController *picker = [[GKPeerPickerController alloc] init];
Attach the delegate:
picker.delegate = self;
Configure the network types that you would like to allow:
picker.connectionTypesMask = GKPeerPickerConnectionTypeNearby |
GKPeerPickerConnectionTypeOnline;
Note
GKPeerPickerConnectionTypeOnlineis included for demonstration purposes. If you leave it out, nearby connections will be used by default and there will be one less step in the connection process. To leave it out, replace the code for Step 3 with this:picker.connectionTypesMask = GKPeerPickerConnectionTypeNearby;
Set the instance property and release the locale reference:
self.peerPicker = picker; [picker release];
Finally, disable the Find button to keep the user from clicking it again, and then call
showto launch the Peer Picker dialog box:findButton.enabled = false; [self.peerPicker show];
These additions will get the peer picker to show on the screen, but you still need to implement the delegate in order to do anything with the session the peer picker configures for you. In order to do this, your class must implement GKPeerPickerControllerDelegate:
@protocol GKPeerPickerControllerDelegate <NSObject>
@optional
- (void)peerPickerController:(GKPeerPickerController *)picker
didSelectConnectionType:(GKPeerPickerConnectionType)type; - (GKSession *)peerPickerController:(GKPeerPickerController *)picker
sessionForConnectionType:(GKPeerPickerConnectionType)type;
- (void)peerPickerController:(GKPeerPickerController *)picker
didConnectPeer:(NSString *)peerID toSession:(GKSession *)session;
- (void)peerPickerControllerDidCancel:(GKPeerPickerController *)picker;
@endHere are the details of how the GKPeerPickerControllerDelegate is implemented in P2PChat:
peerPickerController:didSelectConnectionType:This event notifies the delegate that the user chose a connection type. Online connections are not implementing in this example; for this reason, the Peer Picker dialog box is now closed by calling
dismiss. Next, a message is displayed to the user explaining why nothing happened. Finally, the Find button is re-enabled so the user can start the process all over again:- (void)peerPickerController:(GKPeerPickerController*) picker didSelectConnectionType:(GKPeerPickerConnectionType) type { if (type == GKPeerPickerConnectionTypeOnline) { [picker dismiss]; UIAlertView *alertView = [[UIAlertView alloc] initWithTitle:@"Information" message:@"Online connections are not supported." delegate:nil cancelButtonTitle:@"Close" otherButtonTitles:nil]; [alertView show]; [alertView release]; findButton.enabled = true; } }peerPickerController:sessionForConnectionType:This event notifies the delegate that the connection type is requesting a
GKSessionobject. You should return a validGKSessionobject for use by the picker. If this method is not implemented or returnsnil, a defaultGKSessionwill be created for you:-(GKSession*)peerPickerController: (GKPeerPickerController*)picker sessionForConnectionType:(GKPeerPickerConnectionType) type { if(!gameSession) { gameSession = [[GKSession alloc] initWithSessionID:@"com.appsamuck.p2pchat"displayName:nil sessionMode:GKSessionModePeer]; gameSession.delegate = self; [gameSession setDataReceiveHandler:self withContext:nil]; } return gameSession; }We will look at the creation of
GKSessionin more depth in the next section.peerPickerController:didConnectPeer:toSession:This event notifies the delegate that the peer was connected to a
GKSession. Once this is fired, we know we can start communicating on our connection. In P2P Chat, we enable the Speak button when this event fires:- (void)peerPickerController:(GKPeerPickerController*) picker didConnectToPeer:(NSString*)peerId { speakButton.enabled = true; }peerPickerControllerDidCancel:This event notifies the delegate that the user cancelled the picker. Use this event if you need to perform an action when the player cancels the connection process: You need to re-enable the Find button here also:
- (void)peerPickerControllerDidCancel: (GKPeerPickerController*)picker { findButton.enabled = true; }
Now that you have a peer picker set up, you can implement the GKSession object that you will use to send and receive messages between devices. In P2P Chat, the GKSession object is initialized in the peerPickerController:sessionForConnectionType: method implementation for the protocol GKPeerPickerControllerDelegate:
-(GKSession*)peerPickerController:(GKPeerPickerController*)picker
sessionForConnectionType:(GKPeerPickerConnectionType)type {
if(!gameSession) {
gameSession = [[GKSession alloc]
initWithSessionID:@"com.appsamuck.p2pchat"
displayName:nil sessionMode:GKSessionModePeer];
gameSession.delegate = self;
}
return gameSession;
}This line creates and initializes the session:
gameSession = [[GKSession alloc] initWithSessionID:@"com.appsamuck.p2pchat" displayName:nil sessionMode:GKSessionModePeer];
The parameters needed for initializing a session are:
sessionID. A unique string that identifies your application.
name. A string identifying the user to display to other peers.
mode. The mode the session should run in.
In P2P Chat, the displayName parameter is set to nil. Setting displayName to nil instructs the picker to use the device name as the displayName. We set the mode to GKSessionModePeer, which tells the session to act as both server and client. This results in the best user experience.
Once you have created the GKSession you begin to send messages. To send a message, you will need to call the method sendDataToAllPeers:withDataMode:error:. This method is used in P2P Chat whenever the Speak button is clicked:
- (IBAction)speakButtonClicked:(id)sender {
if (!isConnected) return;
NSString *message = textField.text;
NSData *data = [message dataUsingEncoding:NSASCIIStringEncoding];
[gameSession sendDataToAllPeers:data withDataMode:GKSendDataReliable error:nil];
}Take care to notice the parameter data mode. There are two ways to send messages:
GKSendDataReliable. Reliable continues to send the data until it is successfully transmitted. However, it may stall if network congestion occurs. Use this method when you need to guarantee delivery.GKSendDataUnreliable. Unreliable is the fastest way to send your data. Data is sent one time and does not retry if an error occurs. Data transmitted this way can be received out of order. Use this method for sending small packets of data that must arrive quickly.
The last thing left to do is to implement pertinent methods defined by the protocol GKSessionDelegate:
@protocol GKSessionDelegate <NSObject>
@optional
- (void)session:(GKSession *)session peer:(NSString *)peerID
didChangeState:(GKPeerConnectionState)state;
- (void)session:(GKSession *)session
connectionWithPeerFailed:(NSString *)peerID withError:(NSError *)error;
- (void)session:(GKSession *)session didFailWithError:(NSError *)error;
@endOnly one method in this protocol is necessary for P2P Chat. The app needs to know whenever the state of a peer changes relative to the session. For this, the app needs to implement the method session:peer:didChangeState. In this method the app needs to react whenever a peer connects or disconnects. The peer picker will handle all other state changes of concern for us:
- (void)session:(GKSession *)session peer:(NSString *)peerID
didChangeState:(GKPeerConnectionState)state {
NSString* stateName = nil;
switch (state) {
case GKPeerStateConnected:
[session setDataReceiveHandler: self withContext: nil];
self.isConnected = true;
self.gameSession = session;
[peerPicker dismiss];
break;
case GKPeerStateDisconnected:
self.isConnected = false;
break;
}
}Note these two lines of code from above:
[session setDataReceiveHandler: self withContext: nil];
and
[peerPicker dismiss];
Calling dismiss on the peer picker simply closes the peer picker. However, remember to make the call to get the peer picker off the screen. The call to setDataReceiveHandler: withContext warrants a little more discussion. Setting the DataReceiveHandler tells the GKSession which object to send data to as it arrives from the remote peer. The class receiving the data must implement the following method as P2P Chat has done:
- (void) receiveData:(NSData *)data fromPeer:(NSString *)peer
inSession:(GKSession *)session context:(void *)context {
NSString *message = [[NSString alloc] initWithData:data
encoding:NSASCIIStringEncoding];
textView.text = [textView.text stringByAppendingString:
[NSString stringWithFormat:@"%@
", message]];
}As illustrated above, whenever data is received from a peer, you can intercept the data in this method and use it in your app as prescribed by your requirements.
Earlier in the chapter we discussed that network games at times have to deal with lost packets and latency. These are the types of issues that can trip us up in the later stages of the development process and lead to an expensive overhaul. As long as we are sending packets quickly and repeatedly, a lost packet here or there will not cause huge hiccups. However, latency could be an issue here. We need a good idea of how much latency to expect in a normal peer-to-peer connection. The best thing to do is to try and measure it so we know what we are dealing with. In order to see what we were up against, we wrote a small app that sends a packet of data back and forth between two peers to constantly record the current time on the device. This allows us to measure how long it takes a packet to round-trip, or get back to the device that it originated from.
Note
With Bluetooth, real-world conditions may affect actual performance. Conditions such as the proximity of the two devices and the use of other Bluetooth hardware (headsets, wireless mice/keyboards, etc.) in close proximity will impact latency and packet loss. Also, some devices will perform better than others as "host" devices. An iPod touch does not have to manage extra background processes such as cell phone communications. Also, the 2G iPod touch and the iPhone 3GS have a faster CPU.
We created a small app based on P2P Chat to perform the test. Here is a short breakdown of the key pieces of the application and how it works so you will understand how we arrived at our results. First, we need a packet to round-trip for the test:
typedef struct {
int player;
int count;
double time;
} Packet;Once the GKSession is established, a message can be sent to the peer. The following code is used to send the message:
localPacket.player = playerNumber; localPacket.count = ++currentCount; localPacket.time = CFAbsoluteTimeGetCurrent(); localData = [localData initWithBytes:&localPacket length:sizeof(Packet)]; [self.gameSession sendDataToAllPeers:localData withDataMode:GKSendDataUnreliable error:&sendError];
When the peer receives a packet from a peer, it returns the package back to the sender. When the peer receives a packet that it created, measurements can be recorded. Listing 7.1 shows how this was accomplished.
Note
To download all of the code listings in this chapter, go to www.wileydevreference.com and click the Downloads link.
Example 7.1. The Method receiveData Will Be Called Any Time Data Is Received from a Peer
#pragma mark GKSessionDelegate
- (void) receiveData:(NSData *)data fromPeer:(NSString *)peer
inSession:(GKSession *)session context:(void *)context {
Packet packetData;
[data getBytes:& packetData length:sizeof(Packet)];
if (packetData.player == playerNumber) {
// This packet originated here
if (lastCount+1 != packetData.count) {
// This throws out missed or late packets
packetData++;
double elapsedTime = CFAbsoluteTimeGetCurrent() - packetData.time;
totalElapsedTime += elapsedTime;
NSString *remoteStatus remoteStatus = [NSString stringWithFormat:
@"Average time: %f", totalElapsedTime / packetCount];
textView.text = remoteStatus;
lastCount = packetData.count;
}
}
else {
// This packet originated on the peer we need to return it
remotePacket = received;
remoteData = [remoteData initWithBytes:&remotePacket
length:sizeof(Packet)];
[self.gameSession sendDataToAllPeers:remoteData
withDataMode:GKSendDataUnreliable error:nil];
}
}Tip
In peer-to-peer you are writing one app that needs to behave slightly differently on each device. It is not obvious at first how to choose the device to be the host versus the client. We use the session: didReceiveConnectionRequestFromPeer method to make that determination for us. This message is sent to only one of the two devices, which helps you decide which device does what:
- (void)session:(GKSession *)session
didReceiveConnectionRequestFromPeer:(NSString *)peerID {
// This method will only be called on one device
playerNumber = 2;
}After running the test, we discovered that in peer-to-peer the time it takes to round-trip is as follows:
Average time: 0.038 seconds
Worst time: 0.180 seconds
Best time: 0.012 seconds
Also realize this is a round trip, so we can assume that a single packet will be roughly half of this time. Also, if your packet is larger, it will take longer to send. So what does this tell us? If we keep small packets, we can expect to be able to receive about 50 per second; worst case, we will receive 10 per second. That's not too shabby. What happens if we switch the same example to reliable messaging? You can do this by changing GKSendDataUnreliable to GKSendDataReliable throughout the code.
For example, change this:
[self.gameSession sendDataToAllPeers:remoteData withDataMode:GKSendDataUnreliable error:nil];
to this:
[self.gameSession sendDataToAllPeers:remoteData withDataMode:GKSendDataReliable error:nil];
When this was done in our test, we yielded the following results with reliable messaging:
Average time: 0.043 seconds
Worst time: 0.246 seconds
Best time: 0.015 seconds
As expected, reliable is a bit slower, but still fairly good. Choose whether to use reliable messaging or unreliable messaging according to the needs of your game. For the AmuckPuck game, we will need to use a little of both. For puck and paddle movements, we will use unreliable for speed. For major game events like scoring, we will use reliable messaging. Also, based on the numbers above, we will be able to move forward without prediction or interpolation.
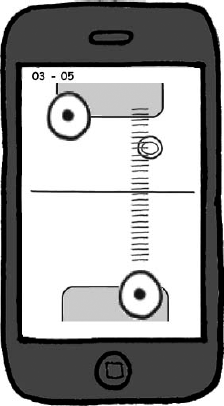
Earlier in this chapter you looked at some ideas and mock-ups for the game AmuckPuck. Now, we will walk you through the critical steps necessary to bring this idea to life (Figure 7.13). AmuckPuck is an exciting application to work on. Peer-to-peer really brings a whole new level to the game that the head-to-head versions of air hockey on the App Store completely lack. This game was really fun to build and test. We had a hard time putting it down every time we fired it up to play it. We hope you enjoy it as much as we have.

Figure 7.13. This chapter guides you through the critical steps needed to transform the game AmuckPuck from an idea to an application.
Along with the technical details of a game, remember that appearances are important. When it comes to the App Store today, it is safe to go further and say appearances are of paramount concern. We spent some extra time and effort to make sure that graphics in AmuckPuck make a good first impression.
The first graphic a potential buyer will see in iTunes is your icon. At a glance, your icon should strive to accurately describe your application and capture the eye of someone browsing through the App Store. Figure 7.14 illustrates the icon we settled on for AmuckPuck.

Tip
By default, the iPhone will round the corners of your icon and apply a glossy shine to it. However, notice that the icon used for AmuckPuck already has rounded corners and a shine effect applied to it. You can prevent the iPhone from adding this effect on top of yours by adding the value UIPrerenderedIcon to your application's info.plist and setting the value to true.
Once you get potential buyers to take the bait, they will click on your app icon and you'll have an opportunity to wow them a bit more. On the application details screen, you can show up to five screen shots to your potential buyers. This is another opportunity to put your best foot forward. On the details page, AmuckPuck uses a couple of in-game shots, such as the one shown in Figure 7.15. It also shows a splash screen (Figure 7.16), the menu screen (Figure 7.17), and the About Us screen (Figure 7.18).

Tip
You can supply a loading screen to your application by adding an image to the resource bundle and naming it Default.png. This image will load the second a user clicks on your application icon and will remain visible until the application fully loads. However, Apple does not want you to use Default.png as a splash screen; they want it to look like the first real screen your users will encounter when they open your app. To get around this, you can load your splash screen first and use an animation to fade it away after a one- or two-second delay. This way you can use your splash screen for Default.png because it is the first screen users encounter.
Now let's take time to look at the application in detail. The full source code for AmuckPuck can be found at http://appsamuck.com/gamedevbook/airhockey.


In AmuckPuck we are going to focus on the key class and structures that bring it to life. There are several other files in the application, but these are the standard menu and support files you should already be familiar with. The three items we will focus on are:
StateData and EventData. These are structures defined inHockeyData.h. They are used to store the state of the hockey table and are sent asGKSessionmessages between the host and the client.HockeyTableView. This is the most important file in the application. It renders the paddles based on touch. It handles the physics necessary to animate the puck. It changes the way it behaves depending on how you connect.HockeyViewController. This is the controller that plays host to theHockeyViewTable. This controller is responsible for standing up theHockeyTableView, managing, and delegating peer-to-peer duties.
StateData and EventData are used to store and communicate data. StateData stores the current state of one of the paddles and the puck. The HockeyTableView uses two of these structures—one for each of the paddles it hosts. This is also sent between the client and host as a GKSession message:
#import <Foundation/Foundation.h>
Typedef struct {
int packetType;
int player;
int step;
bool intersect;
CGPoint paddleLocation;
CGPoint paddleVelocity;
CGPoint puckLocation;
CGPoint puckVelocity;
double puckRotation;
double puckAngle;
} StateData;EventData is used only to communicate major system events. When a goal is scored, this message is sent from the host to the client to communicate the event:
typedef struct {
int packetType;
int eventType;
int clientScore;
int hostScore;
} EventData;Next is the first piece of the HockeyTableView header—this is the big one. The following definitions supply several knobs to turn so you can fine-tune the behavior and physics of the hockey table:
#define ANIMATION_INTERVAL 1.0 / 60.0 #define MAX_TOP_PLAYER_Y 200 #define MIN_BOTTOM_PLAYER_Y 280 #define MAX_PADDLE_STRIKE 15.0 #define MIN_PADDLE_STRIKE 2.5 #define PADDLE_STRIKE 1.5 #define PUCK_DECAY_RATE 0.10 #define PUCK_SPIN_DECAY_RATE 0.05 #define PUCK_DIAMETER 40 #define PUCK_RADIUS 20 #define PADDLE_DIAMETER 80 #define PADDLE_RADIUS 40 #define GOAL_START 80 #define GOAL_END 240
The following enumerations are used to define and communicate the different states that the table can assume:
typedef enum {
NO_CONNECTION = 0,
HEADTOHEAD_CONNECTION,
HOST_CONNECTION,
CLIENT_CONNECTION
} ConnectionType;
typedef enum {
BOTTOM_PLAYER = 0,
TOP_PLAYER
} PlayerCode;
typedef enum {
SCORE_MESSAGE = 0,
WIN_MESSAGE
} MessageCode;HockeyTableViewDelegate is a protocol that is used to send an alert when a goal has been scored. This protocol is needed by the HockeyViewController so it can send out a message when a goal is scored:
@protocol HockeyTableViewDelegate <NSObject> @optional - (void)hockeyTableDidScore:(PlayerCode)playerCode; @end
Next is the remaining "public" definition for the HockeyTableView interface:
@interface HockeyTableView : UIView {
id<HockeyTableViewDelegate> delegate;
ConnectionType connectionType;
CALayer *bottomPaddleLayer;
CALayer *topPaddleLayer;
CALayer *puckLayer;
StateData bottomPaddleData;
StateData topPaddleData;
UIImage *goalImage;
UIImage *blueWinsImage;
UIImage *redWinsImage;
int topScore;
int bottomScore;
double messageRotation;
NSTimer *animationTimer;UILabel *scoreLabel; UIImageView *messageView; } @property (nonatomic,assign) id /*<HockeyTableViewDelegate>*/ delegate; @property (nonatomic) StateData bottomPaddleData; @property (nonatomic) StateData topPaddleData; @property (nonatomic) ConnectionType connectionType; - (void)startAnimation; - (void)stopAnimation; - (void)updatePuckData:(StateData)puckData; - (void)displayMessage:(MessageCode)messageCode forPlayer:(PlayerCode)playerCode; @end
At the beginning of the implementation of HockeyTableView you will see a short list of private methods. It is helpful to separate fields and attributes of the interface this way, especially when a class becomes as large as this one:
// HockeyTableView.m #import "HockeyTableView.h" // private methods @interface HockeyTableView () @property (nonatomic, assign) NSTimer *animationTimer; - (void)initializeContents; - (void)drawView; - (void)updateView; - (void)updatePuck; - (void)didScore:(PlayerCode)playerCode; @end
In addition to the private section, we have included a handful of helper methods. These methods do not need to access any class members and could be moved out to another global library. The helper methods have been implemented in C instead of Objective-C to illustrate how you can seamlessly blend the two syntaxes in a single project in Xcode:
// helper methods CGPoint normalVector(double x1, double x2, double y1, double y2); double distance(double x1, double x2, double y1, double y2); double paddleSpeed(StateData stateData); void correctTouchPoint(CGPoint *touchPoint);
HockeyViewController manages and hosts the HockeyTableView. All peer-to-peer communication that occurs between the two devices is managed right here in this class. This has been extremely beneficial in this project because we can come to one place for all of our communication maintenance:
// HockeyViewController.h
#import <GameKit/GameKit.h>
#import "FlipsideViewController.h"
#import "MainView.h"
#import "HockeyData.h"
#import "MenuViewController.h"
#import "RootViewController.h"
@interface HockeyViewController : UIViewController <GKPeerPickerControllerDelegate, GKSessionDelegate, HockeyTableViewDelegate> {
RootViewController *rootViewController;
MainView *mainView;
GKPeerPickerController *picker;
GKSession *session;
ConnectionType connectionType;
}
@property (nonatomic, retain) GKSession *session;
@property (nonatomic, retain) GKPeerPickerController *picker;
@property (nonatomic, assign) RootViewController *rootViewController;
- (IBAction)showInfo;
- (IBAction)showMenu;
- (void)sendData;
- (void)showPeerPicker;
- (void)startNearby;
- (void)startHeadToHead;
@endHopefully, the bird's-eye-view tour you just took of the class headers has helped you to see the big picture more clearly. For the rest of the code analysis, we will take you to ground level and review the details of the code. Please realize that not every method that makes HockeyTableView and HockeyViewController has been listed here. Several methods in these classes are the same run-of-the-mill methods you deal with every day in iPhone development. Remember, you can always download the entire project from http://appsamuck.com/gamedevbook/airhockey to see all the mundane details.
First we are going to look at method implementations for the class HockeyTableView, then we'll look at the ones for the class HockeyViewController.
The method initializeComponents of HockeyTableView is called during the construction of the class. This method is responsible for the following:
Constructing and initializing
CALayerinstances for the two paddles and the puck.Loading images for the paddles and puck.
Loading a background image for our table.
Setting the initial position of the paddles and puck. The "actual" position of the paddles and puck are recorded in
StateDatastructuresbottomPaddleDataandtopPaddleData. This allows the application to easily grab this information and move it around. This is a requirement for ourGKSessionused inHockeyViewController.Constructing a
UILabelto display the score.Preloading the
UIImageobjectsgoalImage, blueWinsImage, andredWinsImage. These images are used in the methoddisplayMessagelisted further down in Listing 7.2.
Example 7.2. Initializing All of the Game Components
- (void)initializeContents {
self.multipleTouchEnabled = true;
CGImageRef puckImg = [[UIImage imageWithContentsOfFile:[[NSBundle mainBundle]
pathForResource:@"AmuckPuck" ofType:@"png"]] CGImage];
puckLayer = [CALayer layer];
puckLayer.frame = CGRectMake(0.0, 0.0, CGImageGetWidth(puckImg),
CGImageGetHeight(puckImg));
puckLayer.contents = (id)puckImg;
puckLayer.anchorPoint = CGPointMake(0.5, 0.5);
CGImageRef paddle1Img = [[UIImage imageWithContentsOfFile:[[NSBundle
mainBundle] pathForResource:@"RedPaddle" ofType:@"png"]] CGImage];
bottomPaddleLayer = [CALayer layer];
bottomPaddleLayer.frame = CGRectMake(0.0, 0.0, CGImageGetWidth(paddle1Img),
CGImageGetHeight(paddle1Img));
bottomPaddleLayer.contents = (id)paddle1Img;
bottomPaddleLayer.anchorPoint = CGPointMake(0.5, 0.57);
CGImageRef paddle2Img = [[UIImage imageWithContentsOfFile:[[NSBundle
mainBundle] pathForResource:@"BluePaddle" ofType:@"png"]] CGImage];
topPaddleLayer = [CALayer layer];
topPaddleLayer.frame = CGRectMake(0.0, 0.0, CGImageGetWidth(paddle2Img),
CGImageGetHeight(paddle2Img));
topPaddleLayer.contents = (id)paddle2Img;
topPaddleLayer.anchorPoint = CGPointMake(0.5, 0.57);
bottomPaddleData.paddleLocation = CGPointMake(160, 380);
topPaddleData.paddleLocation = CGPointMake(160, 100);
bottomPaddleData.puckLocation = CGPointMake(160, 250);
bottomPaddleData.puckVelocity = CGPointMake(0, 0);
// Set the background image CGImageRef bgImg = [[UIImage imageWithContentsOfFile:[[NSBundle mainBundle]
pathForResource:@"stagebg" ofType:@"png"]] CGImage];
self.layer.contents = (id)bgImg;
// Add our sublayers
[self.layer insertSublayer:puckLayer above:self.layer];
[self.layer insertSublayer:bottomPaddleLayer above:self.layer];
[self.layer insertSublayer:topPaddleLayer above:self.layer];
// Prevent things from drawing outside our layer bounds
self.layer.masksToBounds = YES;
// add a label to display the score
scoreLabel = [[UILabel alloc] initWithFrame:CGRectMake(10.0, 10.0, 150.0,
25.0)];
scoreLabel.textColor = [UIColor whiteColor];
scoreLabel.backgroundColor = [UIColor clearColor];
scoreLabel.font = [UIFont fontWithName:@"Arial" size:18];
scoreLabel.alpha = 0.5;
[self addSubview:scoreLabel];
[self bringSubviewToFront:scoreLabel];
// load images for messages
goalImage = [UIImage imageNamed:@"Goal.png"];
blueWinsImage = [UIImage imageNamed:@"BlueWins.png"];
redWinsImage = [UIImage imageNamed:@"RedWins.png"];
}Today it is fairly common for 2-D games to be powered by 3-D graphics. Graphics accelerators are equipped with powerful capabilities. They can blend, rotate, translate, and more without taxing the processor. Therefore, it makes more sense to use the 3-D accelerator to draw in 2-D than it does to try and manage the pixels by hand. In fact, all the views and animations we have used so far are built on top of an underlying 3-D engine.
Until now we have been using UIViews for all of our graphics needs. We could do the same for this game, but this is a great opportunity to pull back the layers a little and work directly with Core Animation. Core Animation is built directly on top of OpenGL ES, so we get the benefits of 3-D acceleration but without the full complexity of a 3-D environment.
If you have done game programming in the past, you may have used a game loop. It really makes sense for AmuckPuck to update the position of items in a game loop, especially the puck. In order to make this happen, we dropped down a level so we could work directly with CALayer objects. The methods startAnimation and stopAnimation manage an NSTimer object, which is the basis for our game loop. On each pulse of the timer, animateView is called, which in turn calls updateView and drawView:
- (void)startAnimation {
animationTimer = [NSTimer scheduledTimerWithTimeInterval:ANIMATION_INTERVAL
target:self selector:@selector(animateView) userInfo:nil repeats:YES];
}
- (void)stopAnimation {
animationTimer = nil;
}
#pragma mark Animate Layers
- (void) animateView {
[self updateView];
[self drawView];
}Separation of game logic into updateView and drawView was the goal of using CALayer objects and the NSTimer. This allows the application to manage positional data and game physics in the method updateView. Then we can code rendering and drawing separately in the method drawView.
Now inside the method drawView we can manually change the position of each CALayer. Remember that position, velocity, and rotation puck and paddles are managed in structures that are not part of the CALayer. In the updateView method, we update the position inside of the structures independent of the layers. When this is complete and drawView is called, we render the view by updating the CALayer objects with data from these structures inside of a CATransaction:
- (void)drawView {
// Wrap these layer changes in a transaction and set the animation
// duration to 0 so we don't get implicit animation
[CATransaction begin];
[CATransaction setValue:[NSNumber numberWithDouble:0.]
forKey:kCATransactionAnimationDuration];
// Position the paddle
bottomPaddleLayer.position = bottomPaddleData.paddleLocation;
topPaddleLayer.position = topPaddleData.paddleLocation;
puckLayer.position = bottomPaddleData.puckLocation;
puckLayer.transform = CATransform3DMakeRotation(bottomPaddleData.puckAngle,
0., 0., 1.);
if (messageView) {
messageView.layer.transform = CATransform3DMakeRotation(messageRotation,
0., 0., 1.);
}
[CATransaction commit];
}Notice that in drawView we are updating the internal CALayer of the UIView messageView. This is an example of how the UIView and CALayer can work together. This is being implemented in this manner because it gives us a smooth rotation of the messageView that will continue over the course of two separate animations. We will show the rest of the message animation a little later in the chapter.
For a game like this, physics are necessary to emulate a realistic experience. Calculating believable physics can be a real challenge. The following methods are full of calculations, algorithms, and math, working hard to produce believable physics of the puck bouncing around on the hockey table:
- (void) updateView {
if (connectionType != CLIENT_CONNECTION) {
[self updatePuck];
}
// update the message rotation; this is only used if messageView
// is visible;
if (messageView) {
messageRotation += 0.05;
if (messageRotation > 100*3.24)
messageRotation = messageRotation - (100*3.24);
}
}In the updateView method above, you see a call out to updatePuck. This method is really the meat of the physics engine. The function of each line in this method is not as easily discoverable as most of the others. To compensate, updatePuck is decorated with comments much more heavily than the norm (Listing 7.3).
Example 7.3. Calculating the Next Position of the Puck
- (void)updatePuck {
// handle the puck hitting the paddle
// Calculate the distance between the centers of the puck and the paddle
double dist = distance(bottomPaddleData.puckLocation.x,
bottomPaddleData.paddleLocation.x, bottomPaddleData.puckLocation.y,
bottomPaddleData.paddleLocation.y);
if (!bottomPaddleData.intersect & dist < (PADDLE_RADIUS + PUCK_RADIUS)) {
// calculate a normal vector from the paddle to the puck
CGPoint vector = normalVector(bottomPaddleData.puckLocation.x,
bottomPaddleData.paddleLocation.x, bottomPaddleData.puckLocation.y, bottomPaddleData.paddleLocation.y);
double speed = paddleSpeed(bottomPaddleData);
vector.x = vector.x * speed;
vector.y = vector.y * speed;
// update the velocity of the puck
bottomPaddleData.puckVelocity.x = vector.x;
bottomPaddleData.puckVelocity.y = vector.y;
bottomPaddleData.intersect = true;
}
else
bottomPaddleData.intersect = false;
dist = distance(bottomPaddleData.puckLocation.x,
topPaddleData.paddleLocation.x, bottomPaddleData.puckLocation.y,
topPaddleData.paddleLocation.y);
if (!topPaddleData.intersect & dist < (PADDLE_RADIUS + PUCK_RADIUS)) {
// calculate a normal vector from the paddle to the puck
CGPoint vector = normalVector(bottomPaddleData.puckLocation.x,
topPaddleData.paddleLocation.x, bottomPaddleData.puckLocation.y,
topPaddleData.paddleLocation.y);
double speed = paddleSpeed(topPaddleData);
vector.x = vector.x * speed;
vector.y = vector.y * speed;
// update the velodity of the puck
bottomPaddleData.puckVelocity.x = vector.x;
bottomPaddleData.puckVelocity.y = vector.y;
bottomPaddleData.intersect = true;
}
else
bottomPaddleData.intersect = false;
// decay the velocity of the puck
if (bottomPaddleData.puckVelocity.x > 0.3)
bottomPaddleData.puckVelocity.x += -PUCK_DECAY_RATE;
else if (bottomPaddleData.puckVelocity.x < −0.3)
bottomPaddleData.puckVelocity.x += PUCK_DECAY_RATE;
if (bottomPaddleData.puckVelocity.y > 0.3)
bottomPaddleData.puckVelocity.y += -PUCK_DECAY_RATE;
else if (bottomPaddleData.puckVelocity.y < −0.3)
bottomPaddleData.puckVelocity.y += PUCK_DECAY_RATE;
// apply terminal velocity.
// the puck should not be traveling so fast that it can pass
// through the paddle without intersecting with it
if (bottomPaddleData.puckVelocity.x > PADDLE_RADIUS)
bottomPaddleData.puckVelocity.x = PADDLE_RADIUS;
else if (bottomPaddleData.puckVelocity.x < -PADDLE_RADIUS)
bottomPaddleData.puckVelocity.x = PADDLE_RADIUS; if (bottomPaddleData.puckVelocity.y > PADDLE_RADIUS)
bottomPaddleData.puckVelocity.y = PADDLE_RADIUS;
else if (bottomPaddleData.puckVelocity.y < -PADDLE_RADIUS)
bottomPaddleData.puckVelocity.y = PADDLE_RADIUS;
// decay the rotation of the puck
if (bottomPaddleData.puckRotation > 0.001)
bottomPaddleData.puckRotation += -PUCK_SPIN_DECAY_RATE;
else if (bottomPaddleData.puckRotation < −0.001)
bottomPaddleData.puckRotation += PUCK_SPIN_DECAY_RATE;
// move the puck as prescribed by the rotation
bottomPaddleData.puckAngle += bottomPaddleData.puckRotation;
if (bottomPaddleData.puckAngle > 360.0)
bottomPaddleData.puckAngle = bottomPaddleData.puckAngle - 360.0;
// move the puck as prescribed by the velocity
bottomPaddleData.puckLocation.x += bottomPaddleData.puckVelocity.x;
bottomPaddleData.puckLocation.y += bottomPaddleData.puckVelocity.y;
// bounce the puck off left and right walls
if ((bottomPaddleData.puckLocation.x + PUCK_RADIUS) > 320) {
// invert the velocity
bottomPaddleData.puckVelocity.x = -bottomPaddleData.puckVelocity.x;
// move the puck back inbounds before it is drawn
bottomPaddleData.puckLocation.x = 320 - PUCK_RADIUS;
// change the rotation of the puck according to the angle and speed
// that it strikes the wall
bottomPaddleData.puckRotation +=
-(bottomPaddleData.puckVelocity.y * 0.005);
}
if ((bottomPaddleData.puckLocation.x - PUCK_RADIUS) < 0) {
bottomPaddleData.puckVelocity.x = -bottomPaddleData.puckVelocity.x;
bottomPaddleData.puckLocation.x = PUCK_RADIUS;
bottomPaddleData.puckRotation +=
(bottomPaddleData.puckVelocity.y * 0.005);
}
// bounce the puck off the top and bottom walls
if (!messageView) {
if ((bottomPaddleData.puckLocation.y + PUCK_RADIUS) > 480) {
// let the puck go if it is headed through the goal
if ((bottomPaddleData.puckLocation.x < GOAL_START)
| (bottomPaddleData.puckLocation.x > GOAL_END)) {
bottomPaddleData.puckVelocity.y = -bottomPaddleData.puckVelocity.y;
bottomPaddleData.puckLocation.y = 480 -PUCK_RADIUS;
bottomPaddleData.puckRotation +=
(bottomPaddleData.puckVelocity.x * 0.005);
}
else { [self didScore:BOTTOM_PLAYER];
}
}
if ((bottomPaddleData.puckLocation.y - PUCK_RADIUS) < 0) {
if ((bottomPaddleData.puckLocation.x < GOAL_START)
| (bottomPaddleData.puckLocation.x > GOAL_END)) {
bottomPaddleData.puckVelocity.y = -bottomPaddleData.puckVelocity.y;
bottomPaddleData.puckLocation.y = PUCK_RADIUS;
bottomPaddleData.puckRotation +=
-(bottomPaddleData.puckVelocity.x * 0.005);
}
else {
[self didScore:TOP_PLAYER];
}
}
}
}You may have noticed the connectionType flag in some of the previous code listings. This is used to indicate the connection type of the application. In its current version, the application can be connected as follows:
Head-to-head
Peer-to-peer host
Peer-to-peer client
In a head-to-head connection, updates to the puck and paddles are all handled and maintained on a single device. Also, Multi-Touch has to be enabled since two touches (one for each paddle) are observed at the same time. The top player is only updated locally in head-to-head connections (Listing 7.4).
Example 7.4. Change the Position of the Paddles Based on the Last Touch Location
- (void)updatePaddlesWithTouches:(NSSet *)touches {
NSArray *allTouches = [touches allObjects];
int count = [allTouches count];
if (count > 0) {
for (int i=0; i<count;i++) {
UITouch *touch = [allTouches objectAtIndex:i]; CGPoint touchPoint = [touch locationInView:self];
// if the touchPoint is out of bounds we need to correct it
correctTouchPoint(&touchPoint);
if (connectionType == HEADTOHEAD_CONNECTION &
touchPoint.y < MAX_TOP_PLAYER_Y) {
topPaddleData.paddleVelocity.x =
touchPoint.x - topPaddleData.paddleLocation.x ;
topPaddleData.paddleVelocity.y =
touchPoint.y - topPaddleData.paddleLocation.y;
topPaddleData.paddleLocation.x = touchPoint.x;
topPaddleData.paddleLocation.y = touchPoint.y;
}
else if (touchPoint.y > MIN_BOTTOM_PLAYER_Y) {
bottomPaddleData.paddleVelocity.x =
touchPoint.x - bottomPaddleData.paddleLocation.x;
bottomPaddleData.paddleVelocity.y =
touchPoint.y - bottomPaddleData.paddleLocation.y;
bottomPaddleData.paddleLocation.x = touchPoint.x;
bottomPaddleData.paddleLocation.y = touchPoint.y;
}
}
}
}
- (void)touchesBegan:(NSSet *)touches withEvent:(UIEvent *)event {
[self updatePaddlesWithTouches:touches];
}
- (void)touchesMoved:(NSSet *)touches withEvent:(UIEvent *)event {
[self updatePaddlesWithTouches:touches];
}
- (void)touchesEnded:(NSSet *)touches withEvent:(UIEvent *)event {
[self updatePaddlesWithTouches:touches];
}Another important thing to notice in the method updateView (repeated below) is that updatePuck is not called for client connections:
- (void) updateView {
if (connectionType != CLIENT_CONNECTION) {
[self updatePuck];
}
...
}In a peer-to-peer client connection, the top player is updated whenever data is received remotely from the method updatePuckData:
- (void)updatePuckData:(StateData)puckData {
bottomPaddleData.puckLocation.x = 320 - puckData.puckLocation.x;
bottomPaddleData.puckLocation.y = 480 - puckData.puckLocation.y;
bottomPaddleData.puckRotation = puckData.puckRotation;
bottomPaddleData.puckVelocity.x = 320 - puckData.puckVelocity.x;
bottomPaddleData.puckVelocity.y = 480 - puckData.puckVelocity.y;
}The previous method ultimately receives its data from a message sent from a peer-to-peer host. This way puck physics are calculated only on one of the two devices. The sendData and receiveData methods from HockeyViewController implement this functionality (Listing 7.5).
Example 7.5. Using Game Kit Methods to Send and Receive Data Between Two Devices
- (void)sendData {
if (mainView.connectionType == HEADTOHEAD_CONNECTION) return;
StateData paddleData = mainView.bottomPaddleData;
NSData *data = [[NSData alloc] initWithBytes:&paddleData
length:sizeof(StateData)];
[session sendDataToAllPeers :data withDataMode:GKSendDataUnreliable
error:nil];
}
- (void) receiveData:(NSData *)remoteData fromPeer:(NSString *)peer
inSession: (GKSession *)session context:(void *)context {
int messageType;
[remoteData getBytes:&messageType length:sizeof(int)];
if (messageType == 0) {
StateData paddleData;
[remoteData getBytes:&paddleData length:sizeof(StateData)];
// Remote player should display on top so we need
// to invert the values
paddleData.paddleLocation.x = 320 - paddleData.paddleLocation.x;
paddleData.paddleLocation.y = 480 - paddleData.paddleLocation.y;
mainView.topPaddleData = paddleData;
// if we are a client we need to copy puck data sent from the host
if (mainView.connectionType == CLIENT_CONNECTION ) {
[mainView updatePuckData:paddleData]; }
[self sendData];
}
else {
EventData eventData;
[remoteData getBytes:&eventData length:sizeof(EventData)];
[mainView displayMessage:SCORE_MESSAGE forPlayer:TOP_PLAYER];
}
}Note that receiveData inverts the paddle and puck positions that are received from the peer. This way, in peer-to-peer connections, each player controls the paddle on the bottom of the screen.
Back in the HockeyTableView class, the method didScore is called whenever a player scores a goal. We list this method here to highlight the fact that it calls out to the delegate method hockeyTableDidScore conditionally, depending on connection type:
- (void)didScore:(PlayerCode)playerCode {
if (messageView) return;
if ((bottomPaddleData.puckLocation.y > 480 + PUCK_DIAMETER)
| (bottomPaddleData.puckLocation.y < -PUCK_DIAMETER)) {
bottomPaddleData.puckVelocity.x = 0;
bottomPaddleData.puckVelocity.y = 0;
[self displayMessage:SCORE_MESSAGE forPlayer:playerCode];
if (connectionType == HOST_CONNECTION) {
[delegate hockeyTableDidScore:playerCode];
}
}
}This method is needed because all puck movements are calculated on the host in peer-to-peer and the client never knows when the player scores. Calling out to this delegate sends the appropriate message to the client, as seen in the following method hockeyTableDidScore from HockeyViewController:
- (void)hockeyTableDidScore:(PlayerCode)playerCode {
EventData eventData;
eventData.packetType = 1;
NSData *dataPacket = [[NSData alloc] initWithBytes:&eventData
length:sizeof(EventData)];
[session sendDataToAllPeers:dataPacket withDataMode:GKSendDataReliable
error:nil];
}Earlier in the chapter we discussed how each client is notified when a goal is made. When a player does score, we added a circular "Goal" message that zooms in and out of view while rotating (Figure 7.19).

A call to displayMessage starts this animation and plays it all the way through. If you run the app you will see that the message zooms out from the center and then pauses for a second. After the pause, the message expands and fades until it is no longer visible:
- (void)displayMessage:(MessageCode)messageCode forPlayer:(PlayerCode)playerCode {
UIImage *messageImage = goalImage;
if (messageCode == WIN_MESSAGE) {
if (messageCode == BOTTOM_PLAYER)
messageImage = connectionType =
CLIENT_CONNECTION ? redWinsImage : blueWinsImage;
else if (messageCode == TOP_PLAYER)
messageImage = connectionType =
CLIENT_CONNECTION ? blueWinsImage : redWinsImage;
}
messageView = [[UIImageView alloc] initWithImage:messageImage];
[goalImage release];
messageView.alpha = 0.0;
messageView.frame = CGRectMake(self.center.x, self.center.y, 0.0, 0.0);
[self addSubview:messageView];
[self bringSubviewToFront:messageView];
[UIView beginAnimations:nil context:messageView];
[UIView setAnimationDuration:0.75];
[UIView setAnimationCurve:UIViewAnimationCurveLinear];
[messageView setAlpha:0.5];
messageView.frame = CGRectMake(self.center.x-150.0, self.center.y-150.0,
300.0, 300.0);
messageView.tag = 0;
[UIView setAnimationDelegate:self];
[UIView setAnimationDidStopSelector:
@selector(animateMessageDidStop:finished:context:) ];
[UIView commitAnimations];
}By having one animation begin after another ends, we create a nice effect for the game. This is accomplished by assigning animateMessageDidStop as the selector in the call to the setAnimationDidStopSelector method above. Notice that animateMessageDidStop also points its selector back to itself, which provides a nice place to do some cleanup:
- (void)animateMessageDidStop:(NSString *)animationID finished:
(NSNumber *)finished context:(void *)context {
if (messageView.tag == 1) {
bottomPaddleData.puckLocation = CGPointMake(160, 250);
bottomPaddleData.puckVelocity = CGPointMake(0, 0);
[messageView release];
messageView = nil;
return;
}
[UIView beginAnimations:nil context:messageView];
[UIView setAnimationDelay:2.0]; [UIView setAnimationDuration:0.75];
[UIView setAnimationCurve:UIViewAnimationCurveLinear];
[messageView setAlpha:0.0];
messageView.frame = CGRectMake(self.center.x-750.0, self.center.y-750.0,
1500.0, 1500.0);
messageView.tag = 1;
[UIView setAnimationDelegate:self];
[UIView setAnimationDidStopSelector:
@selector(animateMessageDidStop:finished:context:) ];
[UIView commitAnimations];
}During the entire animation, the message is rotated. The rotation is applied to the CALayer of the UIImageView in the drawMethod you saw earlier:
if (messageView) {
messageView.layer.transform = CATransform3DMakeRotation(messageRotation,
0., 0., 1.);
}A handful of helper methods are used to abstract out some of the common logic needed throughout the previous code listings. They are listed here to help connect the last dots of the code in HockeyTableView. Listing 7.6 returns a normal vector between x1, y1, and x2; y2 is used to represent direction. It then returns the distance between two points, calculates the speed of the paddle, and prevents the paddle from sliding past its boundary.
Example 7.6. Helper Methods Used in AmuckPuck
CGPoint normalVector(double x1, double x2, double y1, double y2) {
double run = x1 - x2;
double rise = y1 - y2;
double total = abs(rise) + abs(run);
CGPoint vector;
vector.x = run / total;
vector.y = rise / total;
return vector;
}
double distance(double x1, double x2, double y1, double y2) {
return sqrt(pow(x1 -x2, 2) + pow(y1 - y2, 2));
}
double paddleSpeed(StateData stateData) {
double speed = sqrt(pow(stateData.paddleVelocity.x, 2)
+ pow(stateData.paddleVelocity.y, 2));
speed = abs(speed * PADDLE_STRIKE);
if (speed > MAX_PADDLE_STRIKE)
return MAX_PADDLE_STRIKE; if (speed < MIN_PADDLE_STRIKE)
return MIN_PADDLE_STRIKE;
return speed;
}
void correctTouchPoint(CGPoint *touchPoint) {
if ((*touchPoint).x - PADDLE_RADIUS < 0)
(*touchPoint).x = PADDLE_RADIUS;
if ((*touchPoint).x + PADDLE_RADIUS > 320)
(*touchPoint).x = 320 - PADDLE_RADIUS;
if ((*touchPoint).y - PADDLE_RADIUS < 0)
(*touchPoint).y = PADDLE_RADIUS;
if ((*touchPoint).y + PADDLE_RADIUS > 480)
(*touchPoint).y = 480 - PADDLE_RADIUS;
}
@endThe HockeyViewController is the final class we will be discussing. This class is responsible for managing our GKSession and GKPeerPickerController objects. The process is the same as it was in P2P Chat, so you should find the code familiar.
The methods connectionType and startNearby are straightforward but noteworthy. When a player selects a game type from the menu, these methods are called to record connectionType internally. Peer-to-peer connections start as a host connection and then one peer switches to the client during the connection process:
- (void)startNearby {
connectionType = HOST_CONNECTION;
}
- (void)startHeadToHead {
connectionType = HEADTOHEAD_CONNECTION;
}The receiveData method is called by your GKSession whenever data is received from a peer. This method was listed in the preceding code to demonstrate how paddle data is sent to the client in a peer-to-peer connection. When looking at it this time, notice how you can discover the message type by partially reading into the data stream. This is very useful since the message containing StateData is sent unreliably and the message containg MessageData is sent reliably:
- (void) receiveData:(NSData *)remoteData fromPeer:(NSString *)peer
inSession: (GKSession *)session context:(void *)context {
int messageType;
[remoteData getBytes:&messageType length:sizeof(int)];
if (messageType == 0) {
StateData paddleData; [remoteData getBytes:&paddleData length:sizeof(StateData)];
// Remote player should display on top so we need
// to invert the values
paddleData.paddleLocation.x = 320 - paddleData.paddleLocation.x;
paddleData.paddleLocation.y = 480 - paddleData.paddleLocation.y;
mainView.topPaddleData = paddleData;
// if we are a client we need to copy puck data sent from the host
if (mainView.connectionType == CLIENT_CONNECTION ) {
[mainView updatePuckData:paddleData];
}
[self sendData];
}
else {
EventData eventData;
[remoteData getBytes:&eventData length:sizeof(EventData)];
[mainView displayMessage:SCORE_MESSAGE forPlayer:TOP_PLAYER];
}
}Calling hockeyTableDidScore and showPeerPicker sends out the data we just saw being received in the method receiveData from the preceeding code:
- (void)hockeyTableDidScore:(PlayerCode)playerCode {
EventData eventData;
eventData.packetType = 1;
NSData *dataPacket = [[NSData alloc] initWithBytes:&eventData
length:sizeof(EventData)];
[session sendDataToAllPeers:dataPacket withDataMode:GKSendDataReliable
error:nil];
}
- (void)sendData {
if (mainView.connectionType == HEADTOHEAD_CONNECTION) return;
StateData paddleData = mainView.bottomPaddleData;
NSData *data = [[NSData alloc] initWithBytes:&paddleData
length:sizeof(StateData)];
[session sendDataToAllPeers :data withDataMode:GKSendDataUnreliable
error:nil];
}The following code to connect peers is almost identical to that in P2P Chat. However, one very important step stands out. The method session: didReceiveConnectionRequestFromPeer is used to make the distinction that we are the client if it is called (Listing 7.7).
Example 7.7. Using the Peer Picker to Establish a Connection Between Peers
- (void)showPeerPicker {
// allocate and setup the peer picker controller
picker = [[GKPeerPickerController alloc] init];
picker.delegate = self;
picker.connectionTypesMask =
   GKPeerPickerConnectionTypeNearby;
[picker show];
}
- (void)peerPickerController:(GKPeerPickerController *)picker
didSelectConnectionType:(GKPeerPickerConnectionType)type {
if(type == GKPeerPickerConnectionTypeOnline) {
}
}
- (GKSession *) peerPickerController:(GKPeerPickerController *)picker
sessionForConnectionType:(GKPeerPickerConnectionType)type {
session = [[GKSession alloc] initWithSessionID:
@"com.yourwebsite.yourapplicationname" displayName:nil
sessionMode:GKSessionModePeer];
session.delegate = self;
return session;
}
- (void)peerPickerController:(GKPeerPickerController *)picker
didConnectToPeer:(NSString *)peerID {
[self.picker dismiss];
}
- (void)peerPickerControllerDidCancel:(GKPeerPickerController *)picker {
[self.picker dismiss];
[self.rootViewController showMenu];
}
- (void)session:(GKSession *)session
didReceiveConnectionRequestFromPeer:(NSString *)peerID {
connectionType = CLIENT_CONNECTION;
mainView.connectionType = CLIENT_CONNECTION;
}
- (void)session:(GKSession *)session peer:(NSString *)peerID
didChangeState:(GKPeerConnectionState)state {
switch (state) {
case GKPeerStateConnected:
[self.session setDataReceiveHandler :self withContext:nil];
[self.picker dismiss];
[self sendData];
break;
case GKPeerStateDisconnected:
break;
}
}
@endBuilding an application like AmuckPuck can be a rewarding venture, but it comes with a cost. Bringing together the many technologies can lead to a lot of research, which can spiral out of control if not managed properly. Development costs can increase in terms of both time and money when you consider all the research and trial and error that come into play when pulling it together. Here are a few things to keep in mind while managing a project like this:
Physics engines require a lot of trial and error. Be sure to abstract out all of your control variables so you can tweak without refactoring.
Peer-to-peer can be difficult to debug. With one application that behaves differently as client or host, you end up with lots of conditional logic. When making changes, you will need to redeploy over and over on two separate devices and then establish a connection between them to test. This can take a few minutes to test out a single change.
Note
When developing sophisticated peer-to-peer applications, you should not rely on the iPhone Simulator. At least two devices are required for proper testing and debugging. The performance differences between device models means that the serious P2P developer should have at least one of each model of device. For instance, the 2G iPod touch has a faster CPU and fewer background processes and connections to manage than the iPhone 3G.
AmuckPuck is an application that we love to play ourselves. In fact, some of our beta testers, our kids, enjoyed it so much we had to fight with them to get the devices back. In many cases, your experiences with an application can translate to how well your clients will like it.
In this chapter you learned about the challenges presented when developing multiplayer games and a few techniques for dealing with those challenges. You learned how to use Game Kit to establish a peer-to-peer connection between two devices using Bluetooth. Also, as a bonus, you learned a little about implementing game physics and how important it is to create a believable and immersive experience for your players.
AmuckPuck turned out to be well suited to a peer-to-peer connection. The game play is natural and responsive. This is very encouraging; especially since peer-to-peer is a new technology and will hopefully only get better in future versions. Be prepared for the wave of peer-to-peer applications that will flood the shelves on the App Store.