Chapter 38: Creating a Home Network
IN THIS CHAPTER
Understanding why you create a network
Creating a traditional Ethernet network
Creating a wireless network
Setting up a wired network
Setting up a wireless network
If you have two or more computers, you may already be using what's known as a sneaker network. For example, to get files from one computer to another, you copy files to a flash drive or CD. Then, you walk over to the other computer and copy the files from the disk to that computer. Wouldn't it be nice if you could just drag icons from one computer to the other without having to use a flash drive or CD?
What if you have several computers, but only one printer, one Internet connection, or one DVD burner? Wouldn't it be nice if all the computers could use that one printer, that one Internet connection, and that one DVD burner? All these things are possible if you connect the computers to one another in a local area network (LAN) or a private wireless network (WiFi).
After you've purchased and installed networking hardware, you're ready to set up your network. Windows 8.1 includes features that remove the complexities commonly associated with network configurations.
This chapter describes how to configure Windows for different types of hardware setups. Remember that you should always follow the instructions that came with your networking hardware first. After all, those instructions are written for the exact products you've purchased.
What Is a LAN?
A local area network (sometimes referred to as a LAN, a workgroup, a private network, or just a network) is a small group of computers within a relatively small geographic area such as a campus, single building, or household that can communicate with one another and share resources. A resource is anything useful to the computer. For example:
- All computers in the LAN can use a single printer.
- All computers in the LAN can connect to the Internet through a single Internet connection and Internet account.
- All computers in the LAN can access shared files and folders on any other computer in the LAN.
In addition, you can move and copy files and folders among computers using exactly the same techniques you use to move and copy files among folders on a single computer. However, it's not entirely necessary to move or copy a document that you want to work on, because if a document is in a shared folder, you can open and edit it from any computer in the network. This is good because you have only one copy of the document, and you don't have to worry about having multiple, slightly different copies of the same document all over the place to confuse matters.
Planning a LAN
To create a LAN, you need a plan and special hardware to make that plan work. For one thing, each computer will need a device known as a network interface card (NIC) or Ethernet card. You can purchase and install those yourself. Many PCs, however, come with an Ethernet card already installed for connecting to a wired network. In that case, you'll have an RJ-45 port on the back of the computer. It looks a lot like the plug for a telephone, just a little bigger. You just plug one end of an Ethernet cable into that port, and plug the other end of the cable into a network hub or wall jack. You can also connect computers without any cables at all by using wireless networking hardware. Exactly what you need, in terms of hardware, depends on what you want to do. The rest of this chapter describes your options.
Creating a Wired LAN
If you have two or more computers to connect, and they're all in the same room and close to one another, you can use a traditional Ethernet hub and Ethernet cables to connect the computers with cables. You'll need exactly one NIC and one Ethernet cable for each computer in the LAN. Figure 38.1 shows an example of four computers connected in a traditional LAN. Notice how each computer connects to the hub only — no cables run directly from one computer to another computer.
Figure 38.1
Four computers connected in a traditional Ethernet LAN.

By the way, in Figure 38.1 a printer can be connected to any computer on the LAN. In fact, you could have several printers connected to several computers. All computers will be able to use all printers, no matter which computer that printer is (or those printers are) connected to. In addition, a printer with a network interface need not be connected to a computer at all, but rather can be connected directly to the network.
Traditional Ethernet speeds
When it comes time to purchase network interface cards, cables, and a hub, you'll need to decide on the speed you want. As with everything else in the computer industry, network speed costs money. However, in the case of networks, the cost differences are minor, whereas the speed differences are huge. The three possible speeds for Ethernet LANs are listed in Table 38.1.

If it's difficult to relate the numbers to actual transfer rates, consider a dial-up modem, which tops out at about 50 Kbps. That's 51,000 bits per second. A 100Base-T network moves 100,000,000 bits per second. That's 2,000 times faster or, in other words, you only have to wait 1/2,000 as long for the same file to transfer across a 100Base-T connection. So, a file that takes 33 minutes (2,000 seconds) to transfer over a dial-up modem takes 1 second to transfer over a 100Base-T network.
The slowest component rules
When purchasing hardware, it's important to understand that the slowest component always rules. For example, if you get gigabit Ethernet cards, but connect them to a 100Base-T hub, the LAN will run at 100 Mbps. The faster gigabit NICs can't force the slower hub to move any faster.
It makes sense if you envision the electrons going through the wire as cars on a freeway. Let's say lots of cars are zooming down a ten-lane freeway, but there's some road construction where the freeway narrows to one lane. Cars are going to pile up behind that point because the one-lane portion is slowing things down. Where the one lane reopens back to ten lanes, cars will still be trickling out of the bottleneck — the single lane — one at a time. The ten lanes at the other side of the bottleneck can't “suck the cars through” the bottleneck any faster than one car at a time.
Likewise, if your computers are connected together with a gigabit LAN, but they all share a single 512 Kbps broadband connection to the Internet, your Internet connection is still 512 Kbps. Your fast LAN can't force the data from your ISP to get to your computer any faster than 512 Kbps. Furthermore, if two people are using the 512 Kbps broadband connection at the same time, they have to share the available bandwidth, meaning that each user might get only a portion of the available bandwidth. But if only one person is online, she gets the full 512 Kbps because she's not sharing bandwidth with anyone else.
Creating a Wireless Network
Wireless networking reigns supreme when it comes to convenience and ease of use. As the name implies, with wireless networks you don't have to run any cables. Plus, no computer is tied down to any one cable. For example, you can use your notebook computer in any room in the house, or even out on the patio, and still have Internet access without being tied to a cable.
To set up a wireless network, you need a wireless NIC for each computer that you want to connect using wireless. To set up an ad-hoc wireless network, that's all you need. The computers can communicate with each other, so long as they're within range of one another. If you want Internet connectivity for all the computers in a wireless LAN, you'll need some kind of access point that acts as a central location for all the computers and also provides an Internet connection. Typically, that device would be a wireless broadband router, as illustrated in Figure 38.2.
Figure 38.2
Four computers connected in a wireless network.

Wireless broadband router
The big advantage of wireless networking is, of course, the lack of cables. This is especially handy on a notebook computer or handheld device because the device isn't tethered to one location by a cable. Granted, you can't stray too far from the wireless access point (100 to 150 feet or so), but that will probably be sufficient in most cases.
Also, many universities and retail businesses offer public Internet access from any computer that has an 802 class (802.11b, 802.11g, 802.11n, and so on) wireless network interface. So, if you create your home wireless network using one of those standards, you'll also be able to use public Wi-Fi Internet access where it's available.
Wireless networks are built around four different standards. Table 38.2 summarizes the main differences between the four most common standards in use today. The Public Access column refers to Internet Wi-Fi hotspots such as those found at some airports, hotels, and other places.

In most cases, when setting up your network you're really setting up two networks. The first network involves the computer-to-computer communication. This includes the wireless setup or a wired setup discussed earlier in the chapter. The second network is the Internet. Connecting to the Internet involves some form of an ISP. Today, two of the most popular methods are Digital Subscriber Line (DSL) modem connections and (more likely) broadband connections, which your cable TV company may be able to supply. If you're sharing an Internet connection, one device in your network will have physical access to the Internet, and the other computers will share the connection. The one device that actually sees the Internet can be a computer, or you can purchase an inexpensive device that connects to the Internet called a broadband router.
Other useful wireless goodies
If you already have a wired network with Internet connectivity and you just want to add some wireless computers to that network, you don't need a wireless broadband router. Instead, you need a wireless access point (WAP). First, you'll need to configure the WAP, as per the manufacturer's instructions, by connecting it directly to one of the computers in your wired network. Then you can disconnect the WAP from the computer and connect it directly to the switch for your wireless network. The wireless computer can use the same shared Internet connection that the wired network uses.
Getting a wireless network to cover a whole house can be a challenge, especially if you have two or more floors. If you want to extend Wi-Fi to the entire house, you may need to use one or more wireless range expanders to extend the reach of the network. Putting one near the staircase is a good idea when you need to reach upstairs or downstairs. You can also use multiple access points to achieve the same results.
A Wi-Fi finder can also be helpful. It's a small device (small enough to fit on a keychain) that measures the strength of a wireless network signal at wherever you're standing. It can help you determine where the edge of a signal is, which is a good place to put a range expander to get more coverage.
Acquiring and Installing Network Hardware
Almost all PCs manufactured in the last several years have networking capability built in. So, it's unlikely that you'll need to buy NICs for your devices. If you need one for a desktop PC and you aren't comfortable working inside the computer, just buy a USB network adapter. If you're not sure, check with your local PC dealer.
If you're new to all this and you just want to see what some of this stuff looks like, here are some websites you can visit. They're all network hardware manufacturers, not retailers:
- D-Link:
www.d-link.com - GigaFast:
www.gigafast.com - Linksys:
http://www.linksys.com/en-us/home - Netgear:
www.netgear.com - SMC Networks:
www.smc.com - TRENDnet:
www.trendnet.com
In terms of actually purchasing the products, you can find these products at any store that sells computer supplies, including many of the large office supply chains such as Staples and OfficeMax. Of course, you can buy the devices online at any website that sells computer stuff. Shopping jaunts include websites such as www.amazon.com, www.cdw.com, www.cyberguys.com, www.officemax.com, www.staples.com, www.tigerdirect.com, and www.walmart.com, just to name a few.
After you've acquired the hardware, you need to install it. We can't help you much there either. You'll have to follow the manufacturer's instructions on that one because there is no one-rule-fits-all when it comes to installing hardware. As a general rule of thumb, you'll probably want to
- Get the hub or router (if any) set up first.
- Install the network interface cards second.
- Connect all the cables last.
Once all the hardware is connected and installed, you're ready to set up the network. That part isn't so complicated because Windows does a great job of searching out networks. You work through that next.
After the Hardware Setup
A couple steps are involved in actually setting up the networking hardware. First, make sure that the hardware you purchased is installed based on the manufacturer's instructions. This may include plugging in the device, then connecting the device to the Internet, and finally plugging in the other computers to the device. When this is complete, you can run the Set Up a New Connection or Network Wizard to let Windows finish the process.
Close any open programs and documents before you start configuring your network. The type of network hardware you have set up will determine what configuration you'll need to use. Here's where to look, depending on your network configuration:
- If you have an Ethernet network, and you're using a modem inside of, or connected to, one computer in the network, you can use Internet connection sharing (ICS) to share a single Internet account. Because this scenario isn't very common anymore, we don't cover it in this book. Search the web for “Internet connection sharing” for details.
- If you have a router or residential gateway that all computers in your network connect to, each computer will have its own direct access to the Internet via the router. See the section “Setting Up a Wired Network,” later in this chapter.
- If you have a wireless network, see the section “Setting Up a Wireless Network,” later in this chapter.
- If you want to set up a Bluetooth personal area network, see Chapter 35.
Be sure to turn off all computers before you install the networking hardware (unless you're installing a USB adapter). Then install all the networking hardware and turn on all the computers. Chances are, Windows 8.1 will detect the hardware and start setting things up automatically. If you see any prompts asking what type of network you're installing, make sure you specify that it's a private network (not a public network). When asked about file sharing, make sure you make choices that allow for file and printer sharing among computers in the private network.
With those buzzwords and tips in mind, let's move on to the specifics of things to do after you get all the network hardware in place and all the computers turned on.
Setting Up a Wired Network
With a wired network, your first step after setting up the hardware and connecting the PCs to the hub (or gateway device that contains the hub) will usually be to get online from one computer. You'll need to refer to instructions that came with your router, as well as your ISP's instructions, to do that. In a typical scenario, however, you configure the router or gateway to automatically assign an IP address, default gateway address, and DNS addresses to your computers. Then you configure your devices for automatic address assignment. The computers should then receive their addresses (generally no need to reboot them) and have access to the network and the Internet.
After connecting and configuring your PCs, Windows attempts to find the network for you. To see where you stand, follow these steps:
- Open the Control Panel.
- If the Control Panel opens in Category view, click the Network and Internet icon.
- Open the View Network Status and Tasks link below Network and Sharing Center.
- As shown in Figure 38.3, the system is connected to a local network and to the Internet.
- If the connection doesn't show Internet as the access type, check your gateway configuration and make sure your settings are correct.
In Figure 38.3, Windows sees the local network and also sees the Internet connection from the local network. If your networking hardware is configured correctly, Windows sees the network and sets it up for you appropriately.
If you're working from the Start screen, you can also see your connection status, although with less detail. Open the Charms Bar and click Settings; then click Network. Figure 38.4 shows an example.
Figure 38.3
A computer connected to the network and also connected to the Internet.
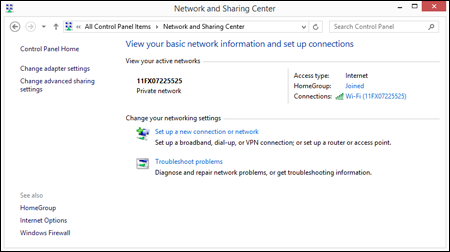
Figure 38.4
View the network status from the Charms Bar.

If your network is configured correctly for the first computer, try configuring your next system on the network using the steps outlined earlier.
If you have wireless devices that you want to connect to the network, follow the instructions in the next section.
Setting Up a Wireless Network
There's something about the term wireless that makes it seem as though it must be easier than wired. In truth, wireless networking is quite a bit more complicated terminology-wise. There are lots of buzzwords and acronyms everyone assumes that you already know. So, before we get into this topic, let's get all that out of the way.
The 802.11 standard
The Institute of Electrical and Electronics Engineers, Inc., abbreviated IEEE (pronounced eye-triple-E), is an organization of some 360,000 electrical engineers who develop many of the standards that PC products use to interact with one another. The IEEE isn't big on giving fancy names to things. They prefer numbers (which somehow seems fitting). Names often get tacked on later. For example, what is now called Ethernet is actually IEEE 802.3. What Apple calls FireWire and Sony calls iLink is actually IEEE 1394.
IEEE created the 802.11 standard for most wireless networking today. Several revisions to the original specification have been proposed, with 802.11a, 802.11b, 802.11g, and 802.11n are the most common (802.22 is the latest standard in use). Most likely, you'll be using 802.11g or 802.11n because they're the standard to which most of the recently released wireless networking products adhere.
Access point, SSID, WEP, and WPA
Wireless networking requires some kind of wireless access point, also called a base station. The base station is the central unit with which all computers in the network communicate. It's the same idea as a hub in Ethernet networking. It's just that there are no wires connecting computers to the access point. Instead, each computer has a wireless network interface card (NIC), as illustrated in Figure 38.5.
Figure 38.5
Wireless communications all go through an access point or base station.

The access point in a wireless network plays the same role as the hub in a wired network in that all traffic goes to the access point first and is passed on to the appropriate destination from there. The problem is that, with wireless networks, you have radio waves, which aren't confined to the inside of a wire. Radio waves go all over the place, just as when you throw a rock in the water and make waves that spread out in a circle.
The radio waves can be a problem when you have multiple wireless networks that are close to each other. For example, let's say that a company has several departments, and each department has its own, separate wireless network.
To avoid that problem, you need some means of discriminating among multiple wireless access points. For example, you need some means of setting rules such as “these six computers in the marketing department communicate only with each other through access point X, while these 12 computers in the accounting department communicate with each other only through access point Z.” The way you do that in today's wireless networking is through things such as network names, SSID, WEP, and WPA.
About SSIDs
Every wireless network has a unique name called a service set identifier (SSID), or just a wireless network name for simplicity. The access point in the network holds the SSID When you start a wireless network computer, it scans the airwaves for SSID. When you set up a wireless network access point (by reading the manufacturer's instructions, of course), you assign an SSID to your access point.
The name you assign doesn't have to be anything fancy, but it should be unique enough to avoid conflict with any close neighbors who also have wireless networks. The SSID doesn't provide any real network security. After all, the access point broadcasts the SSID out some distance from the access point. So, if some hackers happened to be driving by with a notebook computer, they might be able to pick up the name of your wireless LAN from the car. Then they could join your network and receive data being sent by computers in your network. WEP and WPA are encryption tools designed to avoid such intrusions.
About WEP and WPA
Wired Equivalent Privacy (WEP) is a wireless security protocol that protects wireless network data from falling into the wrong hands. Before any information leaves your computer, it's encrypted using a WEP key. The key is a simple string of characters that you can generate automatically, or have Windows generate for you.
Wi-Fi Protected Access (WPA) is a newer and stronger encryption system that supports modern EAP security devices such as smart cards, certificates, token cards, one-time passwords, and biometric devices. WPA2 adds support for the AES encryption algorithm, which provides better security than WPA. If your wireless devices support WPA2, you should use that rather than WPA.
Installing the wireless networking hardware
The most critical step in setting up a wireless network is installing the hardware devices. It's imperative that you follow the instructions that came with the device to the letter because guessing almost never works. In particular, it's important to note that even devices that plug into a hot-pluggable port such as USB devices or a PC Card need you to install drives before you install the hardware device. That's unusual for hot-pluggable devices, and most people just assume that they can plug in the device and go. But it just doesn't work that way with wireless networking devices.
Connecting to available networks
The main trick to wireless networking is setting up the access point. Typically, you do this by configuring one computer with a static IP address and connecting it to the access point with a wired connection. With both the computer and WAP on the same IP subnet, you can then open a browser and connect to the WAP's web-based configuration pages. Then you configure the access point from that computer. You give the network its name (SSID) and choose your encryption method. The access point then begins transmitting that name at regular intervals.
On any computer that's to join the wireless LAN, you install a wireless network adapter. On a notebook computer, it's likely that a card resides internal to the system. On a desktop computer, you can install an internal wireless network adapter, or connect one to a USB port.
Once you've installed the network adapter, you're ready to connect to the wireless network. If you're working from the Windows 8.1 interface, open the Charms Bar and click or tap Settings. Then click or tap the Change PC Settings link and select the Network link to view a list of available networks. Click or tap the connection you want to use and then click or tap Connect. If the connection requires that you enter a passphrase, type the passphrase and click or tap Next to connect to the network.
If you need to change network properties, press Windows+X and click Network Connections. Double-click the connection and then click the Wireless Properties button. The network's Network Properties dialog box opens as shown in Figure 38.6. Figure 38.7 shows the Connection tab for the connection.
Figure 38.6
Wireless Network Properties allow you to configure the connection.

Figure 38.7
The Connection tab for a wireless network connection.

The Notification icon
Windows 8.1 can include your network connectivity information within the notification area. The icon for a wired connection is a computer with a network cable beside it. The icon for a wireless connection is a set of signal-strength bars. If you don't see an icon, check to make sure that it's not just hidden by clicking the < button at the left side of the notification area. If you still don't see the icon, click the up arrow at the left of the notification area and select Customize. Beside the Network item, click the drop-down list under the Behaviors column and choose Show Icon and Notifications. Then click OK.
When you've finished, you're ready to move on to Chapter 39 where you learn to share resources and use those shared resources from any computer in the network.
Wrap-Up
A LAN consists of two or more computers that can communicate with one another through networking hardware. Multiple computers in a network can share a single Internet account, printers, and files and folders. Moving and copying files among networked computers is a simple matter of dragging and dropping. No fumbling around with floppies, CDs, or other removable disks is required. The main points to remember when it comes to buying network hardware are as follows:
- The first step to creating a LAN is to purchase the computer networking hardware.
- Each computer in the network needs a NIC installed.
- Ethernet LANs provide the fastest speeds but require running special Ethernet cables.
- Wireless networking provides complete freedom from cables and wires.
- USB networking devices are easy to install and don't require opening the computer case.
- On a notebook computer, you can use a PC Card NIC (not to be confused with PCI card), USB NIC, or an integrated wireless network card to connect to the network.
- After you acquire your network hardware, you have to set it all up per the manufacturer's instructions. When you've finished that step, you can use the Network and Sharing Center to help configure the hardware.