
Chapter 3: Running Built-In Security Programs
In This Chapter
![]() Making Windows Defender work your way
Making Windows Defender work your way
![]() Coping with SmartScreen
Coping with SmartScreen
![]() Working with UEFI and Secure Boot
Working with UEFI and Secure Boot
![]() Controlling User Account Control
Controlling User Account Control
![]() Understanding Windows Firewall
Understanding Windows Firewall
Windows 8.1, right out of the box, ships with a myriad of security programs, including a handful that you can control.
This chapter looks at the things you can do with the programs on offer: Windows Defender, SmartScreen, UEFI (don’t judge it by its name alone), User Account Control, and Windows Firewall. What you find in this chapter is like a survey of the tip of an iceberg. Even if you don’t change anything, you’ll come away with a better understanding of what’s available, and how the pieces fit together. With a little luck, you’ll also have a better idea of what can go wrong, and how you can fix it.
Working with Windows Defender
Fast, full-featured, and free, Microsoft Windows Defender draws accolades from experts and catcalls from competitors.
If you’ve ever put up with a bloated and expensive security suite exhorting/extorting you for more money, or you’ve struggled with free AV packages that want to install a little toolbar here and a funny monitoring program there — and then ask you for money — you’re in for a refreshing change . . . from an unexpected source.
Windows Defender takes over antivirus and antispyware duties and tosses in bot detection and anti-rootkit features for good measure. In independent tests, Microsoft has consistently received high detection and removal scores for Windows Defender (and Microsoft Security Essentials, Windows Defender’s kissin’ cousin) for years.
Windows Defender conducts periodic scans and watches out for malware in real time. It vets e-mail attachments, catches downloads, deletes or quarantines at your command, and in general, does everything you’d expect an antivirus, anti-malware, and/or anti-rootkit product to do.
 The beauty of Windows Defender is that it just works. You don’t have to do anything — although you should check from time to time to make sure it hasn’t been accidentally (or maliciously) turned off. To check whether Windows Defender is running, go to the Metro Start screen, type def, and below the Search box choose Windows Defender. If you see the green check mark, you’re doing fine. (You can see the check mark in the upcoming Figure 3-1.)
 Microsoft maintains a very active online support forum for Windows Defender at Microsoft Answers,
 www.answers.microsoft.com/en-us/windows/forum/windows_8-security.
When you use Windows Defender, here are a few caveats you need to be aware of:
![]() It’s never a good idea to run two antivirus products simultaneously, and Windows Defender is no exception: If you have a second antivirus product running on your machine, Windows Defender has been disabled, and you shouldn’t try to bring it back.
It’s never a good idea to run two antivirus products simultaneously, and Windows Defender is no exception: If you have a second antivirus product running on your machine, Windows Defender has been disabled, and you shouldn’t try to bring it back.
If you don’t like your AV product and don’t particularly want to keep paying and paying and paying for it, use Windows Remove Programs to get rid of it. Reboot your machine, and Windows Defender returns.
 In summary, Windows Defender works great, but if you get a second antivirus program that’s designed to run continuously, do not run Windows Defender and the usurper at the same time.
![]() Windows Defender updates itself, no matter what setting you may have for Windows Automatic Update or Microsoft Automatic Update.
Windows Defender updates itself, no matter what setting you may have for Windows Automatic Update or Microsoft Automatic Update.
You may see updates listed for Windows Defender, if you go into Windows Update and look. Just leave them alone. They’ll install all by themselves. See Book VIII, Chapter 3 for details about Automatic Update.
![]() No matter how you slice it, real-time protection eats into your privacy. How? Say Windows Defender (or any other antivirus product) encounters a suspicious-looking file that isn’t on its zap list. In order to get the latest information about that suspicious-looking file, Windows Defender has to phone back to Mother Microsoft, drop off telltale pieces of the file, and ask whether there’s anything new. You can opt out of real-time protection, but if you do, you won’t have the latest virus information — and some viruses travel very fast.
No matter how you slice it, real-time protection eats into your privacy. How? Say Windows Defender (or any other antivirus product) encounters a suspicious-looking file that isn’t on its zap list. In order to get the latest information about that suspicious-looking file, Windows Defender has to phone back to Mother Microsoft, drop off telltale pieces of the file, and ask whether there’s anything new. You can opt out of real-time protection, but if you do, you won’t have the latest virus information — and some viruses travel very fast.
Adjusting Windows Defender
Unlike many other antivirus products, Windows Defender has a blissfully small number of things that you can or should tweak. Here’s how to get to the settings:
1. On the Start screen, type def and then on the right, tap or click Windows Defender.
The main Windows Defender screen appears, as shown in Figure 3-1.
2. Tap or click the Settings tab.
Here you can make minor changes in Windows Defender’s behavior.
 It’s rare that you would want to change any of these settings, except the Microsoft Access Protection Services (MAPS), as shown in Figure 3-2.
3. Adjust the MAPS setting if you wish by tapping or clicking the MAPS entry on the left.
Generally, I don’t like it when Microsoft gathers information about my system, but in this case I make an exception and set MAPS at Basic Membership, which is the default. That’s the only way to get the full benefit of real-time checking for updated definitions. As I explain earlier in this chapter, you’re caught between a rock and a hard place.

Figure 3-1: The Windows Defender main screen.

Figure 3-2: The MAPS settings for Windows Defender.
4. If you change anything on the Settings tab, tap or click Save Changes and then tap or click X to close Windows Defender. (If you didn’t change anything, just tap or click X.)
Your changes take effect immediately.
Running Windows Defender manually
Windows Defender works without you doing a thing, but you can tell it run a scan if something on your computer is giving you the willies. Here’s how:
1. On the Start screen, type def and just below the Search box, tap or click Windows Defender.
The main Windows Defender screen appears (refer to Figure 3-1).
2. On the Update tab (see Figure 3-3), to get the latest anti-malware definitions, tap or click Update.
When you tap or click Update, Windows Defender retrieves the latest signature files from the Microsoft site, but it doesn’t run a scan. If you want to run a scan, you need to go back to the Home tab and run it.
3. To perform a manual scan, tap or click one of the three buttons on the left and then tap or click Scan Now.
Here’s what the Scan options mean:
• Quick looks in locations where viruses and other kinds of malware are likely to hide.
• Full runs a bit-by-bit scan of every file and folder on the PC.
• Custom is like Full, but you get to choose which drives and folders get scanned.

Figure 3-3: The current status of Windows Defender signature file updates.
4. To see what Windows Defender has caught and zapped, historically, tap or click the History tab (see Figure 3-4).
Once upon a time, Windows Defender would flag infected files and offer them up for you to decide what to do with the offensive file. It appears as if that behavior has been scaled back radically. As best I can tell, in almost all circumstances, when Windows Defender hits a dicey file, it quarantines the file — sticks it in a place you won’t accidentally find — and just keeps going. You’re rarely notified, (although a toaster notification may slide out from the right side of the screen), but the file just disappears from where it should’ve been.
If you just downloaded a file, and it disappeared, there’s a very good chance that it’s infected, Windows Defender has whisked it away to a well-guarded location, and the only way you’ll ever find it is in the History tab of the Windows Defender program.
Should you decide to bring the file back, for whatever reason, select the check box next to the file and then tap or click Restore. Rub your lucky rabbit’s foot a couple of times while you’re at it.

Figure 3-4: A full history of the actions Defender’s taken appear here.
Judging SmartScreen
Have you ever downloaded a program from the Internet, then clicked to install it — and then, a second later, think, “Why did I do that?”
Microsoft came up with an interesting technique it calls SmartScreen that gives you an extra chance to change your mind, if the software you’re trying to install has drawn criticism from other Windows customers. It was built in to the older version of Internet Explorer, version 9. It’s now part of Windows 8.1.
SmartScreen is not the same as Smart Search. SmartScreen, discussed here, offers some real benefits to most Windows users. Smart Search, on the other hand, is a pernicious piece of snooping malware (did I put you off sufficiently?) that Microsoft sneaks into Windows 8.1. Follow the easy instructions in Book II, Chapter 3 to turn off Smart Search. Follow along here to use SmartScreen.
One part of SmartScreen works in conjunction with Windows Defender. In fact, sometimes I’ve seen an infected file trigger a toaster notification from Windows Defender, and later had the same infected file prompt the SmartScreen warning shown in Figure 3-5.

Figure 3-5: Smart-Screen may take the credit for the bust, but Windows Defender did the work.
If you tap or click the More Info link in Figure 3-5, Windows shows you the filename and the publisher (if one can be identified) and gives you the option to run the program anyway. If you don’t run the program, it gets stuffed into the same location that Windows Defender puts its quarantined programs — out of the way where you can’t find it, unless you go in through Windows Defender’s History tab (refer to Figure 3-4).
There’s a second part of SmartScreen that works completely differently. Something like this:
1. You download something — anything — from the Internet.
Most browsers and many e-mail programs and other online services (including instant messengers) put a “brand” on the file that indicates where the file came from.
2. When you try to launch the file, Windows checks the name of the file and the URL of origin to see whether they’re on a “trusted” white list.
3. If the file doesn’t pass muster, you see the notification in Figure 3-5.
4. The more people who install the program from that site, the more “trusted” the program becomes.
Again, Microsoft is collecting information about your system — in this case, about your downloads — but it’s for a good cause.
Microsoft claims that SmartScreen helped protect IE9 users from more than 1.5 billion attempted malware attacks and 150 million phishing attacks. MS also claims that, when a Windows user is confronted with a confirmation message, the risk of getting infected is 25–70 percent. Of course it’s impossible to independently verify those figures — and the gap from 25–70 percent gapes — but SmartScreen does seem to help in the fight against scumware.
So what can go wrong? Not a lot. If SmartScreen can’t make a connection to its main database when it hits something phishy, er, fishy, you see a blue screen like the one in Figure 3-6 telling you that SmartScreen can’t be reached right now. The connection can be broken for many reasons, such as the Microsoft servers go down or maybe you downloaded a program and decided to run it later. When that happens, if you can’t get your machine connected, you’re on your own.
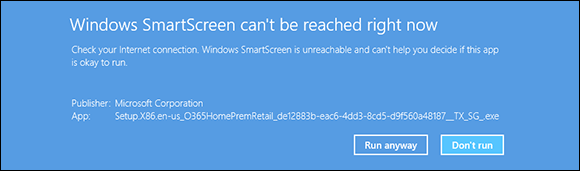
Figure 3-6: If Smart-Screen can’t phone home, it leaves you on your own.
Turning off SmartScreen is an option when you install Windows. You can also turn it off manually. Normally, overriding a SmartScreen warning requires the okay of someone with an administrator account. You can change that, too. Here’s how:
1. On the Start screen, type action; on the right, choose Action Center.
The Windows Action Center appears.
2. Tap or click the down arrow to the right of Security.
A lengthy list of security options appears.
3. Under Windows SmartScreen, tap or click the Change Settings link.
The Windows SmartScreen dialog box appears, as shown in Figure 3-7.

Figure 3-7: Think twice before turning off Smart-Screen.
4. Tap or click the appropriate button to drop the requirement for an administrative account in order to okay a SmartScreen warning override or to turn off SmartScreen entirely.
5. Tap or click OK.
If you disabled SmartScreen, you see a near-immediate reaction in the desktop’s notification area, warning you that SmartScreen has been turned off.
Booting Securely with UEFI
If you’ve ever struggled with your PC’s BIOS — or been knee-capped by a capable rootkit — you know that BIOS should’ve been sent to the dugout a decade ago.
Windows 8.1 will pull the industry kicking and screaming out of the BIOS generation and into a far more capable — and controversial — alternative, Unified Extensible Firmware Interface (UEFI). Although UEFI machines in the time of Windows 7 were unusual, starting with Windows 8, every new machine with a Runs Windows 8 sticker is required to run UEFI; it’s part of the licensing requirement. ’Tis a brave new world.
A brief history of BIOS
To understand where Windows is headed, it’s best to look at where it’s been. And where it’s been with BIOS inside PCs spans the entire history of the personal computer. That makes PC-resident BIOS more than 30 years old. The very first IBM PC had a BIOS, and it didn’t look all that different from the inscrutable one you swear at now.
The Basic Input/Output System, or BIOS, is a program responsible for getting all your PC’s hardware in order and then firing up the operating system — in this case, Windows — and finally handing control of the computer over to the OS. BIOS runs automatically when the PC is turned on.
Older operating systems, such as DOS, relied on BIOS to perform input and output functions. More modern OSs, including Windows, have their own device drivers that make BIOS control obsolete, once the OS is running.
Every BIOS has a user interface, which looks a lot like the one in Figure 3-8. You press a key while the BIOS is starting and, using obscure keyboard incantations, take some control over your PC’s hardware, select boot devices (in other words, tell BIOS where the operating system is located), overclock the processor, disable or rearrange hard drives, and the like.

Figure 3-8: The AwardBIOS Setup Utility.
The PC you’re using right now may or may not have UEFI, and even if it does have UEFI, you may not be able to get to it. Windows 8.1 runs just fine on BIOS systems, but it can protect you even better — especially from rootkits — if your PC supports UEFI.
How UEFI is different from/better than BIOS
BIOS has all sorts of problems, not the least of which is its susceptibility to malware. Rootkits like to hook themselves into the earliest part of the booting process — permitting them to run underneath Windows — and BIOS has a big Kick Me sign on its tail.
 UEFI and BIOS can coexist: UEFI can run on top of BIOS, hooking itself into the program locations where the operating system may call BIOS, basically usurping all the BIOS functions after UEFI gets going. UEFI can also run without BIOS, taking care of all the run-time functions. The only thing UEFI can’t do is perform the POST power-on self test or run the initial setup. PCs that have UEFI without BIOS need separate programs for POST and setup that run automatically when the PC is started.
Unlike BIOS, which sits inside a chip on your PC’s motherboard, UEFI can exist on a disk, just like any other program, or in non-volatile memory on the motherboard or even on a network share.
UEFI is very much like an operating system that runs before your final operating system kicks in. UEFI has access to all the PC’s hardware, including the mouse and network connections. It can take advantage of your fancy video card and monitor, as shown in Figure 3-9. It can even access the Internet. If you’ve ever played with BIOS, you know that this is in a whole new dimension.
Compare Figure 3-8 with 3-9, and you’ll have some idea where technology’s been and where it’s heading.
BIOS — the whole process surrounding BIOS, including POST — takes a long, long time. UEFI, by contrast, can go by quite quickly. The BIOS program itself is easy to reverse-engineer and has no internal security protection. In the malware maelstrom, it’s a sitting duck. UEFI can run in any irascible, malware-dodging way its inventors contrive.
Dual boot in the old world involves a handoff to a clunky text program; in the new world, it can be much simpler, more visual, and controlled by mouse or touch.

Figure 3-9: The UEFI interface on an ASUS PC.
More to the point, UEFI can police operating systems prior to loading them. That could make rootkit writers’ lives considerably more difficult by, for example, refusing to run an OS unless it has a proper digital security signature. Windows Defender can work with UEFI to validate OSs before they’re loaded. And that’s where the controversy begins.
How Windows 8.1 uses UEFI
A UEFI Secure Boot option validates programs before allowing them to run. If Secure Boot is turned on, operating system loaders have to be “signed” using a digital certificate. If you want to dual boot between Windows 8.1 and Linux, the Linux program has to have a digital certificate — something Linux programs have never required before.
After UEFI validates the digital key, UEFI calls on Windows Defender to verify the certificate for the OS loader. Windows Defender (or another security program) can go out to the Internet and check to see whether UEFI is about to run an OS that has had its certificate yanked.
So, in essence, in a dual boot system, Windows Defender decides whether an operating system gets loaded on your Secure Boot–enabled machine.
That curls the toes of many Linux fans. Why should their operating systems be subject to Microsoft’s rules, if you want to dual boot between Windows 8.1 and Linux?
If you have a PC with UEFI and Secure Boot and you want to boot an operating system that doesn’t have a Microsoft-approved digital signature, you have two options:
![]() You can turn off Secure Boot.
You can turn off Secure Boot.
![]() You can manually add a key to the UEFI validation routine, specifically allowing that unsigned operating system to load.
You can manually add a key to the UEFI validation routine, specifically allowing that unsigned operating system to load.
Some PCs won’t let you turn off Secure Boot. So if you want to dual boot Windows 8.1 and some other operating system on a Windows 8.1–certified computer, you may have a lot of hoops to jump through. Check with your hardware manufacturer.
Controlling User Account Control
User Account Control (UAC) is a pain in the neck, but then again, it’s supposed to be a pain in the neck. If you try to install a program that’s going to make system-level changes, you see the obnoxious prompt in Figure 3-10.

Figure 3-10: User Account Control tries to keep you from clobbering your system.
UAC’s a drama queen, too. The approval dialog box in Figure 3-10 appears front and center, but at the same time, your entire desktop dims, and you’re forced to deal with the UAC prompt.
UAC grabs you by the eyeballs and shakes once or twice for a good reason: It’s telling you that a program wants to make changes to your system — not piddling things like changing a document or opening a picture, but earth-shaking things like modifying the Registry or poking around inside system folders.
If you go into your system folders manually or if you fire up the Registry Editor and start making loose and fancy with Registry keys, UAC figures you know what you’re doing and leaves you alone. But the minute a program tries to do those kinds of things, Windows whups you upside the head, warns you that a potentially dangerous program is on the prowl, and gives you a chance to kill the program in its tracks.
Windows lets you adjust User Account Control so it isn’t quite as dramatic — or you can get rid of it entirely.
To bring up the slider and adjust your computer’s UAC level, follow these steps:
1. Using an administrator account, on the Start screen, type user account; on the right, choose Change User Account Control Settings.
The slider shown in Figure 3-11 appears.

Figure 3-11: Windows allows you to change the level of UAC intrusive-ness.
2. Adjust the slider according to Table 3-1 and then tap or click OK.
Perhaps surprisingly, as soon as you try to change your UAC level, Windows hits you with a User Account Control prompt (refer to Figure 3-10). If you’re using a standard account, you have to provide an administrator username and password to make the change. If you’re using an administrator account, you have to confirm the change.
3. Tap or click Yes.
Your changes take effect immediately.
Table 3-1 User Account Control Levels
|
Slider |
What It Means |
Recommendations |
|
Level 1 |
Always brings up the full UAC notification whenever a program tries to install software or make changes to the computer that require an administrator account, or when you try to make changes to Windows settings that require an administrator account. You see these notifications even if you’re using an administrator account. The screen blacks out, and you can’t do anything until the UAC screen is answered. |
This level offers the highest security but also the highest hassle factor. |
|
Level 2 |
Brings up the UAC notification whenever a program tries to make changes to your computer, but generally doesn’t bring up a UAC notification when you make changes directly. |
The default — and probably the best choice. |
|
Level 3 |
This level is the same as Level 2 except that the UAC notification doesn’t lock and dim your desktop. |
Potentially problematic. Dimming and locking the screen present a high hurdle for malware. |
|
Level 4 |
UAC is disabled — programs can install other programs or make changes to Windows settings, and you can change anything you like, without triggering any UAC prompts. Note that this doesn’t override other security settings. For example, if you’re using a standard account, you still need to provide an administrator’s ID and password before you can install a program that runs for all users. |
Choosing Level 4 automatically turns off all UAC warnings — not recommended. |
This description sounds simple, but the details are quite complex. Consider. Microsoft’s Help system says that if your computer is at Level 2, the default setting in Windows, “You will be notified if a program outside of Windows tries to make changes to a Windows setting.” So how does Windows tell when a program is “outside of Windows” — and thus whether actions taken by the program are worthy of a UAC prompt at Levels 2 or 3?
UAC-level rules are interpreted according to a special Windows security certificate. Programs signed with that certificate are deemed to be part of Windows. Programs that aren’t signed with that specific certificate are “outside of Windows” and thus trigger UAC prompts if your computer is at Level 1, 2, or 3.
Poking at Windows Firewall
A firewall is a program that sits between your computer and the Internet, protecting you from the big, mean, nasty gorillas riding around on the information superhighway. An inbound firewall acts like a traffic cop that, in the best of all possible worlds, allows only “good” stuff into your computer and keeps all the “bad” stuff out on the Internet, where it belongs. An outbound firewall prevents your computer from sending bad stuff to the Internet, such as when your computer becomes infected with a virus or has another security problem.
Windows includes a usable (if not fancy) inbound firewall. It also includes a snarly, hard-to-configure, rudimentary outbound firewall, which has all the social graces of a junkyard dog. Unless you know the magic incantations, you never even see the outbound firewall — it’s completely muzzled unless you dig in to the Windows doghouse and teach it some tricks.
Everybody needs an inbound firewall, without a doubt. You already have one, in Windows 8.1, and you don’t need to do anything to it.
Outbound firewalls tend to bother you mercilessly with inscrutable warnings saying that obscure processes are trying to send data. If you simply click through and let the program phone home, you’re defeating the purpose of the outbound firewall. On the other hand, if you take the time to track down every single outbound event warning, you may spend half your life chasing firewall snipes.
I have a few friends who insist on running an outbound firewall. They uniformly recommend Comodo Firewall, which is available in a free-for-personal-use version at http://personalfirewall.comodo.com.
I think outbound firewalls are a complete waste of time. Although I’m sure some people have been alerted to Windows infections when their outbound firewall goes bananas, 99.99 percent of the time, the outbound warnings are just noise. Outbound firewalls don’t catch the cleverest malware, anyway.
Understanding Firewall basic features
All versions of Windows 8.1 ship with a decent and capable, but not foolproof, stateful firewall named Windows Firewall (WF). (See the nearby sidebar, “What’s a stateful firewall?”)
The WF inbound firewall is on by default. Unless you change something, Windows Firewall is turned on for all connections on your PC. For example, if you have a LAN cable, a wireless networking card, and a 3G USB card on a specific PC, WF is turned on for them all. The only way Windows Firewall gets turned off is if you deliberately turn it off or if the network administrator on your Big Corporate Network decides to disable it by remote control or install Windows service packs with Windows Firewall turned off.
In extremely unusual circumstances, malware (viruses, Trojans, whatever) have been known to turn off Windows Firewall. If your firewall kicks out, Windows lets you know loud and clear with balloon notifications near the system clock on the desktop, toaster notifications from the right on the Start screen, and a crescendo from Ride of the Valkyries blaring on your speakers.
You can change WF settings for inbound protection relatively easily. When you make changes, they apply to all connections on your PC. On the other hand, WF settings for outbound protection make the rules of cricket look like child’s play.
WF kicks in before the computer is connected to the network. Back in the not-so-good old days, many PCs got infected between the time they were connected and when the firewall came up.
Speaking your firewall’s lingo
At this point, I need to inundate you with a bunch of jargon so that you can take control of Windows Firewall. Hold your nose and dive in. The concepts aren’t that difficult, although the lousy terminology sounds like it was invented by a first-year advertising student. Refer to this section if you become bewildered when wading through the WF dialog boxes.
As you no doubt realize, the amount of data that can be sent from one computer to another over a network can be tiny or huge. Computers communicate with each other by breaking the data into packets (or small chunks of data with a wrapper that identifies where the data came from and where it’s going).
On the Internet, packets can be sent in two ways:
![]() User Datagram Protocol (UDP): UDP is fast and sloppy. The computer sending the packets doesn’t keep track of which packets were sent, and the computer receiving the packets doesn’t make any attempt to get the sender to resend packets that vanish mysteriously into the bowels of the Internet. UDP is the kind of protocol (transmission method) that can work with live broadcasts, where short gaps wouldn’t be nearly as disruptive as long pauses, while the computers wait to resend a dropped packet.
User Datagram Protocol (UDP): UDP is fast and sloppy. The computer sending the packets doesn’t keep track of which packets were sent, and the computer receiving the packets doesn’t make any attempt to get the sender to resend packets that vanish mysteriously into the bowels of the Internet. UDP is the kind of protocol (transmission method) that can work with live broadcasts, where short gaps wouldn’t be nearly as disruptive as long pauses, while the computers wait to resend a dropped packet.
![]() Transmission Control Protocol (TCP): TCP is methodical and complete. The sending computer keeps track of which packets it’s sent. If the receiving computer doesn’t get a packet, it notifies the sending computer, which resends the packet. Almost all communication over the Internet these days goes by way of TCP.
Transmission Control Protocol (TCP): TCP is methodical and complete. The sending computer keeps track of which packets it’s sent. If the receiving computer doesn’t get a packet, it notifies the sending computer, which resends the packet. Almost all communication over the Internet these days goes by way of TCP.
Every computer on a network has an IP address, which is a collection of four sets of numbers, each between 0 and 255. For example, 192.168.1.2 is a common IP address for computers connected to a local network; the computer that handles the Dummies.com website is at 208.215.179.139. You can think of the IP address as analogous to a telephone number. See Book VI, Chapter 6 for details.
Peeking in to your firewall
When you use a firewall — and you should — you change the way your computer communicates with other computers on the Internet. This section explains what Windows Firewall does behind the scenes so that when it gets in the way, you understand how to tweak it. (You find the ins and outs of working around the firewall in the “Making inbound exceptions” section, later in this chapter.)
When two computers communicate, they need not only each other’s IP address but also a specific entry point called a port — think of it as a telephone extension — to talk to each other. For example, most websites respond to requests sent to port 80. There’s nothing magical about the number 80; it’s just the port number that people have agreed to use when trying to get to a website’s computer. If your web browser wants to look at the Dummies.com website, it sends a packet to 208.215.179.139, port 80.
Windows Firewall works by handling all these duties simultaneously:
![]() It keeps track of outgoing packets and allows incoming packets to go through the firewall if they can be matched with an outgoing packet. In other words, WF works as a stateful inbound firewall.
It keeps track of outgoing packets and allows incoming packets to go through the firewall if they can be matched with an outgoing packet. In other words, WF works as a stateful inbound firewall.
![]() If your computer is attached to a private network, Windows Firewall allows packets to come and go on ports 139 and 445, but only if they came from another computer on your local network and only if they’re using TCP. Windows Firewall needs to open those ports for file and printer sharing. WF also opens several ports for Windows Media Player if you’ve chosen to share your media files, as you might within a HomeGroup (see Book VII, Chapter 5), for example.
If your computer is attached to a private network, Windows Firewall allows packets to come and go on ports 139 and 445, but only if they came from another computer on your local network and only if they’re using TCP. Windows Firewall needs to open those ports for file and printer sharing. WF also opens several ports for Windows Media Player if you’ve chosen to share your media files, as you might within a HomeGroup (see Book VII, Chapter 5), for example.
![]() Similarly, if your computer is attached to a private network, Windows Firewall automatically opens ports 137, 138, and 5355 for UDP, but only for packets that originate on your local network.
Similarly, if your computer is attached to a private network, Windows Firewall automatically opens ports 137, 138, and 5355 for UDP, but only for packets that originate on your local network.
![]() If you specifically told Windows Firewall that you want it to allow packets to come in on a specific port and the Block All Incoming Connections check box isn’t selected, WF follows your orders. You may need to open a port in this way for online gaming, for example.
If you specifically told Windows Firewall that you want it to allow packets to come in on a specific port and the Block All Incoming Connections check box isn’t selected, WF follows your orders. You may need to open a port in this way for online gaming, for example.
![]() Windows Firewall allows packets to come into your computer if they’re sent to the Remote Assistance program, as long as you created a Remote Assistance request on this PC and told Windows to open your firewall (see Book VII, Chapter 2). Remote Assistance allows other users to take control of your PC, but it has its own security settings and strong password protection. Still, it’s a known security hole that’s enabled when you create a request.
Windows Firewall allows packets to come into your computer if they’re sent to the Remote Assistance program, as long as you created a Remote Assistance request on this PC and told Windows to open your firewall (see Book VII, Chapter 2). Remote Assistance allows other users to take control of your PC, but it has its own security settings and strong password protection. Still, it’s a known security hole that’s enabled when you create a request.
![]() You can tell Windows Firewall to accept packets that are directed at specific programs. Usually, any company that makes a program designed to listen for incoming Internet traffic (Skype is a prime example, as are any instant-messaging programs) adds its program to the list of designated exceptions when the program is installed.
You can tell Windows Firewall to accept packets that are directed at specific programs. Usually, any company that makes a program designed to listen for incoming Internet traffic (Skype is a prime example, as are any instant-messaging programs) adds its program to the list of designated exceptions when the program is installed.
![]() Unless an inbound packet meets one of the preceding criteria, it’s simply ignored. Windows Firewall swallows it without a peep. Conversely, unless you’ve changed something, any and all outbound traffic goes through unobstructed.
Unless an inbound packet meets one of the preceding criteria, it’s simply ignored. Windows Firewall swallows it without a peep. Conversely, unless you’ve changed something, any and all outbound traffic goes through unobstructed.
Making inbound exceptions
Firewalls can be absolutely infuriating. You may have a program that has worked for a hundred years on all sorts of computers, but the minute you install it on a Windows 8.1 machine with Windows Firewall in action, it just stops working, for absolutely no apparent reason.
You can get mad at Microsoft and scream at Windows Firewall, but when you do, realize that at least part of the problem lies in the way the firewall has to work. (See the “Peeking in to your firewall” section, earlier in this chapter, for an explanation of what your firewall does behind the scenes.) It has to block packets that are trying to get in, unless you explicitly tell the firewall to allow them to get in.
Perhaps most infuriatingly, WF has to block those packets by simply swallowing them, not by notifying the computer that sent the packet. Windows Firewall has to remain “stealthy” because if it sends back a packet that says, “Hey, I got your packet, but I can’t let it through,” the bad guys get an acknowledgment that your computer exists, they can probably figure out which firewall you’re using, and they may be able to combine those two pieces of information to give you a headache. It’s far better for Windows Firewall to act like a black hole.
Some programs need to “listen” to incoming traffic from the Internet; they wait until they’re contacted and then respond. Usually, you know whether you have this type of program because the installer tells you that you need to tell your firewall to back off.
If you have a program that doesn’t (or can’t) poke its own hole through the Windows Firewall, you can tell WF to allow packets destined for that specific program — and only that program — in through the firewall. You may want to do that with a game that needs to accept incoming traffic, for example, or for an Outlook extender program that interacts with mobile phones.
To poke a hole in the inbound Windows Firewall for a specific program:
1. Make sure that the program you want to allow through the Firewall is installed.
2. On the Start screen, type firewall; on the right, choose Allow an App Through Windows Firewall.
Windows Firewall presents you with a lengthy list of programs that you may want to allow (see Figure 3-12): If a box is selected, Windows Firewall allows unsolicited incoming packets of data directed to that program and that program alone, and the column tells you whether the connection is allowed for private or public connections.
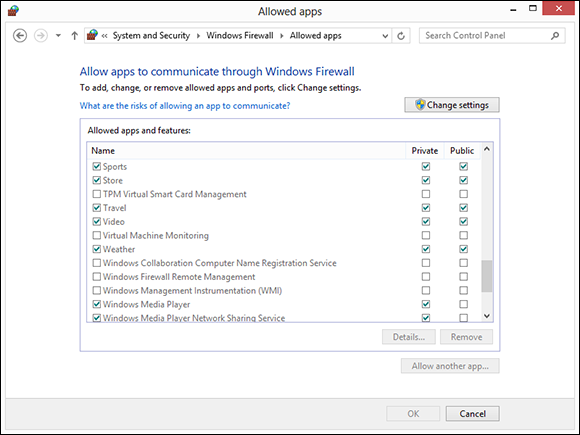
Figure 3-12: Allow installed programs to poke through the firewall.
These settings don’t apply to incoming packets of data that are received in response to a request from your computer; they apply only when a packet of data appears on your firewall’s doorstep without an invitation.
In Figure 3-12, the tiled Weather app is allowed to receive inbound packets whether you’re connected to a private or public network. Windows Media Player, on the other hand, may accept unsolicited inbound data from other computers only if you’re connected to a private network: If you’re attached to a public network, inbound packets headed for Windows Media Player are swallowed by the WF Black Hole (patent pending).
3a. If you can find the program that you want to poke through the firewall listed in the Allow Programs list, select the check boxes that correspond to whether you want to allow the unsolicited incoming data when connected to a home or work network and whether you want to allow the incoming packets when connected to a public network.
It’s rare indeed that you’d allow access when connected to a public network but not to a home or work network.
3b. If you can’t find the program that you want to poke through the firewall, you need to go out and look for it. Tap or click the Change Settings button at the top and then tap or click the Allow another App button at the bottom.
You have to tap or click the Change Settings button first and then tap or click Allow another Program. It’s kind of a double-down protection feature that ensures you don’t accidentally change things.
Windows Firewall goes out to all common program locations and finally presents you with the Whack a Mol . . . er, Add an App list like the one shown in Figure 3-13. It can take a while.

Figure 3-13: Windows Firewall suggestions for programs you may want to poke through it.
4. Choose the program you want to add and then tap or click the Add button.
Realize that you’re opening a potential, albeit small, security hole. The program you choose had better be quite capable of handling packets from unknown sources. If you authorize a renegade program to accept incoming packets, the bad program could let the fox into the chicken coop. If you know what I mean.
You return to the Windows Firewall Allowed Apps list (refer to Figure 3-12), and your newly selected program is now available.
5. Select the check boxes to allow your poked-through program to accept incoming data while you’re connected to a private or a public network. Then tap or click OK.
Your poked-through program can immediately start handling inbound data.
In many cases, poking through the Windows Firewall doesn't solve the whole problem. You may have to poke through your modem or router as well — unsolicited packets that arrive at the router may get kicked back according to the router's rules, even if Windows would allow them in. Unfortunately, each router and the method for poking holes in the router's inbound firewall differ. Check the site www.portforward.com/routers.htm for an enormous amount of information about poking through routers.