Managing computers means many things to many people. Everyone can find some common ground, though, especially power users. Keeping track of events that affect the computer's stability and performance is one example. Scheduling jobs that automate maintenance is another. This chapter covers the maintenance tasks that most power users consider important. It does not discuss how to manage Microsoft Windows 2000 Professional on networks, however, which is a big job that's better left to books such as Inside Windows 2000 Server (New Riders, 1999).
The most important aspect of managing the computers that are running Windows 2000 Professional is managing the users. Microsoft Windows 98 users will find this particular aspect of the operating system its most frustrating feature. All users don't share all files on the computer. Instead, users' settings are in their user profiles, which are separate from all other users' profiles. Not only does Windows 2000 Professional separate users' files into different profiles, but users must log on to the computer individually and an authorization process determines the files they can access, programs they can run, and so on. The operating system is secure and how you manage users has a significant impact on your satisfaction with it. As a result, you should carefully read Chapter 11, "Securing Your Computer," to make sure you understand how to administer security. This chapter specifically discusses user profiles and how to best manage them to get around their significant drawbacks that affect power users. For more information about making the switch from Windows 98 to Windows 2000 Professional and for an introduction to user profiles and security, see Appendix B, "Quick Start for Windows 98 Users."
Windows 98 displays most diagnostic information, warnings, and error messages in simple dialog boxes. Very seldom does it use log files to accumulate information over time. When it does, log files are plain text files, with each application or module creating its own. Microsoft Windows NT introduced a more elegant solution, one that Windows 2000 Professional continues to use, called the event log. The operating system still displays a plethora of warnings and error messages in dialog boxes, but it and applications that run on it also stash more detailed information in the event log. Information in the event log is generally more detailed than the error messages you see onscreen.
In fact, entries in the event log are often the most useful tools at your disposal for diagnosing and repairing problems. For example, if the computer is suddenly behaving erratically, check the event log first. Often, you'll see a recent entry that can explain the change in behavior. Also, don't forget to look for relationships between different events in the log. If you see a vague entry in the log, a second entry (usually before or after it) will often shed light on the first entry.
Event Viewer is your window into the event log. And that brings up the fact that there isn't just one log. There are actually three event logs in Event Viewer: application, security, and system. As their names imply, applications log information in the application log. The operating system logs information in the system log. Both log security information in the security log. Of the three event logs, the system log is the most used and the most useful for diagnosing and repairing problems in Windows 2000 Professional. To see these three event logs, open Event Viewer. In Control Panel, double-click the Administrative Tools icon and then double-click the Event Viewer icon. The result is a window similar to what you see in Figure 8.1. Click the event log you want to view: Application Log, Security Log, or System Log. You must log on to the computer as an Administrator in order to view the security log, but power users can view the other two logs.

Figure 8.1. You can also view these event logs in Computer Management. In Control Panel, double-click the Administrative Tools icon, followed by the Computer Management icon.
Double-click any entry in an event log to view it. There are three types of events: information, warning, and errors. Their purpose is obvious—based on their names. Double-click any event to view it. The top portion of the window shows statistical information about the event, such as its date, source, user, and so on. The middle portion contains the event's most useful information, text that describes the event. The bottom portion contains the least useful bits of information: data related to the event that usually requires technical analysis to figure out what it represents.
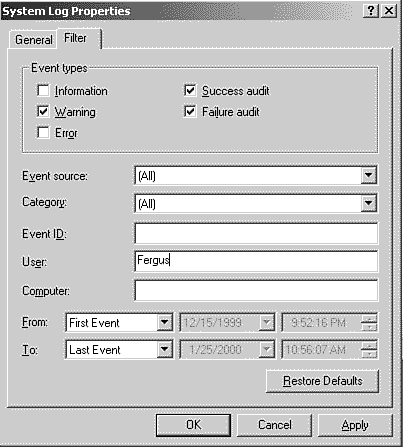
Over time, the event log accumulates a huge number of events. This can make it tough to sort out what led to a particular problem or sort out the computer's history of errors. Event Viewer provides features to help you sort all this out, however. First, it supports filtering. With filtering, you see just the events that interest you. You can limit the display to warnings, for example, or you can limit the display to errors that a particular component produced. On the View menu, click Filter. On the Filter tab, shown in Figure 8.2, specify the events you want to view. When you finish filtering the event log, click All Records on the View menu.
Second, Event Viewer allows you to search for particular events. On the View menu, click Find. The dialog box looks similar to the one in Figure 8.2. Specify the events for which you're searching and then click Find Next. To find the next matching event in the log, click Find Next again. Searching for events is more useful than filtering events because it allows you to view events in relation to others that occurred at the same time.
Much more is behind Event Viewer. It allows you to organize events to suit your needs. First and foremost, for any of the logs, you can create alternative views and then filter them however you like. To create an alternative view of any log, click New Log View on its shortcut menu. After you create a new log view, filter it as you learned in the previous section, and then rename it using a name that describes its contents. For example, I like to create a new view for the system log and then filter it to display only errors. I call this new view System Error Log, so that I can see all system errors at a glance. You can delete the new log file view by clicking Delete on its shortcut menu.
When the log files become too big, which happens over time as the system logs more and more events, you'll start seeing errors that say the log file is full. Also, the log files can become too big for you to manage. I like to clear the log files so they show only recent entries. This keeps their sizes reasonable and ensures that I notice important events when they occur. To clear any log file, click Clear all events. Before doing this, I suggest that you save a text copy of the log file for future reference, however. When you clear a log file, Event Viewer prompts you to save the current entries to a text file, but you can do so manually: Click Save Log File As on its shortcut menu. If you'd rather not clear the log file, but you want to make sure it doesn't become full, adjust the amount of space that is available to it.
Click Properties on the log file's shortcut menu.
In Maximum log size, specify the amount of space you want to make available to the log file.
In the Log size area, do one of the following:
To allow Event Viewer to overwrite events when it runs out of space, click Overwrite events as needed.
To allow Event Viewer to overwrite events when they become old, click Overwrite events older than and then specify how old an event must age before Event Viewer overwrites it.
To prevent Event Viewer from overwriting events, click Do not overwrite events.
Note
In Windows 2000 Professional, the event log tends to fill with plenty of useless entries, particularly if you still connect to a network that Microsoft Windows NT Server 4.0 manages. One of those entries is due to the fact that the operating system is looking for a timeserver, which Windows 2000 Server provides and Windows NT Server 4.0 doesn't. You can eliminate these entries in the event log by disabling the Windows Time service in Services. Another annoying example is an entry from Oakley, which you'll see if you haven't installed the high-encryption pack.
Windows NT Workstation 4.0 had its diagnostics, Winmsd, which had a tabbed user interface that displayed useful information about the computer and operating system's configuration. Windows 2000 Professional doesn't have this same utility, but it does have Microsoft System Information, a much more useful and much more descriptive utility than Winmsd. Still, users who are in the habit of quickly typing winmsd in the Run dialog box will be pleased to know that doing so runs System Information now. The other way to run System Information is by using Control Panel. In Control Panel, double-click Computer Management and then click System Information. Also, you can type msinfo32 in the Run dialog box.
System Information displays five categories of information, but you can't change any of it using this user interface:
System Summary . Displays basic information about the computer. You know the CPU, amount of memory, BIOS information, and so on.
Hardware Resources . Contains useful information that helps you troubleshoot device conflicts. It displays information about how each device uses computer resources such as I/O ports, IRQs, and memory ranges. Conflicts/Sharing is the node of interest here because it describes any conflicts.
Components . Describes each of the components installed on the computer, including information about the display adapter, ports, modems, network components, storage devices, and printers. Rather than rooting around Device Manager for this type of information, this is the ultimate source.
Software Environment . Contains warm-and-fuzzy information about the applications you installed and the environment in which they run. It describes any processes that are currently running, as well as any DLL files that are loaded.
Internet Explorer 5 . Shows the components that Internet Explorer 5 is using, their versions, and how you configured them. This node is rather dull.
Task scheduling has come a long way in Windows 2000 Professional, particularly over Windows NT Workstation 4.0's AT command, which Windows 2000 Professional continues to support. Task Scheduler started as part of Internet Explorer 4, and it is now included in all of Microsoft's current operating system offerings. It's easy to use and makes automating routing tasks simple. The only problem is that in order to schedule a task to run any particular program, the program must be capable of running with no user interface. That means that the program must have a fairly comprehensive command-line interface. Sadly, many of the utilities in Windows 2000 Professional don't have suitable command-line interfaces and you can't schedule them. You can't schedule Disk Defragmenter to defragment your disks automatically, for example. You can still schedule Windows Backup to automate the backup process, however.
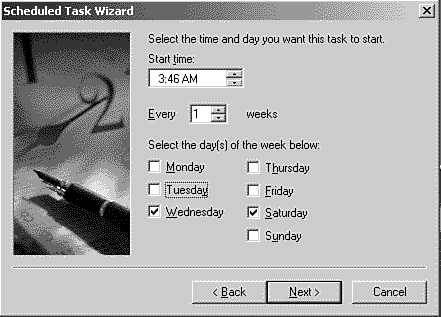
Task Scheduler is in Control Panel. Double-click the Scheduled Task icon. To schedule a task, double-click the Add Scheduled Task icon. Shown in Figure 8.3, the wizard walks you through the entire process, which is rather straightforward. It prompts you for the program you want to schedule, its command-line options, and the schedule. Scheduling options include daily, weekly, or just about any screwball schedule you want to create. For any particular task, you can even create multiple schedules. For example, you can schedule a backup task to run every Friday as well as every other Tuesday. Because scheduled tasks don't give you any feedback, you must use their log file to see their results. Task Scheduler also prompts for credentials and runs the task using those credentials. For example, you can run a task using your Administrator account and password. On the Advanced menu, click View Log. Particularly useful is Task Scheduler's capability to notify you when it misses a task, regardless of the reason. To do that, click Notify Me of Missed Tasks on the Advanced menu.
Note
Unlike earlier versions of Windows, including Windows 98, Windows 2000 Professional doesn't schedule any default tasks. Therefore, don't automatically assume that the tasks required to keep your computer running well are already scheduled. Also unlike Windows 98, you can't schedule some of the more useful utilities such as Disk Defragmenter. You can schedule many third-party disk defragmenter utilities, however.
Windows Backup has a lot of command-line options—too many for such a simple task, in my opinion. New in Windows 2000 Professional is a user interface for scheduling backup jobs, though, which eliminates the need for you to keep track of all those command-line options. Run Windows Backup: On the Start menu, point to Programs, point to Accessories, point to System Tools, and then click Backup. Schedule your backup job on the Scheduled Jobs tab. When you schedule a backup job this way, it creates a job file and adds a task to the Scheduled Tasks folder. You can, of course, schedule jobs manually. Windows Backup Help contains a rather complete description of the backup program's command-line options.
All is not well with Windows Backup, however. If you schedule a job, it ignores many options in the job file. For example, it ignores the job file's System State option. Windows Backup always includes the System State because Microsoft considers it to be an essential part of a backup in order for it to be complete. Also, regardless of the settings in the job file, it always backs up protected system files. Again, Microsoft considers it to be an essential part of any backup and doesn't allow you to skip it during a scheduled backup, even if you're just trying to schedule a job that contains a handful of files such as a handful of documents. Not only does Windows Backup ignore some settings in your job files, but the program doesn't have equivalent command-line options for many options you find in the user interface:
Creating emergency repair disks
Restoring backup sets
Backing up mounted drives
Backing up system-protected files
On the other hand, Windows Backup has command-line options for which you find no equivalent in the user interface. For example, the /um option instructs the backup program to overwrite the first tape in the media pool you specify using the /p option. The purpose of this option is to allow unattended backups with standalone tape libraries.
See Also
Chapter 7, "Managing Disks and Files," for more information about using Windows Backup.
Many people continue to use old UNIX-style text editors instead of the modern word processors available. Similarly, old-school Windows NT users will continue to use the AT command, even though Task Scheduler is more robust and has many more capabilities.
The AT command has a simple command-line interface, which you can use from the Run dialog box or at the MS-DOS command prompt:
Syntax:AT [\computername] [[id] [/DELETE] | /DELETE [/YES]]
AT [\computername] time [/INTERACTIVE]
[/EVERY: date[,…] | /NEXT: date[,…]] " command "
Options:
By default, the AT command runs jobs in the context of the System account. In many cases, you might need to run a job in the context of another user, however. For example, you might want to schedule administrative jobs and run them in the context of an Administrator account. To change the service account, click AT Service Account on the Advanced menu and provide the credentials of the account in which you want to run scheduled tasks.
Note
Jobs that you schedule using the AT command appear in Task Scheduler. If you edit such a job in the Scheduled Tasks folder, it's no longer available in the AT command. And because Task Scheduler's jobs are so much more complex than the AT command's jobs, jobs that you create in the Scheduled Tasks folder do not appear in the AT command.
If you're using a network-connected computer, time synchronization is becoming a more important issue for you. This is particularly true if you're using roaming user profiles or offline files, which you learn about in Chapter 13, "Using Mobile Computers." Windows 2000 Professional relies on the times that files were modified to determine whether to update them from the network or vice versa. If your computer's clock doesn't match the server's clock, you might end up with the wrong versions of files, or worse.
The easiest way to make sure that your computer's clock matches the server's clock is to use the Net command. Simply add the command net time \ computer /set to the logon script, where computer is the name of the computer to which you want to synchronize your computer's clock. Alternatively, use net time \ domain /set, where domain is the name of the domain to which you want to synchronize your clock.
Windows 2000 Professional and Windows 2000 Server provide a time service that makes this process automatic, though. So, if you're using this combination of software, you don't have to modify your logon script to synchronize your computer's clock with the server. You don't have to do anything at all to enable this time service. If you suspect that it's not working properly, however, double-click in Services to make sure that it's started.
In Control Panel, double-click the Administrative Tools icon and then double-click the Services icon. This is the administrative tool that you use to administer services in Windows 2000 Professional. Services are programs that provide some sort of system function. For example, the Windows Time Service updates the computer's clock so that its time matches the server's time. Another example is the RunAs Service, which allows you to run programs in contexts of different user accounts.
Some operating system features require that you start a particular service in order to use them. Still other features you might not want to use, and you can disable them by disabling their corresponding services. You can click Start, Stop, Pause, Resume, or Restart on any service's shortcut menu. This action is temporary, though. When you restart the computer, the service returns to its normal state. You can permanently configure a service by doing the following:
In Services, double-click a service.
In Startup type, click one of the following:
Automatic
Disabled
Manual
In Start parameters, type any command-line options you want to pass to the service (very few services accept command-line options).
On the Log On tab, do one of the following:
To run the service in the context of the system account, click Local System Account. If you want to allow the service to interact with users, select the Allow service to interact with desktop check box.
To run the service in the context of another user's account, click This account and then provide the account's name and password.
On the Recovery tab, specify what actions you want Windows 2000 Professional to take when the service fails. In the First failure, Second failure, and Subsequent failures lists, click one of these:
Restart the Service
Run a File
Reboot the Computer
Take No Action
Note
Windows 2000 Professional allows you to disable services for certain hardware profiles. This is useful if a service is associated with a device that's not enabled in a particular profile. Although the service shouldn't load if the device isn't enabled, you might still find that you must manually disable the service for that profile. To do this, click the Log On tab on the service's Properties dialog box. Then click the hardware profile in which you want to disable the device and click Disable.
User profiles are folders that contain each user's settings and documents. In Windows 2000 Professional, user profiles are in SystemDriveDocuments and Settings. The name of each user profile varies, but it is usually the user name. When users logging on to the computer and creating user profile folders based on their user names would result in duplicate folder names, the operating system appends the name of the computer or domain to the end of the profile folder's name. You'll commonly see two user profile folders after logging on to the computer locally when you normally log on to the domain.
Windows 2000 Professional supports three types of user profiles. Local user profiles are the profiles that the operating system creates locally. Roaming user profiles are network-based user profiles that the operating system copies to the local computer when you log on to the domain and then copies back to the network when you log off. Roaming user profiles allow you to log on to any computer that's connected to the network and still be able to access your documents and use your own, familiar settings. In short, every computer that's connected to the network has a copy of your settings and documents available. Mandatory user profiles are user profiles that administrators create and Windows 2000 Professional downloads from the network. The operating system doesn't copy mandatory user profiles back to the network, however, which means that every time you log on to the domain, you start with the exact same settings. If you don't log on to a network, you're using local user profiles. If you do log on to a network, you might be using roaming user profiles, assuming that the network's administrator enabled them.
Roaming user profiles don't work well with dissimilar computer con- figurations. If you tend to use computers with screens that have different resolutions, different sets of applications, different directory structures, and so on, your roaming experience won't be very good. The reason is that per-user settings frequently depend on several per-computer settings. The organization of icons on your desktop is one example. If you arrange icons one way on a large monitor and then log on to a lower-resolution display, the operating system will rearrange the desktop so that all the icons fit onscreen. Windows that you might size to fit in one display don't look good in another lower-resolution display. Roaming user profiles are best when both computers have similar configurations so that you're not constantly reorganizing the desktop, resizing windows, and so on. For this reason, roaming user profiles are not a good way to synchronize your settings between a portable and desktop computer. After months of trying, I wasn't pleased with this configuration. Also, synchronizing settings require that you pay attention to the order in which you log on and off each computer.
The last shortcoming with roaming profiles is the actual data that the operating system copies to them. Within each user profile folder is a subfolder called Local Settings. The operating system does not copy this folder to the network when you log off the domain. The problem is that some of the most interesting settings and data are in this folder, and they won't be available on other computers that you use. For example, Microsoft Outlook Express stores its data in Local Settings. Because the operating system doesn't copy this folder to the network, your mail and news files won't be available on other computers you use.
Copying user profiles has two useful purposes. First, when you migrate to Windows 2000 Professional from earlier versions of Windows, the Setup program might create a default user profile for you instead of migrating your existing user profile. If this happens, you can copy your original user profile or your new user profile to preserve your preferences. Second, you can copy a user profile to the Default User user profile in order to establish a template for new users who log on to the computer. For example, after installing the operating system, the first thing I do is configure all my preferences and then copy that user profile to the Default User user profile so each account I create starts with that same basic set of preferences.
Here's how to copy a user profile (you can't copy the profile of the user that's currently logged on, though):
In Control Panel, double-click the System icon.
On the Users Profile tab, click the user profile that you want to copy and then click Copy T o.
In Copy profile to, type the path to which you want to copy the user profile.
Click Change to pick the user who has permission to use the files in this user profile.
Copying user profiles through the official channels isn't the only solution, though. You can copy files from one user profile folder to another by using Microsoft Windows Explorer. Permissions aren't a problem if you copy files from one to another rather than move them. When you copy files, they inherit the permissions of the folder into which you copied them. When you move files, they retain their permissions—problematic if you want the user of the target user profile to be able to access them. If your goal is to move files from one profile folder to the other, copy them first and then remove the originals.
If you log on to a domain and the administrator configured your account to use roaming profiles, you can take back control. Roaming profiles are not always the cat's meow when your profile is large, and it takes forever for the operating system to copy it to and from the network. To change a roaming profile back to a local user profile, click Change Type on the User Profiles tab of the System Properties dialog box.
Most of Windows 2000 Professional's management tools are actually Microsoft Management Console (MMC) consoles. The most useful of these are in Computer Management. In Control Panel, double-click the Administrative Tools icon and then double-click the Computer Management icon. Computer Management includes Event Viewer, System Information, Performance Logs and Alerts, Shared Folders, Device Manager, Local Users and Groups, Disk Management, Disk Defragmenter, Logical Drives, Removable Storage, and other tools. All of these and many other tools are available in individually wrapped consoles, however. Run any of them by typing the console filename, including the file extensions, in the Run dialog box:
| Certmgr.msc | Certificates |
| Compmgmt.msc | Computer Management |
| Devmgmt.msc | Device Manager |
| Dfrg.msc | Disk Defragmenter |
| Diskmgmt.msc | Disk Management |
| Eventvwr.msc | Event Viewer |
| Faxserv.msc | Fax Service Management |
| Fsmgmt.msc | Shared Folders |
| Gpedit.msc | Group Policy |
| Ntmsmgr.msc | Removable Storage Manager |
| Perfmon.msc | Performance |
| Sysmon.msc | System Monitor |
For measuring the performance of your computer, Windows 2000 Professional provides Performance, an MMC console that contains the System Monitor and Performance Logs and Alerts snap-ins. In Control Panel, double-click the Administrative Tools icon and then double-click the Performance icon. The differences between these two snap-ins are as follows:
System Monitor . Views real-time information about the computer's performance, including data about memory, disks, processors, and the network. System Monitor displays results in graphs, histograms, and reports.
Performance Logs and Alerts . Records performance information in text files and sets system alerts that notify you when counters are above or below certain values.
System Monitor is more useful for observing your computer's performance while troubleshooting. For example, you can run and close different applications and see their impacts on memory consumption. Performance Logs and Alerts is useful to manage things as exceptions. That is, it notifies you when things aren't right and might require more attention.
In Performance, click System Monitor. You see the results in the right pane. By default, you don't see any counters. You add counters by clicking the Add button in the toolbar, picking the performance object, and clicking the counters you want to add. Other buttons on the toolbar allow you to remove, highlight, freeze, and do other things to counters. Right-click anywhere in the right pane and click Properties to display the System Monitor Properties dialog box, which allows you to further customize it. The following list describes each of its tabs:
General . Change how the counters look. For example, you can display them as graphics, histograms, or remotes. You can display a legend, value bar, and toolbar. Most importantly, you can configure how often Performance updates the display (the default is every second).
Source . By opening a log file, you can display previously logged resources in the right pane. This allows you to save performance data to a log file and view it at a later time. This is particularly useful if you want to show someone else the symptoms of a performance problem without having to create that problem again.
Data . On this tab, add and remove counters, just as you do by clicking the Add button on the toolbar.
Graph . Add a title to the graph, display vertical and horizontal grids, or change the vertical scale.
Color . Change the color of background, foreground, graph lines, and so on.
Fonts . Choose the font to display in the right pane. The default is Tahoma 8.25pt.
I must admit that I seldom use Performance as a troubleshooting tool. For individual users, Performance doesn't tell you anything you don't already know (gee, my computer is running slowly). It doesn't necessarily tell you why. As a troubleshooting tool, it might help you identify applications that are memory hogs and might help you determine if your configuration is the best it can be, but performance alerts are more useful. You learn about those in the next section.
Under Performance Logs and Alerts, click one of the following:
Counter Logs . Log counters to a text file. The counters you log do not have to be the same as those you're displaying in Performance. You can specify a time to begin and a time to stop logging the counters you choose.
Trace Logs . Log events such as process creation and page faults in text files. You can specify a time to begin and a time to stop logging the events.
Alerts . Perform some action when a counter reaches a certain level. This is like receiving pager notification when your favorite stock falls or rises to a certain value. You can log an entry to a log file, send a network message, or a run a particular program.
In all cases, create a log or alert is straightforward. Click New Log Settings or New Alert Settings on any of the folder's shortcut menus. Performance will ask you to name the log or event. It stores log files in SystemRootPerfLogs.