Users with mobile computers have special needs, assuming they actually travel with their computers. Their biggest need is access to files when they're not connected to the network. Just because they're not connected to the network doesn't mean they don't need access to their files. Microsoft Windows 2000 Professional helps out in two ways. First, offline files make taking network files with you easy. Second, Briefcase, a feature that Windows 95 introduced, fills the voids left by offline files.
A bigger need is good power management, though. If you're traveling with a mobile computer, power is not always available and you want the battery to last as long as possible. For that matter, if you were curled up with your mobile computer in front of a good movie, you'd like to hope that the battery lasts long enough to make it all the way to the movie's credits. Windows 2000 Professional makes substantial improvements to power management that will conserve battery power. Many of these improvements rely on Advanced Configuration and Power Interface (ACPI), which is still relatively rare for moderately priced mobile computers, but the operating system also supports computers with Advanced Power Management (APM).
This chapter describes Windows 2000 Professional's features that are specifically designed for mobile users. Whether you're traveling or not, these features help mobile computer users get more out of their computers.
Offline Files is a new feature that's similar to Briefcase, a feature that all recent versions of Windows support. There are some big differences, though. In particular, using Offline Files is a no-brainer when compared to using Briefcase. Specify that you want to use a file offline and when you disconnect from the network, that file is still available. Better yet, you access the file in the same place as you did when you were connected to the network. That means that you don't have to root around in a briefcase when you want to access the file. If the file is in \camelotpublicletters, it'll appear in that same place when you disconnect from the network. Still, Briefcase has its appropriate uses and you learn about them in "Briefcase." In particular, Offline Files doesn't work well when you log on to two computers at the same time and want to share files between those two computers. The feature gets too confused and requires you to pay careful attention to the order in which you log off and on each computer, so Briefcase is better here.
To make any network folder or file available offline, click Make Available Offline on its shortcut menu. Windows 2000 Professional copies those files to the local computer's offline files cache. Unlike Briefcase, users can make the root of a shared folder available offline, a source of frustration for Briefcase users. Offline files and folders remain in their original places, whether the computer is offline or not. Thus, you find your offline files in My Network Places, just as if you're still connected to the network. Note that many more files might be available on the network when you're connected to it, but you won't see those files in My Network Places unless you make them available offline. You can easily tell which files are available for offline usage because Windows Explorer puts an overlay in the bottom-left corner of each icon. Offline folders get a bit fuzzy when users add files to the network folder, so rely on this icon to tell whether you're really going to have an offline copy of the file or not.
The first time you make a file available offline, Windows 2000 Professional starts a wizard to explain how the feature works and allows you to customize it a bit. You can choose to display reminders in the taskbar whenever network connections' statuses change. Also, you can configure offline files to auto-matically synchronize with the network each time you log on or off the computer. All these options are on the Offline Files tab of the Folder Options dialog box:
On the Tools menu, click Folder Options and then click the Offline Files tab (see Figure 13.1).
Select any of the following options:
Enable Offline Files . Select this check box to enable offline files; otherwise, deselect this check box.
Synchronize all offline files before logging off . Select this check box if you want to synchronize all offline files every time you log off the computer; otherwise, deselect this check box.
Enable reminders . Select this check box if you want offline files to remind you when you offline files need to be synchronized or when you are working offline.
Drag the slider to the left to reduce the amount of disk space available for temporary offline files or drag the slider to the right to increase the amount of disk space available to them.

Figure 13.1. In most cases, you'll have few reasons to change these options because the default settings are most appropriate.
Temporary offline files are those that the operating system, in its infinite wisdom, makes available offline. Any time you create a file or use a file on the network, the operating system automatically makes an offline copy of that file available. You didn't ask to make these files available offline, but the operating system assumed that you'd want them to be available. Sounds great, but temporary offline files can use a lot of disk space, so you should limit the amount of space that's available to them. Periodically, you might want to delete all the temporary offline files, which you do by clicking Delete Files on the Offline Files tab of the Folder Options dialog box.
When the Windows 2000 Professional loses the network connection, it notifies you by displaying a ToolTip next to the Offline Files button in the taskbar. It tells you that the computer isn't connected to the network, but you can work offline. By default, the operating system displays this information every 60 minutes, but you can configure how often it displays this information, as you learned in the previous section. Double-click the Offline Files button in the taskbar to display more information about the status of offline files.
You can continue working normally, even if you're no longer connected to the network and even if you're editing a network file. Offline files will prompt you to synchronize your changes with the network once the network becomes available again.
By default, Windows 2000 Professional synchronizes offline files each time you log on and off a network connection. You can synchronize anytime, though: On Microsoft Windows Explorer's Tools menu, click Synchronize, and then click Synchronize. The Items to Synchronize dialog box displays a list of each shared folder that contains offline files. Deselect the check boxes next to each shared folder that you don't want to synchronize.
You can configure when Windows 2000 Professional synchronizes offline files. For example, create schedules that are appropriate for individual shared folders. On the Items to Synchronize dialog box, click Setup to display the Synchronization Settings dialog box. For each of the following tabs, you can schedule each shared folder to synchronize:
Logon/Logoff . The operating system synchronizes each shared folder you select on this tab when you log on and off the network connection that you click in the When I am using this network connection list. By default, Windows 2000 Professional configures all offline shared folders to synchronize when you log on or off a network connection. This is the most practical way to synchronize offline files.
On Idle . The operating system synchronizes each shared folder you select on this tab when you haven't used the computer in a specified amount of time. These settings apply to the network connection you click in the When I am using this network connection list. To specify how long the computer must be idle before the operating system synchronizes, click Advanced.
Scheduled . This tab is a bit more complicated than the others. You add individual scheduled items to the list on it. Click Add and follow the Scheduled Synchronization Wizard's instructions to select the shared folders you want to synchronize and the schedule you want to use for them. The scheduling options are somewhat flexible, allowing you to synchronize daily, on weekdays, or every-however-many days.
Exactly what Offline Files does when it synchronizes offline files and folders deserves more attention:
If you add files to an offline folder, Offline Files copies those files to the network when it synchronizes the folder. It also copies files added to the network to the local computer.
If you delete a file from an offline folder, Offline Files does not remove the file from the network folder when it synchronizes the folder.
Offline Files does not support subfile-level synchronization; it only supports file-level synchronization. If both copies of a file change, you can choose to preserve the network version, the local version, or both. If you want to keep both copies, you must rename the local version, and both copies will exist in both locations.
If you make a folder available offline and it contains shortcuts to documents on the network that you didn't make available offline, Offline Files goes ahead and makes the documents that the shortcuts point to available offline. This does not apply to folder shortcuts, however.
Offline Files maintains files' and folders' permissions as if you were still connected to the network; thus, this isn't a good way to get around NTFS file permissions.
Use Briefcase to synchronize files and folders that you copy from another computer on the network. This is similar to Offline Files, except that the process is completely manual and you have to access the offline versions of those files in the briefcase, not in their normal namespace. Briefcase is the method of choice if you're sharing files between two computers that you use at the same time. For example, I log on to my network with a desktop and mobile computer at the same time using the same account. Offline Files breaks down in this situation, but Briefcase doesn't.
Before using a briefcase, you must create one. On any folder's shortcut menu, click New and then click Briefcase. Rename the briefcase. I tend to give them meaningful names that describe what they contain. I also tend to create multiple briefcases, one for different sets of files. After you create a briefcase, you specify which files you want in it by dragging them to the briefcase. The first time you copy files or folders to a new briefcase, Windows 2000 Professional displays a brief bit of information about briefcases and how they work.
A briefcase is nothing more than a folder, which you can browse with Windows Explorer. What makes it a briefcase are the Desktop.ini file and briefcase database files stored in the folder. Desktop.ini points Windows 2000 Professional to the shell extension that adds the Briefcase features to the folder. The briefcase database contains information about the origin of each file and folder in the briefcase.
Like Offline Files, Briefcase performs file-level synchronization. In general, Briefcase doesn't know how to handle the situation in which both versions of a file change, so it simply prompts you for direction. Independent software vendors (ISVs) can publish reconciliation handlers, such as Microsoft did for Microsoft Office 2000, but most don't. Here's how to synchronize a briefcase:
On the briefcase's shortcut menu, click Update All.
For each item in the list, verify the action that Windows 2000 Professional proposes for each file.
You can change the action by right-clicking the arrow and picking a different one. The operating system might report that it's skipping a file because the file has changed in both locations. If you're certain that you want to replace either version of the file, do so by changing the action.
Click Update, and Windows 2000 Professional synchronizes the briefcase.
At any time, you can stop synchronizing a file by splitting it from the original. In the briefcase, click Properties on the file's shortcut menu and then click Split From Original.
Beyond security measures that you normally use, additional security for mobile computers is a concern only if you actually travel with your computer. I'd anticipate that extra security isn't necessary if the farthest you go with your mobile computer is the backyard. However, if you take your computer to school, to work, or on road trips, consider taking these extra precautions:
Use the computer's BIOS to password-protect access to the computer. You can require a password in order to start the computer, for example. This is not a reliable security measure, however, because determined hackers can find information on the Internet about getting around BIOS passwords.
Use the encrypting file system. This is the strongest measure you can take. Even if someone steals your computer, removes its hard disk, and mounts the hard disk on another computer, the hacker will not gain access to your files unless they know your name and password.
Use third-party products to protect your mobile computer from theft. Some products can even contact you via the Internet the first time an unauthorized user tries using it.
As most versions of Windows do, Windows 2000 Professional supports docking stations and port replicators. These are particularly useful for mobile computer users, giving them the combination of a portal and desktop computer with one box. Some companies are turning to mobile computers and docking stations to replace traditional desktop computers. The biggest benefit is that you can insert PC Card devices and plug monitors and keyboards in to a docking station. When you're ready to pack up and go, you simply eject the computer from the docking station without having to remove PC Card devices or unplug the keyboard, mouse, and monitor.
Hardware profiles make docking stations work. In fact, docking stations are the primary reason that hardware profiles exist at all. A hardware profile tells Windows 2000 Professional which devices to use and how to configure them. For mobile computers, the operating system creates two hardware profiles by default: docked, for times when you connect the computer to the docking station, and undocked. The operating system uses the docked profile when you're connected to the docking station. This profile would include the keyboard, mouse, monitor, and any PC Card devices in the docking station. The undocked profile wouldn't have any of these devices. For the most part, you don't have to do anything to manage hardware profiles. The operating system handles them automatically. Still, here's how to configure hardware profiles:
In Control Panel, double-click the System icon, click the Hardware tab, and then click Hardware Profiles (see Figure 13.2).
Do one of the following:
To specify whether a profile belongs to a docked or undocked configuration, in Available hardware profiles, click a profile and then click Properties.
To copy a hardware profile, in Available hardware profiles, click a profile and then click Copy.
To rename a hardware profile, in Available hardware profiles, click a profile and then click Rename.
To remove a hardware profile, in Available hardware profiles, click a profile and then click Delete.
In the Hardware profiles selection area, do one of the following:
To cause the boot loader to always prompt you for the profile you want to use when you start Windows 2000 Professional, click Wait until I select a hardware profile.
To cause the boot loader to use the first hardware profile as a default if you don't choose one within a certain period of time, click Select the first profile listed if I don't select a profile in, and then type the number of seconds you want the boot loader to wait before choosing the default profile.
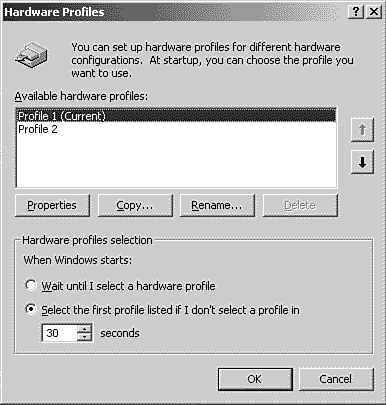
Figure 13.2. Configure hardware profiles only when Windows 2000 Professional doesn't automatically configure them.
You use Device Manager to determine which devices are in each hardware profile. Double-click a device and then select the hardware profiles in which you want to use the device. If you disable a device in a hardware profile and then start the computer with that profile, Windows 2000 Professional does not load the device's drivers when you're using that hardware profile.
You create dial-up connections in the Network and Dial-up Connections folder. Though the user interface is slightly different, the information it collects is similar to other versions of Windows:
In Control Panel, double-click the Network and Dial-up Connections icon and then double-click the Make New Connection icon.
Click Next and then do one of the following:
To create a connection to a private network, such as a home or business, click Dial-up to private network.
To create a connection to the Internet service provider, click Dial-up to the Internet.
To create a virtual private network connection, click Connect to a private network through the Internet.
To configure your computer to accept incoming connections (the other computer would create a connection to a private network), click Accept incoming connections.
To connect your computer to another computer using a serial, parallel, or infrared port, click Connect directly to another computer. This type of connection is handy and often overlooked when you don't have networking equipment available.
Follow the instructions you see onscreen. For more information about each type of connection, see Chapter 12, "Networking Your Computer."
See also
Chapter 12, "Networking Your Computer," to learn more about dial-up connections.
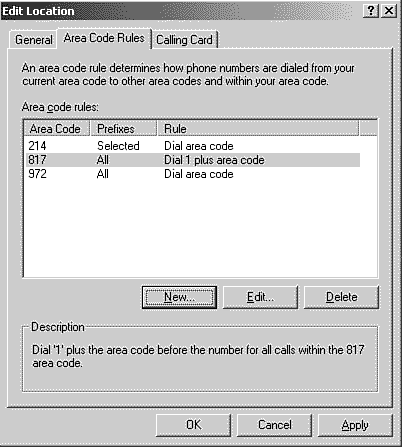
The most frustrating part of traveling with a mobile computer is figuring out how to dial dial-up connections from various locations. In Control Panel, double-click the Phone and Modem Options icon to configure each modem and describe how you want the operating system to dial different telephone numbers.
Install modems using the Modems tab; click the Add button. Windows 2000 Professional automatically detects most modems, however, so you seldom ever have to manually install a modem.
Set dialing rules on the Dialing Rules tab. These set rules that determine how Windows 2000 Professional dials telephone numbers, depending on the location from which you're calling. For example, I require the operating system to dial the area code when calling from 972 to 214, and I require it to use 1+ dialing when calling 817 (even if all of these area codes are part of the same D/FW metroplex). In the past, these 10-digit dialing schemes were difficult to configure, requiring you to disable dialing locations altogether so you could manually configure phone numbers each time you call. Dialing rules alleviate the problems, however. Here's how to create a dialing rule:
Do one of the following:
On the General tab, type a name of the location; then, in Area code, type the location's area code.
On the Area Code Rules dialog box, do one of the following:
To create a new dialing rule, click New.
To edit an existing dialing rule, click the rule you want to edit in the Area code rules list and then click Edit.
To remove a dialing rule, click the rule you want to remove in the Area code rules list and then click Delete.
On the Calling Card tab, click the calling card you want to use in the Card Types list and then provide details for it in the spaces provided. You can create new calling cards by clicking New.
Windows 2000 Professional supports two types of power management. Support for Advanced Power and Configuration Interface (ACPI) delivers the latest power-management features when you combine Windows 2000 Professional with mobile computers that have ACPI BIOSes. ACPI gives the operating system complete control over the computer's power management. For more information about ACPI BIOSes, see Chapter 3, "Configuring Hardware." Windows 2000 Professional also includes support for legacy mobile computers that don't have ACPI BIOSes. It supports hibernation, suspend and resume via the APM BIOS, and basic battery-level reporting via the APM BIOS.
Configure battery-management policy and other power-management features in the Power Options Properties dialog box (see Figure 13.3). To open this dialog box, double-click the Power Options icon in Control Panel. Here's a description of each tab:
Power Schemes . Choose or create power schemes that determine how long the computer must remain idle before changing the monitor or hard disk's power state, and before the operating system suspends the computer.
Advanced . Select whether to display the power status on the taskbar and whether the operating system prompts you for a password when the computer resumes.
Hibernate . Enable or disable hibernation. When the computer hibernates, it stores everything in memory to disk and then shuts down. When you turn on the computer, the computer restores its previous state. This feature requires an amount of disk space equivalent to the amount of RAM to be available.
APM . If you don't have a computer with an ACPI BIOS, make sure you enable support for APM, which will provide some of the power-management functions that ACPI provides. Enabling APM allows the operating system to suspend the computer.