
Microsoft Windows 2000 Professional comes with Microsoft Internet Explorer 5, and you're already familiar with this Web browser. Because it's been around awhile and you're already familiar with it, I'm not going to cover any of its features in this chapter. This chapter deals with issues that you might not be aware of, as well as how to connect your computer to the Internet. In particular, Windows 2000 Professional's dial-up networking features have significantly different user interfaces than Microsoft Windows 98 or Microsoft Windows NT Workstation 4.0. The result is easier connections.
You can connect to the Internet via a dial-up connection or a network connection, which are more popular these days due to the proliferation of cable modems and DSL. Most power users, particularly home users, aren't terribly familiar with how to connect their computers to a network, so they rely on their installers to do the task for them. This isn't always a good idea because the installers tend to want to install their own software on your computer, and very often they make a mess out of your settings. You don't always know whether they've done the job right or not, but the first time a different Web browser pops up, you type a URL in the Run dialog box, or when you notice that your connection isn't quite as fast as a neighbor's, you'll immediately suspect that the installer messed up.
Another problem the knowledge in this chapter helps to solve is when you want to connect multiple computers to the Internet via a single cable modem or DSL. Most services, including the cable modem service that I use, prohibit using a proxy server to connect multiple computers to the Internet via a single cable modem. They see unrealized revenues. This chapter does show you how to get around this problem, but don't tell anyone I told you.
To create an Internet connection, use the Internet Properties dialog box. Double-click the Internet Options icon in Control Panel to open it and then click the Connections tab. Also, you can click Internet Options on Internet Explorer's Tools menu or click Properties on the Internet Explorer icon you see on the desktop. Figure 14.1 shows what the Connections tab looks like. You configure dial-up connections in the top portion and network connections in the bottom portion.

Figure 14.1. Manage your Internet connections via the Connections tab of the Internet Options dialog box.
The simplest way to create a dial-up connection is by using Internet Connection Wizard. The first time you start Internet Explorer, Outlook Express, or any other Internet tool that comes with Windows 2000 Professional, the operating system automatically starts Internet Connection Wizard. You can start the wizard yourself by clicking Setup on the Internet Properties dialog box's Connections tab. After you start the wizard, do one of the following:
To sign up for new Internet service, click I want to sign up for a new Internet account.
To use an existing dial-up connection, click I want to transfer my existing Internet account to this computer. You will require the information that your Internet service provider gave you, including the telephone number, domain name server addresses, your IP address (if any), and so on.
To configure your account yourself, as when you're connecting to the Internet via a network, click I want to set up my Internet connection manually. Using this option, you must configure each aspect of your Internet connection, including the address of your proxy server if you're using one.
The wizard closes by asking you if you want to create an e-mail account in Microsoft Outlook Express. If you don't want to use Outlook Express, click No when it asks if you want to set one up.
In the middle of the Internet Properties dialog box is the Dial-up settings area. The connections you see in this area are the same connections you see in the Network and Dial-Up Connections folder, except for the Local Area Connection icons. Clicking Add displays first, third, and fifth options of Network Connection Wizard: Dial-up to private network, Connect to a private network through the Internet, and Connect directly to another computer. What's missing, oddly enough, is Dial-up to the Internet, but you can create Internet connections using Dial-up to private network.
Here's how to manually create an Internet connection:
In Control Panel, double-click the Internet Options icon and then click the Connections tab.
In the Dial-up settings area, click Add, click Dial-up to private network, and then click Next.
To use dialing rules, which allow you to control the way Windows 2000 Professional treats different area codes and prefixes, select the Use dialing rules check box. In Area code, type your ISP's area code; in Phone number, type its phone number. If you don't use dialing rules, type the phone number you want to dial, including the area code if necessary, in Phone Number.
Click Next, and do one of the following:
Click Next and type a name for this connection. This is the name that you'll see in the Network and Dial-up Connections folder and the Connections tab of the Internet Options dialog box.
Click Finish and then customize your connection in the Dial-up Connection Settings dialog box (the information required varies between ISPs):
When connecting to an ISP via a dial-up connection, you should have no reason to configure a proxy server. Therefore, for this type of connection, leave the settings in the Automatic configuration and Proxy server areas alone.
In the Dial-up settings area, type the credentials required to log on to the ISP. In most cases, you don't provide a domain.
Click Properties to choose the modem you want to use, edit dialing rules, configure the connections security options, and set up Internet Connection Sharing, which you learn about later in this chapter.
See Also
Chapter 13, "Using Mobile Computers," for more information about connecting to a private network over the Internet (virtual private networking).
If your network is already connected to the Internet, you can access the Internet through that network. There are two ways to do this:
Install a proxy client, which you must do if you want the largest variety of Internet programs to work properly. Many different proxy servers are available on the market, so the instructions for installing each are a bit different. If you suspect that your network is using Microsoft Proxy Server, look for a share called Proxy on the server. This share usually contains the installation point for the proxy client.
Configure Windows 2000 Professional to use a proxy server using Control Panel, which allows Internet Explorer and Outlook Express to work via a proxy server without requiring you to first install a proxy client, but some applications won't. Although this is the simplest way to connect to the Internet through a proxy server, it is also the least flexible.
Here's how to configure Internet Explorer to connect to the Internet through a proxy server:
In Control Panel, double-click the Internet Options icon and then click the Connections tab.
Click LAN Settings, and you see the dialog box shown in Figure 14.2.
To allow Internet Explorer to automatically detect your proxy server and configure itself appropriately, select the Automatically detect settings check box. Note that selecting this check box causes Internet Explorer to take a bit longer to load Web pages than using a manual configuration.
To manually configure your proxy settings, select the Use a proxy server check box and then type the address of the proxy server, either a name or an IP address, in Address; and type the proxy server's port number in Port. If you want to configure a different address for each protocol (HTTP, Secure, FTP, Gopher, and Socks) or if you want to specify addresses for which you don't want Internet Explorer to use a proxy server, click Advanced.

Figure 14.2. If you don't know your proxy server's address for certain, just select the Automatically detect settings check box.
See Also
Chapter 12, "Networking Your Computer," for more information about connecting to networks.
When using a cable modem, you install a network adapter, as described in Chapter 12, "Networking Your Computer." Actually, in most cases, your service provider installs the adapter for you. Windows 2000 Professional installs the basic networking components required for connecting to a Microsoft network or the Internet. The components it installs are the Client for Microsoft Network, File and Printer Sharing for Microsoft Networks, and Internet Protocol (TCP/IP). In actuality, the only component that you must have to connect your computer to the Internet is Internet Protocol (TCP/IP). And you must make sure that it's configured correctly:
In Control Panel, double-click the Network and Dial-up Connections icon and then click Properties on the icon corresponding to the network adapter's shortcut menu you use to connect to the ISP.
In the Local Area Connection Properties dialog box, deselect the Client for Microsoft Networks check box and the File and Printer Sharing for Microsoft Networks check box, unless your ISP tells you to do otherwise.
Double-click Internet Protocol (TCP/IP), click Use the following IP address, click Use the following DNS server addresses, and then click Advanced.
On the IP Settings tab, click Add to add the IP address and subnet mask that your ISP assigned to you, and click Add (in the Default gateways area) to add the default gateway that your ISP gave you. Not all cable modem or DSL providers give you a gateway, but most do.
On the DNS tab, click Add to add the DNS server addresses that your cable modem or DSL provider gave you. You should have two addresses. Also, cable modem providers usually give you a domain suffix, which is nothing more than a suffix that TCP/IP adds to the end of addresses when it can't find the address in the DNS database. Click Append these DNS suffixes, click Add, and type the suffix that your cable modem provider gave you.
After you properly configure your TCP/IP connection and restart your computer, if required, you should be able to open a Web page in your browser. The next section, "Sharing Connections," shows you how to use Internet Connection Sharing to do just that.
Internet Connection Sharing, a new feature in Windows 2000 Professional, helps you share Internet connections on a small peer-to-peer network. You can use it to share a regular dial-up connection, however. This assumes that you have a properly configured network and you want to share one of the computer's Internet connections with the other computers on that network:
In Control Panel, double-click the Network and Dial-Up Connections icon, click Properties on the connection's icon that you want to share, and then click the Sharing tab.
On the Sharing tab, shown in Figure 14.3, select the Enable Internet Connection Sharing for this connection check box and make sure you select the Enable on-demand dialing check box if you want it to automatically dial any time a client tries to access the Internet using that connection.
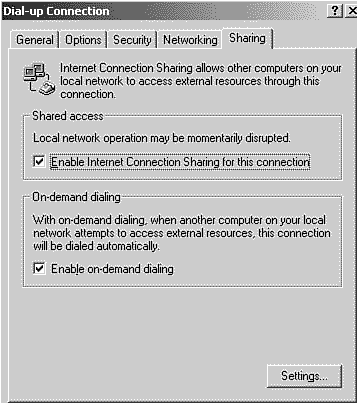
Figure 14.3. Internet Explorer and Outlook Express work properly with Internet Connection Sharing with changing other settings.
Here are some additional notes about using Internet Connection Sharing:
You must log on to the computer as an Administrator to share a connection.
Don't use Internet Connection Sharing on any network that uses static IP addresses. Each computer must use dynamic IP addresses. In Windows 2000 Professional, here's how you configure TCP/IP to use dynamic IP addresses:
In Control Panel, double-click the Network and Dial-up Connections icon and then click Properties on the Local Area Connection icon's shortcut menu.
Double-click Internet Protocol (TCP/IP) and then click Obtain an IP address automatically.
Internet Connection Sharing uses a block of private IP addresses that begins with 192.168.0.1; thus, make sure that you haven't assigned this address as a static address to any client.
Some programs won't work properly until you add them. On the Sharing tab of the connection's dialog box, click Settings. Add the ports that an application requires by clicking Add on the Internet Connection Sharing Settings dialog box's Applications tab.
Other network clients can't access the Internet while you're using a virtual private network connection on the computer that's sharing the connection.
You can't change the network configuration that Internet Connection Sharing uses. For example, you can't change the range of IP addresses that it uses, enable or disable DNS, or change mappings.