
Microsoft Windows 98 gives users ample choices of hardware. Two reasons are the market's expectations and its size. The market, of course, contains consumers who use computers not for business, but at home. They play games, they use the Internet, and they entertain their children. They expect the operating system to support a plethora of devices, and Microsoft delivers. Because the market is so large, independent hardware vendors tend to focus first on Windows 98 device drivers and frequently neglect other business-oriented operating systems. And Microsoft made device drivers easy to develop for Windows 98 versus its other operating systems, providing further impetus for independent hardware vendors (IHVs) to focus their efforts on Windows 98.
Contrast that with Microsoft Windows NT Workstation 4.0, which is undeniably better suited to business than home entertainment. Businesses have simpler requirements: network-connected computers that support the devices users require for doing their jobs: displays, keyboards, pointing devices, and so on. Seldom does that mean they need the latest 3D gaming card. And recent demand isn't for hand-numbing joysticks, it's for devices that have practical business uses and more instrumentation built into already existing devices. Add on top of low demand for oddball devices the fact that device drivers are harder to build for Windows NT Workstation 4.0. The operating system's best features, stability and security, prevent IHVs from realistically developing device drivers for some classes, particularly when they'd be servicing a market so small as to make the venture unprofitable.
Microsoft Windows 2000 Professional straddles the line somewhere between Windows 98 and Windows NT Workstation 4.0. In fact, this is one of the media's favorite targets when criticizing Microsoft; they say that in trying to be all things to all people, Microsoft has made a product that's not fit for home or business. Regardless, Windows 2000 Professional supports many more device classes and many more devices than Windows NT workstation 4.0 does. In rough terms, the operating system supports more than 6,500 devices, including 65 percent more legacy devices such as printers, scanners, and digital cameras. Broad support like this is due mostly to architectural changes to the operating system. A new driver model, Win32 driver model, makes it possible for IHVs that once limited themselves to Windows 98 to develop device drivers that work in Windows 98 and Windows 2000 Professional. And servicing both markets with one bang means that users are likely to see more device drivers for Windows 2000 Professional. Plug and Play, appearing for the first time in an operating system based on NT technology, allows users to install devices easily. Windows 2000 Professional is still a business-oriented operating system, but now it supports the hardware that home users want to use.
This chapter describes Windows 2000 Professional's new hardware features. It covers obvious topics such as how to install new devices and how to configure them, yes. Most of this chapter covers less-obvious topics, however, such as troubleshooting and how to pick a computer that works well with Microsoft's latest desktop operating system. As with many topics, exceptions are more frustrating than the rules, so this chapter focuses on exceptions. For example, one of the most troubling issues for new users installing Windows 2000 Professional for the first time is BIOS compatibility. This chapter addresses this issue in great detail.
In an ideal world, you'd use nothing but Plug and Play devices that are on the hardware compatibility list and would therefore have little maintenance. Windows 2000 Professional automatically recognizes and configures Plug and Play devices. How you install a Plug and Play device depends on its type, though. Internal devices, such as video adapters, require that you shut down the computer before you install them. Install the device and then restart the computer. To install external devices, such as those you connect to USB ports or those that you insert in PC Card slots, plug in the device. An exception is SCSI devices, which usually require you to turn off the computer so you can set the device's SCSI ID, attach the device to the bus, and properly terminate the bus before restarting the computer. In all cases, when you restart the computer, the operating system recognizes new devices, starts the Found New Hardware wizard, configures the devices, and prompts you for device drivers only if it doesn't find them on the computer.
The goal is a computer that's maintenance-free. You don't want to juggle resources between devices or troubleshoot hardware that doesn't work. To that end, the best advice I can give you is not to mix Plug and Play and legacy ISA devices. Doing so minimizes the operating system's capability to configure the computer's hardware correctly. The reason is that legacy devices, which you must manually configure using jumpers and switches, don't report to the operating system the resources they're using. The operating system often allocates those same resources to Plug and Play devices, causing resource conflicts that are time-consuming and frustrating to repair. For example, if you use a legacy network adapter and set its jumpers so it uses IRQ 7, the operating system is likely to cause a conflict by assigning IRQ 7 to a Plug and Play device because it doesn't know that the IRQ is allocated. The symptom is usually that your network connection doesn't work, but these problems can cause the operating system to fail. At home and in some shops, people are still stuck with legacy devices, though. If you must use legacy devices, here's the best way to install them:
Remove all legacy (ISA) devices from the computer.
Install and configure Windows 2000 Professional, making sure that all devices work properly and the operating system allocated resources to them.
Determine what resources are available, and then make a note of the resources you want to allocate to each legacy device. Do one of the following:
In Device Manager, on the View menu, click Resources by type and then note resources that are available under each type. Figure 3.1 is an example, showing which devices are using which resources. To open Device Manager, in Control Panel, double-click the Administrative Tools icon, double-click the Computer Management icon, and then click Device Manager.
In Computer Management, in the tree pane, double-click System Tools, double-click the System Information, and then click Hardware Resources. Examine each node to see what resources are available.
Reconfigure each legacy device using the resource you allocated to it in the previous step, and then install the device in your computer.
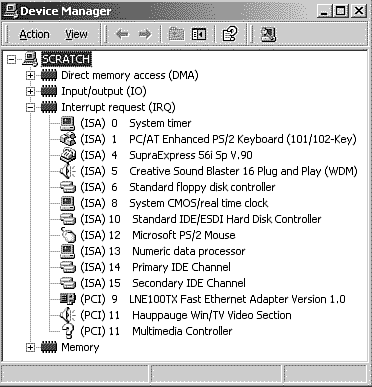
Figure 3.1. There are some resources that you should never allocate. Those include IRQ 2 and IRQ 9 on ACPI-based computers.
You might require some legacy ISA devices in order to install Windows 2000 Professional. If you're installing the operating system from a network, for example, and you use a legacy network adapter, you must install the adapter before running the setup program. In those cases, note the resources that you've configured those devices to use and then use the computer's BIOS setup utility to reserve them for legacy ISA devices. To reserve resources on computers containing an Award BIOS, choose PNP/PCI CONFIGURATION from the BIOS setup utility's main menu, change Resources Controlled By to Manual, and then indicate each resource that you want to reserve by changing it to Legacy ISA. Reserving resources using other BIOSes is a similar process. The operating system won't allocate those resources to Plug and Play devices because the BIOS reserves them for legacy devices. Even after all this, the operating system probably won't recognize the device, so you'll have to install it manually, which you will learn how to do in the next section, "Installing."
Note
Device Manager, by default, does not show non-Plug and Play device drivers. To view them, on the View menu, click Show Hidden Devices and then double-click Non-Plug and Play Drivers. Not only do you see non-Plug and Play device drivers, but you see legacy software drivers, too. Device Manager allows you to start and stop each device driver and change its startup type: automatic, boot, demand, system, and disabled.
Just because a device isn't working, don't automatically assume that the operating system didn't recognize the device and then set off installing it manually. If the operating system finds a Plug and Play device but can't find a device driver for it, the operating system still recognizes it but can't enable the device. The easiest way to get this device working is by using Device Manager to install its device driver, which presumably came on a disk with the device (or you must get it from the device's manufacturer). In Device Manager, double-click the device and then click Update Driver on the Driver tab. You can also use the Add/Remove Hardware Wizard to troubleshoot the device: In Control Panel, double-click the Add/Remove Hardware icon, click Next, click Add/Troubleshoot a device, and then follow the instructions you see on the screen. This gives you the opportunity to enable the device by starting the Updated Device Driver wizard.
If Windows 2000 Professional does not automatically detect and configure a device, and the device isn't already listed in Device Manager, it's probably a legacy ISA device. You must manually install these devices using the Add/ Remove Hardware Wizard. In Control Panel, double-click the Add/Remove Hardware icon and follow the instructions you see onscreen. The wizard displays a list of devices that are installed. But because a legacy ISA device isn't likely to be in this list, you want to add a new device and select the device from a list or provide third-party device drivers that you have on a disk. The operating system does provide drivers for many legacy devices and just might be your only source for them because some IHVs aren't updating older device drivers for Microsoft's latest and greatest operating system.
Tip
You can force Device Manager to rescan the computer for hardware changes. On the Action menu, click Rescan for hardware changes.
Device Manager and the Add/Remove Hardware Wizard are the two primary user interfaces you use to configure and troubleshoot hardware. Both require that you log on to the computer as an administrator, but you can use Device Manager to view your computer's configuration otherwise. Use Device Manager to manually set devices' resources and do some unguided troubleshooting. This is the tool for power users because they tend to know more about hardware and how Plug and Play allocates resources to devices. Use the Add/Remove Hardware Wizard to do the same, but with more guidance from the operating system and also to install new hardware that the operating system didn't detect automatically. Both are equally useful for removing hardware, which you learn about in the next section, but Device Manager is the quickest route.
The fact that I've included a section about removing hardware must indicate that there's more to it than you might imagine. Yes and no. Although in almost all cases, you simply unplug the device, you should realize that Windows 2000 Professional does not uninstall the device driver or any services associated with it. Device drivers remain fully installed, but the operating system doesn't start them if the device is missing from the computer. Services still start, however, and they tend to display errors and log errors in the event log if their corresponding device drivers aren't running. Thus, the only way to permanently remove a device is by using Device Manager or the Add/Remove Hardware Wizard.
To remove a device, do one of the following:
In Device Manager, double-click the device you want to remove; and on the Driver tab, click Uninstall. Follow the instructions.
In Control Panel, double-click the Add/Remove Hardware icon, click Next, click Uninstall/Unplug a device, click Next, and click Uninstall a device. Follow the instructions.
The order in which you remove a device and remove its device drivers is important. Windows 2000 Professional doesn't load a device driver if the device is missing from the computer's current configuration. That also means that the device driver doesn't show up in Device Manager and isn't available for removal. Thus, remove the device driver before removing the device from the computer. Also, make sure that you remove the device from the computer before restarting the computer again, so you can prevent the operating system from detecting the device again and reinstalling its device driver.
Caution
You can remove most hot-pluggable devices while the computer is running. Keep in mind that some devices require you to use the Add/Remove Hardware Wizard before removing them, however, because the operating system needs a chance to flush any cached data and close any connections to the device. If in doubt, check the device's documentation to see if removing a hot-pluggable device without using the Add/Remove Hardware Wizard might cause data loss. Never remove any hot-pluggable storage device without using the Add/Remove Hardware Wizard, however, because doing so will almost certainly lead to damage.
Unplugging devices is different from removing them. Windows 2000 Professional doesn't uninstall their device drivers, ensuring that they're ready to go the next time you plug them in to the computer. For most devices, you simply eject or unplug the device, and the operating system automatically detects that you've unplugged the device and reconfigures the computer accordingly. Some devices, however, particularly storage devices, require a user interface to unplug or eject them, making it safe to remove the device without losing data by flushing cached data and closing connections to it. The user interface merely shuts down the device nicely.
To unplug a device, do one of the following:
In Control Panel, double-click the Add/Remove Hardware icon, click Next, click Uninstall/Unplug a device, click Next, and click Unplug/Eject a device. Follow the instructions.
In the taskbar, double-click the Unplug/Eject icon. Windows 2000 Professional automatically adds this icon when your computer has PC Card slots or if you select the Show Unplug/Eject icon on the taskbar icon in the Add/New Hardware Wizard.
Ejecting or unplugging portable computers from docking stations is a bit different. On the Start menu, click Eject PC and then wait until you see a message that says undocking your computer is safe. Of course, you won't see this command on the Start menu if you're not actually using a docking station, and Windows 2000 Professional seems a little picky about the portable computers for which it displays it. Rumor has it that you can force the operating system to display this command by removing the portable computer from Device Manager, however.
Windows 2000 Professional supports both ACPI and APM BIOSes, although its support for ACPI is more complete and more robust than its support for APM. Some BIOSes, ACPI and APM, are not compatible with the operating system, however. The most notable problems are with ACPI BIOSes because the technology is new relative to APM, and many IHVs failed to design their computers to be 100 percent compatible with the ACPI specifications.
Problems run the gamut between not being able to install Windows 2000 Professional at all to blue screens of death (BSOD) popping up from time to time. The former is more menacing than the latter, no matter how frustrated you get while trying to install the operating system. Worse is that some ACPI-based systemboards have such huge problems that you must actually return them to the manufacturer so they can rework them in order to work properly with the operating system's ACPI hardware abstraction layer (HAL). For example, in order to use certain versions of ASUS dual-processor systemboards with the ACPI HAL, you must return them to the distributor so that ASUS can rework them. This actually involves moving a resistor from one location on the systemboard to another (are you handy with a soldering iron?). Fortunately, most users get off with nothing more than BIOS upgrades. And, in most cases, even if the computer doesn't work with the ACPI HAL, you can install Windows 2000 Professional with the APM HAL, and everything works handily.
Which leads me to the fact that Windows 2000 Professional maintains a list of compatible BIOSes. When the setup program detects that you're installing the operating system on a computer with a good ACPI BIOS, it installs the ACPI HAL. When it doesn't find the BIOS in the good BIOS list, it installs the APM HAL. The good BIOS list, which you learn more about in the following section, does a good job of catching most problems In my tests, however, it didn't identify the ASUS dual-processor systemboard as having an incompatible ACPI BIOS. This prevented the operating system from installing properly and required me to manually install the APM HAL during installation.
Figure 3.2 shows how the Setup program checks to see whether an ACPI BIOS is compatible with Windows 2000 Professional. The good and bad BIOS lists that you read about in these steps is in Txtsetup.inf, which is located in the i386 from which you installed the operating system:
The Setup program checks the bad BIOS list. If the version number of the current BIOS is newer than the version number in the list, the Setup program installs the ACPI HAL; otherwise, it installs the legacy APM HAL. The bad BIOS list is the section
[NWACL], which contains an item for each BIOS that indicates another section containing more specific information about the BIOS. Examine this table if you're unclear about why the Setup program is not installing the ACPI HAL.The Setup program examines the date of the BIOS. If it's a recent BIOS (newer than 1/1/99), the Setup program assumes that it's a good BIOS list (it's already checked the bad BIOS list), and installs the ACPI HAL.
The Setup program did not find the BIOS on the bad BIOS list and it's an older BIOS, so the Setup program examines the good BIOS list to determine whether this older BIOS passed Microsoft's testing. The good BIOS list is in the section
[GoodACPIBios]and each item indicates another section that has more specific information about the BIOS other than just its name. You can examine this list to determine whether the Setup program will install the ACPI HAL prior to actually running it.
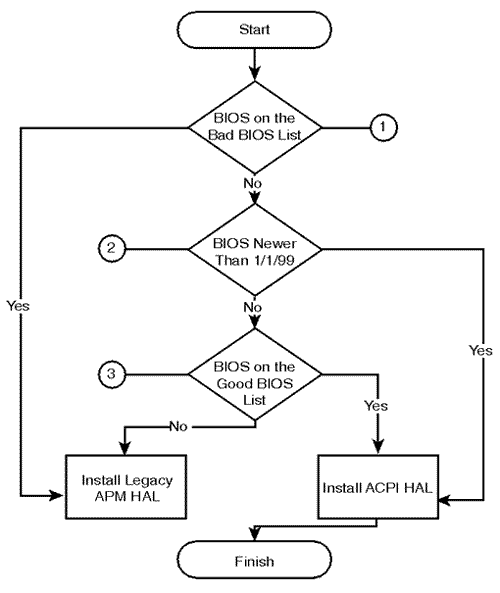
Figure 3.2. Microsoft assumes that any recent BIOS is compatible, even though that is not always true and causes problems.
BIOSes end up in the bad BIOS list when Microsoft finds that the BIOS doesn't work with Windows 2000 Professional or an IHV reports that its BIOS is not compatible with the operating system. The problems vary, but symptoms include hardware that doesn't work properly, an instable system that hangs frequently, or BSODs that cause data loss. Even though I show you how to override the bad BIOS list, doing this is not a good idea unless you're very sure that using the ACPI HAL with your BIOS is safe and won't cause you to lose any data. Microsoft provides no support in these cases, and you have to assume that the BIOS ended up on the list for a reason. Still, to force the setup program to accept your BIOS as a good BIOS and install the ACPI HAL, change ACPIEnable=2 to ACPIEnable=1. You must make this change at the installation point prior to installing the operating system, which implies that you are installing from a network share, a local folder, or a customized Windows 2000 Professional CD-ROM. As a result, the section [ACPIOptions] will look like this:
; [ACPIOptions]
; This section lists options that affect the installation of ACPI on x86
;
; ACPIEnable
;     0 - ACPI will be disabled at install time regardless of the BIOS
;     1 - ACPI will be enabled at install time if an ACPI BIOS is present
;     2 - ACPI will be enabled based on the GoodACPIBios list, the NWACL
;         and ACPIBiosDate
;
; ACPIBiosDate = mm,dd,yyyy
;     Supplies the date that a BIOS must have to be considered good if it is
;     not in the GoodACPIBios list. If a BIOS has a date greater than this and
;     is not in the NWACL list, then it will be used unless ACPIEnable = 0
;
[ACPIOptions]
ACPIEnable = 1
ACPIBiosDate = 01,01,1999
If you're ACPI BIOS is in the bad BIOS list or if it's older than 1/1/99 and not in the good BIOS list, you might gain ACPI functionality by upgrading your BIOS. The process is similar for any BIOS:
Download the BIOS update from the systemboard's manufacturer, not from the BIOS's manufacturer.
Unzip the disk to a bootable 3.5-inch disk.
Restart the computer and follow the instructions you see on the screen. Do not restart the computer while the flash software is updating the BIOS!
Caution
A few cautions are in order because human error while upgrading your BIOS can render your computer dead, requiring you to return it to the manufacturer for repair. First, if you're updating a portable computer's BIOS, make sure that you plug the computer into a power outlet. If the BIOS decides that the computer has been idle long enough and shuts down the computer before the upgrade process finishes, you might not be able to start the computer again. You might also make sure that you have configured the BIOS using the BIOS setup utility to shut down an idle computer, even if it's connected to a power source. If in doubt, tap one of the Shift keys every once in awhile to keep the computer awake. Second, and for the same reason, if you have a UPS available, attach it to your computer whether it's a portable or desktop computer, protecting the computer from power outages that could also render the computer useless. Finally, don't shut down the computer until the upgrade process is complete.
Most BIOS manufacturers don't offer upgrades anymore because systemboard vendors usually customize their BIOSes. Thus, you must go to the systemboard's manufacturer for an update. If you know the manufacturer's Web site, you can usually find BIOS updates quickly. If you don't know the systemboard's manufacturer, restart the computer and pay attention to the screen as it first starts. This screen will usually indicate the name of the manufacturer or, at the very least, the systemboard's version number, which can easily lead to a manufacturer. With a version in hand, I can usually track down the manufacturer by searching the Web using the version as the keyword.
To make upgrading your BIOS easier, Microsoft, Compaq, and Dell co-sponsor a Web site that makes it easier to locate BIOS upgrades: http://www.Hardware-Update.com. You must know your computer's manufacturer, make, and model in order to use this site. After providing this vital information to the site, it displays information about the update; the setup for updating your BIOS, tips and tricks; and (the most important thing of all) a link to the BIOS update itself. As of this writing, the following manufacturers offer updates via this Web site (the Web site is open to all manufacturers, so you can expect more to participate by the time you read this book):
The single biggest barrier to getting all of your hardware working properly is device driver compatibility. Windows 2000 Professional ships with thousands of drivers that do work well with the operating system, but so many devices don't yet have device drivers and don't work well with it. For example, at this writing, no device drivers are available for ATI TV cards, frustrating many users. To be fair, ATI does promise that it will make drivers available by the time the operating system ships, but those drivers aren't going to be available on the Windows 2000 Professional CD-ROM.
Compatibility is an issue for many reasons. Windows 2000 Professional introduces a new driver model, for example. The format of Setup Information (INF) files is different, forcing IHVs to update their products' INF files. New features such as Windows File Protection prevent some device drivers from installing properly because they can't overwrite protected system files. Still others refuse to install in Windows 2000 Professional because they don't like the operating system's version number. The way to get most devices working, particularly when you see that big yellow question mark and exclamation point in Device Driver, is to get updated device drivers. The best source is the device's manufacturer. Visit the Web site, and you can usually download device drivers.
Note
Microsoft online hardware compatibility list, http://www.microsoft.com/hcl, is the best way to verify whether a particular device works well with Windows 2000 Professional. It's worth much more than that, however. It's also the best source for finding updated device drivers. Look up a device and click it. You'll see a list of certification levels for each operating system that Microsoft sells and notes about using the device. Best of all, for each operating system, you'll find links to updated device drivers if they're available. Other Web sites are notorious for making beta device drivers available, and the two that I use most are Frank Condron's World O'Windows (http://www.worldowindows.com) and BetaOS.com (http://www.betaos.com). Both are good sources for device drivers that haven't yet made it on to Microsoft's online hardware compatibility list.
Note
Chapter 5, "Installing and Using Applications," to learn more about Windows File Protection.
If your difficulty is with the setup process, take a look at Chapter 2, "Troubleshooting Setup." The help you find in this chapter is specifically for troubleshooting hardware after you have successfully installed Windows 2000 Professional. Chapter 2 includes information about installing the APM HAL, for example.
Most problems reflect themselves in Device Manager. If devices aren't working properly, you see exclamation points next to them. Double-click the device and you'll see an error message and code in the Device Status area. Knowing what those codes really mean and what steps you should take in fixing them is key to fixing those problems. The following list shows the codes and their descriptions:
| 1 | Windows 2000 Professional did not find a suitable driver for the device. Make sure that Driver.cab is in SystemRootDriver Cachei386. If Driver.cab is present, the operating system doesn't provide a device driver and you must get one from the device's manufacturer. If updating the device driver doesn't remove this error, assume that the registry is corrupt and restore it. |
| 3 | Either the device driver is corrupt or does not have enough memory to work properly. Update the driver. If that doesn't help, verify that the computer has enough memory. |
| 10 | This is one of the most common errors; it indicates that the driver is incompatible with Windows 2000 Professional. Get an updated device driver from the manufacturer. A less common cause is a device that's actually damaged. |
| 12 | Windows 2000 Professional cannot allocate to the device the resources that it needs. The most common reason is that there simply aren't enough resources available, such as when you've used all the available IRQs. Often, shuffling resources around can fix this problem because some devices work only with specific ranges of resources, and changing another devices' resources might free theresources that the offending device wants. |
| 14 | You see this error when you haven't yet restarted the computer after installing a device that requires you to do so. Restarting the computer usually removes this error. |
| 16 | Windows 2000 Professional isn't communicating well with the device driver, and this is due to an incompatible device driver or failed hardware. Update the device driver and, if that doesn't resolve the error, replace the device. Even if the error message says that you should manually allocate resources to the device, don't do it. This action will limit the usefulness of Plug and Play. |
| 17 | This error code usually displays because of a bad device driver.Update the device driver. |
| 18 | If you upgraded to Windows 2000 Professional from an earlier versions of Windows, you might see this error if the Setup program couldn't replace the device driver with one that works in the new operating system. You might also see this message if you install a device, but can't install the device driver because you must log on to the computer as an administrator. In either case, do as the message suggests: Install a driver for the device. |
| 19 | This is a serious error, indicating that your registry might be corrupt. Removing and reinstalling the device might repair the problem. Otherwise, resource the Last Known Good Configuration, as described in Chapter 2, "Troubleshooting Setup." |
| 21 | Device Manager displays this error when you try to open a device that it's removing. Restarting the computer usually fixes it. |
| 22 | You manually disabled the device in the current hardware profile. Enable the device. |
| 24 | You usually see this error when using a bad device driver. Update the device driver. |
| 28 | Like many other errors, this one usually results from an incompatible device driver. Update the device driver. |
| 29 | This error message is a bit misleading. It usually means that you disabled the device in the BIOS, but the BIOS still reports the device to Windows 2000 Professional. To fix this problem, update the computer's BIOS. |
| 31 | A faulty device driver is the usual culprit. Contact the device's manufacturer to obtain a device driver that actually works. |
| 32 | A misleading error message that says a device driver is not required; this really indicates that the device driver depends on a service that is disabled. Enable the service. You can usually locate the service by checking the event log or by looking for services that seem to be related to the device. |
| 33 | This error code usually displays because of bad device driver. Update the device driver. |
| 34 | You see this error code as a result of using legacy ISA devices that don't report their settings to the operating system. Verify the devices settings and make sure that the settings on the Resources tab match them. |
| 35 | Your computer's BIOS requires an update. If an update isn't available, you won't be able to use this device. If the BIOS allows you to switch between MPS 1.1 and MPS 1.4, switch to MPS 1.4. (MPS is Microsoft Platforms Support.) |
| 36 | You reserved a resource for a legacy ISA device, but a PCI device is using it. Use the BIOS's setup utility to reconfigure the BIOS. If you find no fault with these settings, update the computer's BIOS. |