Chapter 6: Don’t Stop! Exploring Plugins and Resources That Will Keep You Going
Looking back, I realize how many new things we've been through. At the beginning of this book, Lottie was something you may have heard about but maybe you weren't sure what it was or how it worked, and now, just five chapters later, I'm sure you feel confident enough when talking about Lottie's environment, animations and After Effects (AE). You've learned about and experienced the benefits of creating animations with AE and LottieFiles, you are now familiar with Adobe AE, and are capable of ideating, sketching, creating, and exporting your own unique animations, and have had the chance to learn and experience a real user experience (UX) animation workflow on your own.
That said, this chapter is a handy guide to keep closer when animating, a place you can come back to any time you need to find new resources for your animations. In the following sections, you'll find the links and instructions to download and install all the necessary tools and plugins we need to create our animations so you don't get lost.
We will cover a list of what features are or are not supported for each platform and device with tips and tricks on how to avoid them. Remember what happened to our icon back in Chapter 5, Share It With the World: Working With LottieFiles? The sparks didn't work, right? So, keep this table at hand, as it will be very useful when creating our animations in AE.
We will go through a list of shortcuts that will help speed up your work and save you tons of time. And finally, we will give you enough resources so that you can keep learning on your own.
Let's move forward to the next section to install all the tools and plugins we need.
I'd like to share some tips and tricks that will help speed up your work and save you time. Also, I'd like to share the resources I normally use when ideating, drawing, or animating, which I'm sure will help you out when you are about to create your animations.
In this chapter, we are going to cover the following topics:
- Downloading and installing the necessary tools and plugins you'll need to create your animations
- Supported Lottie features for iOS, Android, and web
- Main AE shortcuts for Windows and Mac
- Resources that will help with the animation process
- Tutorials to keep growing your animation skills
Technical requirements
For this chapter, we won't need anything except your preferred browser.
Downloading and installing the necessary plugins and tools
Before we start creating our animations, we need some specific tools and plugins that need to be installed on our computers and mobile devices first. These tools are going to help us import, create, edit, and export our files to create Lottie animations.
As you may remember, we've already talked about these tools and plugins back in Chapter 1, Get Started With Lottie. In this section, we will guide you through the process of downloading and installing them so you are all set up and ready to start animating. Let's go then.
Downloading and installing Adobe AE
As we mentioned earlier in this book, Adobe AE is not a free tool. It is subscription-based software, and you must purchase it as part of an Adobe Creative Cloud subscription. However, remember that Adobe offers a 7-day free trial period so you can try before you buy.
For complete instructions on installing the software and system requirements, visit https://helpx.adobe.com/after-effects/using/setup-installation.html and follow the instructions, as shown in the following screenshot:
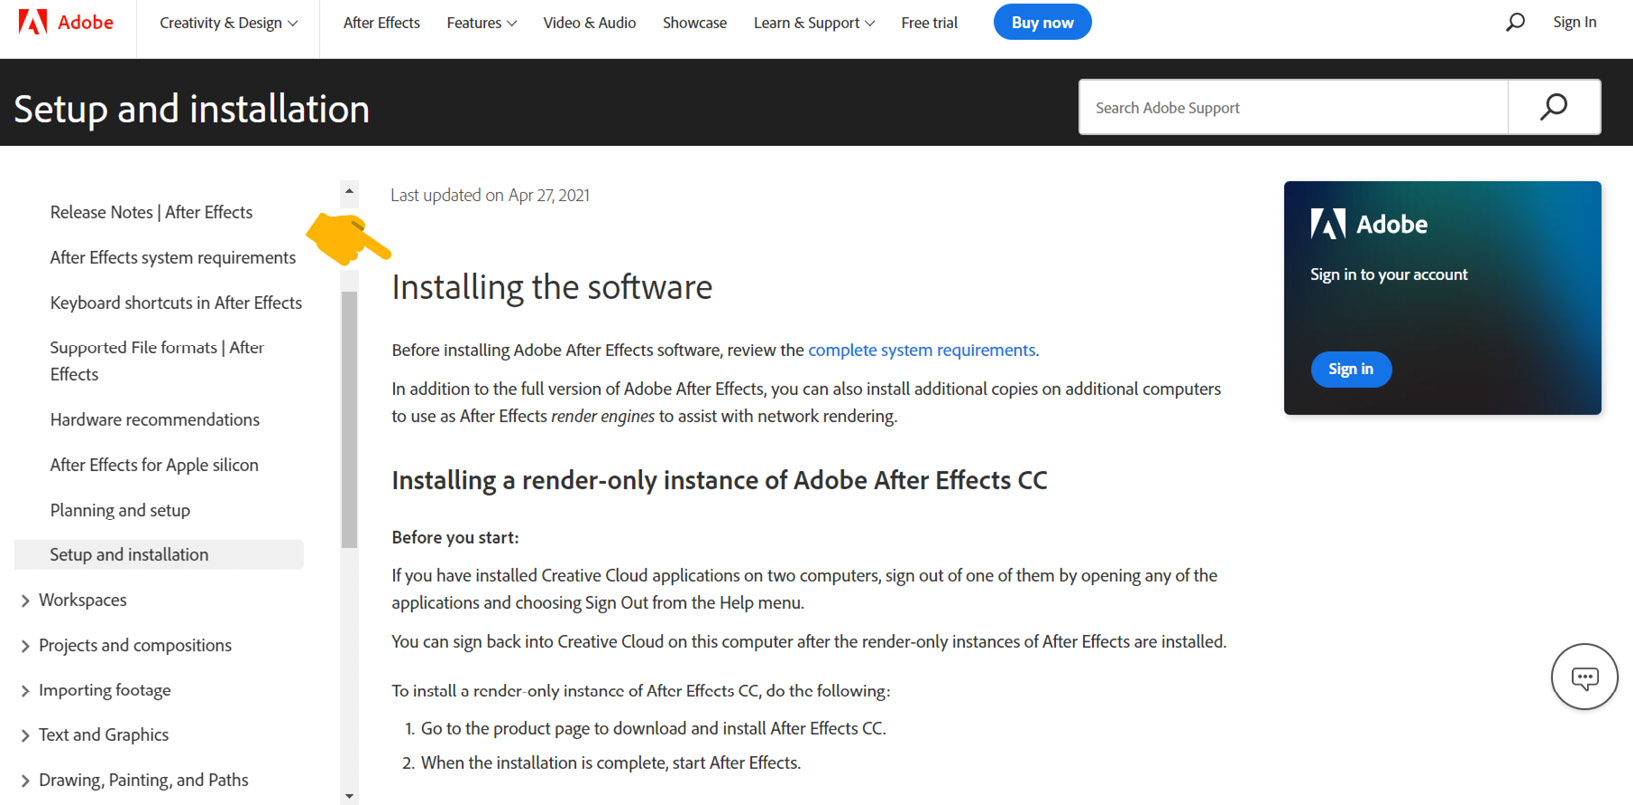
Figure 6.1 – Adobe AE user guide
Downloading and installing the Bodymovin plugin for AE
The Bodymovin plugin is very easy to install. Just follow these simple steps.
If you have a Creative Cloud subscription, follow these steps:
- Go to https://exchange.adobe.com/creativecloud.details.12557.bodymovin.html.
- Click on the Install Now button and follow the steps:
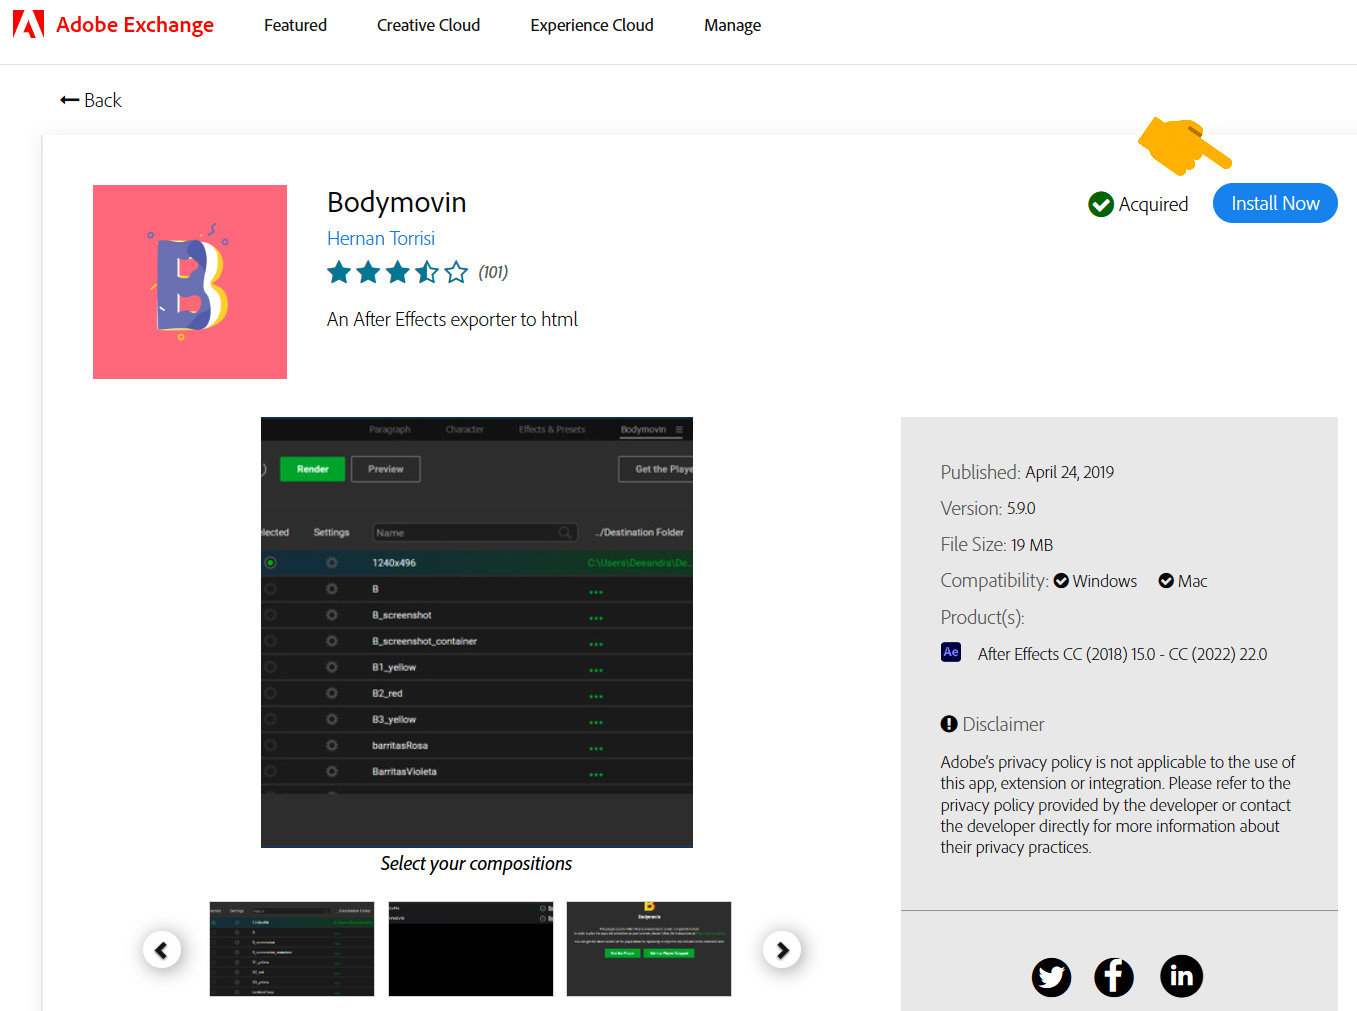
Figure 6.2 – Adobe Exchange platform – Bodymovin extension
If you don't have a Creative Cloud subscription, execute the following:
- Download the Bodymovin extension from https://aescripts.com/bodymovin/. Bear in mind that you'll need to create an account to do that.

Figure 6.3 – Downloading Bodymovin
- Download ZXP Installer (https://aescripts.com/learn/zxp-installer/) to install the plugin via Extension Manager:

Figure 6.4 – Downloading ZXP Installer
- Install and open ZXP installer aescripts + aeplugins zxp installer (setup) for macOS or Windows.
- Drag and drop bodymovin.zxp into the ZXP Installer window.
- Click Ok once the installation is successfully completed.
- Open Adobe After Effects.
- Go to the top navigation menu and click on Window | Extensions.
The recently installed Bodymovin extension should appear in the menu:

Figure 6.5 – Adobe AE Extensions window
Downloading and installing the LottieFiles plugin for AE
LottieFiles installation is very simple. If you have a Creative Cloud subscription, follow these steps:
- Go to https://lottiefiles.com/plugins/after-effects.
- Click on the VIA ADOBE EXCHANGE button:

Figure 6.6 – LottieFiles plugin via Adobe Exchange
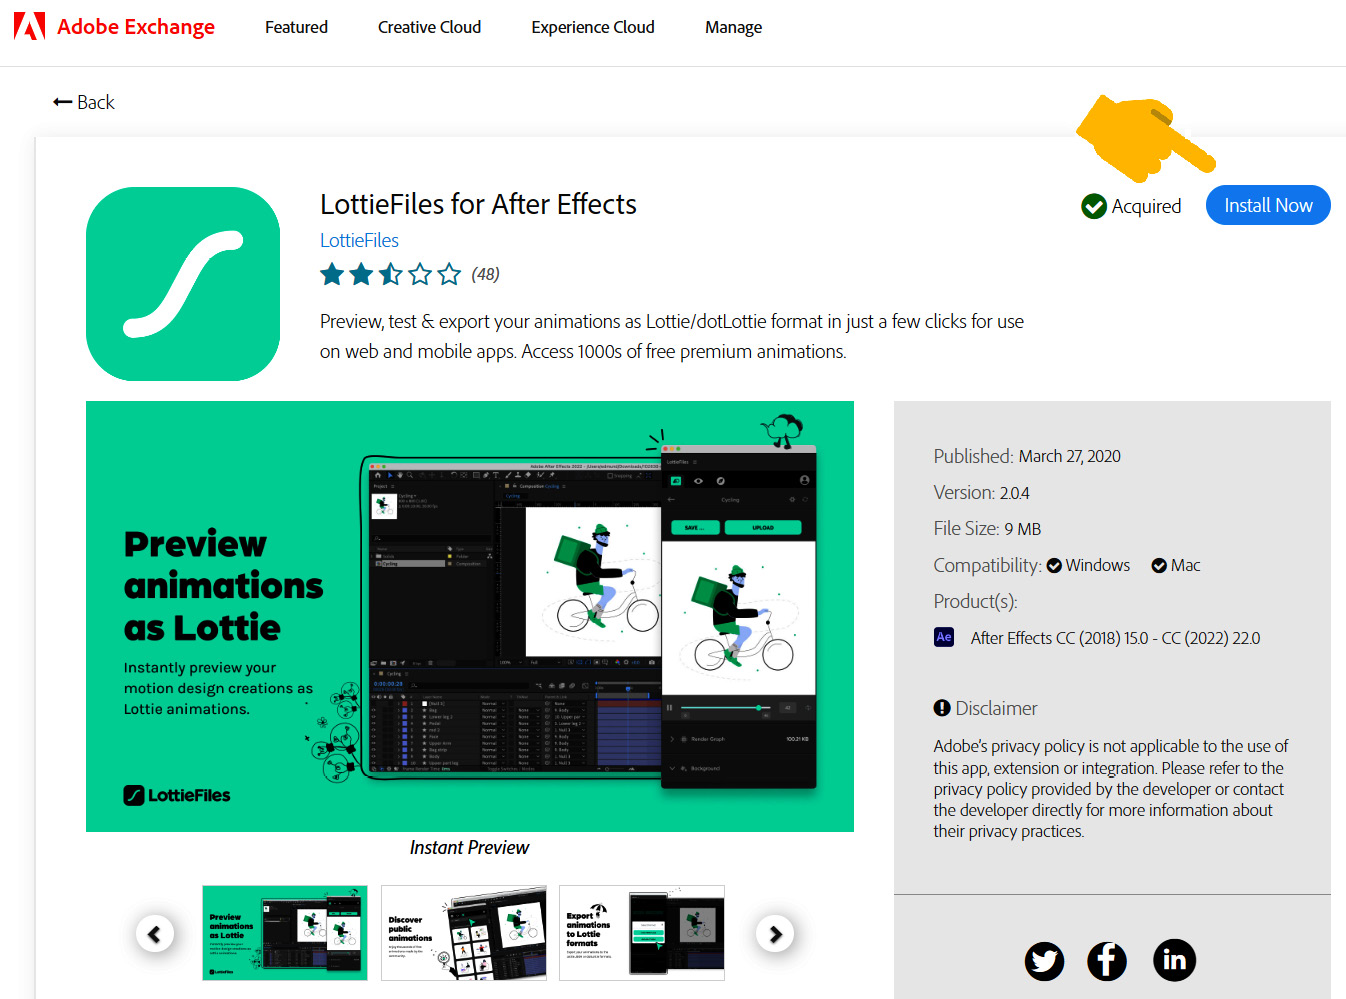
Figure 6.7 – Adobe Exchange platform – LottieFiles extension
If you don't have a Creative Cloud subscription, we will install the plugin using Extension Manager. To do that, execute the following steps:
- Go to https://aescripts.com/learn/zxp-installer/.
- Download ZXP Installer:

Figure 6.8 – ZXP Installer
- Go to https://lottiefiles.com/plugins/after-effects.
- Click on the DOWNLOAD PLUGIN (ZXP) button to install the plugin using Extension Manager:
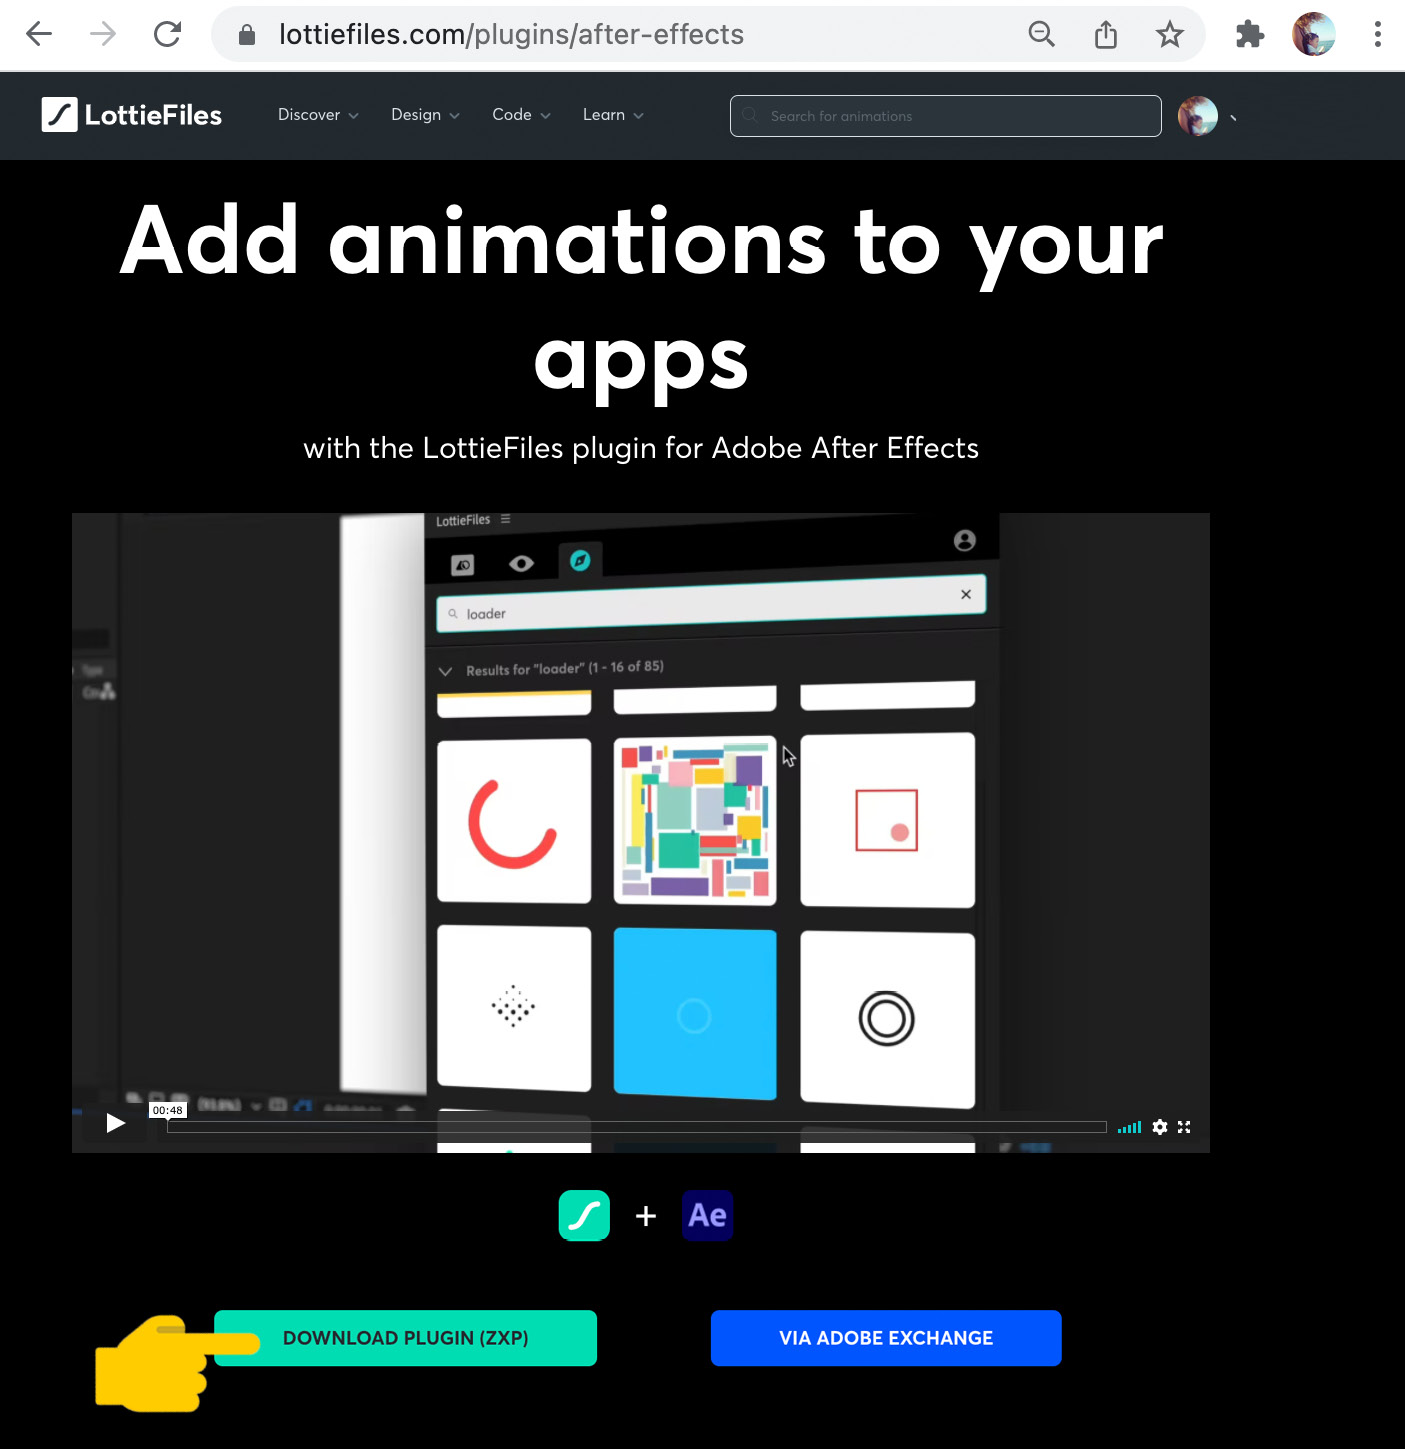
Figure 6.9 – LottieFiles plugin installing with ZXP Installer
- Install and open ZXP installer aescripts + aeplugins zxp installer (setup) for macOS or Windows.
- Drag and drop ae-plugin-0.1.20.zxp into the ZXP Installer window.
- Click the Ok button once the installation is successfully completed.
- Open Adobe After Effects.
- Go to the top navigation menu and click on Window | Extensions.
The recently installed LottieFiles plugin should appear in the menu:

Figure 6.10 – Adobe AE LottieFiles extension menu
Downloading and installing the AEUX plugin for Sketch and Figma
If we are using Sketch or Figma for our illustrations and designs, this plugin will become very handy once we have to export the files from Sketch or Figma to AE. So, if that's the case, let's install our plugins:
Installing ZXP Extension Manager
To install any of the AEUX plugins for Figma, Sketch, or AE, we need to install the ZXP Extension Manager first. So, if you haven't done that yet in the previous sections, here's how you do it:
- Go to https://aescripts.com/learn/zxp-installer/.
- Download ZXP Installer:
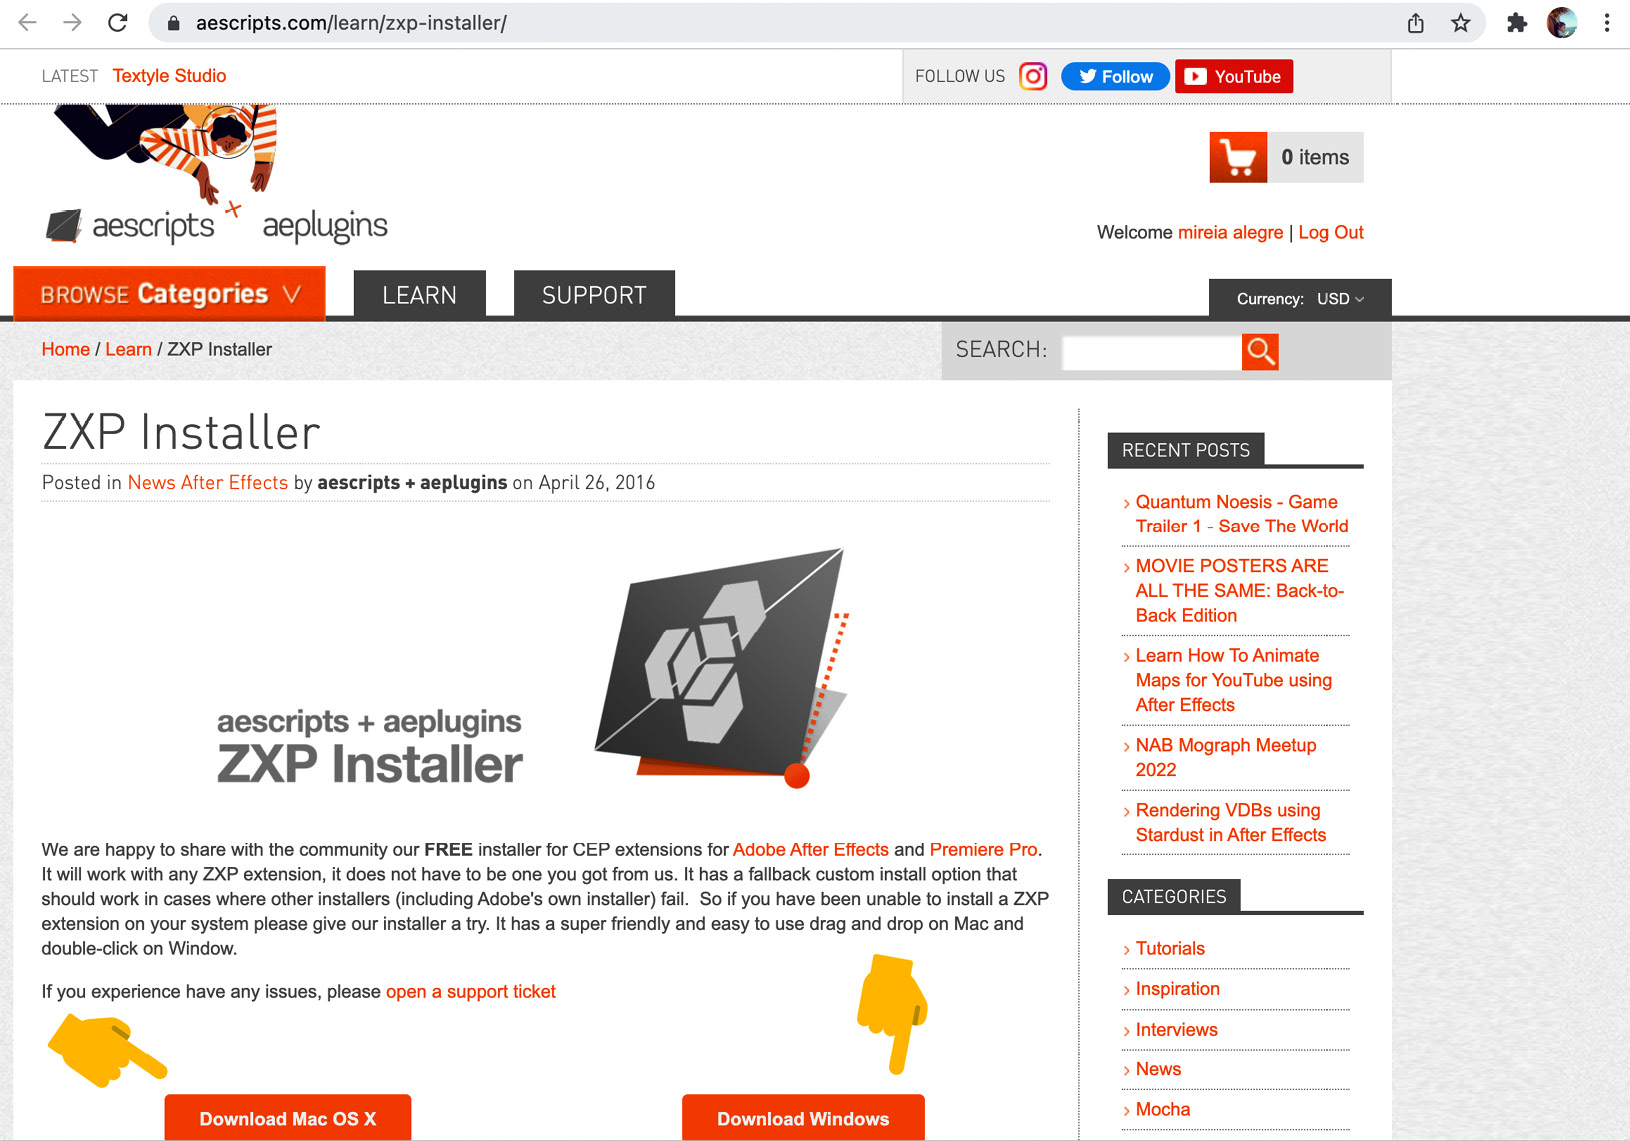
Figure 6.11 – ZXP Installer for macOS and Windows
- Install and open ZXP installer aescripts + aeplugins zxp installer (setup) for macOS or Windows.
Installing AEUX for Figma
Now that we've got the ZXP Extension Manager up and running, let's install AEUX for Figma. Installing AEUX for Figma can be a bit tricky, so I recommend you follow the instructions described on their support website. To do that, follow these steps:
- Download the AEUX for Figma plugin from https://aeux.io/guide/download.html#sketch-57-figma
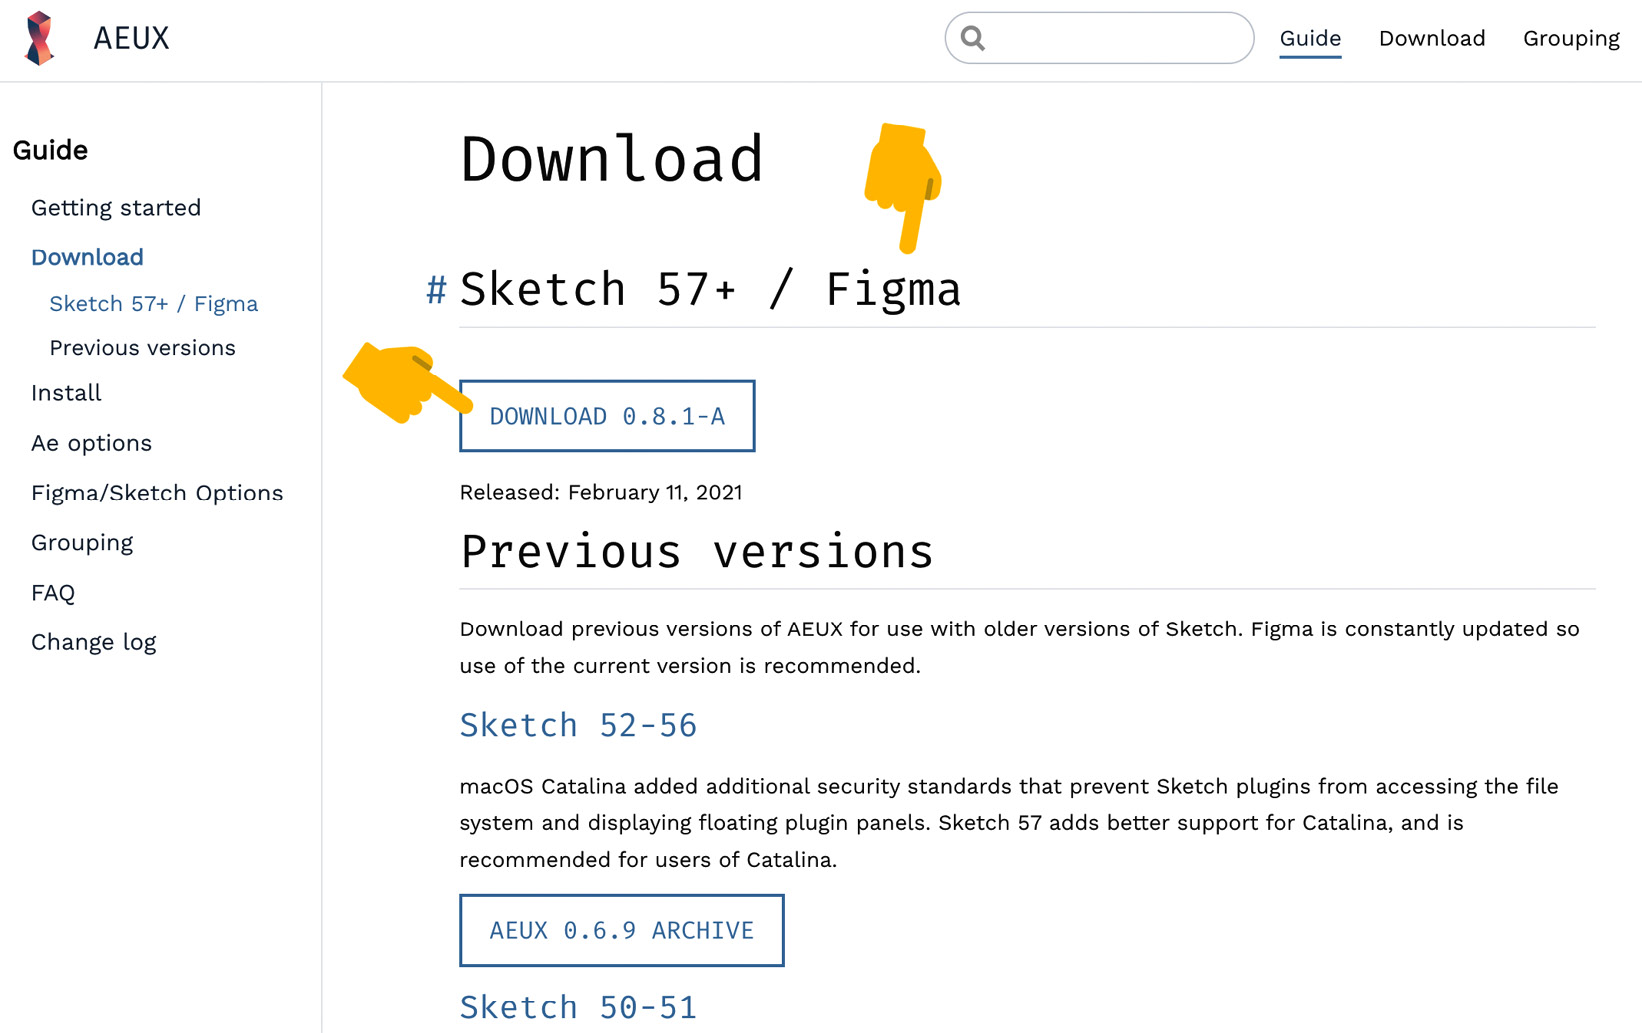
Figure 6.12 – AEUX download plugin for Figma and Sketch
- Go to https://aeux.io/guide/install.html#figma and follow the instructions to install the plugin:

Figure 6.13 – How to install the AEUX for Figma plugin
Installing AEUX for Sketch
After we have installed the ZXP Extension Manager, we are going to download and install AEUX for Sketch. Installing AEUX for Sketch is very easy, and This is how it is done:
- Download the AEUX for Sketch plugin from https://aeux.io/guide/download.html#sketch-57-figma:
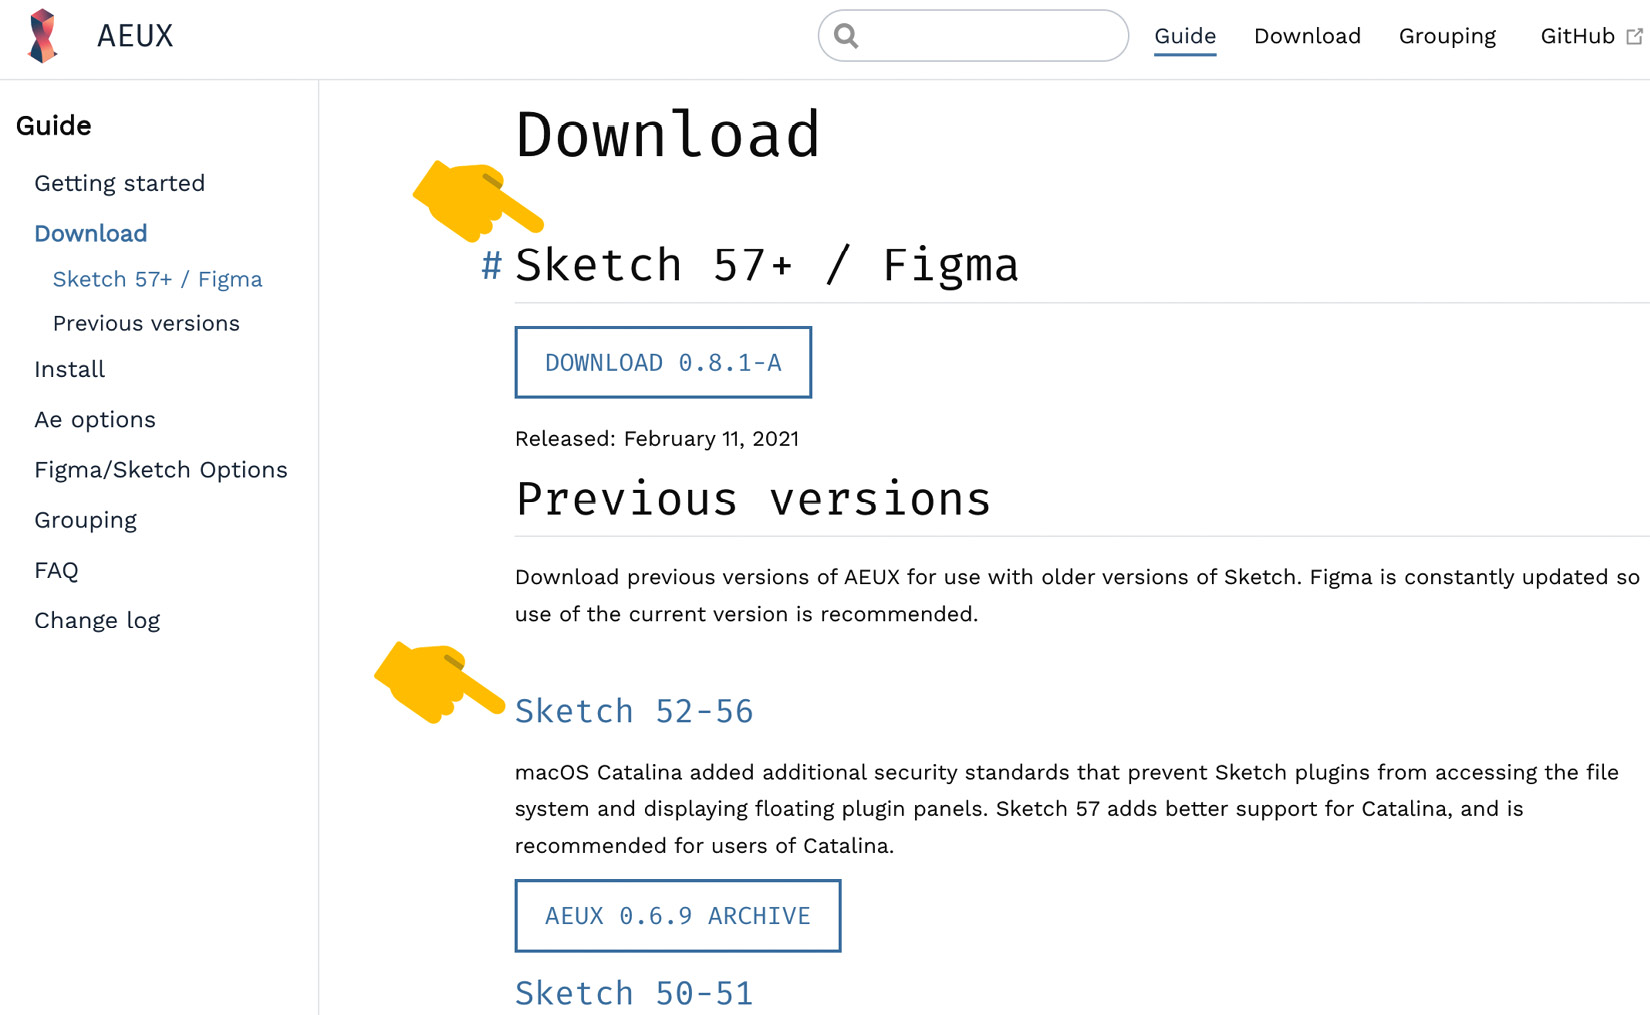
Figure 6.14 – How to install the AEUX for Sketch plugin
- Unzip AEUX_0.8.1-a.zip.
- Open the unzipped folder, AEUX_0.8.1-a/Sketch.
- Double-click to open AEUX.sketchplugin:
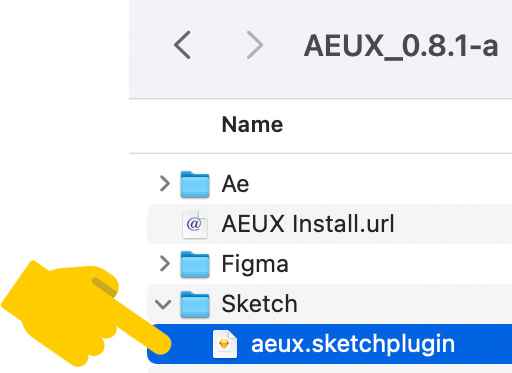
Figure 6.15 – AEUX Sketch plugin folder
Sketch will open and tell you once the plugin is installed:

Figure 6.16 – The AEUX for Sketch plugin successfully installed
AEUX plugin for AE
We also need to install the AEUX plugin for Adobe AE if we want to import our designs from Figma or Sketch to AE. We are going to use this plugin to define how our layers are imported.
We are assuming you already installed the ZXP Extension Manager earlier in this section, otherwise, jump back to the Installing the ZXP Extension Manager section and follow the instructions described there.
Now, let's install AEUX for Adobe AE, and to do that, follow the next steps:
- Look for the AEUX_0.8.1-a folder we downloaded when installing AEUX for Figma or Sketch.
- Open ZXP Extension Manager.
- Open AEUX_0.8.1-a/Ae:

Figure 6.17 – AEUX for AE plugin folder
- Drag and drop AEUX.zxp into the ZXP Installer window.
- Close and reopen AE.
- In AE, navigate to the top Window menu and select Extension | AEUX.
- Click to open the panel:

Figure 6.18 – AEUX for AE panel view
If this doesn't work, you can still try to install it manually. To do that, follow the instructions described at https://aeux.io/guide/install.html#after-effects.
Note – AEUX Plugin for AE
The main role of the AEUX plugin is to control how layers are built. We need to set the preferences and once that's done, there's no need to keep the panel open. So, our AE working area doesn't get too messy.
Before we start importing our files from Figma or Sketch, we can define some values here in the AEUX panel. As I mentioned earlier in this book, I normally work at 60 frames per second (fps) and turn the options in Detect parametric shapes and Precomp groups on. However, this is up to you and how you feel more comfortable working. If you want to get more information on this, just follow this link: https://aeux.io/guide/ae-options.html.
The LottieFiles platform
As you know by now, LottieFiles allows us to preview, test, and share our animations, among many other things such as edit animations, create stickers for Telegram, export our animations to GIF, or create animations from static SVGs, to mention a few.
If we want to test, edit, and share our animations on iOS, Android, and the web, we need to install a couple of tools. Just click on the following links to download the specific ones for each platform:
- LottieFiles for Desktop: https://lottiefiles.com/desktop
- LottieFiles for Android: https://play.google.com/store/apps/details?id=com.lottiefiles.app&hl=en&gl=US
- LottieFiles for iOS: https://apps.apple.com/us/app/lottiefiles/id1231821260
Supported Lottie features for iOS, Android, and the web
As we experienced a couple of chapters ago, Lottie does not support all features of Adobe AE. So, before we start creating our animations in AE, it is a good idea to have a look at the following tables if we want to avoid frustration and extra work. As we mentioned earlier, in this book, we are going to focus on iOS, Android, and web-supported features. However, you can check the following tables for supported features on Windows devices as well.
The simpler the better. It is good practice to keep our files tidy and create simple illustrations with single paths and fills. I recommend trying to avoid Boolean options directly in AE (we will see more about it in a minute), and the use of images, masks, and effects, as these features are not well supported on all devices. I also recommend creating animations that will work across all platforms and devices so that we don't need different .json files for each of them.
Shapes
Shapes are very well supported across all platforms. We can import our shapes from vector-based tools or create them directly in AE. We shouldn't have any problem when working with Ellipse, Rectangle, Rounded Rectangle, Star, Polygon, and Trim Path. However, remember back in Chapter 4, Move It! Animating Our First Lottie With After Effects, we had some trouble using the Repeater feature.
This won't show correctly when previewing our animation on iOS devices, so I recommend thinking about this feature as if it didn't exist and looking for another way around to achieve a similar effect:
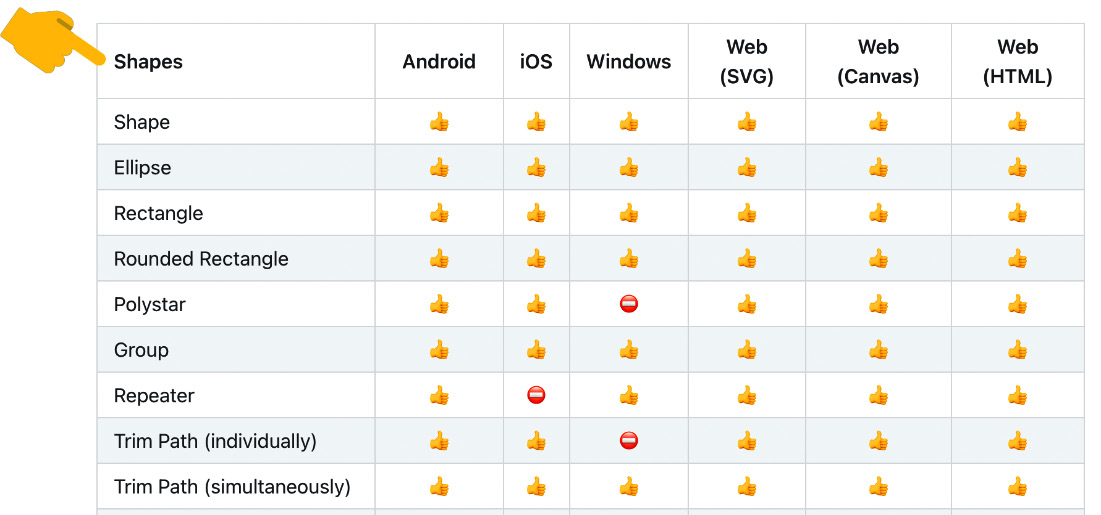
Figure 6.19 – Shapes supported features
Fills
All Fills features are well supported for all platforms and devices, so there's no need to worry about working with fills at all. We can use plain colors, play around with opacity, and even use radial or linear gradients in our designs, as the use of these features won't affect our animation:

Figure 6.20 – Fills supported features
Strokes
There is no need to worry when we work with Strokes either. We can use and apply any Strokes style or feature and we won't get into trouble. So, feel free to play around with Color, Opacity, Width, Dashes, Gradient, and so on:
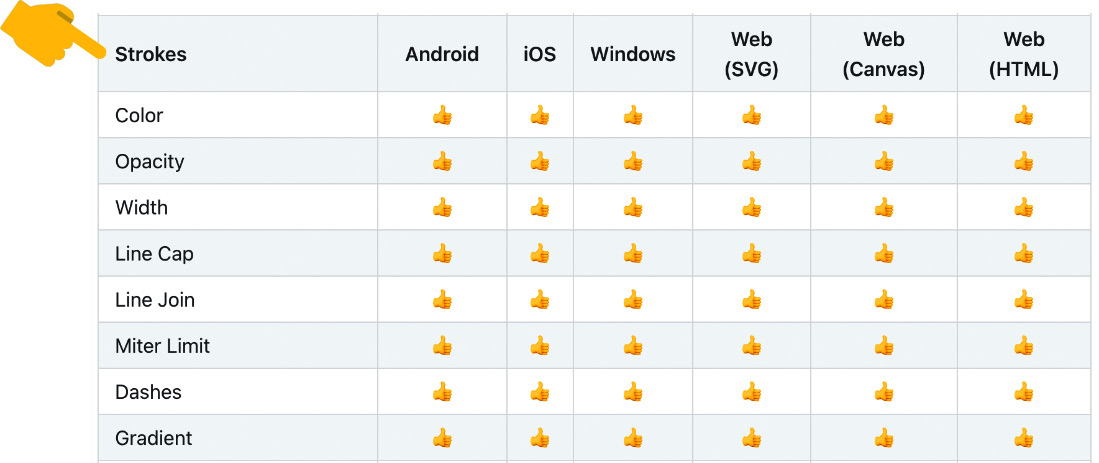
Figure 6.21 – Strokes supported features
Transforms
When working with Transforms, there are a couple of options we want to avoid, such as Auto Orient and Skew:

Figure 6.22 – Transforms supported features
Auto Orient is used when we are animating along paths. If we want to add this effect for our Lottie animations, we are going to have to do that manually by adjusting the rotation on each keyframe:
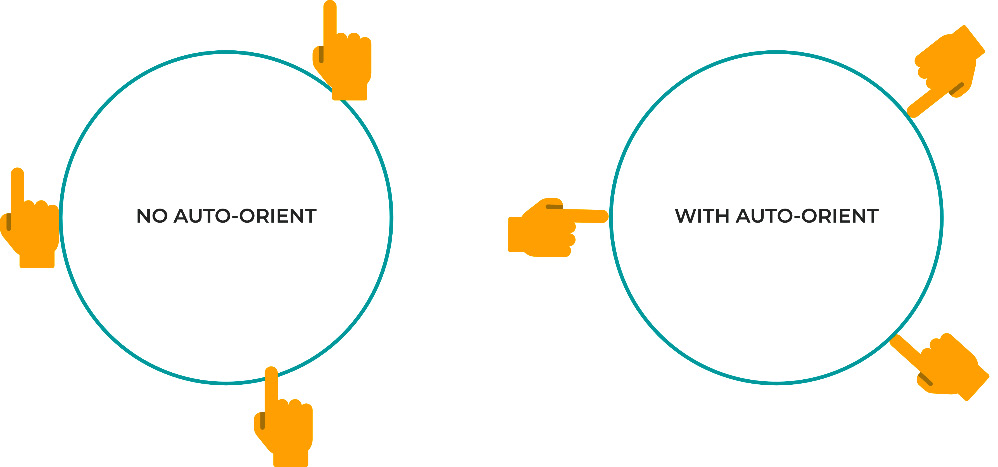
Figure 6.23 – Auto Orient feature
The second unsupported Transform option is Skew. This is not shown properly on Android devices, or at least we don't have enough information about it, as it sometimes works but sometimes doesn't. So, let's just stay away from it to avoid having any unpleasant surprises:

Figure 6.24 – Skew feature
Interpolation
Interpolation is another property we can play around with without causing any problems to our previews. And, now that we are talking about interpolations, I highly recommend reading more about Rove Across Time properties, as this is a cool feature that will help you smooth out your animation. You can find more information about the Rove Across Time feature at https://helpx.adobe.com/after-effects/using/speed.html and scroll down to Create smooth motion with roving keyframes.

Figure 6.25 – Interpolation supported features
Masks
In the early days, using Masks would get us into trouble when exporting our animations to Lottie, but times change and these days, there are a few Masks properties that are well supported. Mask Path, Mask Opacity, Add, Subtract, and Intersect can be used without getting into trouble. Forget about the rest as if they didn't exist, as we won't be using these at all.
Mastering masks is not hard to achieve and it will give you more resources when animating. As you know, this book doesn't pretend to be an AE guide (there are plenty of books out there that do that very well), although I'd recommend you read more about masks. You can check the Adobe help page for more information here: https://helpx.adobe.com/after-effects/using/create-masks.html.

Figure 6.26 – Masks supported features
Mattes
We can use Alpha Matte for Lottie. Mattes work very similarly to masks; they show or hide a part of another layer. You can find more information about them at https://helpx.adobe.com/after-effects/using/alpha-channels-masks-mattes.html.
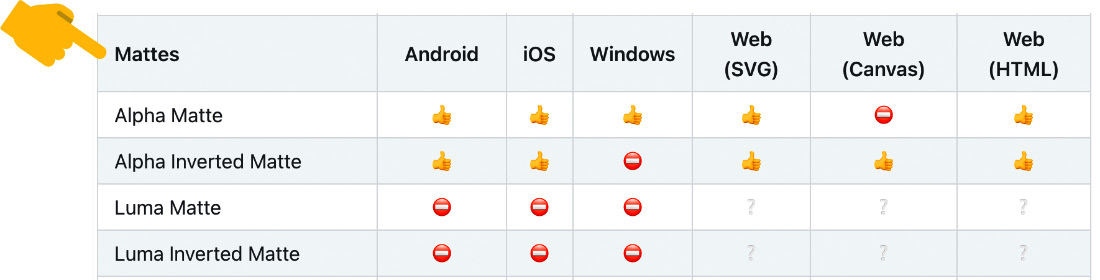
Figure 6.27 – Mattes supported features
Merge paths
Houston, we have a problem! Merge paths won't work at all on iOS devices or the web. I would highly recommend forgetting about them and pretending these don't exist only if you want to use Boolean operations straight from AE. Otherwise, keep reading.
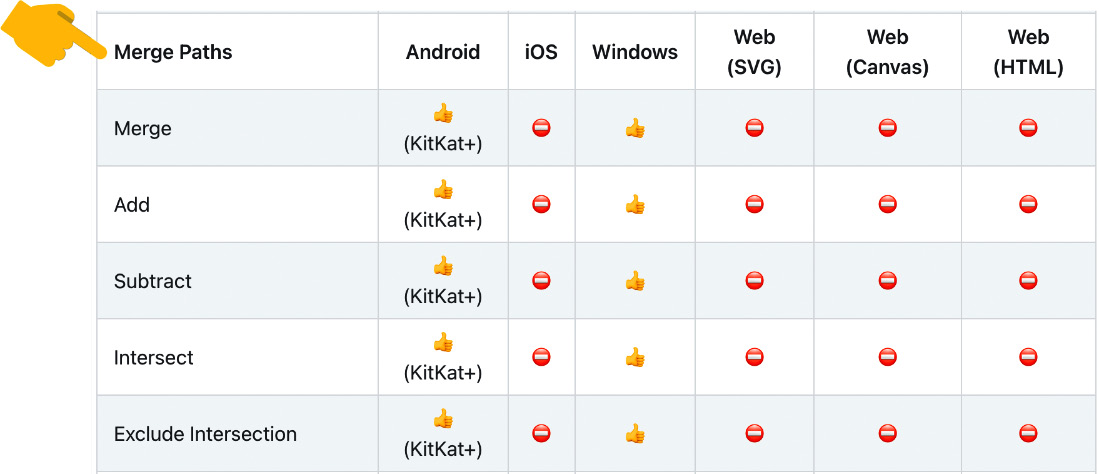
Figure 6.28 – Merge paths supported features
As I said earlier, it is better to keep our illustrations as simple as possible, which means trying to avoid having multiple paths used in Boolean too. So, does that mean we have to stick to basic shapes? Not really. In XD, Figma, and Sketch, we can convert these multiple paths used in Boolean operations (such as Add, Subtract, Intersect, or Exclude) to a single one. Let's look at how to do that.
For Adobe XD, follow these steps:
- Design using basic shapes.
- Add the Boolean operation (Add, Subtract, Intersect, or Exclude Overlap).
- Go to the top menu and select Object | Path | Convert to Path:
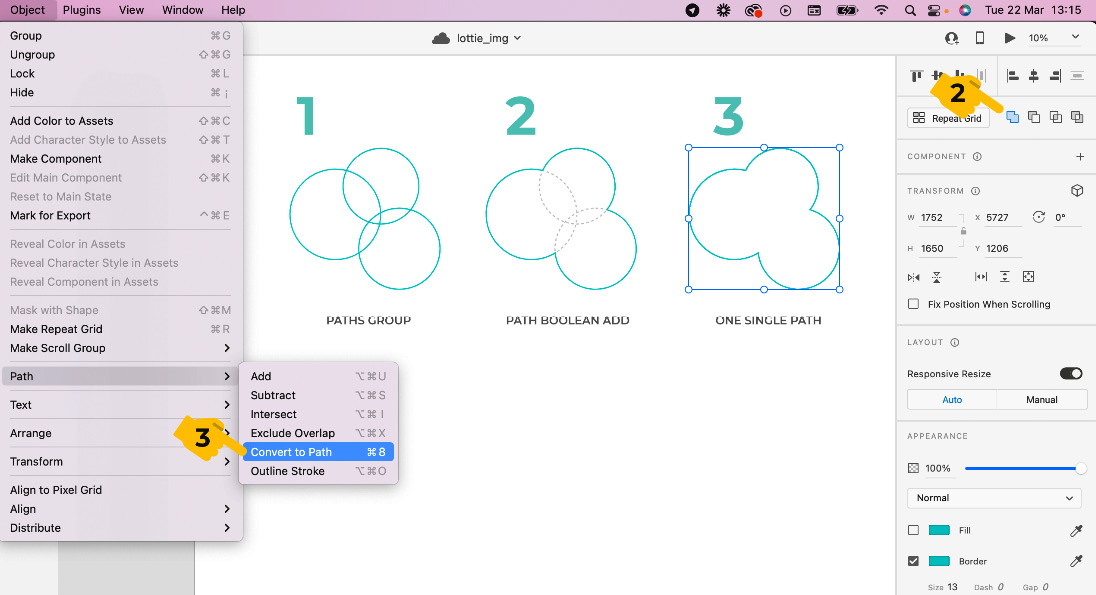
Figure 6.29 – Converting multiple paths to a single path in XD
If you work with Figma, follow these steps:
- Do your drawing and add the Boolean operation (Add, Subtract, Intersect, or Exclude Overlap).
- Select Flatten Selection from the top menu:
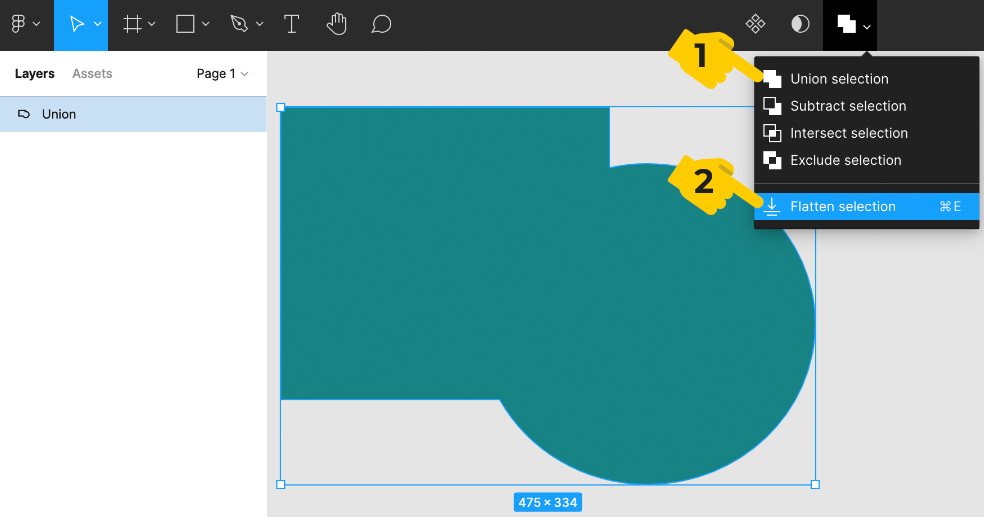
Figure 6.30 – Converting multiple paths to a single path in Figma
If you are on Sketch, follow these steps:
- Add the Boolean operation to your shapes (Add, Subtract, Intersect, or Exclude Overlap).
- Go to the top menu and select Layer | Combine | Flatten before exporting your work to AE:

Figure 6.31 – Converting multiple paths to a single path in Sketch
Layer effects
Well, there's not too much we can talk about here. Neither Android nor iOS supports any layer effects created in AE, at least not for now or any time soon. However, if you want to use your animations only on the web, you could use layer effects on your animation.

Figure 6.32 – Layer effects supported features
Text
When we talk about fonts for Lottie, we see the basic stuff that can be done here. So, there's no problem with using text in AE, transforming it, or changing its fill and stroke.
That said, if you are thinking of including text in your animation so that it can be edited directly on the LottieFiles platform later on, well, I wouldn't recommend doing that. I've actually tried this myself: exported a .json file with text and edited it on the LottieFiles platform, but the text wouldn't show up right. Sometimes, the text wouldn't show up, or sometimes would just look weird. So, I just forgot about it for now, although, I'm sure this will be reviewed in future releases.

Figure 6.33 – Text supported features
Other
You may have heard about AE expressions, but not in this book because they are not supported for Android or iOS. But if you were animating for the web, I'd highly recommend reading more about it, as it can be a big time and effort saver.
To introduce you to expressions, we could define them as a small piece of JavaScript code that you can plug in your layer's properties to add specific behavior to your animations. For more information, just go visit the following link: https://helpx.adobe.com/after-effects/using/expression-basics.html.
Now, let's talk about images. Images are supported for Android and iOS. But remember that if you use images in your animations, they will increase the file size and won't be responsive. So, it is up to you if you want to use images at all. In my case, I always try to avoid using them.
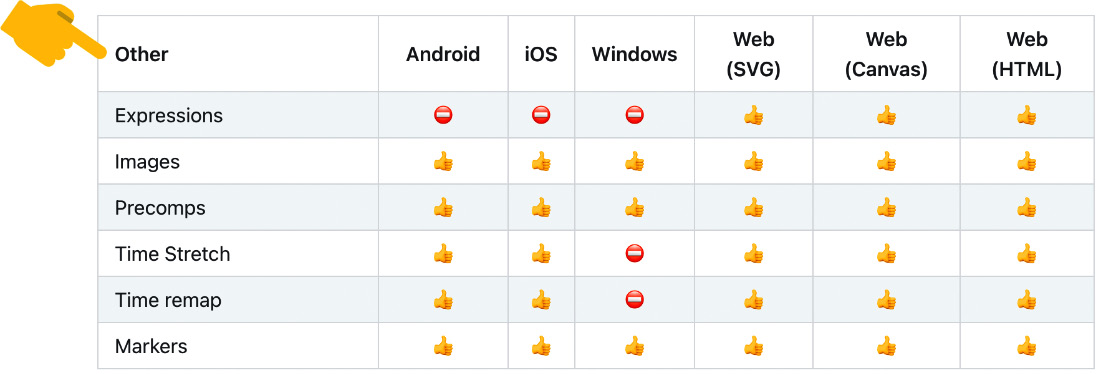
Figure 6.34 – Other supported features
Now that we have an understanding of what can and cannot be done when animating for Lottie, Android, and iOS, let's move to the next section, which I'm sure will help you speed up your workflow.
Keyboard shortcuts that will make your life easier
You've seen that, at first, Adobe AE can be quite overwhelming. So many options, panels, and new keywords to learn about. However, once you get used to the shortcuts, it doesn't look that hard, does it? Especially when animating for Lottie, as we can just focus on some of the features and forget about most of the panels and tools.
To make it even easier, we can use some shortcuts to speed up our work and get our animations done quicker.
Here's a list of my time-saving shortcuts, although feel free to look around for more; the internet has plenty of websites with AE shortcut examples. Just get the ones you feel more comfortable with and start animating!
General shortcuts

Transform properties shortcuts

Frames and keyframes shortcuts

Layers shortcuts

Free graphic resources and UX/UI inspiration
Last but not least, I'd like to share with you the resources I normally use when creating animations, which will help you out with your creative process.
Graphic resources
I am a digital designer with a graphic design background but I'm not an illustrator. Actually, my illustration skills are quite limited but not my illustration resources. What I mean by that is when I have to create an animation or an illustration, I normally search on the web for references to inspire me. Once I have a clear concept in mind, I look for a specific style, colors, or maybe a character illustration I can reuse and adjust to the look and feel I need. So, I don't go through the whole process of illustrating; I take some bits and pieces from here and there to create my own.
So, here's a list of free for personal use websites to search and download your graphic resources from.
Illustrations
My favorite one is Freepik (https://www.freepik.com/). You can search from thousands of different illustrations that cover all styles and concepts. You can download most of the files as vectors or pay a monthly subscription plan to access the premium files.
At DrawKit (https://drawkit.com/), you can search and download beautiful handmade illustration packs and icon collections for free.
Colors
With Coolors (https://coolors.co/), you can create your own unique color palettes as easily as pressing the spacebar. You can use it for inspiration to create your own or to search for color trends.
Icons
Flaticon (https://www.flaticon.com/) is probably the best icon website ever. Search through thousands of icon collections to download. And, if you have a premium subscription, you can download animated Lottie icons as .ae and .json files.
Download the Font Awesome (https://fontawesome.com/) icons kit and start using the icons for your designs as if they were a regular font.
Free stock images
There are a few stock image websites out there that offer really good quality images for free. My favorite ones are Unsplash (https://unsplash.com/) and Pexels (https://www.pexels.com/).
Fonts
When using fonts, I always try to stick to Google fonts (https://fonts.google.com/) as they are multiplatform and can be used on your websites.
If I'm doing some off-line project or when I need to be more creative, I look for some specific fonts at Free Fonts (https://www.freefonts.io/).
Animations
For me, the best place to look for inspiration to create my own Lottie animations can only be LottieFiles (https://lottiefiles.com/).
UX/UI inspiration
You know, inspiration is not something you can just sit down and come up with, but sometimes, you need to get inspiration at a specific time of the day so you can get your job done. Here's a list of websites that will help you out with this:
- Behance (https://www.behance.net/) is the Adobe online community platform to showcase and discover creative work.
- Dribbble (https://dribbble.com/) is a great place to get inspiration from.
- UX Movement (https://uxmovement.com/) teaches you how to improve the UX of your apps and websites through tips, techniques, and best practices.
- Collect UI (https://collectui.com/) is a platform for your daily inspiration, based on handpicked Dribbble.
- Visit UI Garage (https://uigarage.net/) to find specific design inspiration for web, mobile, and tablet.
- User Interface Design patterns (https://ui-patterns.com/) "are recurring solutions that solve common design problems. Design patterns are standard reference points for the experienced user interface designer."
- Mobbin (https://mobbin.design/) saves you hours of UI and UX research thanks to its thousands of mobile app screenshots.
Summary
Looking back now, in this second part of the book, we've been going through so many new concepts, keywords, tools, and plugins. We've learned how to create an animation from scratch to finally export it and hand it off to the dev team, covering the whole UX animation workflow. We've also seen how to download and install all the necessary tools, extensions, and plugins we need to get our animation done.
We've checked the list of what can or cannot be done in AE when creating animations for Lottie so that our work is going to be previewed properly. We've gone through a list of shortcuts to speed up our work and, finally, you've ended up with my list of resources, which I hope will inspire you and give you enough resources to create your animations.
Now, let's jump to the third part of this book, Adding Your Lottie Animations Into Mobile Apps, where we will learn how to implement our animation into a mobile app and web with React Native.